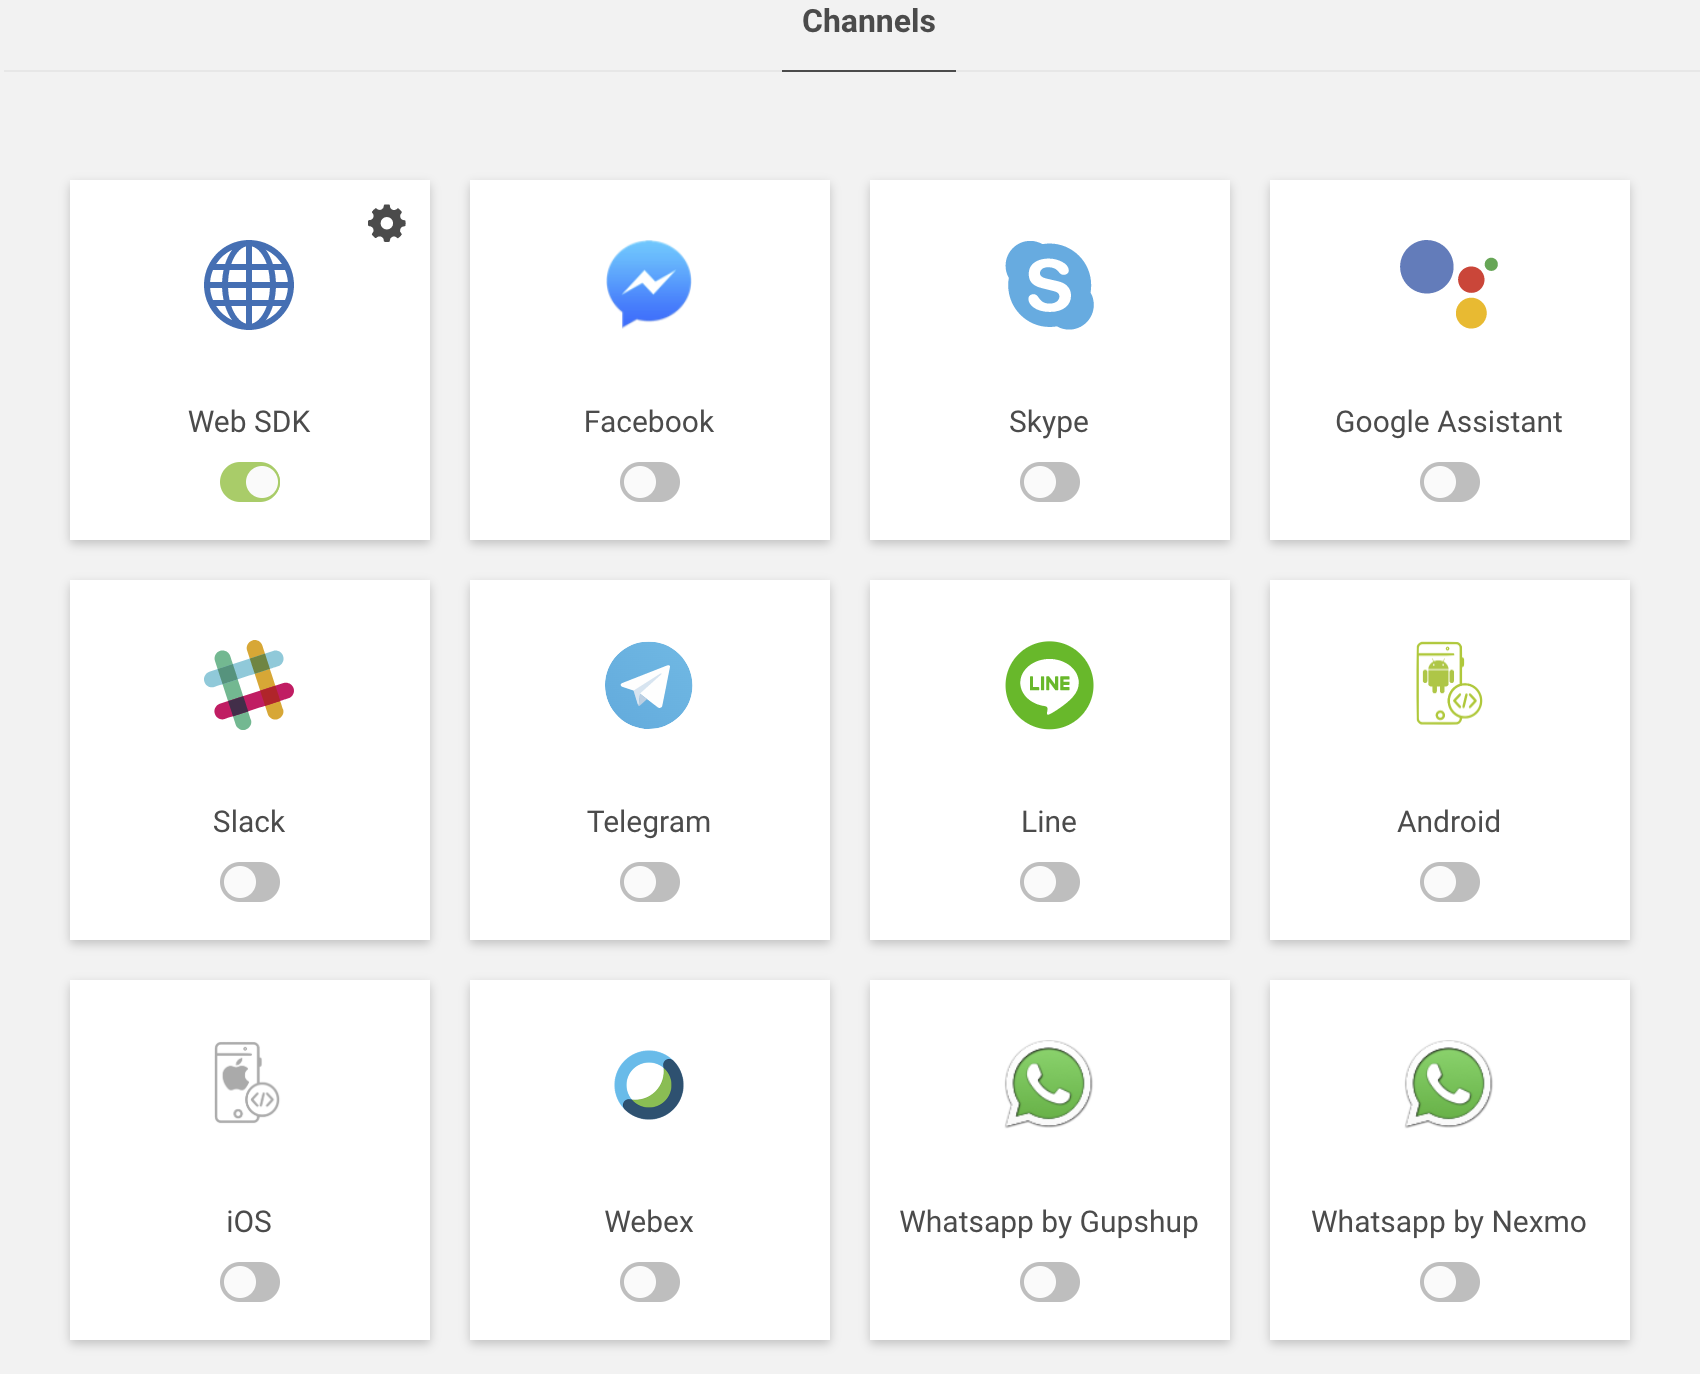
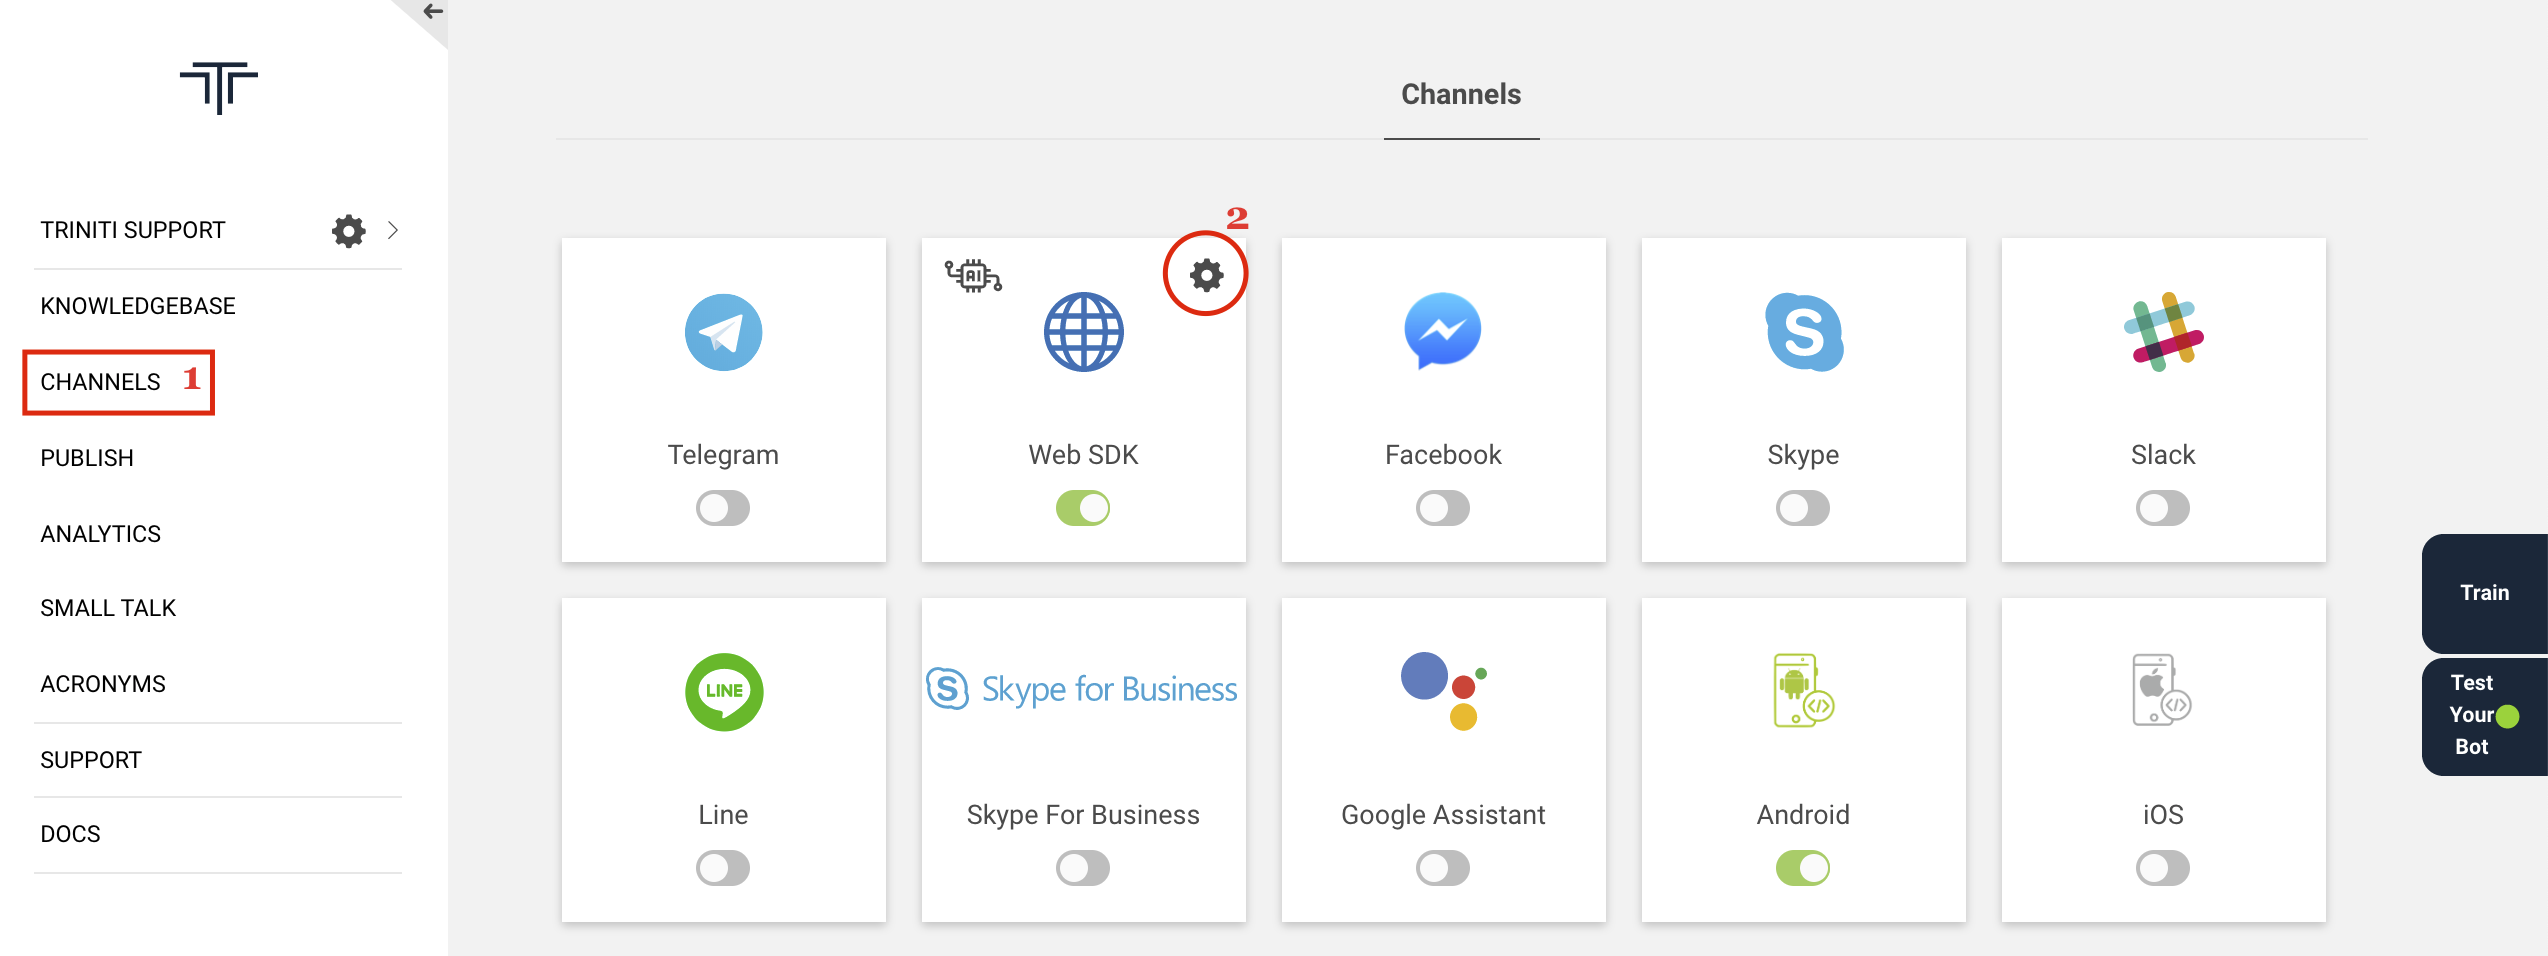
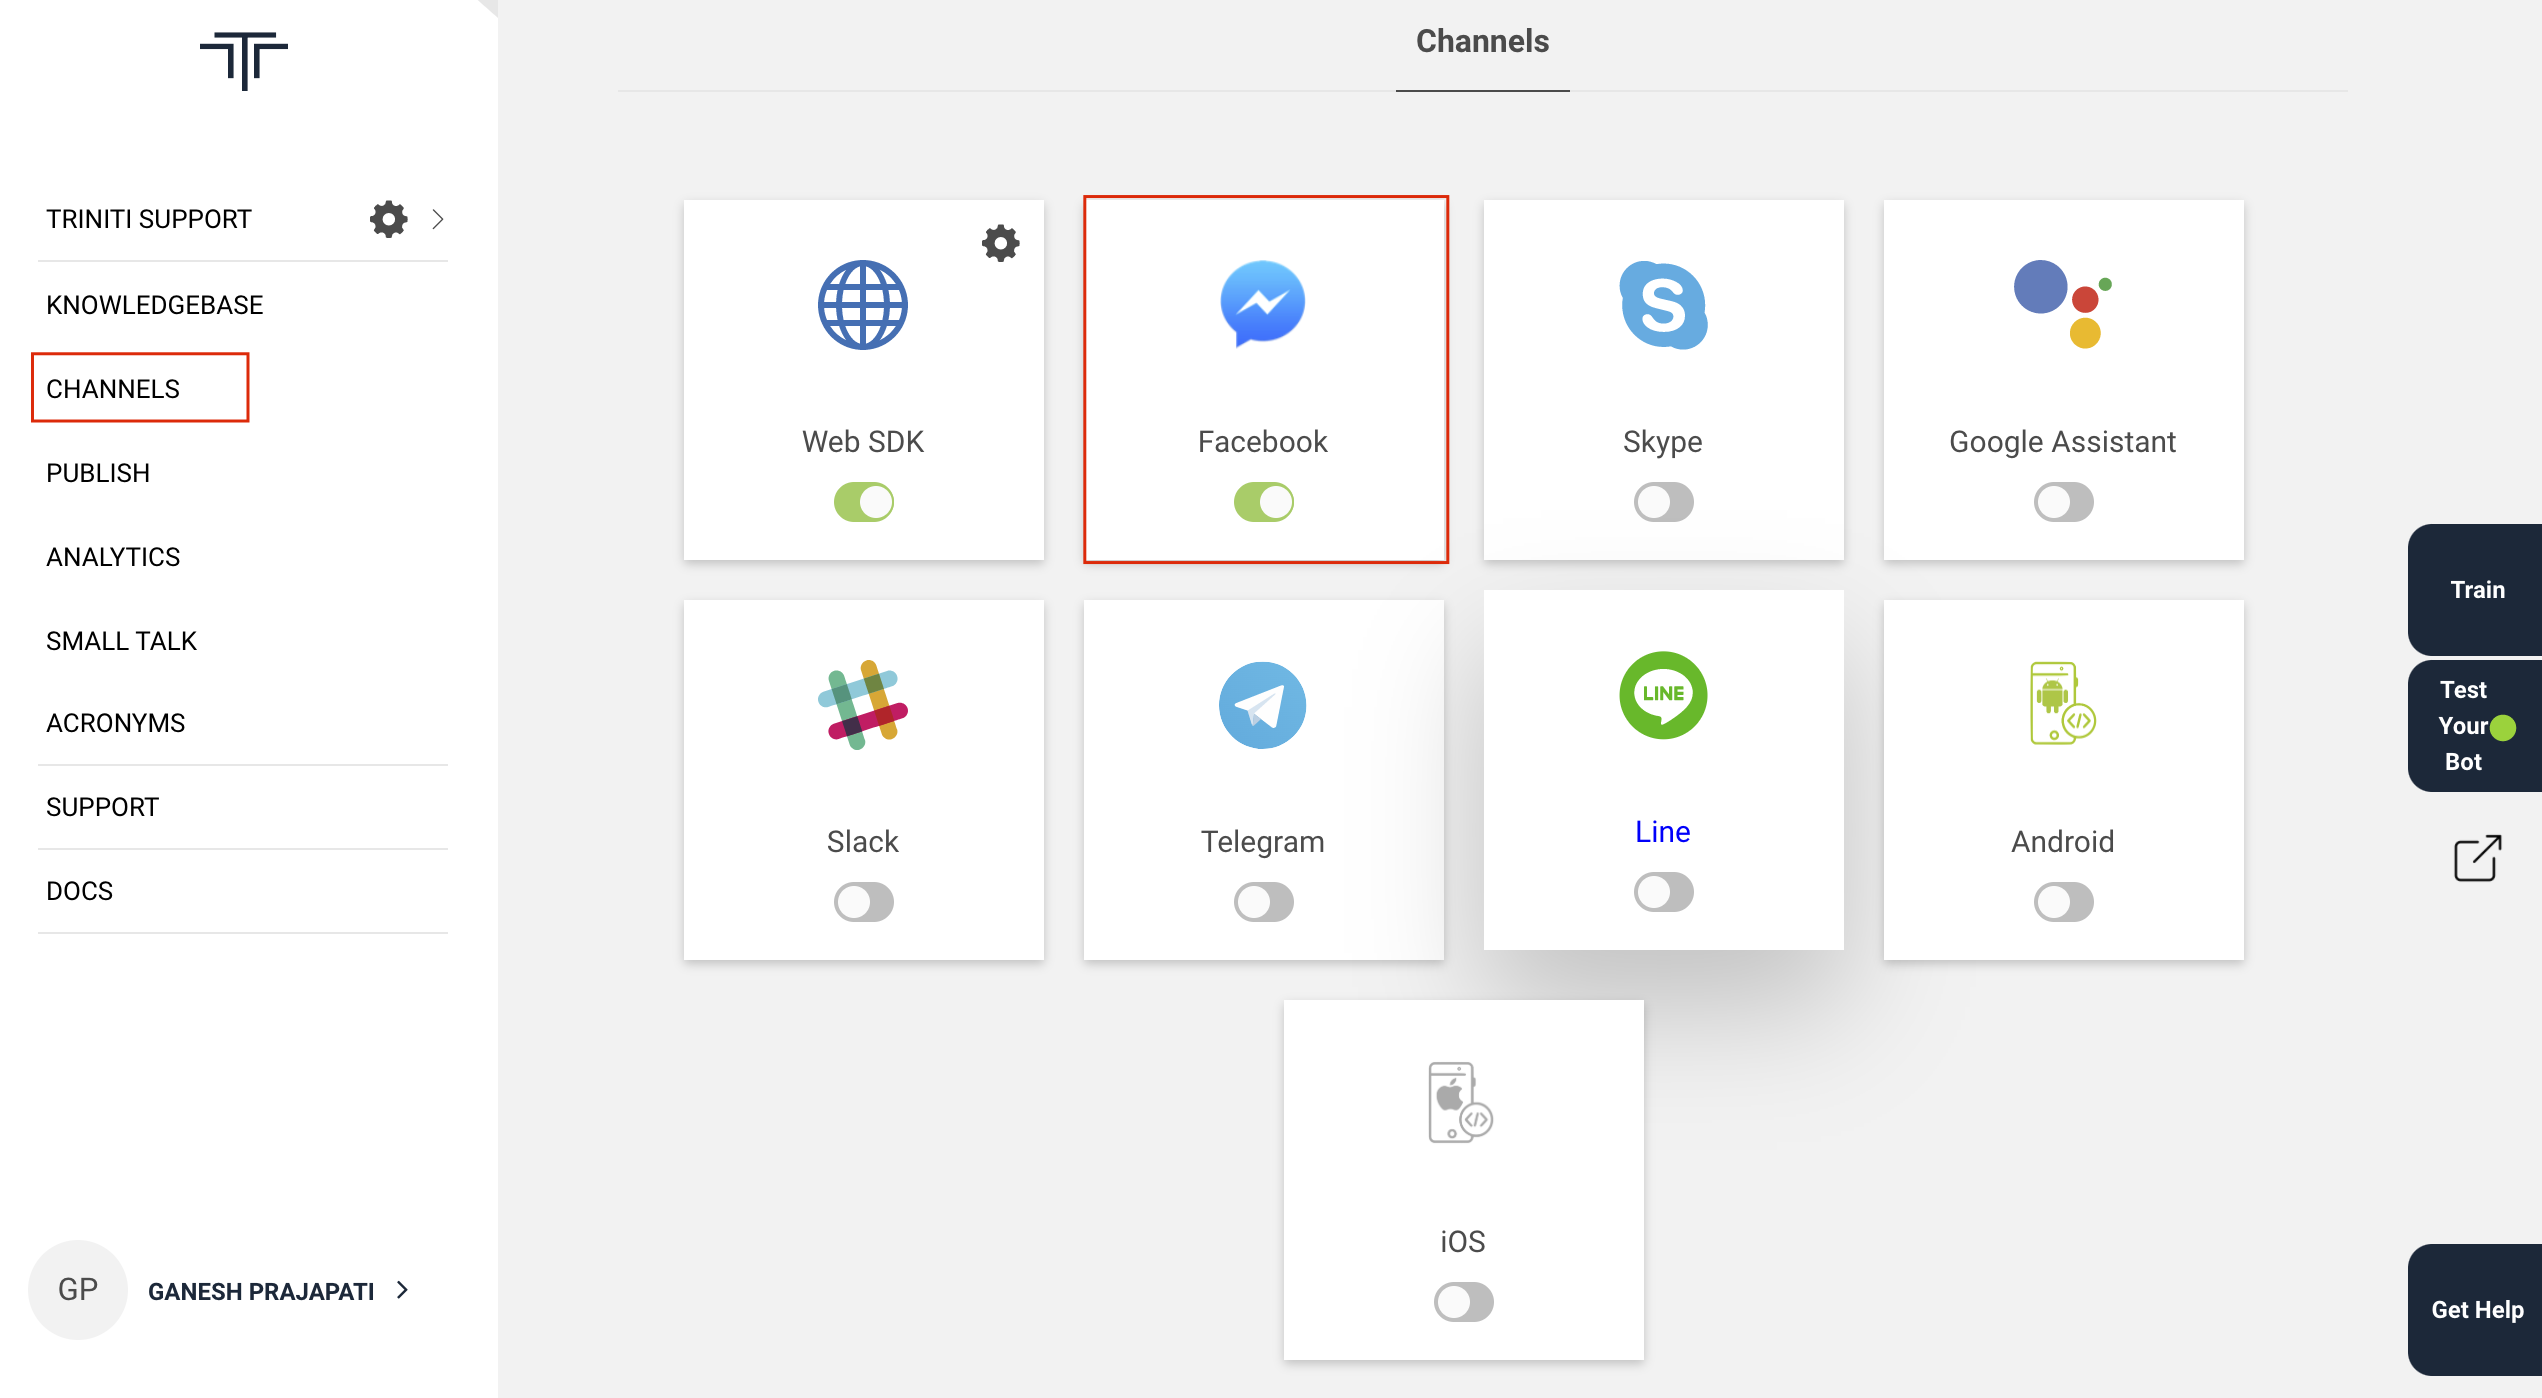
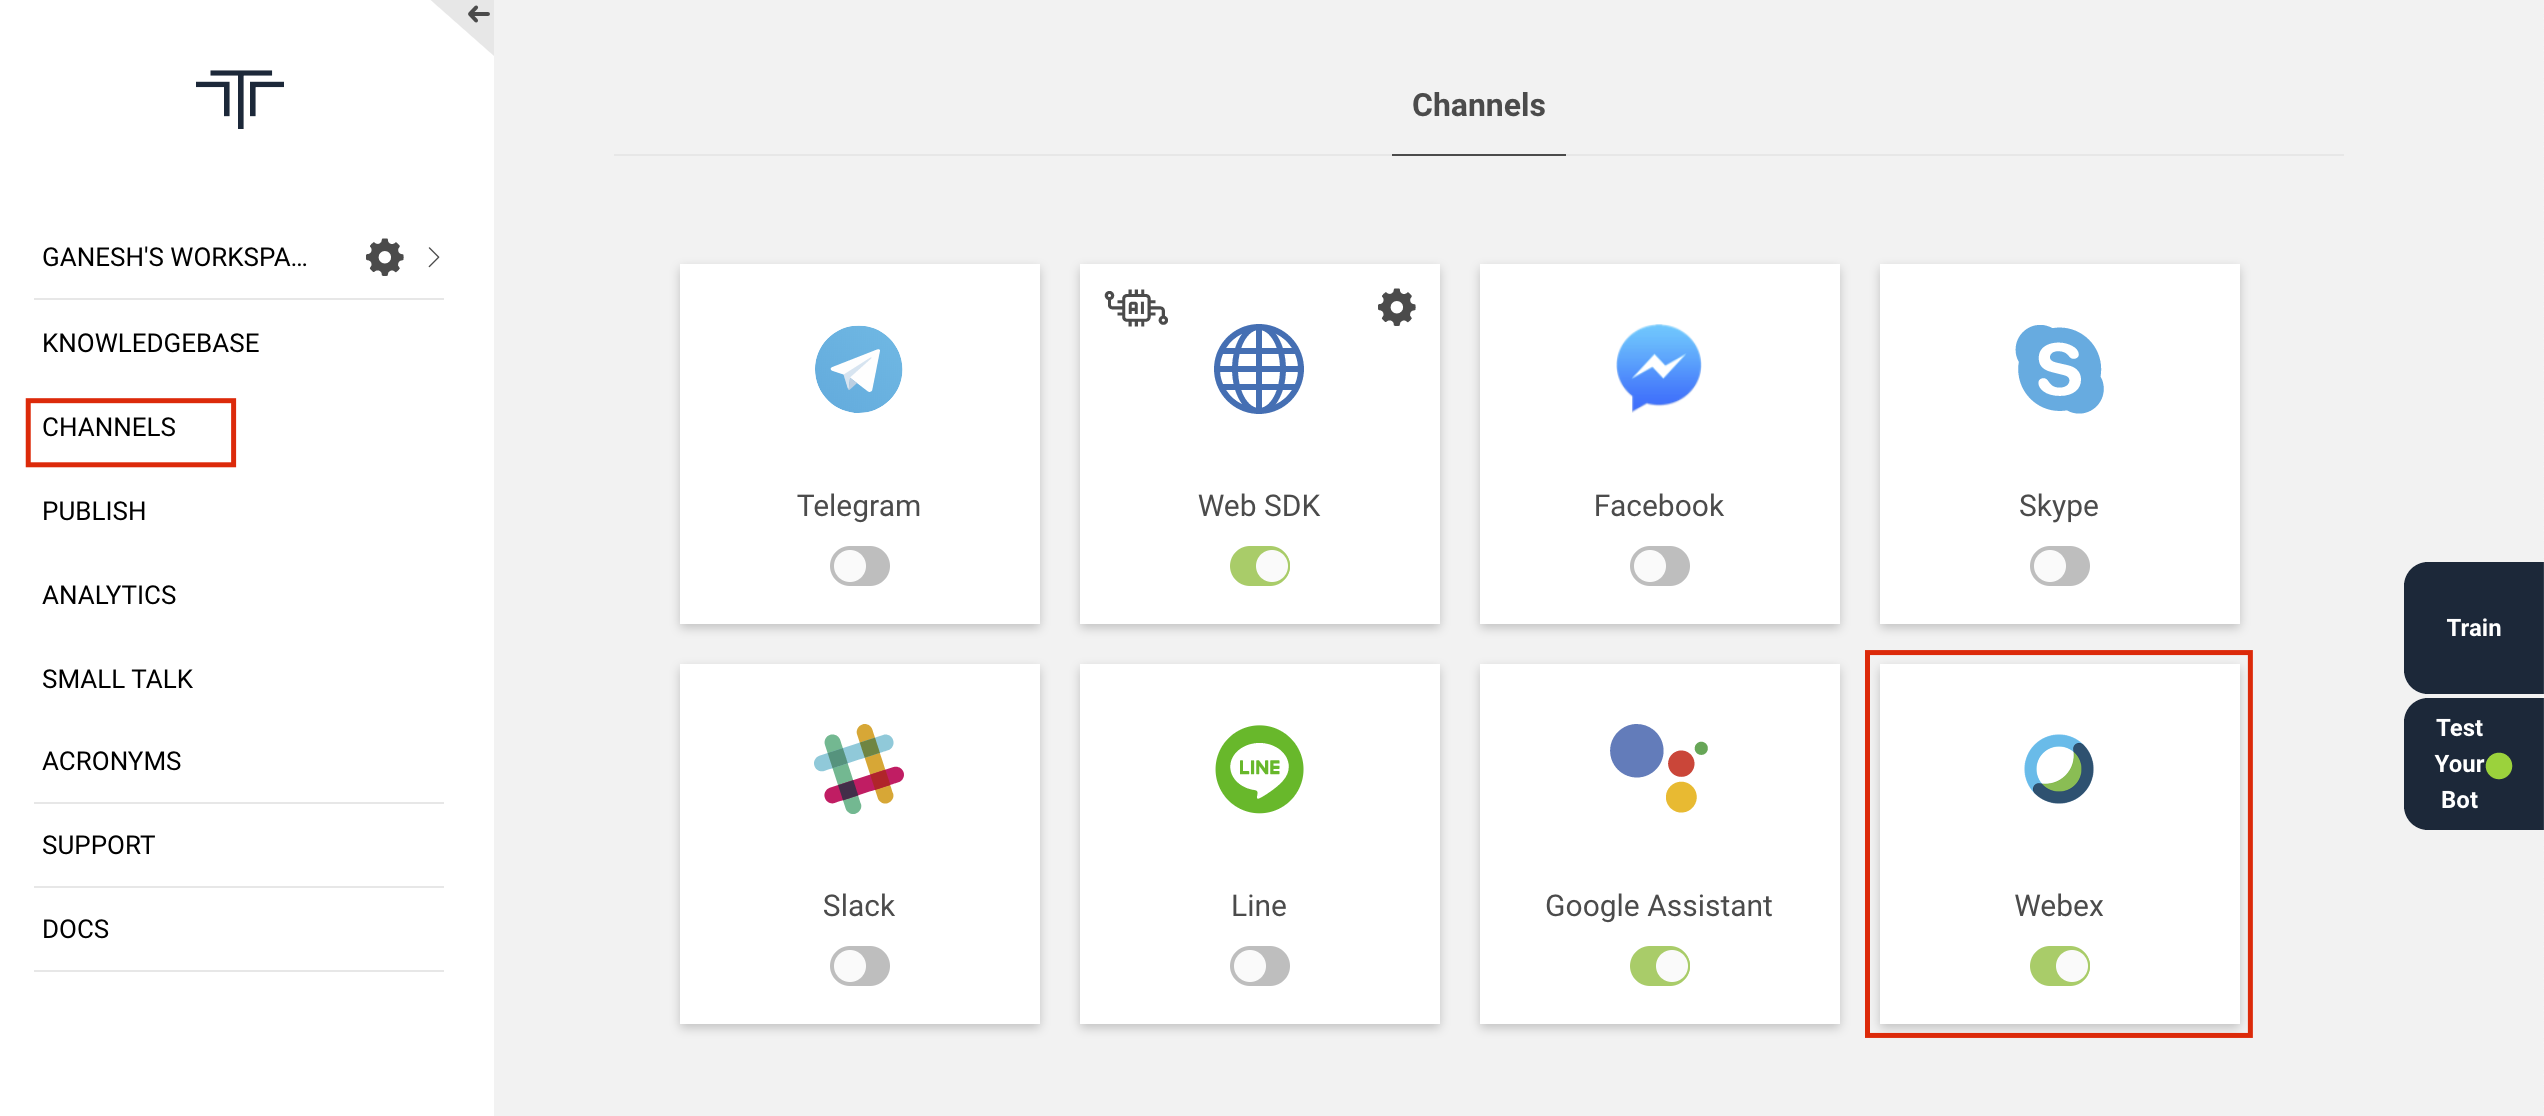
Manage Channels
We have social, IoT & app-based channels for the conversation between the user & the bot. These channels can help you to expand your services on the various channel platform as every user might be using the various channels. So we have provided some configuration to make your bot channel specific to interact with the user. Users can either interact with the bot by typing or can interact with the voice command, the bot will perform any kind of transaction or inquiry that the user has asked.
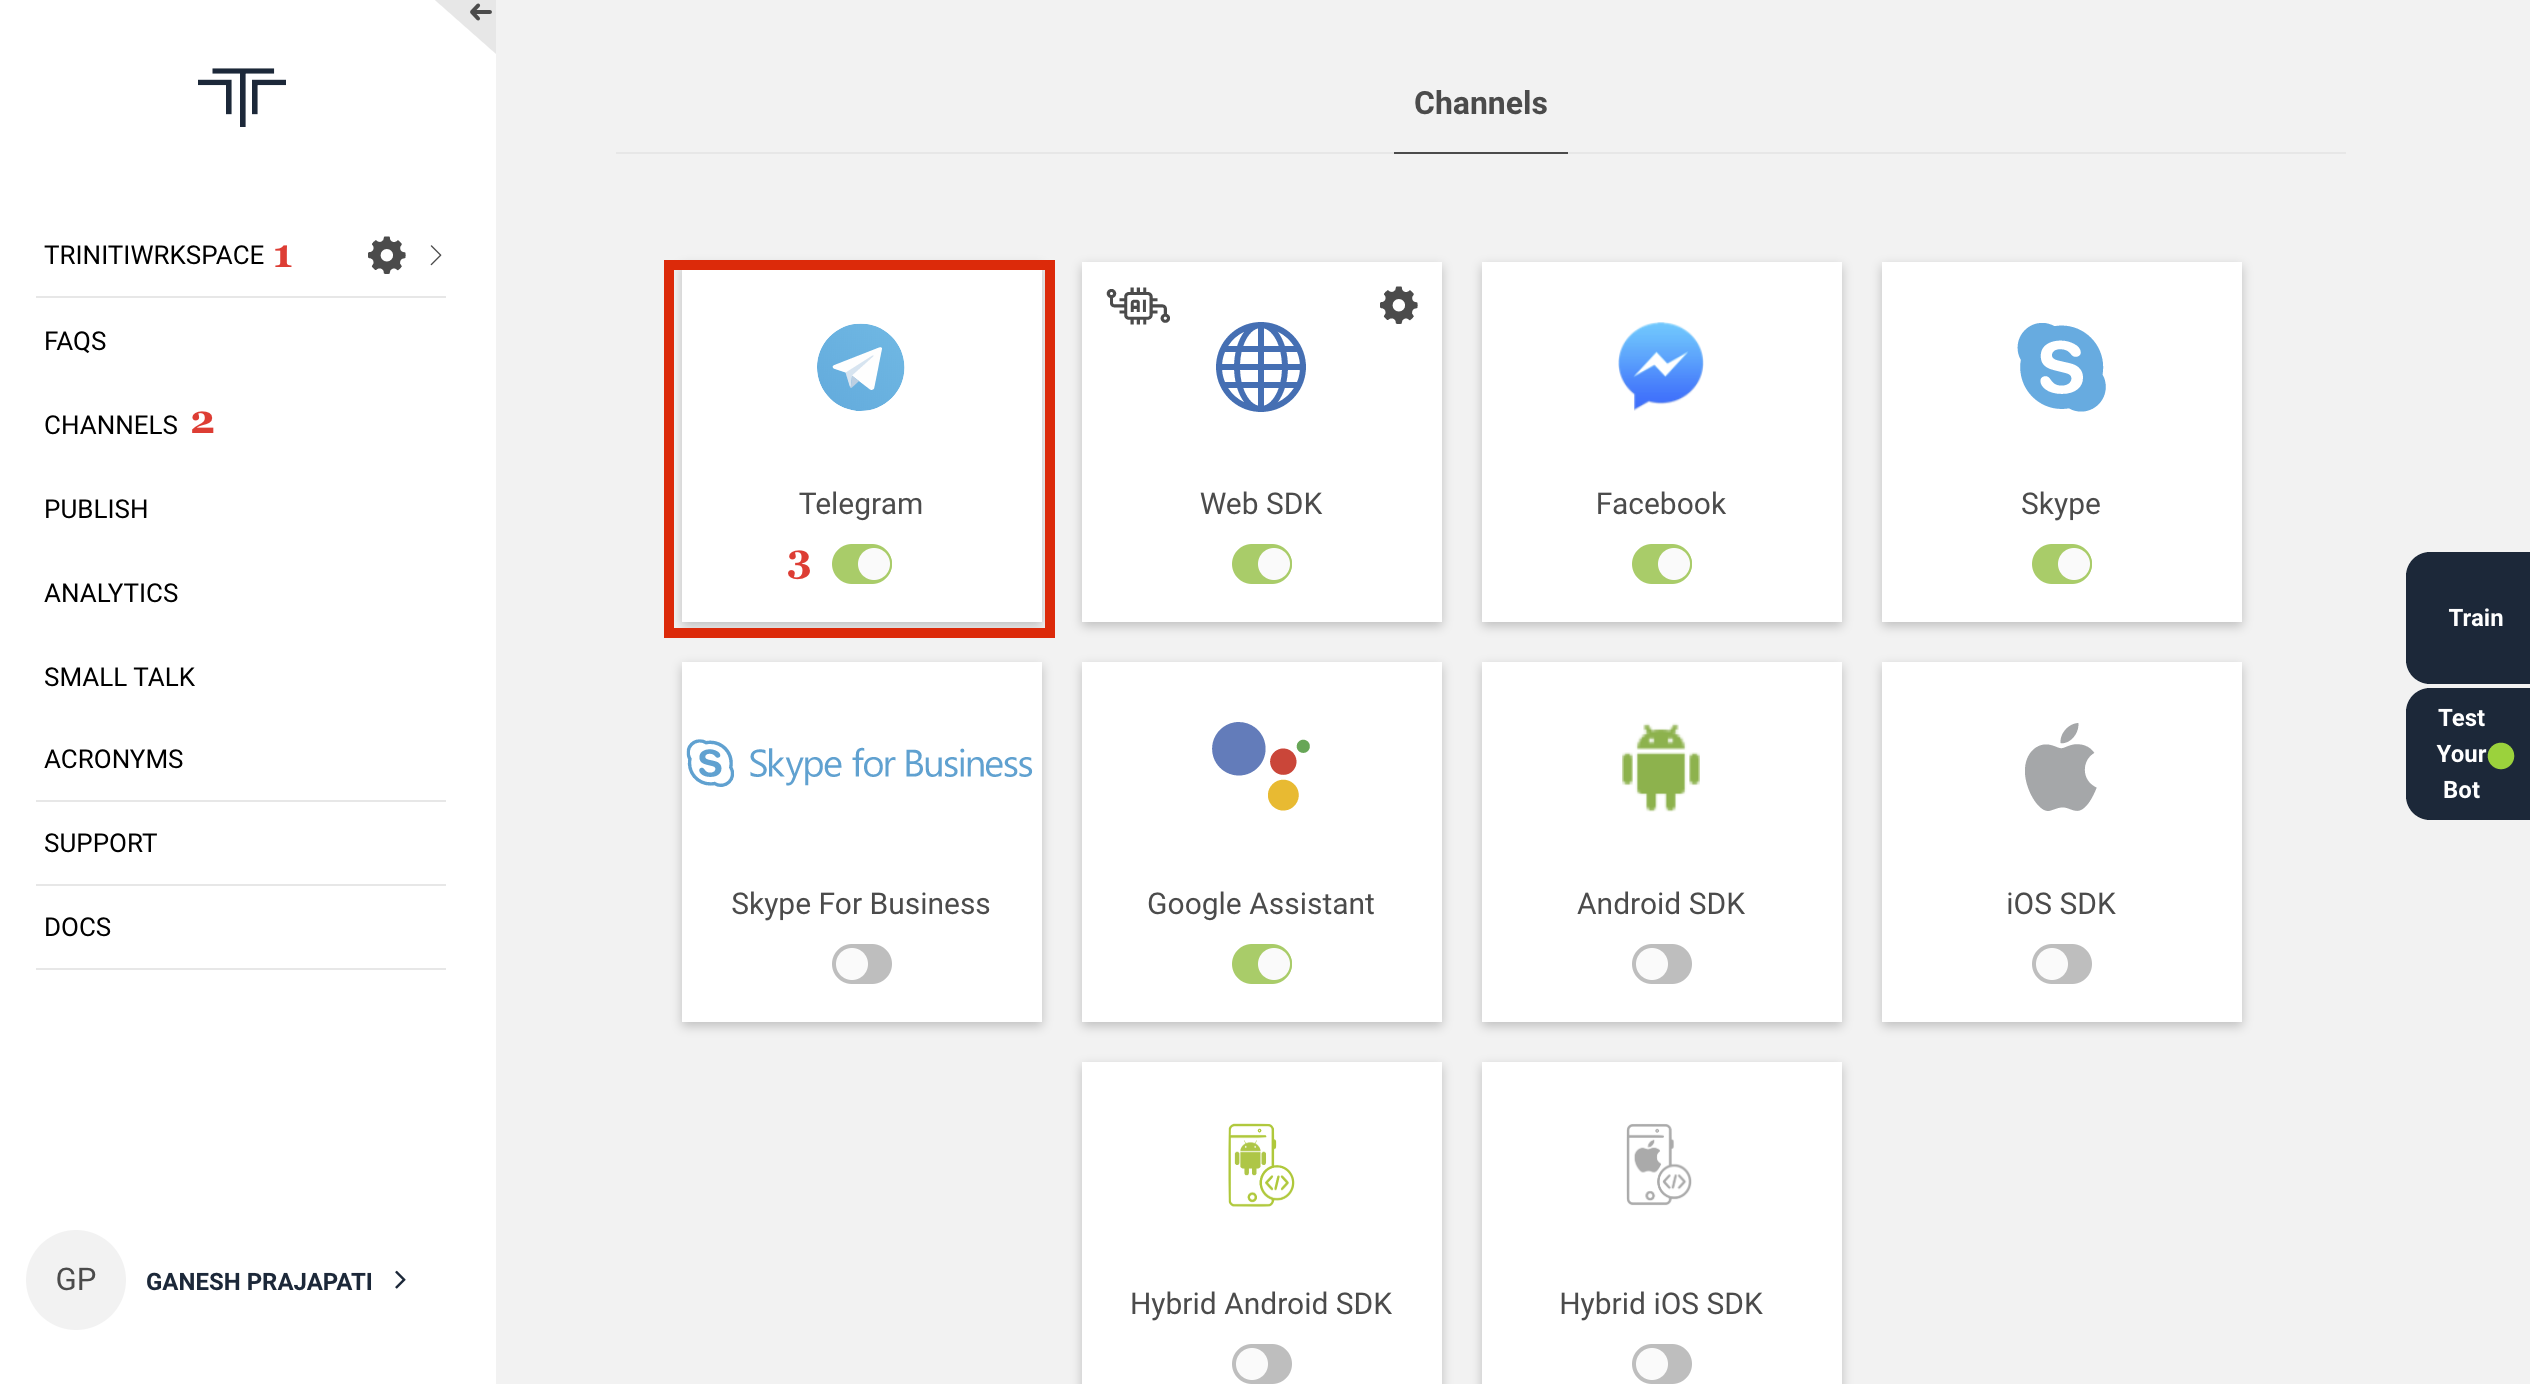
Currently, we are supporting the following channels:
- Social Channels (Facebook, Skype, Telegram, Line, Slack, WhatsApp, etc.)
- Application-based Channels (Web SDK, Android, iOS, etc.)
- IoT based Channels (Google Assistant)
Supported Components:
The following components are supported for the various channels to make your bot more attractive with the user as shown in the following table:
| Channels | Text | Card | Button | Carousel | List | Image | Quick Reply | Location | Videos |
|---|---|---|---|---|---|---|---|---|---|
| ✔ | ✔ | ✔ | ✔ | ✔ | ✔ | ✔ | ✔ | ✔ | |
| Skype | ✔ | ✔ | ✔ | ✔ | ✗ | ✔ | ✗ | ✗ | ✗ |
| Google Assistant | ✔ | ✔ | ✔ | ✗ | ✔ | ✔ | ✗ | ✗ | ✗ |
| Slack | ✔ | ✔ | ✔ | ✔ | ✗ | ✔ | ✗ | ✗ | ✗ |
| Telegram | ✔ | ✔ | ✔ | ✗ | ✗ | ✗ | ✗ | ✗ | ✗ |
| Line | ✔ | ✔ | ✔ | ✔ | ✗ | ✗ | ✗ | ✗ | ✗ |
| Webex | ✔ | ✗ | ✗ | ✗ | ✗ | ✗ | ✗ | ✗ | ✗ |
| WhatsApp by Gupshup | ✔ | ✗ | ✗ | ✗ | ✗ | ✗ | ✗ | ✗ | ✗ |
| WhatsApp by Nexmo | ✔ | ✗ | ✗ | ✗ | ✗ | ✔ | ✗ | ✔ | ✔ |
Managing Web
WebSDK is a lightweight messaging SDK which can be embedded easily in web sites and hybrid mobile apps with minimal integration effort. Once integrated it allows end-users to converse with the Conversational AI/bot on the Active AI platform on both text and voice. WebSDK has out the box support for multiple UX templates such as List and Carousel and supports extensive customization for both UX and functionality.
To get a sample application Download Web SDK.
Supported Components
- A chatbot interface, where bubble chain ( bot and user bubble ) is the fundamental medium of communication is called WebSDK.
- To enable rich browsing experience in WebSDK as per the flow demands, custom views get invoked by the user events within WebSDK as an overlay, these extended views incorporate larger images, additional scrolling and specifically structured data, they are commonly called as Webviews. These reviews are bundled as client web, that needs to be hosted along with the WebSDK. Webviews are not part of the scope of WebSDK integrations. Note: Components details given above is just for information based only due to security reason and maintaining a secure financial transaction session, it is a mandate to host the WebSDK and client web in the absolute same domain.
Supported Browsers
- Chrome
- Firefox
- Edge (Windows only)
- Safari (including iOS)
- Android webkit
Embed web SDK into website
1. With "avmode": In this approach, the bot icon will be shown which you have configured on the Triniti.ai portal as a bot logo or you can add a custom logo for your bot. For this, you will have to pass "isavmode=true" as a query parameter in the bot URL as shown below:
<script
    id="triniti-chatbot"
    src="https://demo.triniti.ai/js/chatbot.js"
    data-params="#workspaceId?hosted=true&isavmode=true&host_url=your_website_URL"
    data-style-params="iconWidth=380px&botWidth=380px&avHeight=100px">
</script>
Note: host_url: It's your company or website URL where you're integrating the bot.
Configurable values in data-style-params (Optional):
- iconWidth and iconHeight: Bot icon width and height when displaying the helpText (For initial load in av mode only).
- botWidth and botHeight: Actual bot width & height when expanded.
- avWidth and avHeight: Bot icon width and height in avmode (not for inital load)
Add above <script> tag to the <body> tag in the html file along with the required data-style-params
2. Without "avmode": In this approach, the bot window will be shown on the page with the logo you have set on triniti.ai. For this, no need to pass isavmode=true in the URL as shown below:
<iframe id="chatbot-iframe" src="https://demo.triniti.ai/#{workspace_id}?hosted=true&host_url=your_website_URL" style="z-index:99999; position:fixed; height:80%;bottom:0rem; width:350px; right:5rem; border:none;" />
Note: host_url: It's your company or website URL where you're integrating the bot.
The bot will look like the following images:
With 'avmode' |
Without 'avmode' |
|---|---|
 |
 |
Integration of web SDK:
- Desktop View:
This code snippet explains to add the bot on your website. The following code snippet is of your main webpage in that you can add the styles and the iframe along with the image URL for the bot icon.
    <!DOCTYPE html>
    <html lang="en">
        <head>
            <meta charset="UTF-8">
            <meta name="viewport" content="width=device-width, initial-scale=1.0">
            <meta http-equiv="X-UA-Compatible" content="ie=edge">
            <title>Chatbot</title>
            <style>
                /* Desktop view */
                #chatbotScreen {
                position: fixed;
                bottom: 10px;
                right: 25px;
                width: 60px !important;
                border-radius: 50% !important;
                box-shadow: 0 5px 5px 0 rgba(0, 0, 0, 0.16), 0 0px 10px 0 rgba(0, 0, 0, 0.12) !important;
                }

                #chatbot-iframe {
                width: 350px;
                height: 80%;
                border: none;
                position: absolute;
                bottom: 0;
                z-index: 9999;
                display: none;
                right: 0px;
                }
            </style>
        </head>
        <body>
            <div>
                <script src="https://ajax.googleapis.com/ajax/libs/jquery/1.11.1/jquery.min.js"></script>
                <iframe id="chatbot-iframe"></iframe>
                <img class="chatbotScreen" src="custom_logo_image_url" onclick="showBot(event)"/>
            </div>
        </body>
    </html>
- Mobile View:
For mobile view mode, you will be needed to add the following CSS code in your main webpage code.
    /* Mobile view */
    @media screen and (max-device-width: 600px) {
        #chatbot-iframe {
            position: fixed;
            right: 0px;
            width: 100% !important;
            bottom: 0;
            height: 100%;
        }
    }
Events:
Two basic events will be needed for the bot to perform launch & close the bot using javascript function: 1. Show/launch bot:
- When you click on the bot it should pop up/open the bot.
- To apply this functionality on your webpage you need to write a javascript function as shown below
    function showBot() {
        if (document.getElementById("chatbot-iframe")) {
            document.getElementById("chatbot-iframe").src = "https://demo.triniti.ai/#{workspace_id}?hosted=true";
            document.getElementById("chatbot-iframe").style.display = 'block';
        }
    }
2. Close/minimize bot:
- When you click on minimize/close button your bot should be collapsed/hide behind the icon.
- To apply this functionality you need to write a javascript function as shown below
  window.onload = function (e) {
        window.addEventListener('message', recieveMessage, false);

        function recieveMessage(event) {
            if (event.origin === "https://demo.triniti.ai") {
                if (event.data) {
                    switch (event.data.type) {
                        case "hideChatBox":
                            {
                                document.getElementById("chatbot-iframe").style.height = "150px";
                                break;
                            }
                        case "destroyContainerFrame":
                            {
                                document.getElementById("chatbot-iframe").style.display = "none";
                                document.getElementById("chatbot-iframe").src = "";
                                document.getElementById("chatbotScreen").style.display = "block";
                                break;
                            }
                        case "hideChatBoxInAvatarMode":
                            {
                                document.getElementById("chatbot-iframe").style.width = "90px";
                                document.getElementById("chatbot-iframe").style.height = "90px";
                                break;
                            }
                        case "showChatBox":
                            {
                                if (window.innerWidth <= 600) {
                                    document.getElementById("chatbot-iframe").style.width = "100%";
                                    document.getElementById("chatbot-iframe").style.height = "100%";
                                    document.getElementById("chatbot-iframe").style.right = "0";
                                } else {
                                    document.getElementById("chatbot-iframe").style.width = "350px";
                                    document.getElementById("chatbot-iframe").style.height = "80%";
                                    document.getElementById("chatbot-iframe").style.right = "0";
                                }
                                break;
                            }
                        }
                    }
                }
            }
        }
Customizing Web SDK
You can customize the web SDK as per your requirements to give a better look and feel for the bot, It will make your bot look more cool and make the user more interactive. You can customize your web SDK by following these steps:
- Select your workspace
- Navigate to Channels from side menu
- Click on setting icon of web SDK channel
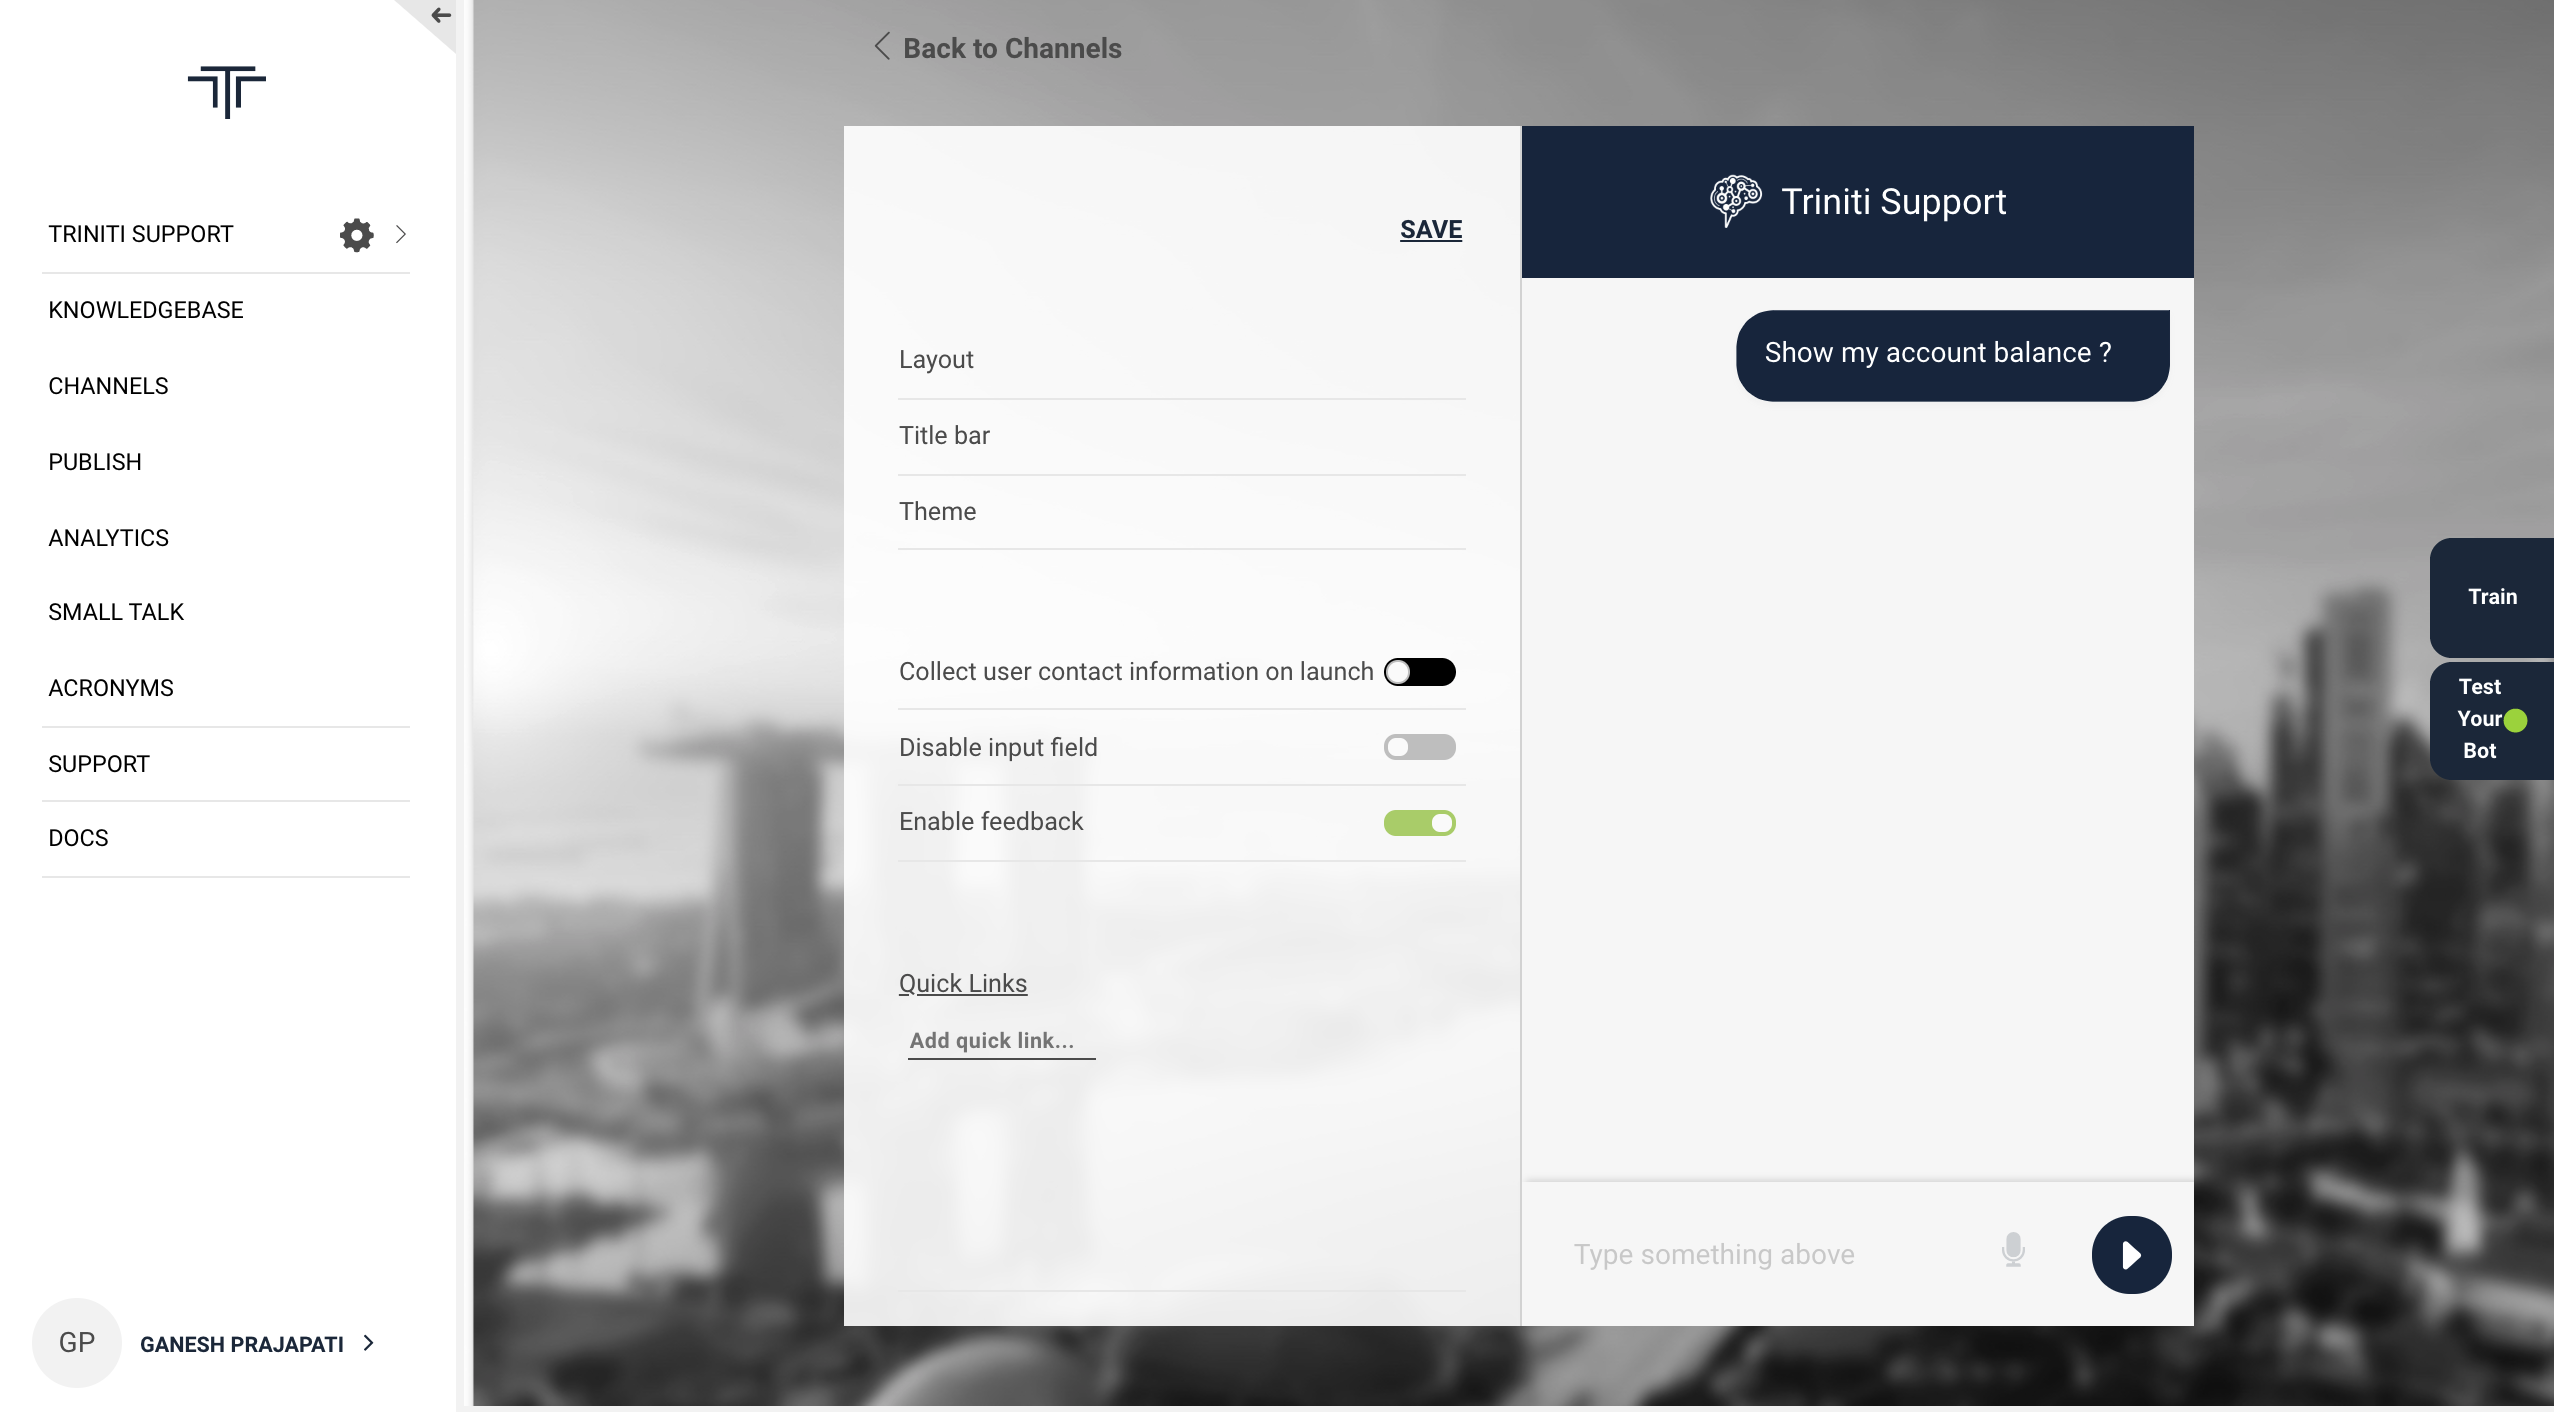
- Customers can customize the
1. Layouts (Templates): With the help of this feature you can choose to show you bot logo on left, right or center and also the conversation style.
Template 1 |
Template 2 |
Template 3 |
|---|---|---|
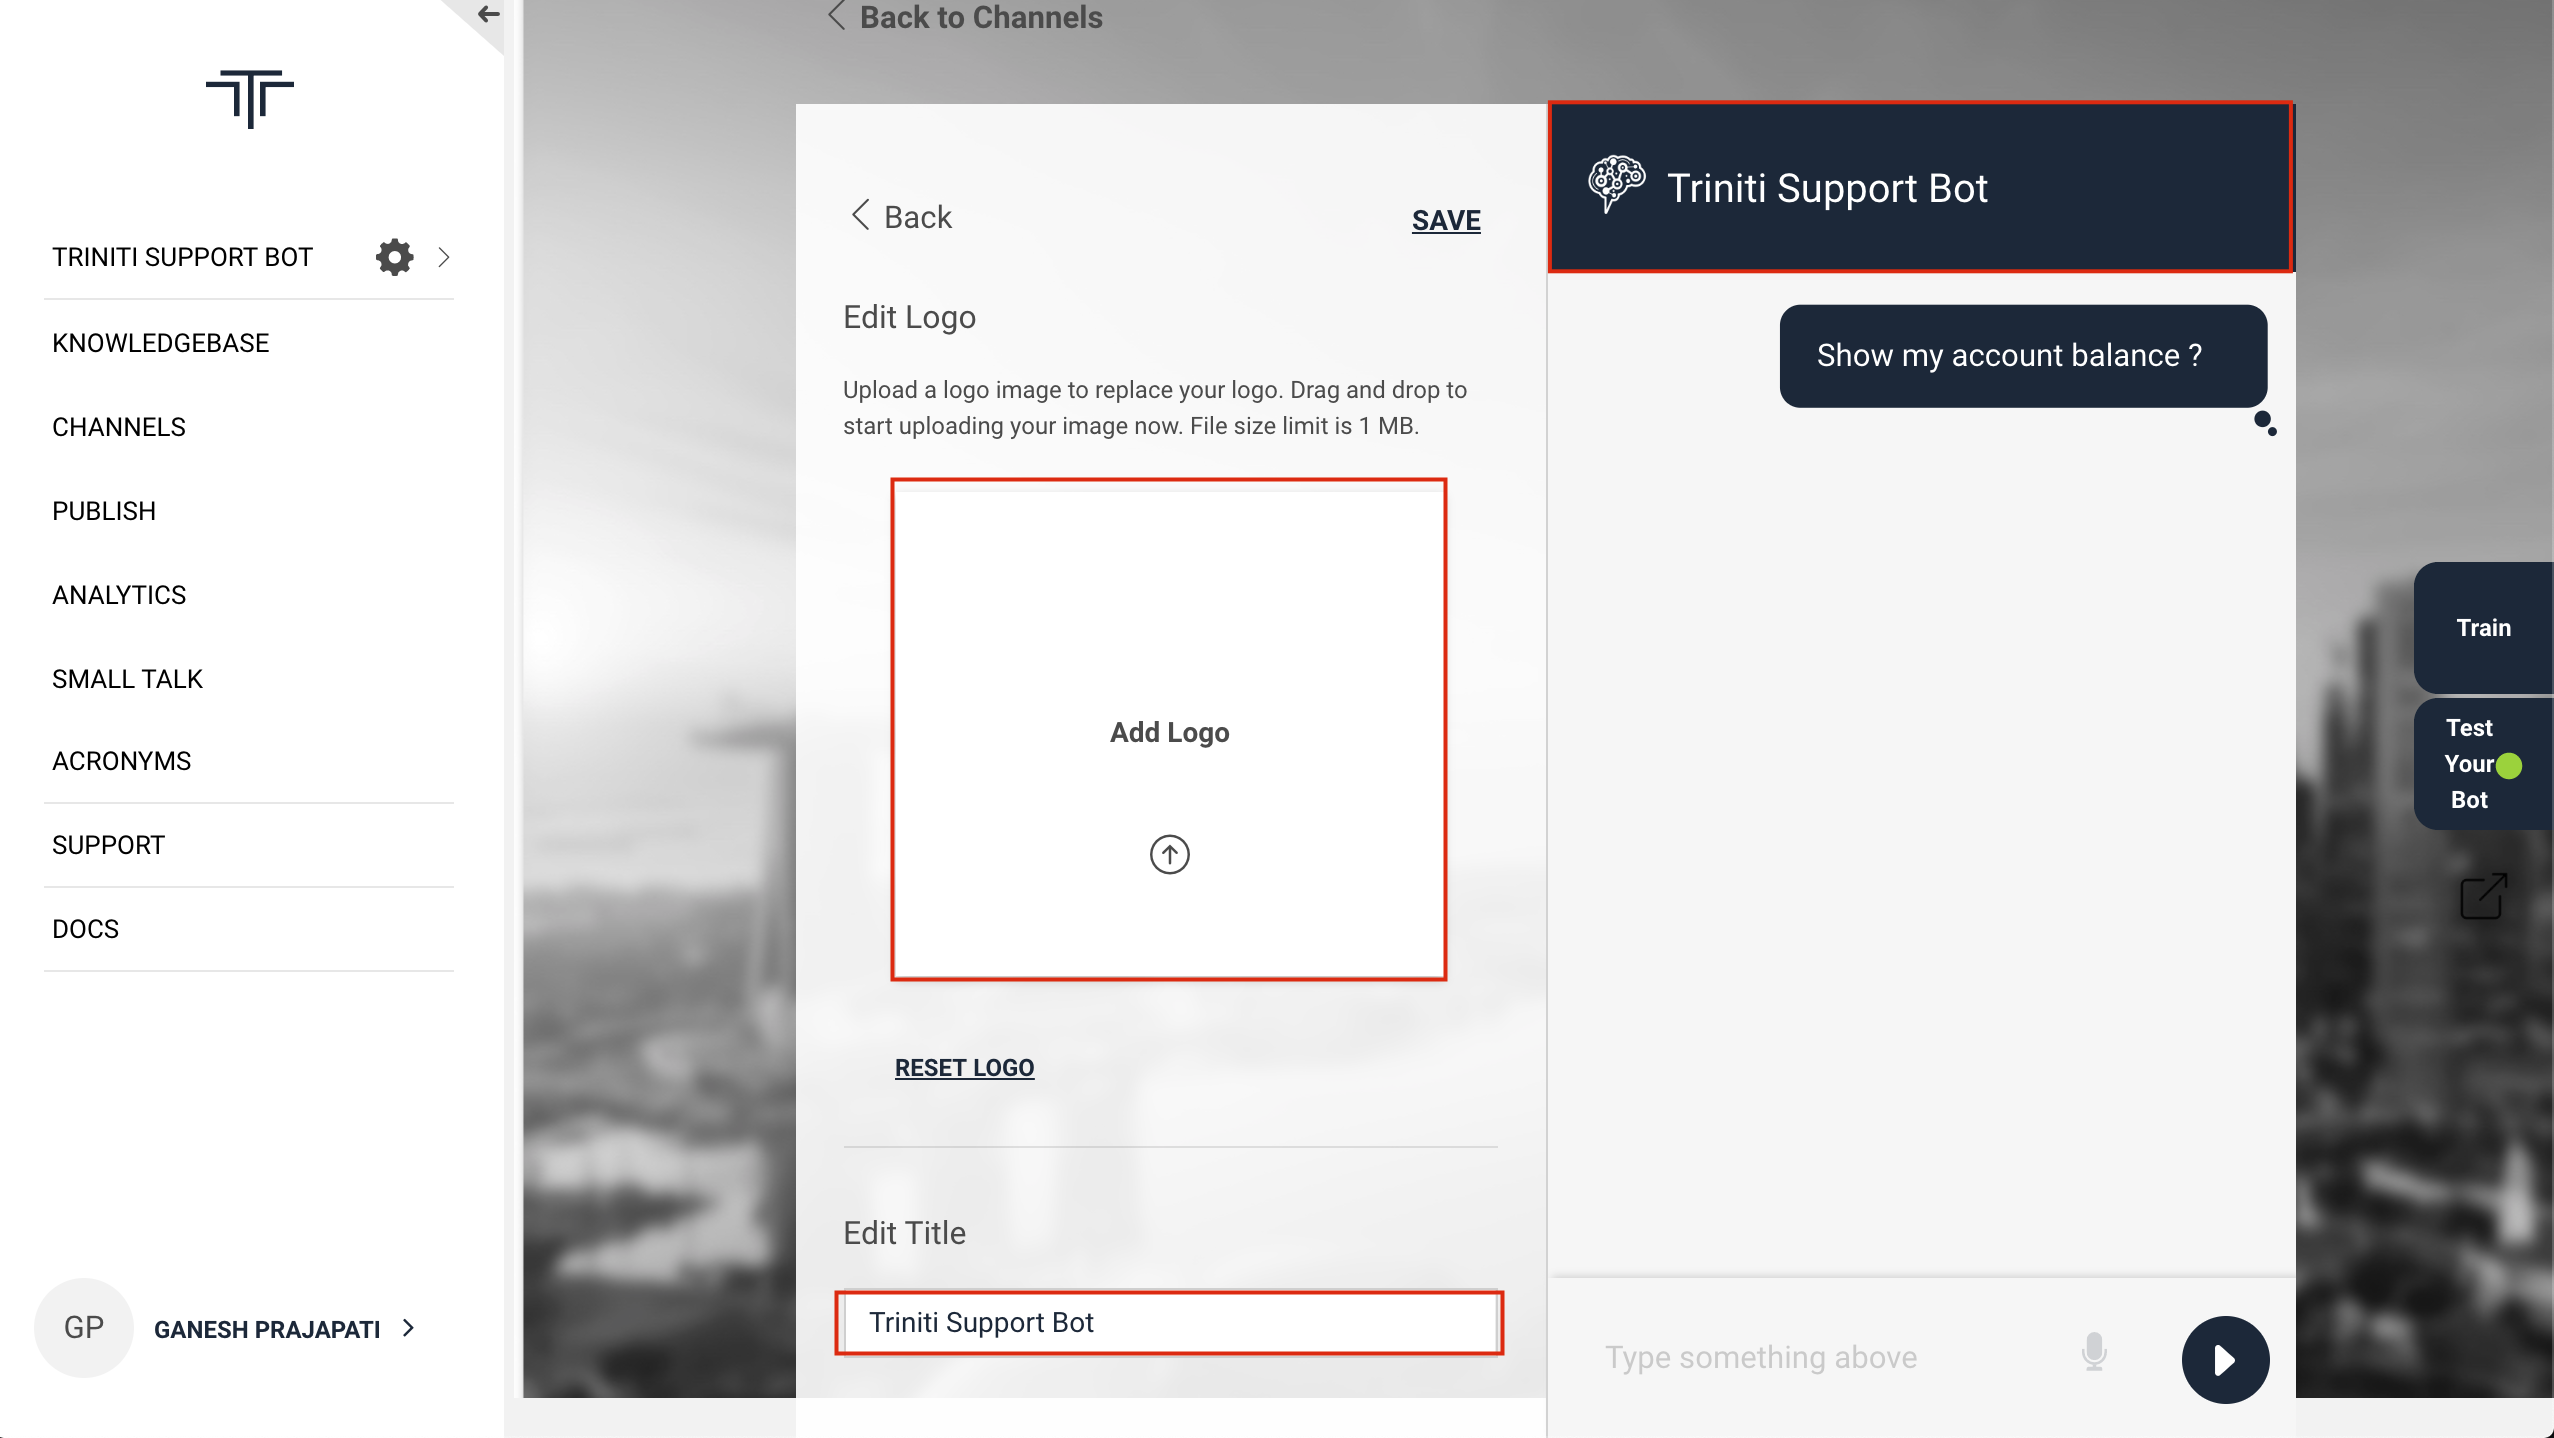
2. Title bar (Logo, Title): You can add the bot logo & bot title for better identification thorugh this section.
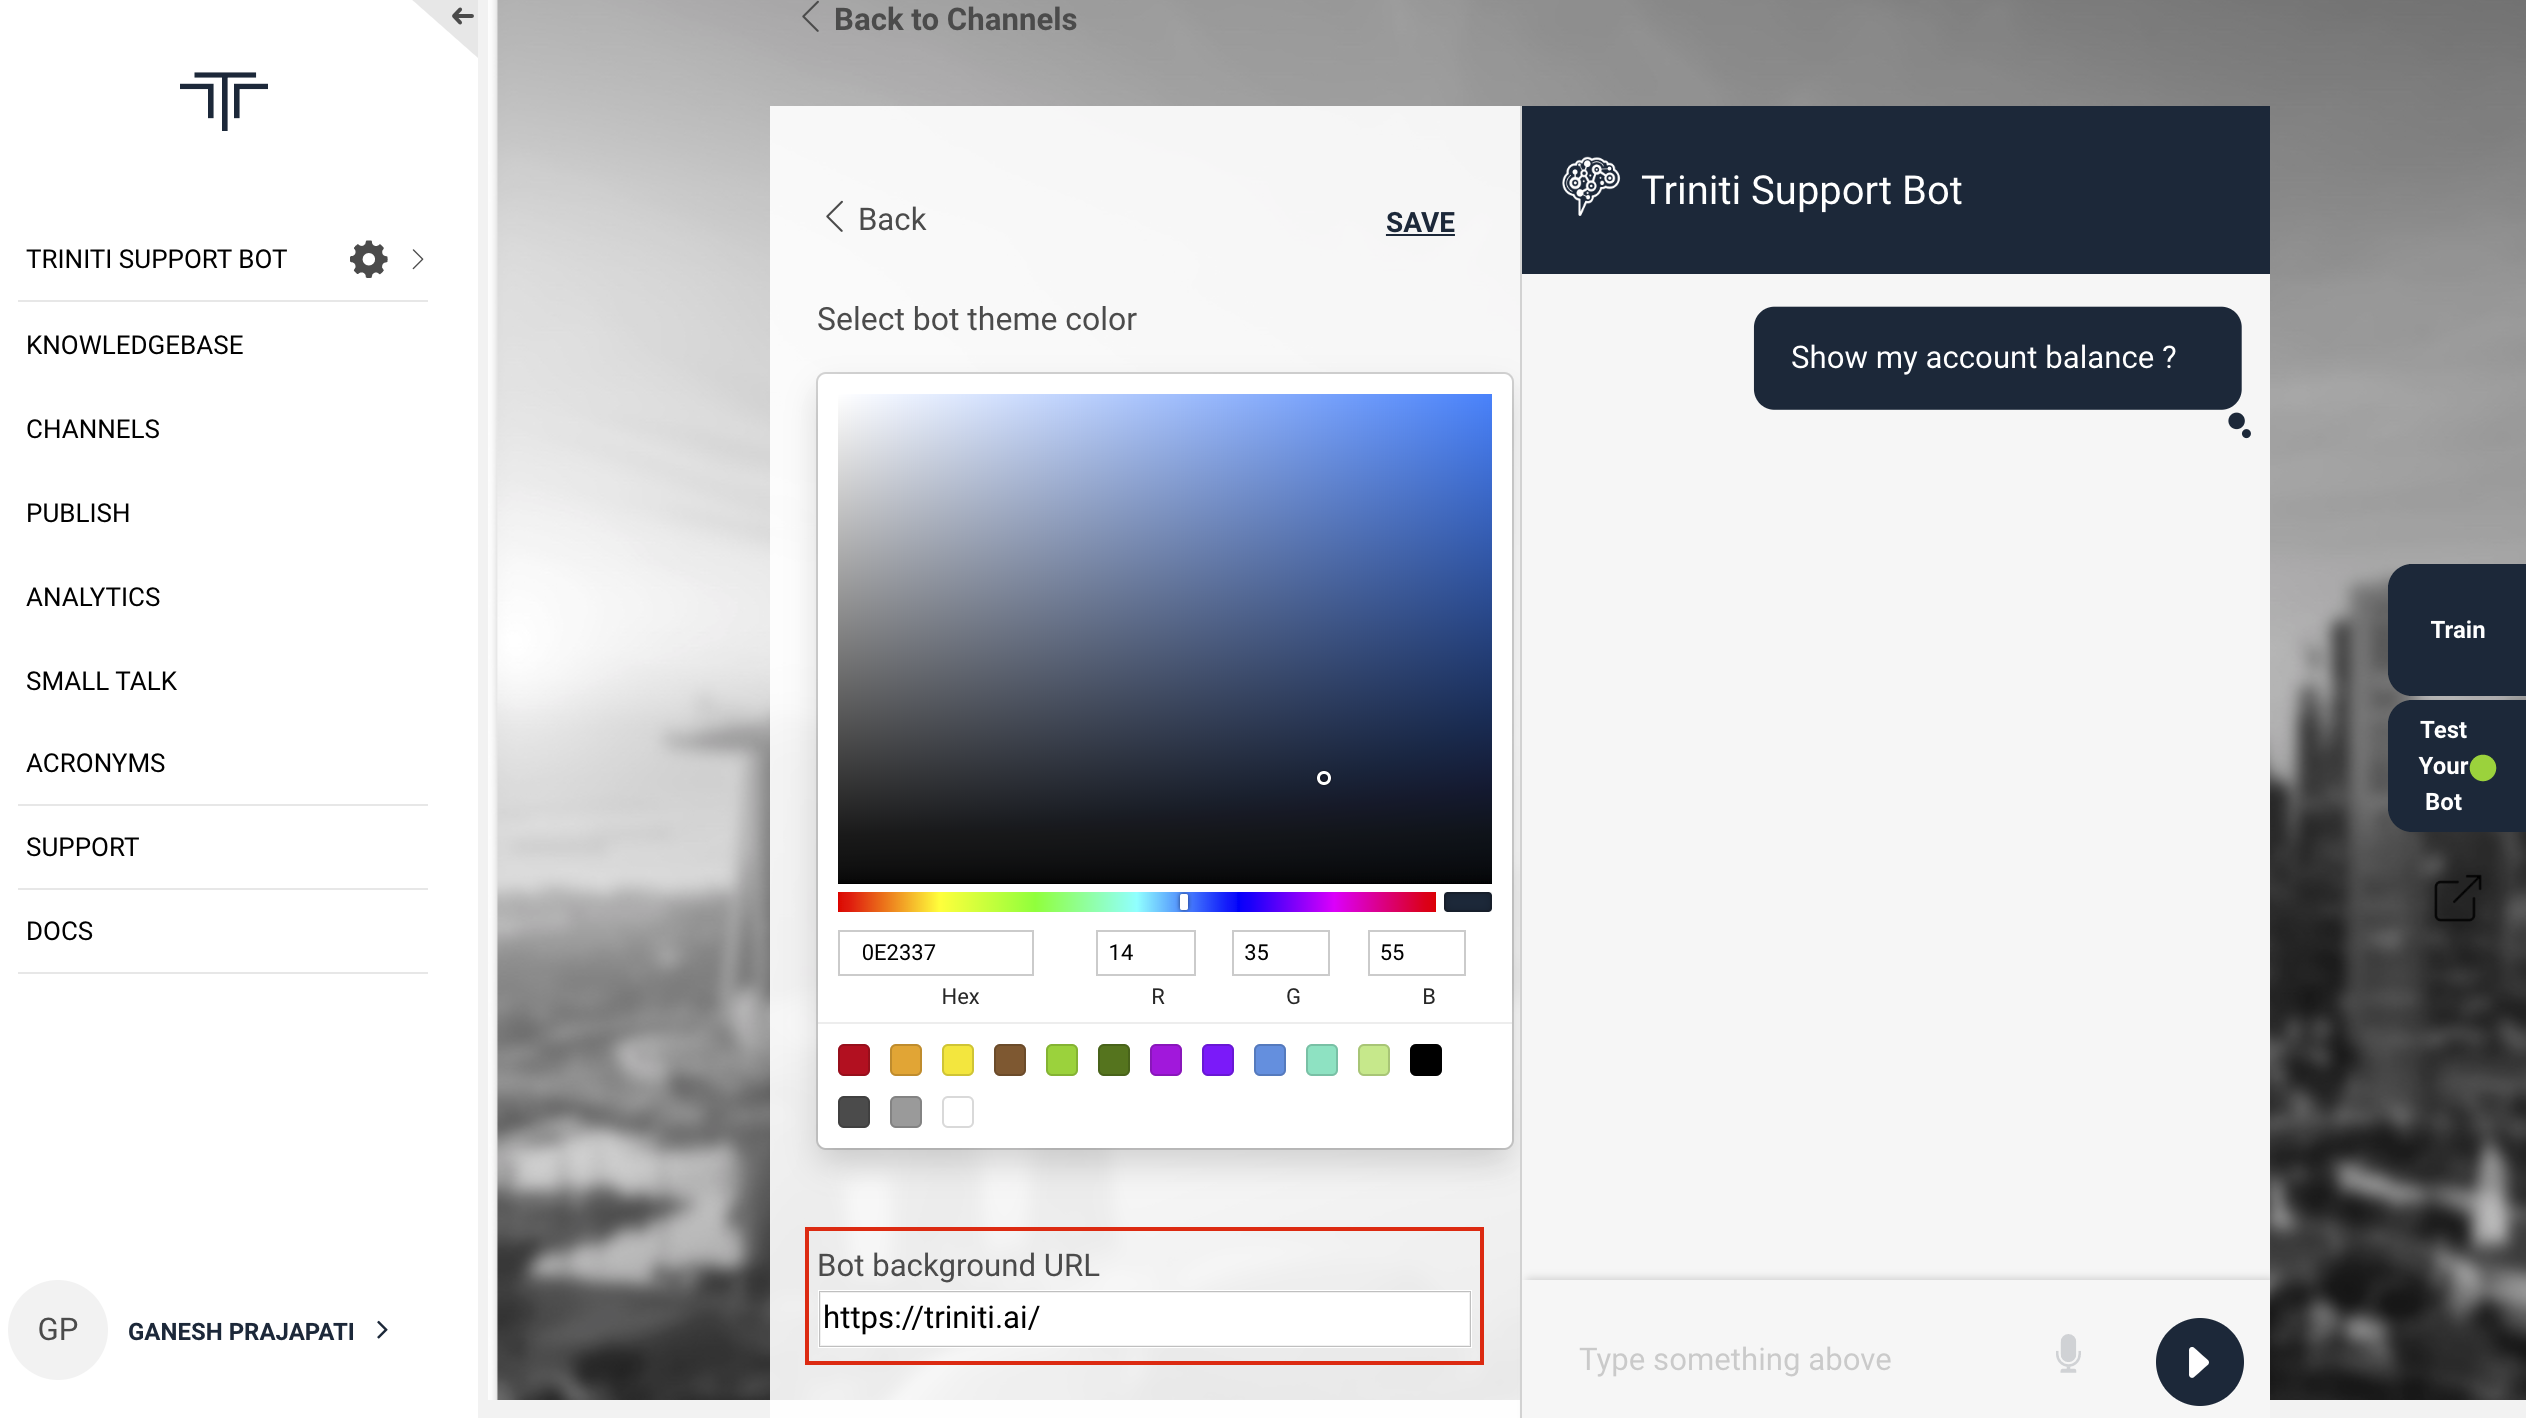
3. Theme : You can choose a color for your bot from this section. And also you can set the 'Bot Background URL' which will show how the bot will look like on your website.
4. Collect user contact information on bot launch: With the help of this option you can make the users to first log into the bot for the conversations. It will ask the user's email id to start the conversation.
5. Enable/Disable input field: If you don't want your user to type anything then you can disable the input field.
6. Enable/Disable feedback: It is good to take feedback from the user to improve our services. You can take the feedback from the user of their experiences of the bot responses by enabling this feature.
7. Help Text: We have enabled a feature to display intuitive help text for the web SDK bot so that if the user loads the page it will ask for the help. It will also help the bot to be in the focus on the website.
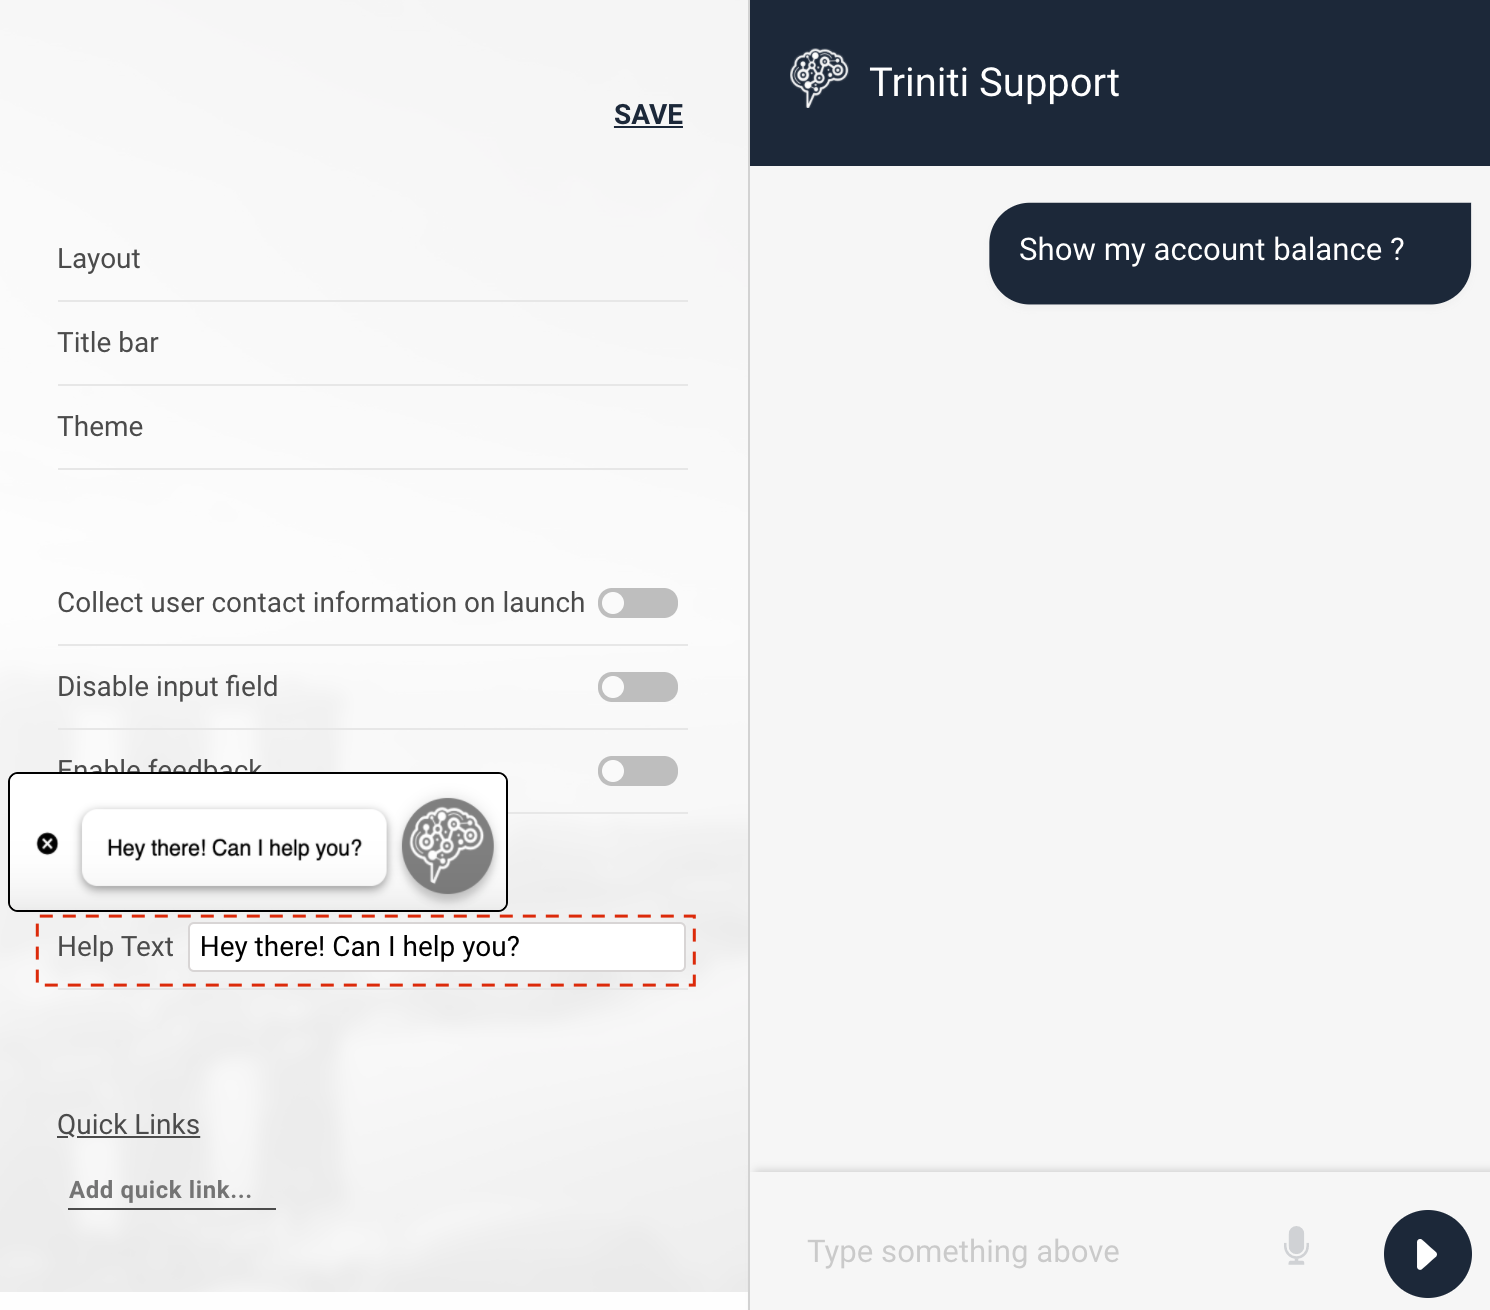
8. Quick Links: If you want to show some offers, services, important responses or most frequently asked questions for all of the users then you can add quick links that will be shown on the bot.
Q. How to add Quick links? A. You can add quick links in two ways: 1. You can add some keyphrases which should be present in the question which you want to show the user. Eg; - I want to open a savings account: The keyphrases could be "open, savings & account". - So you can add quick link like "Open savings account" 2. You can add a short question also from your knowledgebase as a quick link. Eg; - How to transfer money? - So you can add quick link like "How to transfer money" which will give the response of the mentioned question.
Managing Android
Android SDK is a lightweight messaging SDK that can be embedded easily in web sites and hybrid mobile apps with minimal integration effort. Once integrated it allows end-users to converse with the Conversational AI /bot on the Active AI platform on both text and voice. WebSDK has out the box support for multiple UX templates such as List and Carousel and supports extensive customization for both UX and functionality.
Pre Requisites
- Android Studio 2.3+
- Android 4.4.0+
Install SDK
To install SDK add the following configuration to your project level build.gradle file.
allprojects {
   repositories {
       maven {
           url "https://artifacts.active.ai/artifactory/android-sdk-release"
       }
   }
}
And add below configuration to your module level build.gradle file.
dependencies {
    // MFSDK dependencies
    implementation 'com.morfeus.android:MFSDKHybridKit:1.3.41'
    implementation 'com.morfeus.android:MFOkHttp:3.12.0'
    implementation 'com.google.guava:guava:22.0-android'
    implementation 'com.android.support:design:28.0.0'
    implementation 'com.android.support:appcompat-v7:28.0.0'

    // Voice feature dependencies
    implementation 'com.morfeus.android.voice:MFSDKVoice:1.1.6'
    implementation('com.google.auth:google-auth-library-oauth2-http:0.7.0') {
        exclude module: 'httpclient'
    }

    implementation 'io.grpc:grpc-okhttp:1.13.1'
    implementation 'io.grpc:grpc-protobuf-lite:1.13.1'
    implementation 'io.grpc:grpc-stub:1.13.1'
    implementation 'io.grpc:grpc-android:1.13.1'
    implementation 'javax.annotation:javax.annotation-api:1.2'
}
Note: If you get 64k method limit exception during compile time then add following code into your app-level build.gradle file.
android {
    defaultConfig {
        multiDexEnabled true
    }
}
dependencies {
    implementation 'com.android.support:multidex:1.0.1'
}
Initialize the SDK
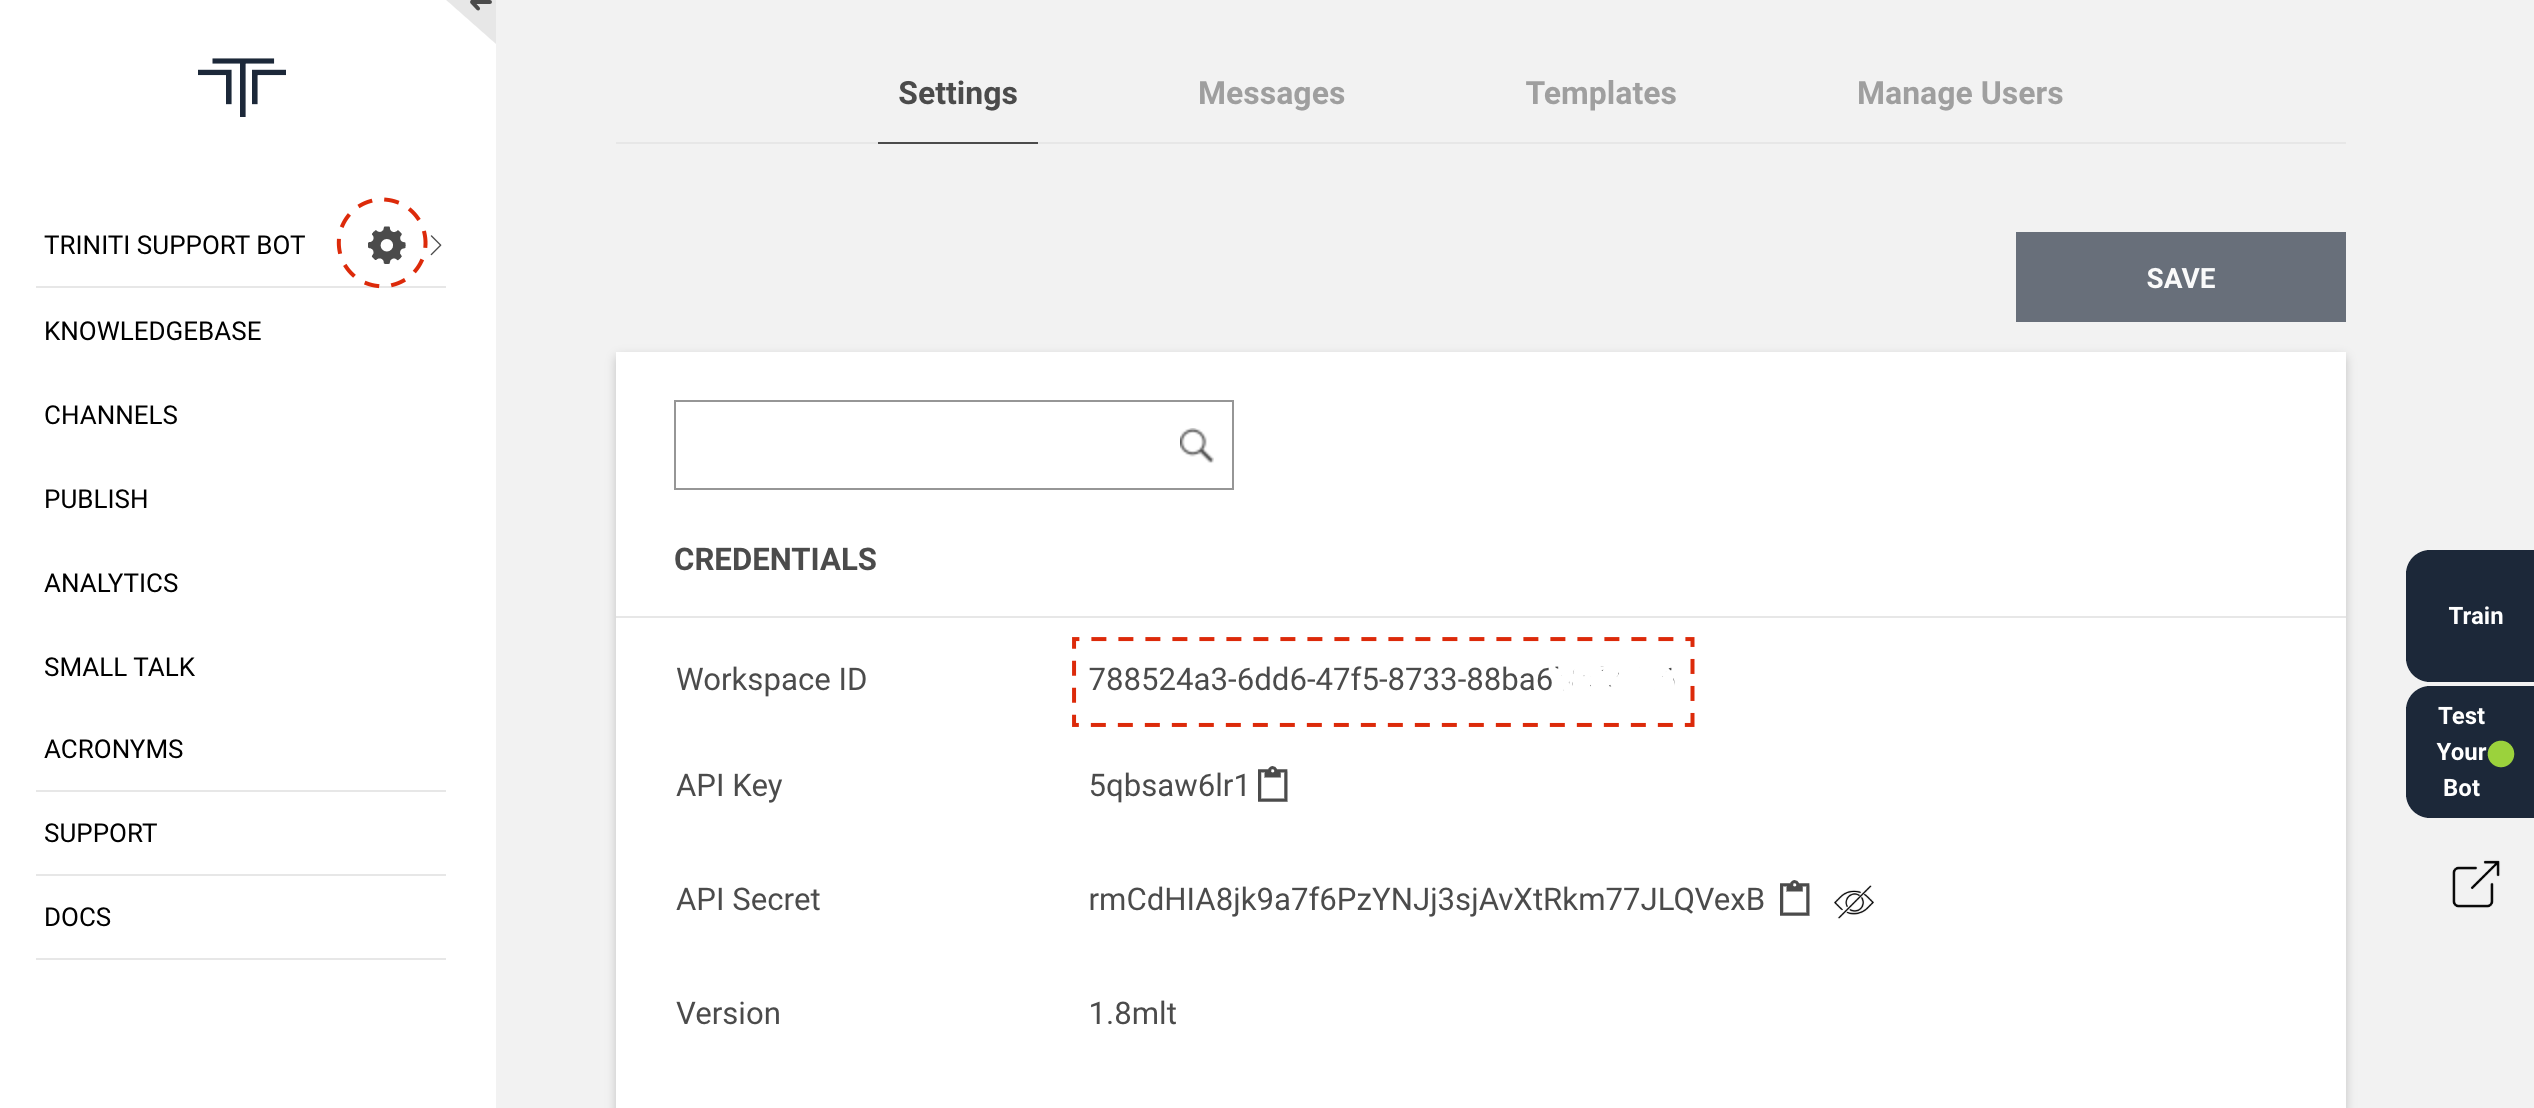
To initialize Morfeus SDK you need workspace Id. Workspace Id you can get through going to your workspace and clicking on setting icon.
Add following lines to your Activity/Application where you want to initialize the Morfeus SDK.onCreate()of Application class is best place to initialize. If you have already initialized MFSDK, reinitializing MFSDK will throw MFSDKInitializationException.
MFSDKProperties sdkProperties = new MFSDKProperties.Builder(BuildConfig.BOT_URL)
                .setWorkspaceId(BuildConfig.WORKSPACE_ID)
                .setSpeechAPIKey(BuildConfig.SPEECH_API_KEY)
                .build();

try {
    sMFSdk = new MFSDKMessagingManagerKit.Builder(this)
            .setSdkProperties(sdkProperties)
            .build();
    sMFSdk.initWithProperties();
} catch (MFSDKInitializationException e) {
    Log.e("MFSDK", "Failed to initialise sdk");
}
Invoke Chat Screen
To invoke chat screen call showScreen() method of MFSDKMessagingManager. Here, sMSDK is an instance variable of MFSDKMessagingManagerKit.
// Open chat screen
MFSDKSessionProperties sdkProperties = new MFSDKSessionProperties.Builder().build();
sMFSDK.showScreen(activityContext, sdkProperties);
You can get instance of MFSDKMessagingManagerKit by calling getInstance()of MFSDKMessagingManagerKit. Please make sure before calling getInstance() you have initialized the MFSDK. Please check following code snippet.
try {
    // Get SDK instance
    MFSDKMessagingManager mfsdk = MFSDKMessagingManagerKit.getInstance();
} catch (Exception e) {
// Throws exception if MFSDK not initialised.
}
Compile and Run Once above code is added you can build and run your application. On launch of chat screen, welcome message will be displayed.
Enable voice chat If you haven't added required dependencies for voice than please add following dependencies in your app/build.gradle
dependencies {
    // Voice feature dependencies
    implementation 'com.morfeus.android.voice:MFSDKVoice:1.1.6'
    implementation('com.google.auth:google-auth-library-oauth2-http:0.7.0') {
        exclude module: 'httpclient'
    }

    implementation 'io.grpc:grpc-okhttp:1.13.1'
    implementation 'io.grpc:grpc-protobuf-lite:1.13.1'
    implementation 'io.grpc:grpc-stub:1.13.1'
    implementation 'io.grpc:grpc-android:1.13.1'
    implementation 'javax.annotation:javax.annotation-api:1.2'
}
Call setSpeechAPIKey(String apiKey) method ofMFSDKProperties builder to pass speech API key.
try {
// Set speech API key
MFSDKProperties properties = new MFSDKPropertie.Builder(WORKSPACE_ID)
        ...
        .setSpeechAPIKey("YourSpeechAPIKey")
        ...
        .build();

} catch (MFSDKInitializationException e) {
    Log.e("MFSDK", e.getMessage());
}
Set Speech-To-Text language
In MFSDKHybridKit, English(India) is the default language set for Speech-To-Text. You can change STT language by passing valid language code using setSpeechToTextLanguage(Language.STT.LANG_CODE)method ofMFSDKSessoionProperties.Builder.
MFSDKSessionProperties sessionProperties = new MFSDKSessionProperties.Builder()
    .setSpeechToTextLanguage(Language.STT.ENGLISH_INDIA)
    .build();
Set Text-To-Speech language
English(India) is the default language set for Text-To-Speech. You can change TTS language by passing valid language code using setTextToSpeechLanguage(Language.STT.LANG_CODE) method of MFSDKSessoionProperties.Builder.
MFSDKSessionProperties sessionProperties = new MFSDKSessionProperties.Builder()
    .setTextToSpeechLanguage(Language.TTS.ENGLISH_INDIA)
    .build();
Provide Speech Suggestions
You can provide additional contextual information for processing user speech. To provide speech suggestions add list of words and phrases into MFSpeechSuggestion.json file and place it under assets folder of your project. You can add maximum 150 phrases intoMFSpeechSuggestion.json. To see sample MFSpeechSuggestion.json, please download it from here.
Security
Enable SSL Pinning
To enable ssl pinning set enableSSL(boolean enable, String[] pins) to true and pass set of set of certificate public key hash(SubjectPublicKeyInfo of the X.509 certificate).
MFSDKProperties sdkProperties = new MFSDKProperties
       .Builder(botURL)
       ...
       .enableSSL(true, new String[]{"sha256/TnsUfcou7yksrrCwJH/NHd1fOeLup8gzfeHUyg+x+pk="})
       ...
       .build();
Enable Root Detection
To prevent chat usage on rooted device set enableRootedDeviceCheck() to true.
MFSDKProperties sdkProperties = new MFSDKProperties.Builder(botURL)
    ...
    .enableRootedDeviceCheck(true)
    ...
    .build();
Prevent user from taking screenshot To prevent user or other third application from taking chat screen screenshot set .disableScreenShot(true).
MFSDKProperties sdkProperties = new MFSDKProperties.Builder(botURL)
    ...
    .disableScreenShot(true)
    ...
    .build();
Enable APK Tampering Detection
Enable tamper-detection to prevent illegitimate apk from executing. Set checkAPKTampering(true, certificateDigest) to true and pass your sha256 digest of apk signing certificate.
MFSDKProperties sdkProperties = new MFSDKProperties.Builder(botURL)
    ...
    .checkAPKTampering(true, "ApkSignningCeritifcateDigest")
    ...
    .build();
Managing iOS
iOS SDK is a light weight messaging sdk which can be embedded easily in web sites and hybrid mobile apps with minimal integration effort. Once integrated it allows end users to converse with the Conversational AI /bot on the Active AI platform on both text and voice. WebSDK has out the box support for multiple UX templates such as List and Carousel and supports extensive customization for both UX and functionality.
Prerequisites
- OS X (10.11.x)
- Xcode 8.3 or higher
- Deployment target - iOS 8.0 or higher
Install and configure dependencies 1. Install Cocoapods CocoaPods is a dependency manager for Objective-C, which automates and simplifies the process of using 3rd-party libraries in your projects. CocoaPods is distributed as a ruby gem, and is installed by running the following commands in Terminal App:
$ sudo gem install cocoapods
$ pod setup
2. Update .netrc file The Morfeus iOS SDK are stored in a secured artifactory. Cocoapods handles the process of linking these frameworks with the target application. When artifactory requests for authentication information when installing 'MFSDKHybridKit', cocoapods reads credential information from the file '.netrc', located in '~/ directory'.
The '.netrc' file format is as explained: we specify machine(artifactory) name, followed by login, followed by password, each in separate lines. There is exactly one space after the keywords machine, login, password.
machine <NETRC_MACHINE_NAME>
login <NETRC_LOGIN>
password <NETRC_PASSWORD>
One example of .netrc file structure with sample credentials is as below. Please check with the development team for the actual credentials to use.

Steps to create or update .netrc file
- Start up Terminal in mac
- Type "
cd ~/" to go to your home folder - Type "
touch .netrc", this creates a new file, If a file with name.netrcnot found. - Type "
open -a TextEdit .netrc", this opens.netrcfile in TextEdit - Append the machine name and credentials shared by development team in above format, if it does not exist already.
- Save and exit TextEdit
3. Install the pod
To integrate 'MFSDKHybridKit' into your Xcode project, specify the below code in your Podfile
source 'https://github.com/CocoaPods/Specs.git'
#Voice support is available from iOS 8.0 and above platform :ios, '7.1'
target 'TargetAppName' do
pod '<COCOAPOD_NAME>'
end
Once added above code, run install command in your project directory, where your "podfile" is located.
$ pod install
If you get an error like "Unable to find a specification for
$ pod repo update
When you want to update your pods to latest version then run below command.
$ pod update
Note: If we get "401 Unauthorized" error, then please verify your .netrc file and the associated credentials.
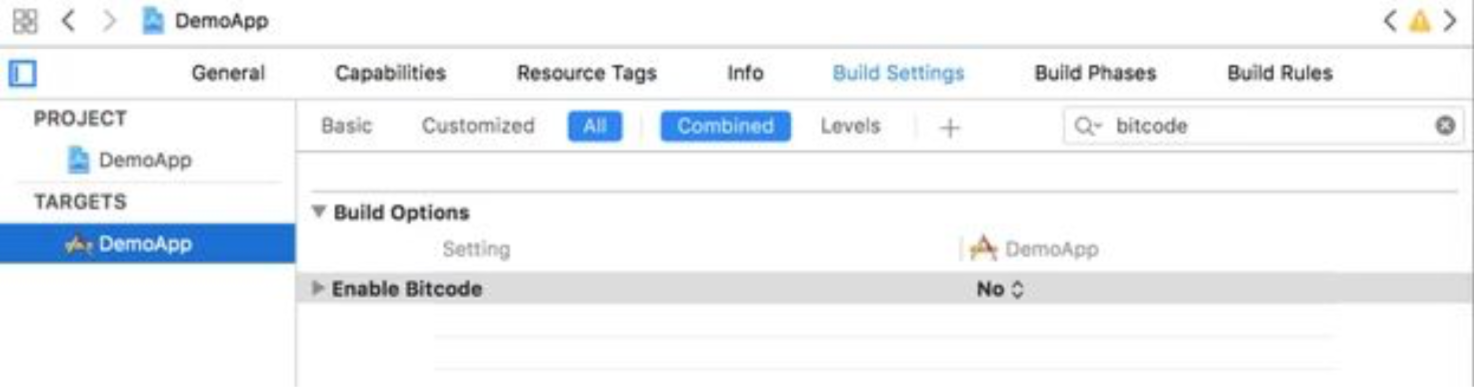
4. Disable bitcode
Select target open "Build Settings" tab and set "Enable Bitcode" to "No".
5. Give permission Search for ".plist" file in the supporting files folder in your Xcode project. Update NSAppTransportSecurity to describe your app's intended HTTP connection behavior. Please refer Apple Documentation and choose the best configuration for your app. Below is one sample configuration.
<key>NSAppTransportSecurity</key>
<dict>
<key>NSAllowsArbitraryLoads</key>
<true/>
</dict>
6. Invoke the SDK To invoke chat screen, create 'MFSDKProperties', 'MFSDKSessionProperties' and then call the method showScreenWithBotID:fromViewController:withSessionProperties to present the chat screen. Please find below code sample.
// Add this to the .h of your file
#import "ViewController.h"
#import <MFSDKMessagingKit/MFSDKMessagingKit.h> @interface ViewController ()<MFSDKMessagingDelegate>
@end
// Add this to the .m of your file
@implementation ViewController
// Once the button is clicked, show the message screen -(IBAction)startChat:(id)sender
{
MFSDKProperties *params = [[MFSDKProperties alloc] initWithDomain:@"<END_POINT_URL>"];
params.workSpaceId = <WORK_SPACE_ID>;
params.messagingDelegate = self; params.enableScheduledBackgroundRefresh = YES;
//optional for ios13 Support
params.sdkStatusBarColor = <UIColor>;//color to be set for status-bar params.botModalPresentationStyle = PresentationFullScreen;
[[MFSDKMessagingManager sharedInstance] initWithProperties:params];
MFSDKSessionProperties *sessionProperties = [[MFSDKSessionProperties
alloc]init];
[[MFSDKMessagingManager sharedInstance] showScreenWithWorkSpaceId:@"<WORK_SPACE_ID>" fromViewController:self withSessionProperties:sessionProperties];
}
@end
Properties:
| Property | Description |
|---|---|
| WORK_SPACE_ID | The unique ID for the bot |
| END_POINT_URL | The bot API URL |
Above properties you can get through nevigating to Channels -> iOS click on settings icon on triniti.ai page.
END_POINT_URL
- Goto triniti.ai portal
- Select your workspace
- Goto channels & Enable the iOS SDK channel
- Copy the Call Back URL and paste in END_POINT_URL

WORK_SPACE_ID
- Goto triniti.ai portal
- Select your workspace
- Click on settings icon
- Copy the Workspace ID & paste in WORK_SPACE_ID

Compile and Run Once above code is added we can build and run. On launch of chat screen, welcome message will be displayed.
Providing User/Session Information You can pass set of key value pairs to the MFSDK using userInfo(NSDictionary) in MFSDKSessionProperties. In following example we are passing Customer ID, Session ID to MFSDK.
MFSDKSessionProperties *sessionProperties = [[MFSDKSessionProperties alloc]init];
sessionProperties.userInfo = @{@"CUSTOMER_ID": @"<CUSTOMER_ID_VALUE>", @"SESSION_ID": @"<SESSION_ID_VALUE>", nil];
[[MFSDKMessagingManager sharedInstance] showScreenWithWorkSpaceId:@"<WORK_SPACE_ID>" fromViewController:self withSessionProperties:sessionProperties];
Setting Chat Screen Header iOS SDK provides feature to set header as native header.You can set native header by using “setHeader” method of MFSDKSessionProperties.You need to create MFSDKHeader object and set below properties according to requirement. In following example we are setting header background as color with left and right button.
MFSDKProperties *params = [[MFSDKProperties alloc] initWithDomain:@"<END_POINT_URL>"];
params.workSpaceId = workspaceID;
params.messagingDelegate = self;
params.showNativeNavigationBar = YES;
[[MFSDKMessagingManager sharedInstance] initWithProperties:params];
MFSDKSessionProperties *sessionProperties = [[MFSDKSessionProperties
alloc]init];
MFSDKHeader *headerObject = [[MFSDKHeader alloc]init]; headerObject.isCustomNavigationBar = YES;
headerObject.titleText = @"ActiveAI Bot !";
headerObject.titleColor = @"#FFFFFF"; headerObject.titleFontName = @"Lato_Medium";
headerObject.titleFontSize = 16.00f;
headerObject.rightButtonAction = HOME_BUTTON; headerObject.rightButtonImage = @"hdr_home";
headerObject.leftButtonAction = BACK_BUTTON;
headerObject.leftButtonImage = @"hdr_menu_icon";
headerObject.backgroundColor = @"#CD1C5F";
[sessionProperties setHeader:headerObject];
Retrieve Logout Event To retrieve logout event, implement the MFSDKMessagingDelegate. MFSDK will call onLogout: method when user logout from the current chat session. There are three type of logout methods supported by MFSDK as listed below.
| Property | Description |
|---|---|
| Logout type | Logout code |
| Auto logout / Inactivity timeout | 1001 |
| Forced logout | 1002 |
Please check following code sample.
// Add this to the header of your file
#import "ViewController.h"
#import <MFSDKMessagingKit/MFSDKMessagingKit.h>
@interface ViewController ()<MFSDKMessagingDelegate>
@end
@implementation ViewController -(IBAction)startChat:(id)sender
{
...
//Show chat screen
}
-(void)onLogout:(NSInteger)logoutType
{
NSLog(@"logoutType: %@",logoutType);
}
@end
Retrieve Close Event To retrieve close event, implement the MFSDKMessagingDelegate. MFSDK will call onChatClose method when user touches back button, which results in closure of chat screen. Please check following code sample.
// Add this to the header of your file
#import "ViewController.h"
#import <MFSDKMessagingKit/MFSDKMessagingKit.h> @interface ViewController ()<MFSDKMessagingDelegate>
@end
@implementation ViewController -(IBAction)startChat:(id)sender {
...
//Show chat screen
}
-(void)onChatClose
{
NSLog(@"Chat screen closed, perform necessary action");
}
@end
Close Chat Screen
To close the chat screen with smooth animation call the closeScreenWithBotID: with the
[[MFSDKMessagingManager sharedInstance]closeScreenWithBotID:@"<WORK_SPACE_ID>"];
To close the chat screen without animation call closeScreenWithBotID:withAnimation: with the
[[MFSDKMessagingManager sharedInstance] closeScreenWithBotID:@"<WORK_SPACE_ID>" withAnimation:NO];
Deeplink You can deep link your application with MFSDK by implementing the MFSDKMessagingDelegate. If Active AI chat bot is not able to answer, framework will call onSearchResponse method of MFSDKMessagingDelegate and “MFSearchResponseModel” model will be passed. User can invoke respective screen from this method depending on properties set in the model.
| Property | Description |
|---|---|
| MFSearchResponseModel | This model contains 3 properties: keyValue, menuCode, & payload which will be used to navigate to respective screen in application. |
// Add this to the header of your file
#import "ViewController.h"
#import <MFSDKMessagingKit/MFSDKMessagingKit.h> @interface ViewController ()<MFSDKMessagingDelegate>
@end
@implementation ViewController -(IBAction)startChat:(id)sender
{
MFSDKProperties *params = [[MFSDKProperties alloc] initWithDomain:@"<END_POINT_URL>"];
params.messagingDelegate = self;
[[MFSDKMessagingManager sharedInstance] initWithProperties:params]; ...
//Show chat screen
}
-(void)onSearchResponse:(MFSearchResponseModel *)model {
//handle code to display native screens
NSLog(@"onSearchResponse: %@",model.menuCode);
}
@end
Provide Speech Provider MFSDKHybridKit supports text to speech and speech to text feature. It has two medium of speech recognition and either of them can be used :
- Google Speech recognition
- iOS Native Speech Recognition
1. Google Speech recognition The minimum iOS deployment target for voice feature is iOS 8.0. The pod file also needs to be updated with the minimum deployment target for voice feature. Speech API key can be passed using speechAPIKey in MFSDKSessionProperties as below.
Provide Speech API Key MFSDKHybridKit supports text to speech and speech to text feature. The minimum iOS deployment target for voice feature is iOS 8.0. The pod file also needs to be updated with the minimum deployment target for voice feature. Speech API key can be passed using speechAPIKey in MFSDKSessionProperties as below.
MFSDKSessionProperties *sessionProperties = [[MFSDKSessionProperties
alloc]init];
... sessionProperties.speechProviderForVoice = SpeechProviderGoogle; sessionProperties.speechAPIKey = @"<YOUR_SPEECH_API_KEY>";
...
[[MFSDKMessagingManager sharedInstance]
showScreenWithWorkSpaceId:@"<WORK_SPACE_ID>" fromViewController:self withSessionProperties:sessionProperties];
Search for “.plist” file in the supporting files folder in your Xcode project. Add needed capabilities like below and appropriate description.
<key>NSSpeechRecognitionUsageDescription</key> <string>SPECIFY_REASON_FOR_USING_SPEECH_RECOGNITION</string>
<key>NSMicrophoneUsageDescription</key> <string>SPECIFY_REASON_FOR_USING_MICROPHONE</string>
2. iOS Native Speech Recognition MFSDKHybridKit supports text to speech and speech to text feature. The minimum iOS required to target native speech recognition feature is iOS 10.0. Speech provider needs to be set as SpeechProviderNative for the property called speechProviderForVoice in MFSDKSessionProperties.
MFSDKSessionProperties *sessionProperties = [[MFSDKSessionProperties
alloc]init];
... sessionProperties.speechProviderForVoice = SpeechProviderNative; ...
[[MFSDKMessagingManager sharedInstance] showScreenWithWorkSpaceId:@"<WORK_SPACE_ID>" fromViewController:self withSessionProperties:sessionProperties];
Search for “.plist” file in the supporting files folder in your Xcode project. Add needed capabilities like below and appropriate description.
<key>NSSpeechRecognitionUsageDescription</key> <string>SPECIFY_REASON_FOR_USING_SPEECH_RECOGNITION</string>
<key>NSMicrophoneUsageDescription</key> <string>SPECIFY_REASON_FOR_USING_MICROPHONE</string>
Both the permission should be provided by the user in order to make apple’s native speech recognition work.
Set Speech-To-Text language English(India) is the default language set for Speech-To-Text. You can change STT language by passing valid language code using speechToTextLanguage property of MFSDKSessionProperties. You can find list of supported language code here.
MFSDKSessionProperties *sessionProperties = [[MFSDKSessionProperties
alloc]init];
sessionProperties.shouldSupportMultiLanguage = YES; sessionProperties.speechToTextLanguage = @"en-IN";
Set Text-To-Speech language English(India) is the default language set for Text-To-Speech. You can change STT language by passing valid language code using textToSpeechLanguage property of MFSDKSessionProperties.Please set language code as per apple guidelines.
MFSDKSessionProperties *sessionProperties = [[MFSDKSessionProperties
alloc]init];
sessionProperties.shouldSupportMultiLanguage = YES; sessionProperties.textToSpeechLanguage = @"en-IN";
Enable Analytics By default, analytics is disabled in SDK. To enable analytics set enableAnalytics to YES and pass analytics provider and id detail with MFSDKProperpties. Please check the following code snippet to enable analytics
// Add this to the header of your file
#import "ViewController.h"
#import <MFSDKMessagingKit/MFSDKMessagingKit.h> @interface ViewController ()<MFSDKMessagingDelegate>
@end
@implementation ViewController -(IBAction)startChat:(id)sender
{
MFSDKProperties *params = [[MFSDKProperties alloc] initWithDomain:@"<END_POINT_URL>"];
params.enableAnalytics = YES;
params.analyticsProvider = @"YOUR_ANALYTICS_PROVIDER_CODE"; params.analyticsId = @"YOUR_ANALYTICS_ID";
...
[[MFSDKMessagingManager sharedInstance] initWithProperties:params];
...
//Show chat screen
}
@end
Provide Speech Suggestions You can provide additional contextual information for processing user speech. To provide speech suggestions add list of words and phrases into MFSpeechSuggestion.json file and add it to main bundle of your target. You can add maximum 150 phrases into MFSpeechSuggestion.json. To see sample MFSpeechSuggestion.json, please download it from here Download link.
Retrieve home button click event To retrieve home button click event, implement the MFSDKMessagingDelegate. MFSDK will call onHomemenubtnclick method when user touches home button. Please check following code sample.
// Add this to the header of your file
#import "ViewController.h"
#import <MFSDKMessagingKit/MFSDKMessagingKit.h> @interface ViewController ()<MFSDKMessagingDelegate>
@end
@implementation ViewController -(IBAction)startChat:(id)sender
{
...
//Show chat screen
}
-(void)onHomemenubtnclick {
NSLog(@"Callback on home button click");
}
@end
Retrieve hamburger button click event To retrieve hamburger button click event, implement the MFSDKMessagingDelegate. MFSDK will call onHamburgermenubtnclick method when user touches hamburger button. Please check following code sample.
// Add this to the header of your file
#import "ViewController.h"
#import <MFSDKMessagingKit/MFSDKMessagingKit.h> @interface ViewController ()<MFSDKMessagingDelegate>
@end
@implementation ViewController -(IBAction)startChat:(id)sender
{
...
//Show chat screen
}
-(void)onHamburgermenubtnclick
{
NSLog(@"Callback on hamburger button click");
}
@end
Managing Facebook
Social channels give you many opportunities and benefits regarding expand your services and reach to the users. Nowadays almost every user is using social channels. So we have segregated the social channels to make your bot more interactive. You can configure your bot to interact with the user through Facebook messenger, where user can ask their query to the bot on the Facebook messenger itself. This page documents how to configure a Facebook channel for your bot in Triniti.ai.
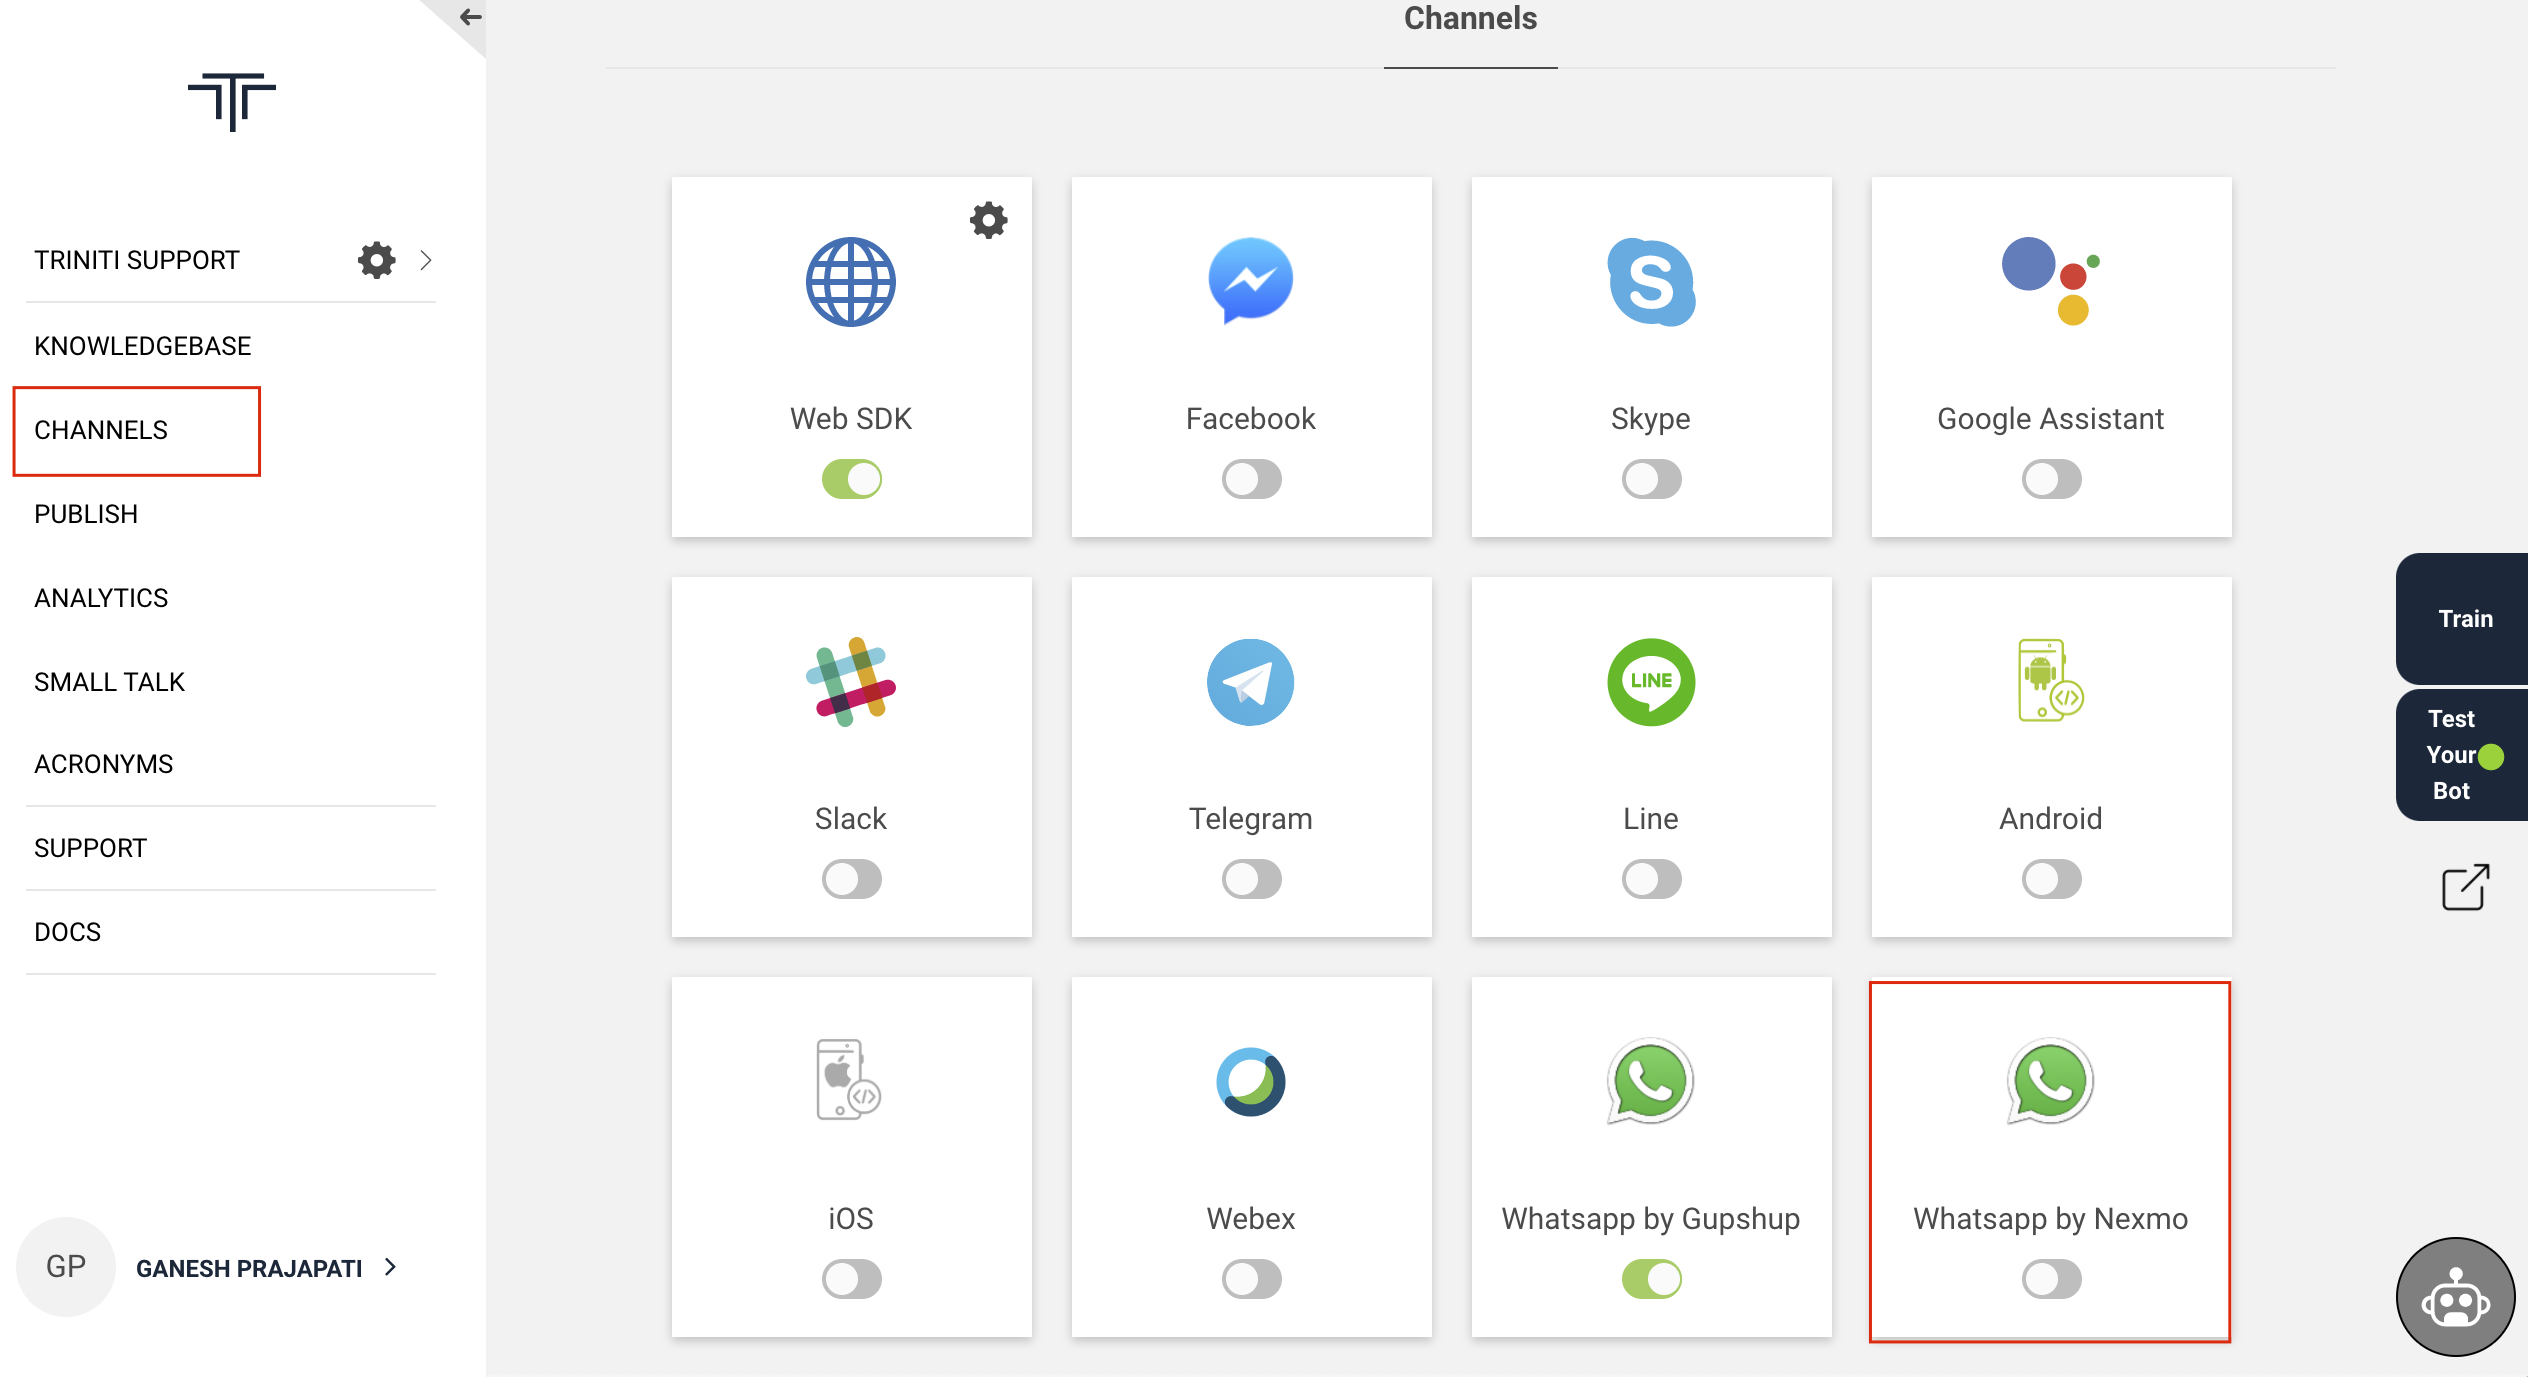
1. Enable Facebook Channel To enable the Facebook channel, go to the "Channels" section in your workspace and toggle the Facebook button.
Before you proceed, you will need to have
- A Facebook Page,
- A Facebook Developer Account (You can use your Facebook account)
A Facebook App. For all these, you can follow Facebook Official Document to Setup Facebook App. While setting up the Facebook App, you will need:
A webhook URL and
A verification token. For that use the Callback URL and Verify Token you get after enabling Facebook channel from triniti.ai.
2. Create Facebook Page
- Click on Create Facebook Page to create a Facebook page
- Select your page type
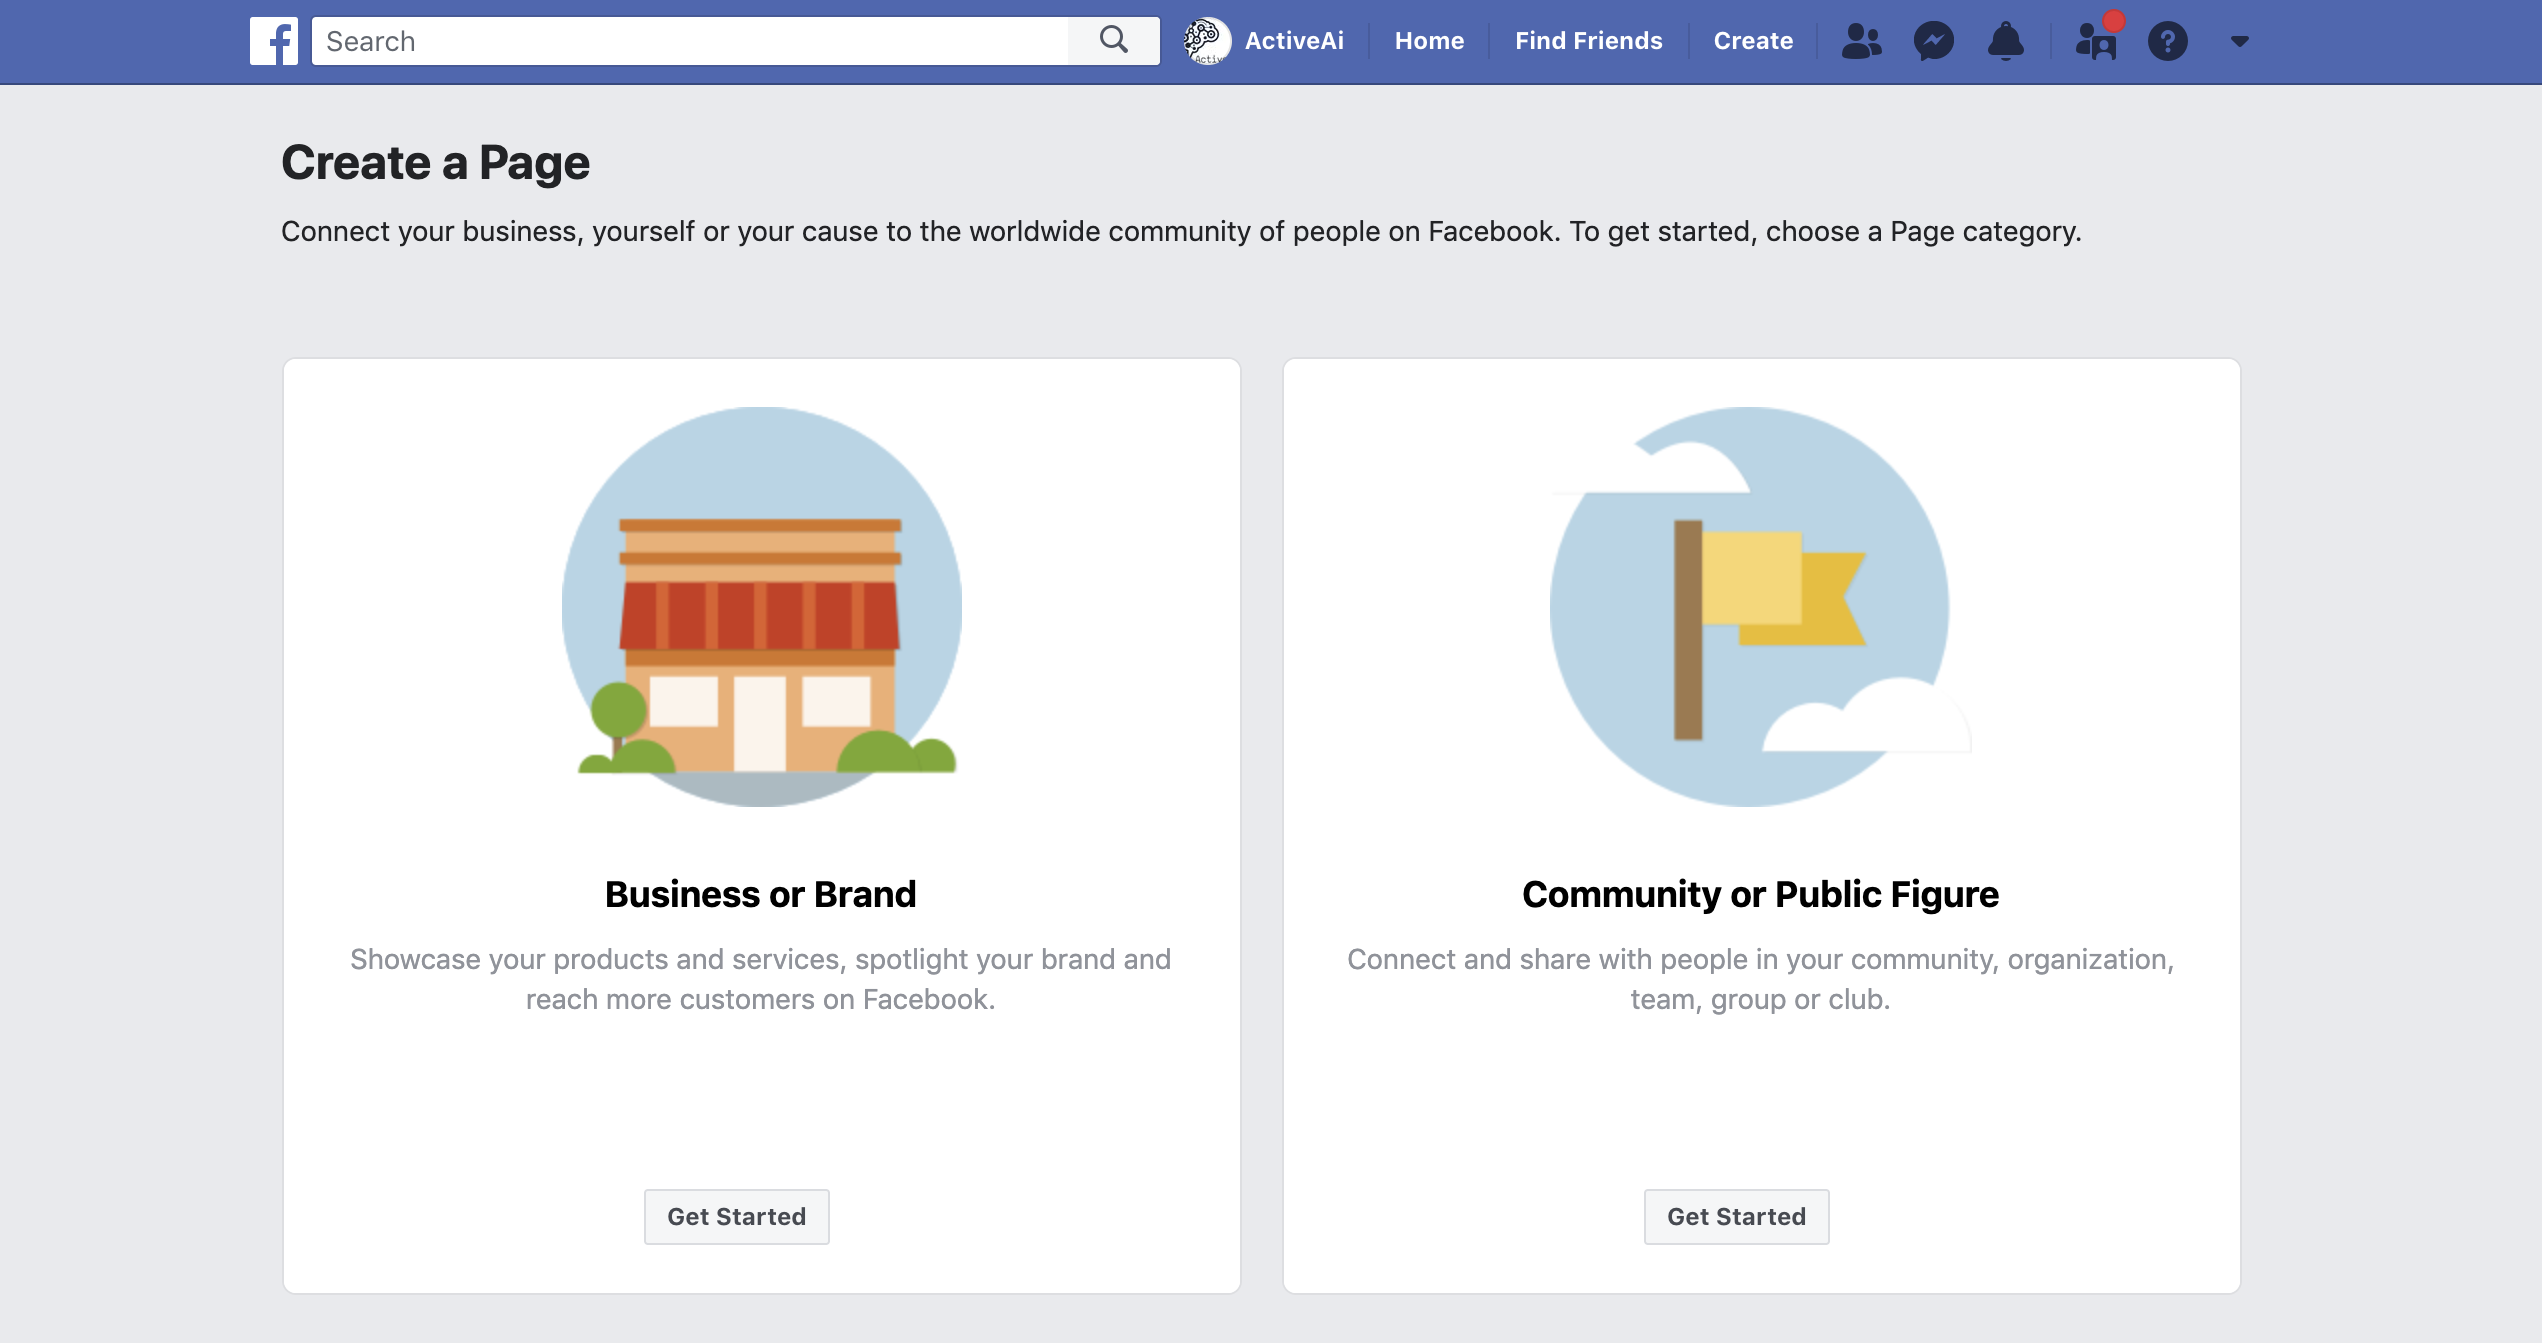
- Fill the all mandatory details on the 'Create a Page' Form and click on Continue
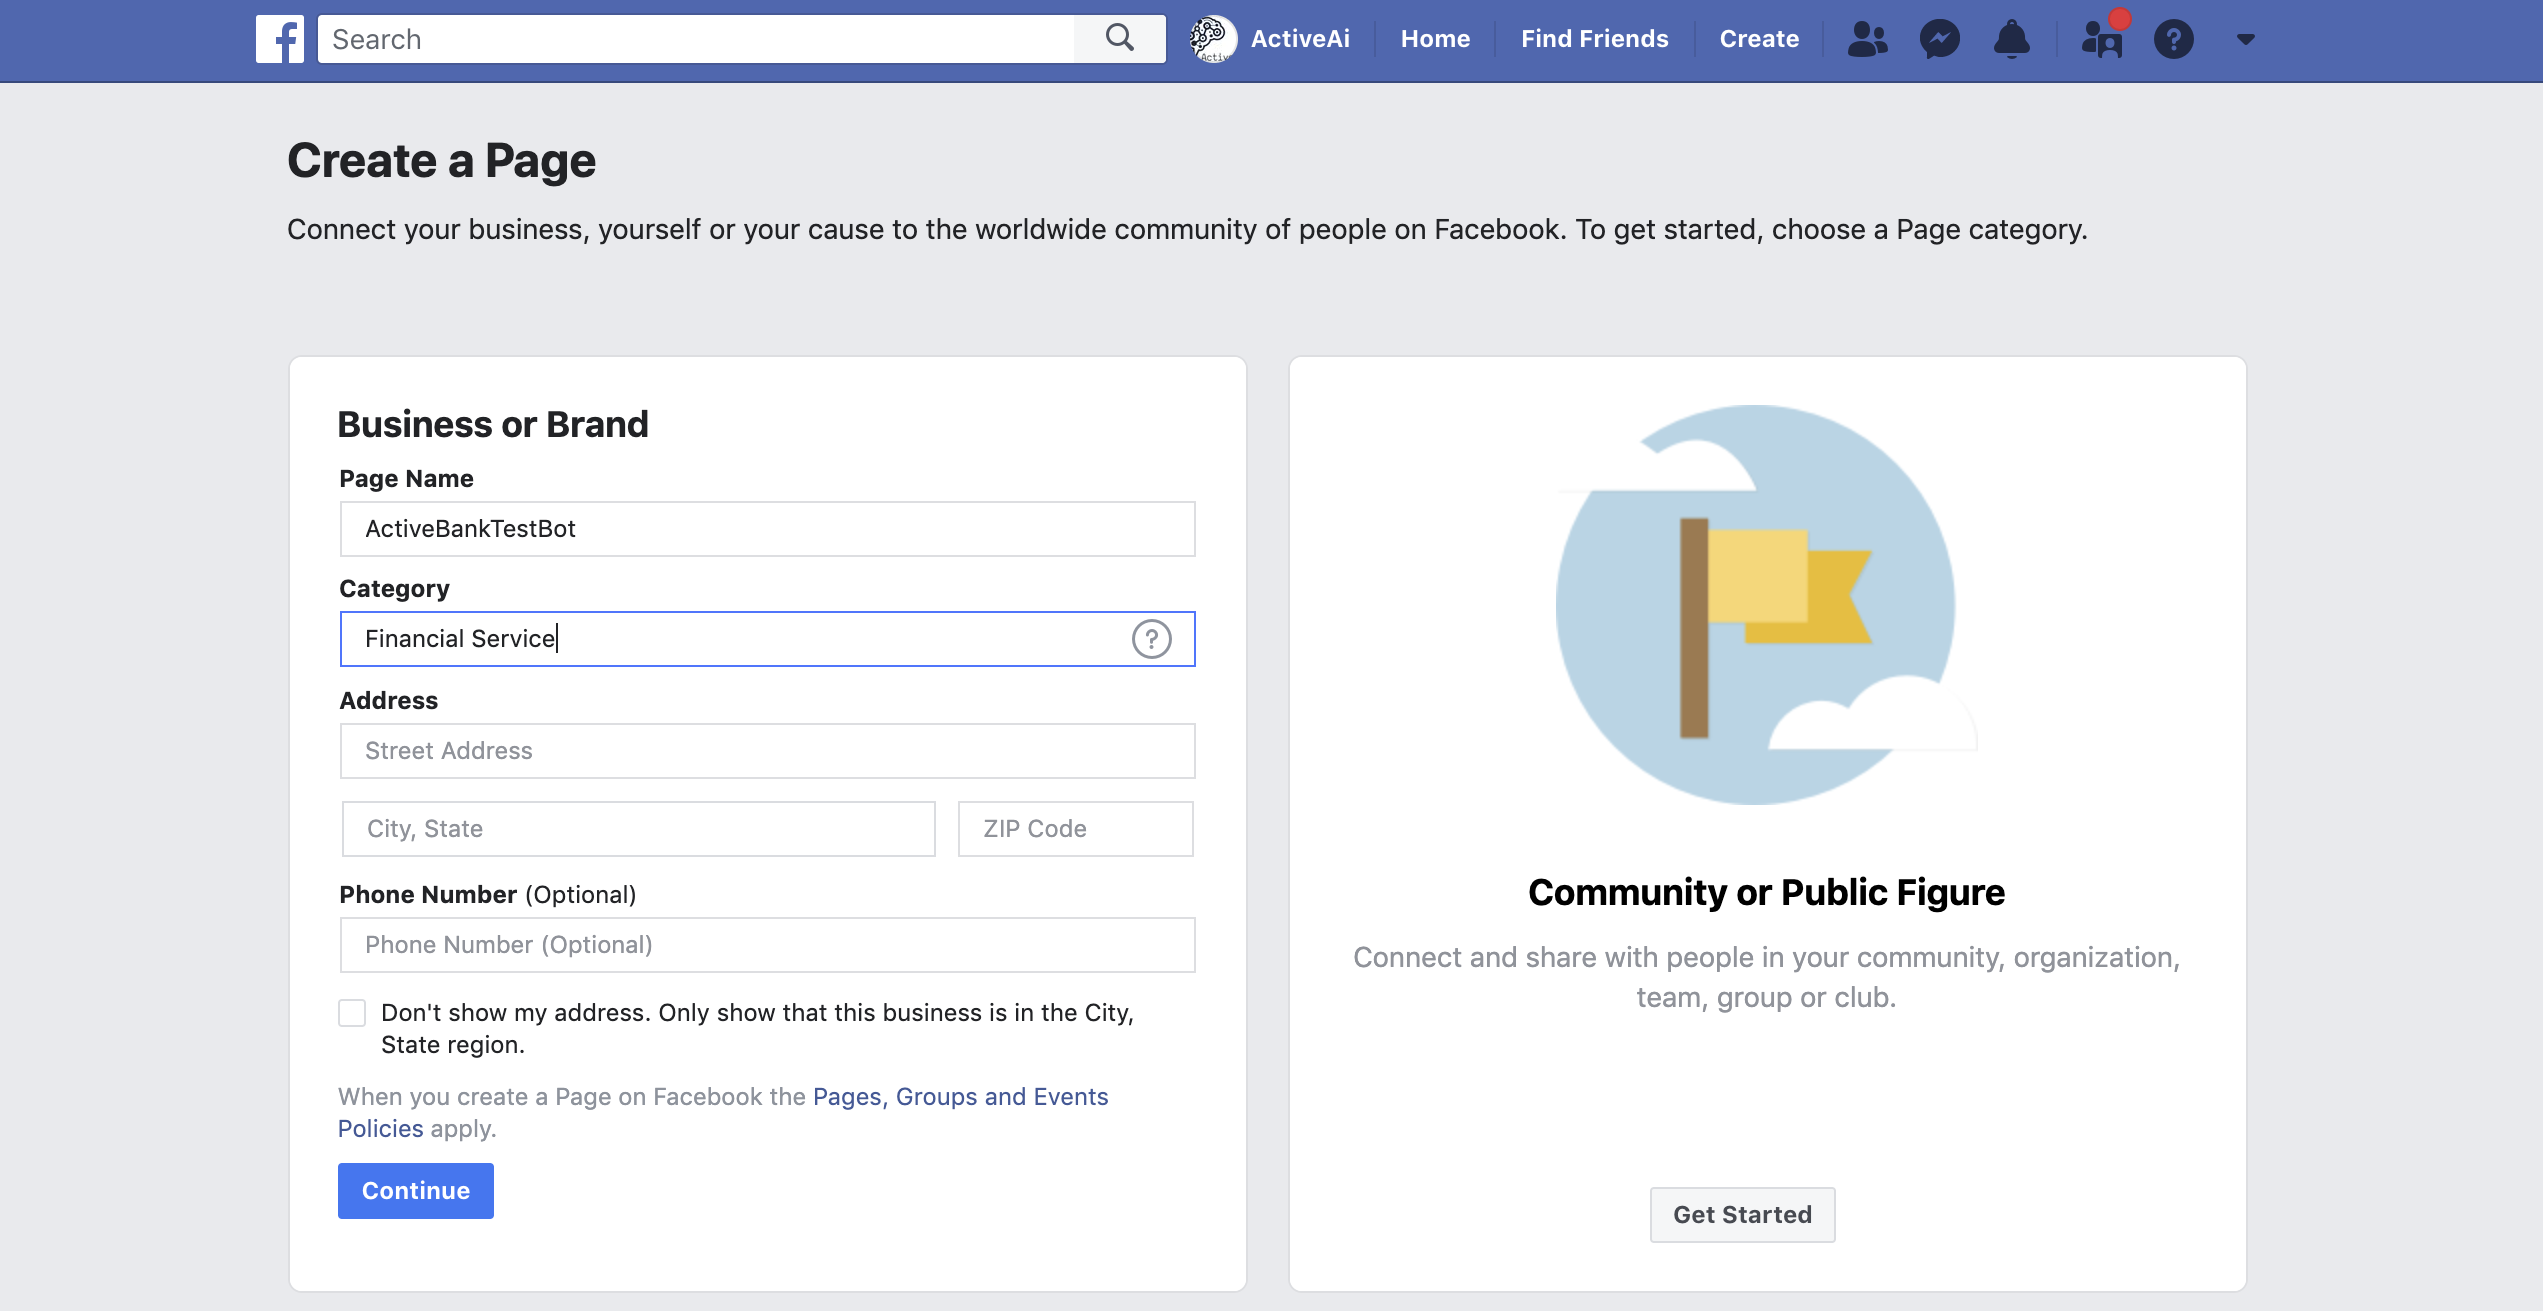
Your Facebook page is created now!
3. Create a Facebook App
- Goto Create Facebook App
- Click on My Apps, click on Create App, Enter Display name & Contact email
- Click on Create App ID
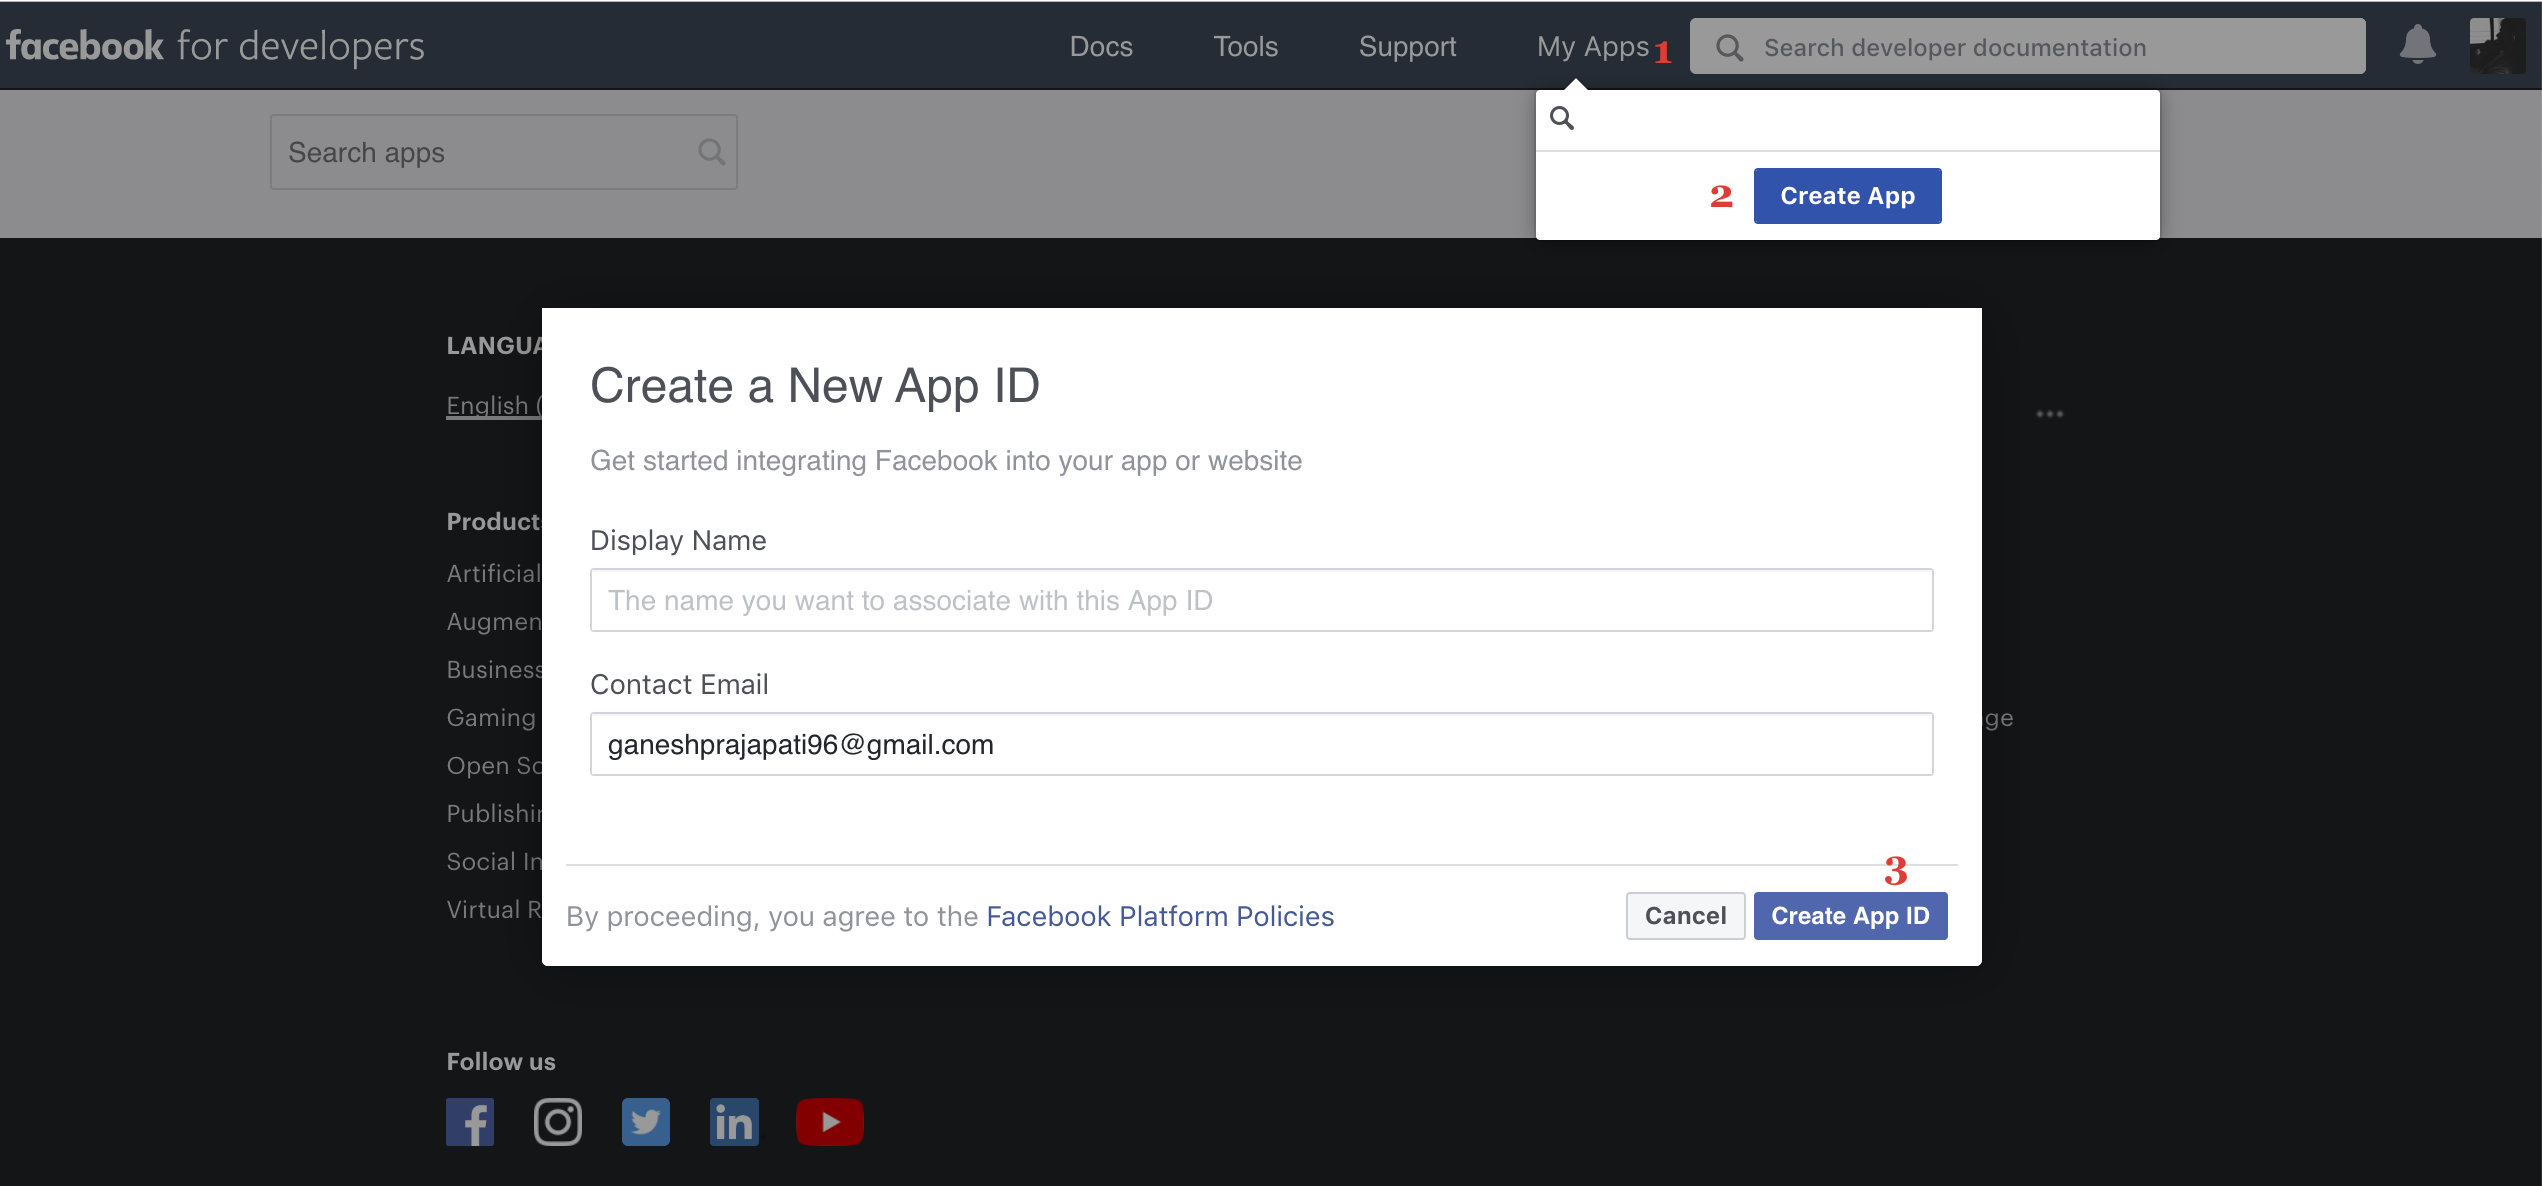
- You will be redirected to the following page, In Add, a Product section Click on Messanger setup
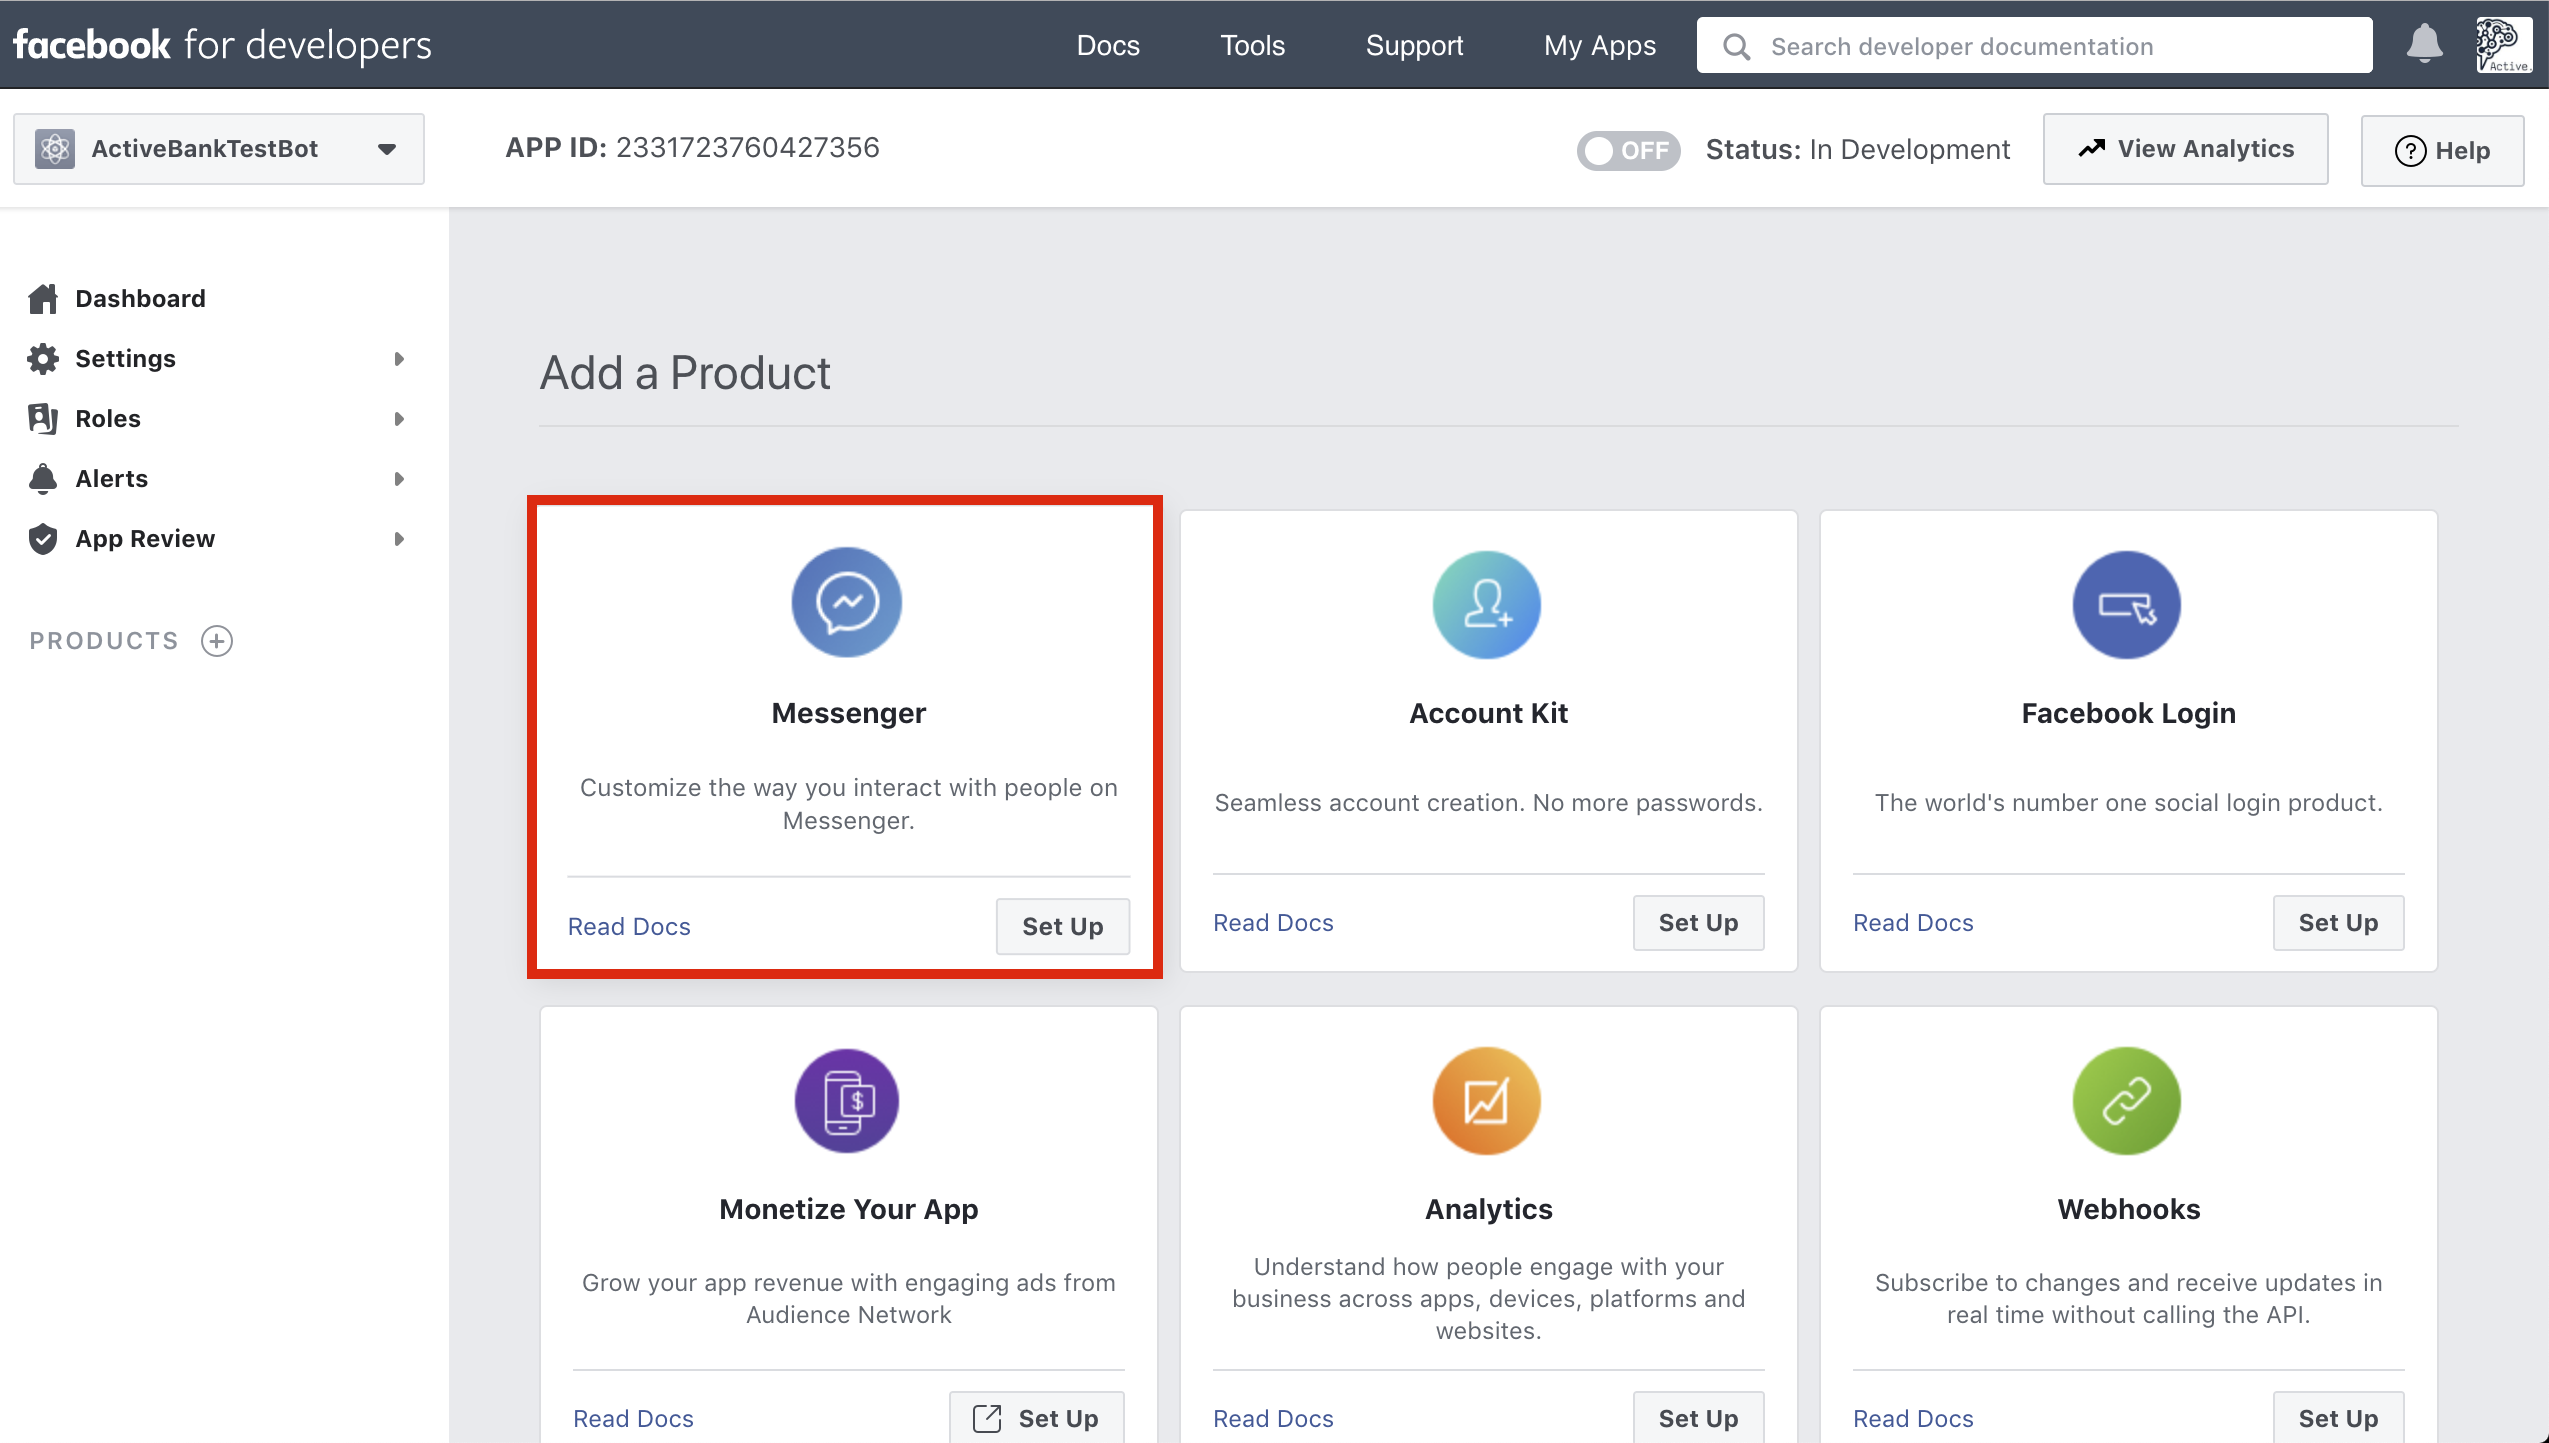
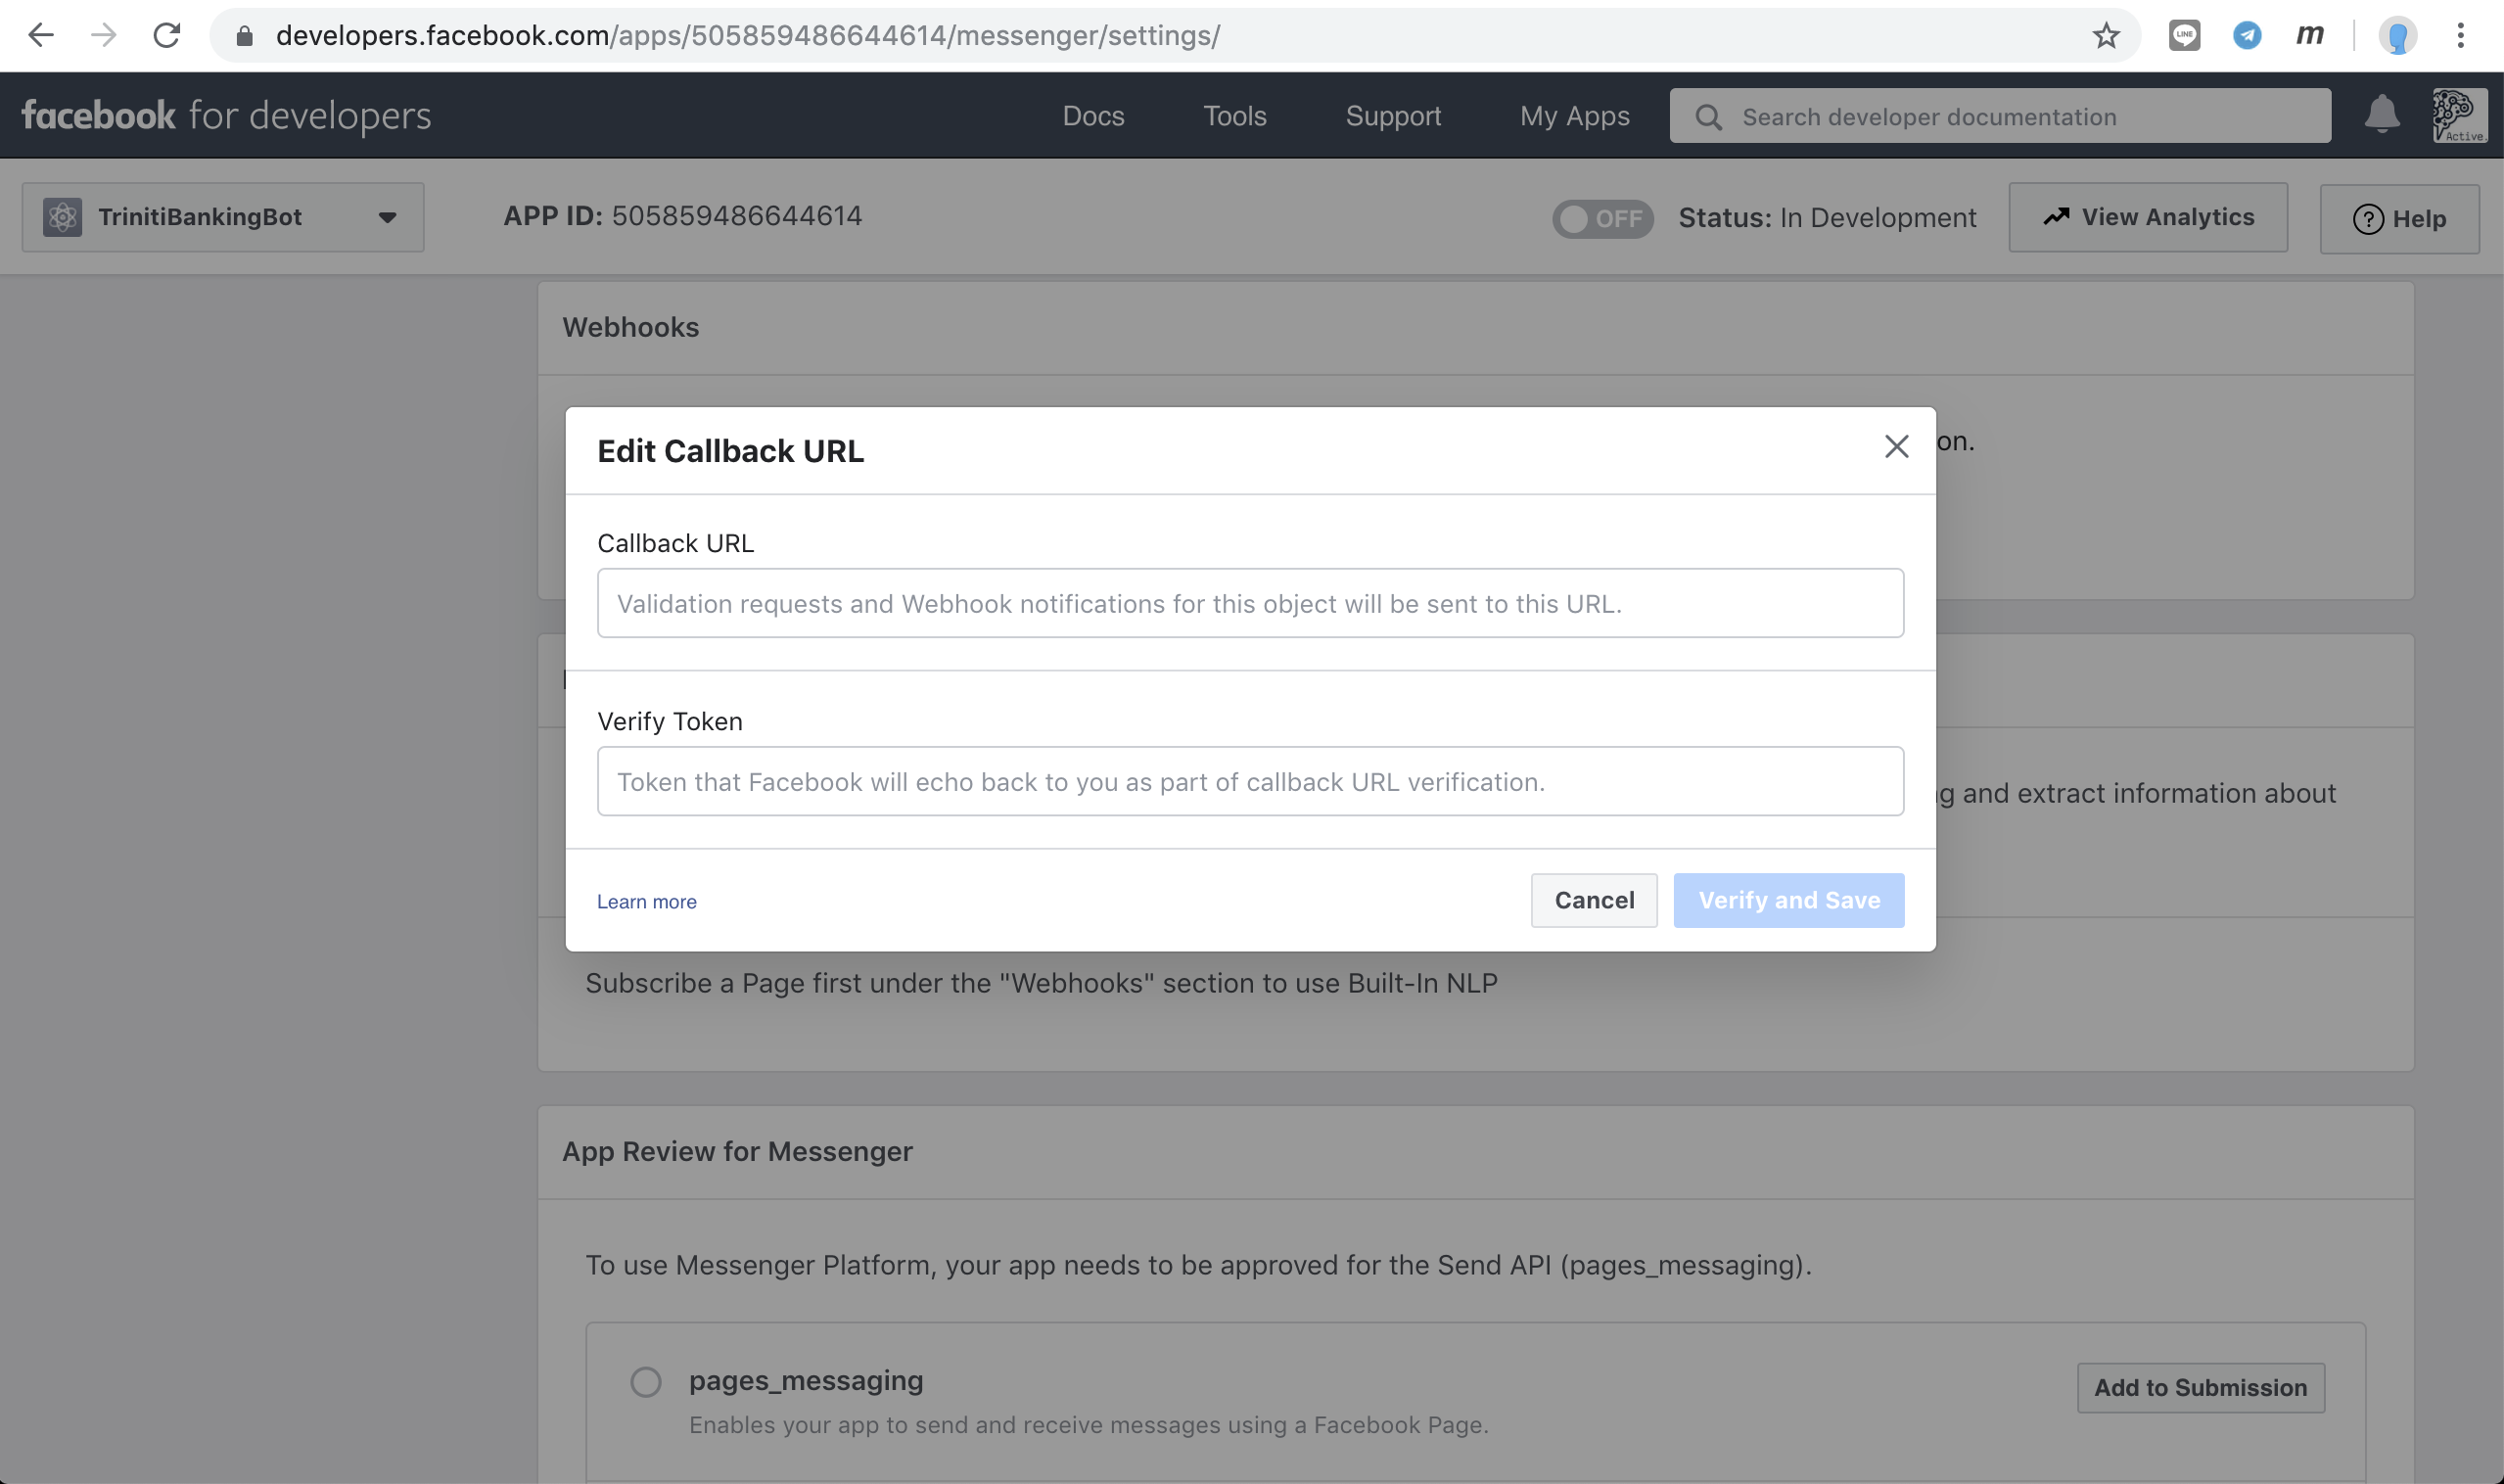
4. Configure Webhook
- On the Next page In the 'Webhooks' section of the Messenger settings console, click on the 'Add call back URL' button.

- Copy the Callback URL & Verify Token from triniti.ai page, and paste it under Call back URL & Verify Token field of webhooks section, Click on 'Verify and Save'
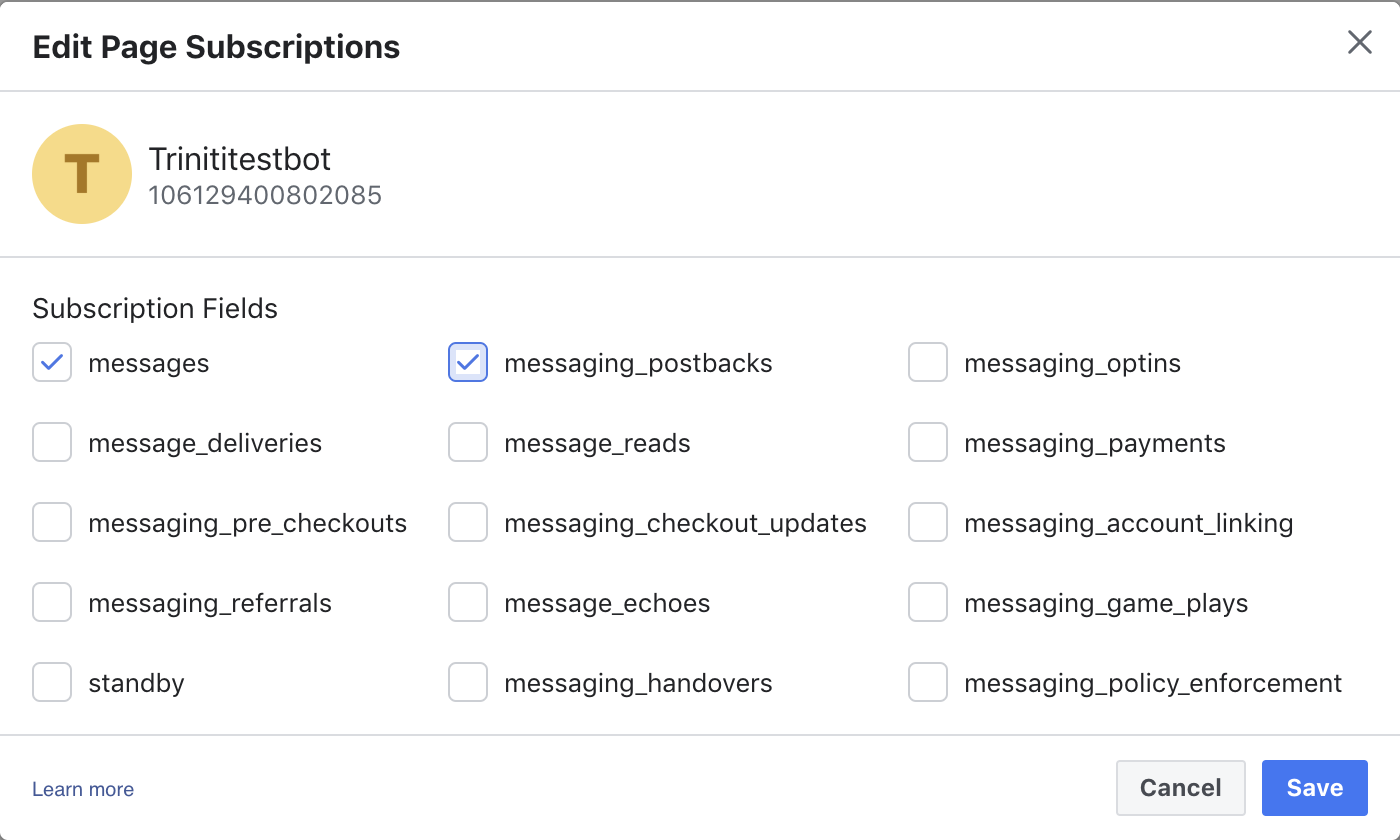
- Below to Webhooks Under 'Pages', Click on 'Add or Remove pages' to add your created Facebook page and click on 'Add Subscription' to select the webhook events you want to be delivered to your webhook.
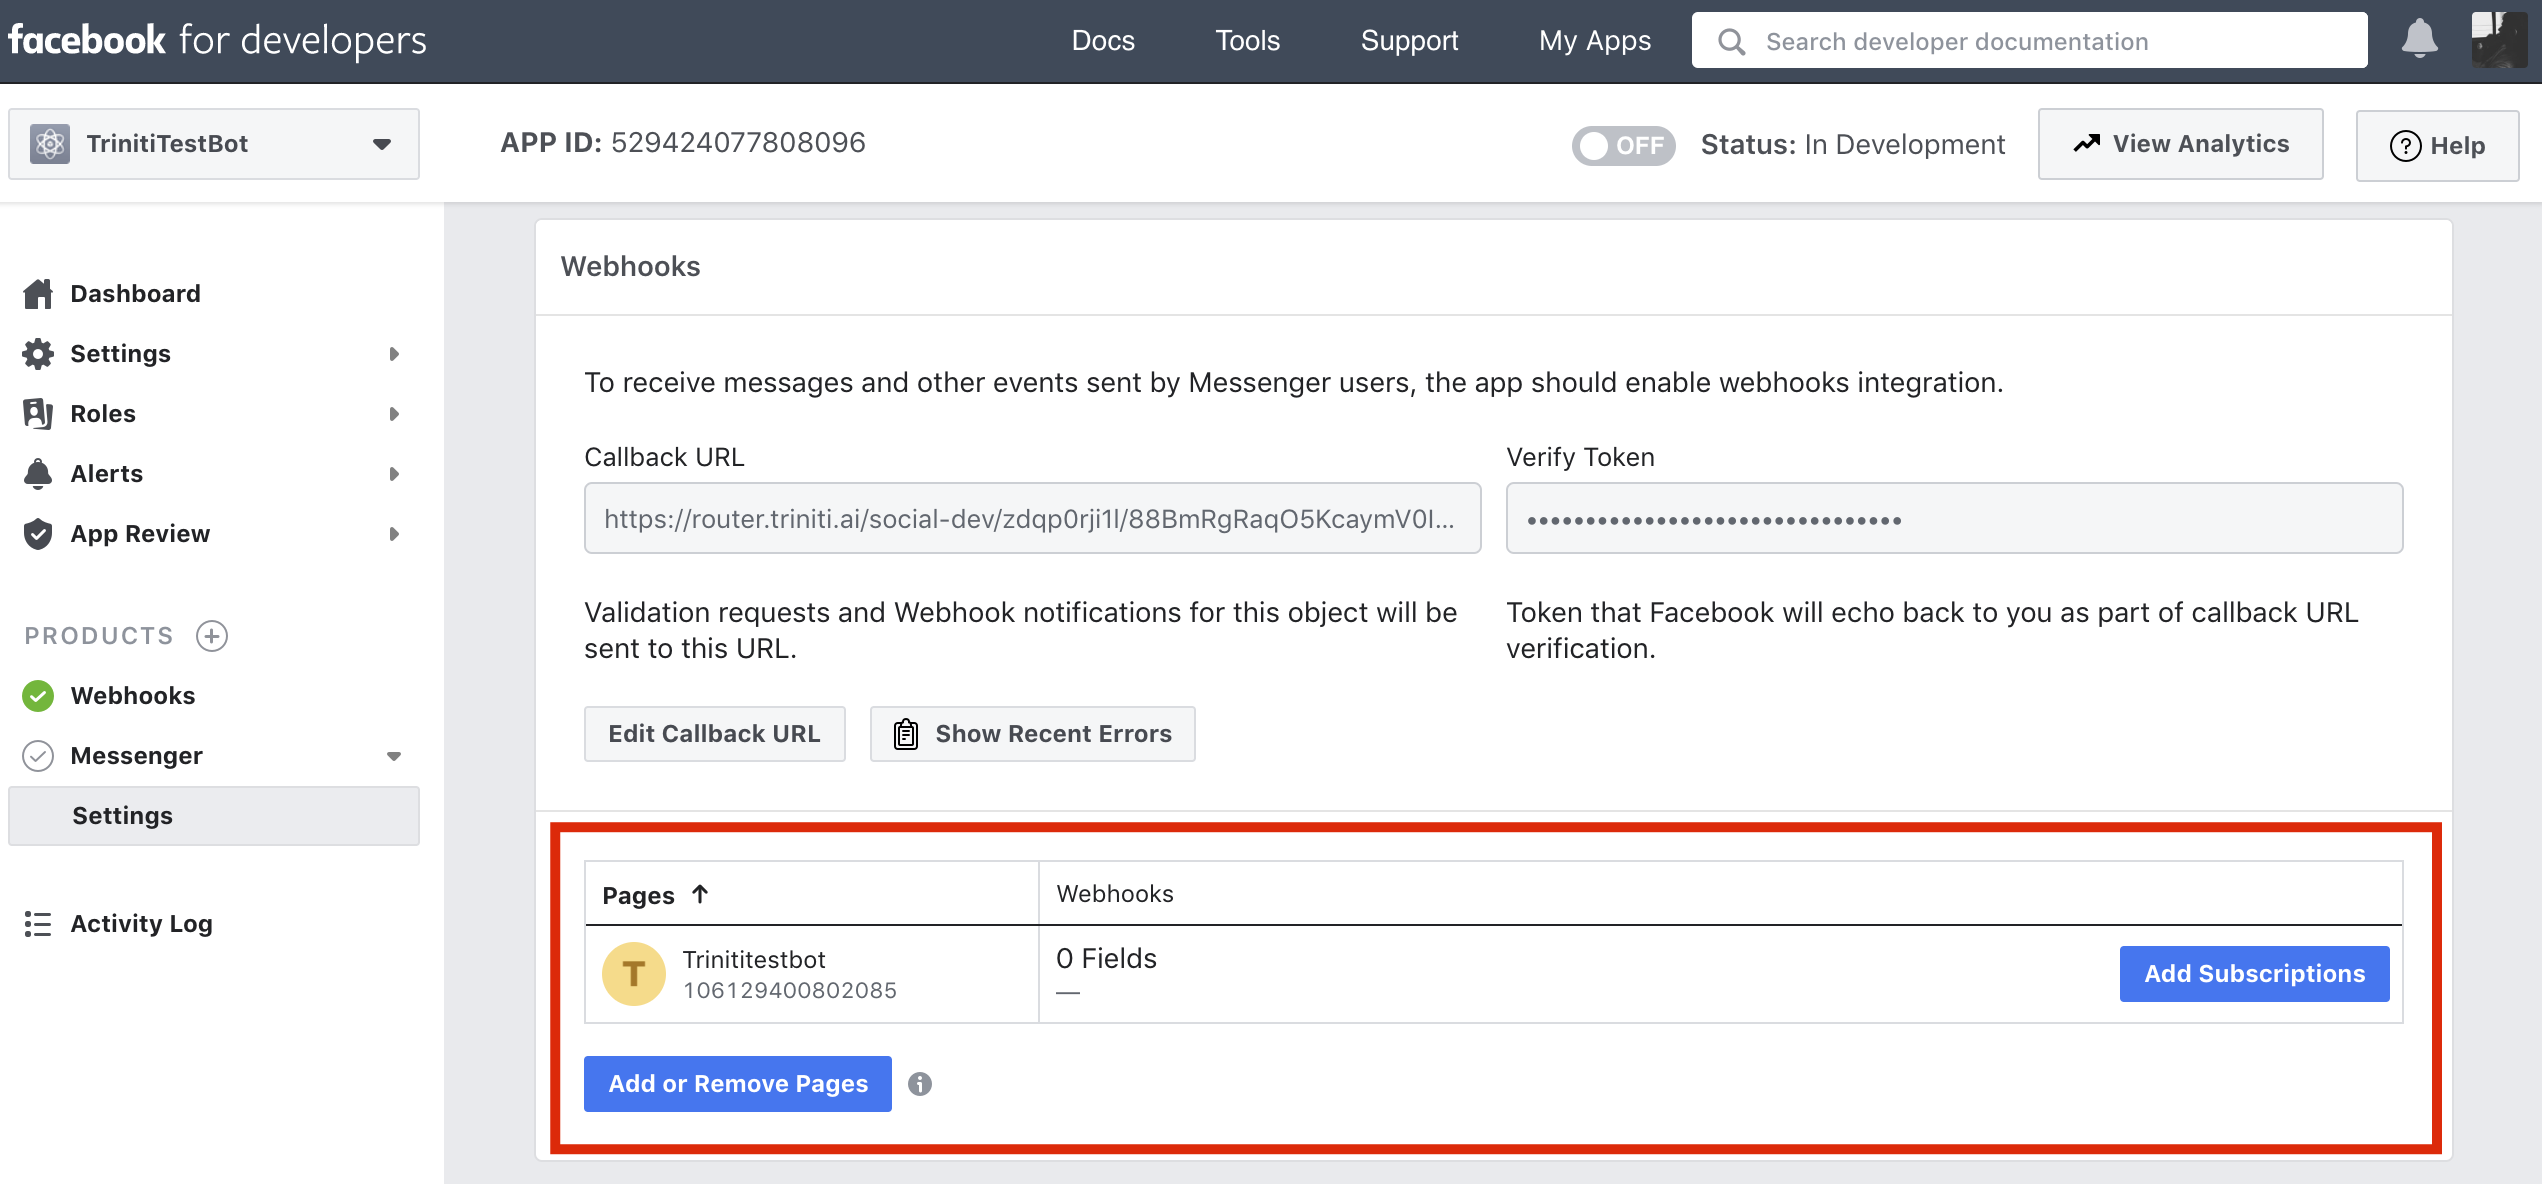
- At a minimum, we recommend you choose messages and messaging_postbacks to get started.
5. Configure Page Access Token And Secret Key Triniti requires the page access token for sending messages from the bot. Also, Secret Key is required to verify the requests are coming from Facebook, not from any unauthorized identity.
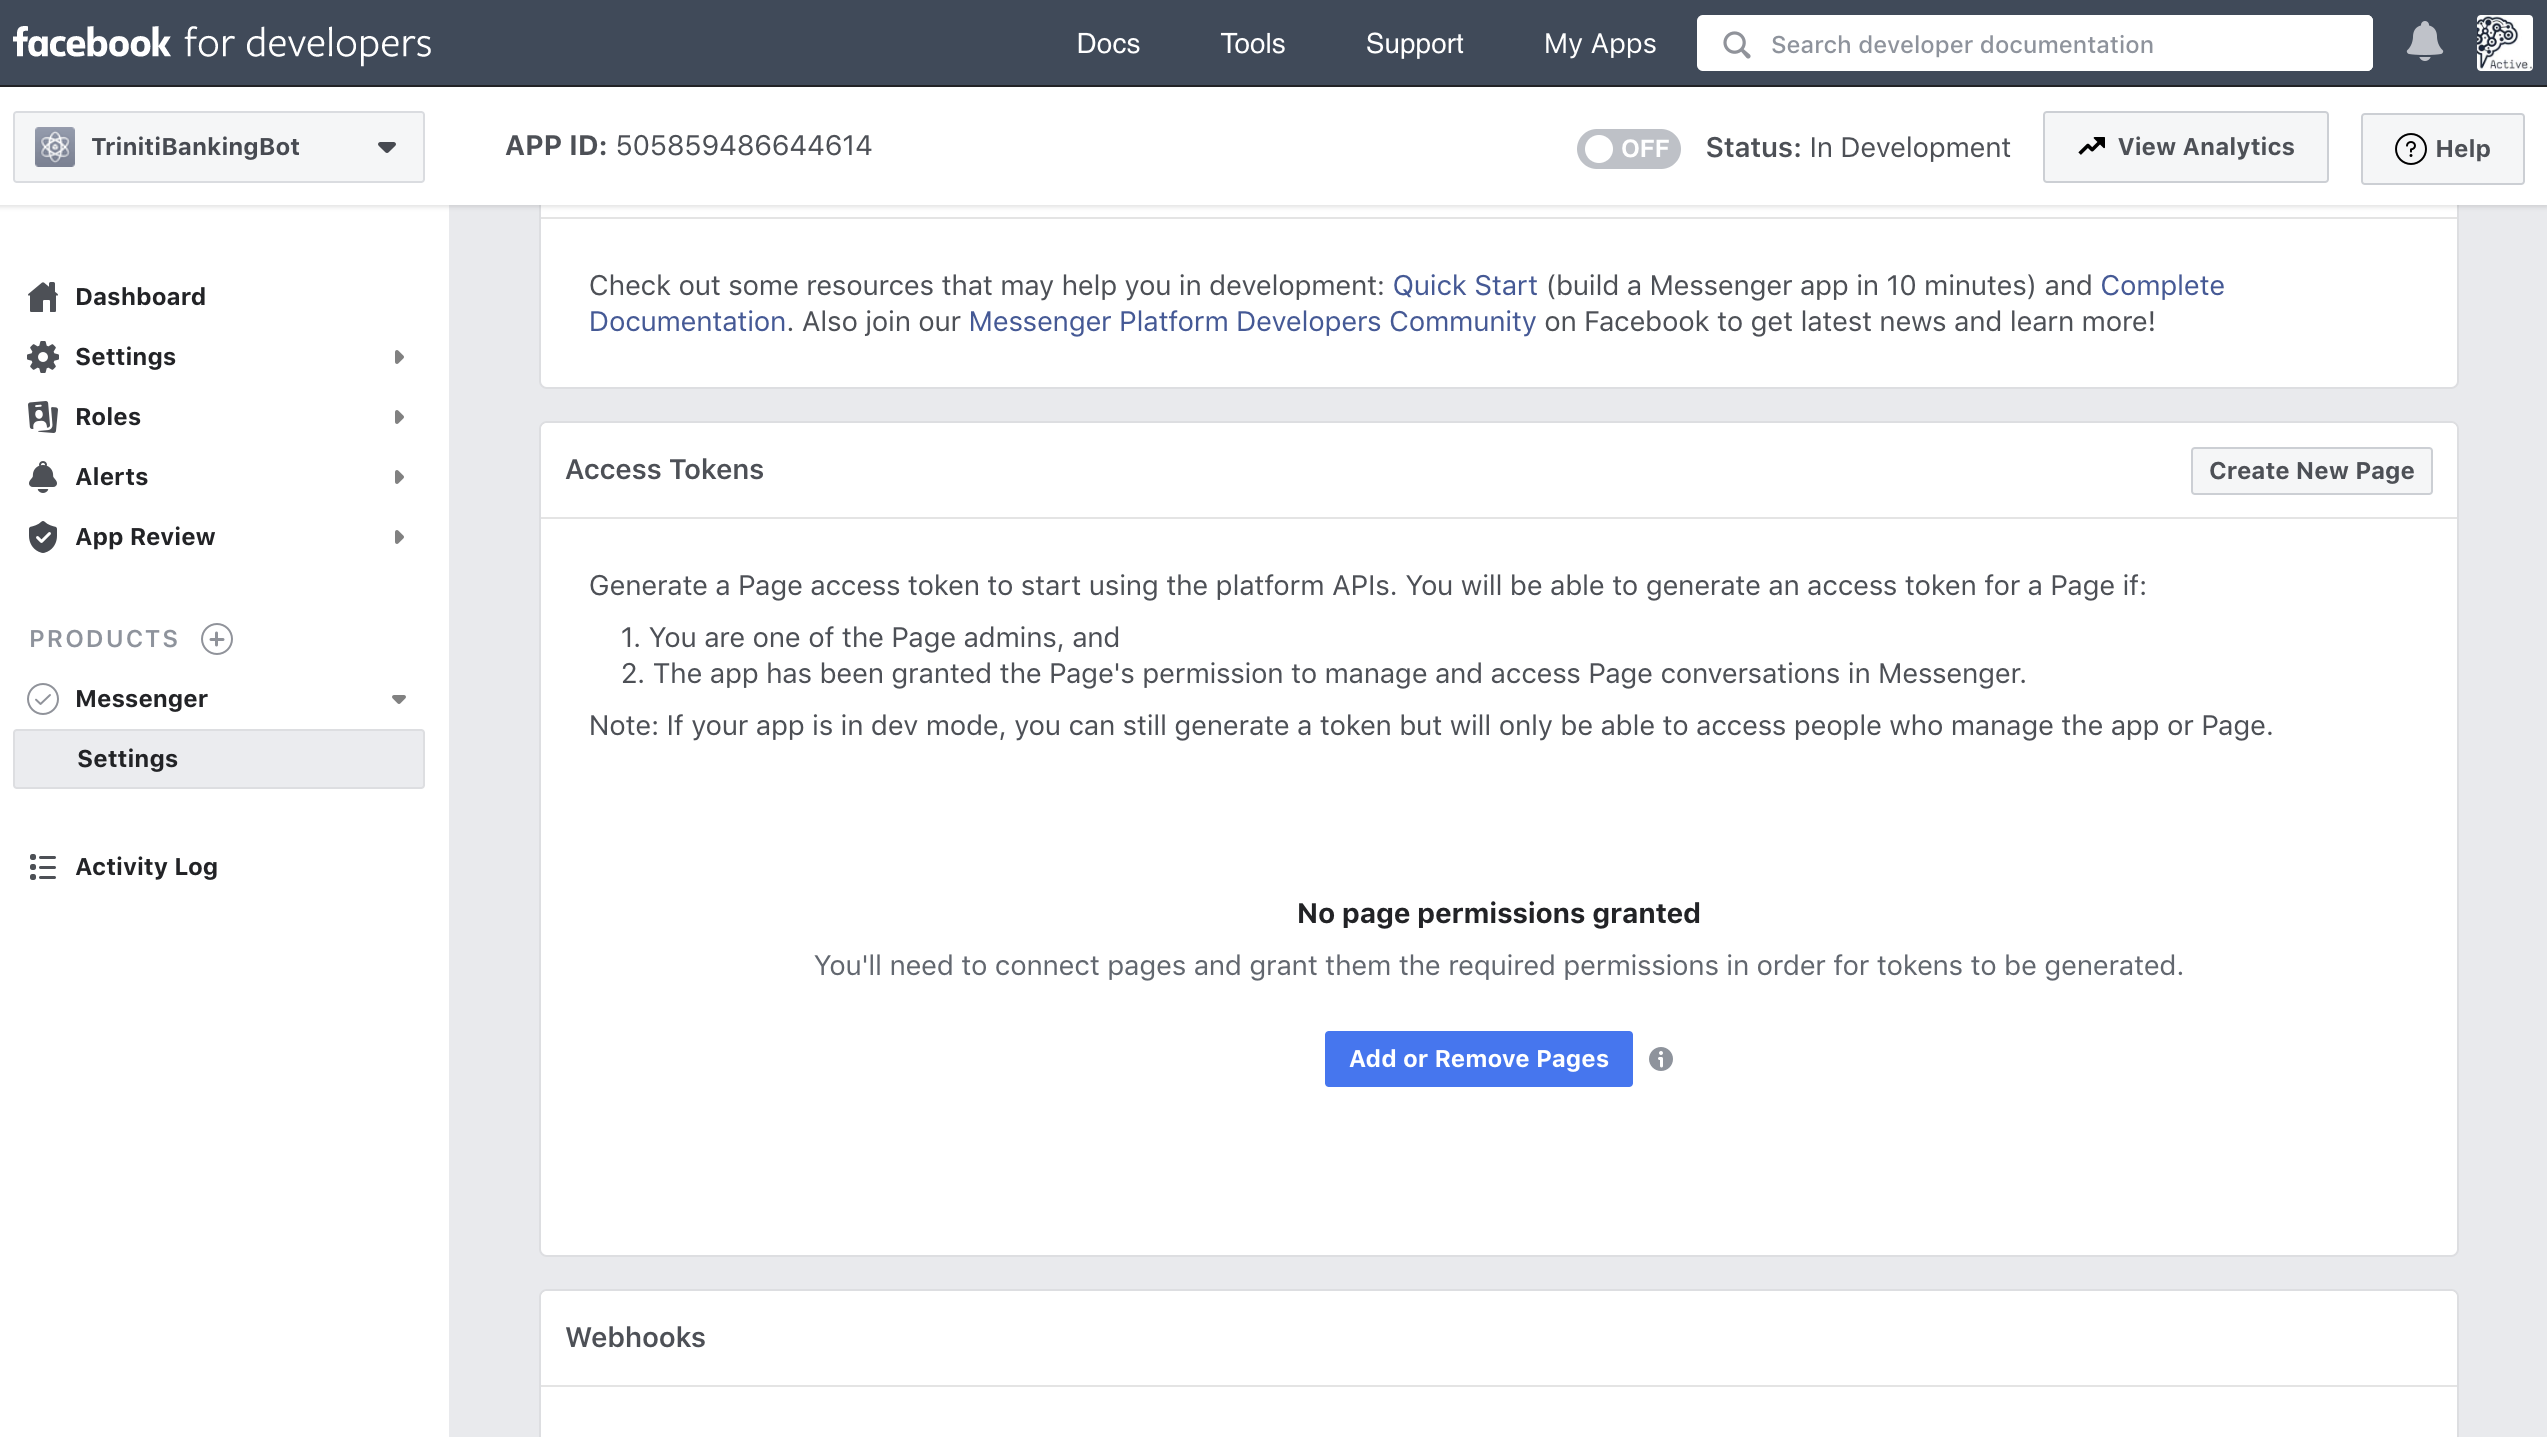
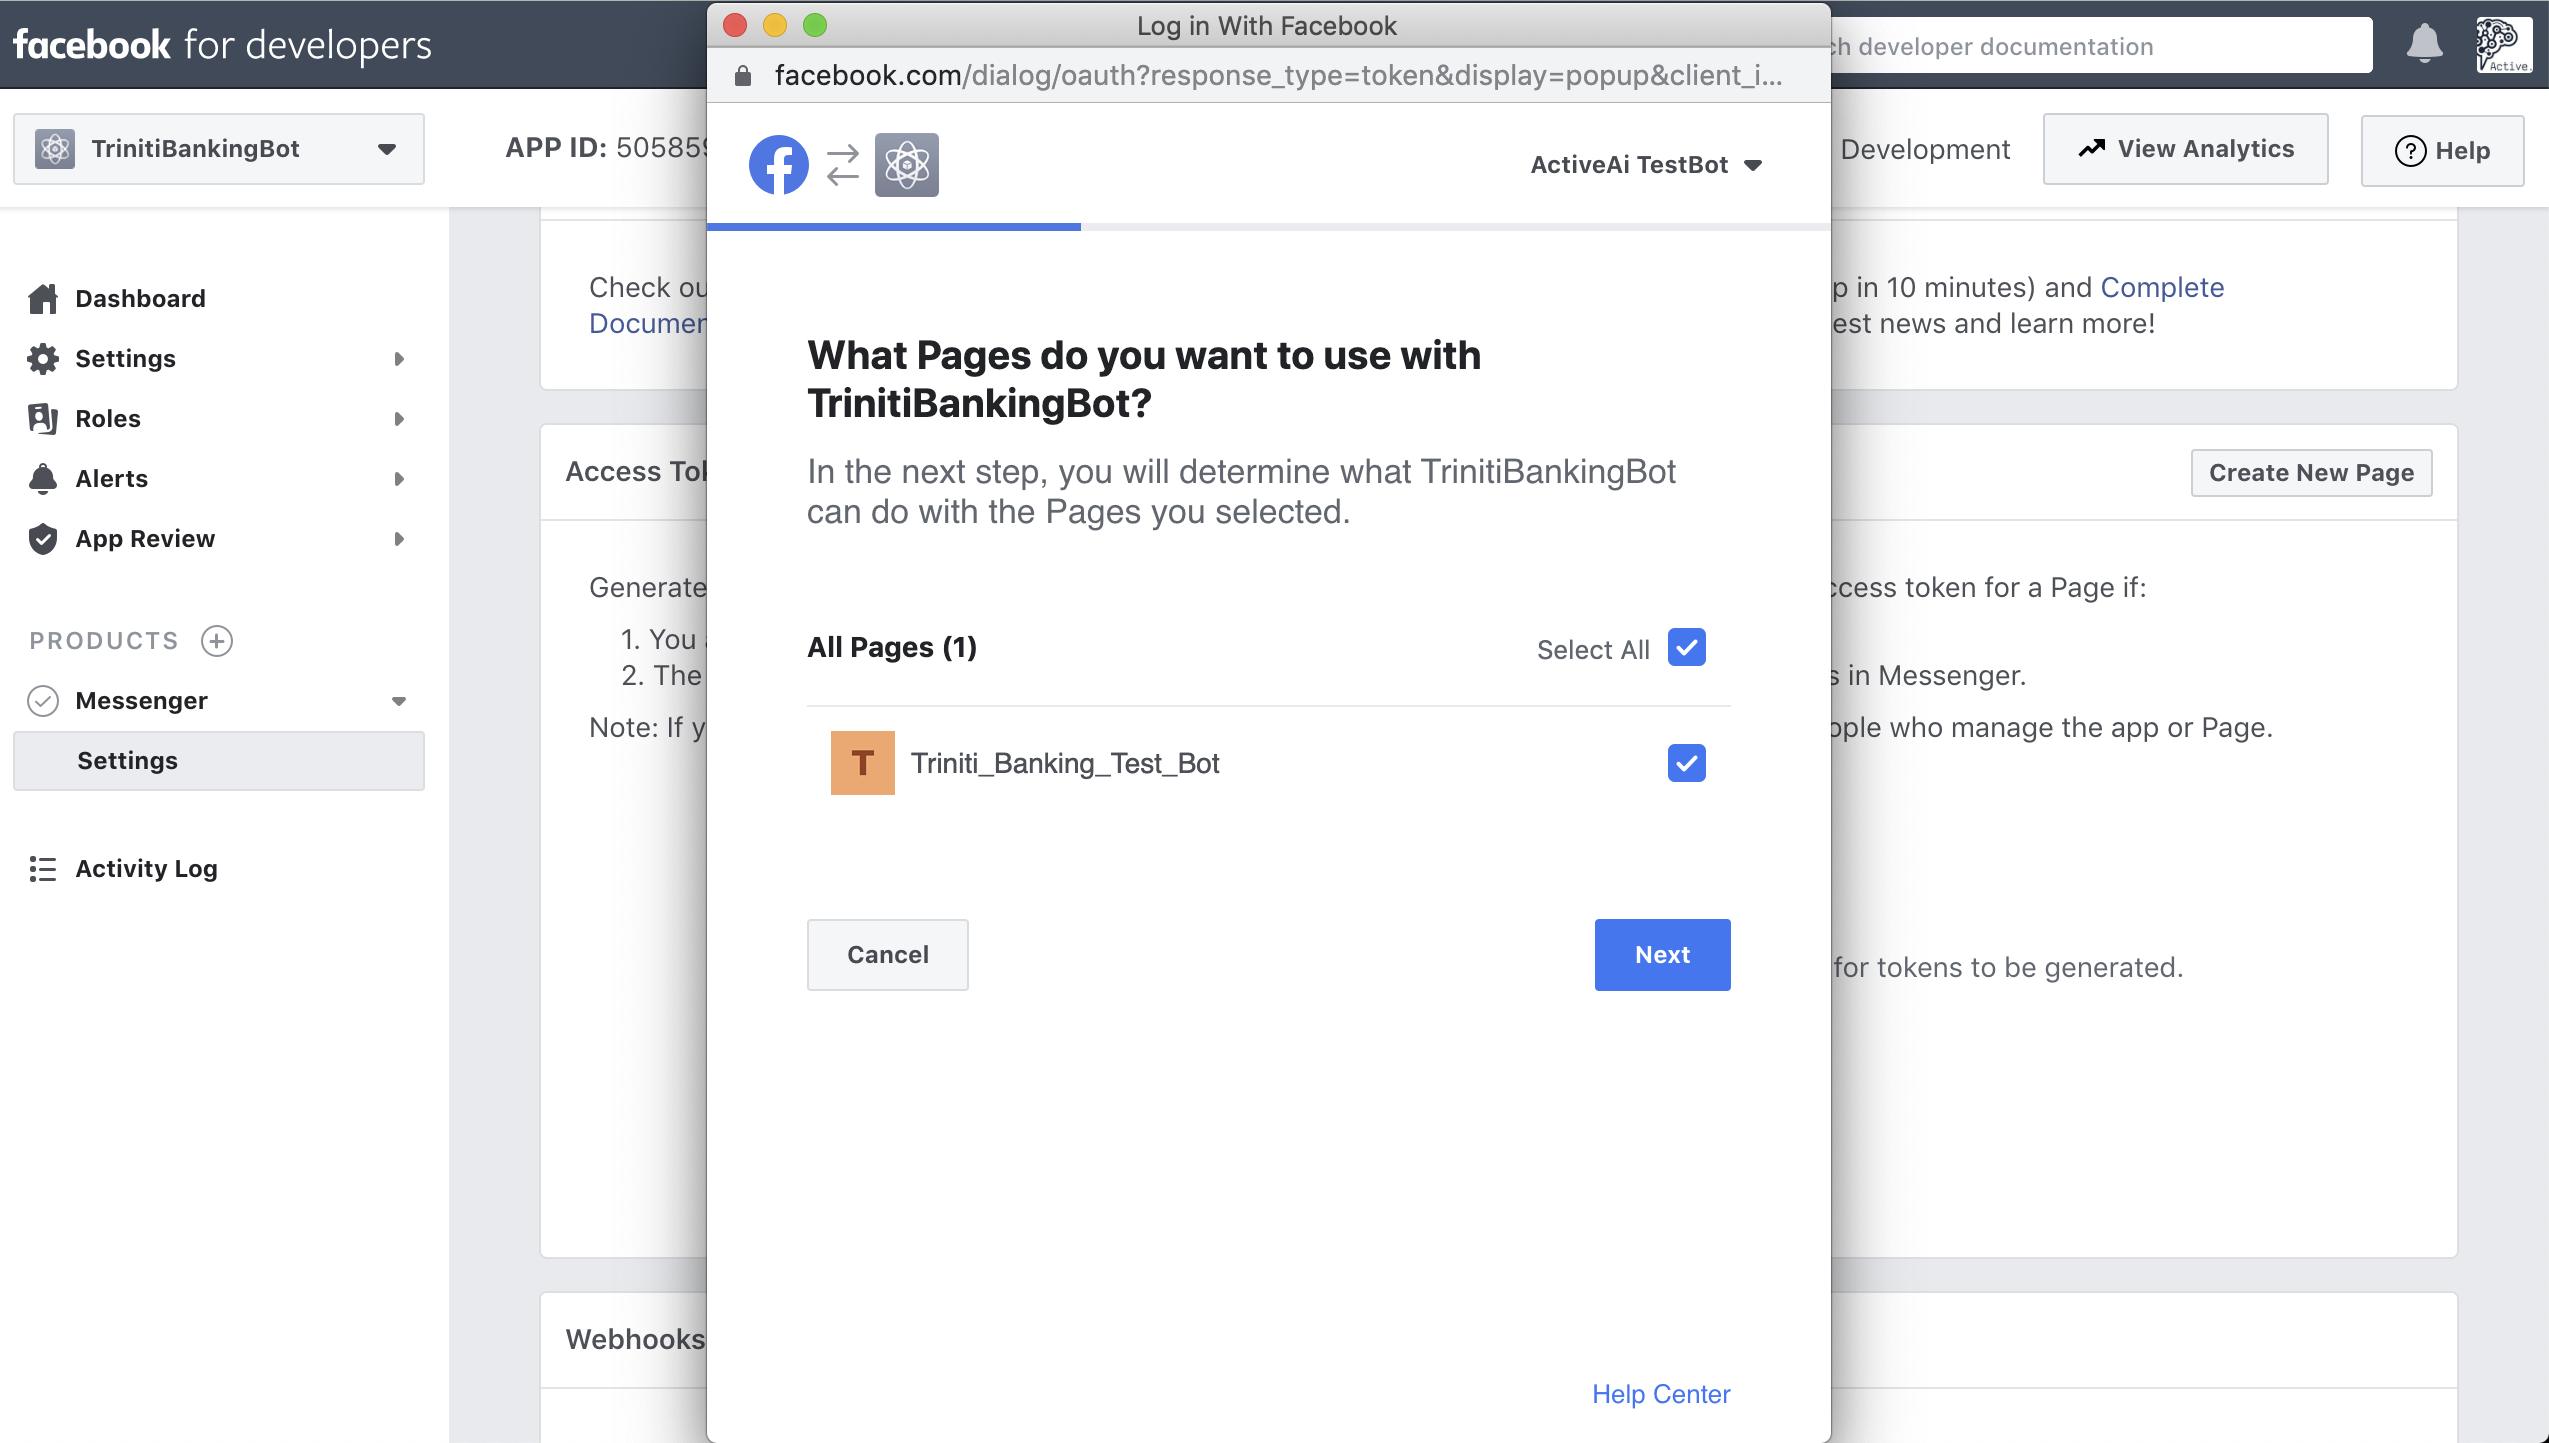
- Click on 'Add or Remove pages' under 'Access Tokens' on the same page, (If you have left the page then You can get it Under Products --> Messenger --> Settings --> Access Tokens)
- Login with your account or continue with your logged-in account and select the page you have created, Click on Next & Done
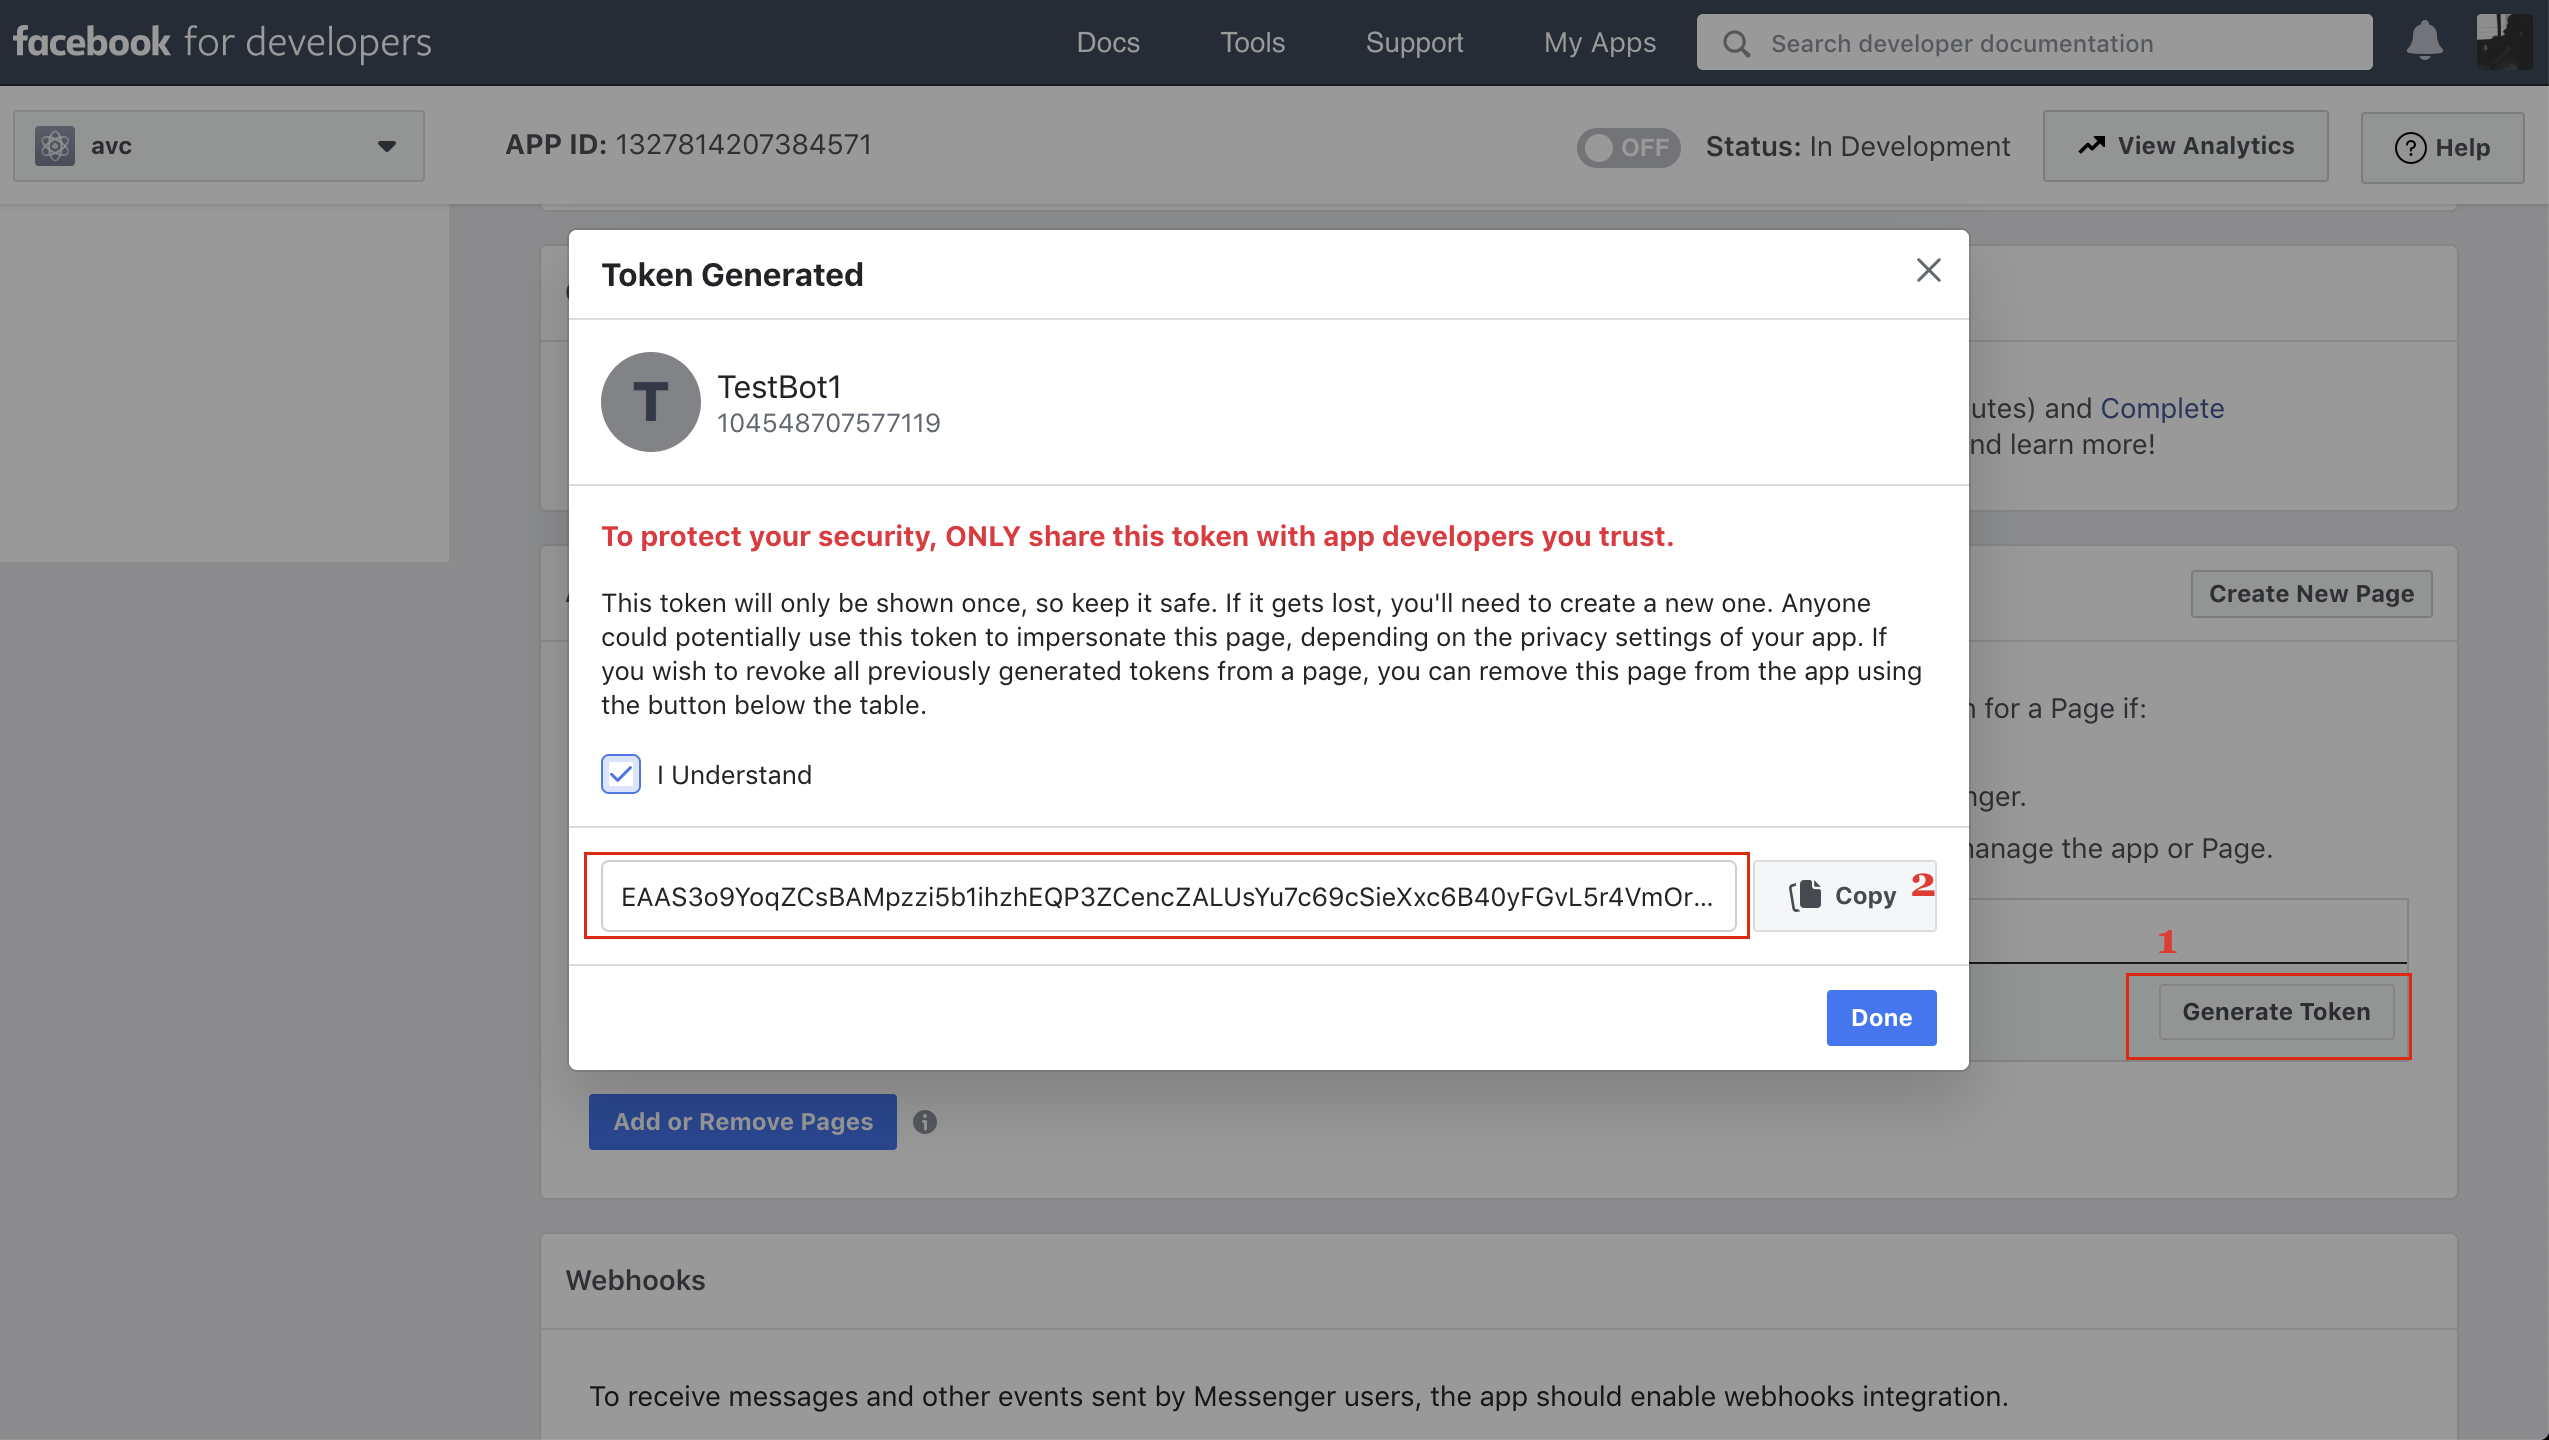
- Goto 'Messanger Settings' & click on 'Generate token' under 'Access Tokens'

- Check mark on the 'I Understand', Copy the Access Token and paste it in the 'Page Access Token' field on triniti.ai
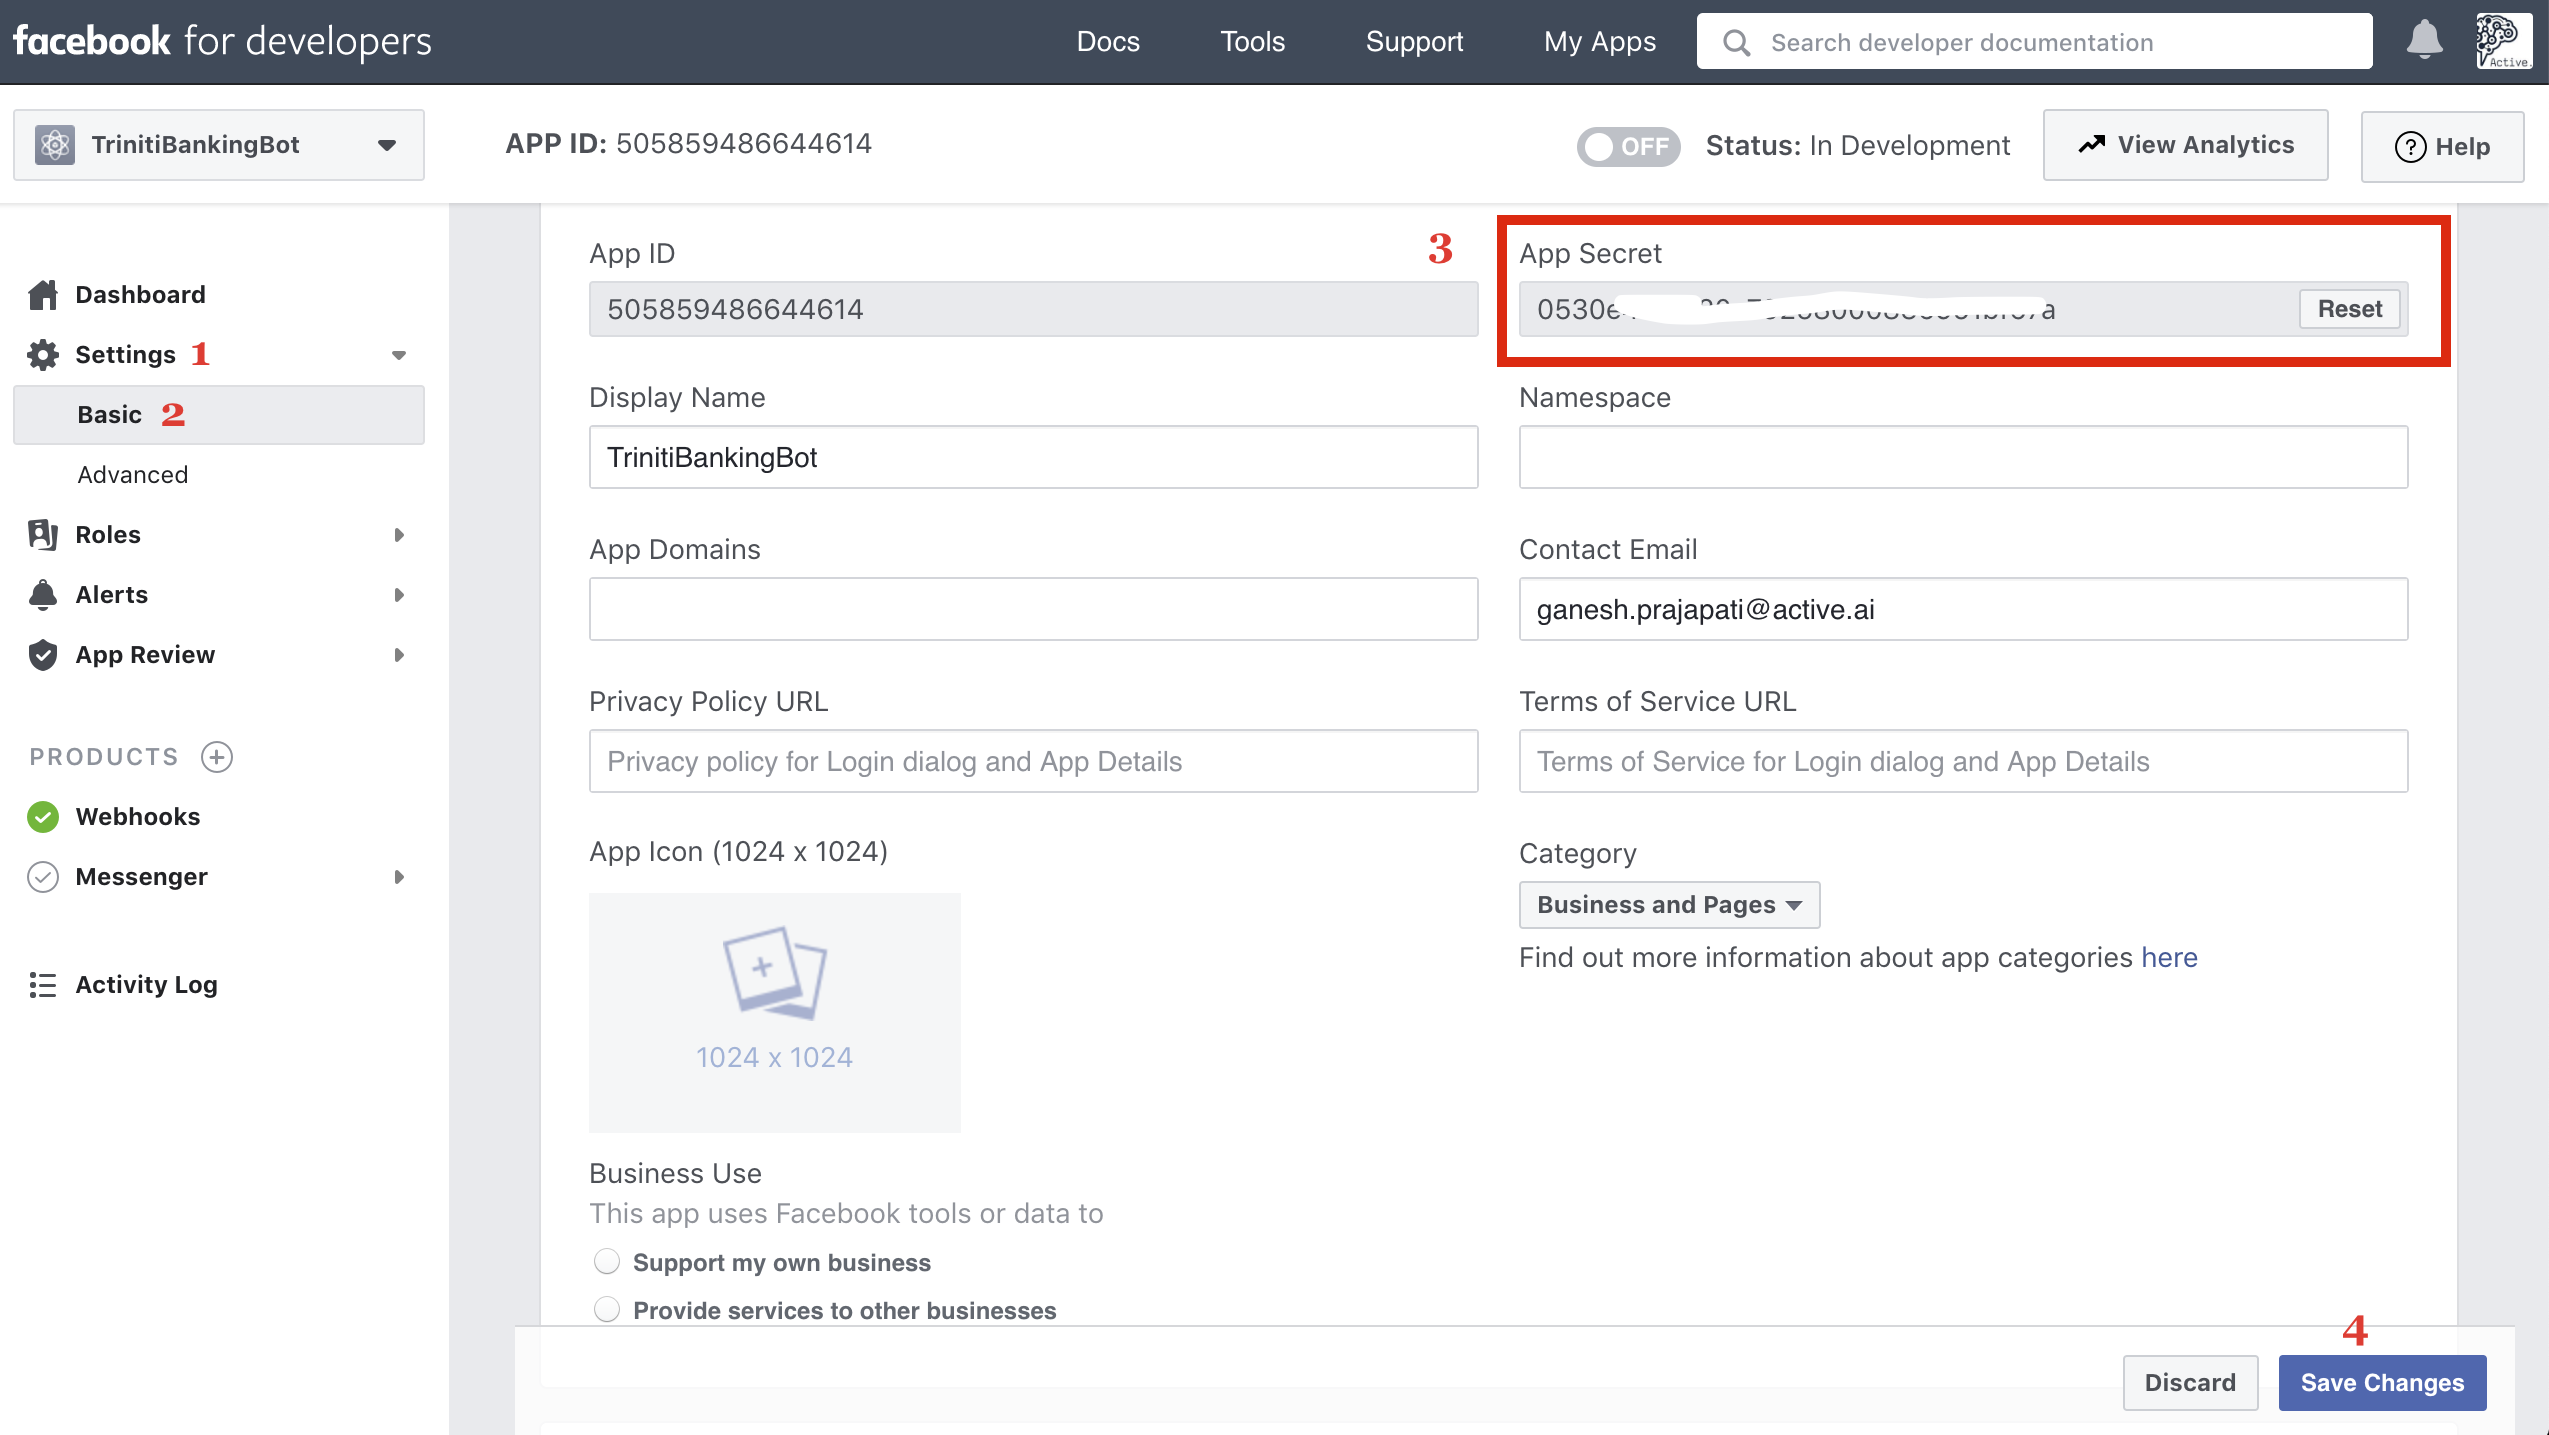
- For Secret Key, Click on Settings then select Basic, Copy the secret key and paste it under 'Secret Key' field on triniti.ai page
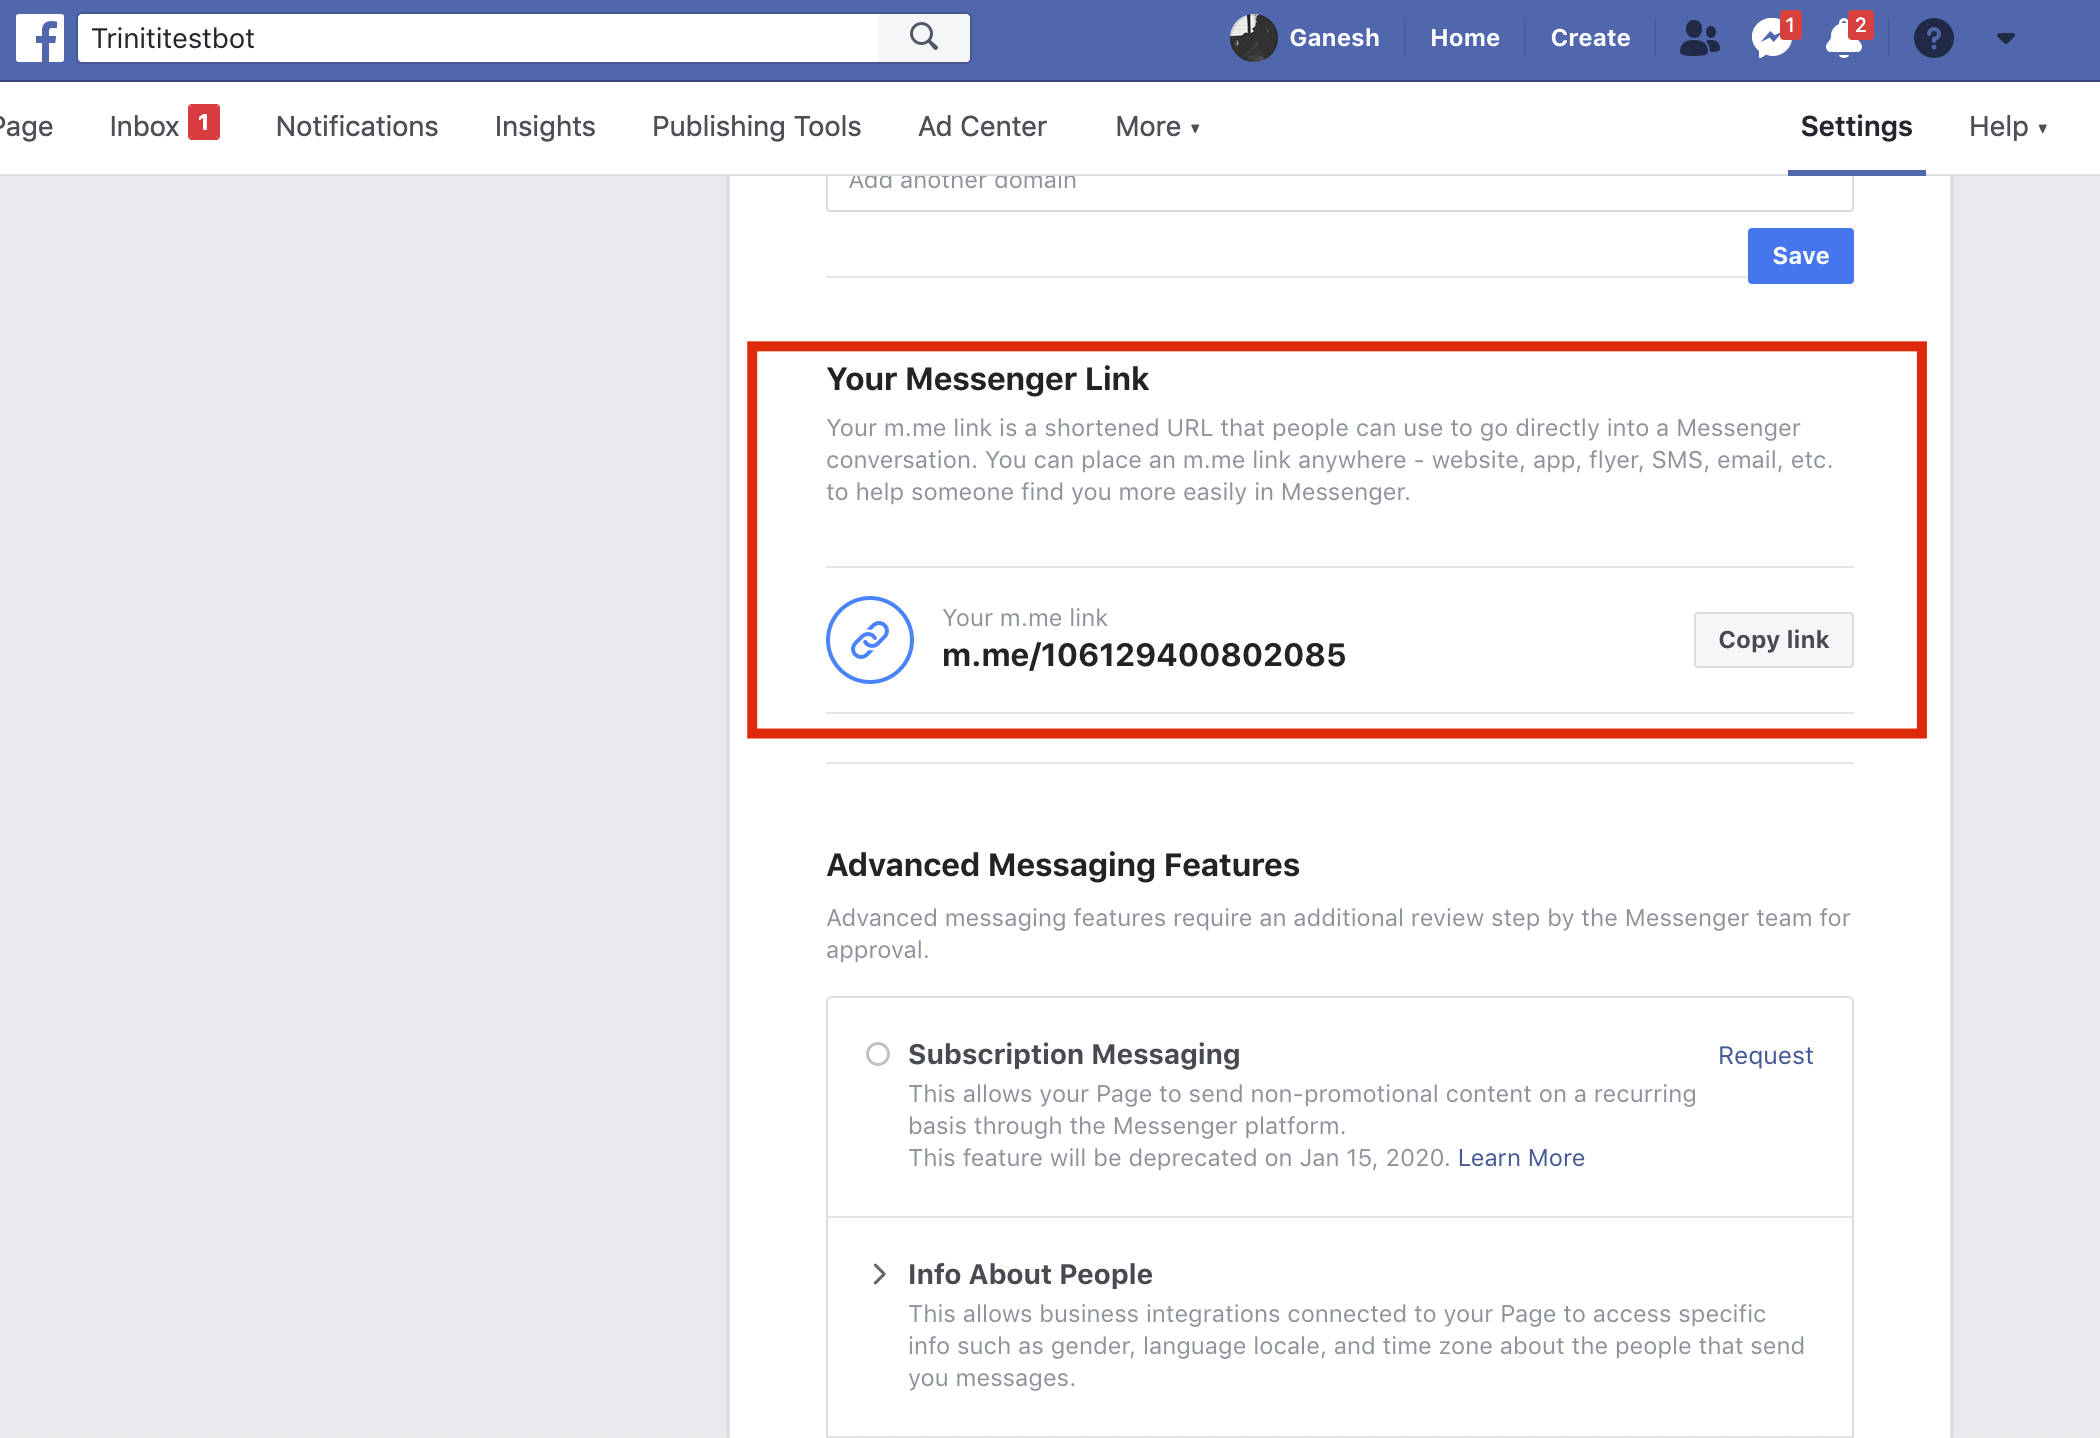
6. Bot username/invitation link
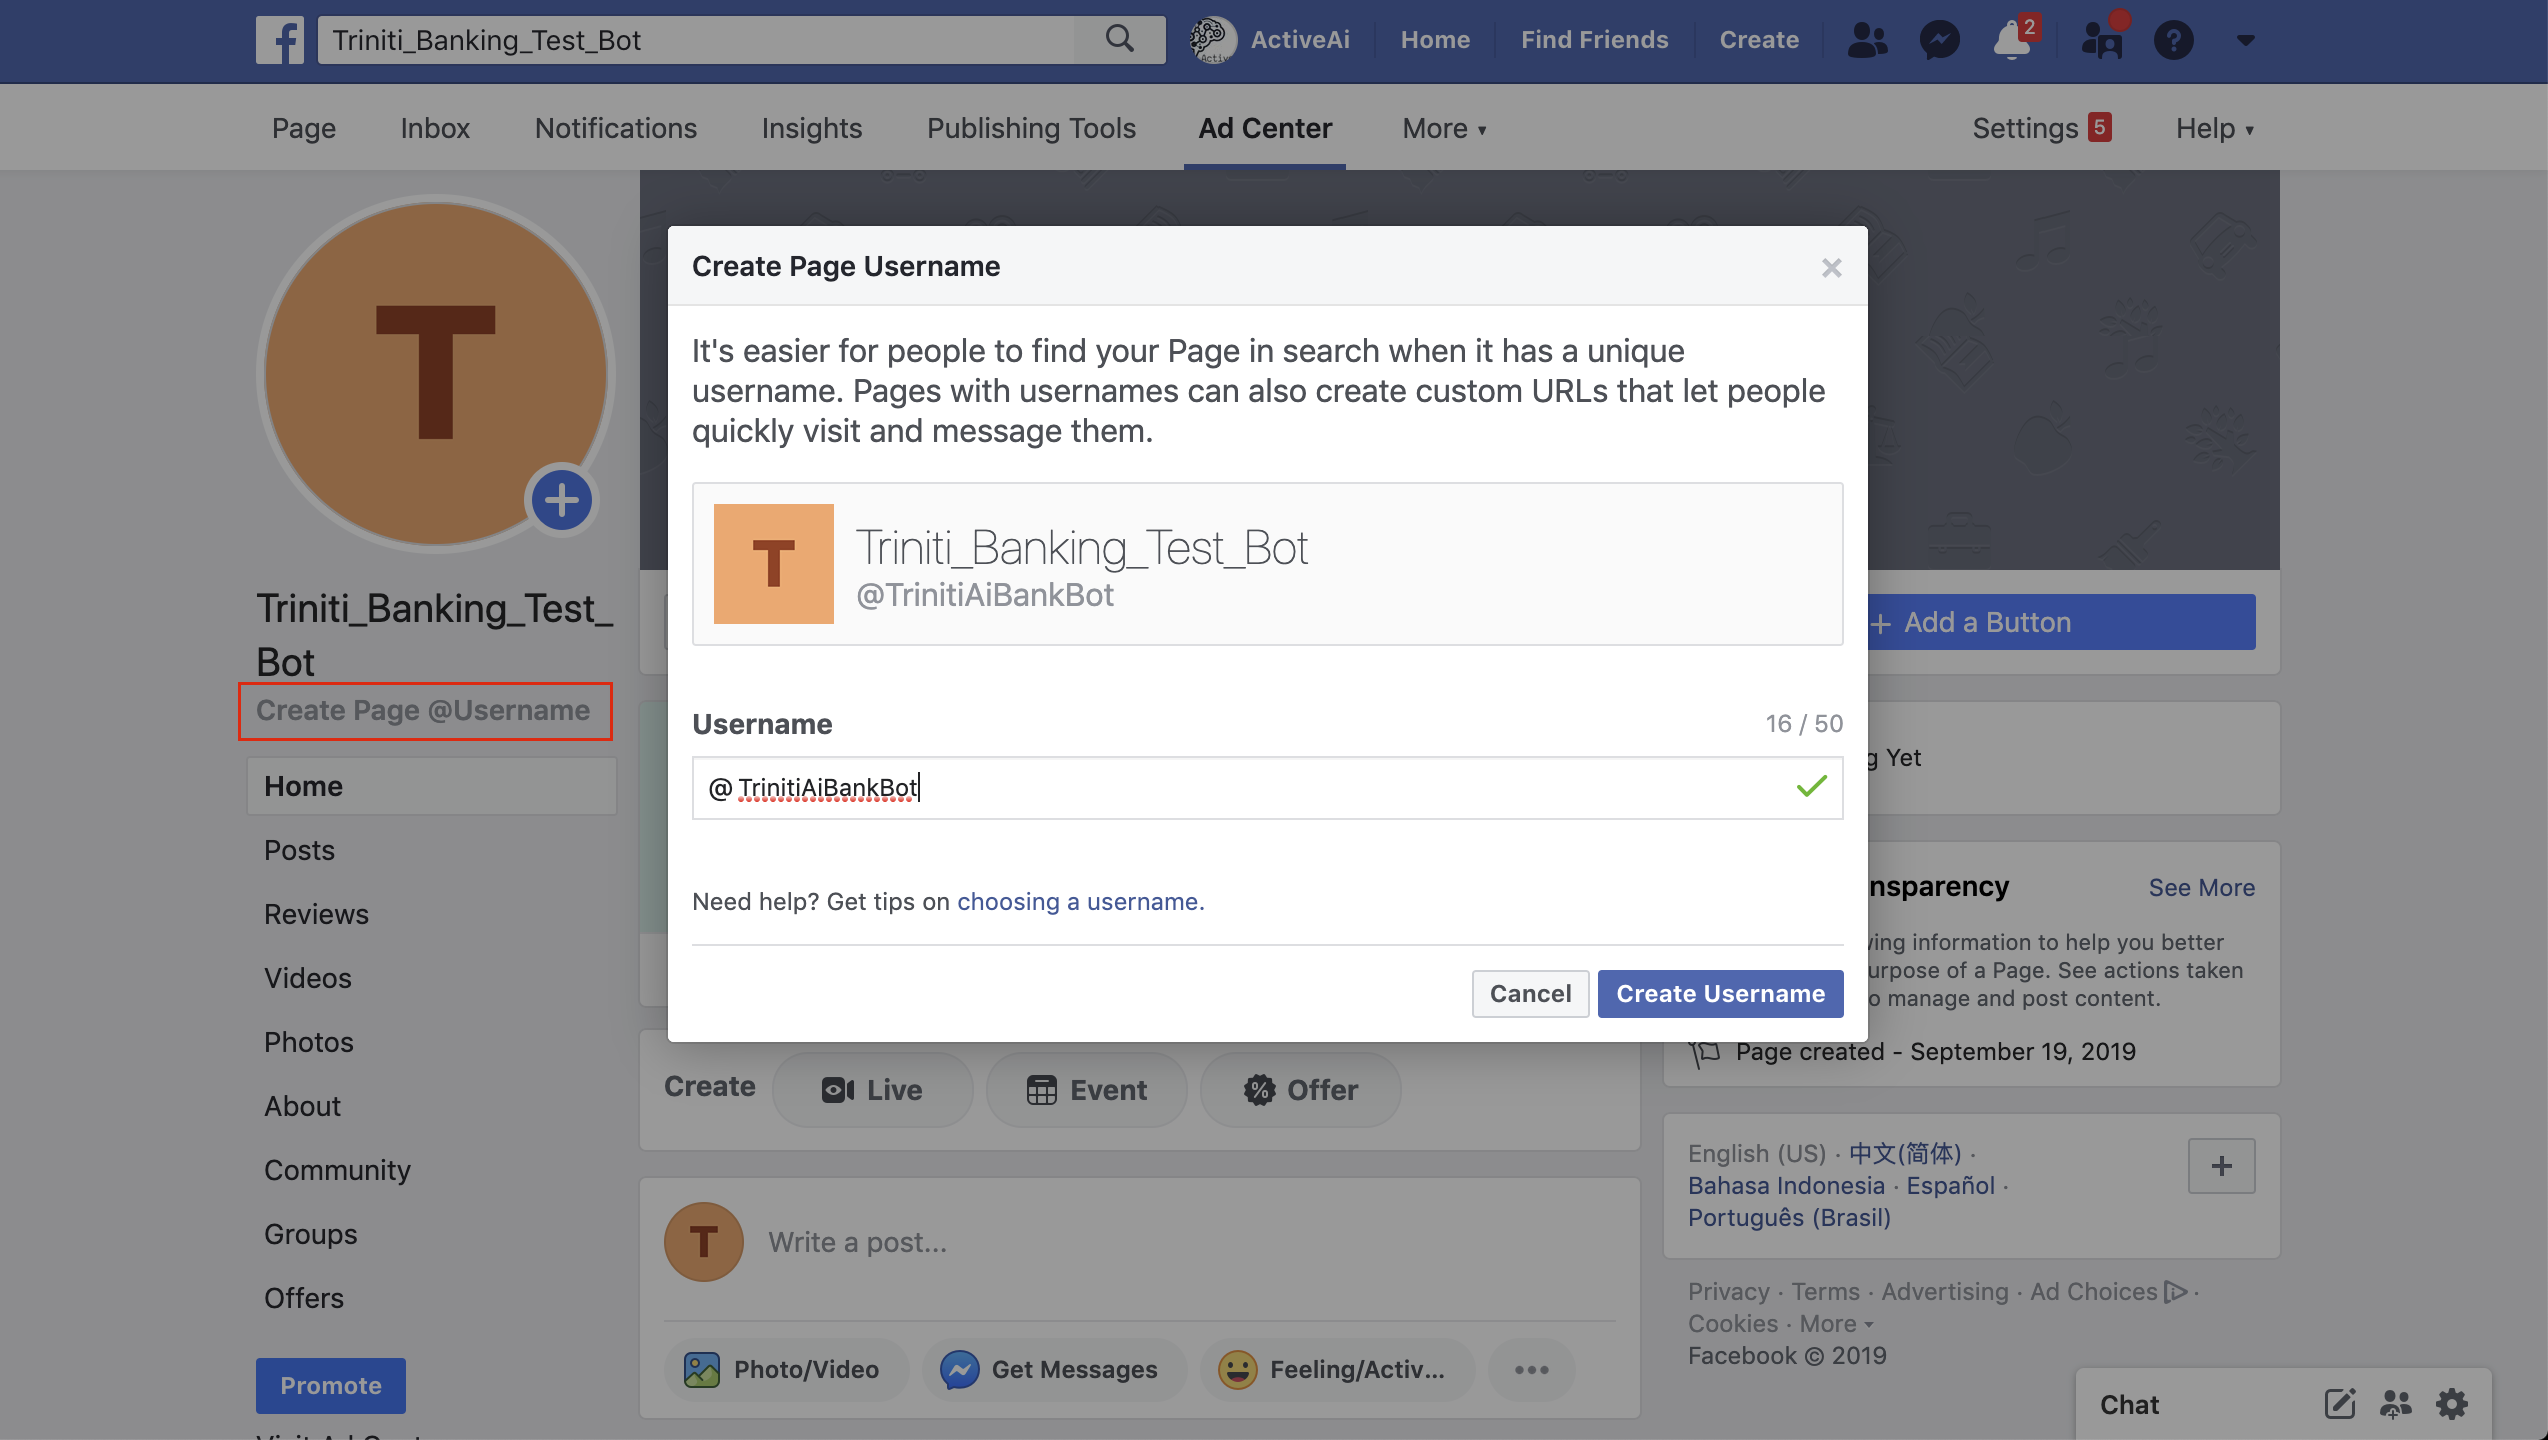
- You can change your bot username by going back to your Facebook page (which you have created)
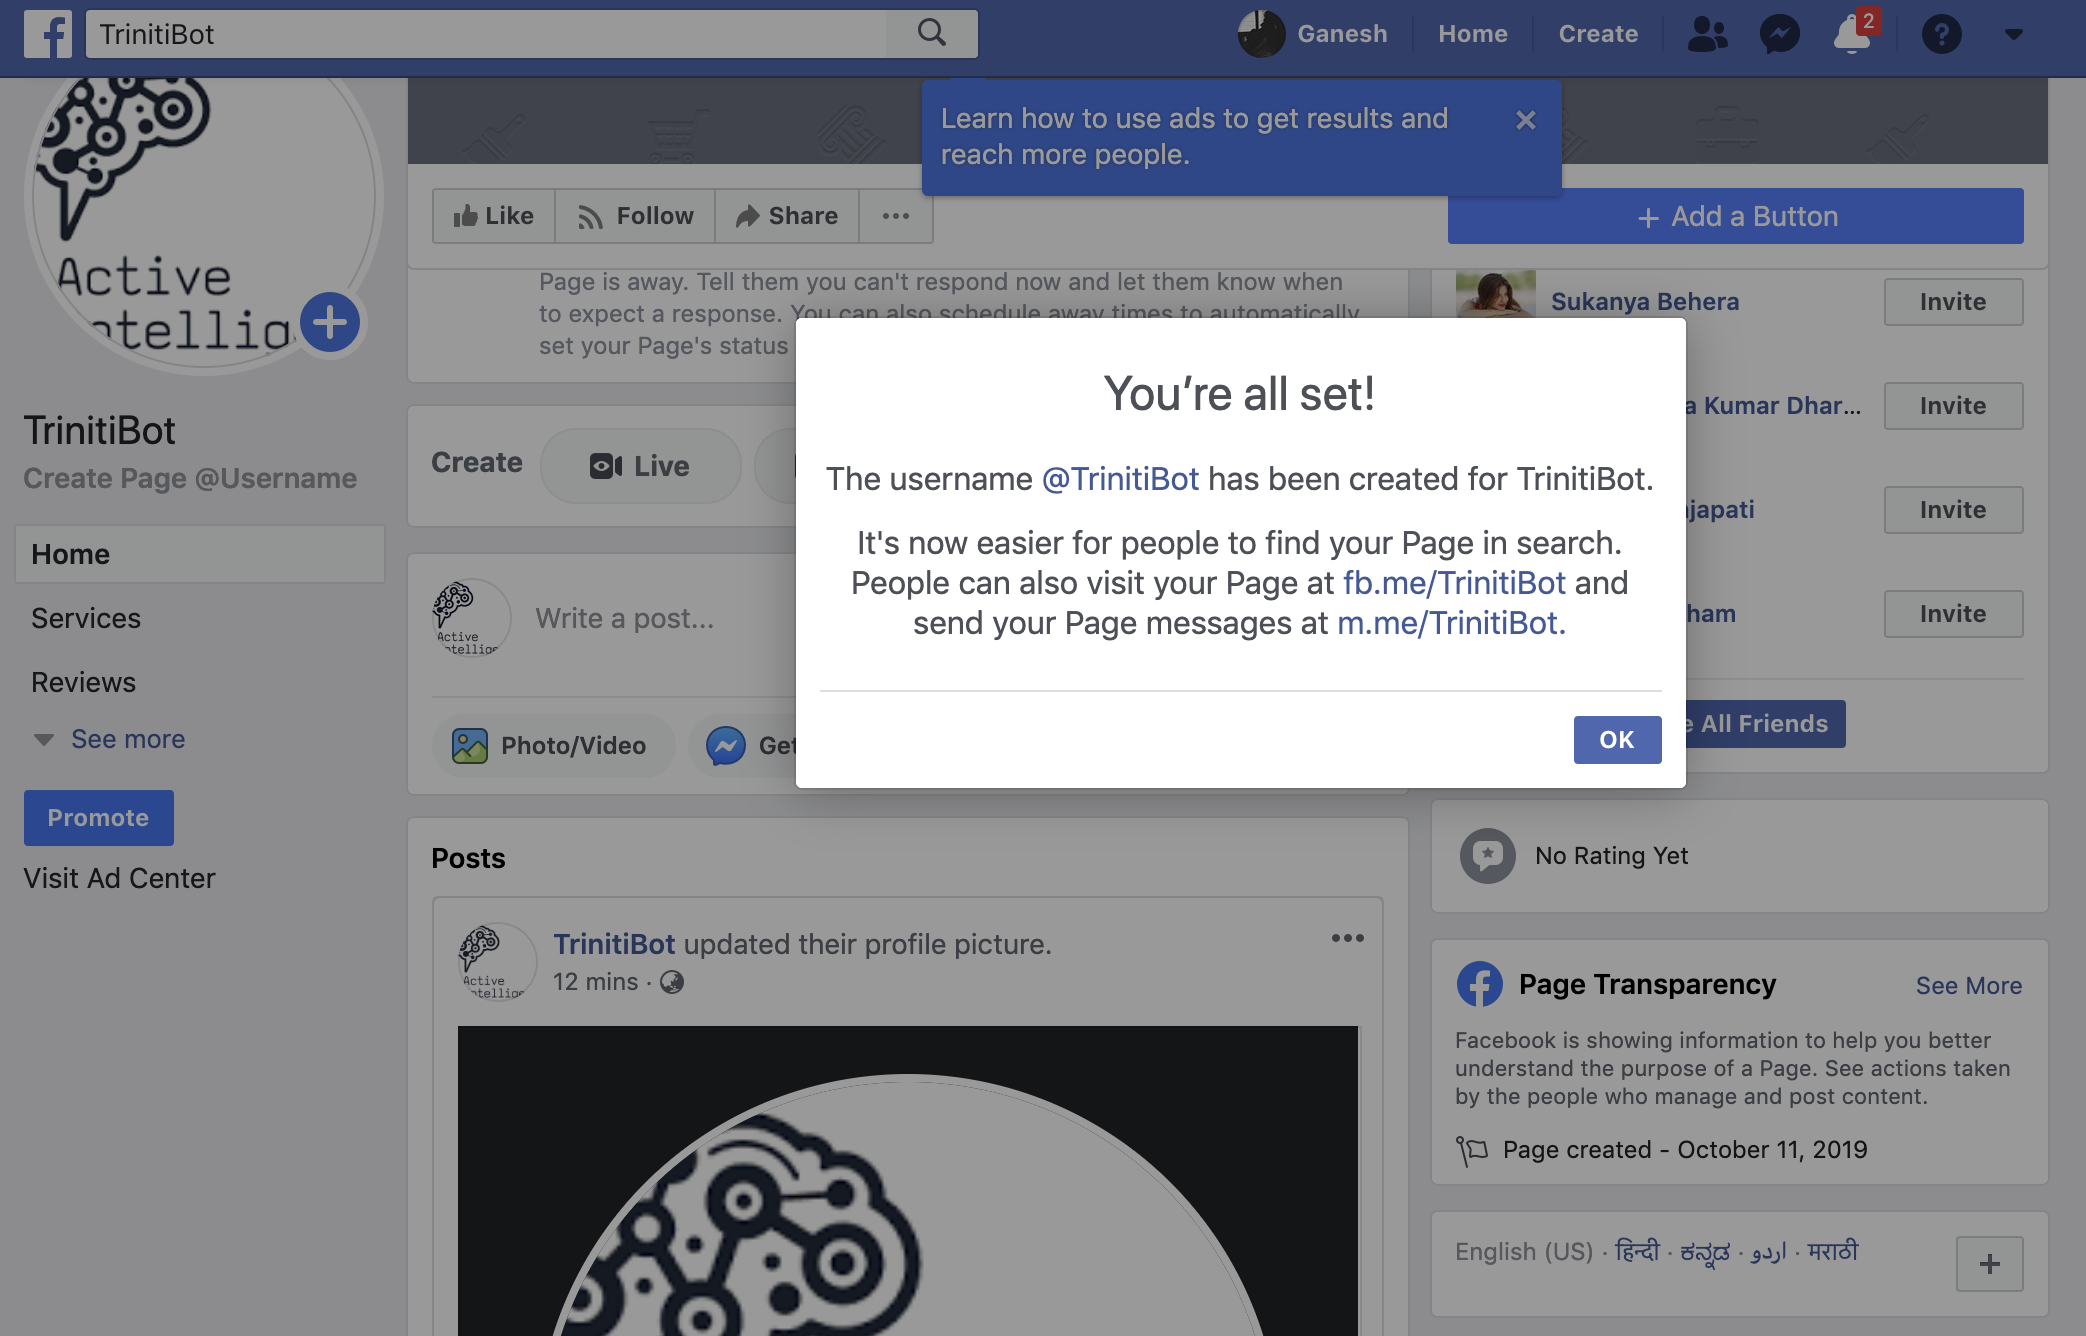
- You will get two links one is to visit your created page and another one is to chat on messenger
- If you have missed that then don't worry you can get your messenger bot invitation link from Page Settings
7. Test Your Messenger Bot
- You can search for your bot in messenger with the Bot/Page name or username that you have set
- You can also interact with your messenger bot invitation link
- Your Facebook bot should start responding with the trained queries if everything is correctly configured.
- To test that your app set up was successful, send a message to your Page from facebook.com or in Messenger.
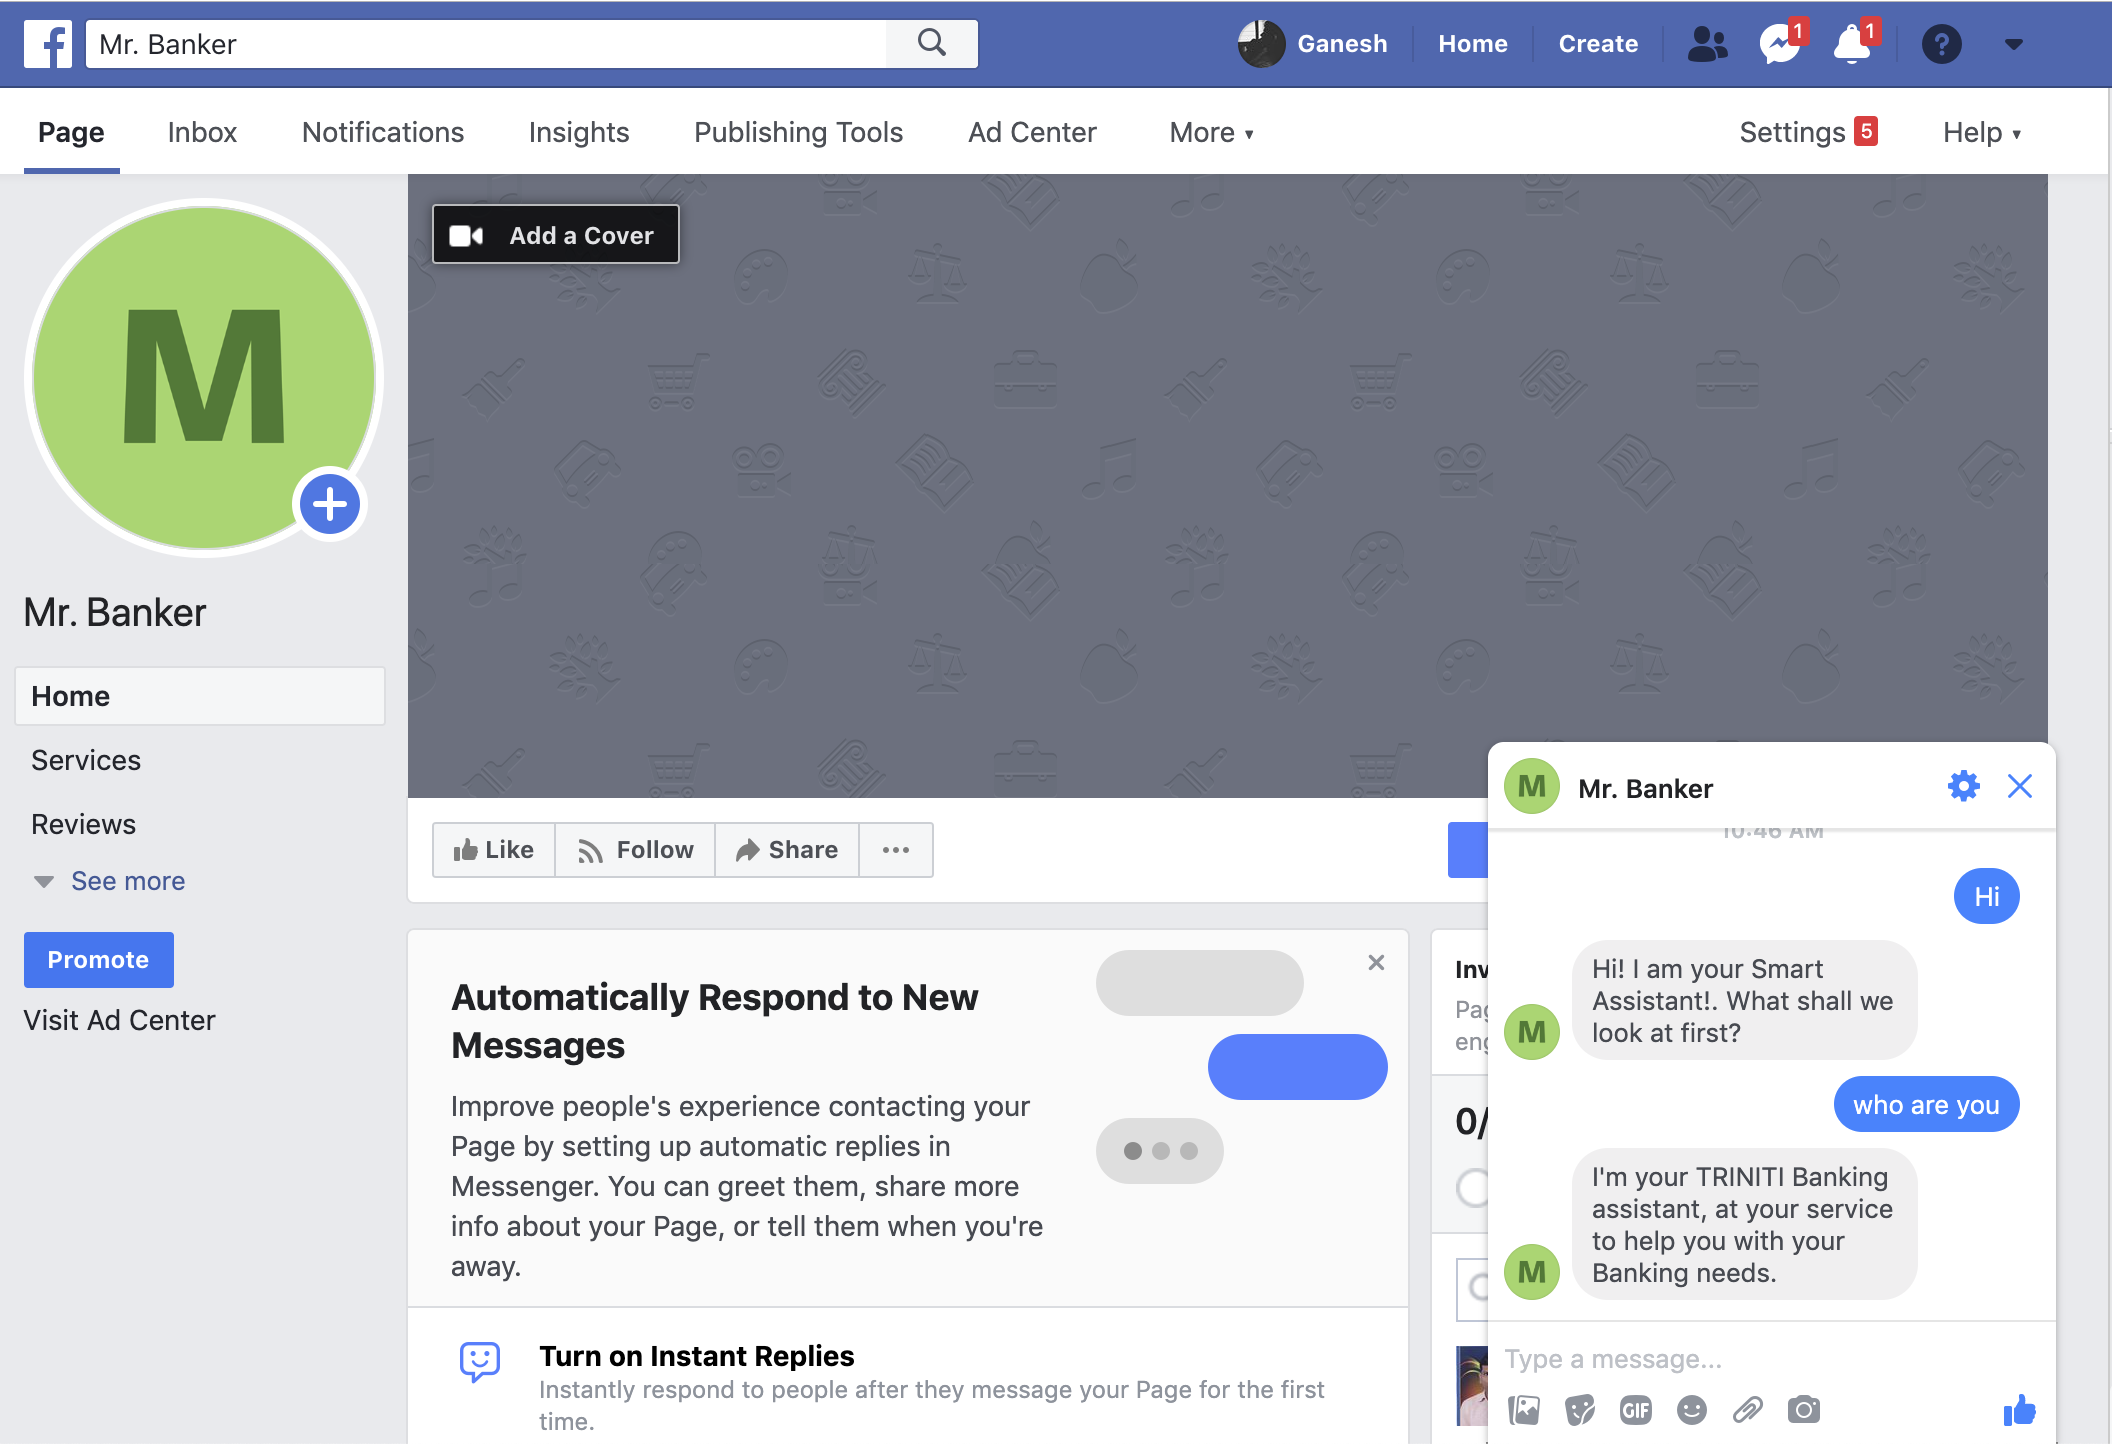
Congratulations, you have finished setting up your Facebook bot using triniti.ai.
Managing Skype
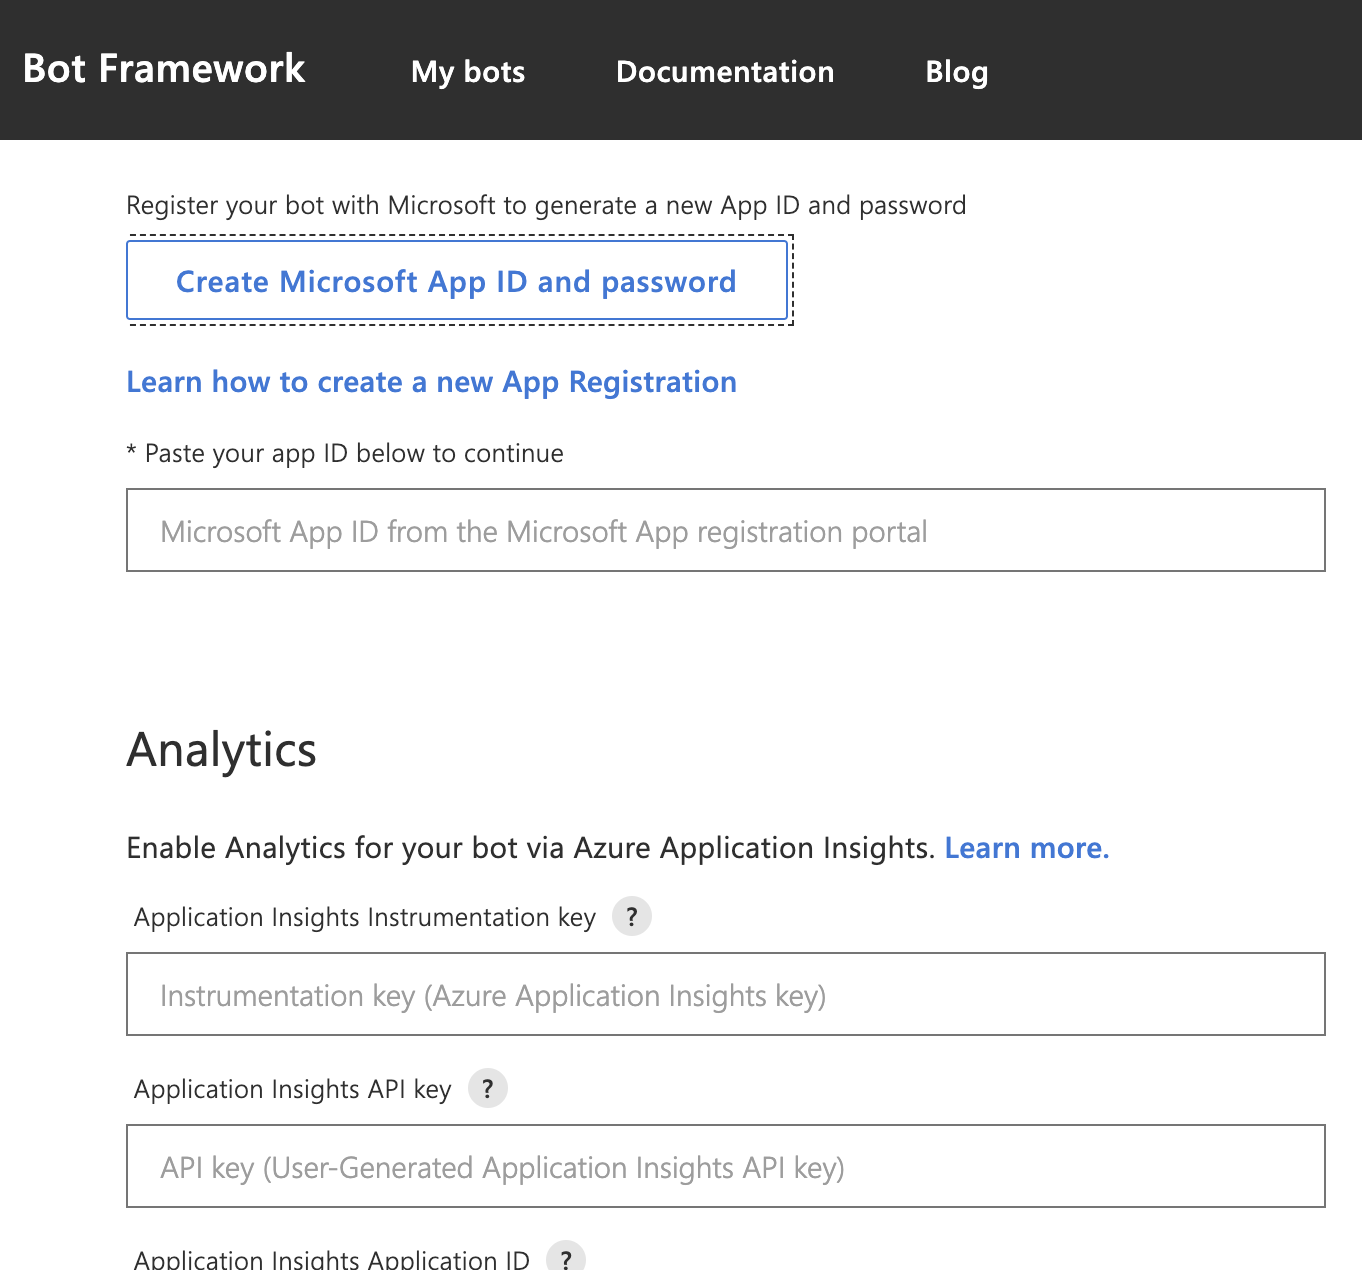
Instant messaging means an instant answer. We do support skype channel for textual conversations on the bot. Skype is an application for instant messaging, voice calls, and video chats. It allows users from any region or part of the world to connect and communicate with one another. Millions of individuals and businesses use Skype to make free video and voice one-to-one and group calls, send instant messages, and share files with other people on Skype. You can enable the skype channels for your bot by following these steps:
Create a new Skype bot
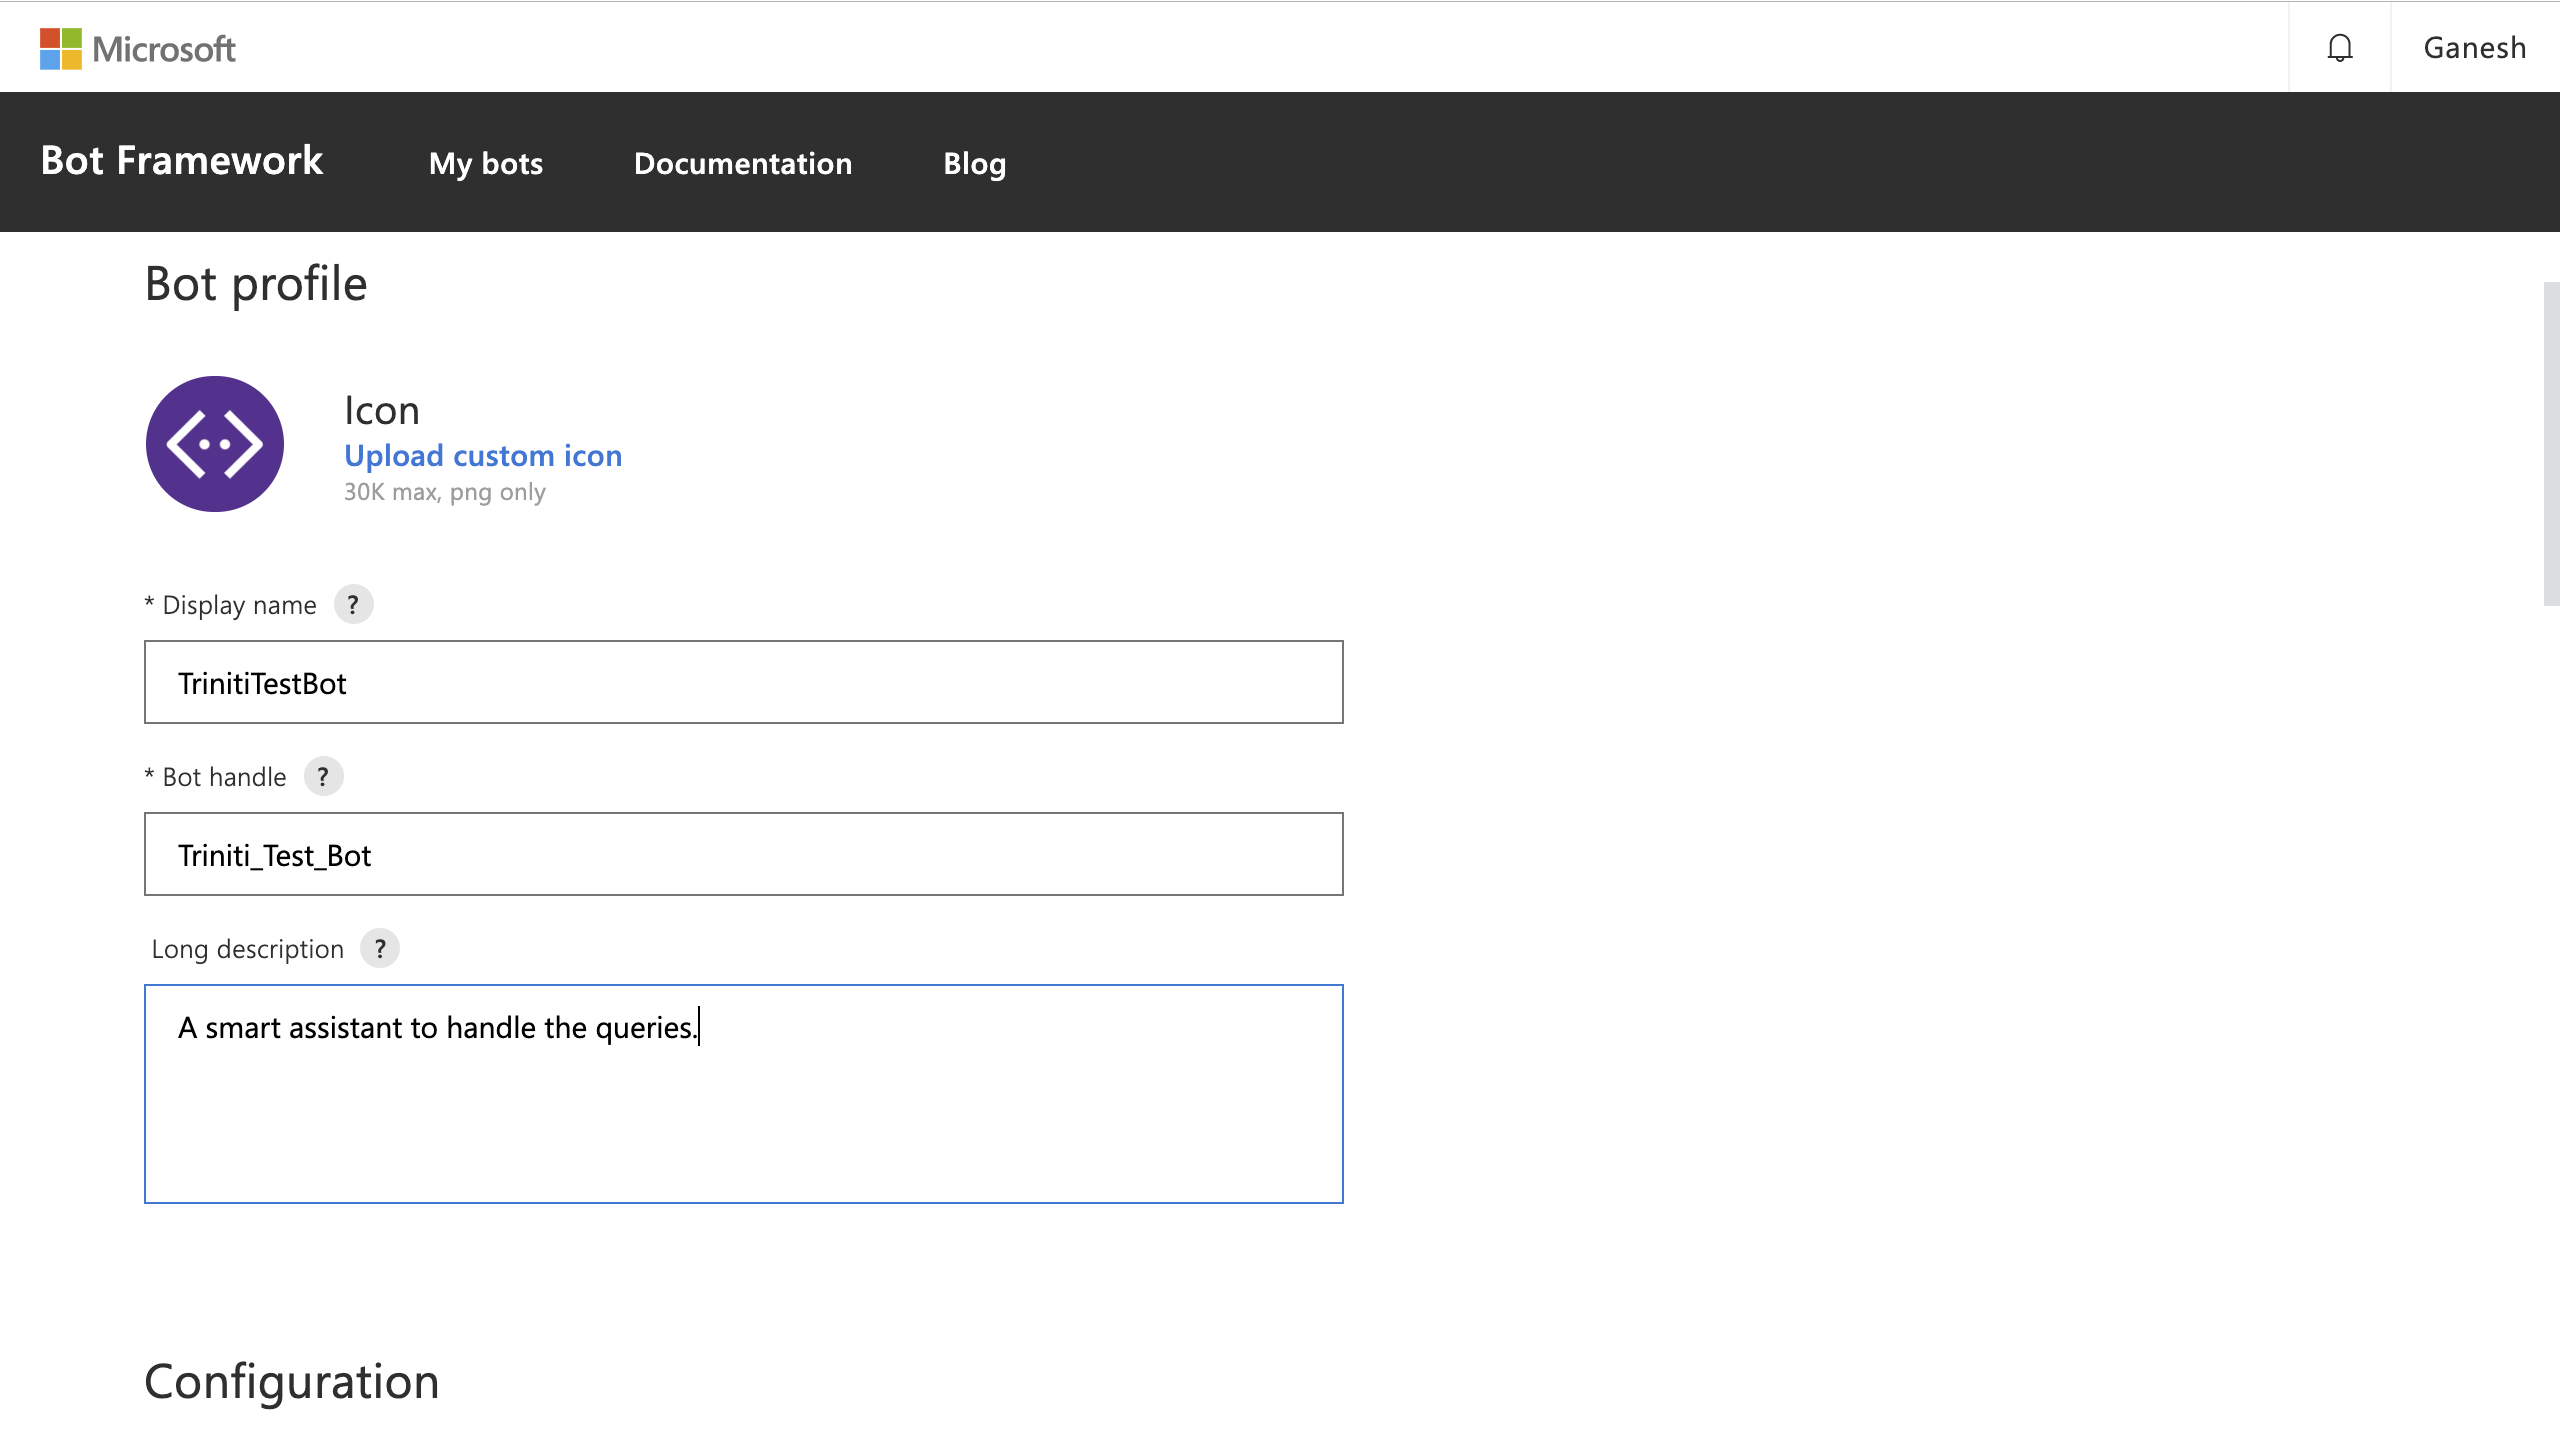
- Log in to Microsoft Bot Framework
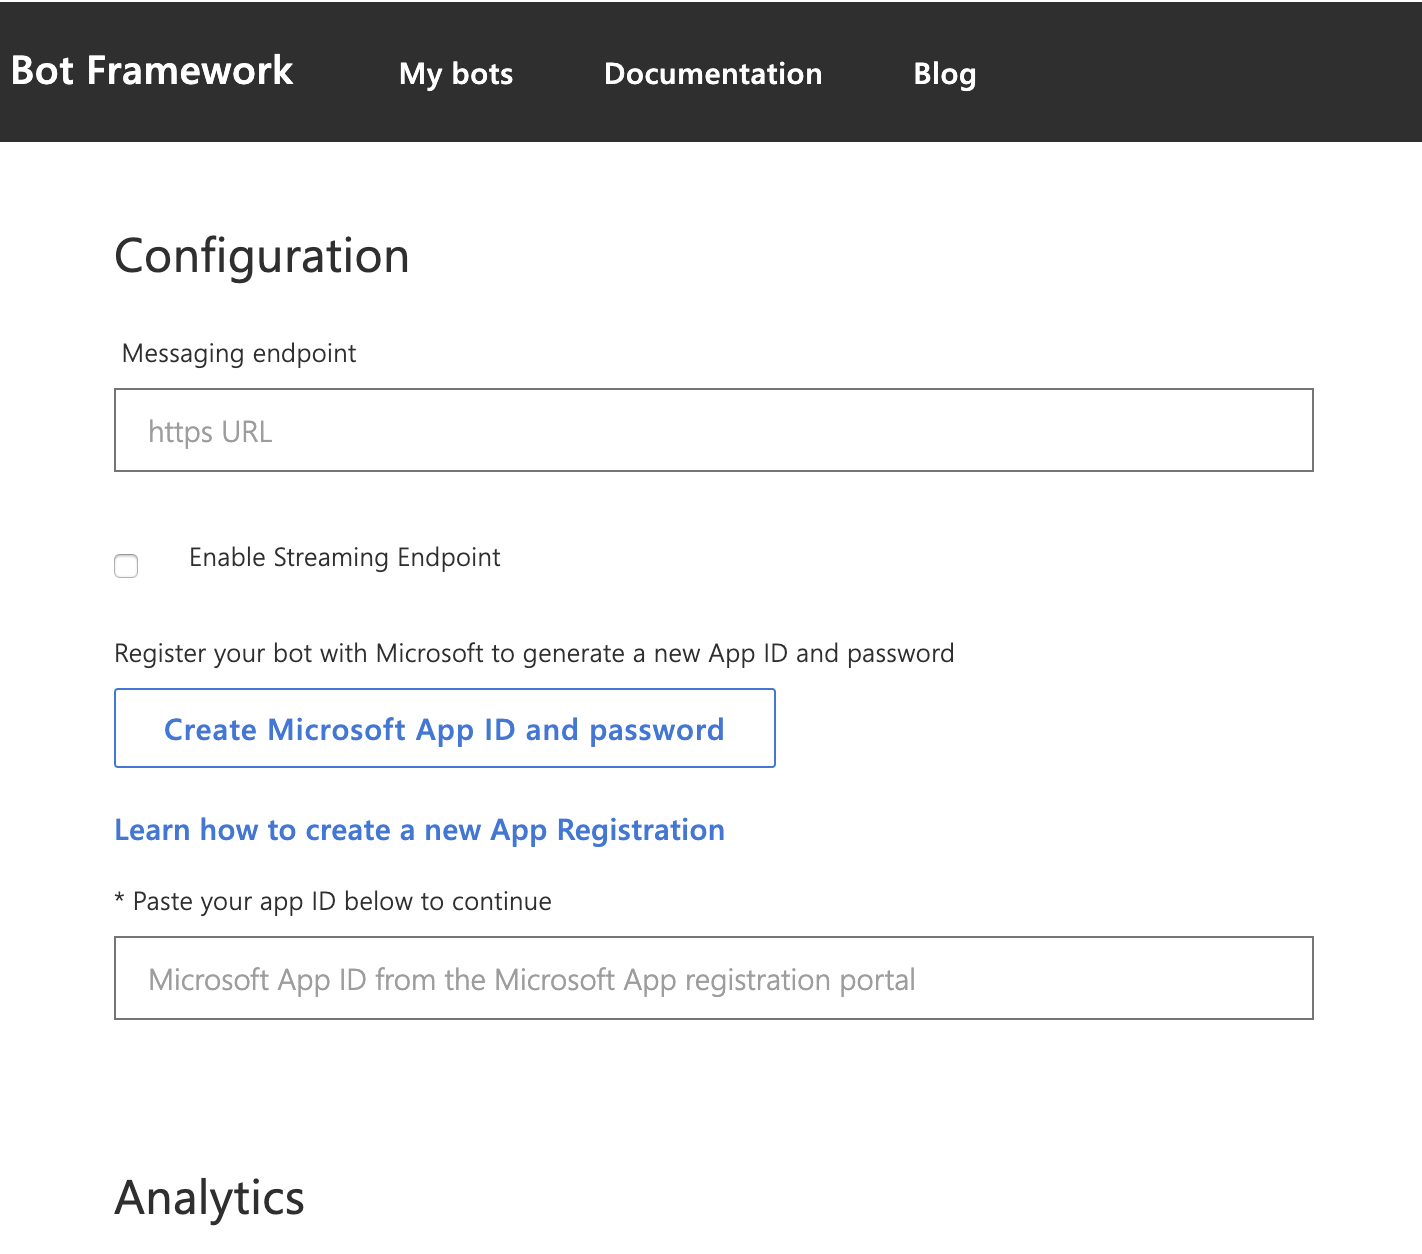
- Provide the mandatory details (Display name, Bot Handle, Long Description, etc.)
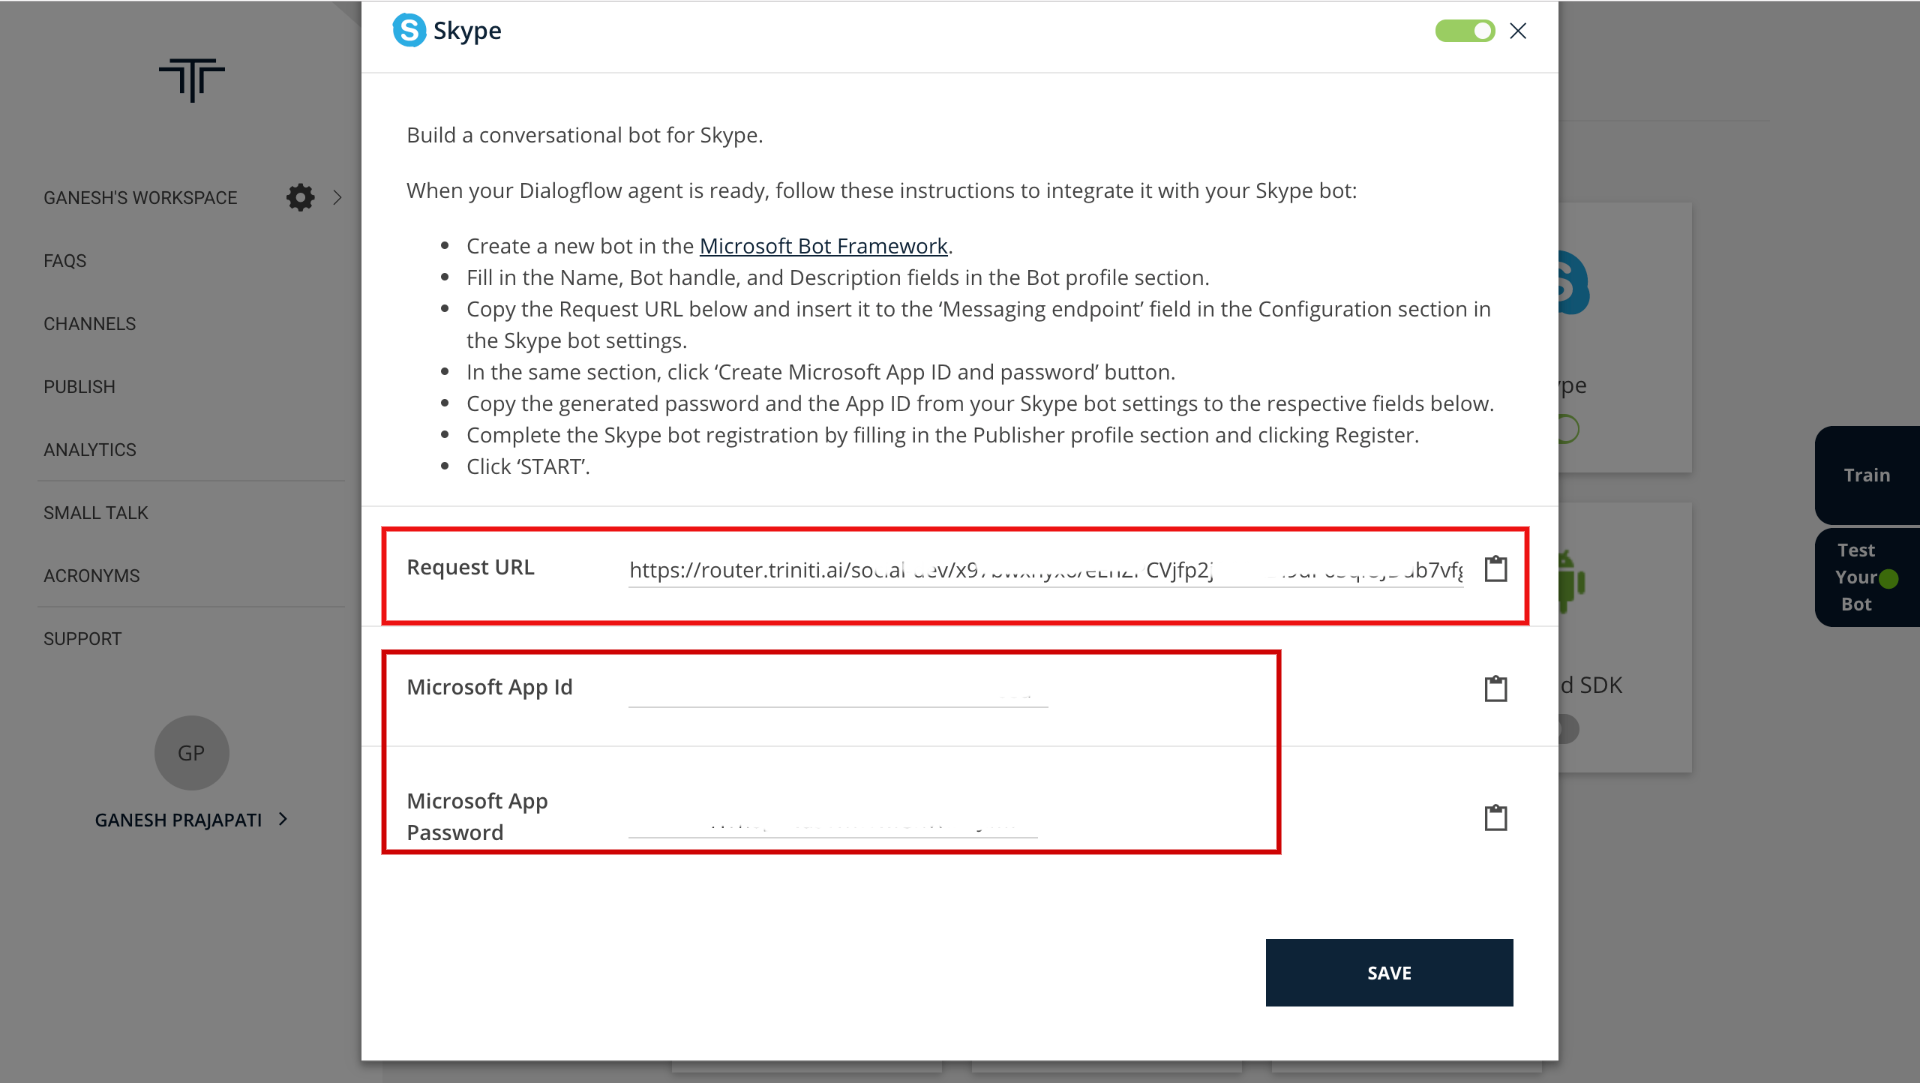
- Now you need Messaging Endpoint to provide under Configuration to create App ID & password
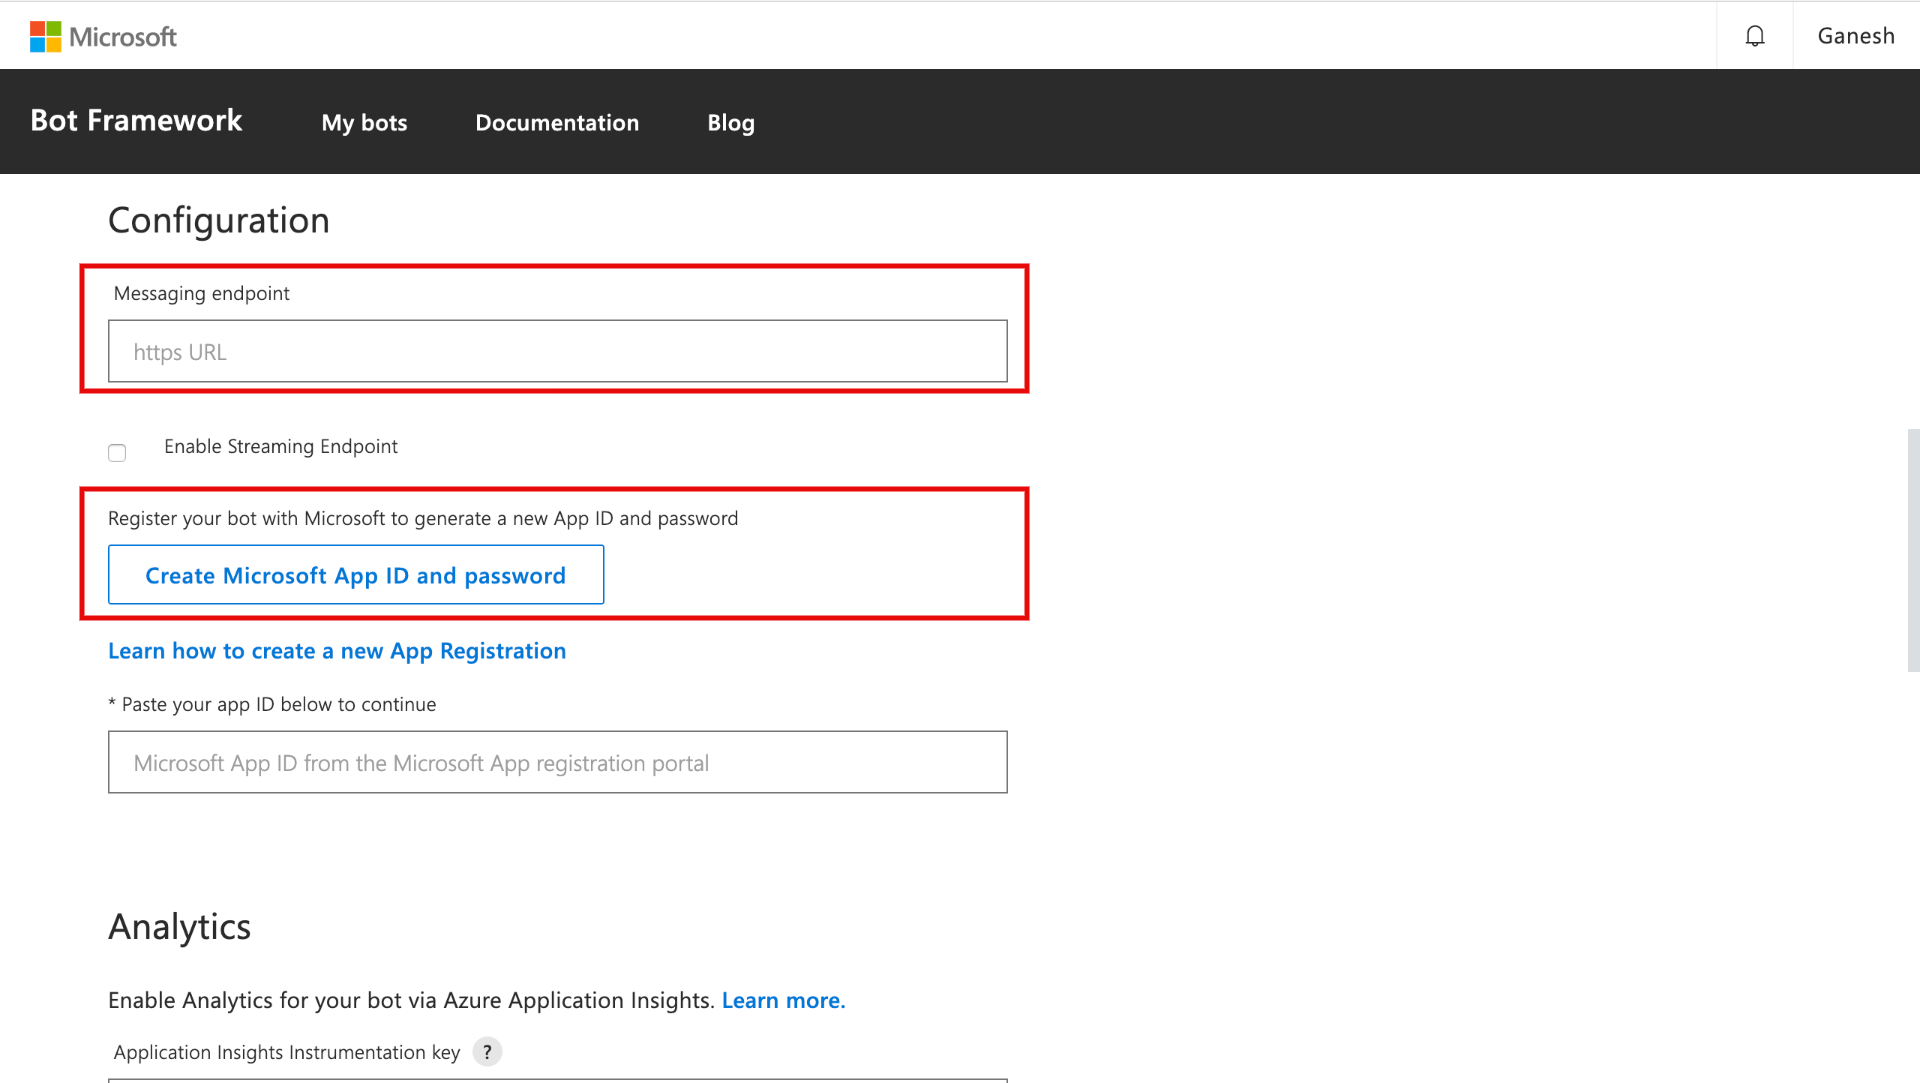
- For Messaging Endpoint Open a new tab and login to triniti.ai admin dashboard
- Select your workspace, click on Channels and enable the Skype channel
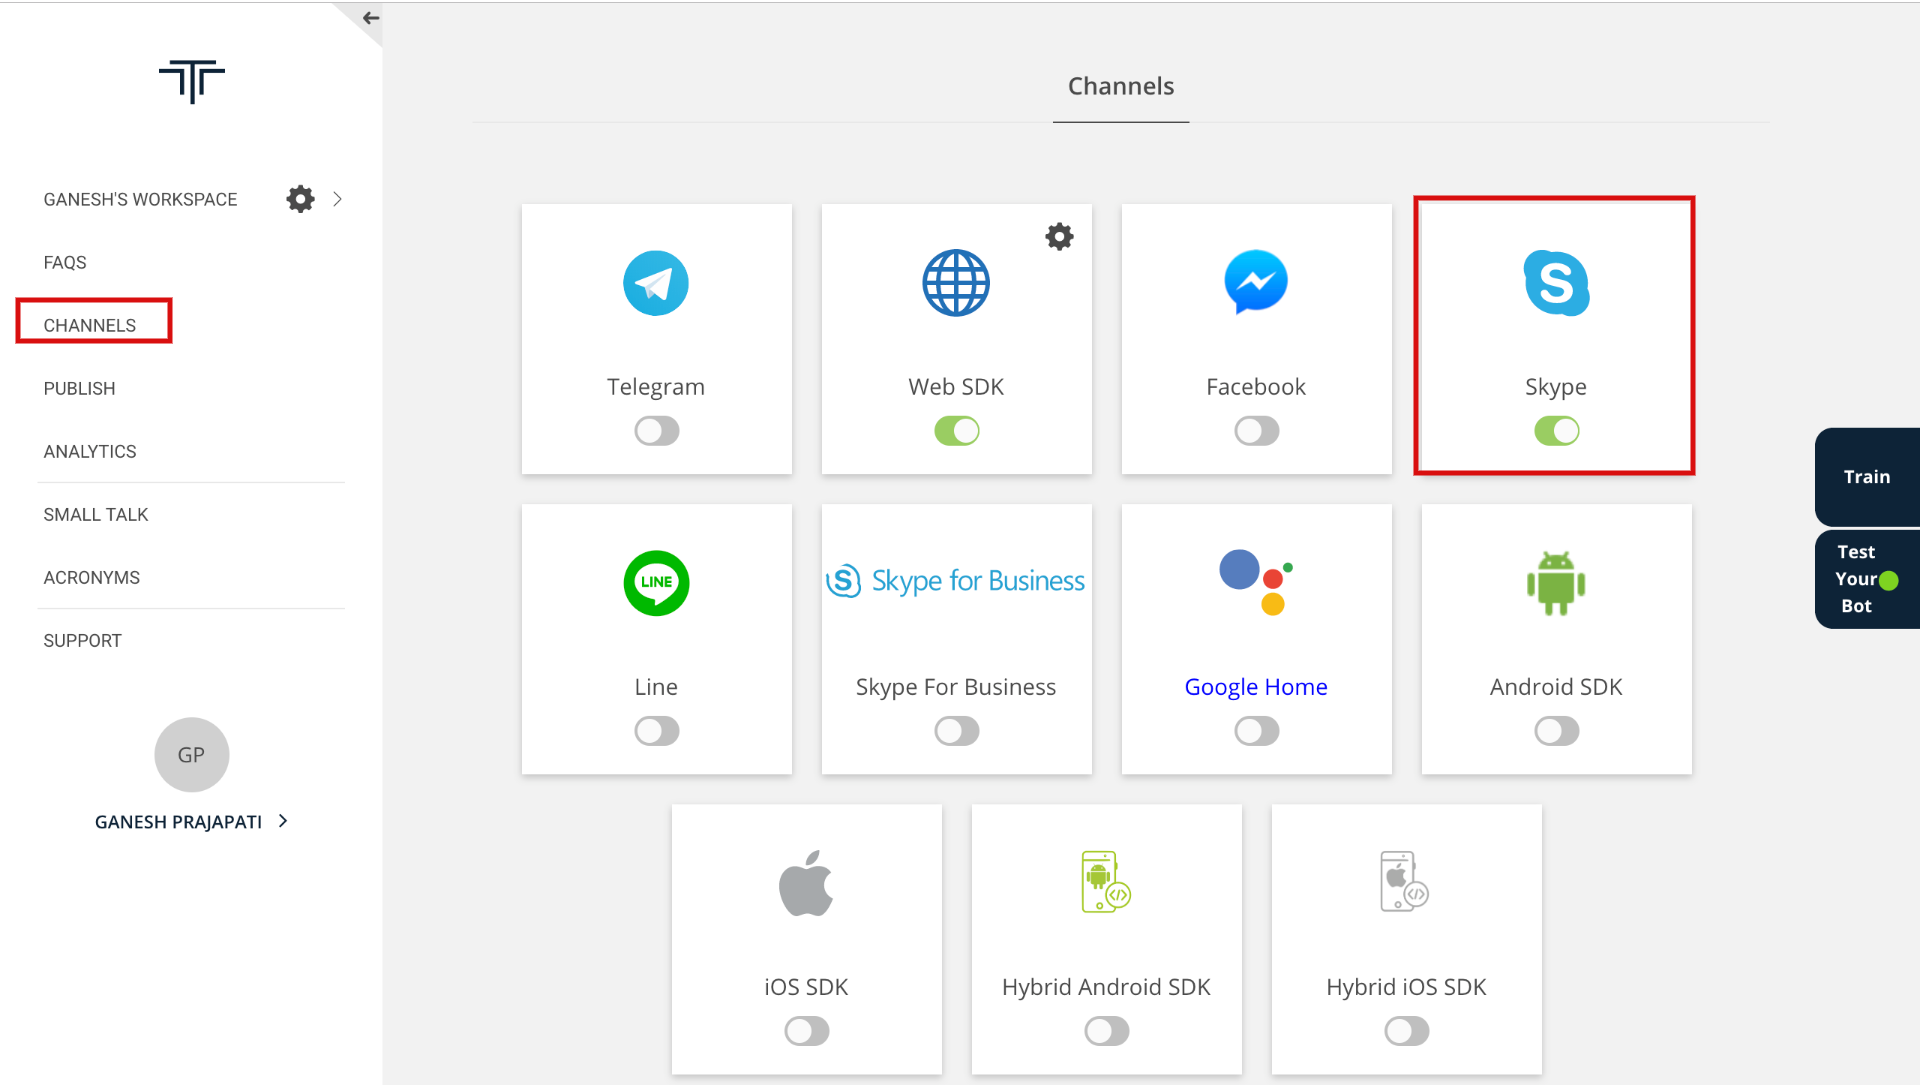
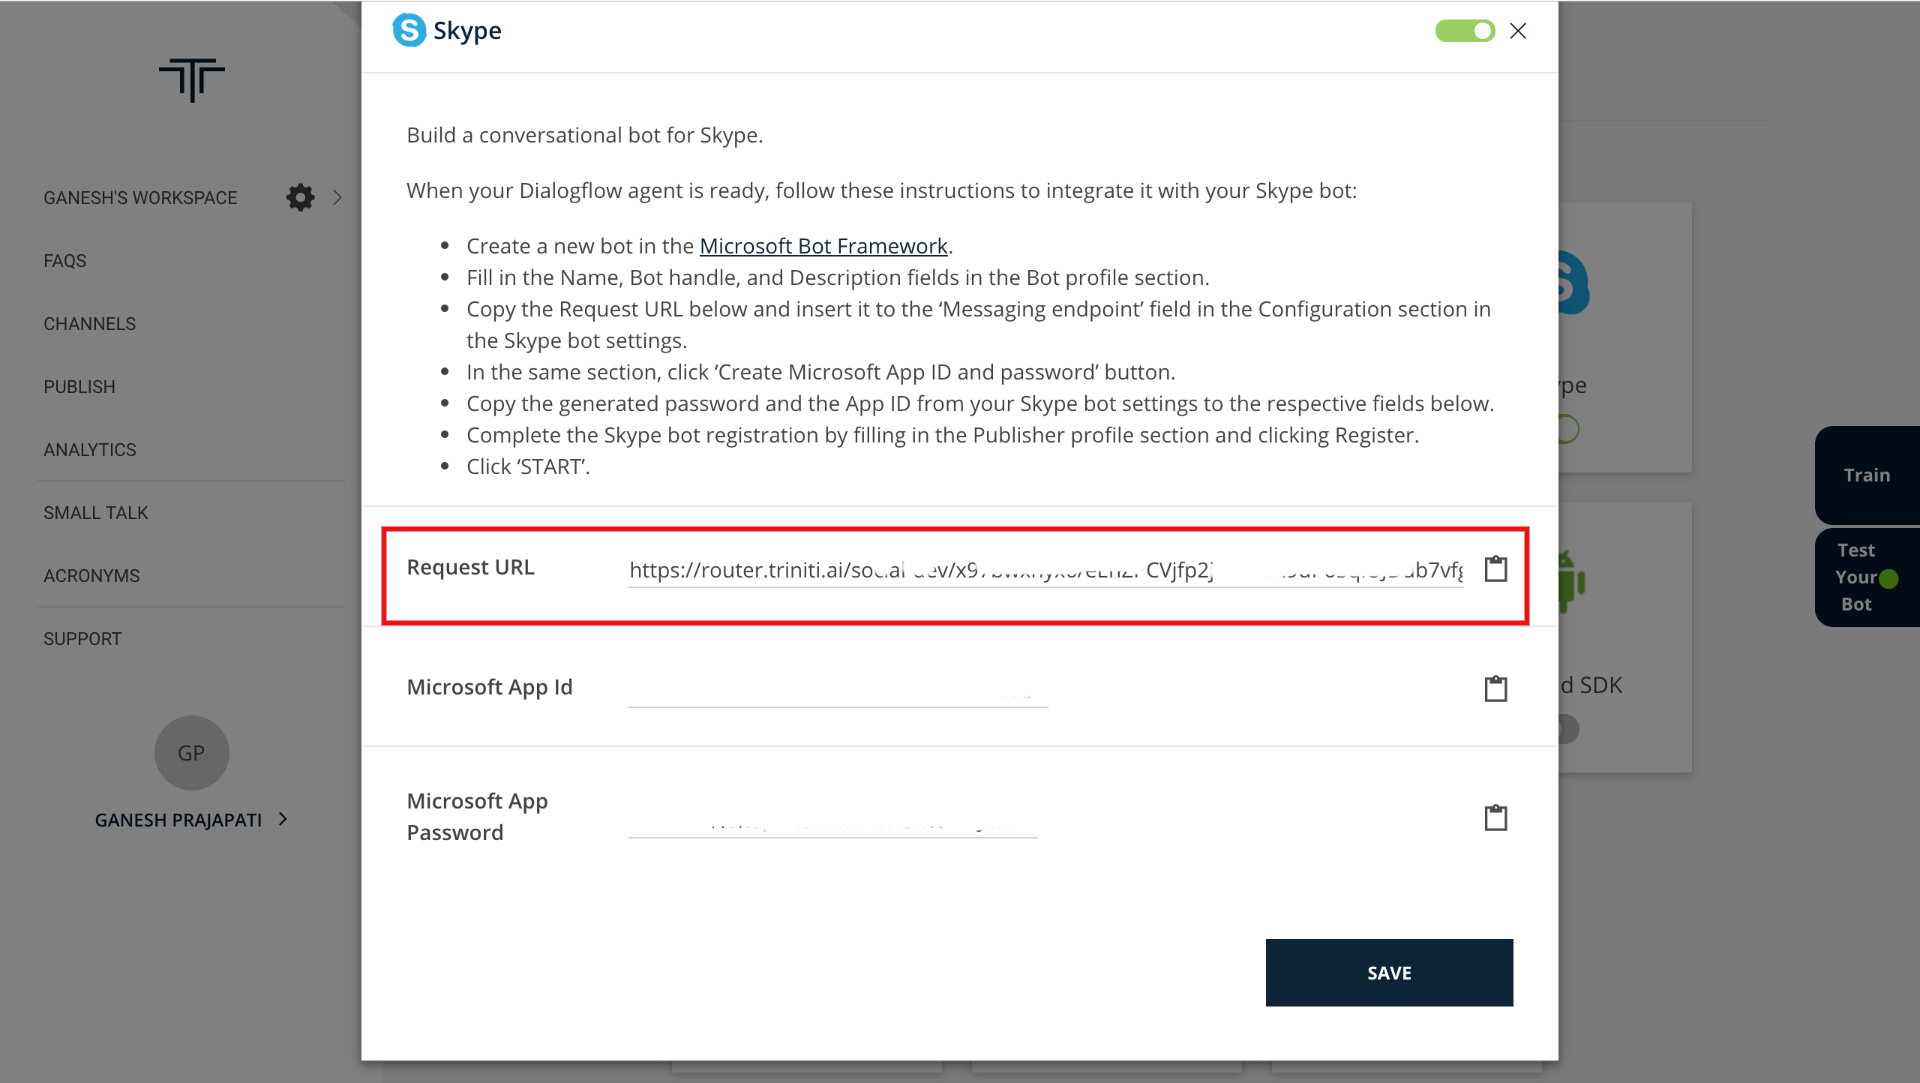
- Copy the Request URL from the following page and paste it in the "Messaging Endpoint" under Configuration on the Botframework page
- Checkmark the "Enable Streaming Endpoint", Click on Create App ID and password
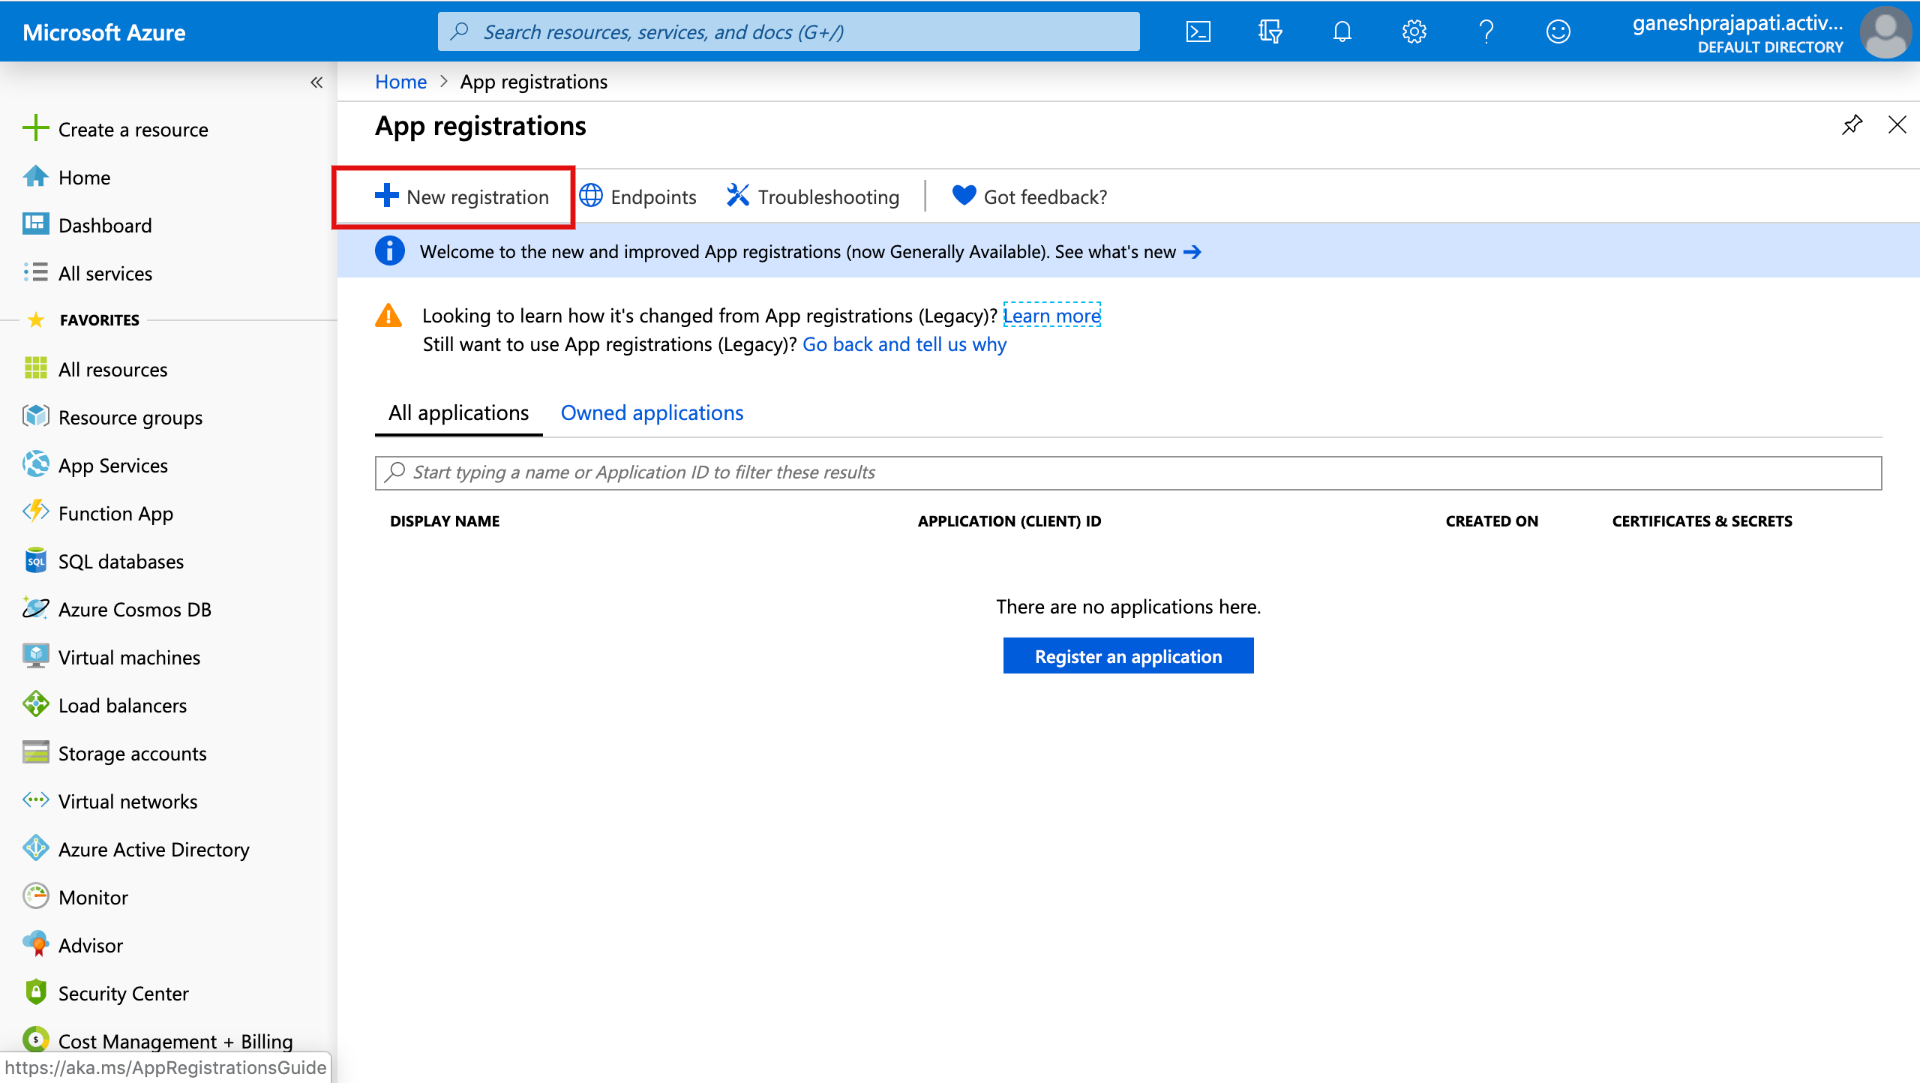
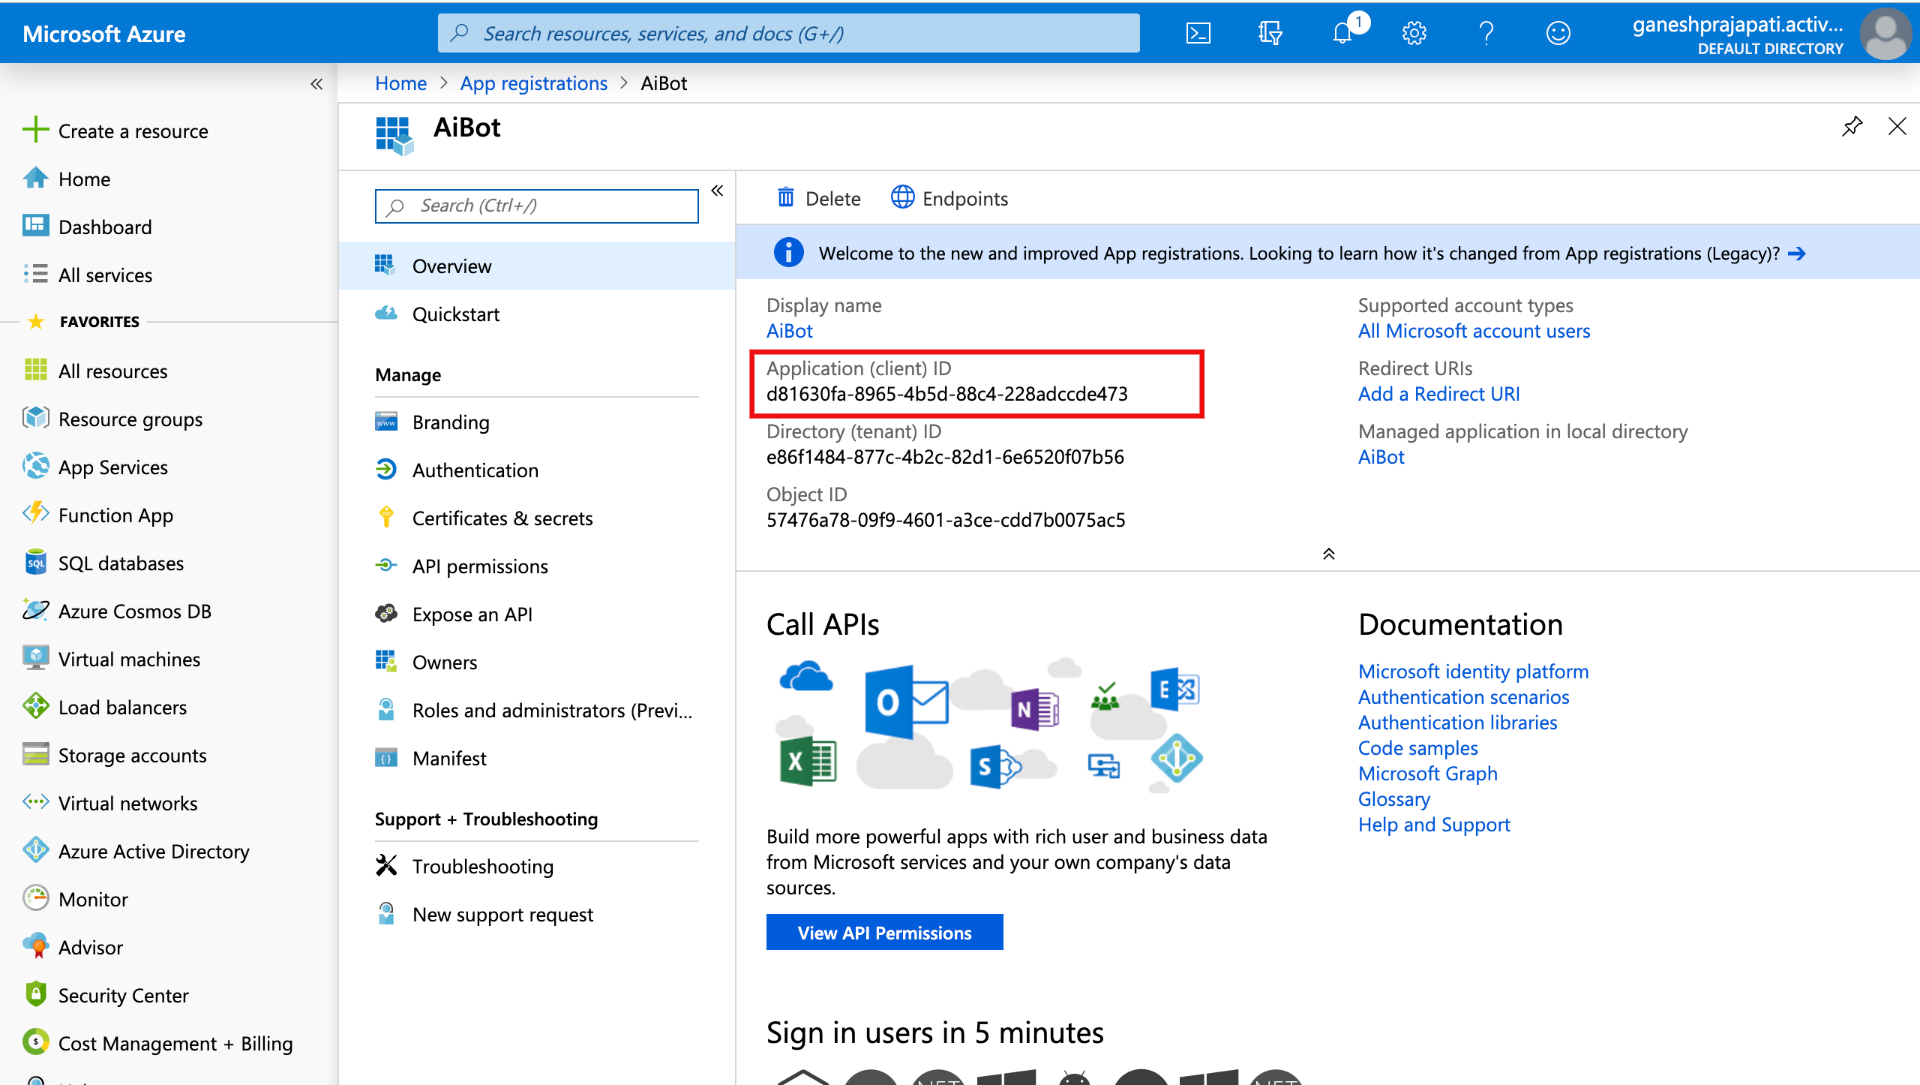
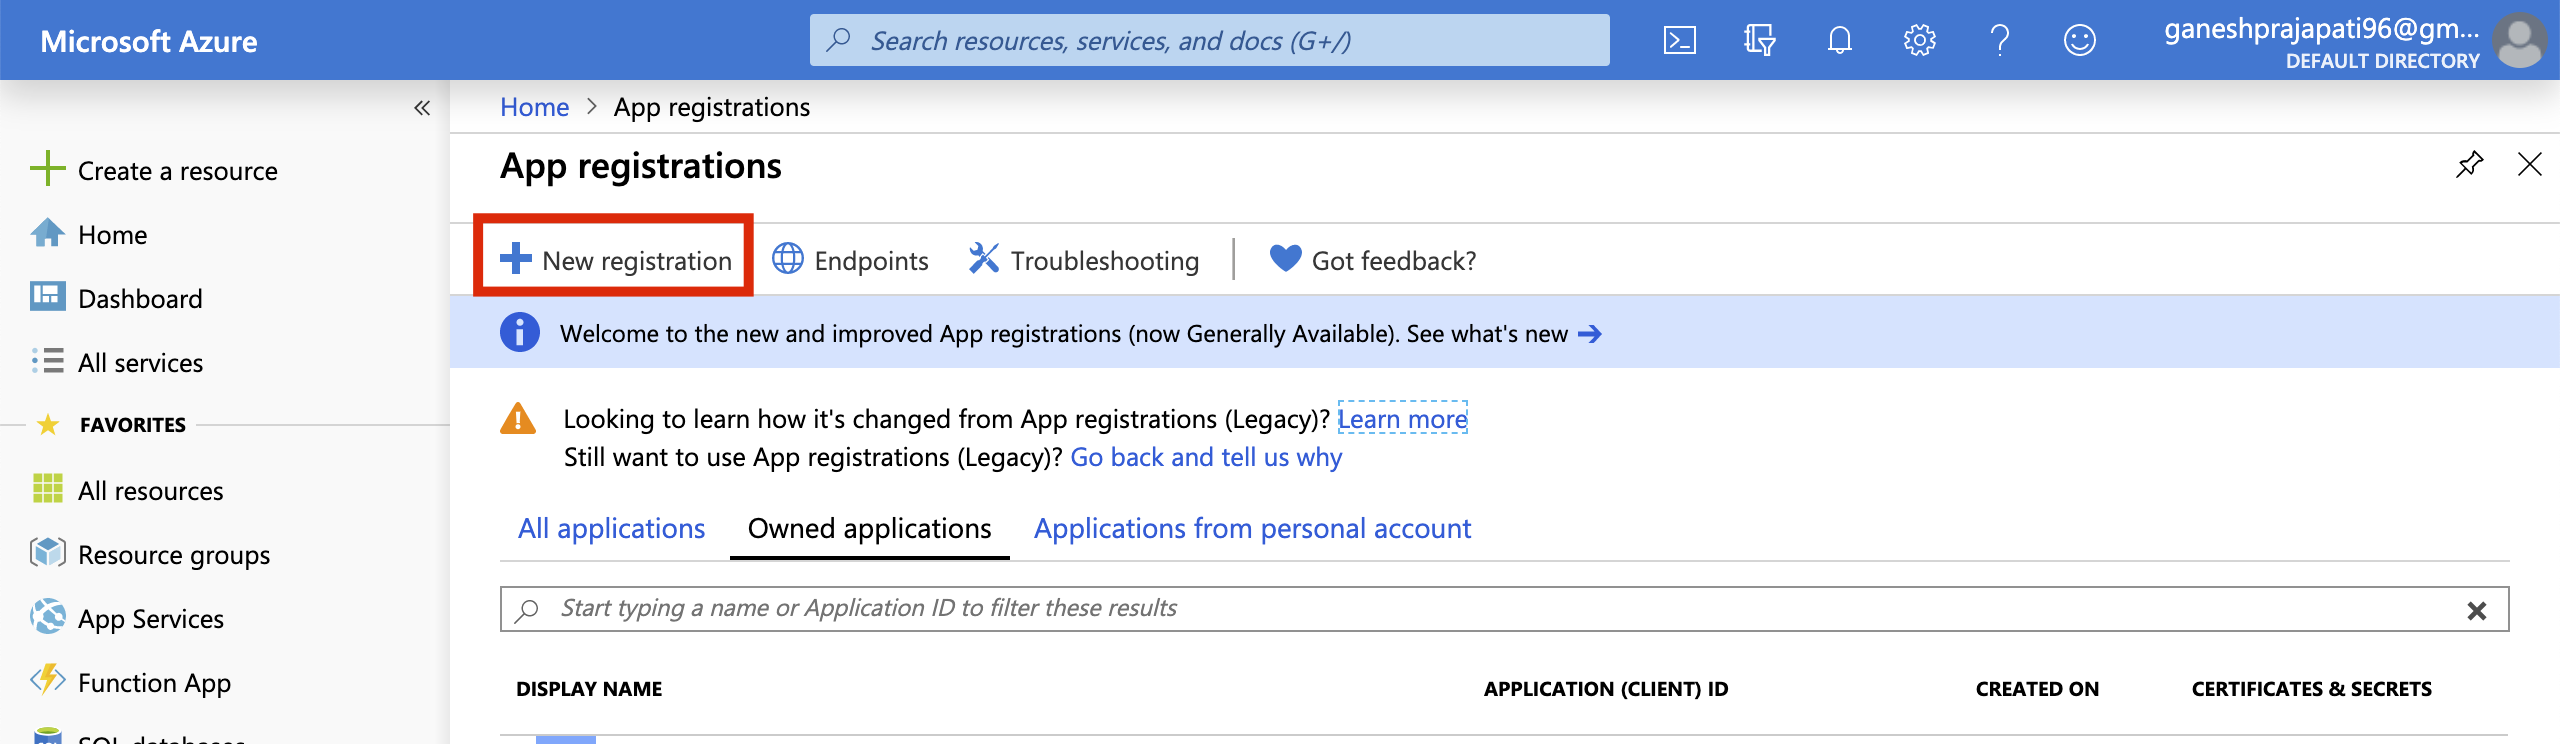
- You will be redirected to the azure portal, click on New Registration Under App Registration
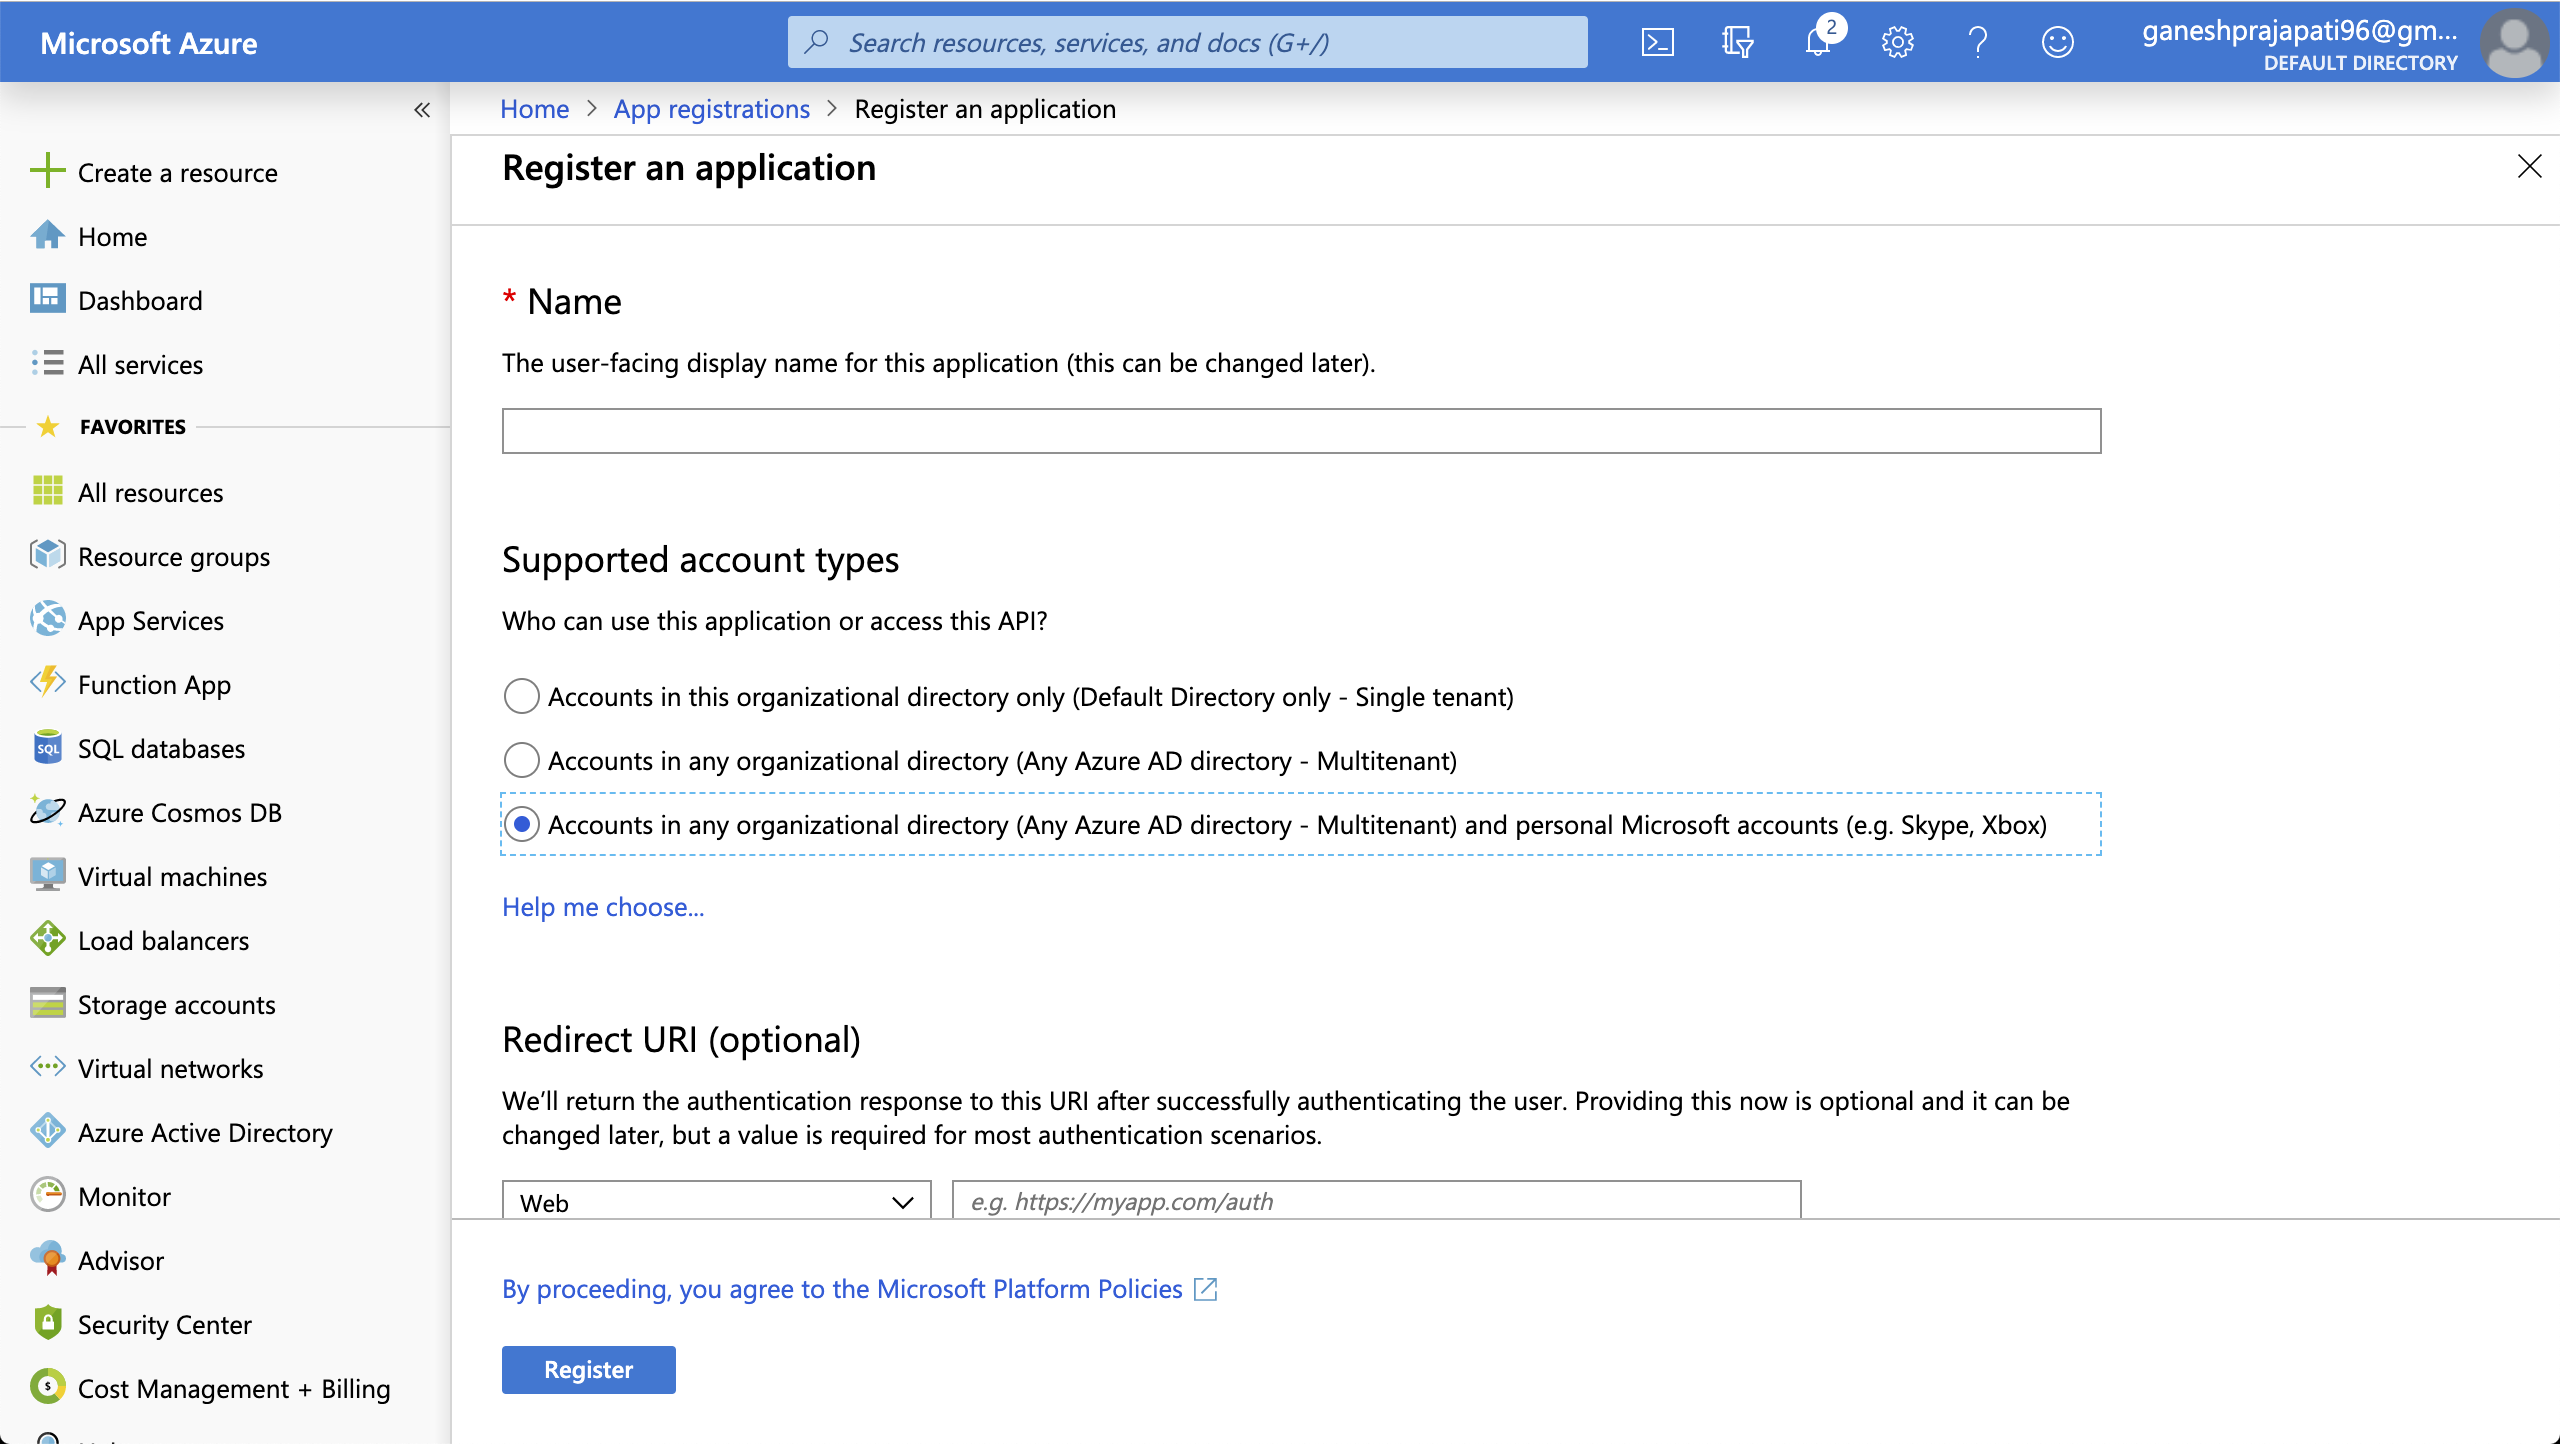
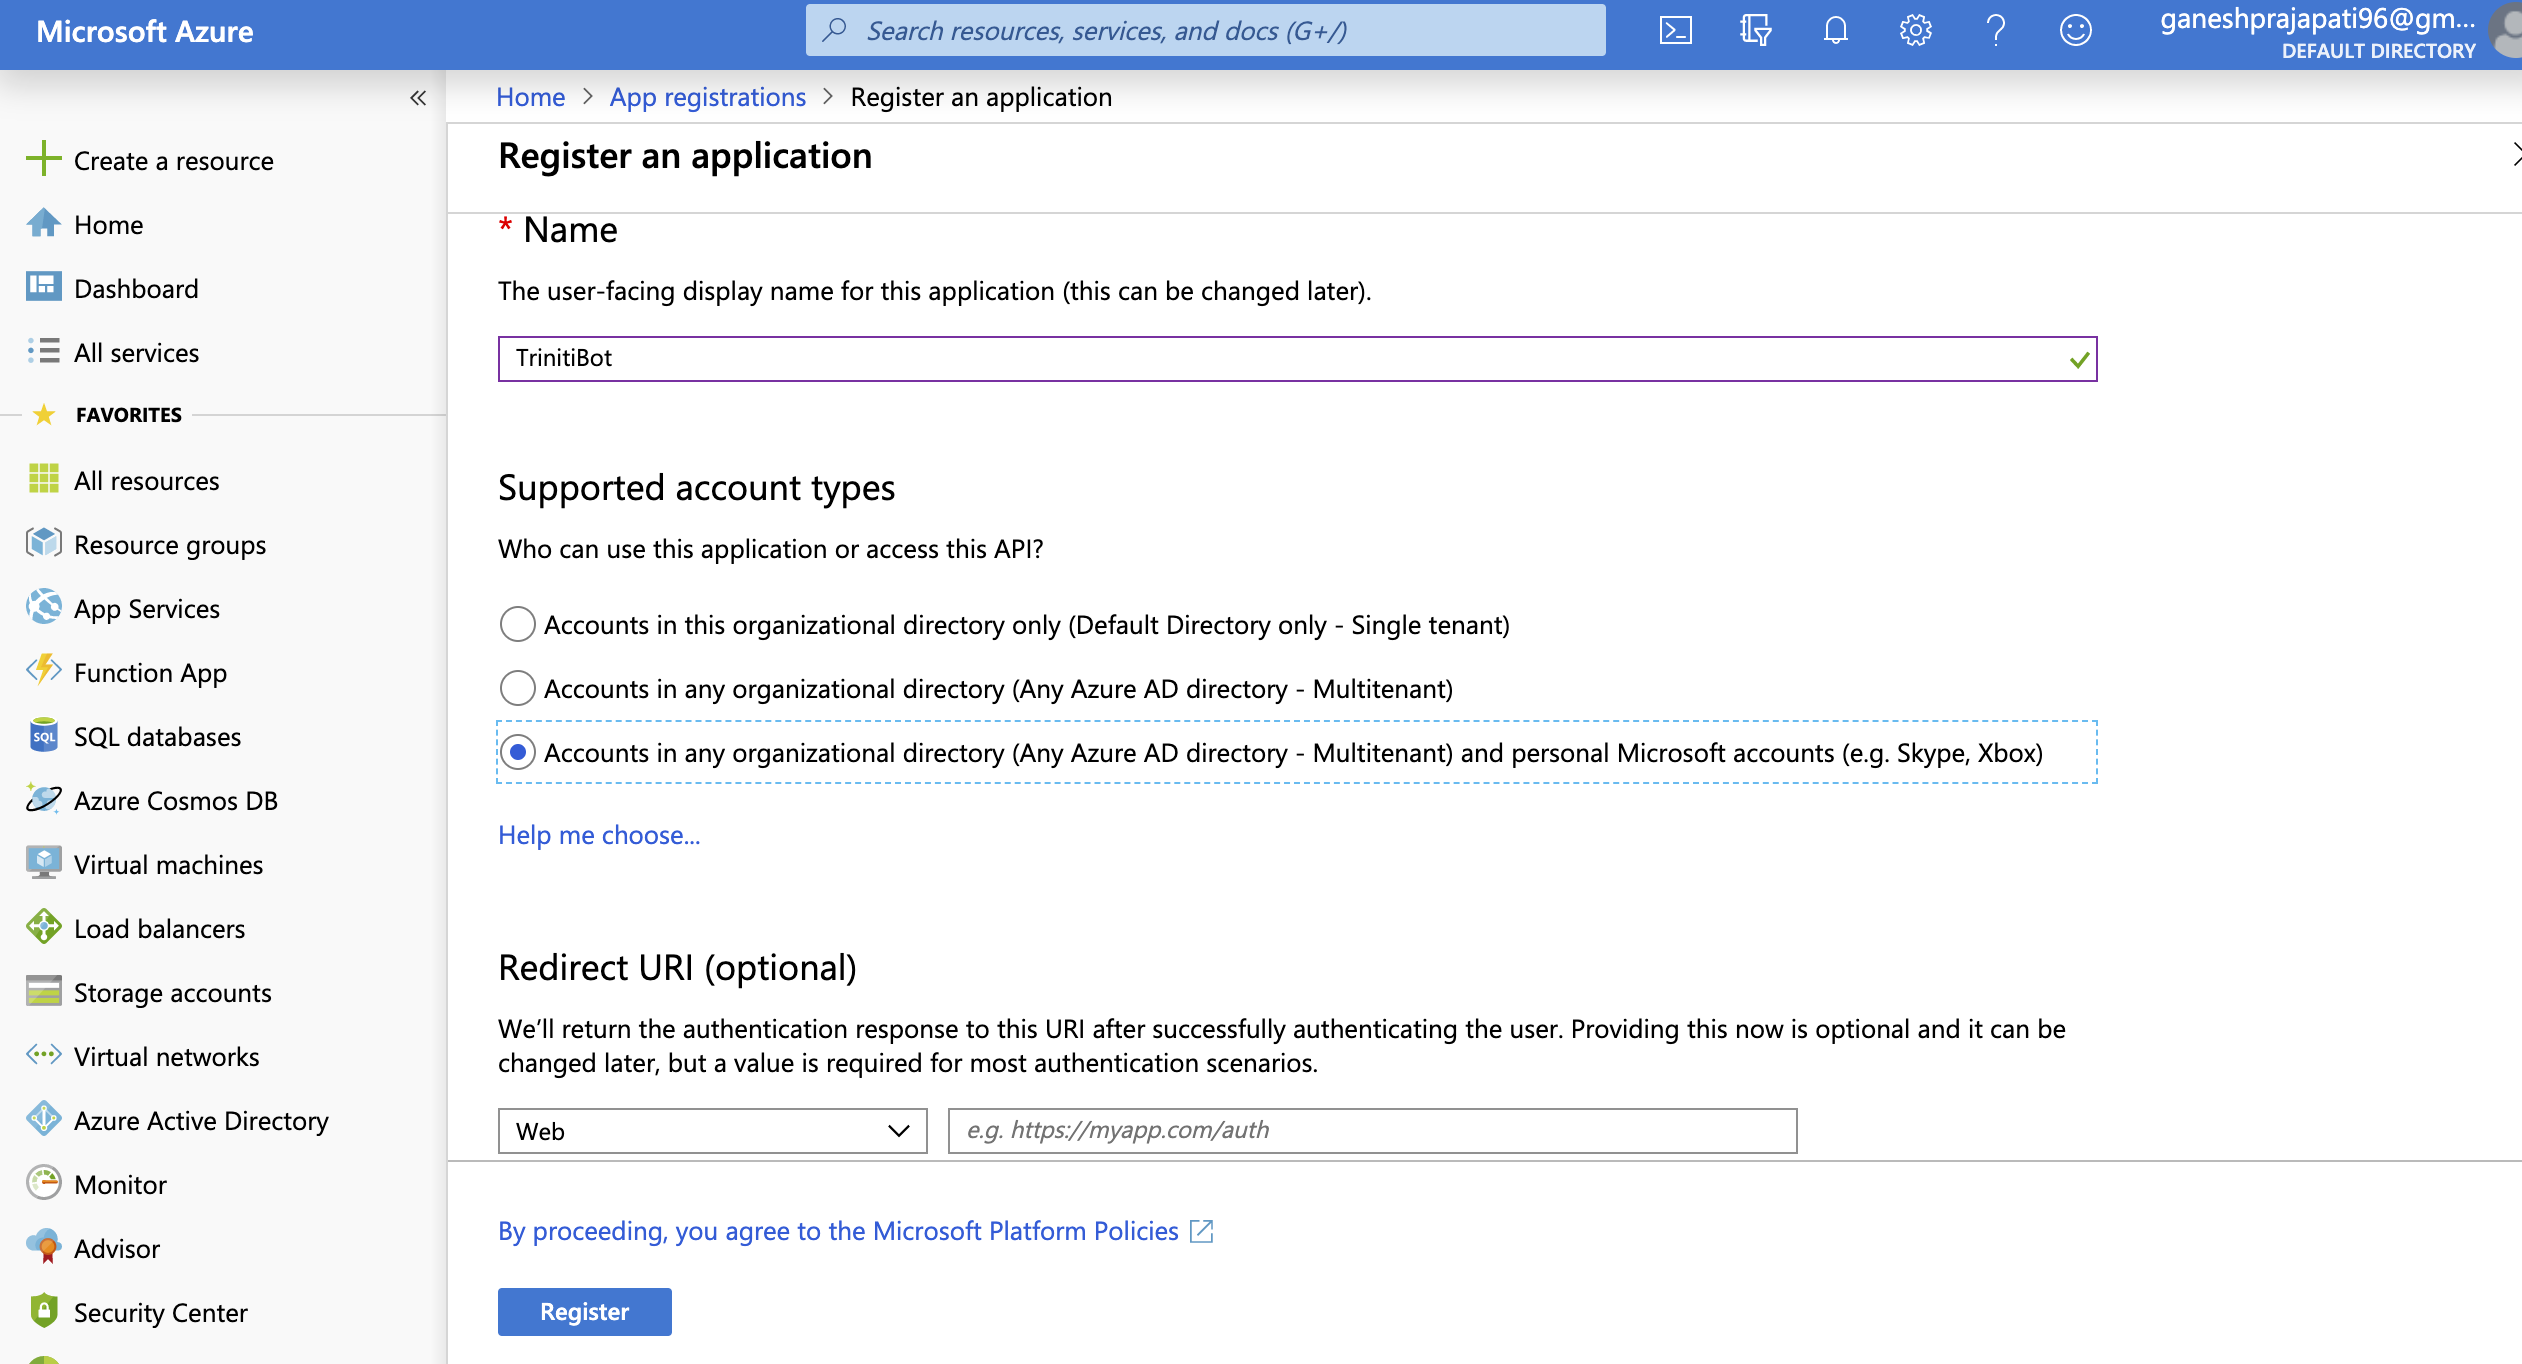
- Enter the registration name, and select "Supported account types" as Accounts in any organizational directory (Any Azure AD directory - Multitenant) and personal Microsoft accounts (e.g. Skype, Xbox) , Click on register
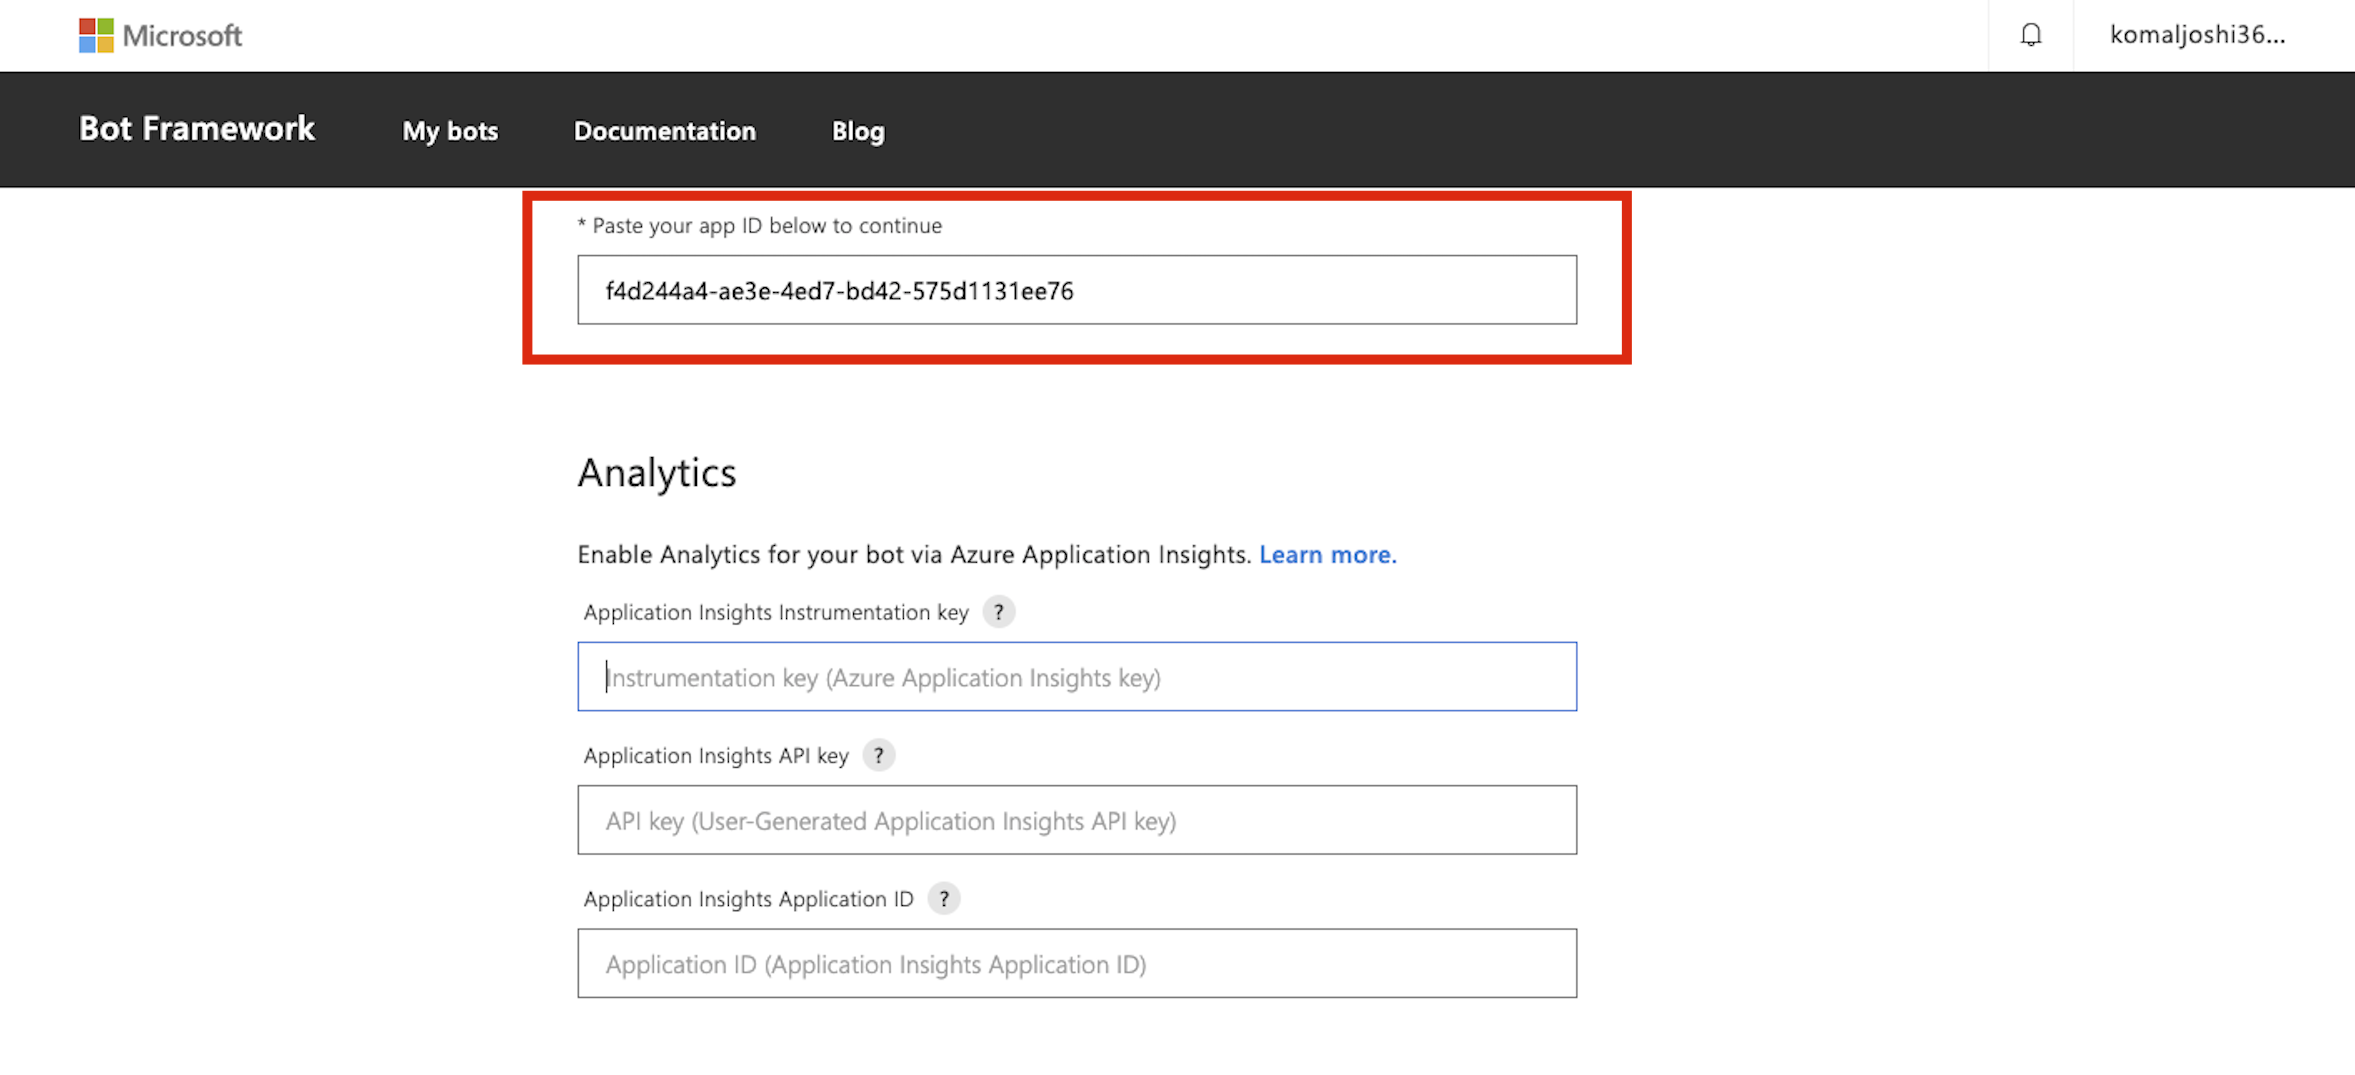
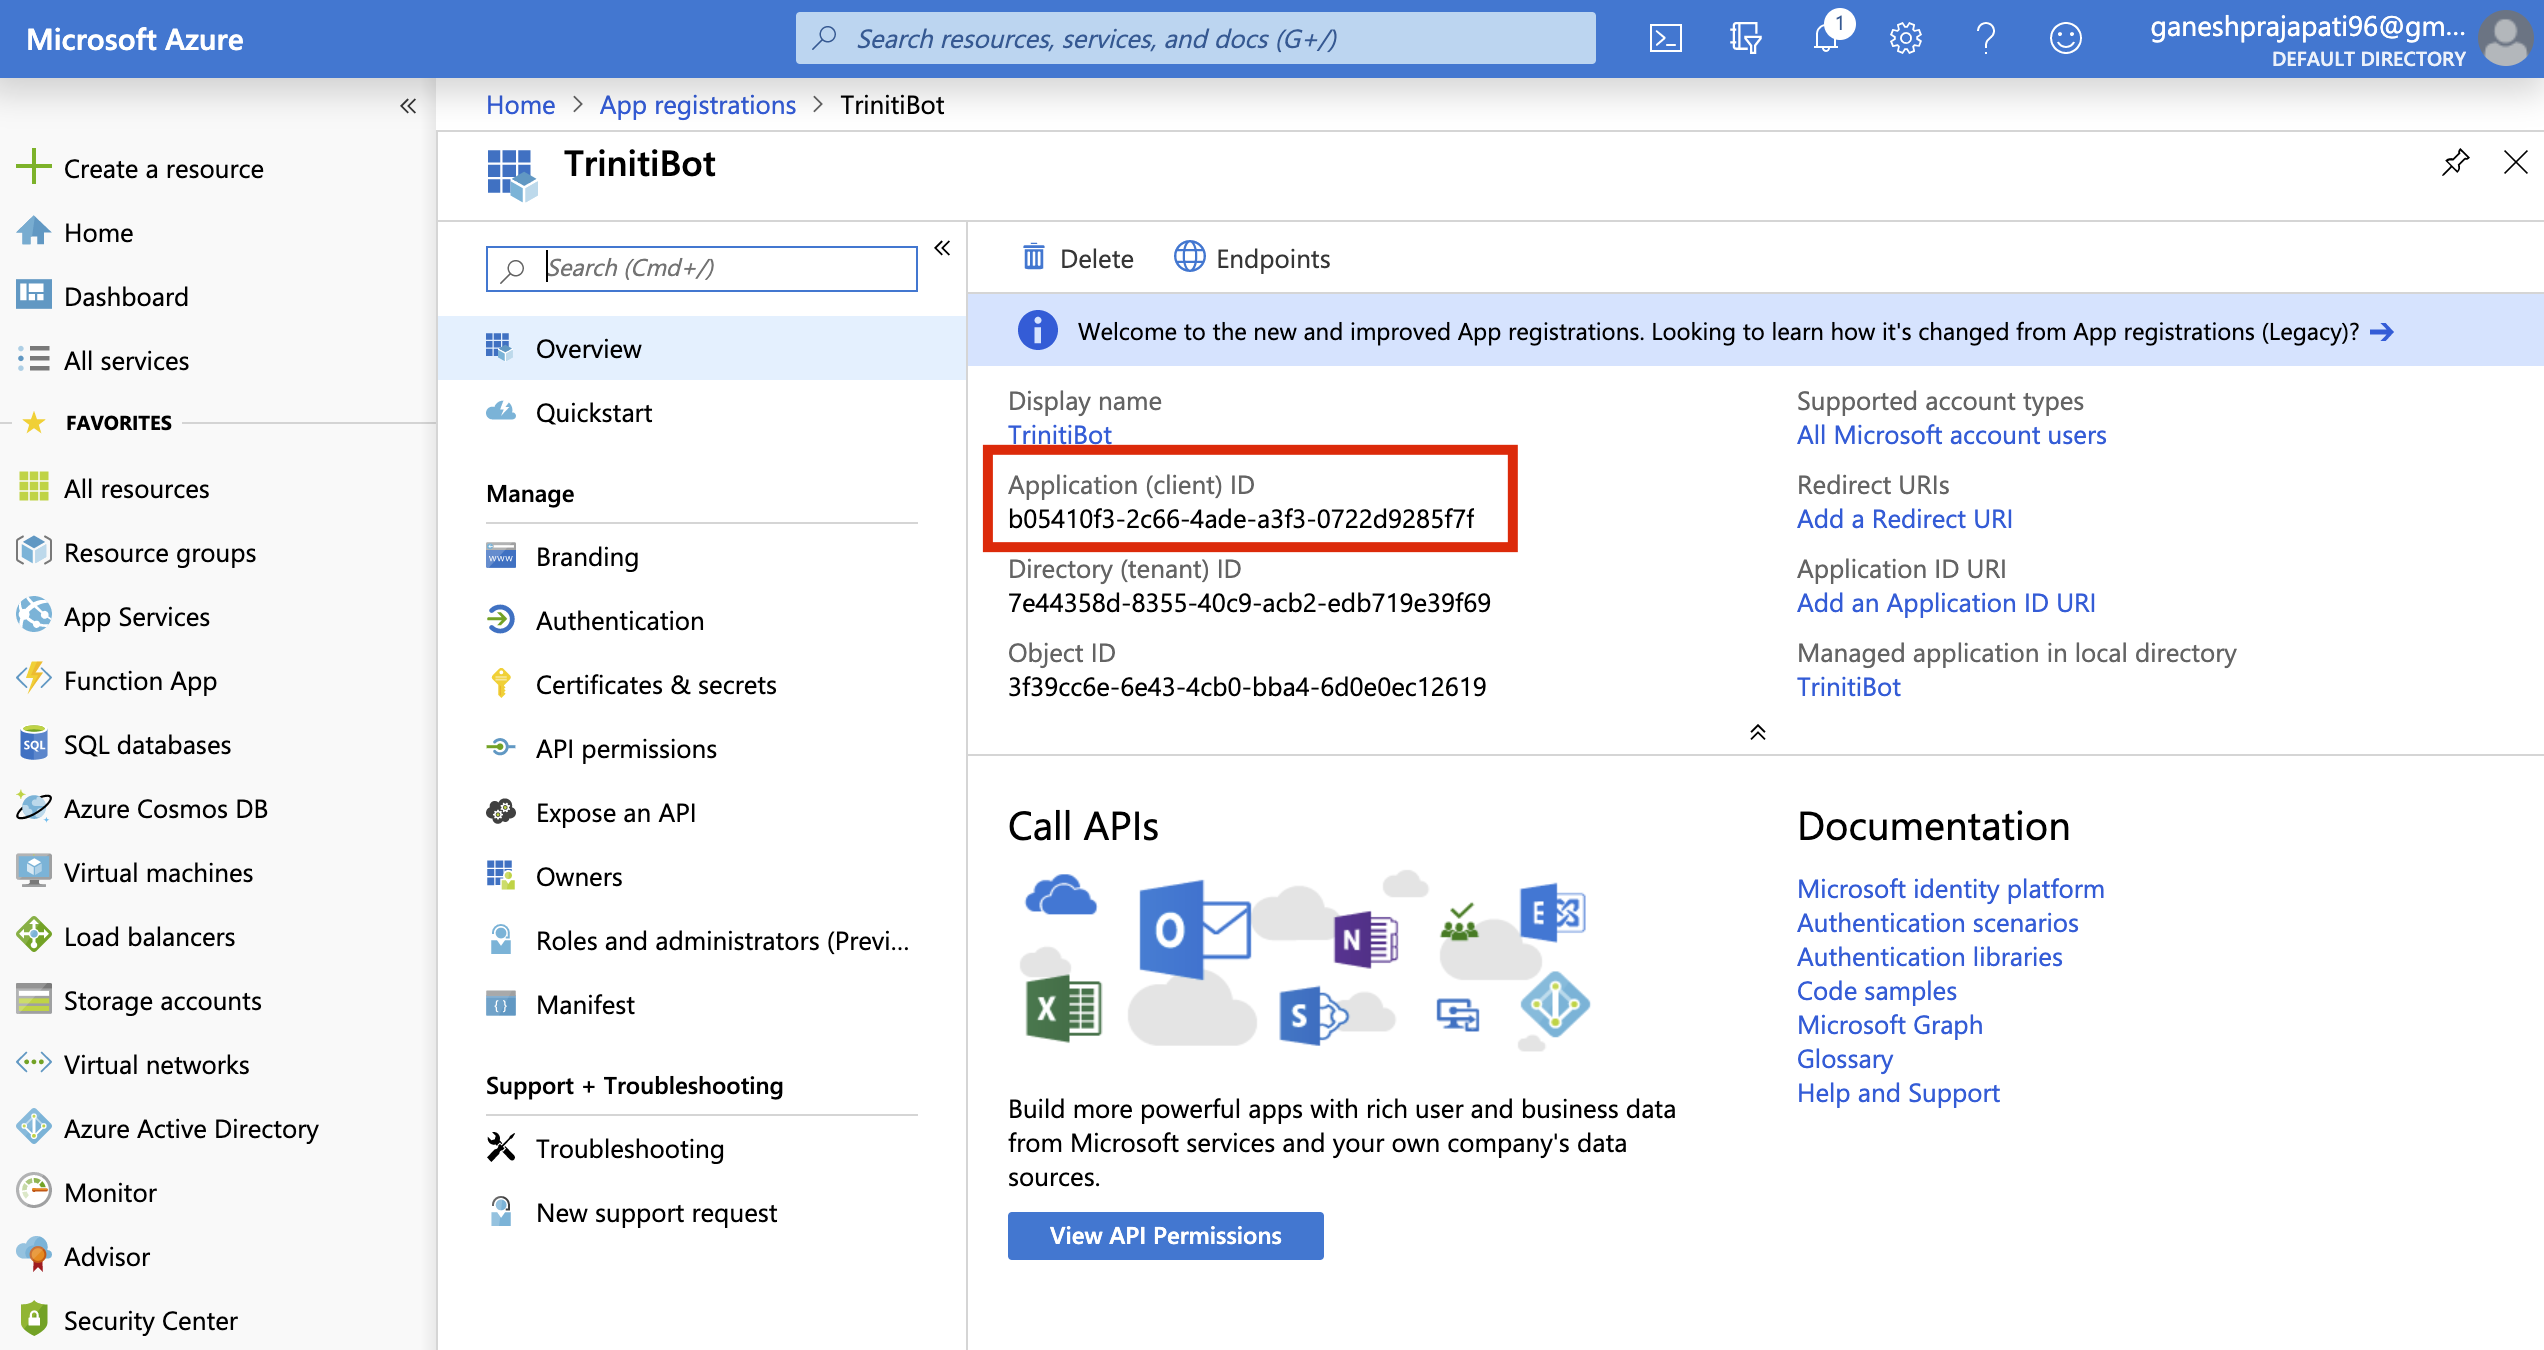
- Copy the Application(Client) ID & paste it under the option "Paste your app ID below to continue" and click on Register on the Bot Framework page
- For password click on "Certificates & secrets", click on "New client secret", Select expires, click on Add
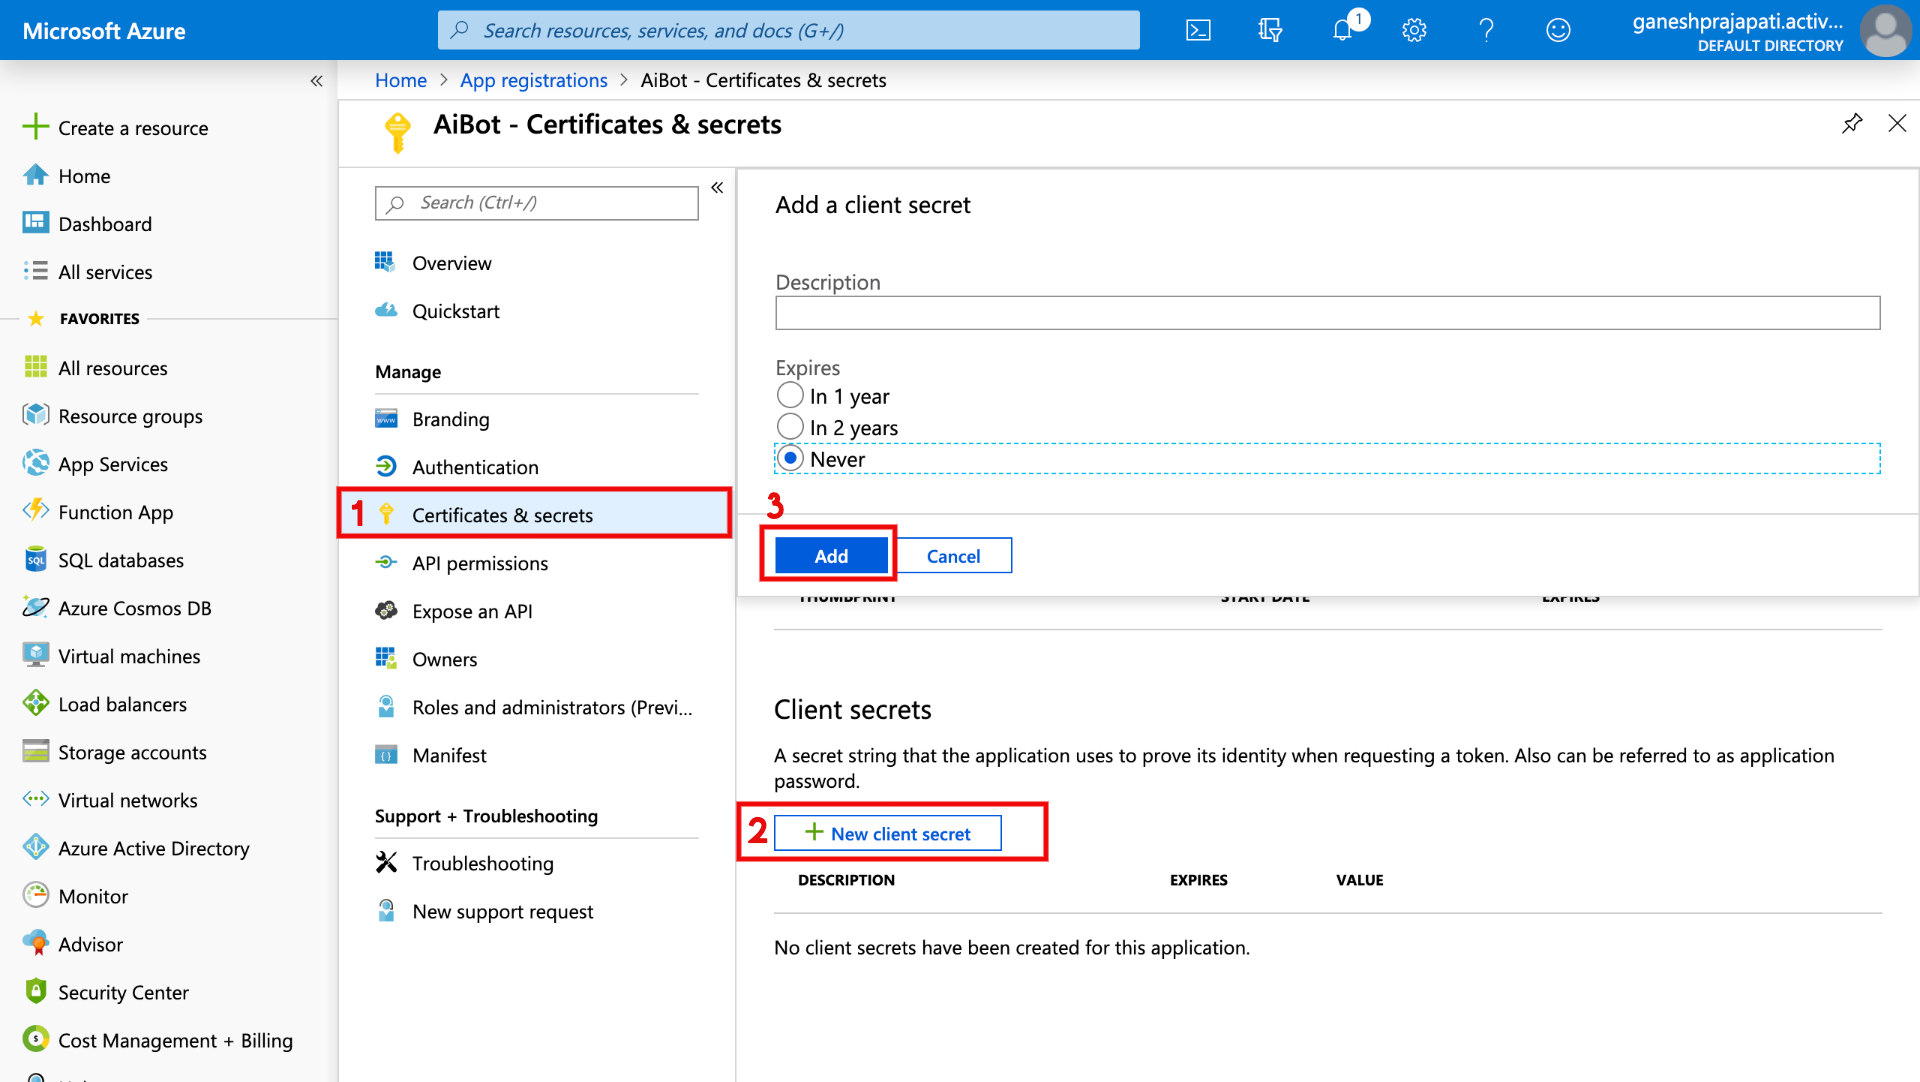
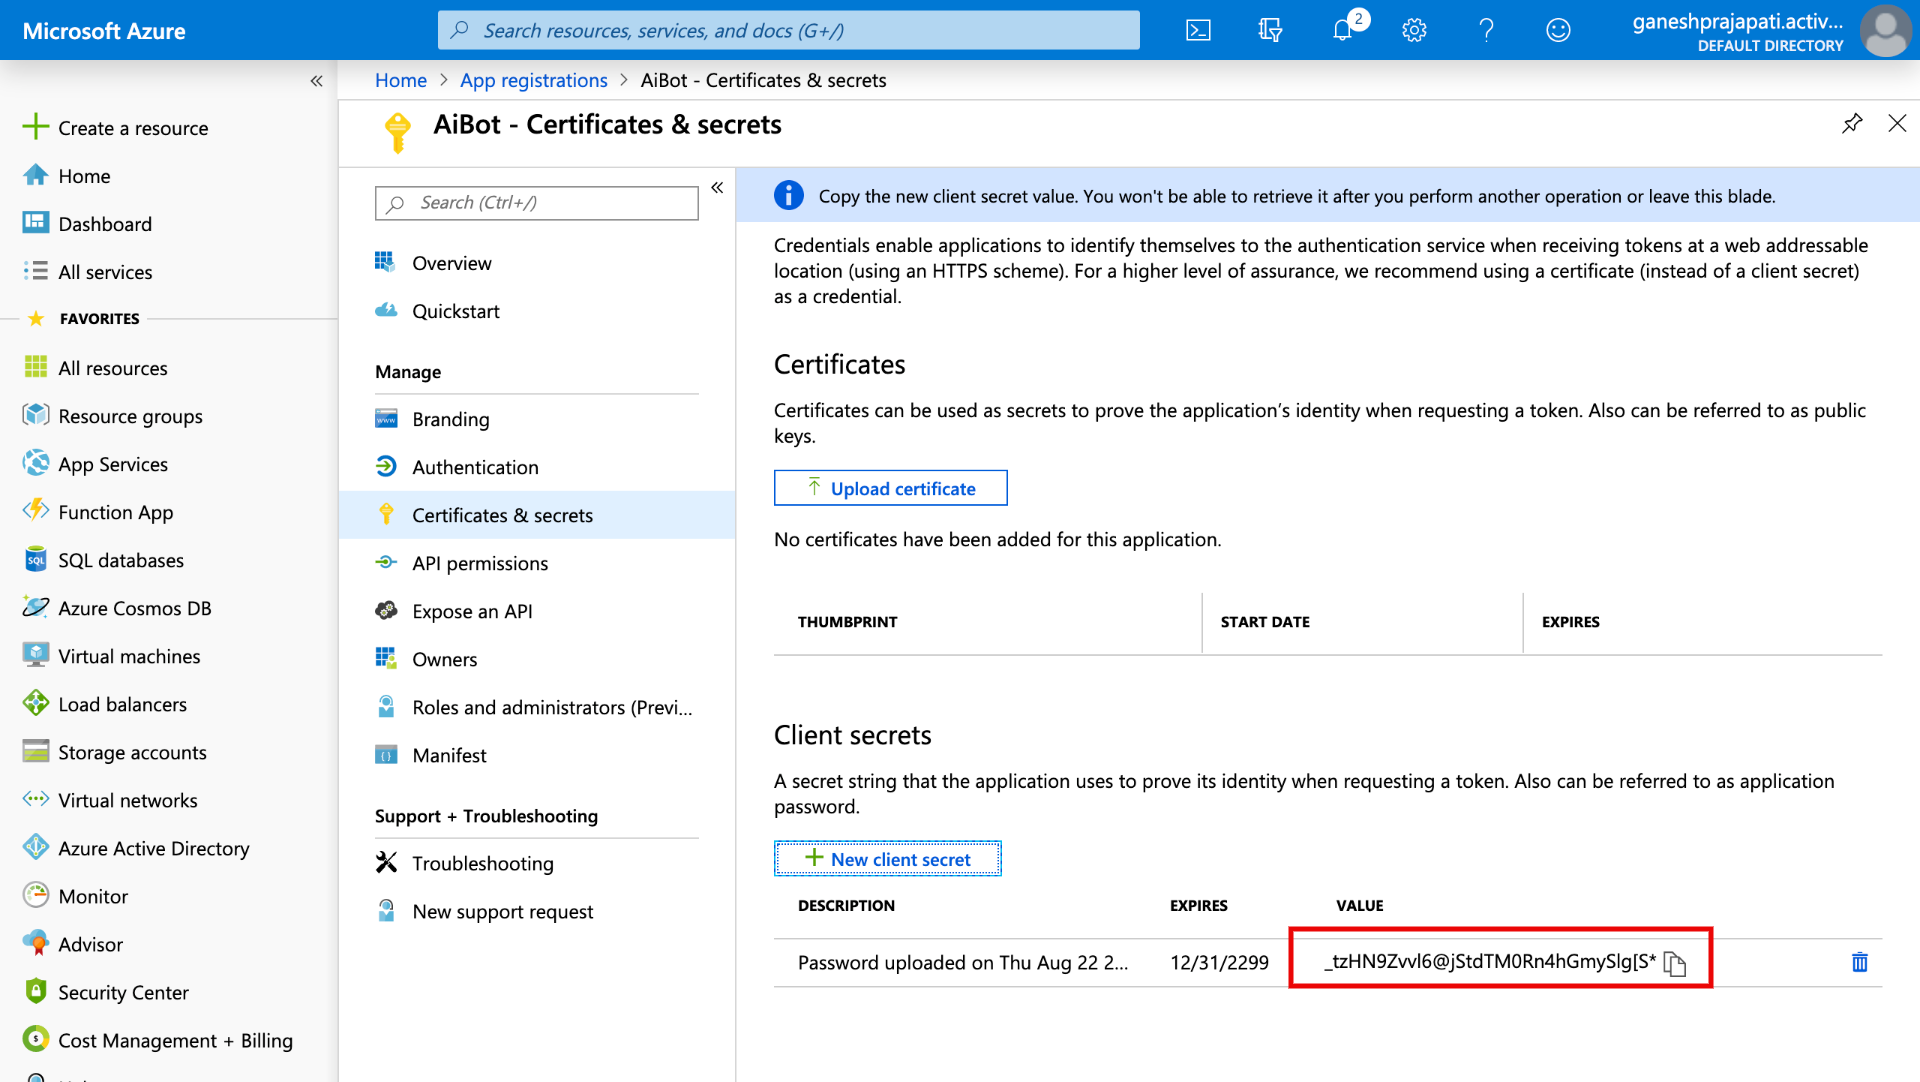
- You will get the password here as shown in following page Note: Make sure you have noted down the password, it will be shown only once.
- On triniti.ai page while enabling the Skype Channel you will need Microsoft App Id and Microsoft App password Paste the Application ID and password that you got from azure portal and click on Save.
- Go back to Bot framework portal paste same Application ID in "Paste your App id below to continue" field.
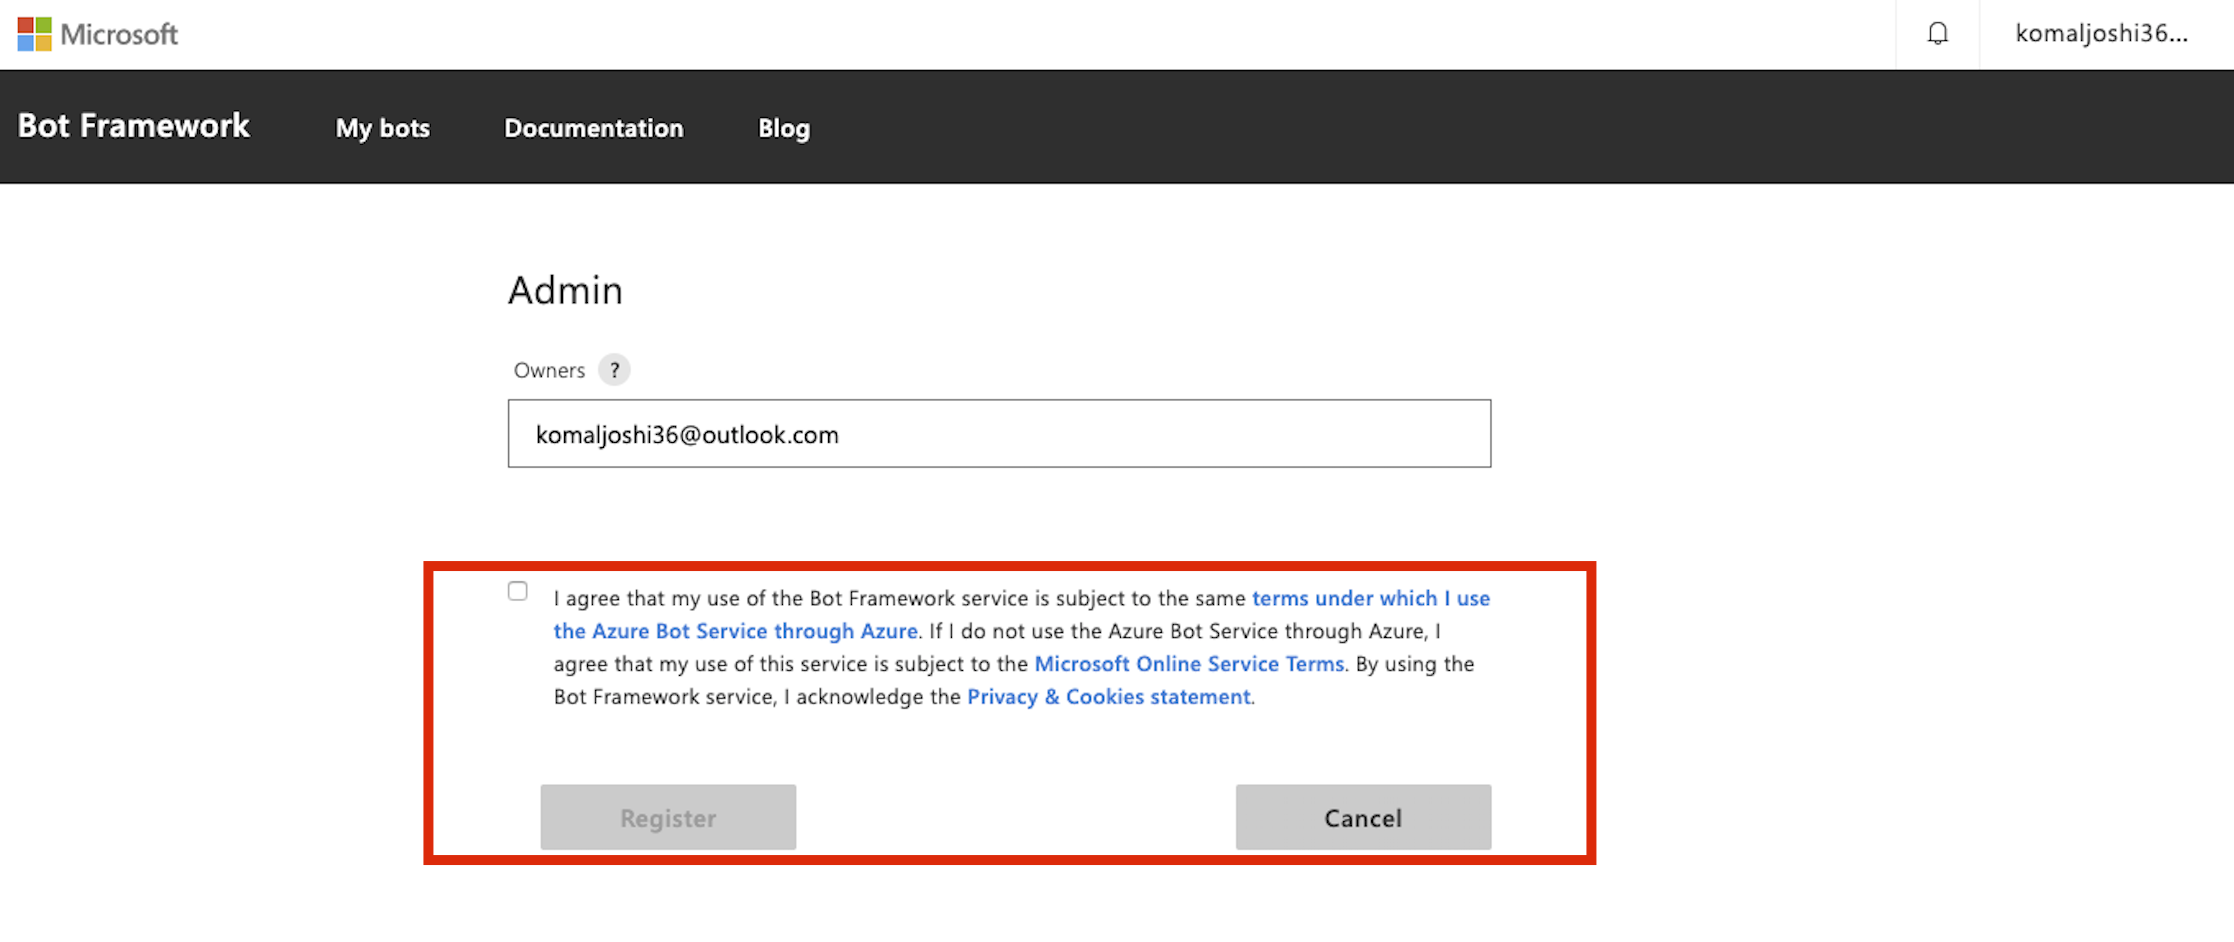
- Read and Agree the Microsoft Online Service terms, Privacy & Cookies statement, Click on Register.
- On the next page Select Skype from "Add a featured channel" option on Botframework page
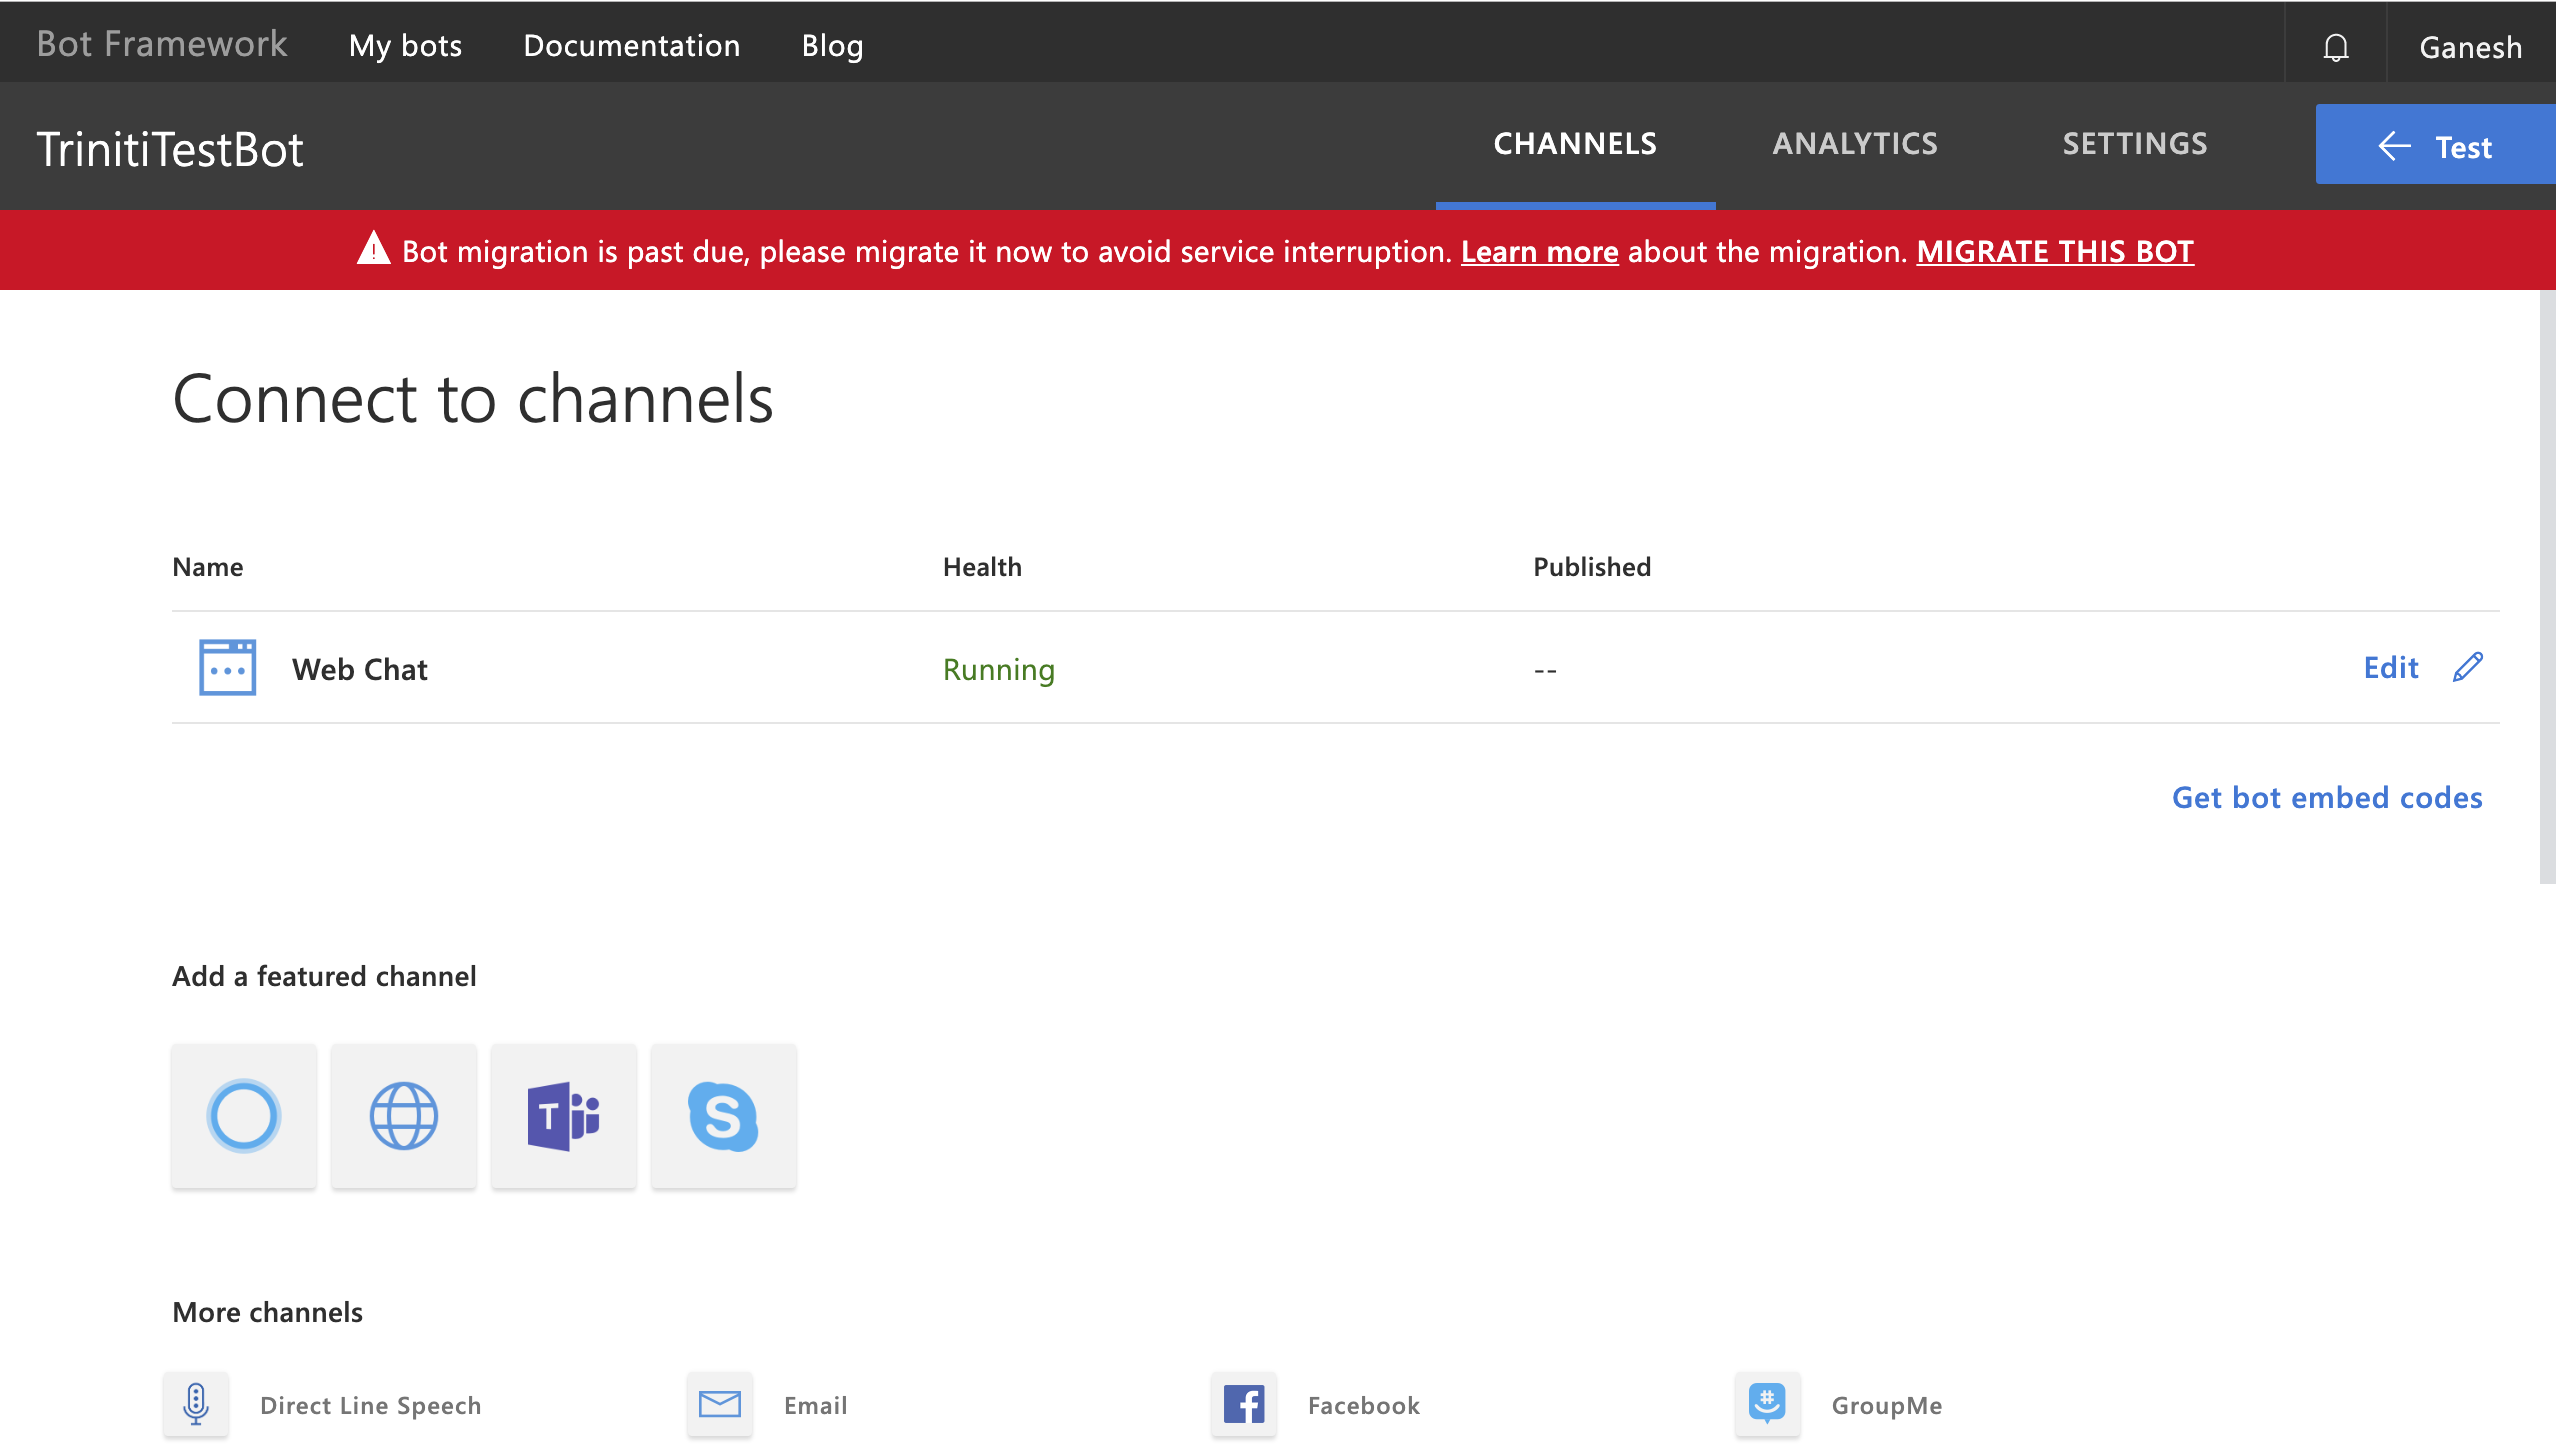
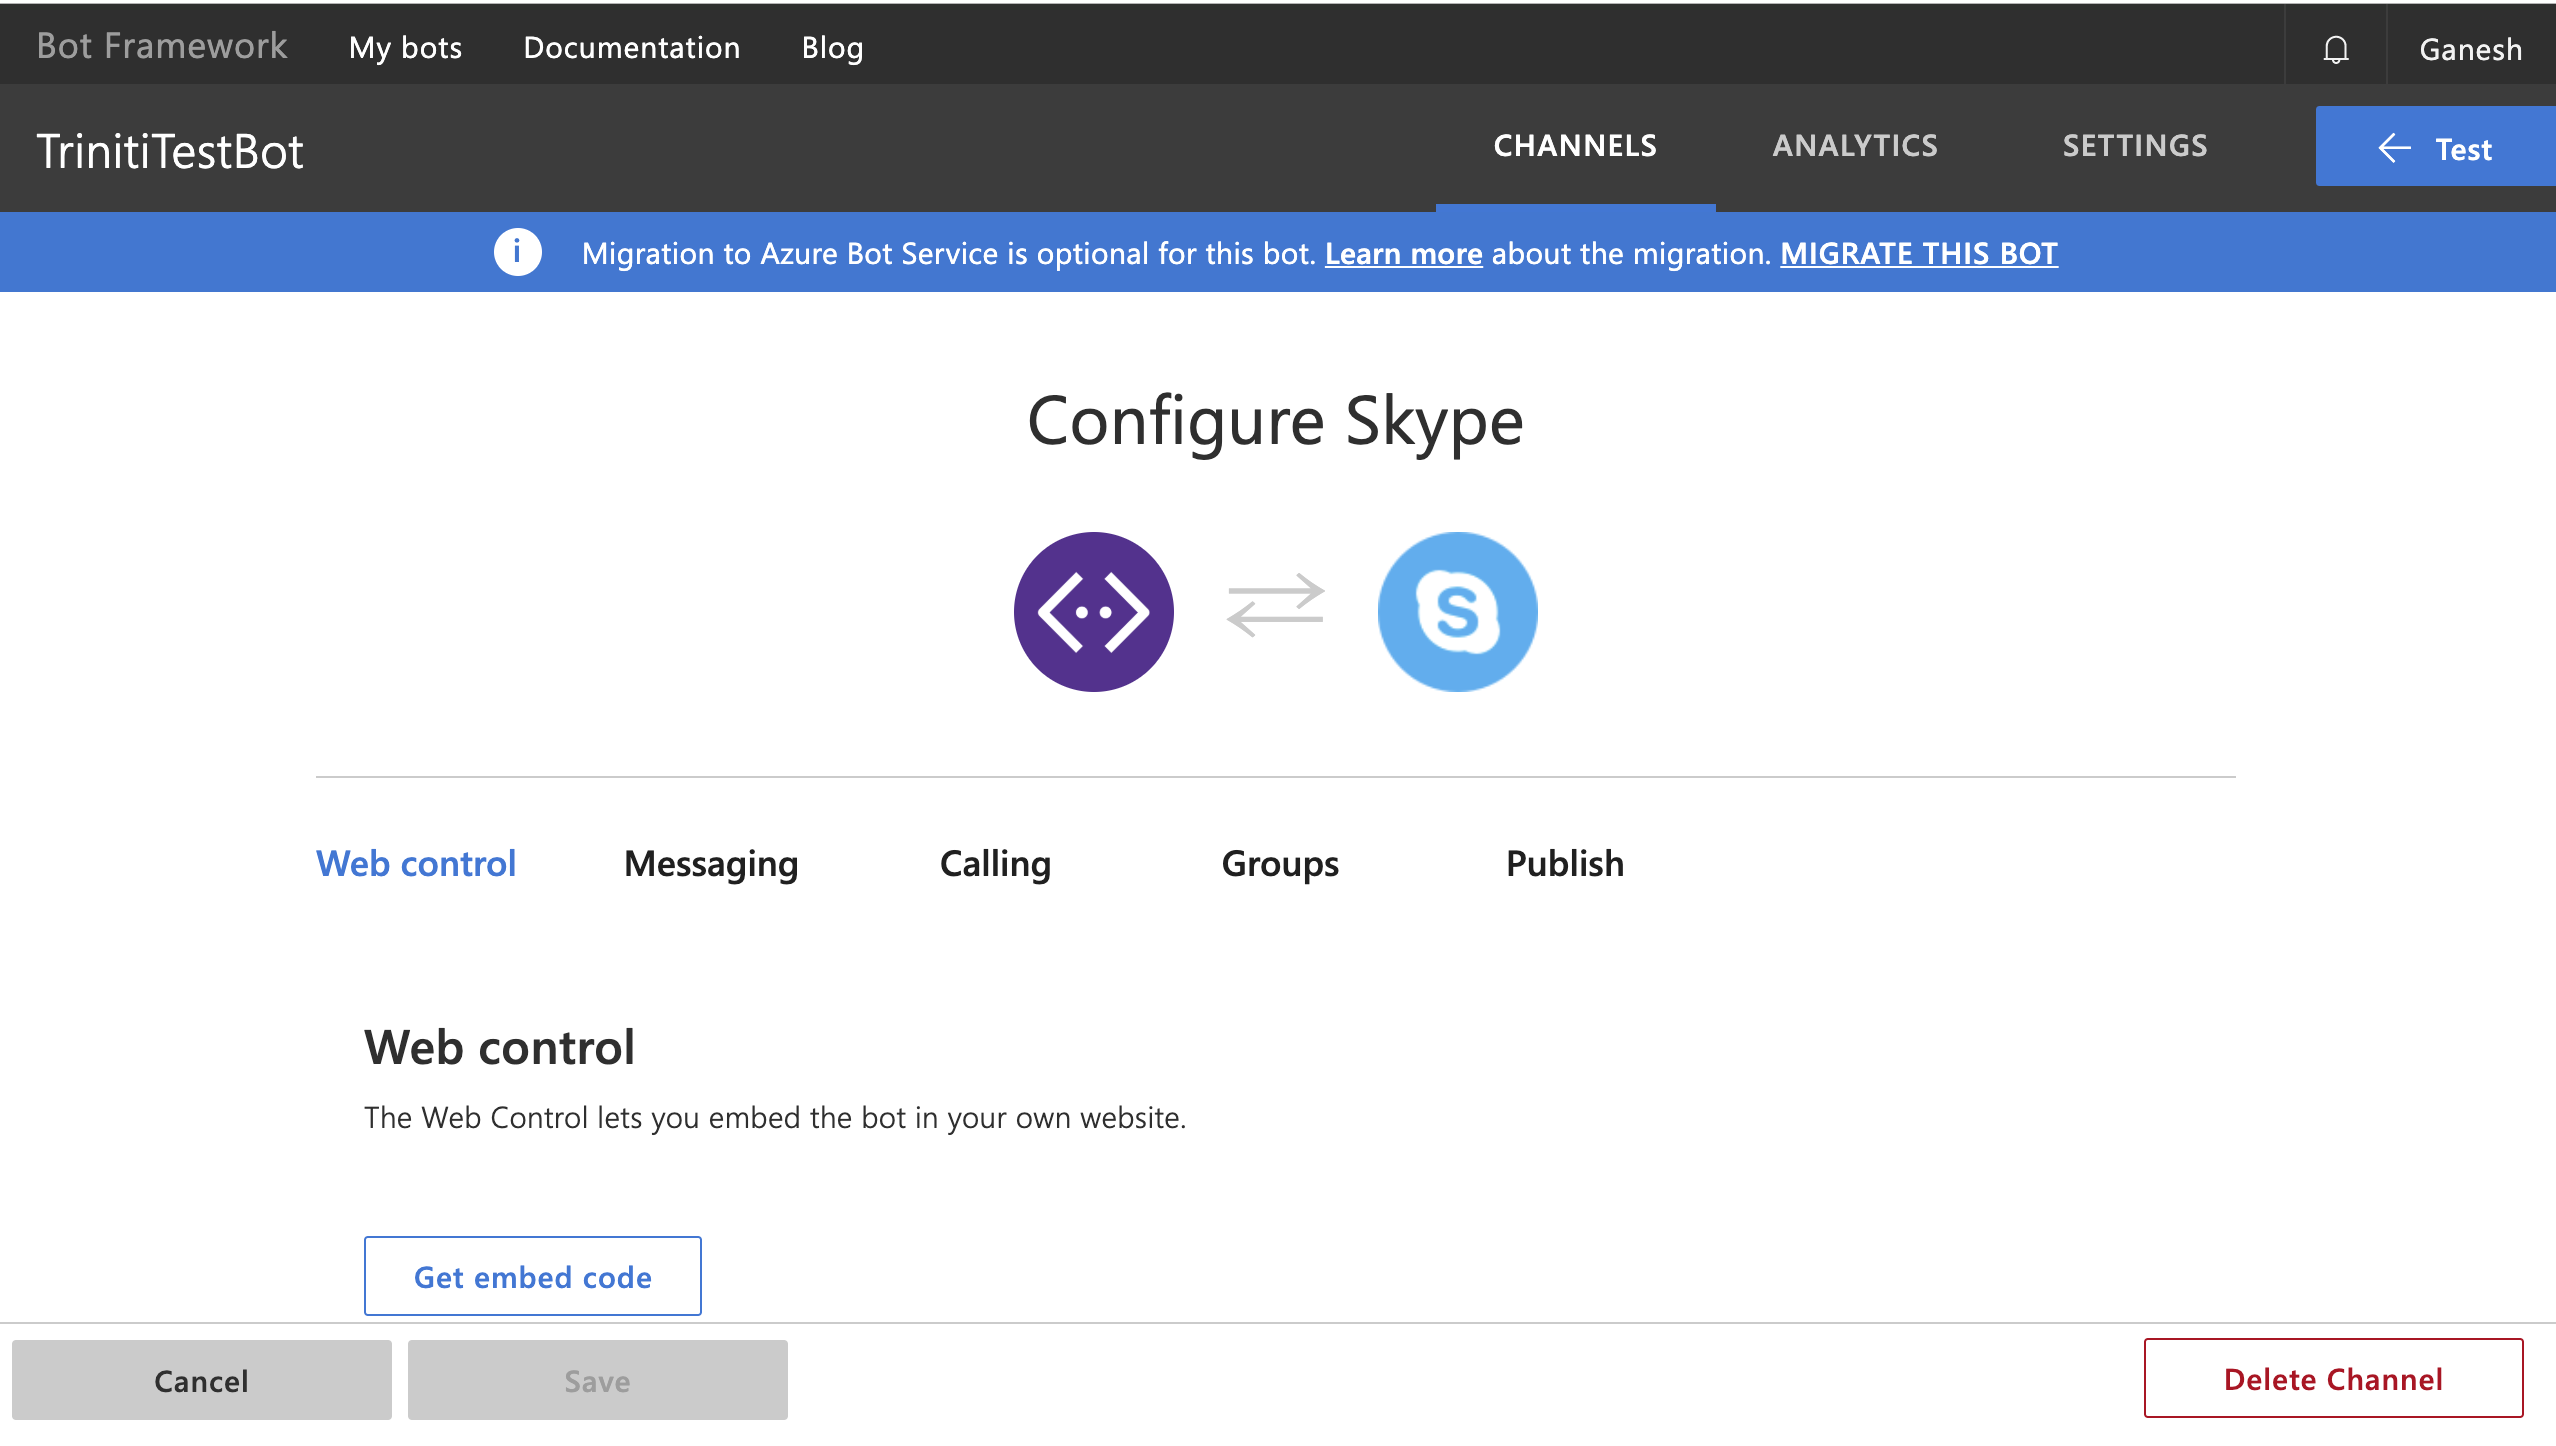
- You can configure your skype as per your requirement, Your Registered Bot is integrated with the Skype channel
- Click on channels in the menu then click on Skype
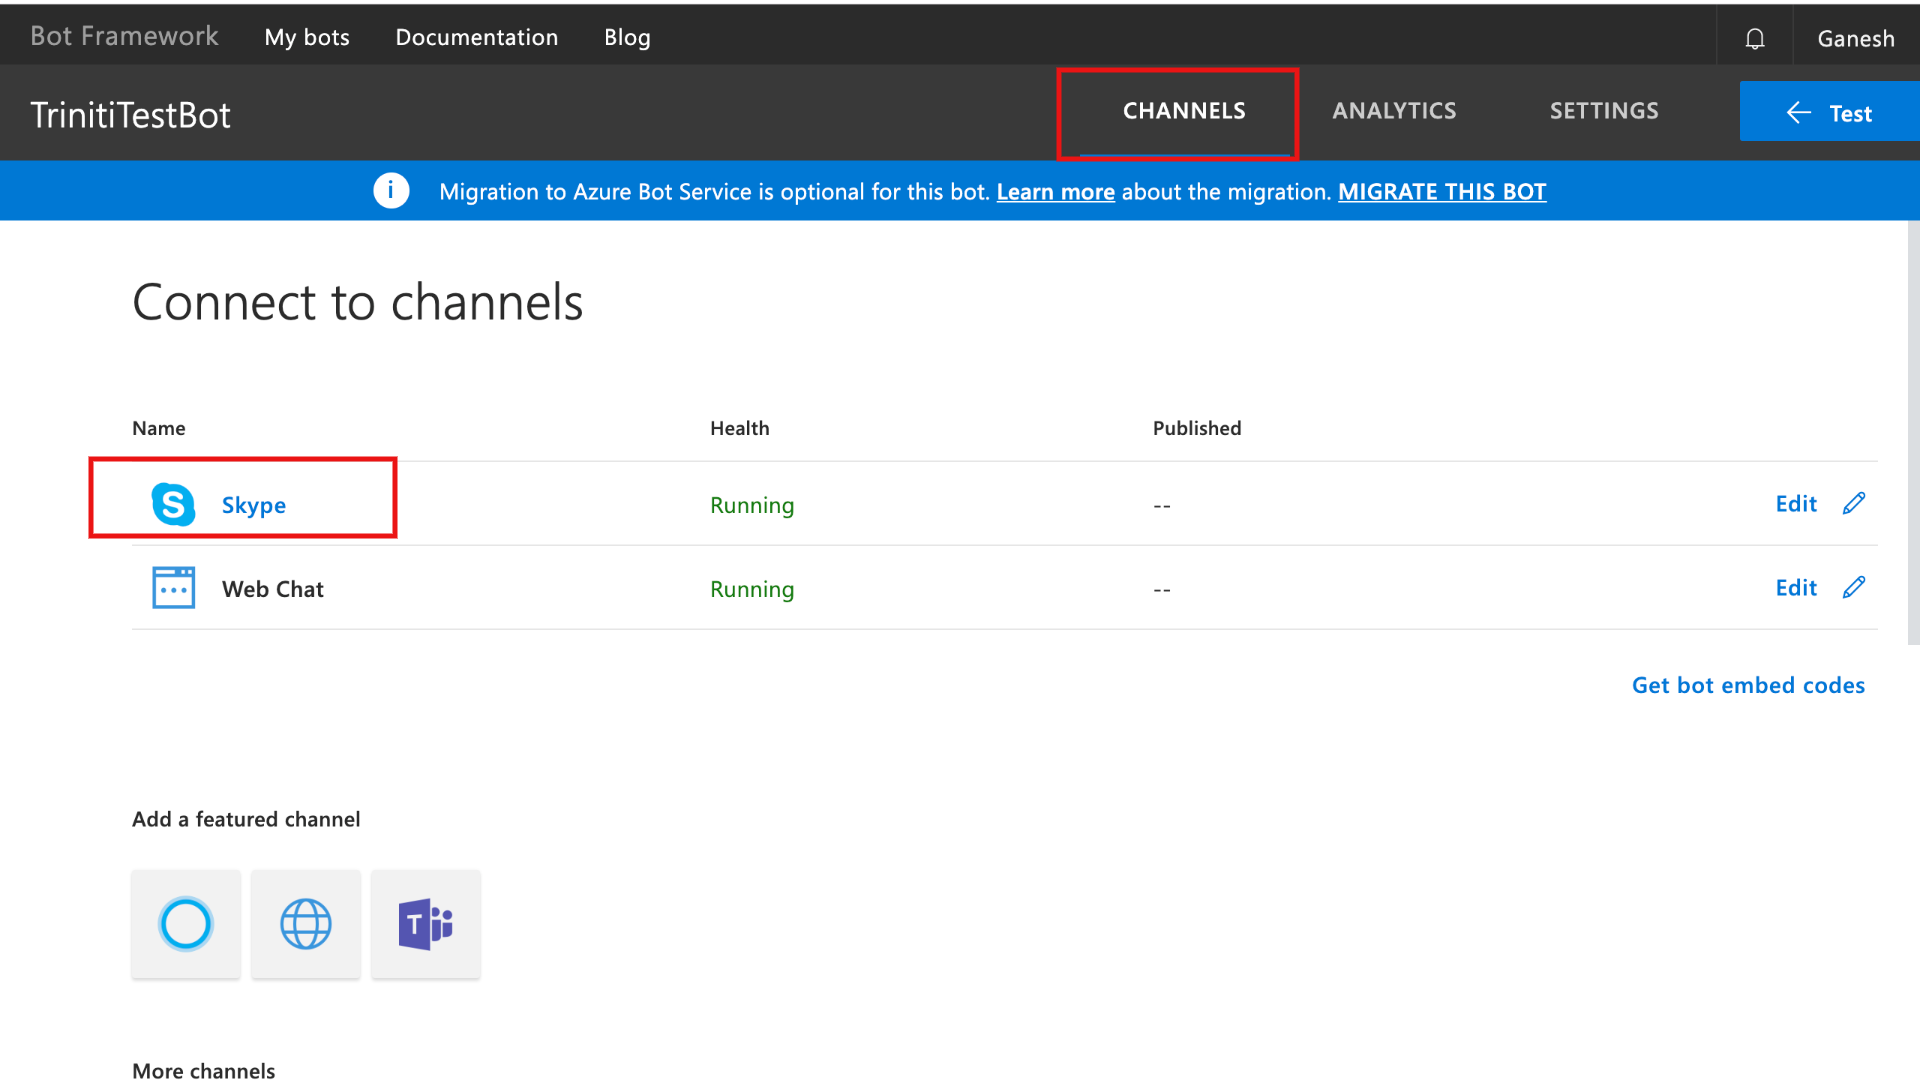
Your bot is ready to add in your Skype contacts
- Click on Add to Contacts

Your skype bot is ready to be interacted with!
Managing Google Assistant
As the most common IoT device is Google Assistant that enables the user to interact by asking or voice command to the google assistant. Google Assistant is an artificial intelligence-powered virtual assistant developed by Google that is primarily available on mobile and smart home devices. We have enabled the google assistant to make your conversational bot more interactive so that the user can interact with your bot by providing any voice command, the bot will send the response in speeches as well. You can enable the Google Assistant channel for your bot by following these steps:
Enable Google Assistant channel
- Login to triniti.ai portal
- Select your workspace
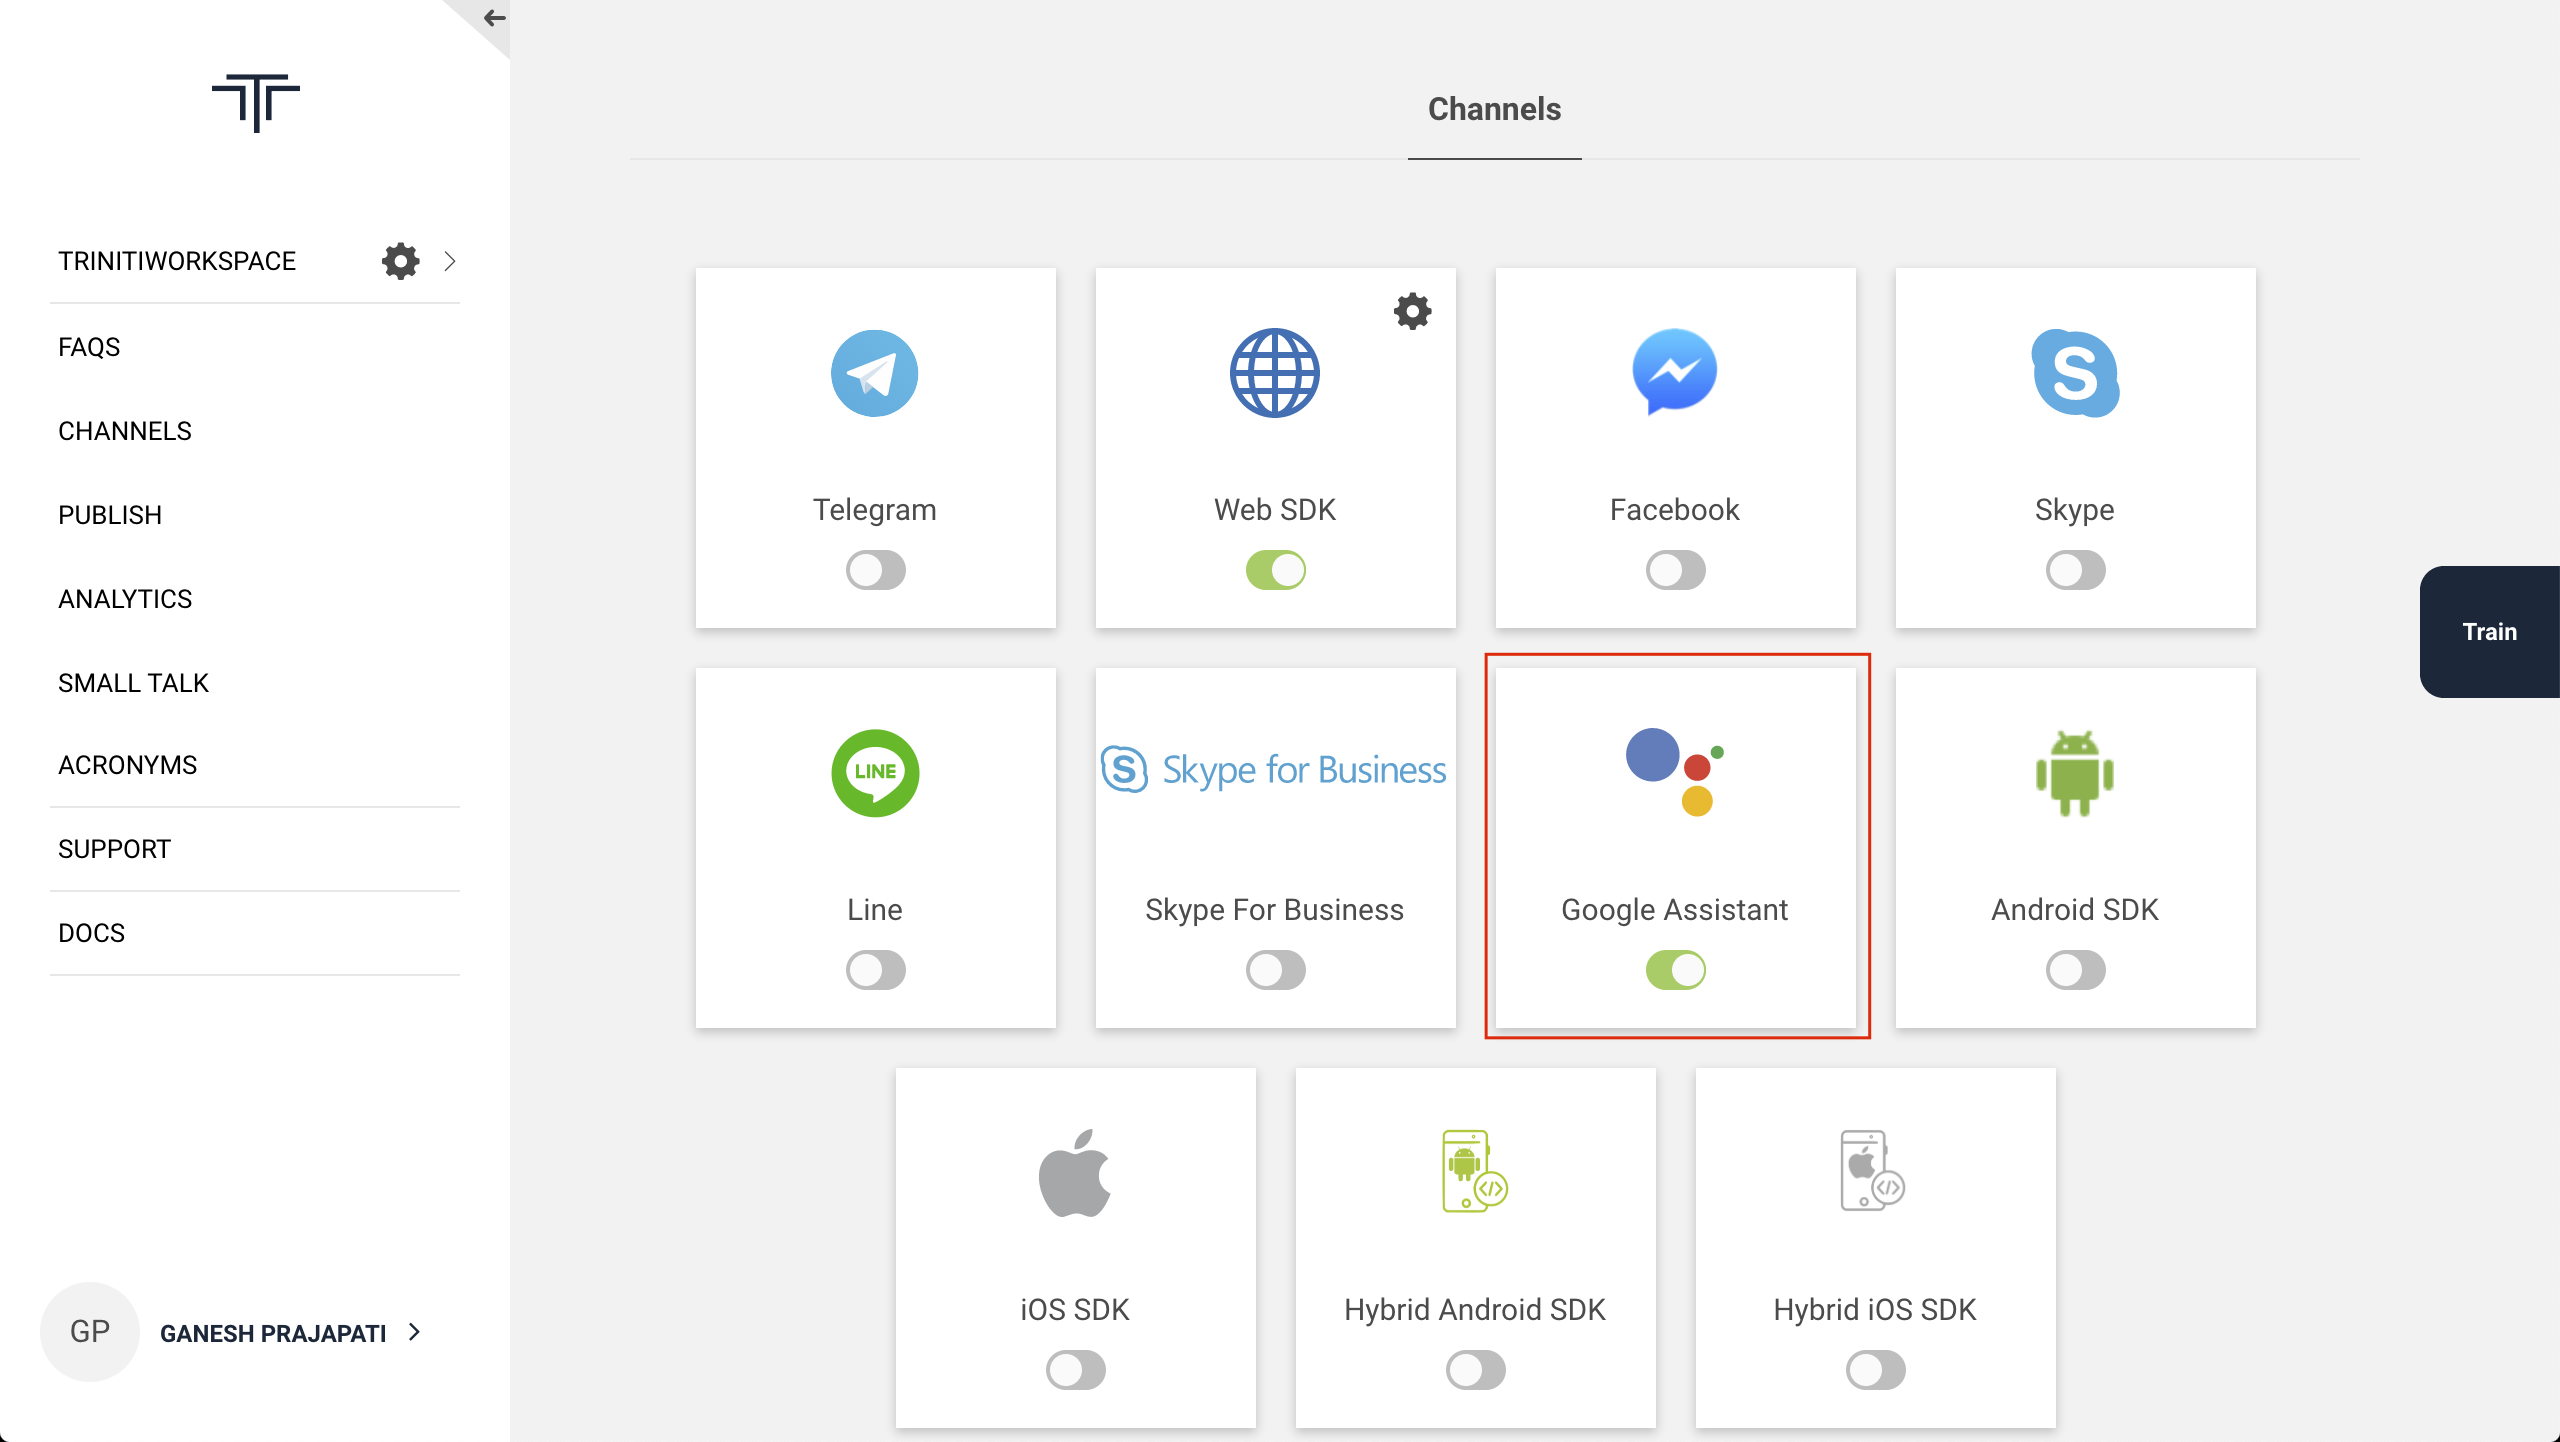
- Goto Channels
- Enable Google Assistant channel
Setup Google Assistant
- Goto Actions on Google console
Click on New Project, Enter your project name, and click on Create Project

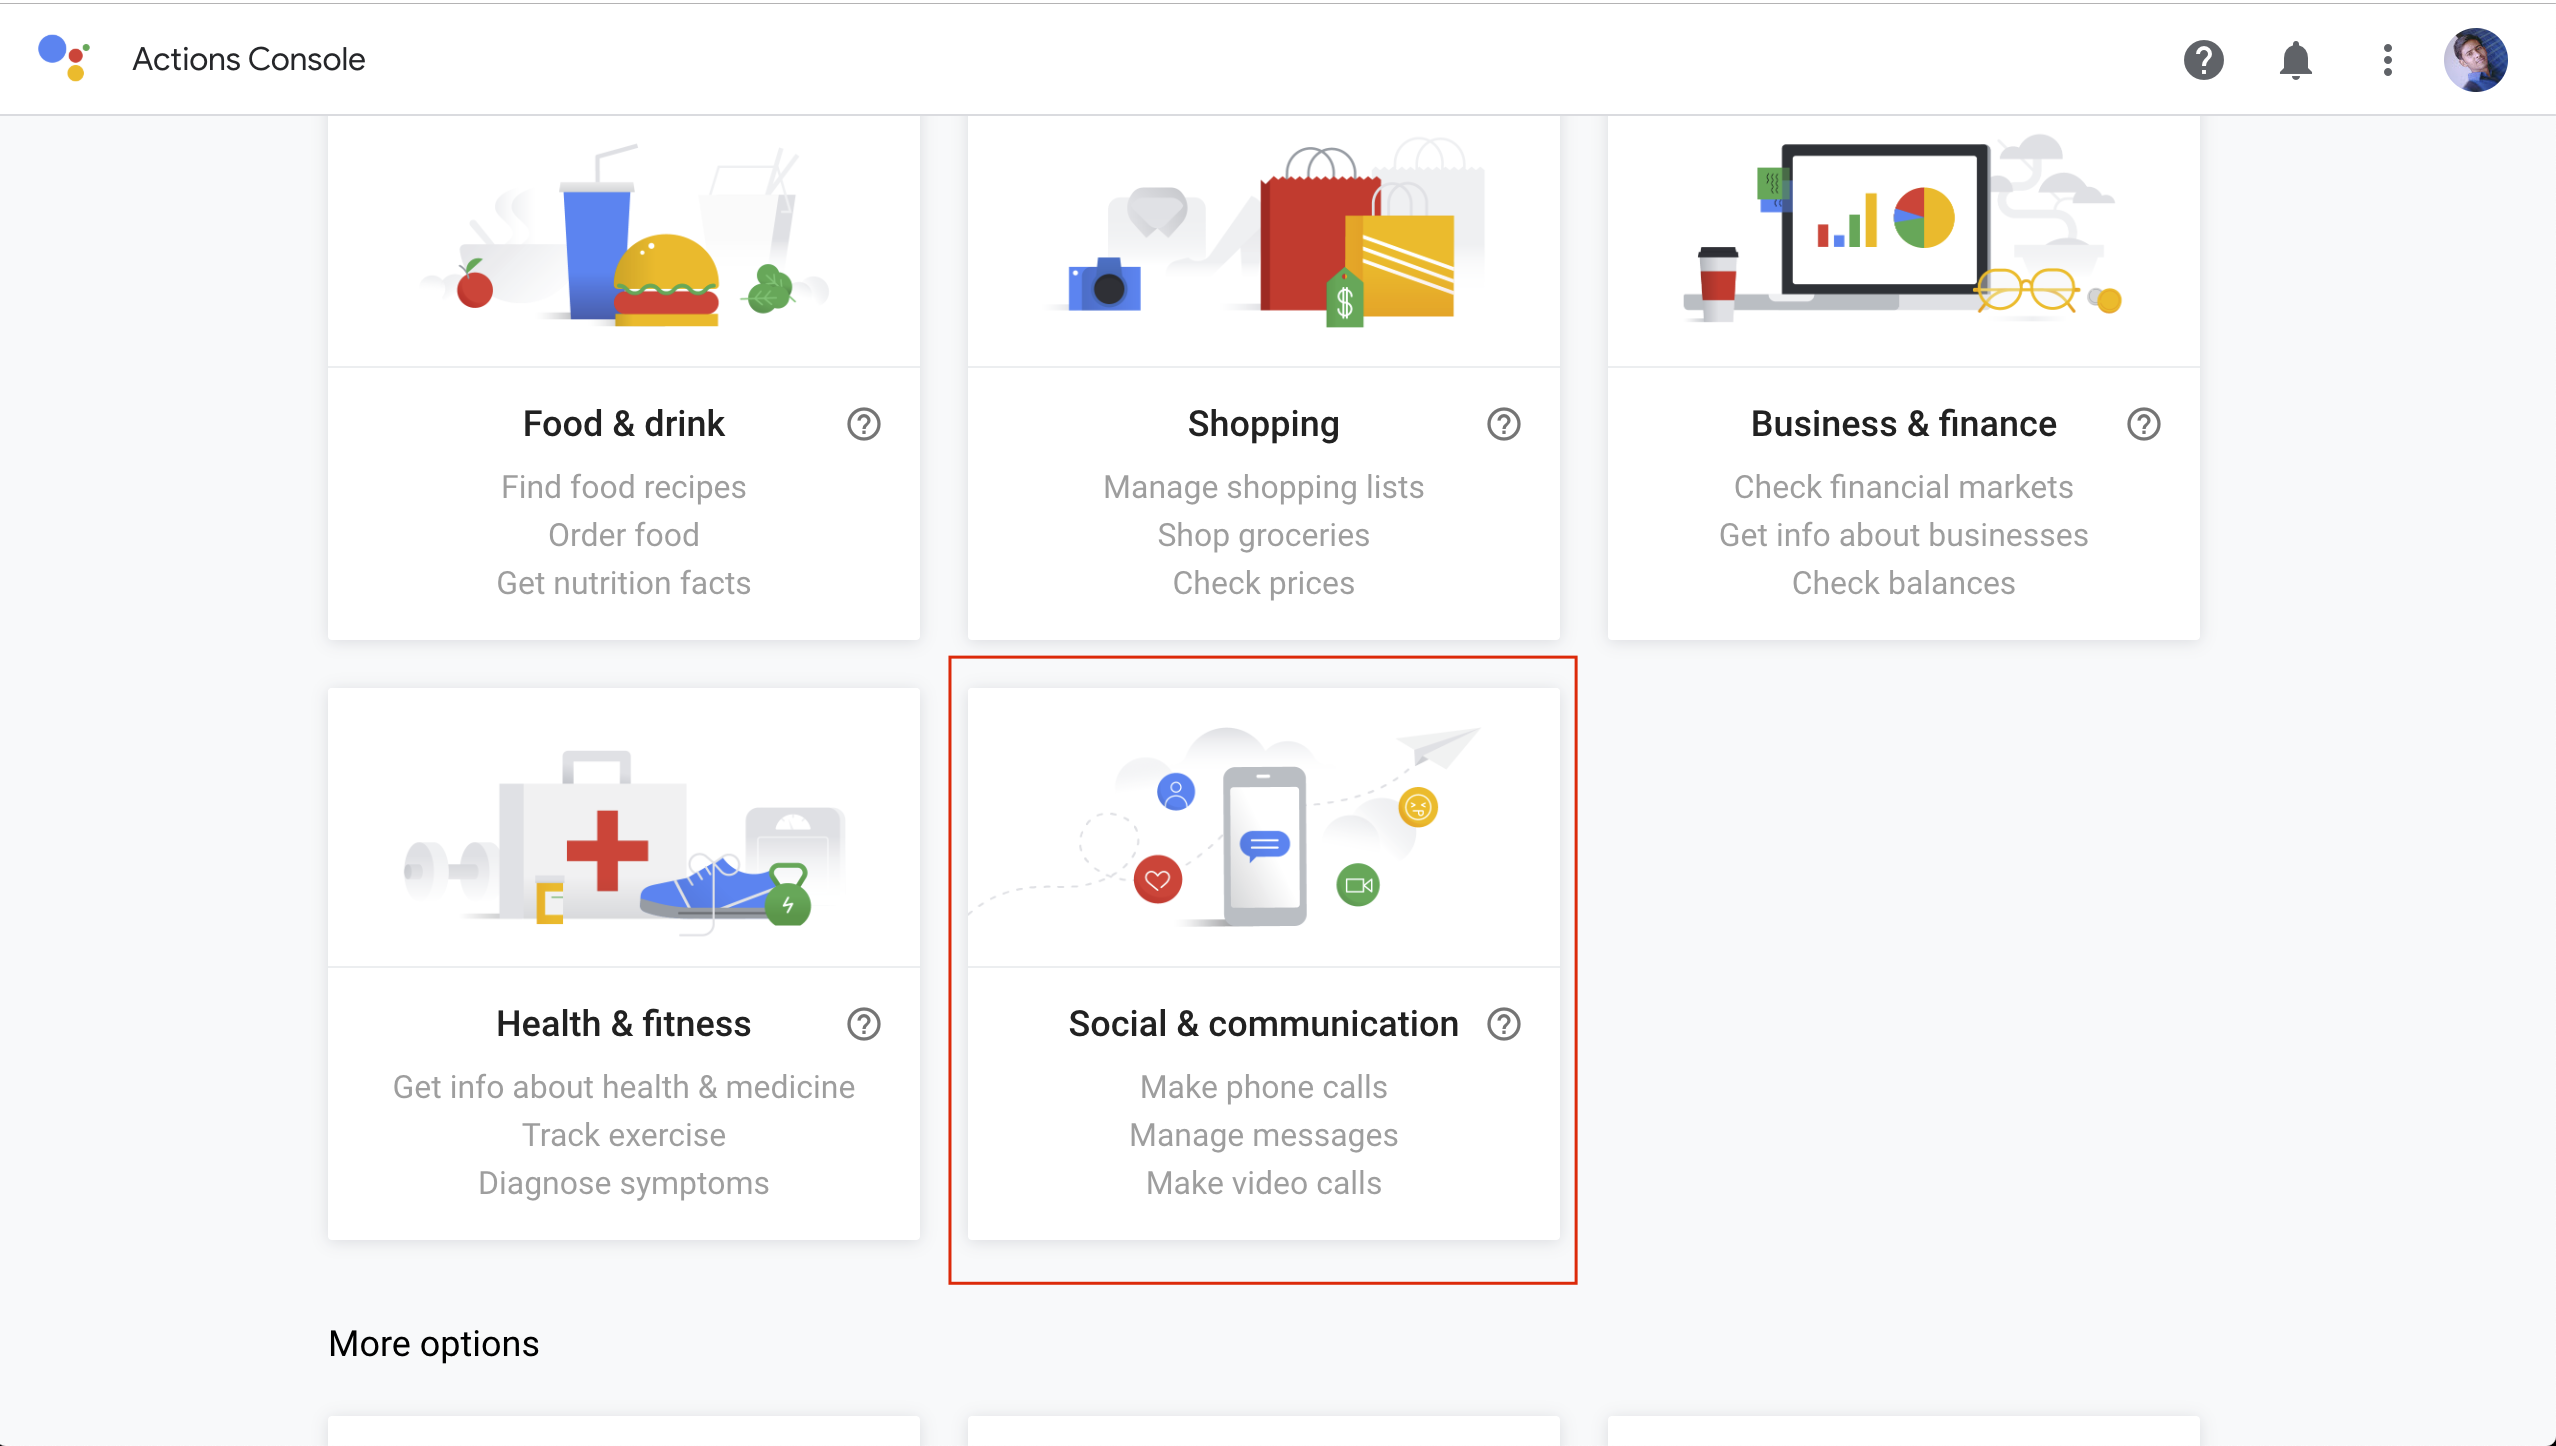
On the next page select Social & communication
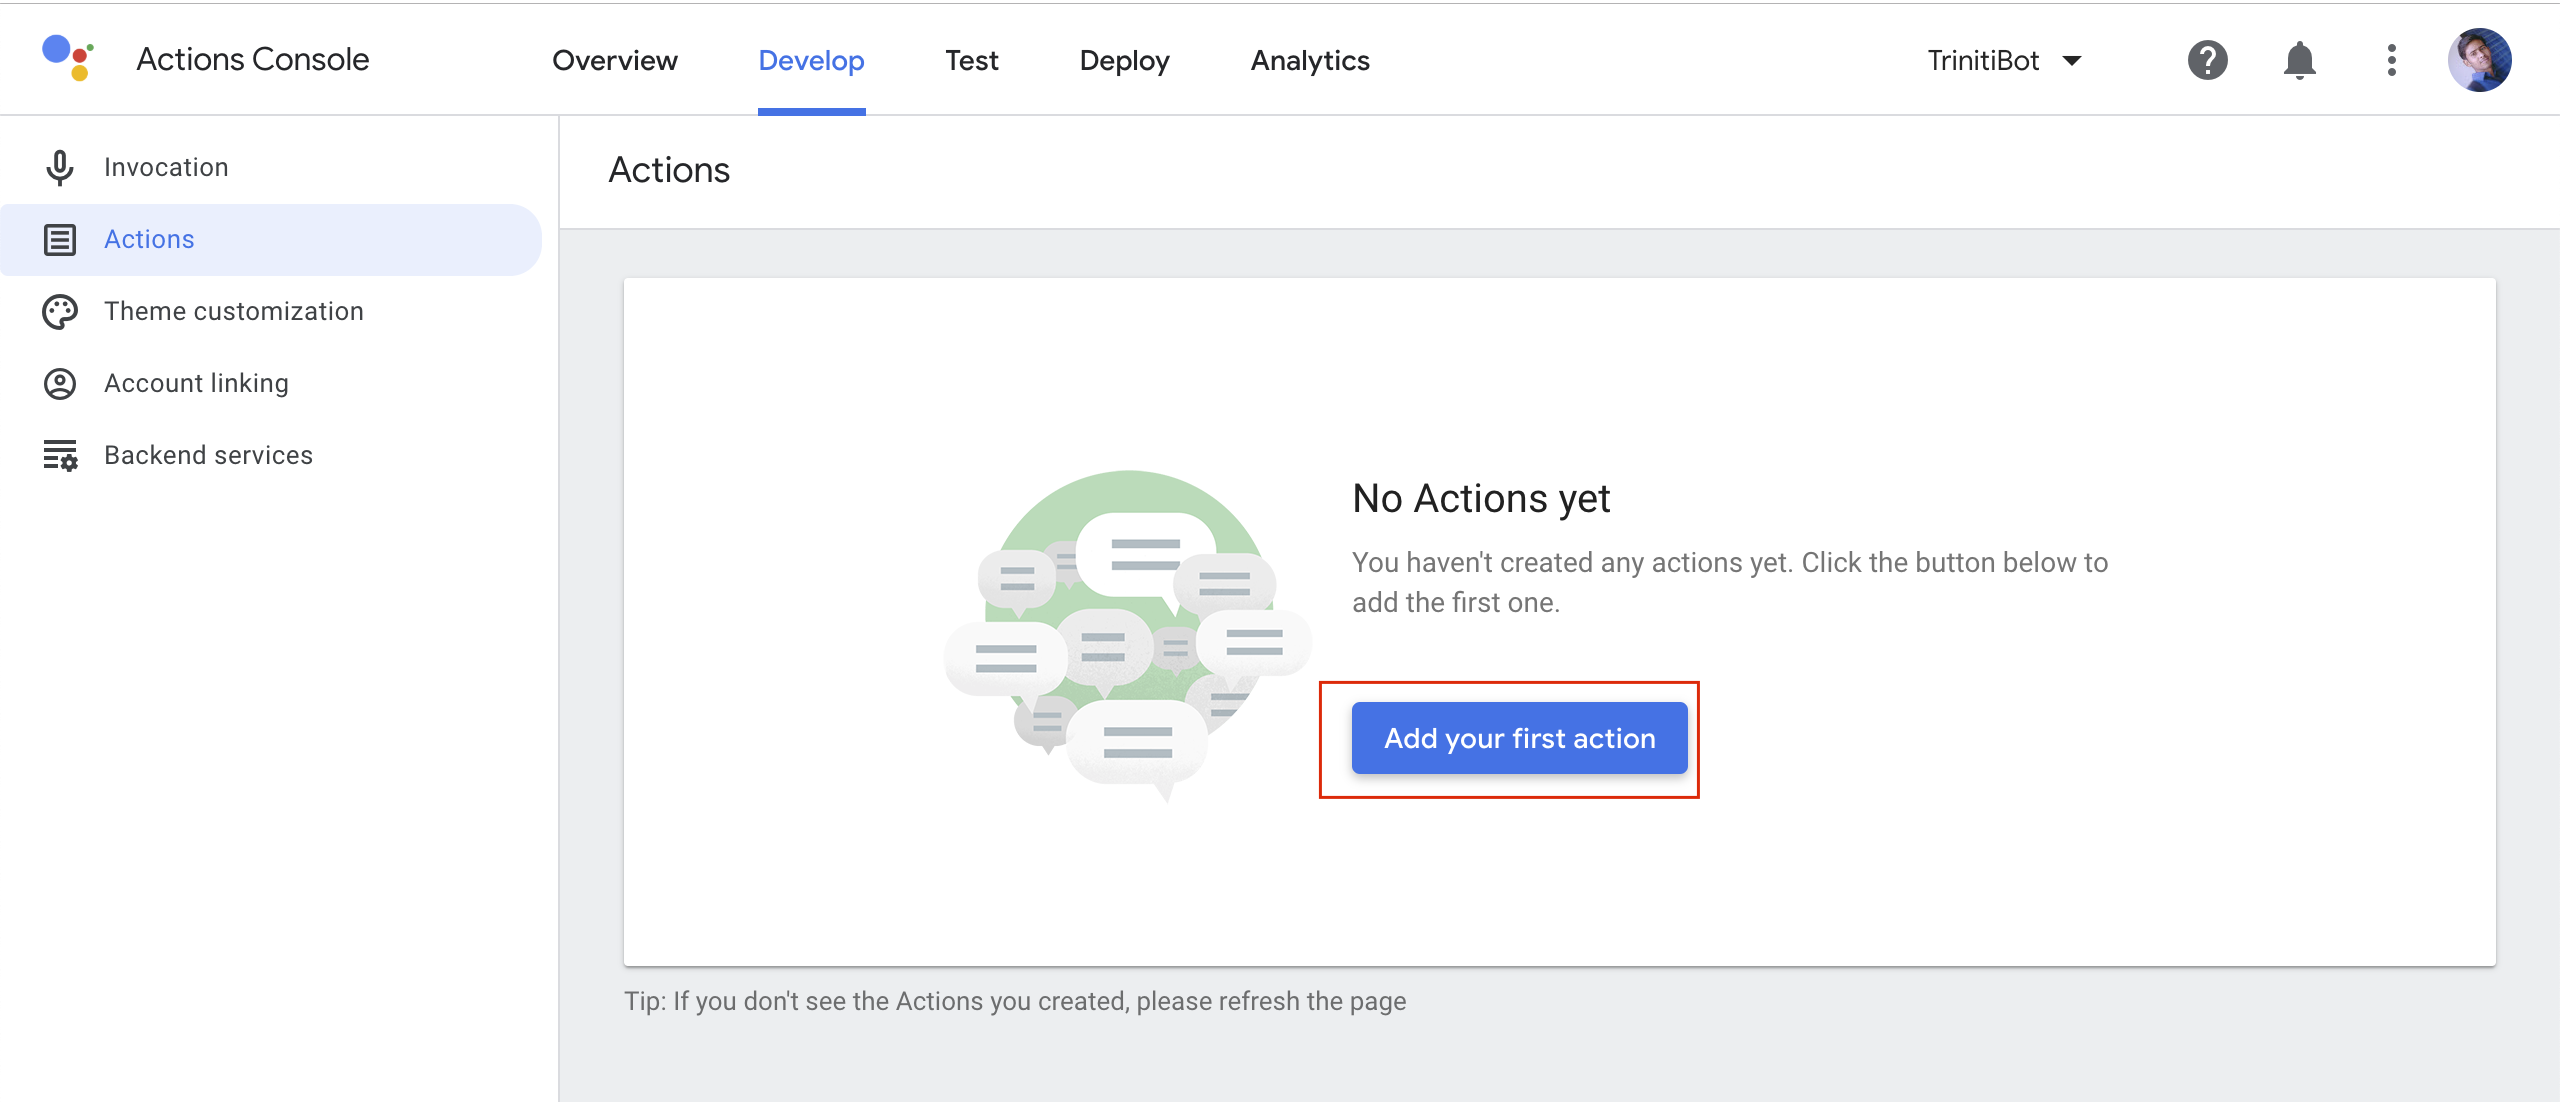
Now it's time to build the actions for your bot
Click on Build your Action, Click on "Add Action(s)"

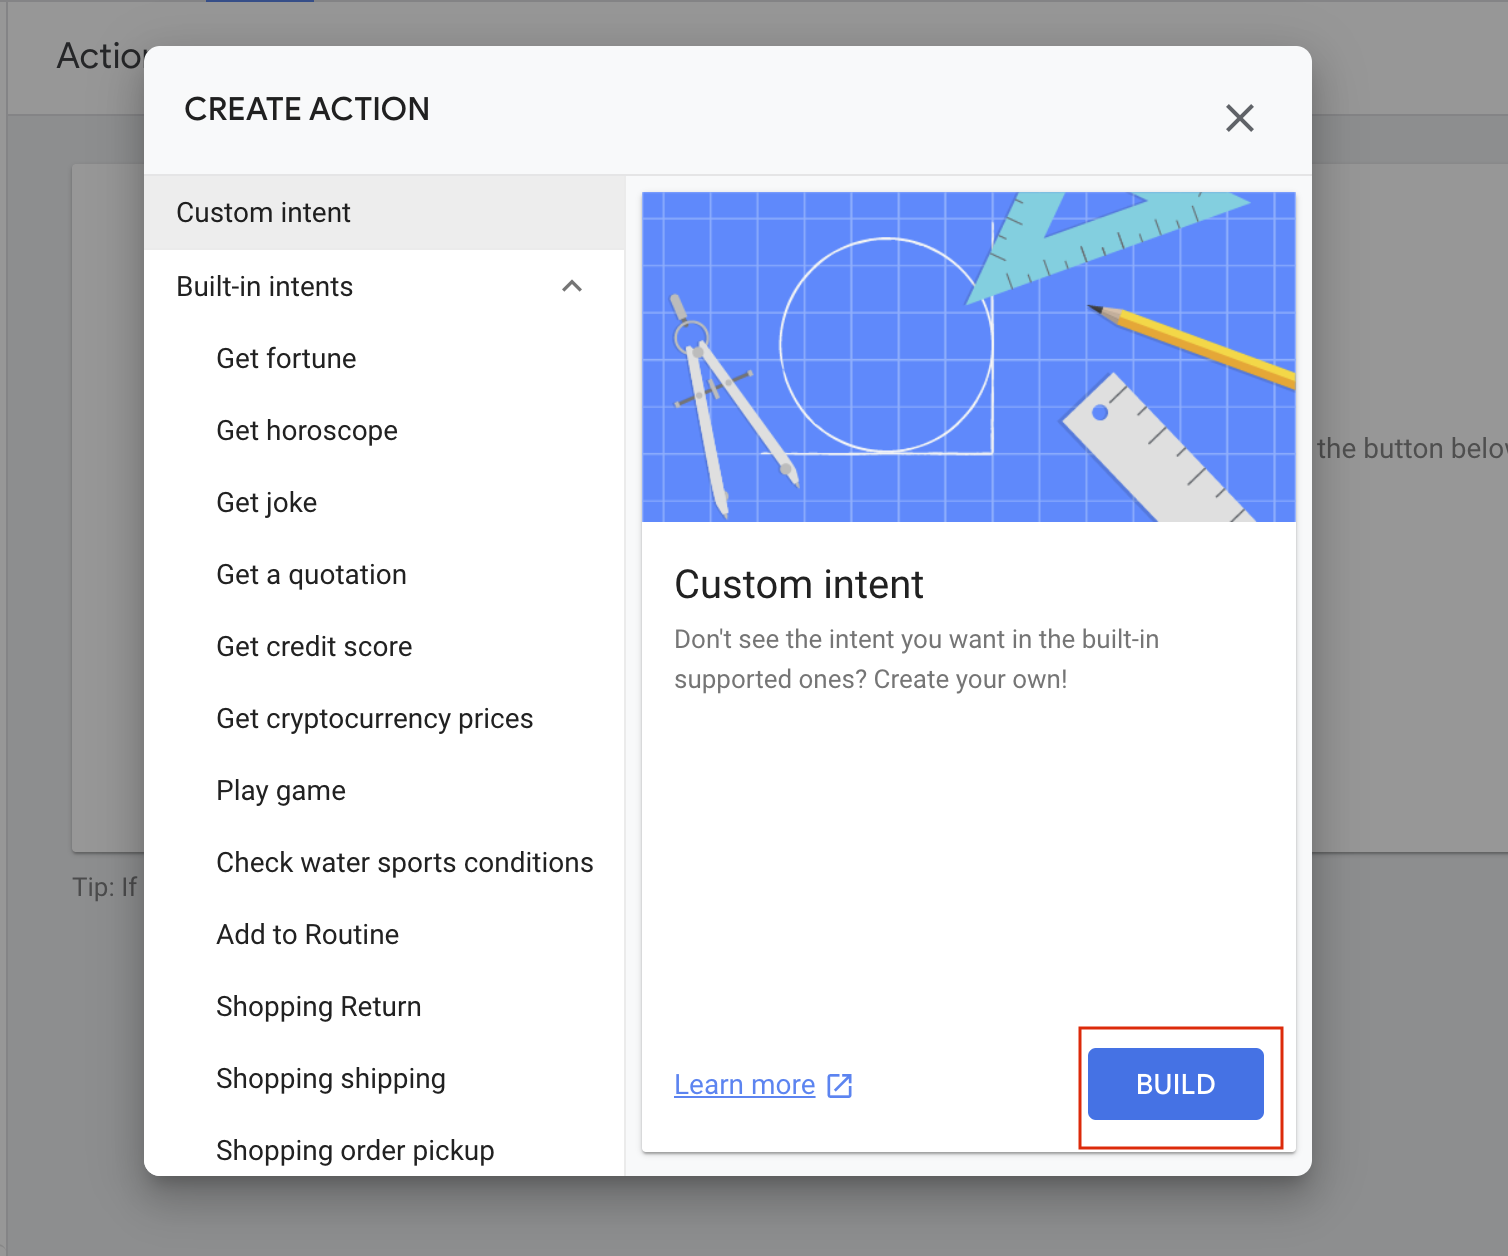
It will redirect you to Action page, Click on "Add your first action"
Select the custom intent and click on Build
You will be redirected to Dialogflow
You will have to create an agent, enter your agent(bot) name and click on CREATE,
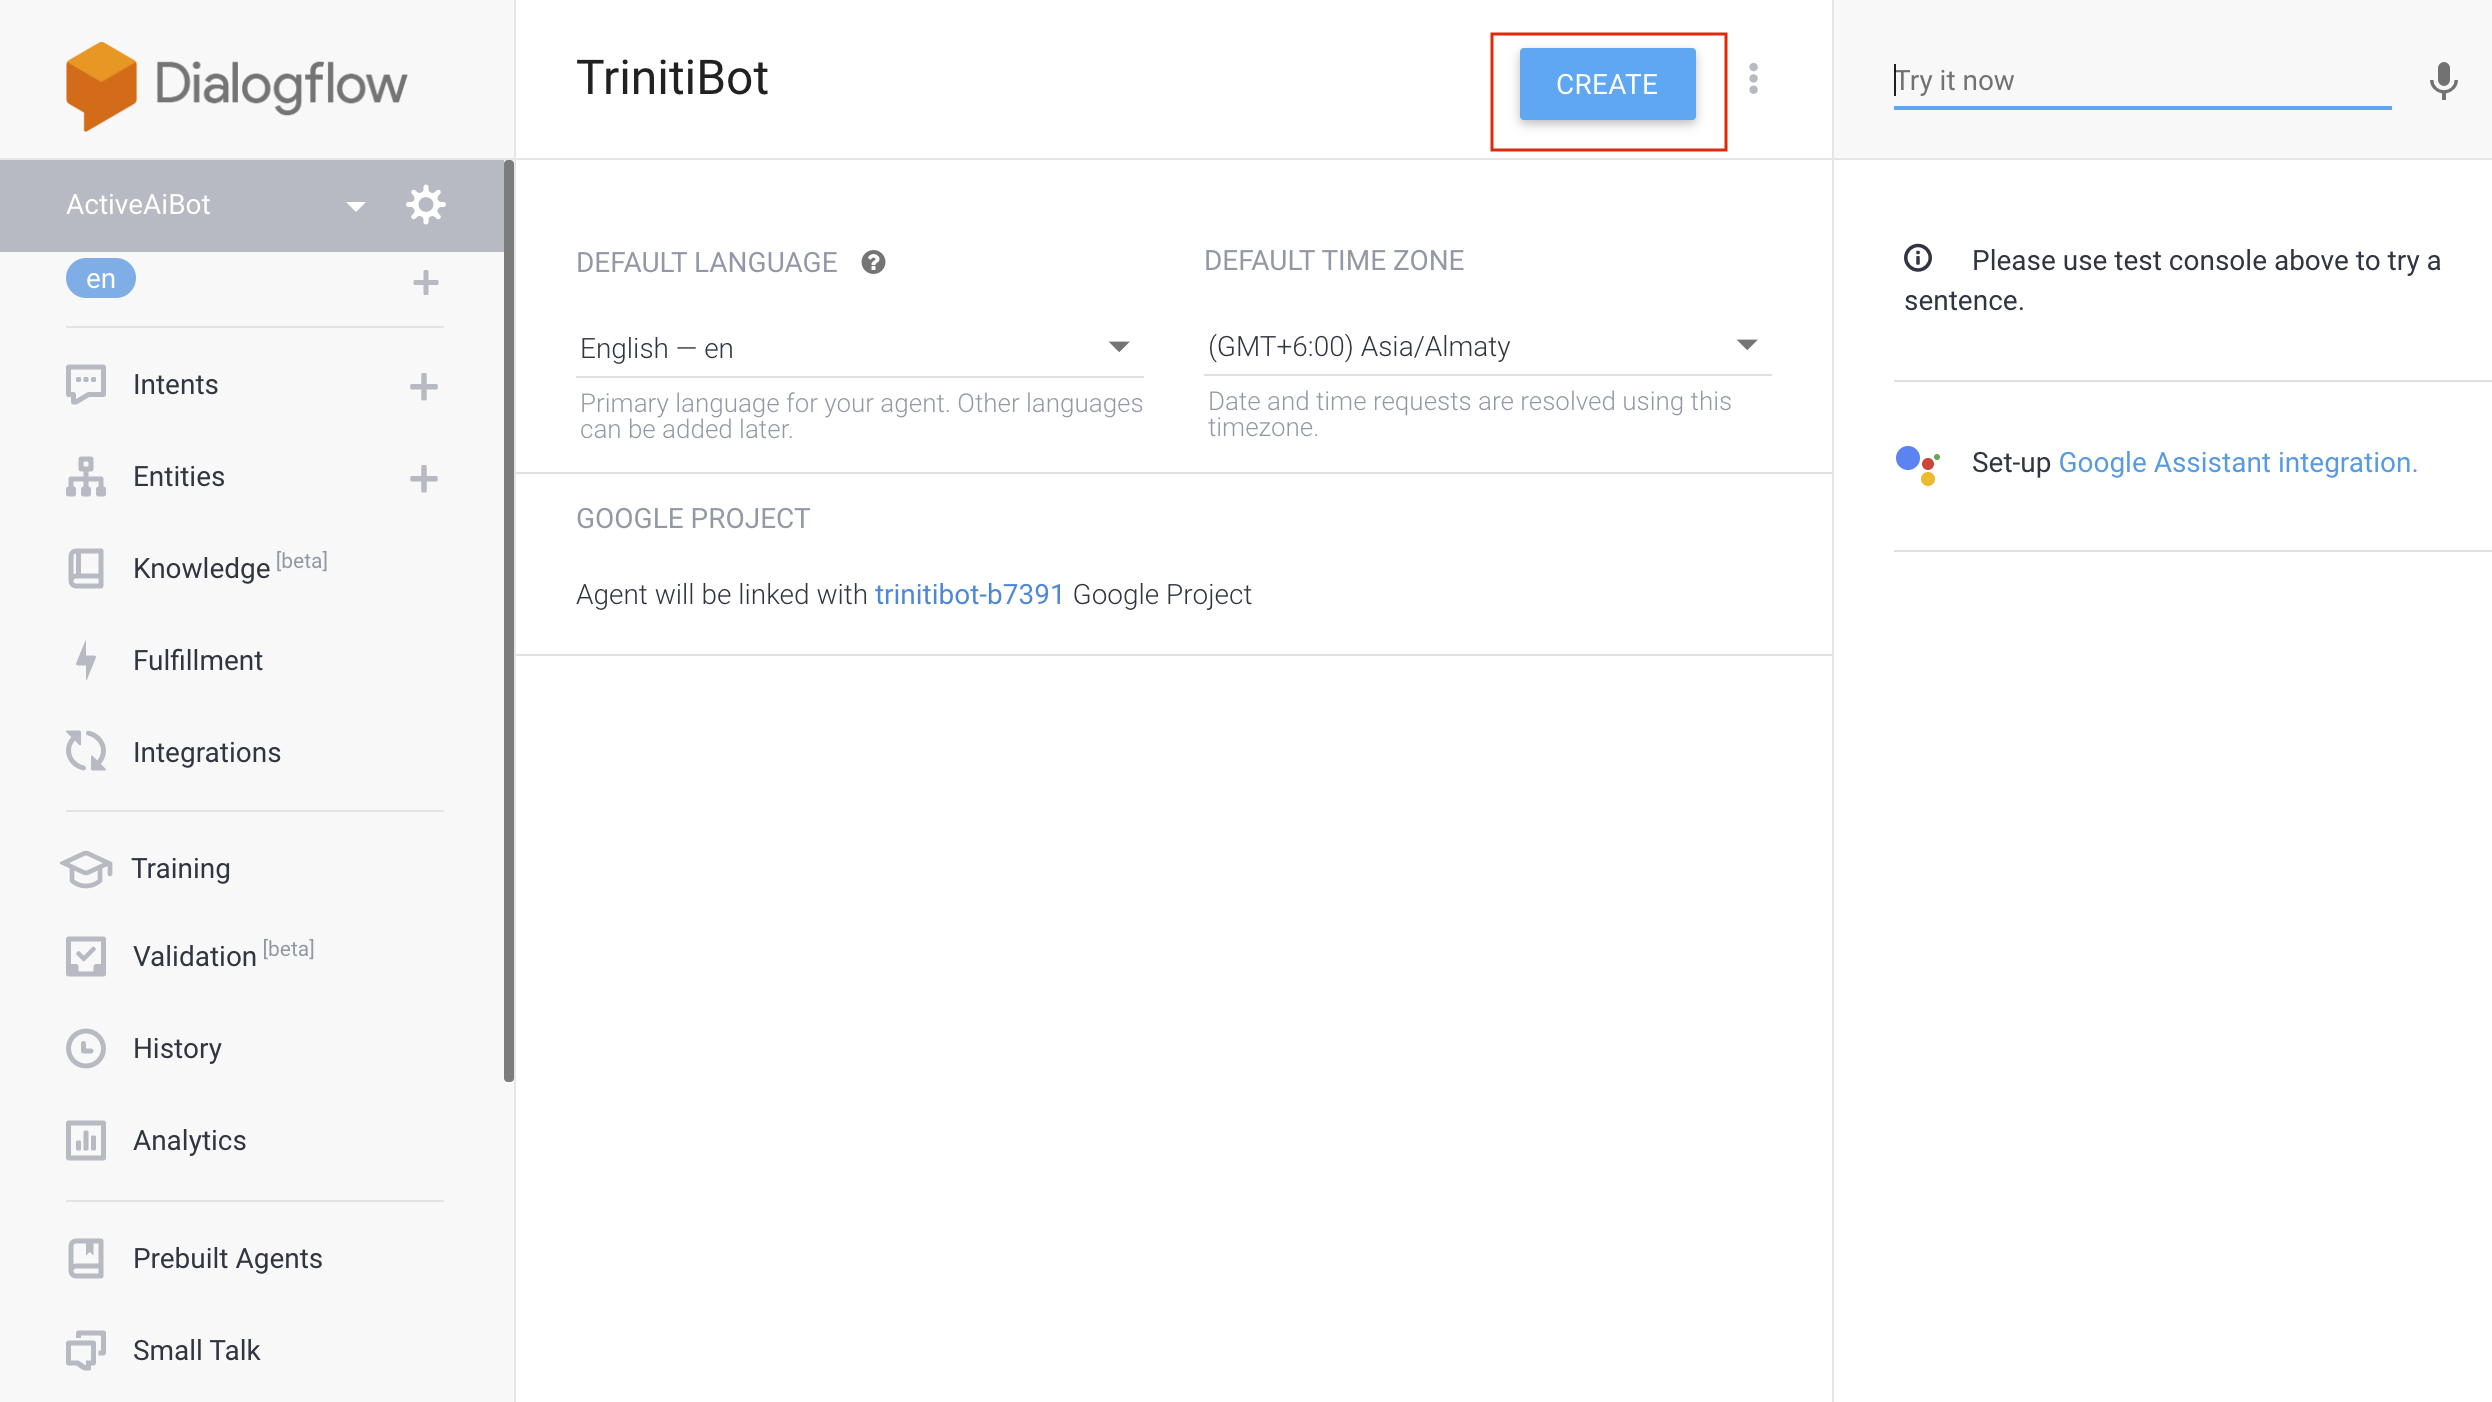
Your agent is now created, you can see it below the Dialogflow logo. Now you need to do setup for your agent
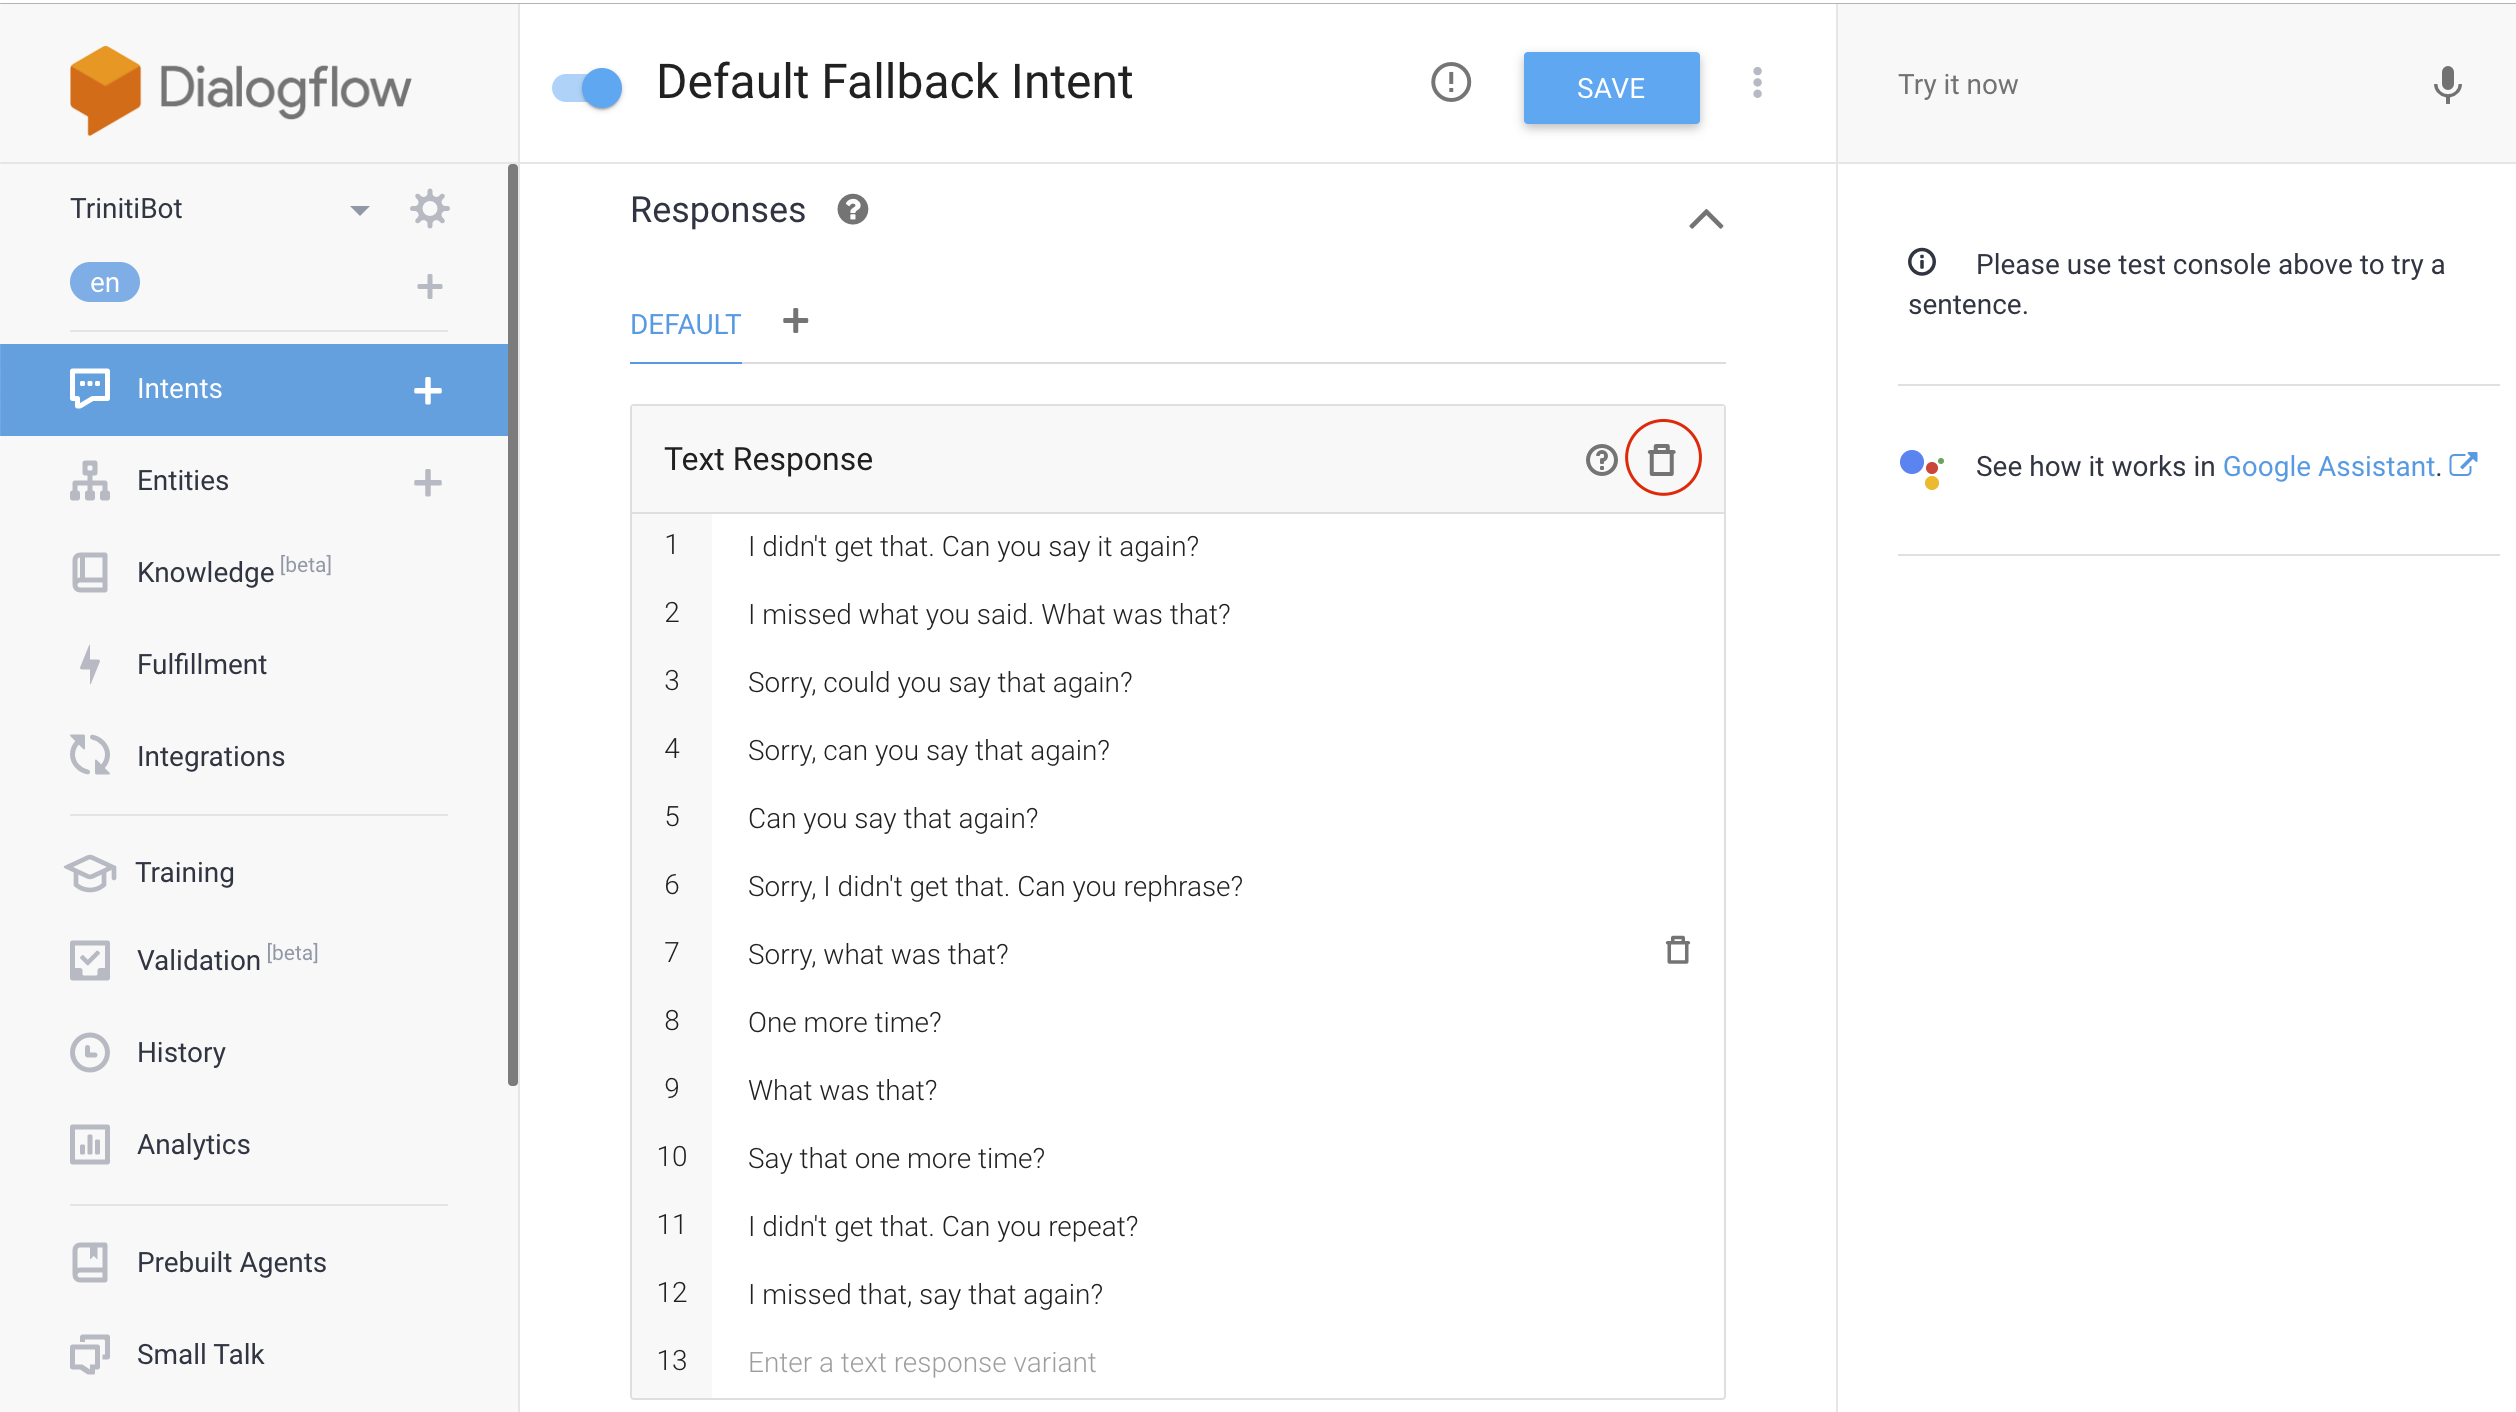
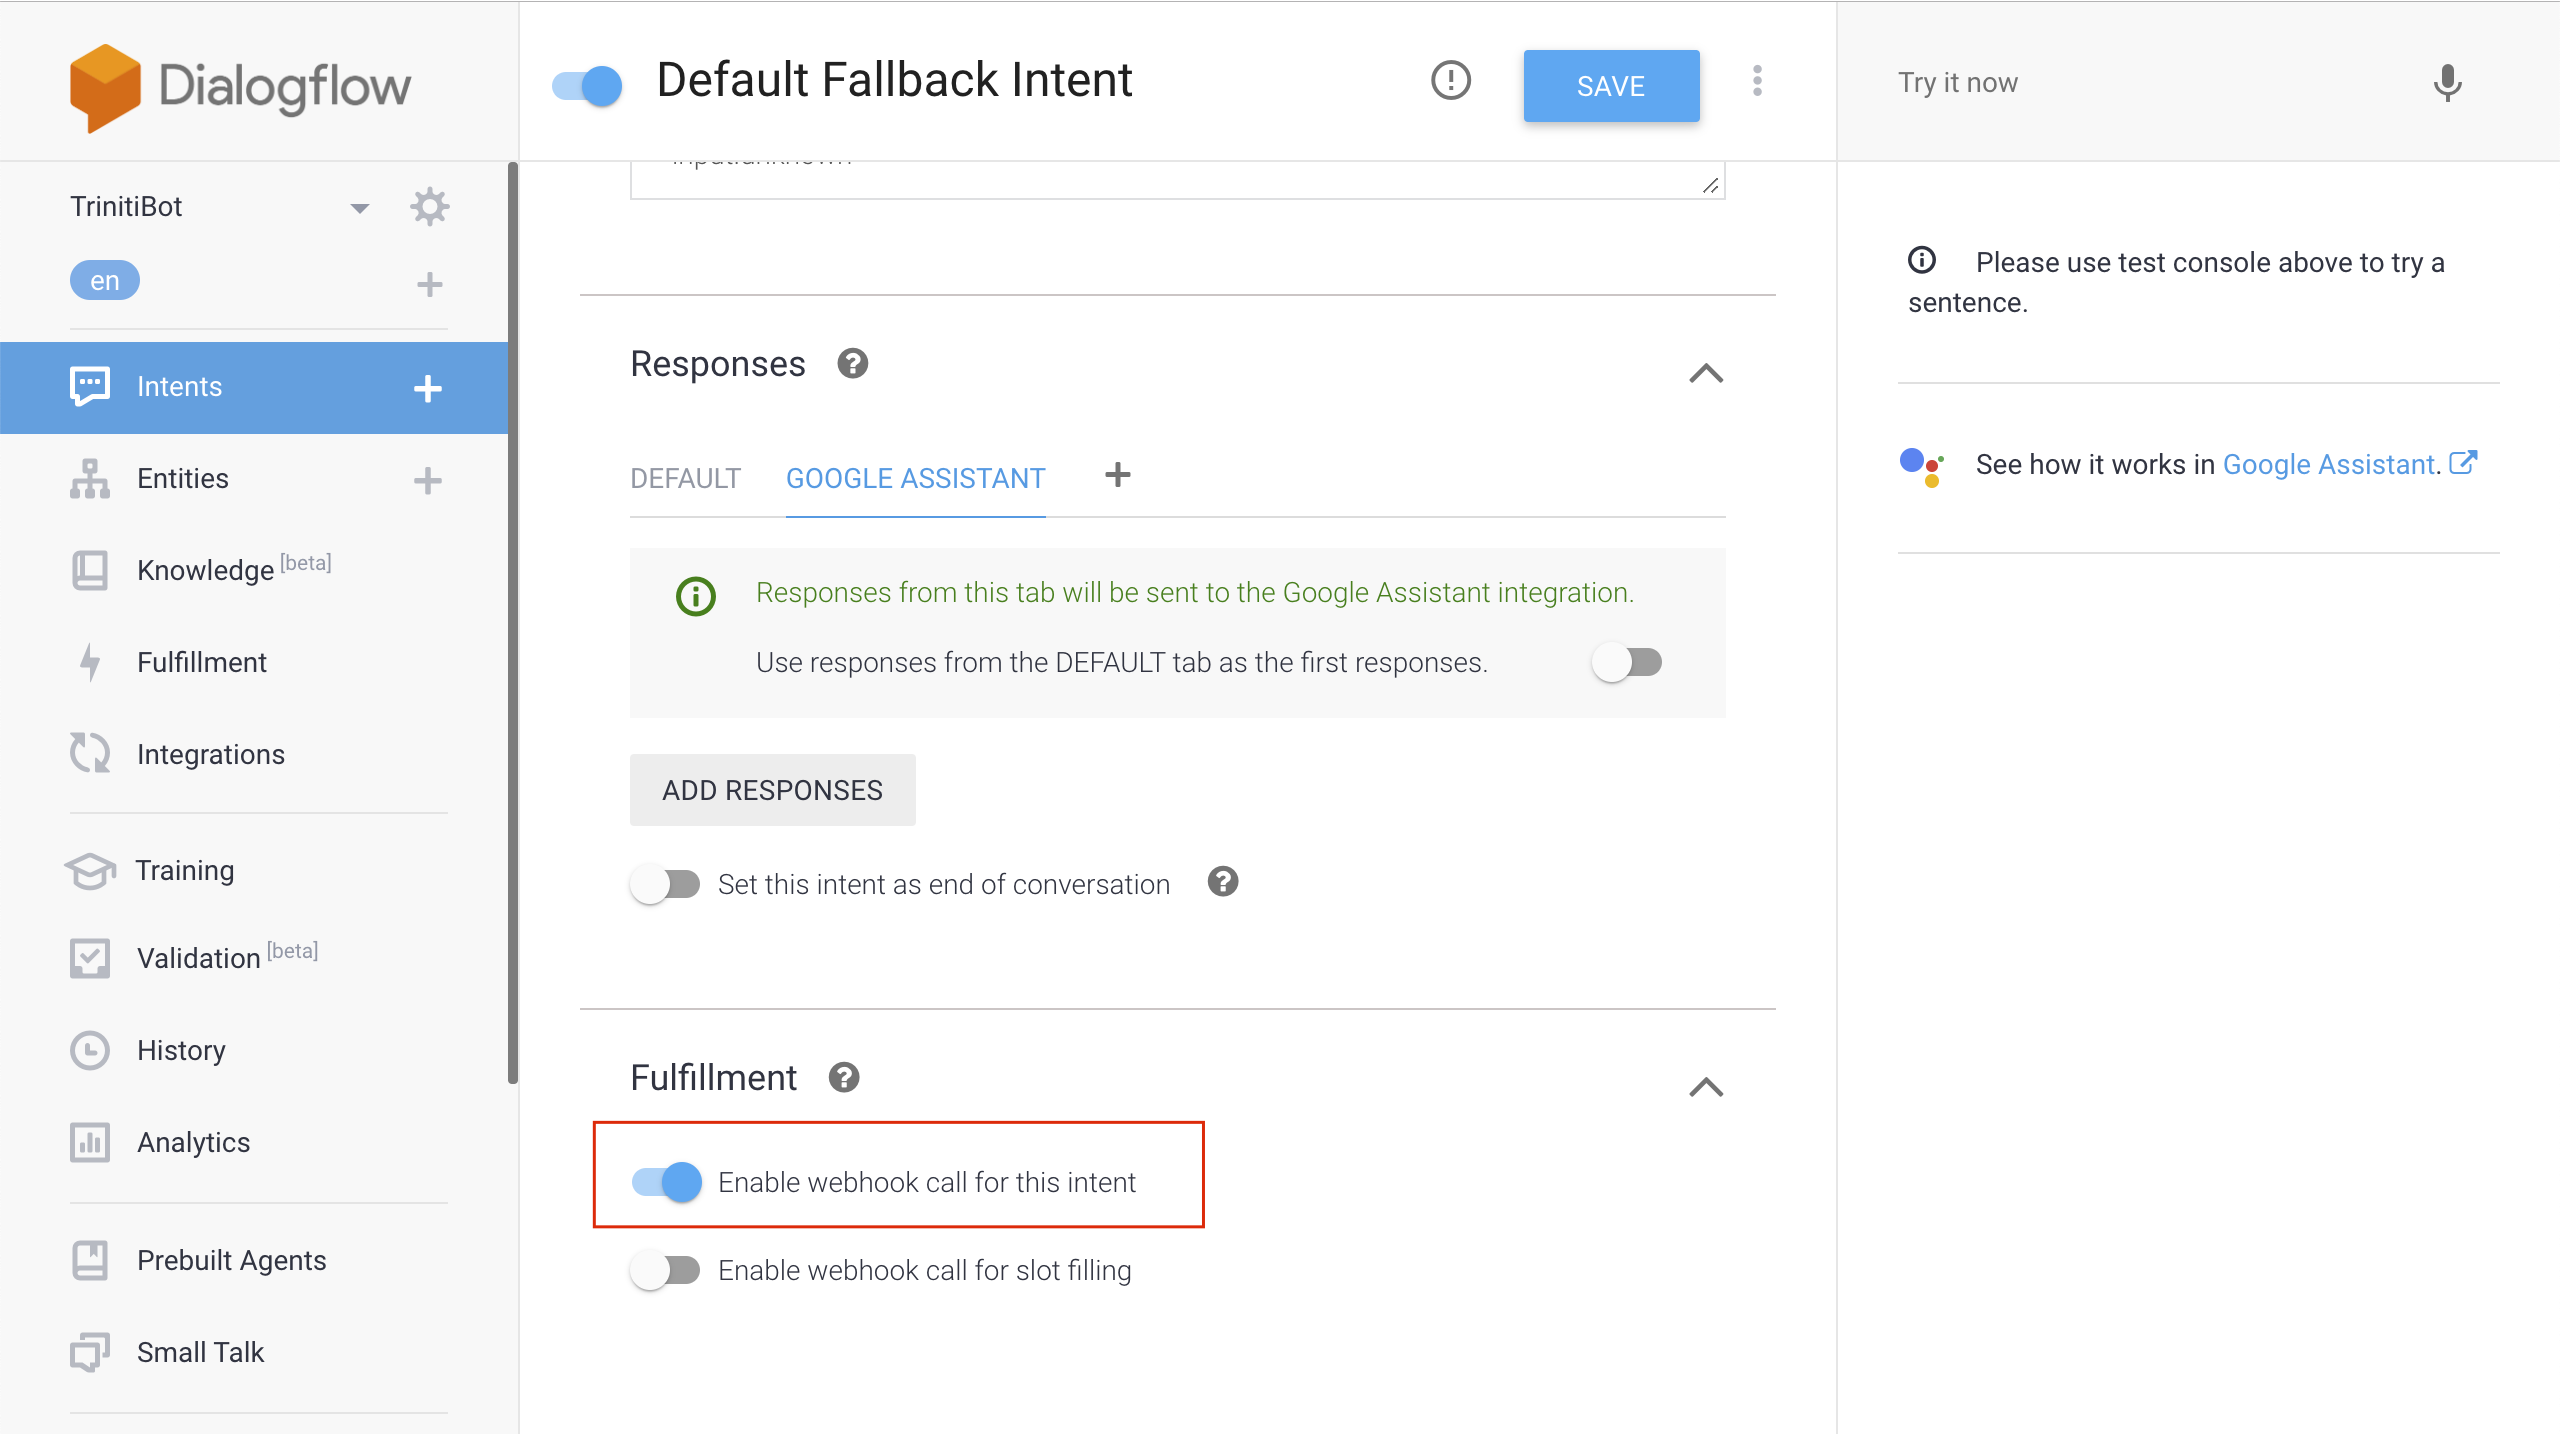
Click on Intents, Click on "Default Fallback Intent"

Scroll Down to Responses and delete all the default text responses.
Add google assistant(Click on + symbol beside Default).
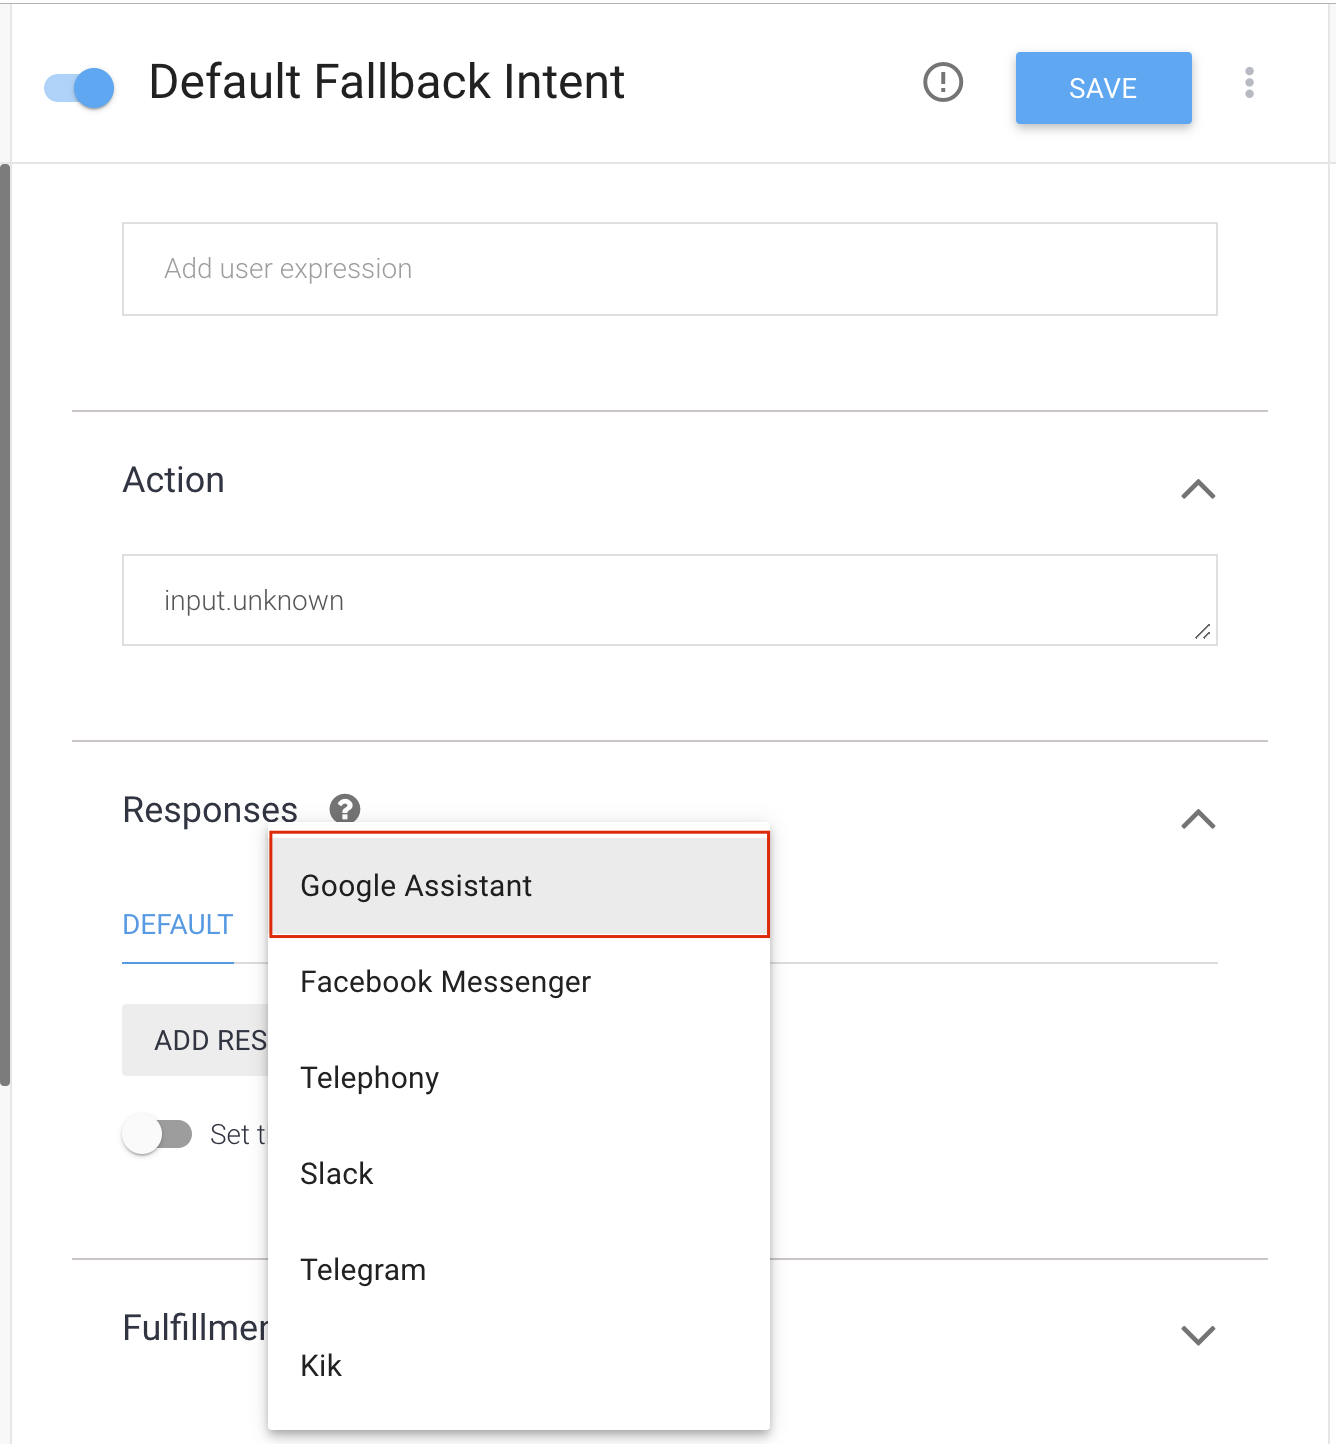
When added, disable the toggle with name "Use responses from the DEFAULT tab as the first responses."

Scroll down to Fullfillment, Enable the "Enable webhoook call for this intent", and click on SAVE
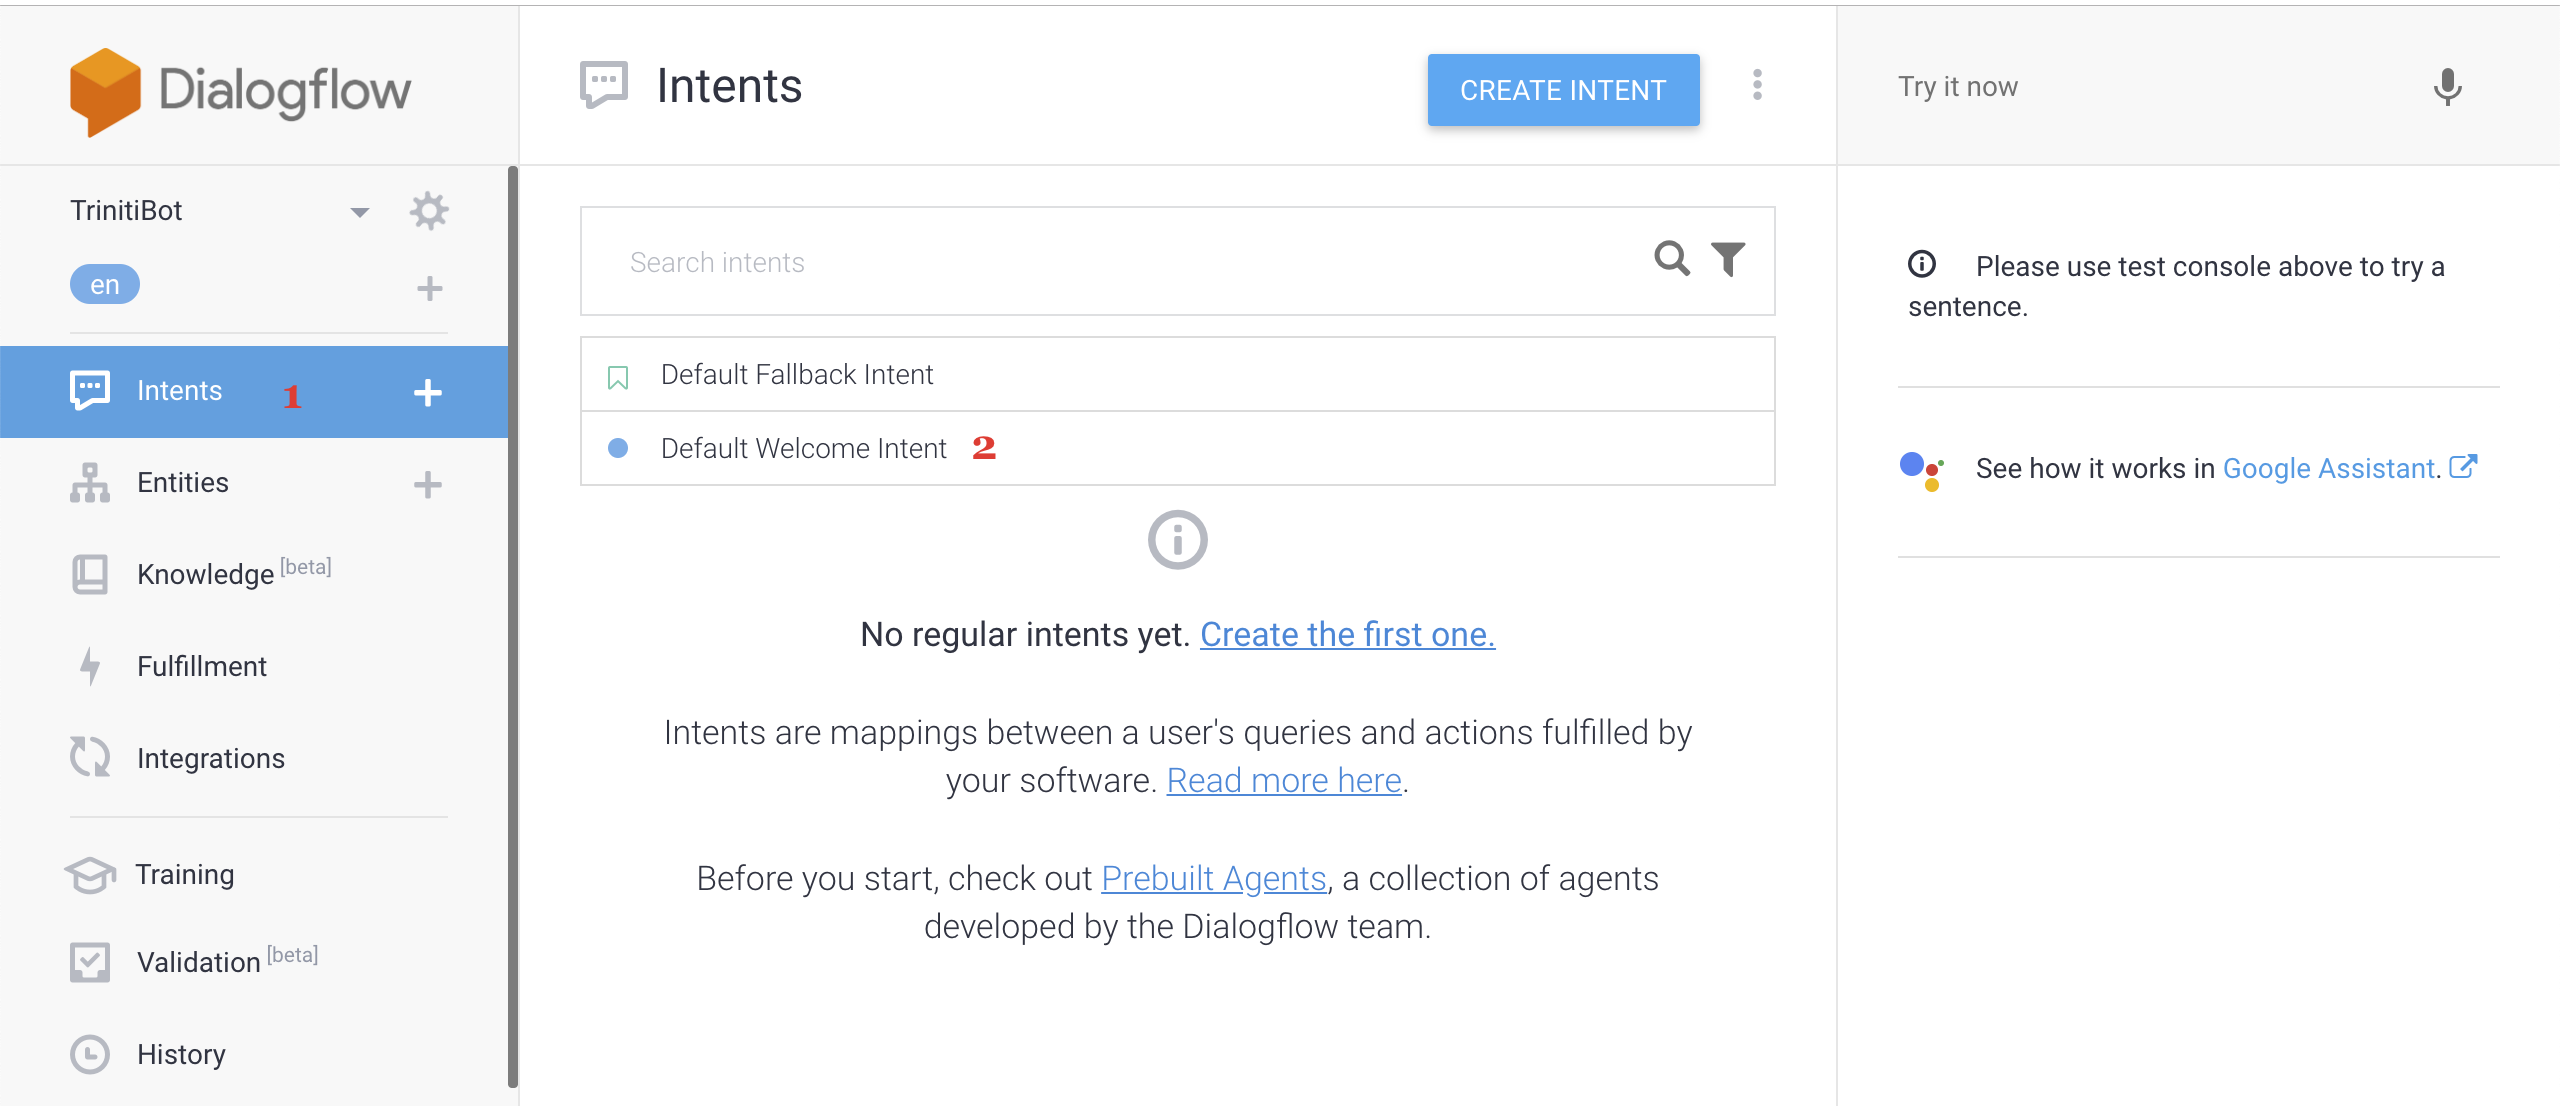
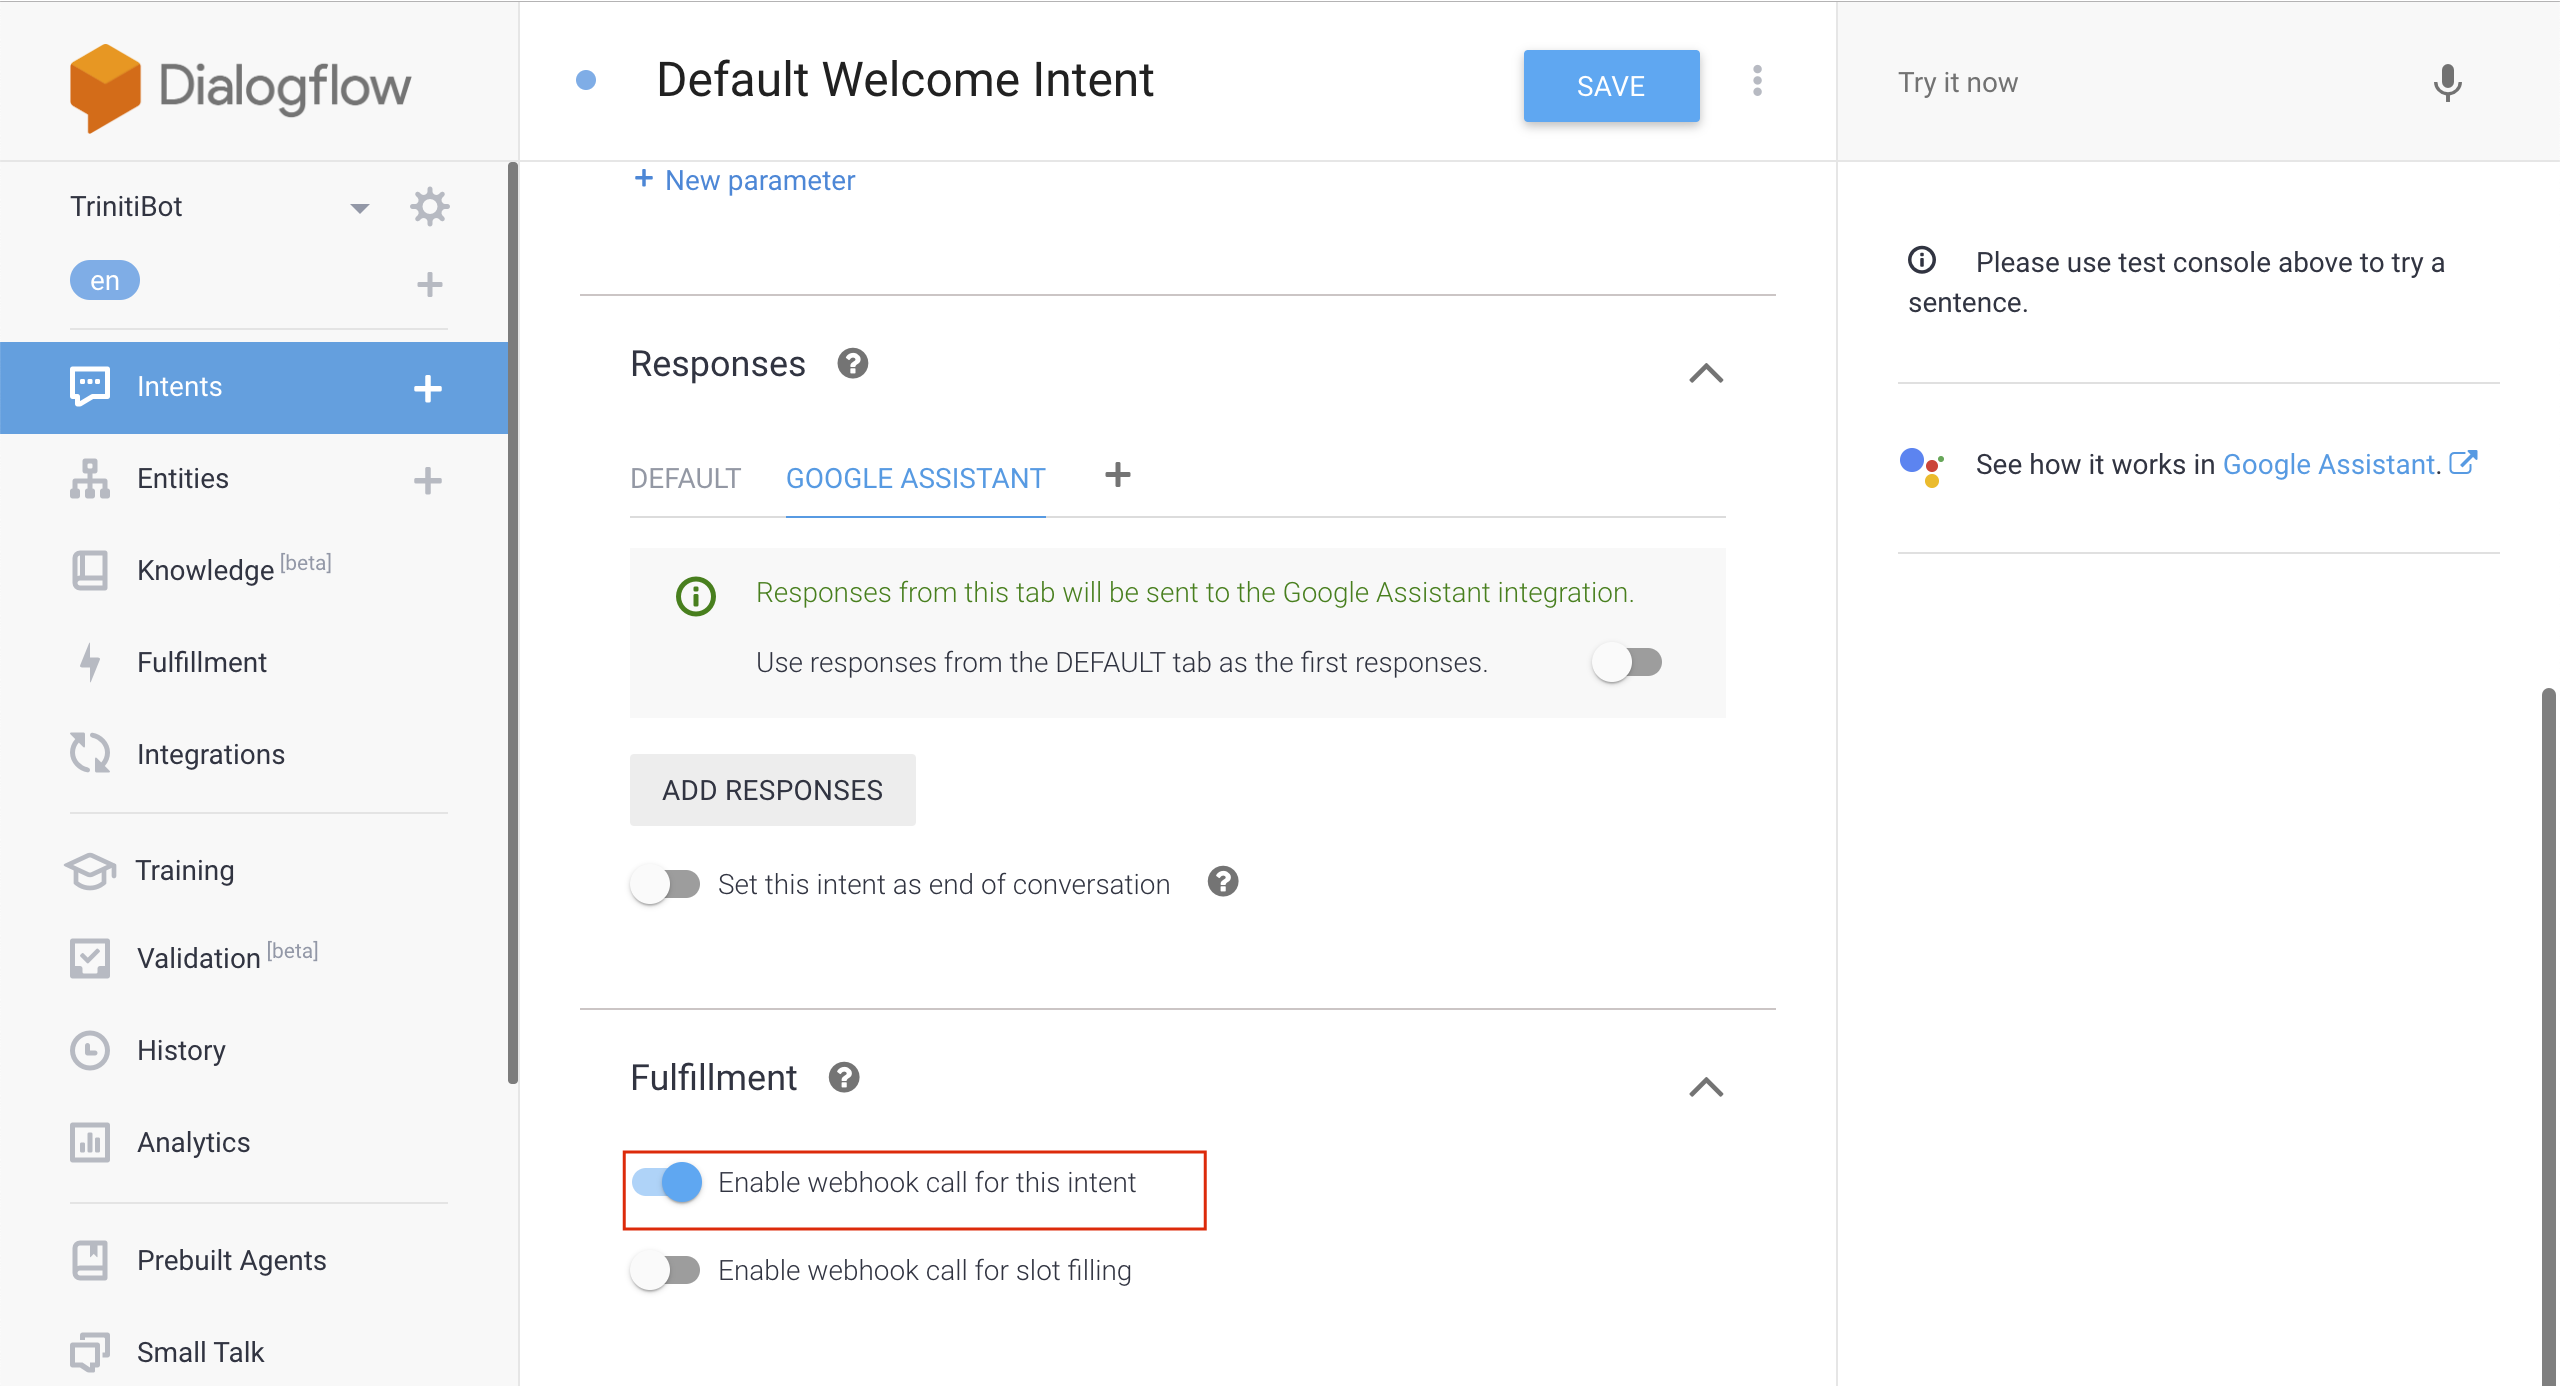
Go back to intents, click on Default Welcome Intent
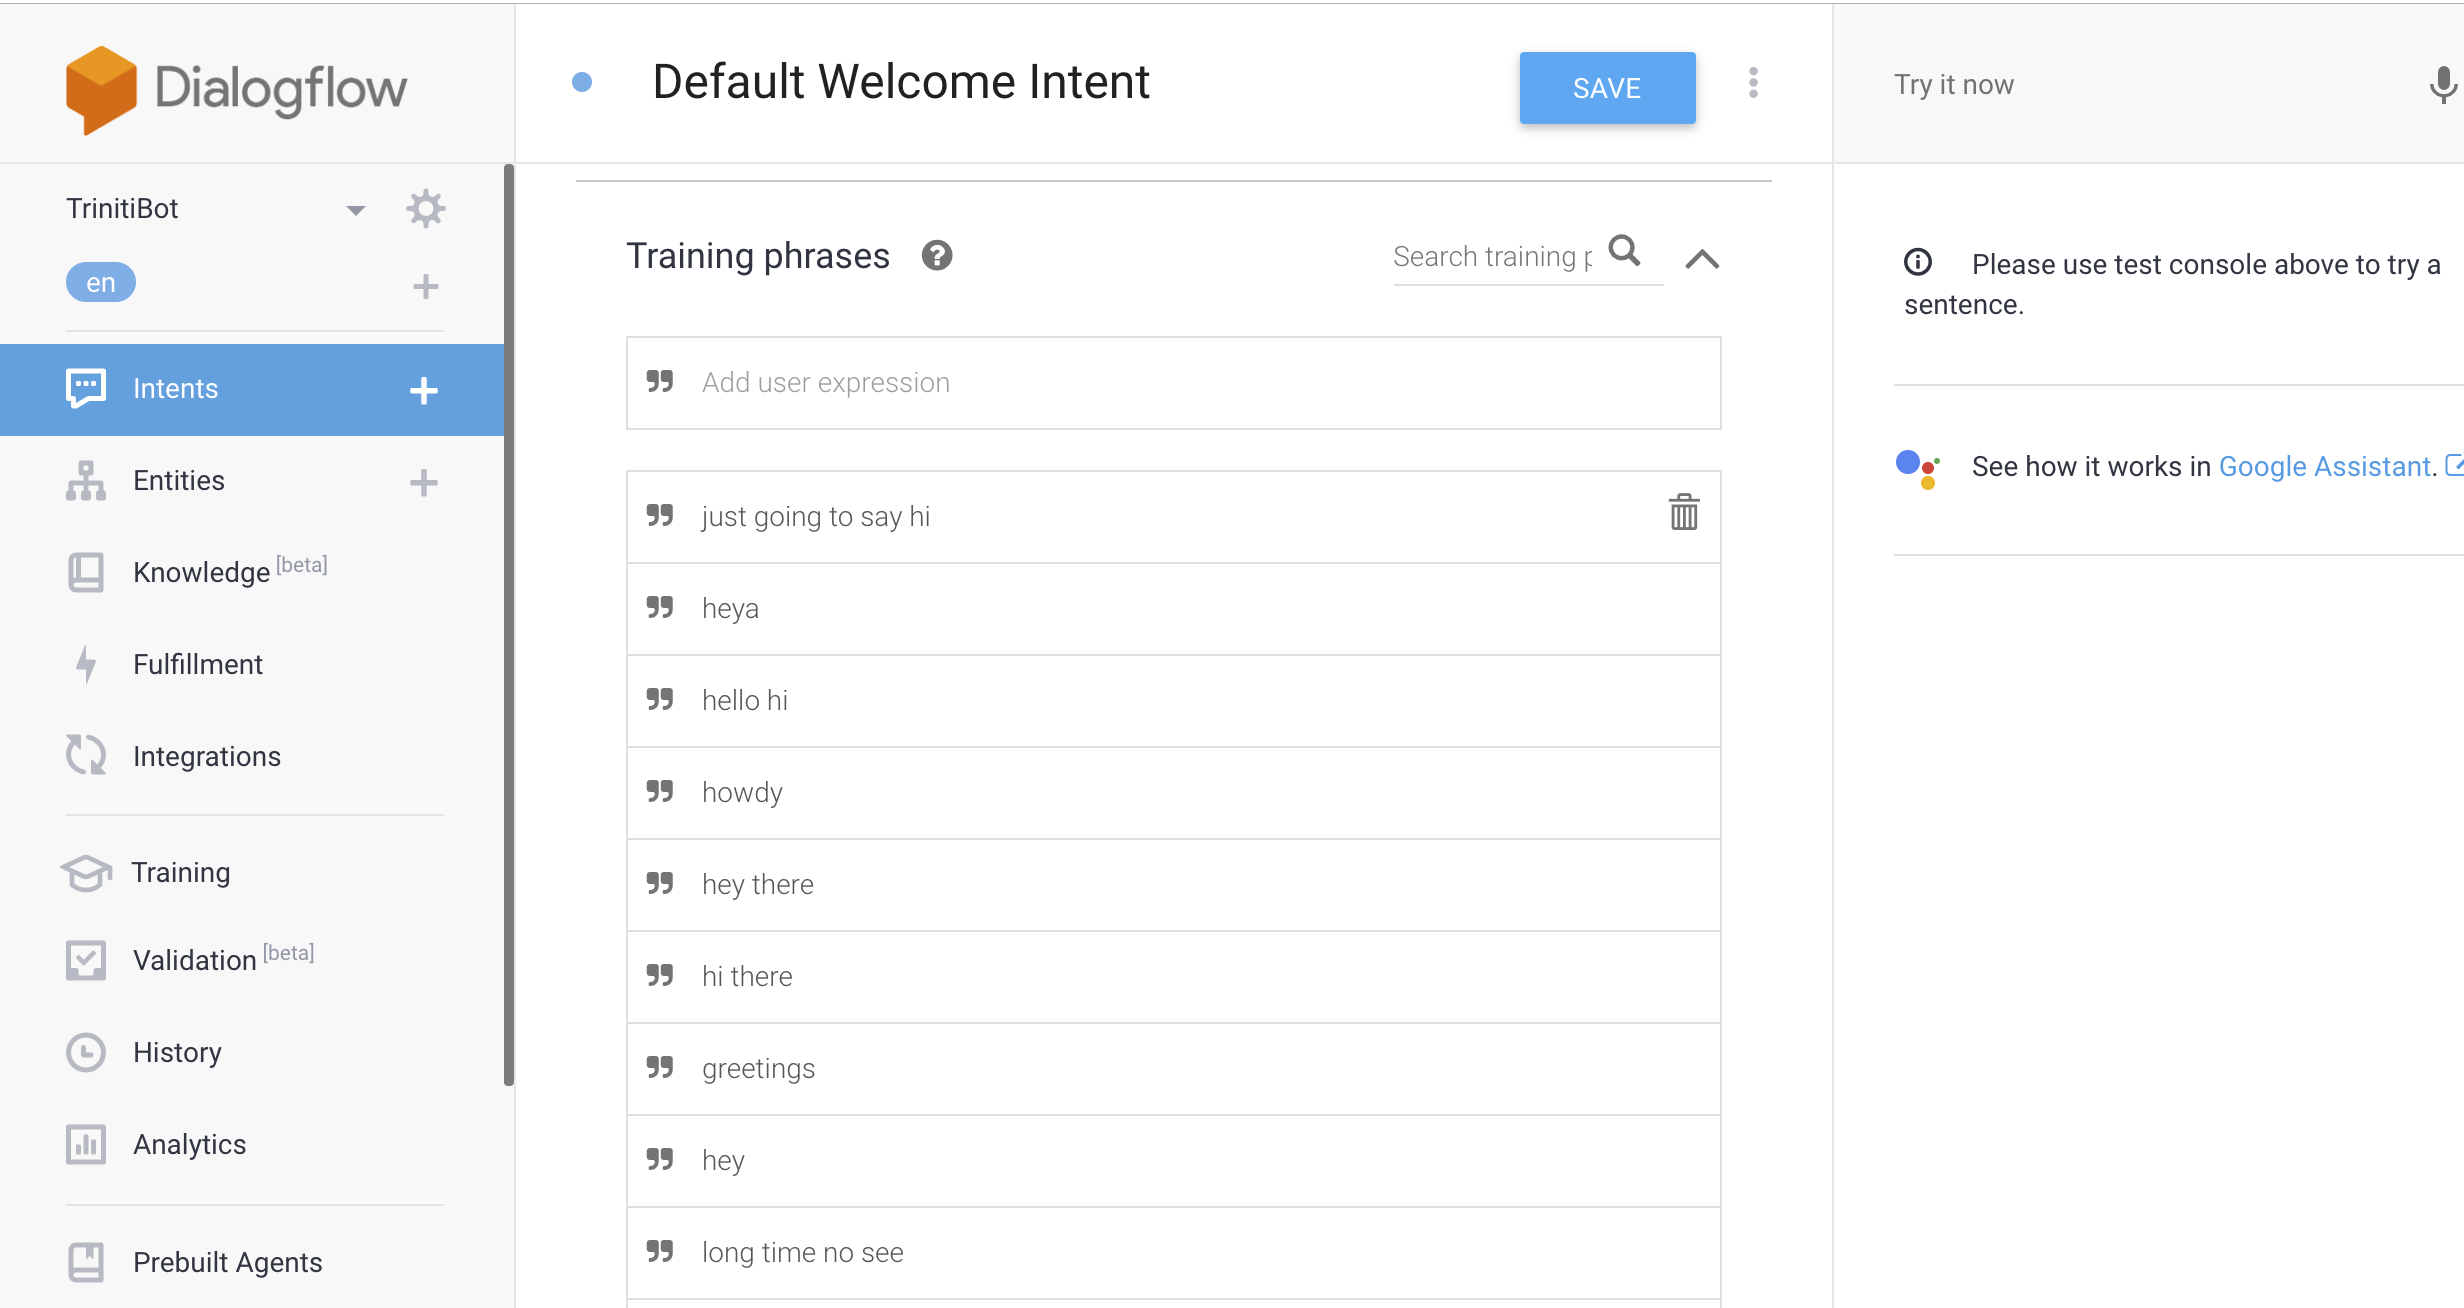
Scroll down to Training phrases, and delete all the phrases
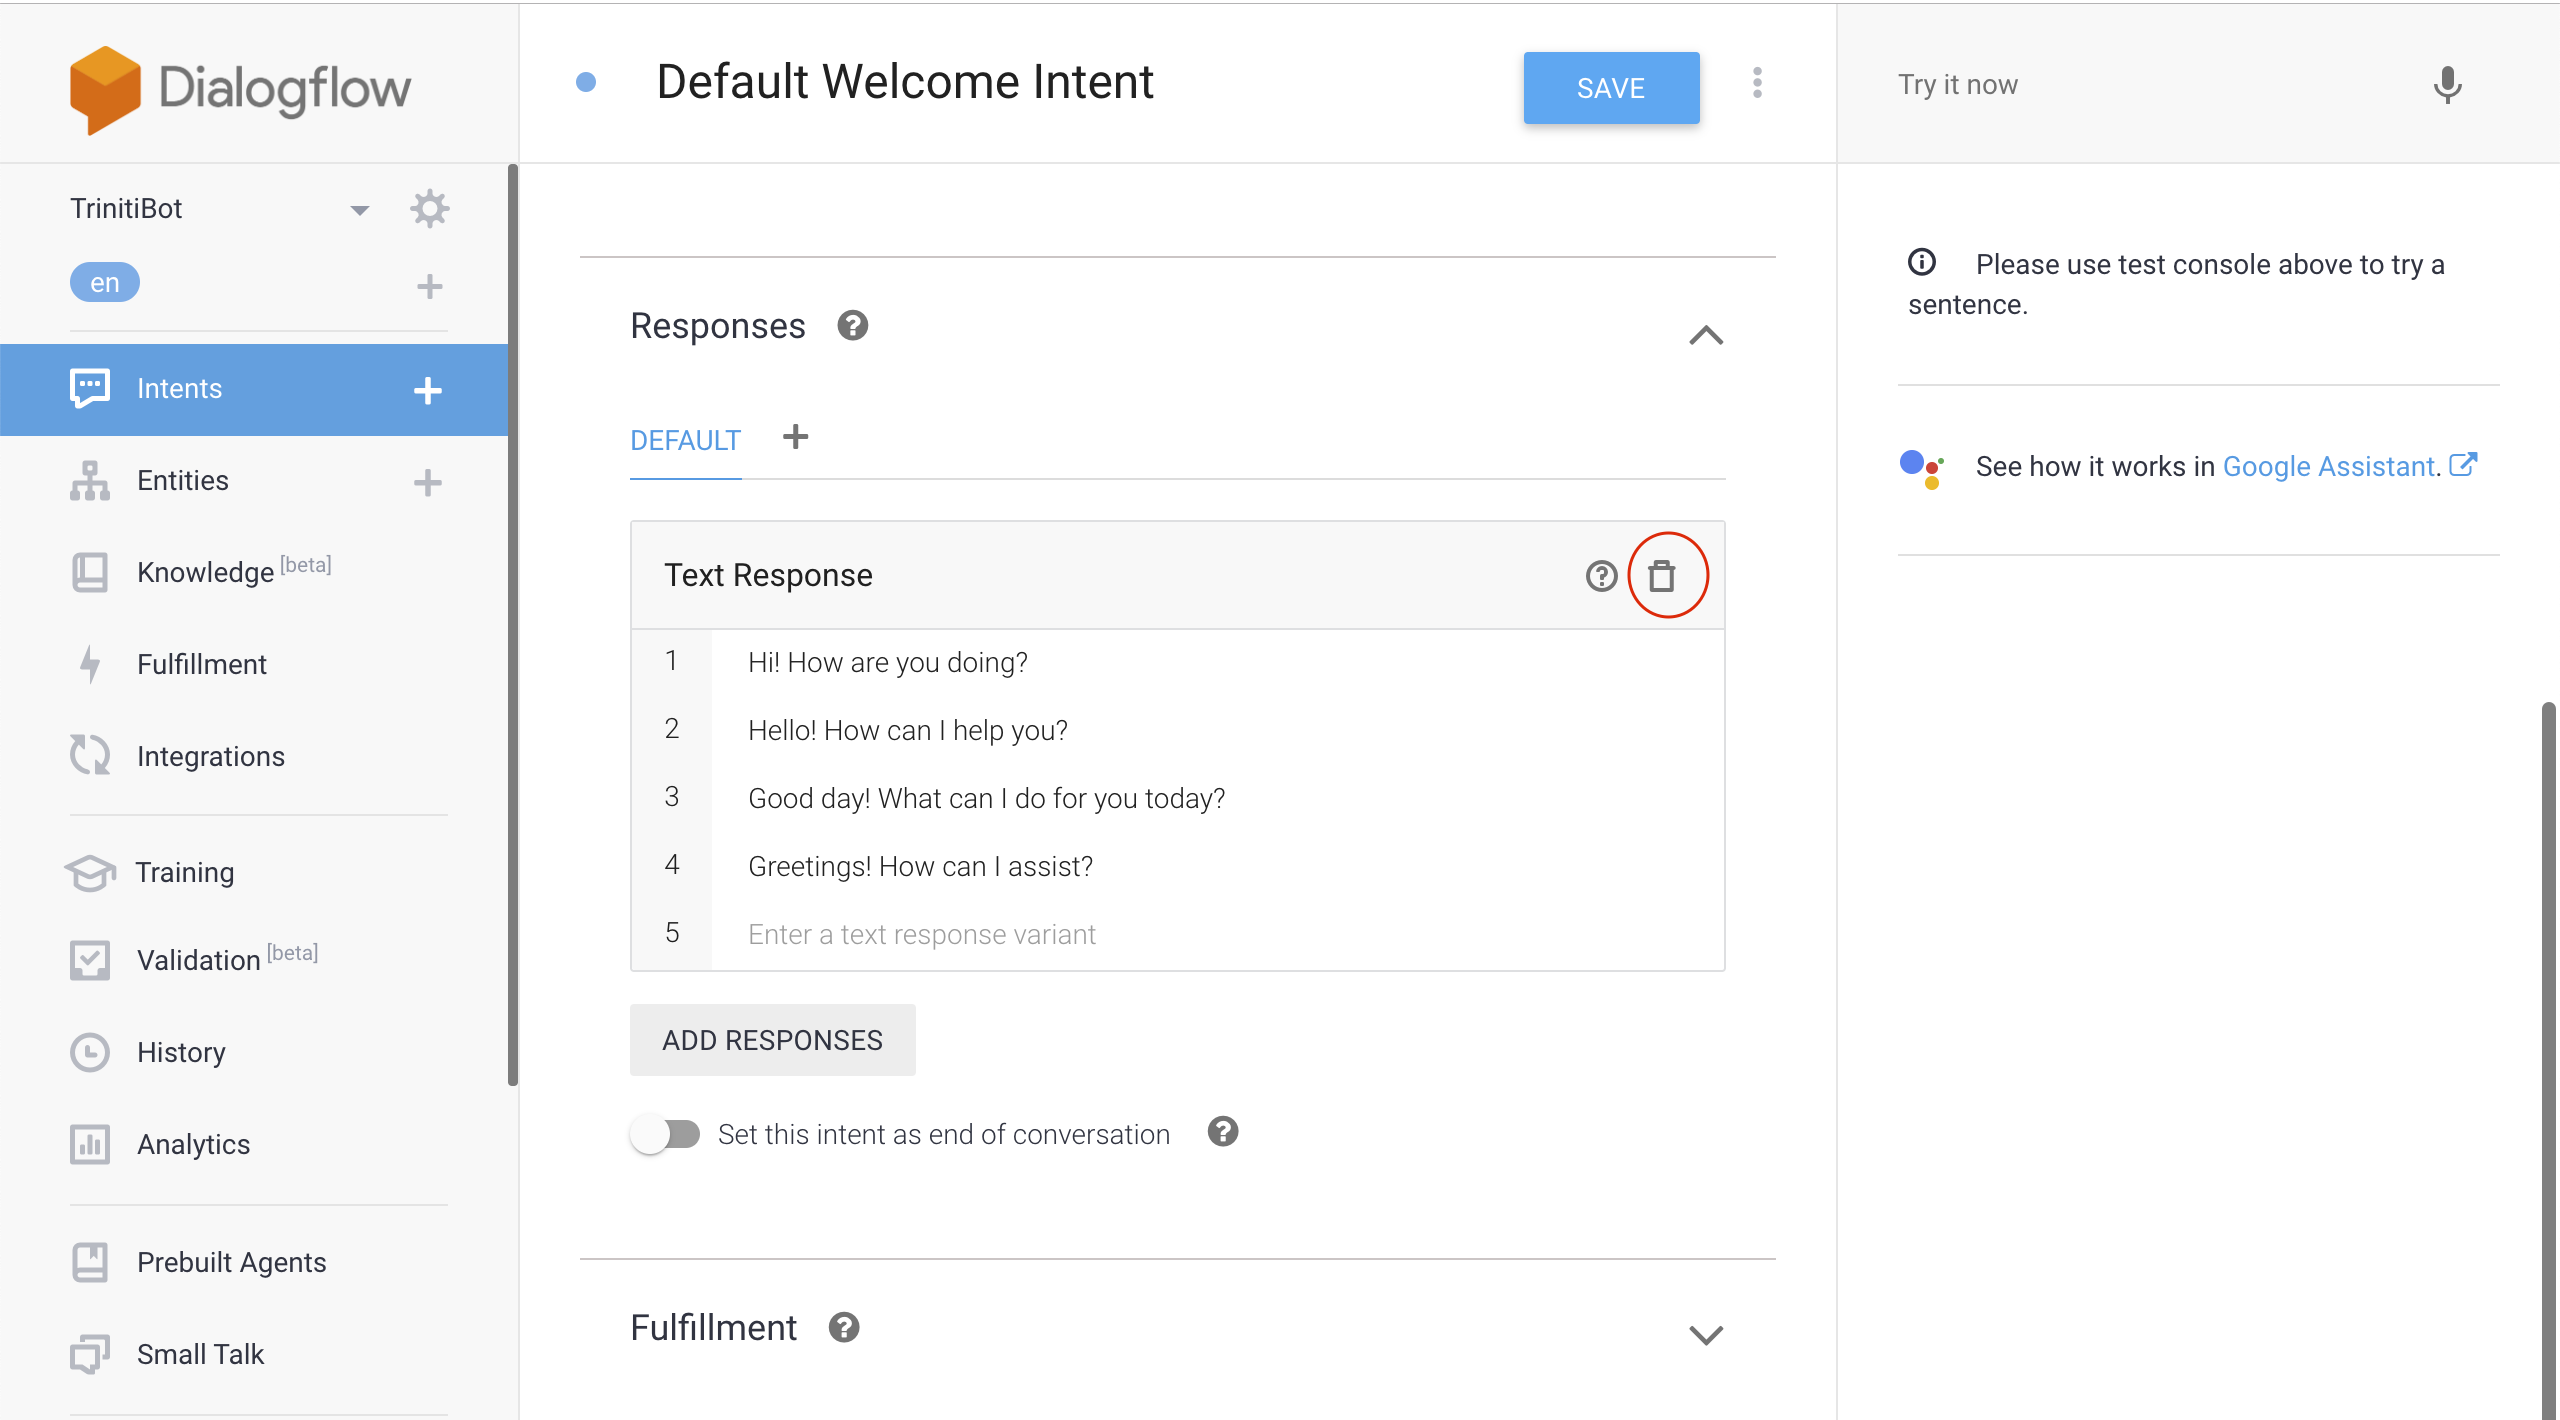
Scroll down to Responses, and delete all the Default Text Reponses
Add google assistant(Click on + symbol beside Default).
When added, disable the toggle with name "Use responses from the DEFAULT tab as the first responses."
Scroll down to Fullfillment, Enable the "Enable webhoook call for this intent", and click on SAVE
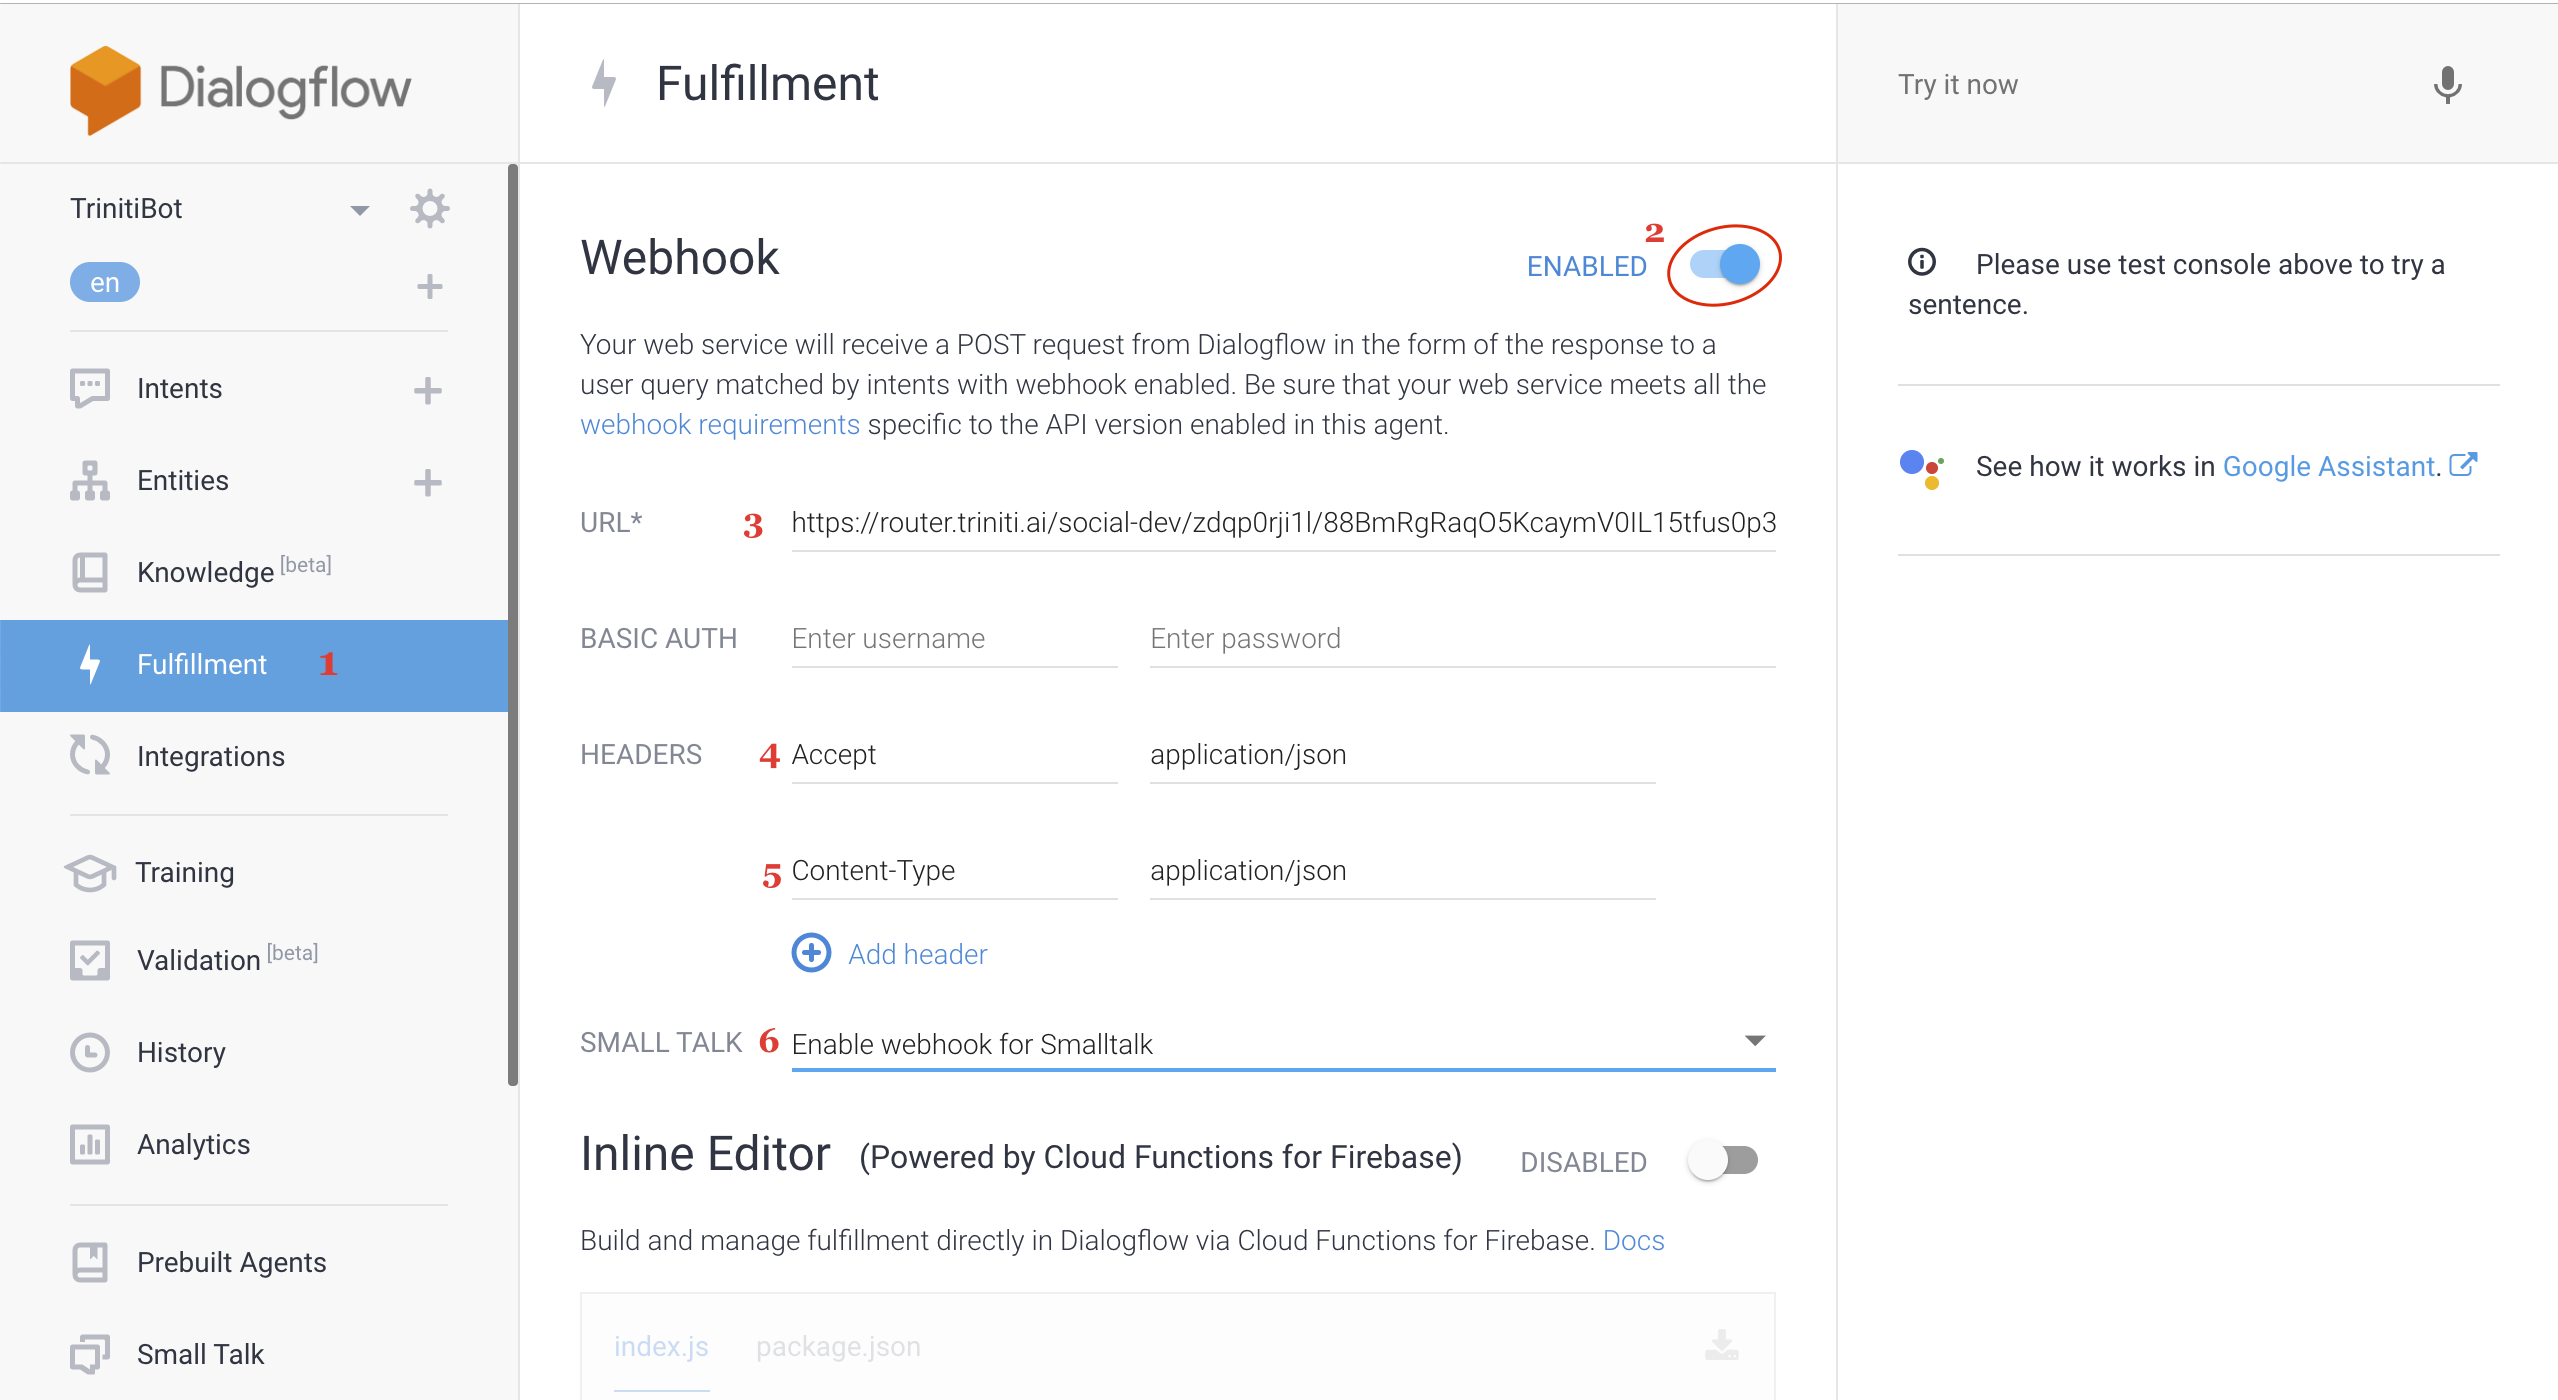
Click on Fullfillment -> Enable Webhook -> copy the "Callback URL" of Google Assistant channel from triniti.ai portal, and paste under "URL" field
Set Headers "Accept" as "application/json" & "Content-Type" as "application/json"
Enable webhook for smalltalk as well on the following page, and click on save
Your agent setup is almost done
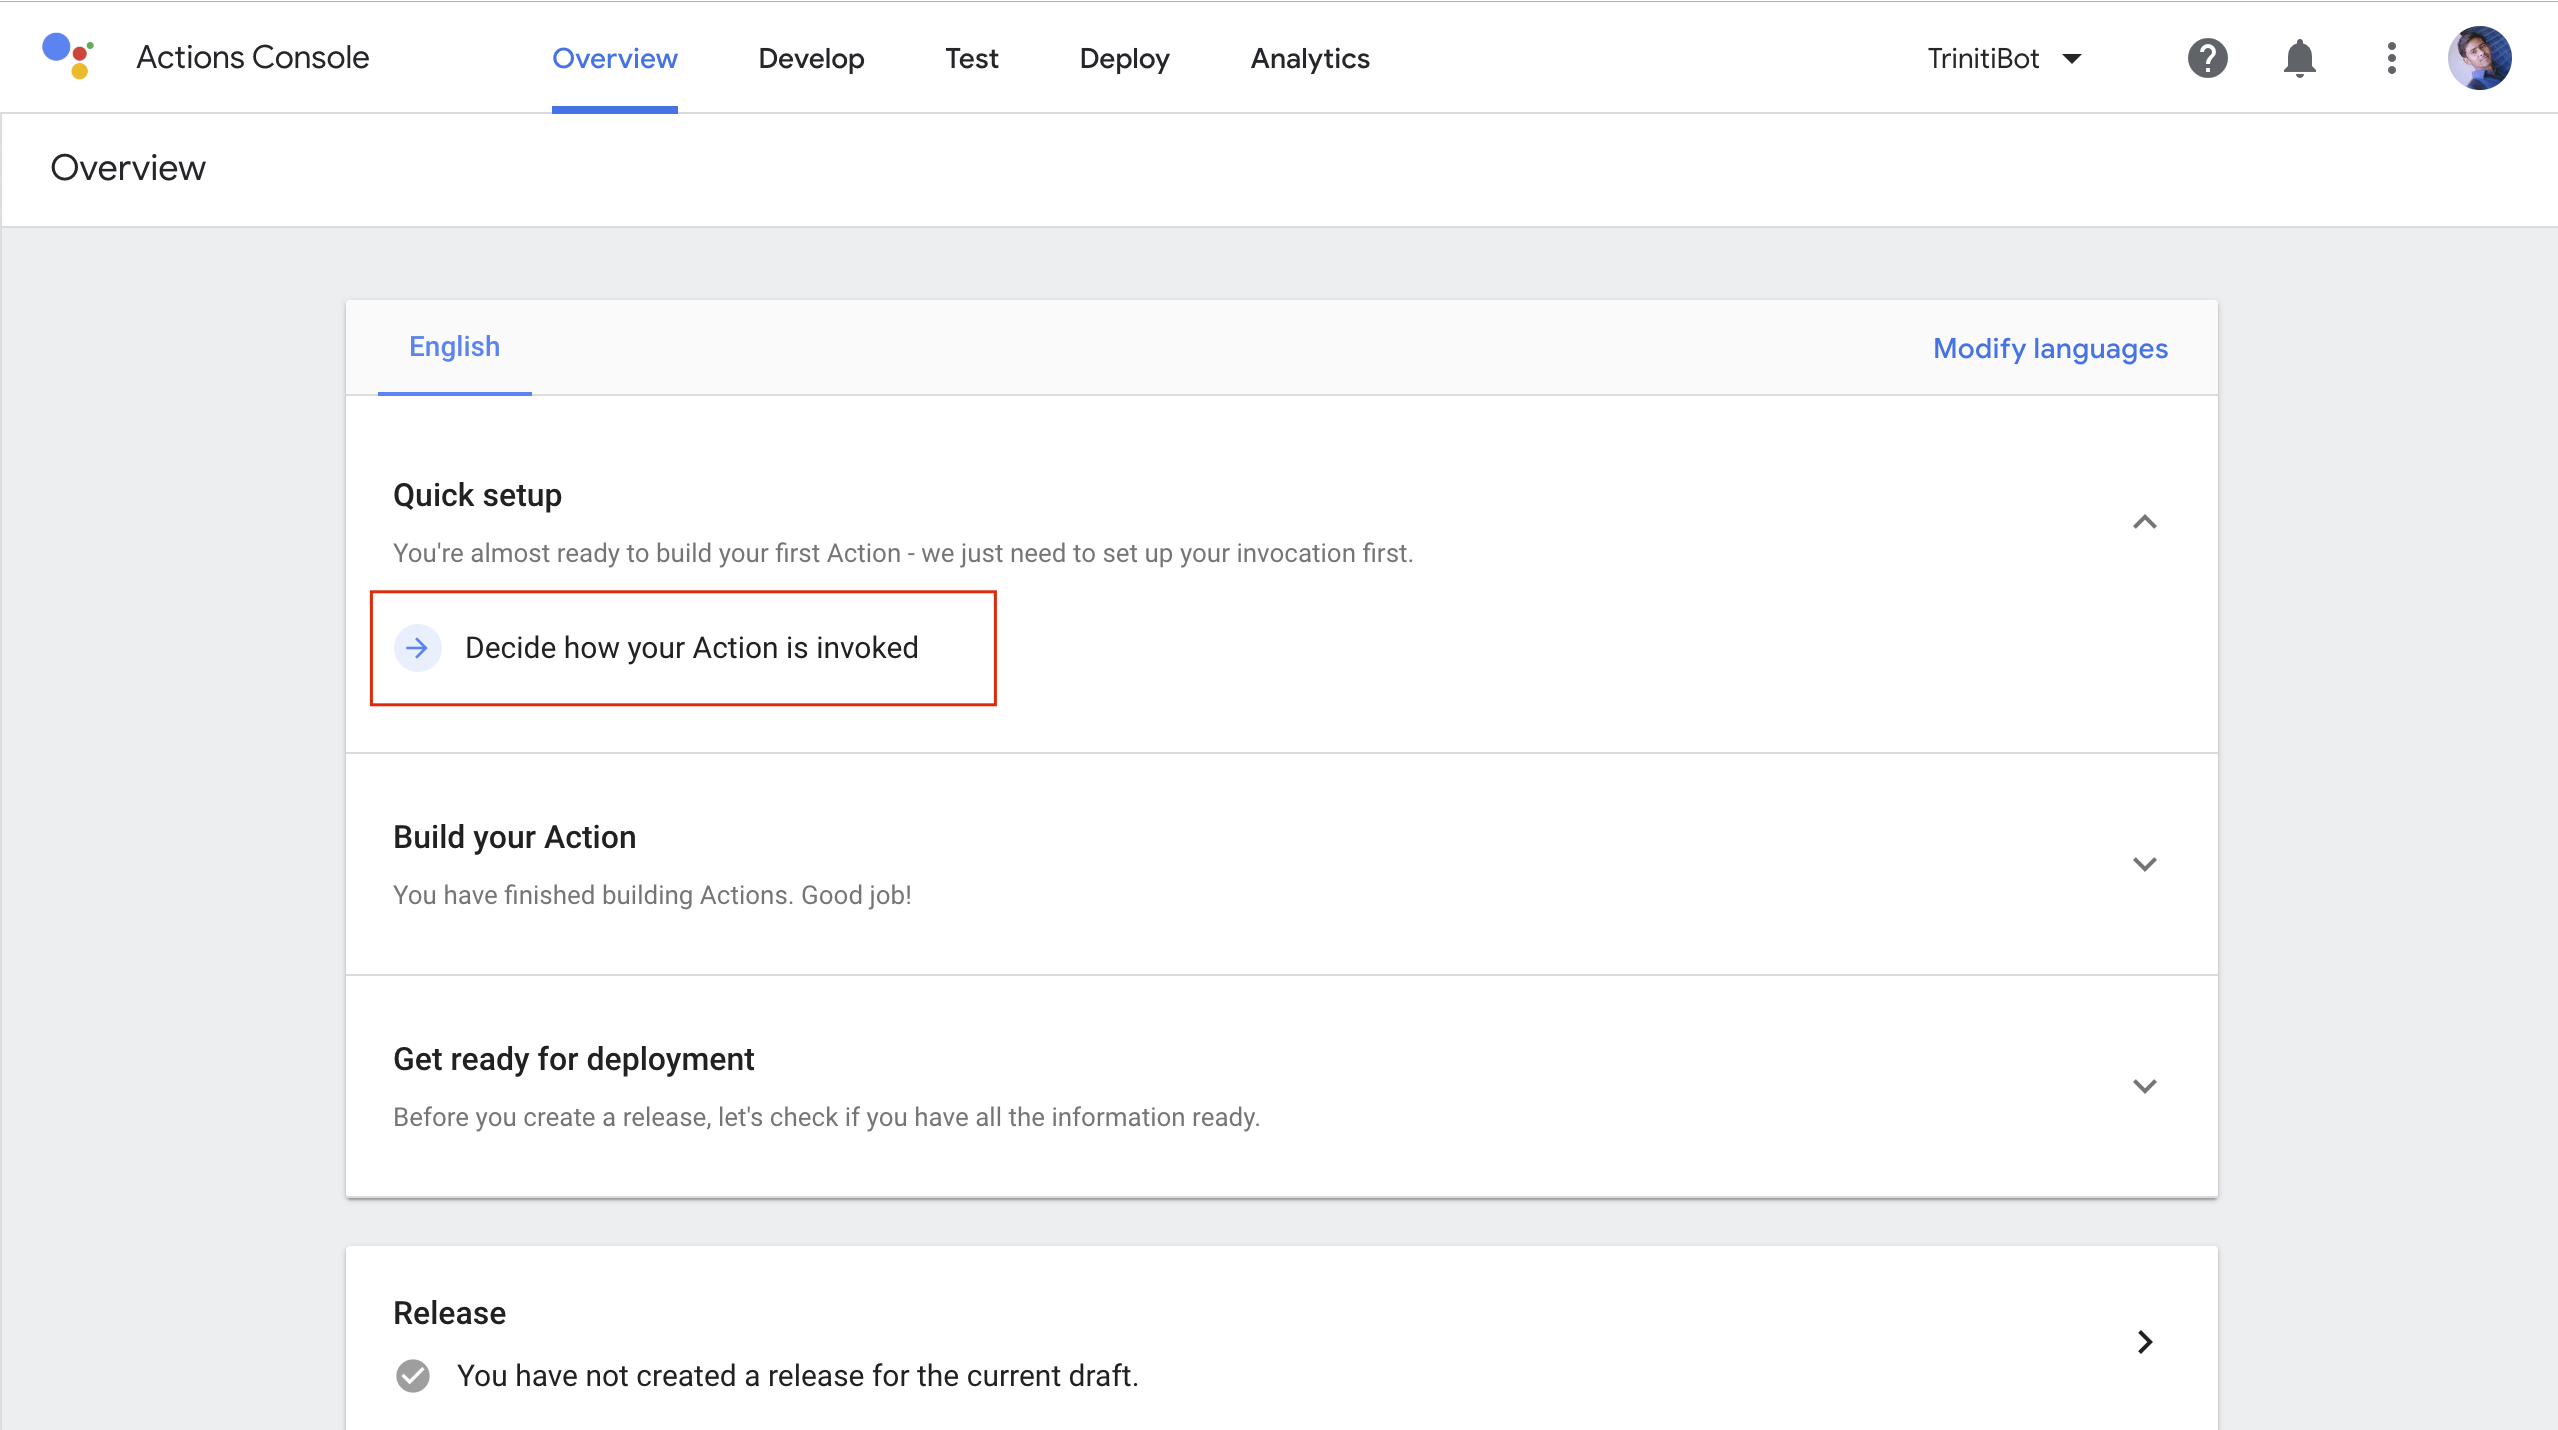
Now go back to your Actions console, click on overview, click on Quick setup, now click on "Decide how your Action is invoked"
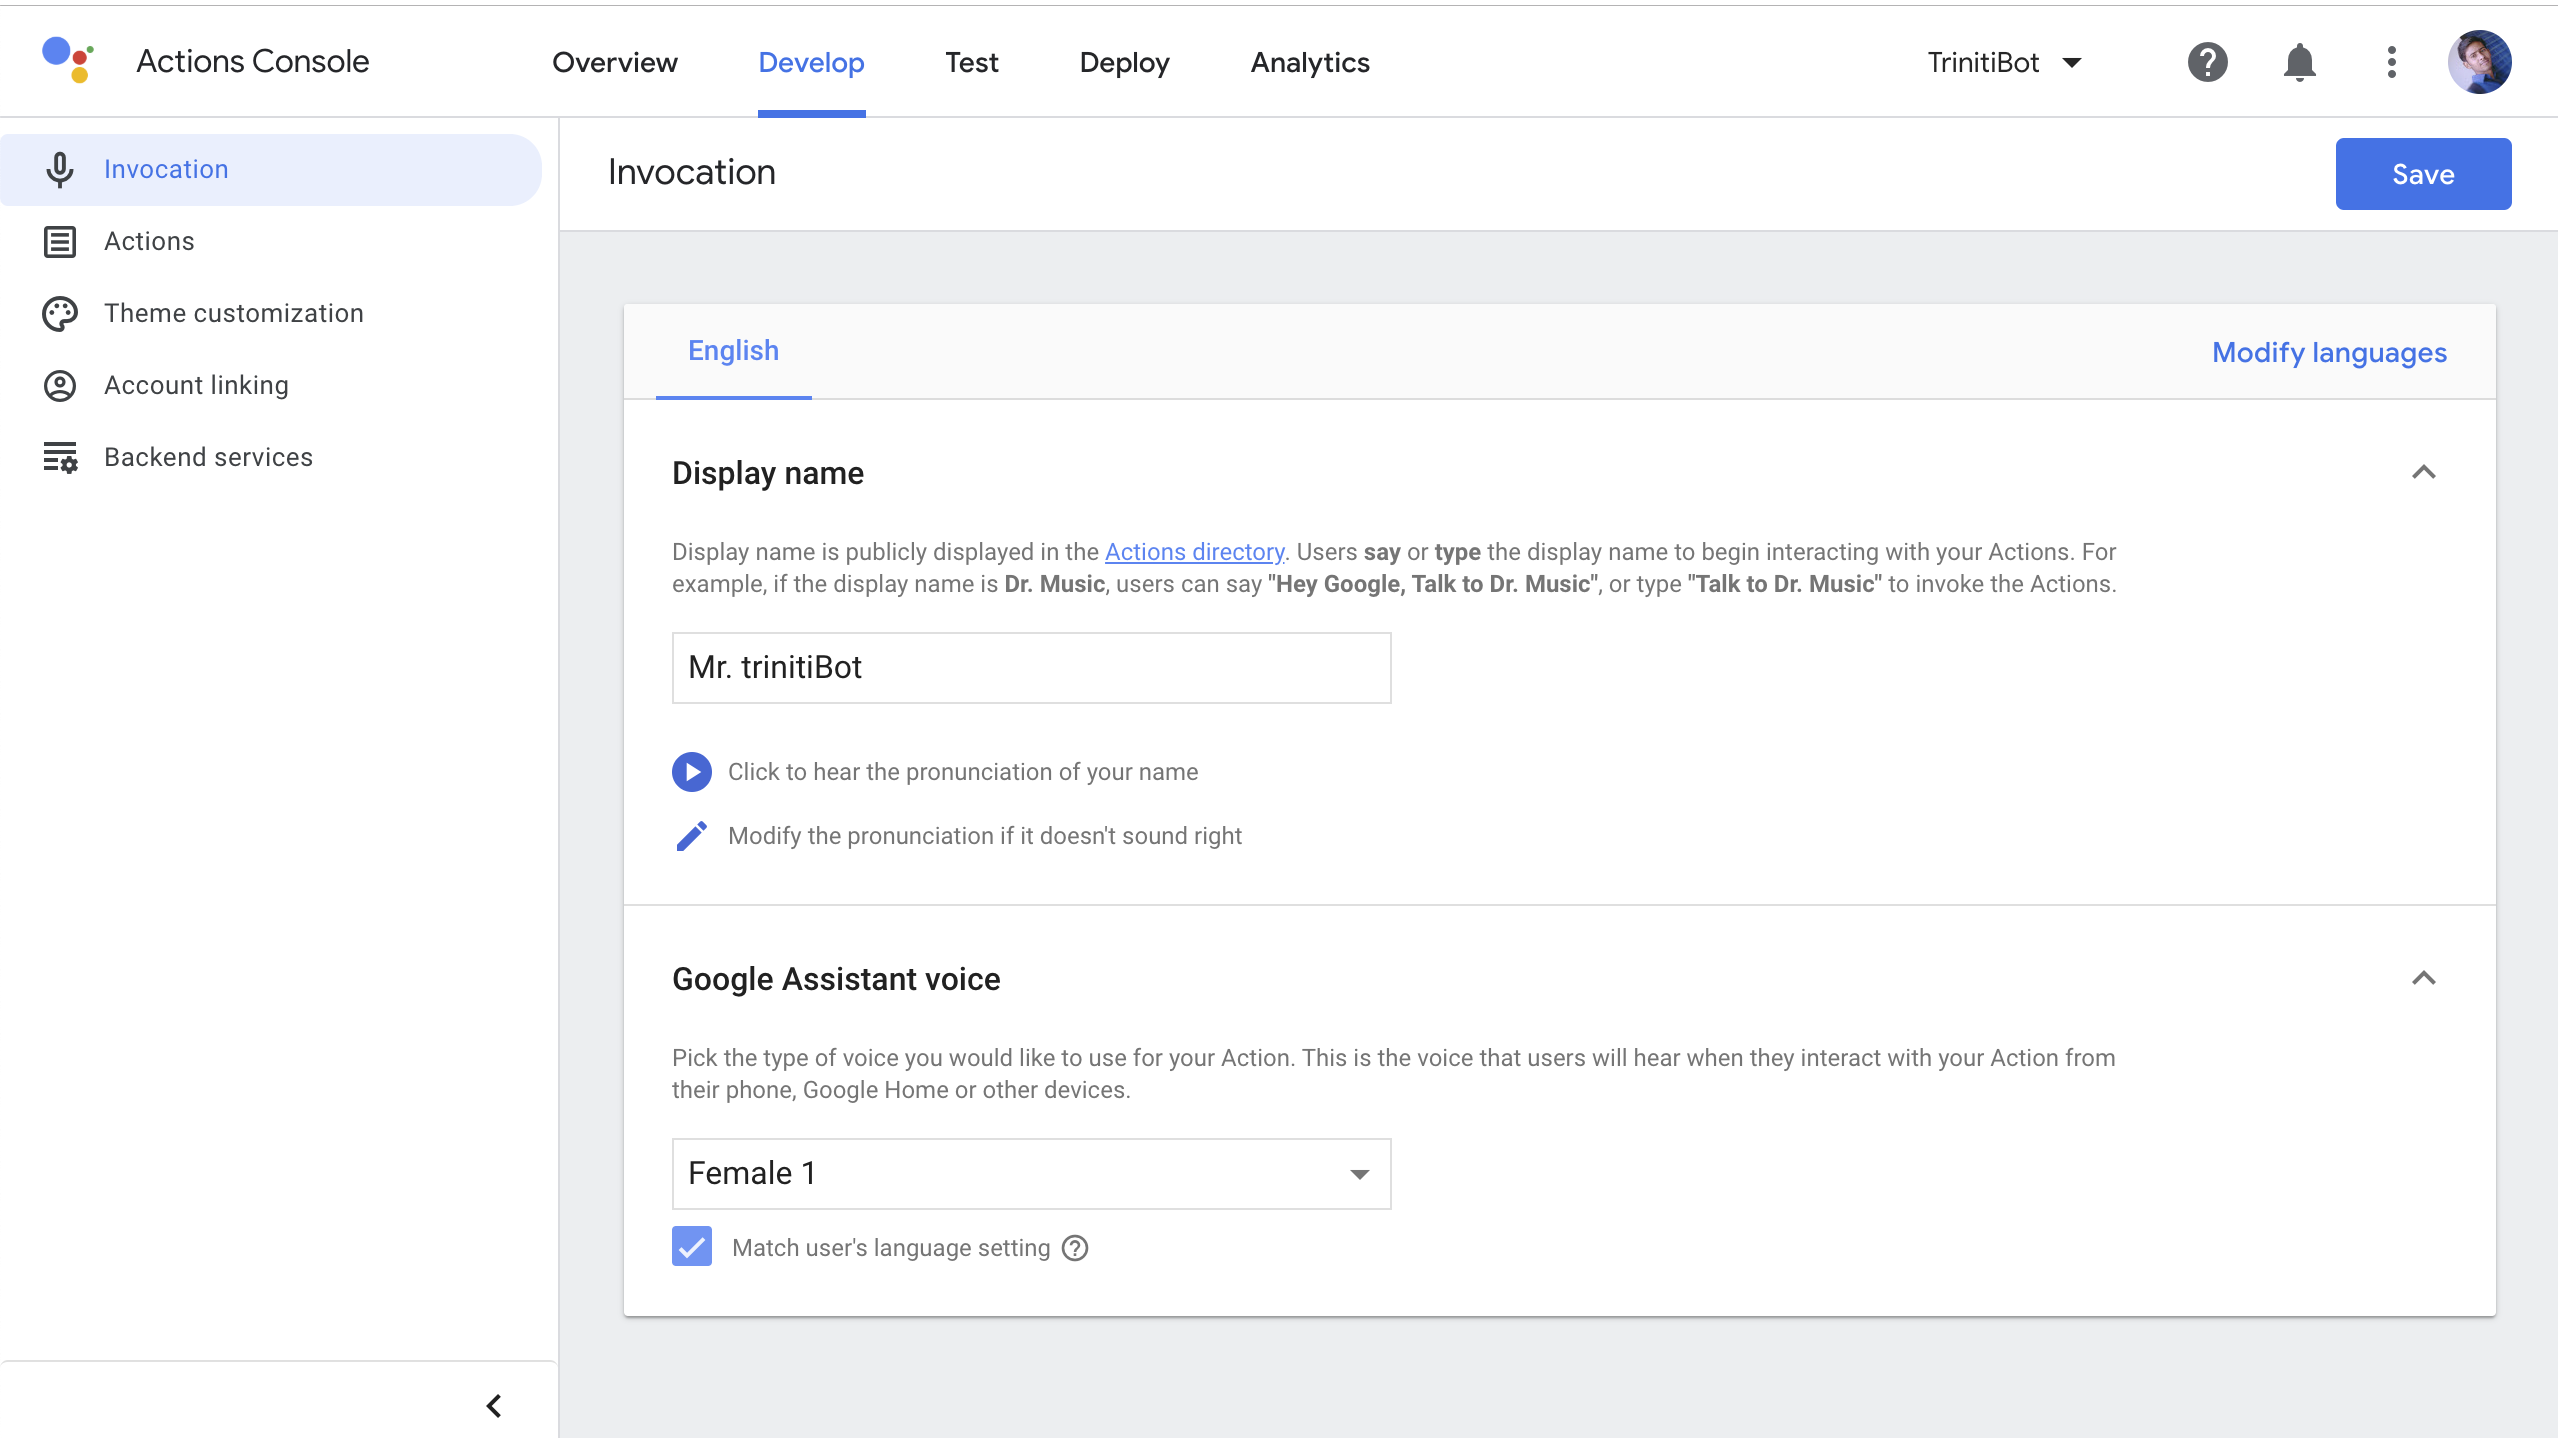
Enter your display name, It will be shown on your google assistant enabled device when you invoke your bot
To test it on simulator, click on Test and you can test your queries (Make sure you have trained your queries well)
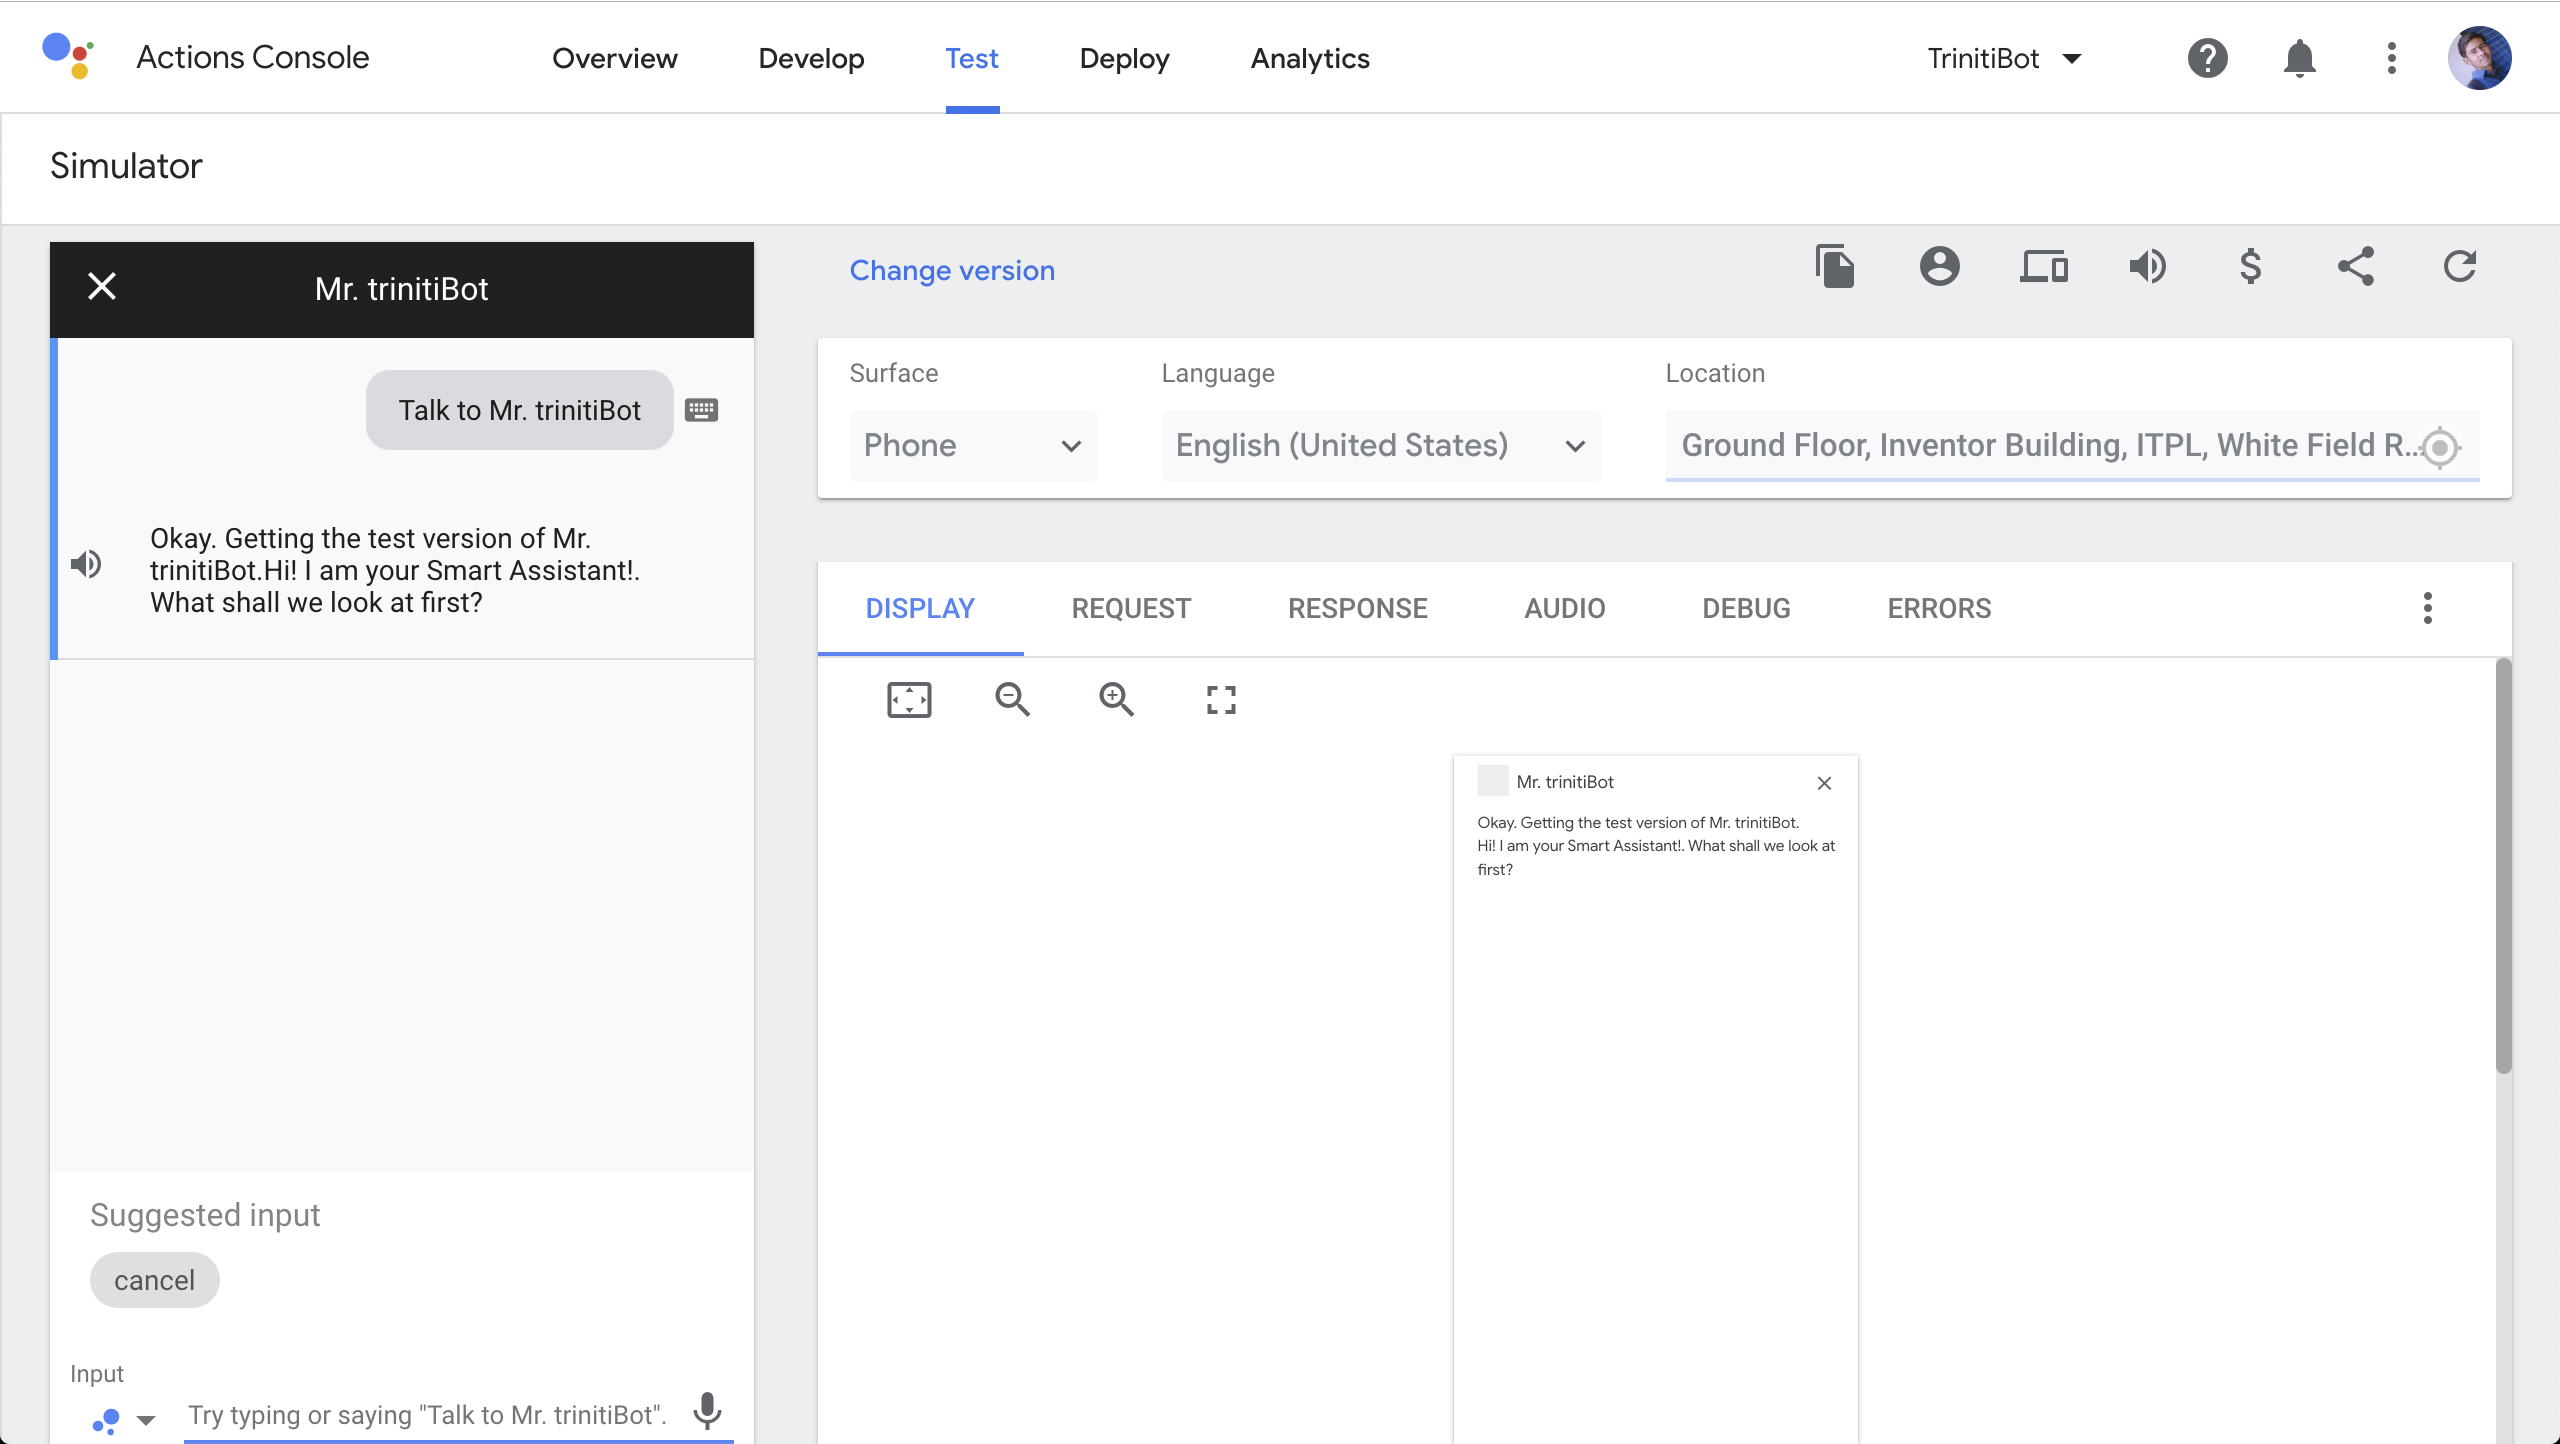
You can use your bot on any google assistant enabled device with the email id you have used to create bot logged in
Now your bot is ready to be interacted with!
Managing WhatsApp by Gupshup
Today, more than 1.5 billion people in over 180 countries use WhatsApp to stay in touch with friends and family anytime and anywhere. Businesses all over the world have already been using WhatsApp informally to communicate with customers, whether about product enquiries or transactional updates.
We have enabled the WhatsApp by Gupshup, Gupshup is a messaging services company with primary operations. Gupshup enables businesses to build engaging conversational experiences.
To enable the WhatsApp by Gupshup you will be needed a Gupshup account. You can enable WhatsApp channel in your bot by following these steps:
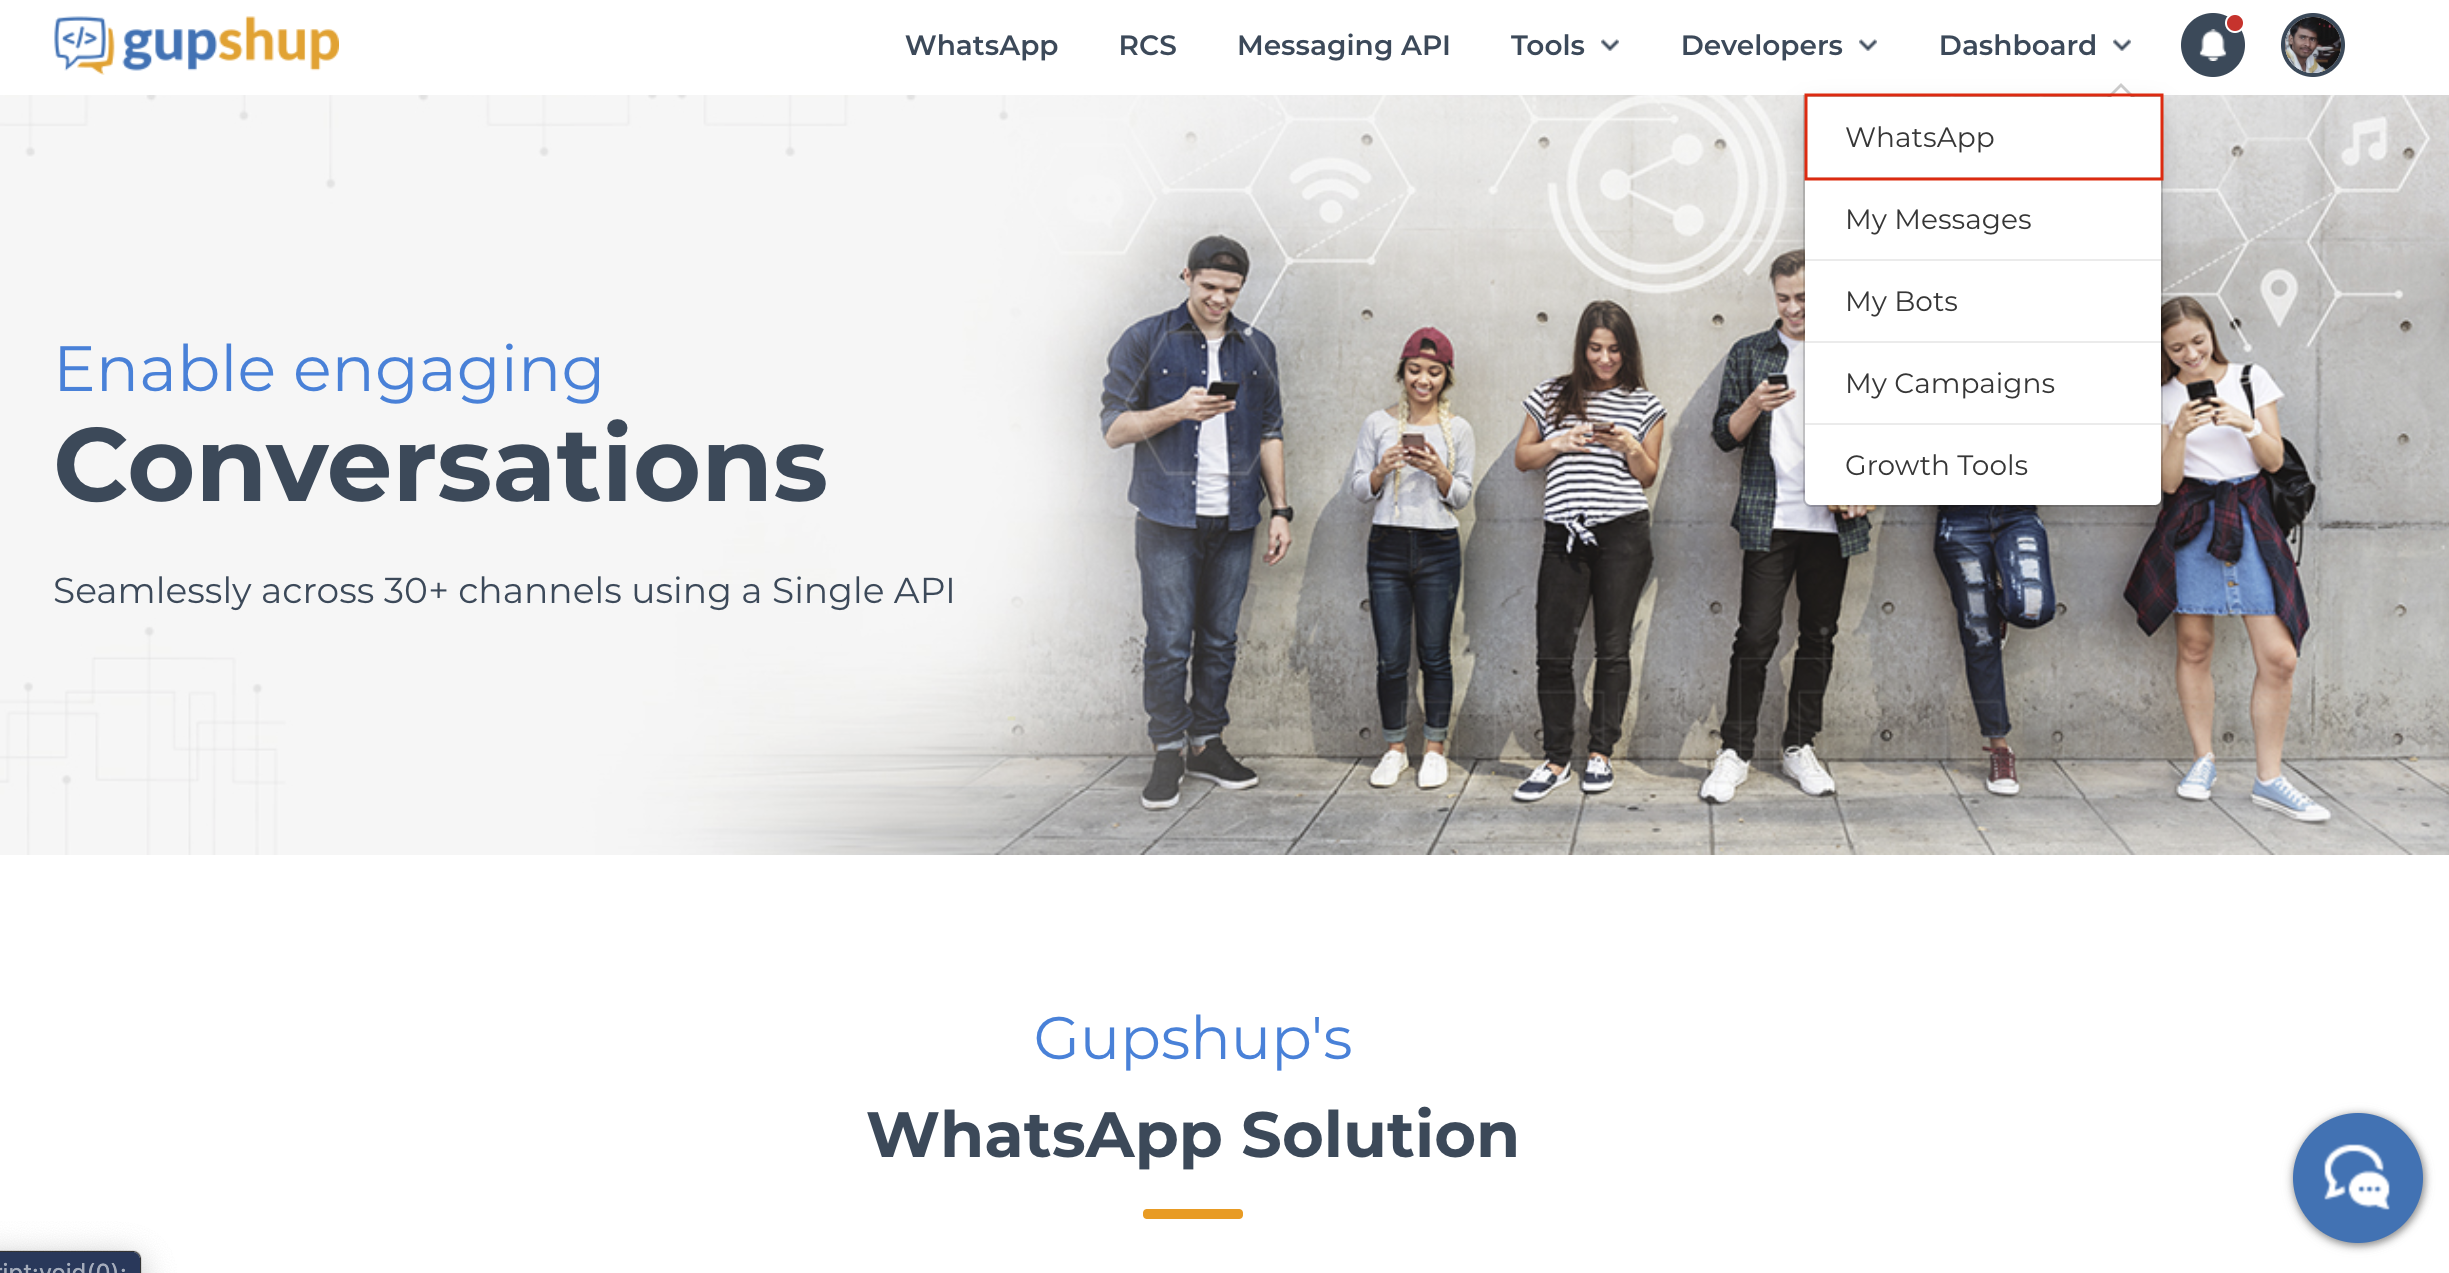
- Goto Gupshup and signup (If you don't have Gupshup account).
- After logging in select "WhatsApp" from the dropdown of the dashboard.
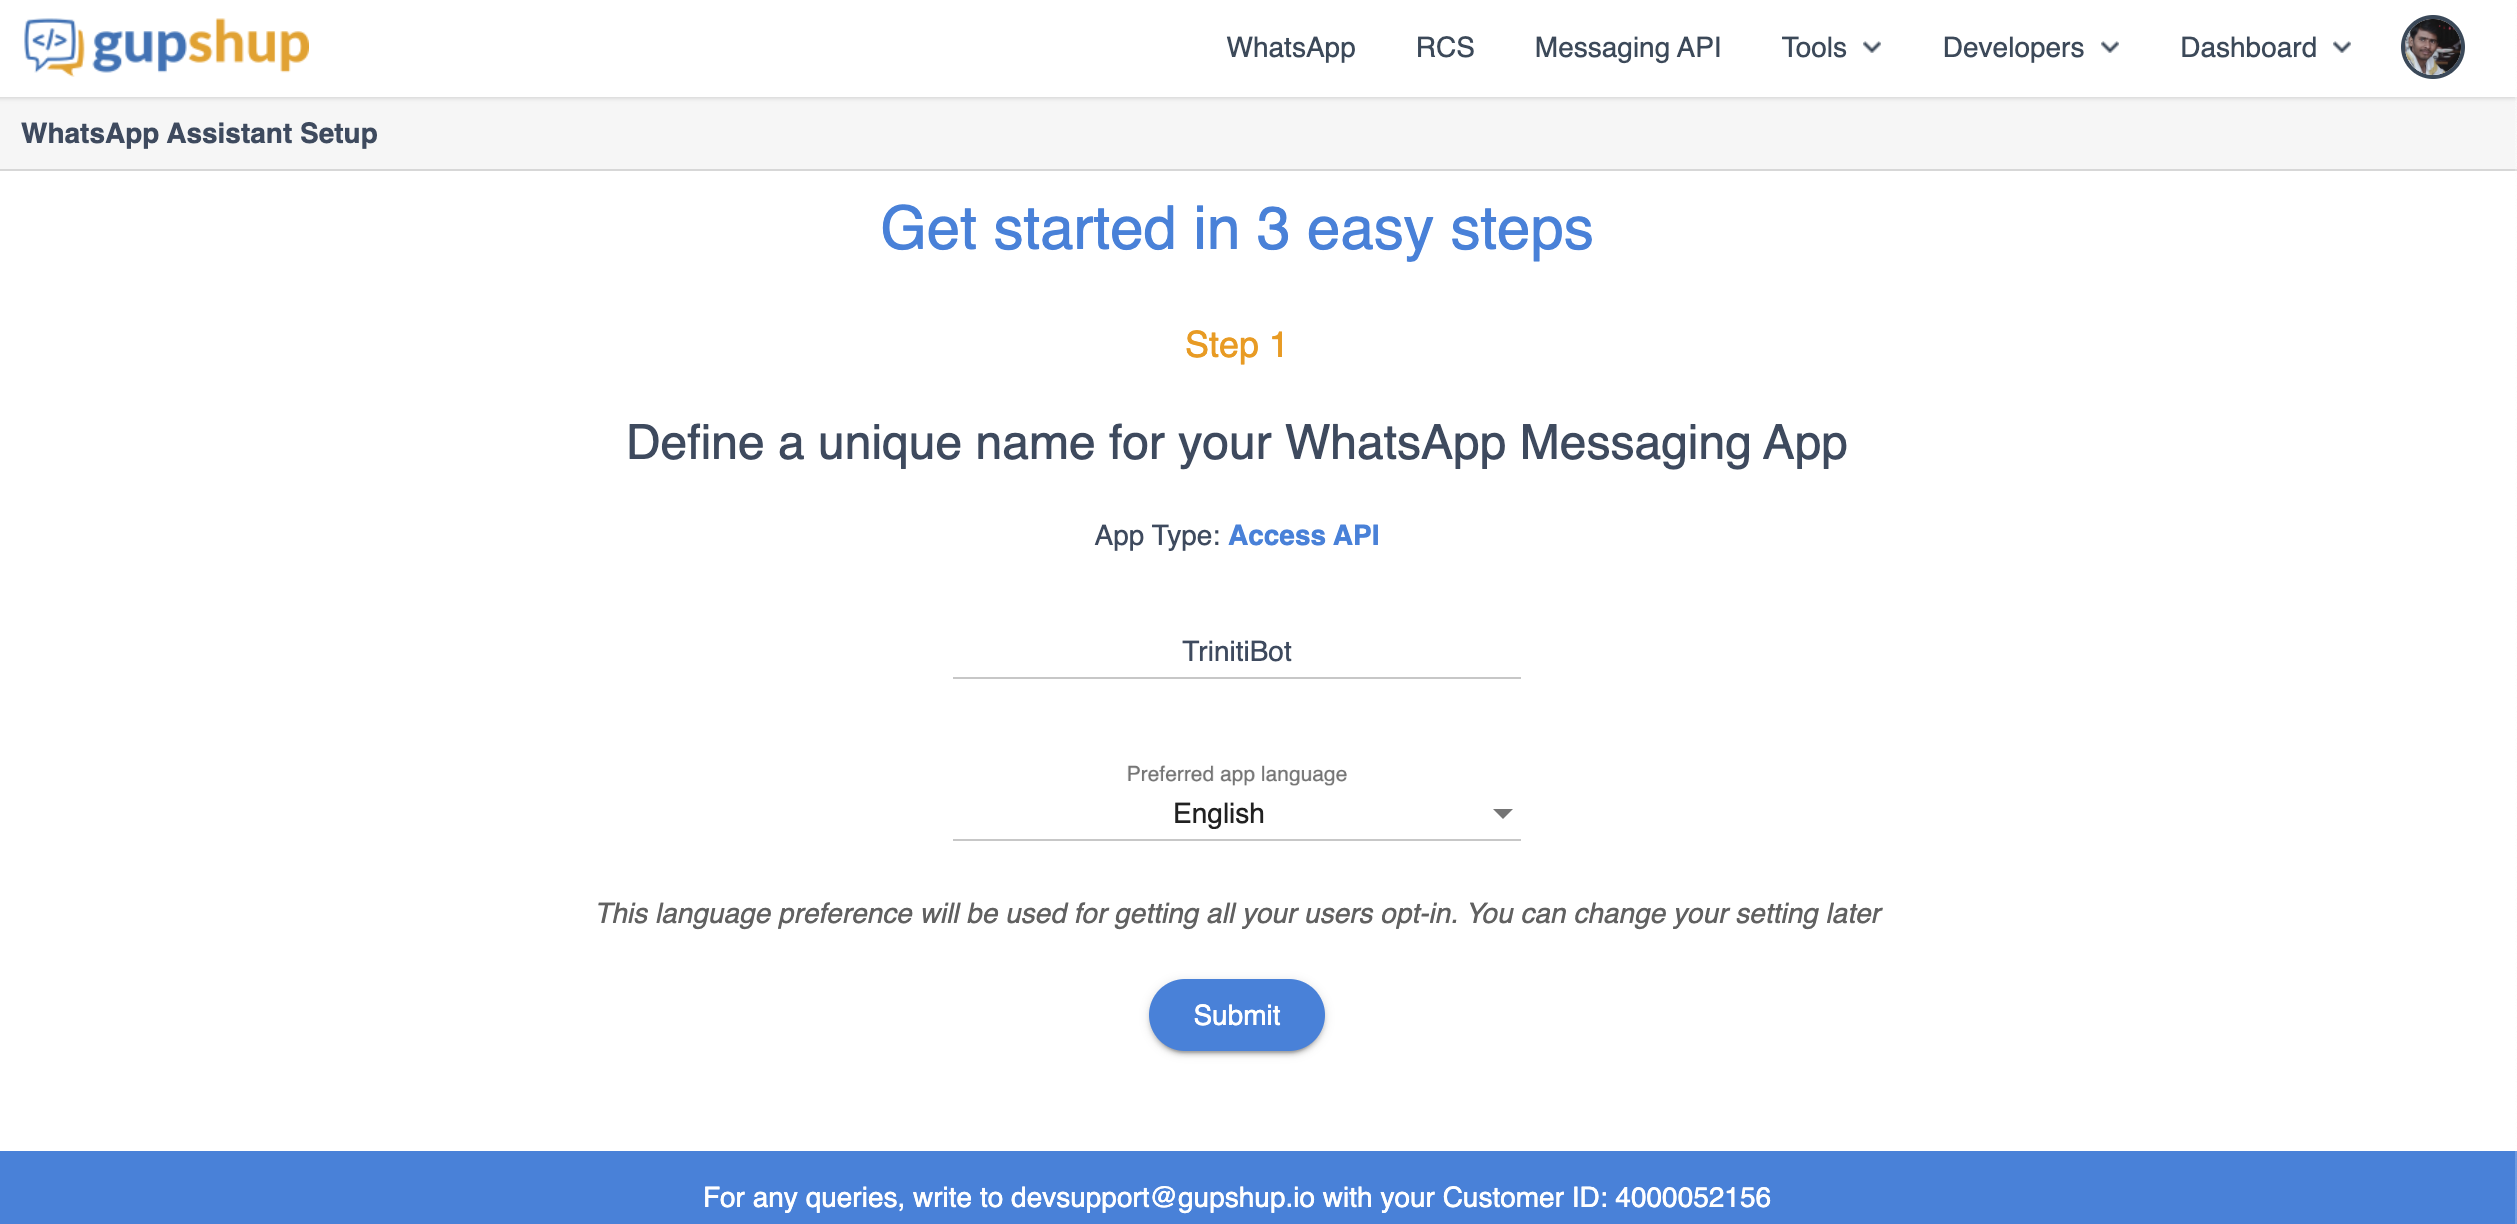
- Click on 'Create App' on the top right corner (+) symbol.
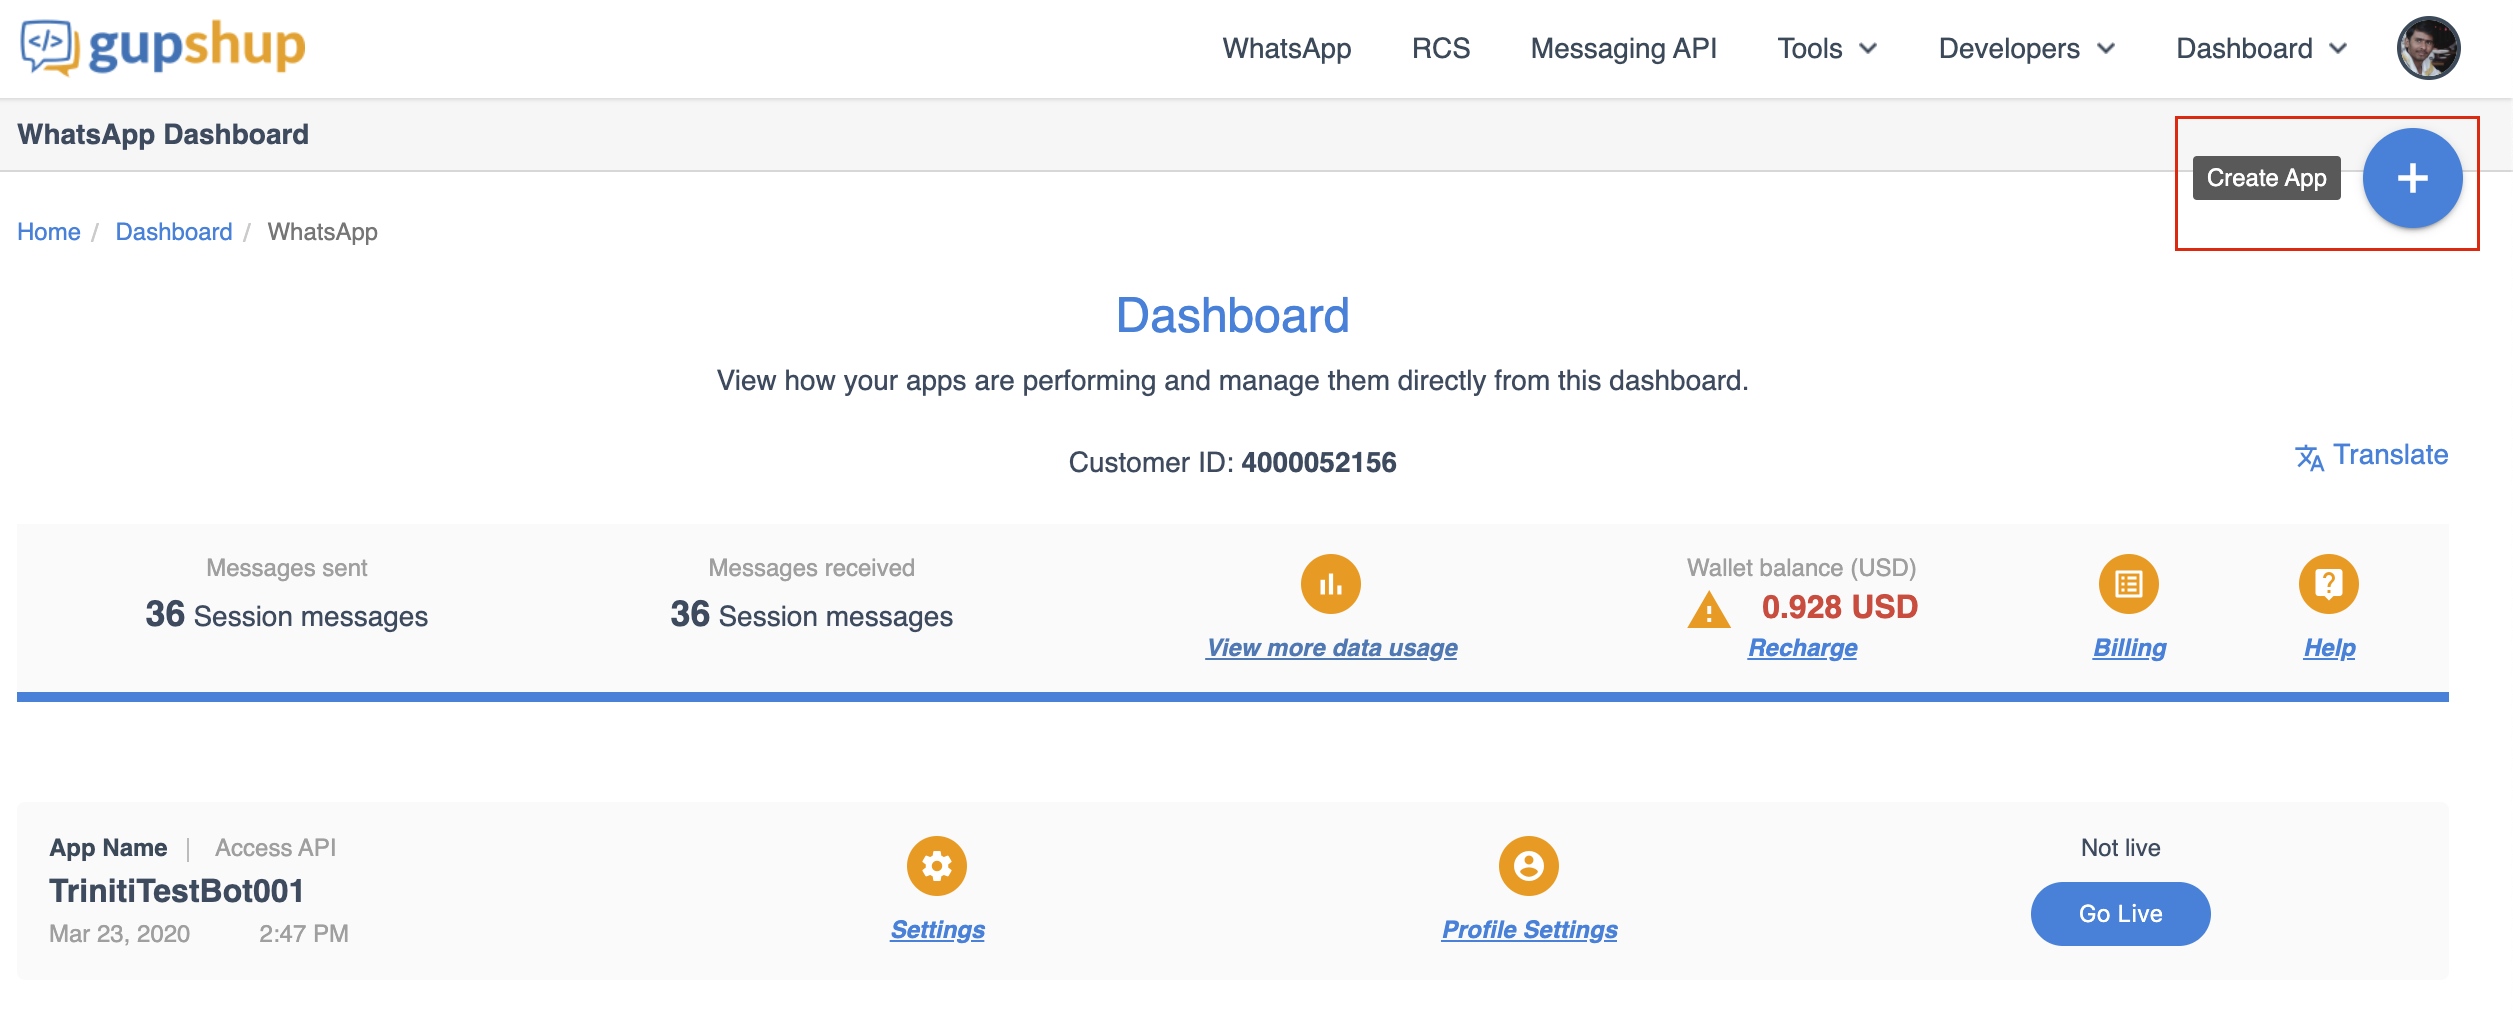
- Click on 'Access API'
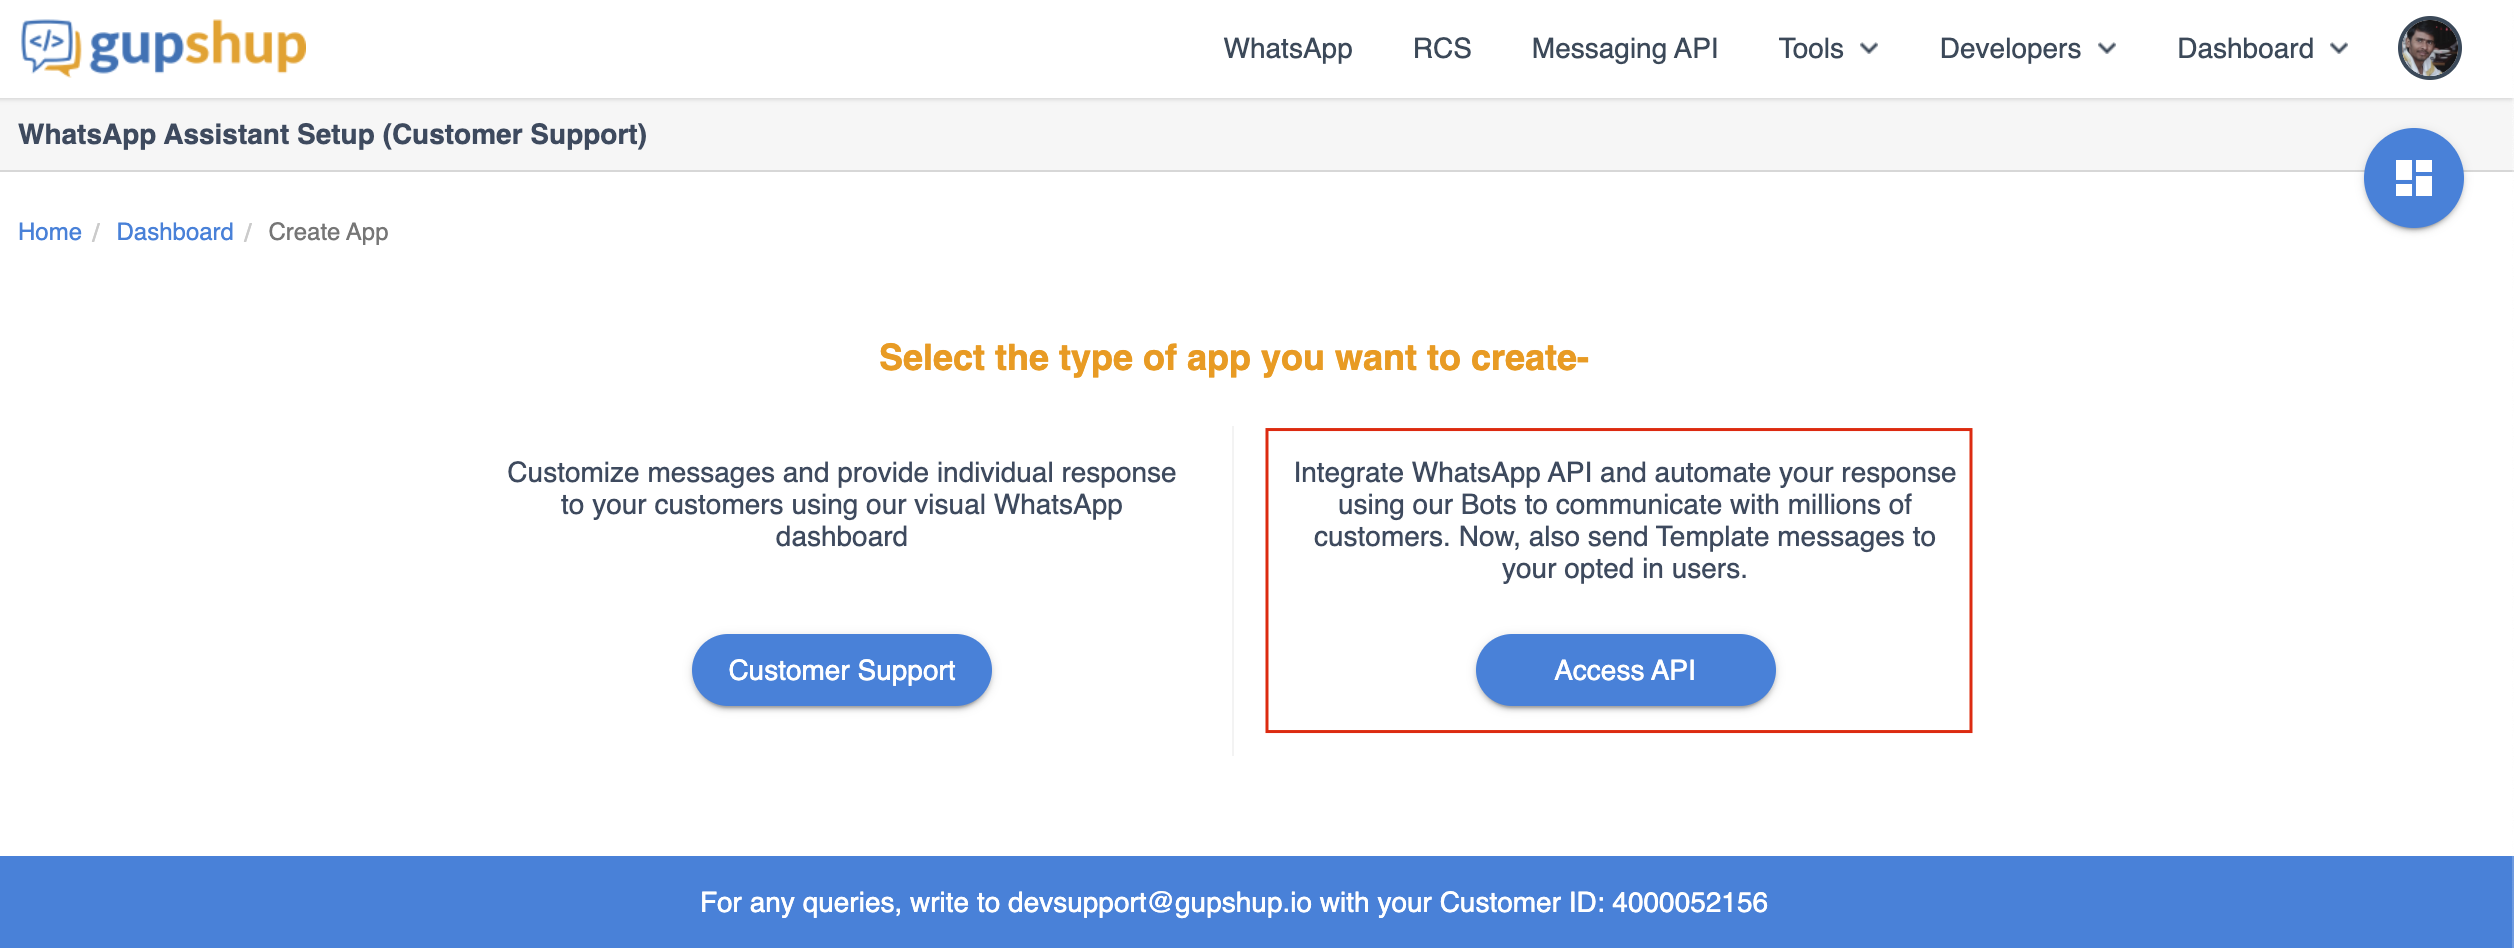
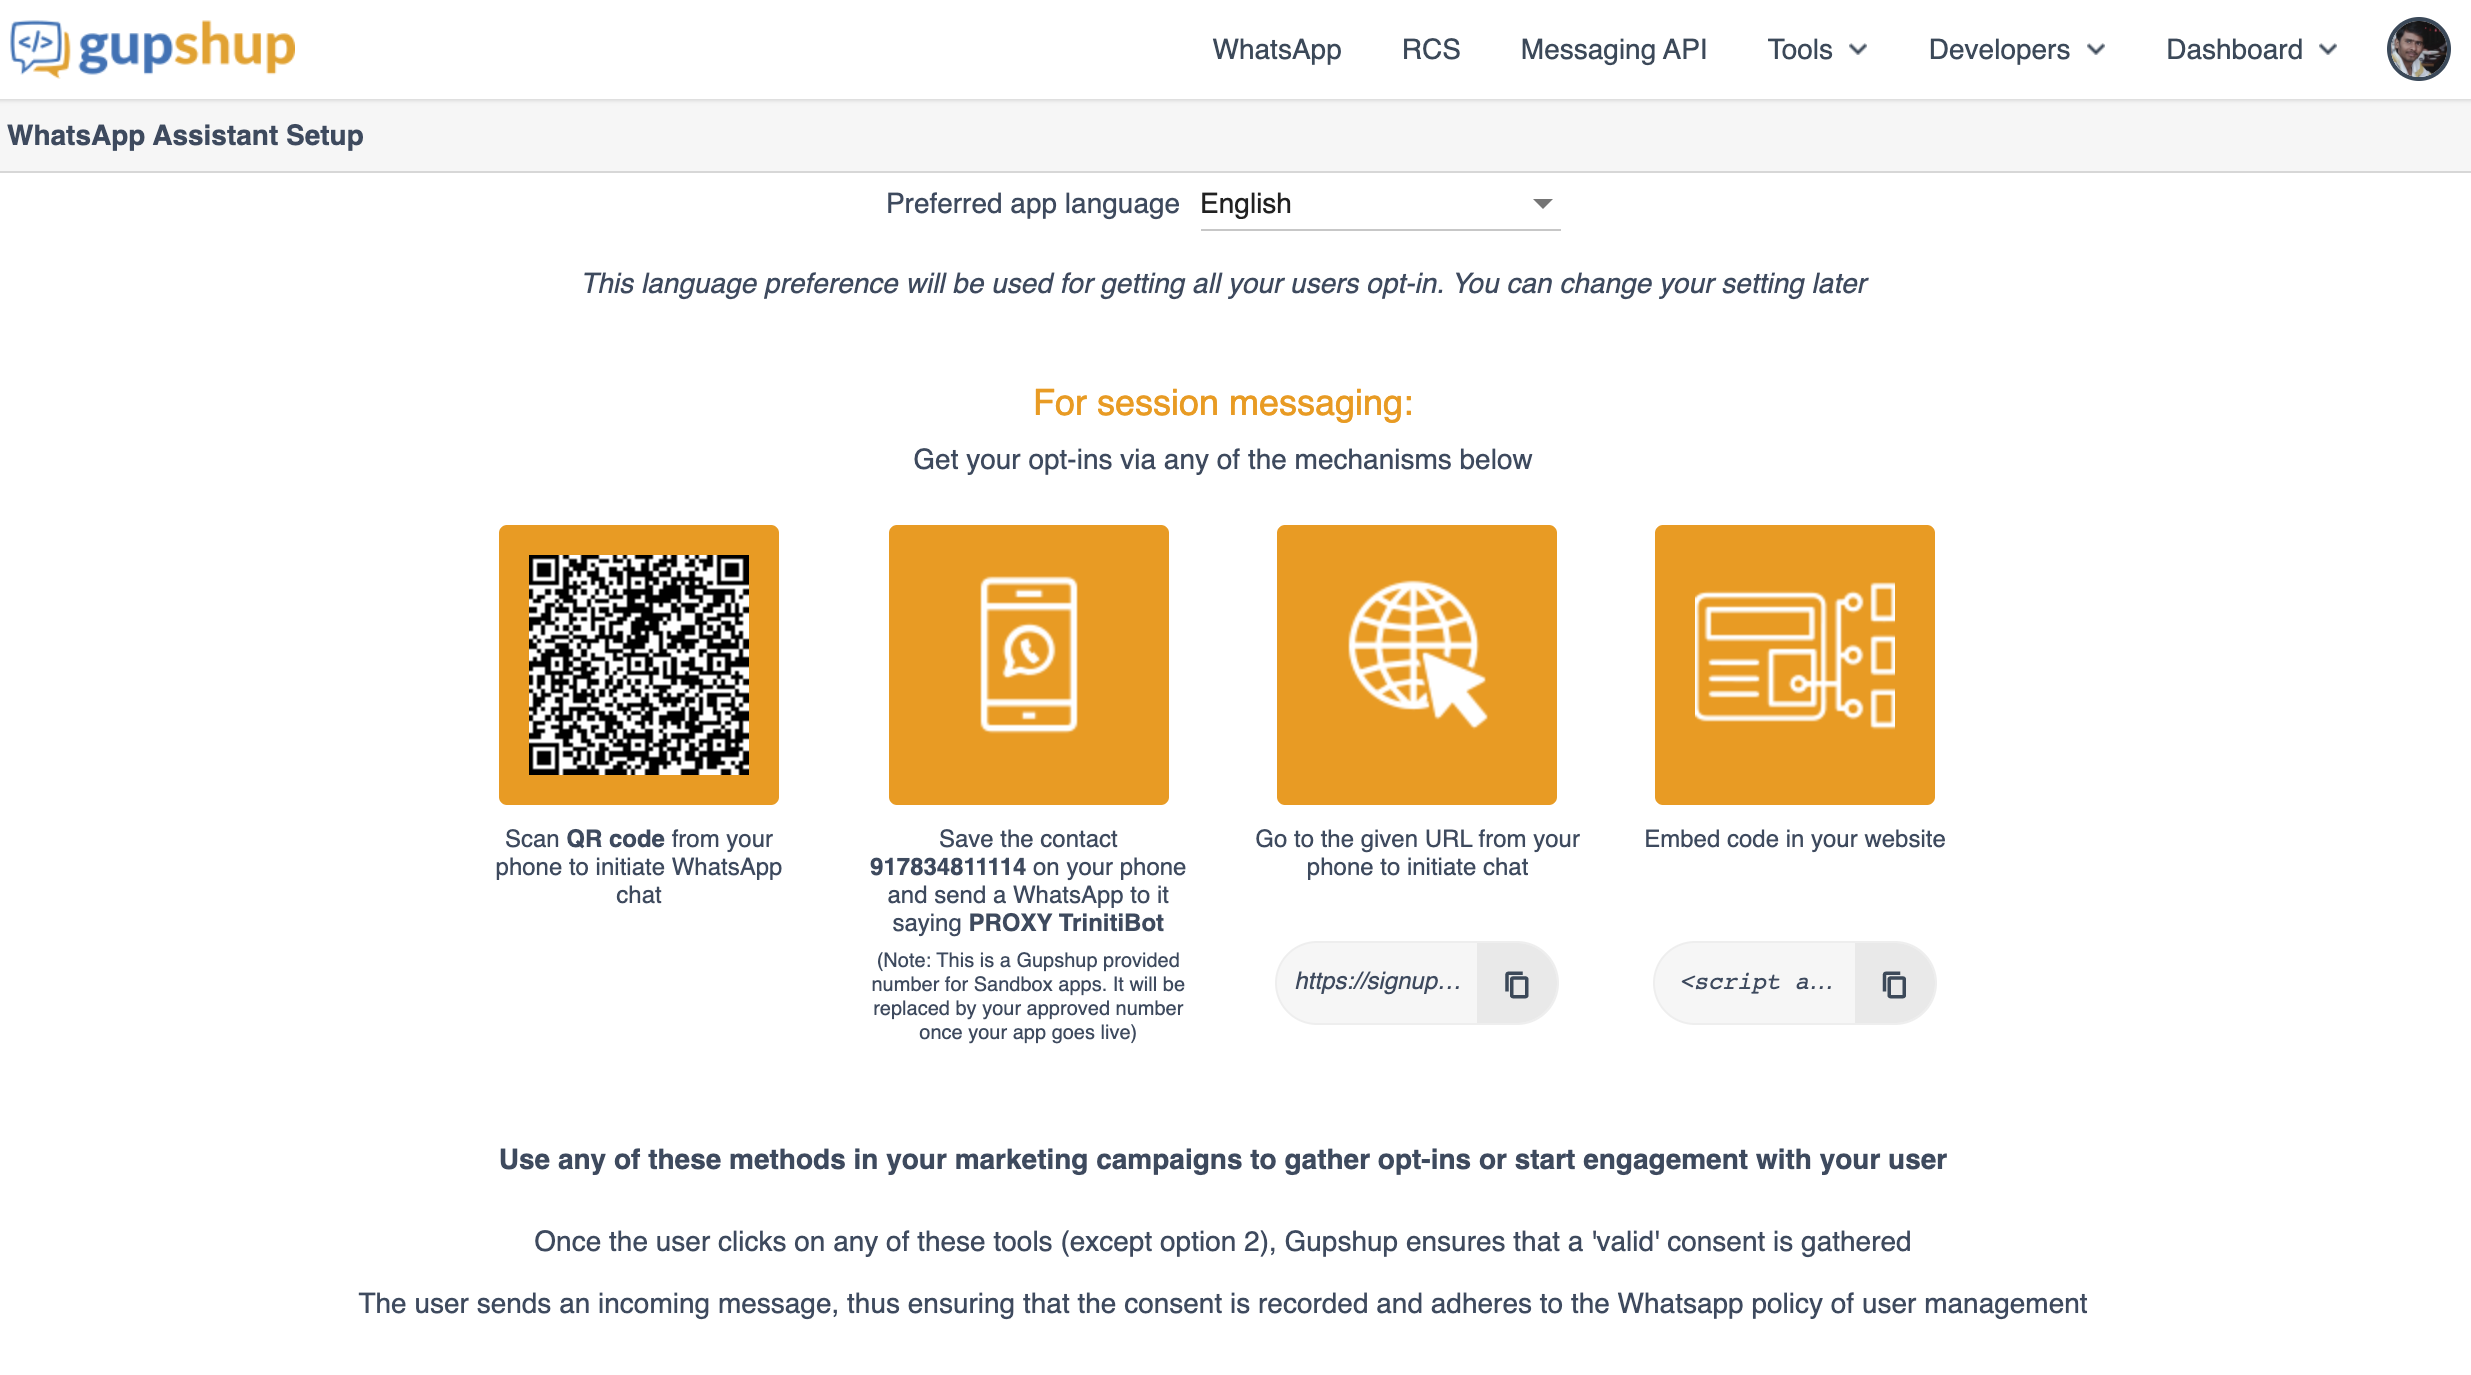
- Enter the bot name, select the preferred app language and click on submit.
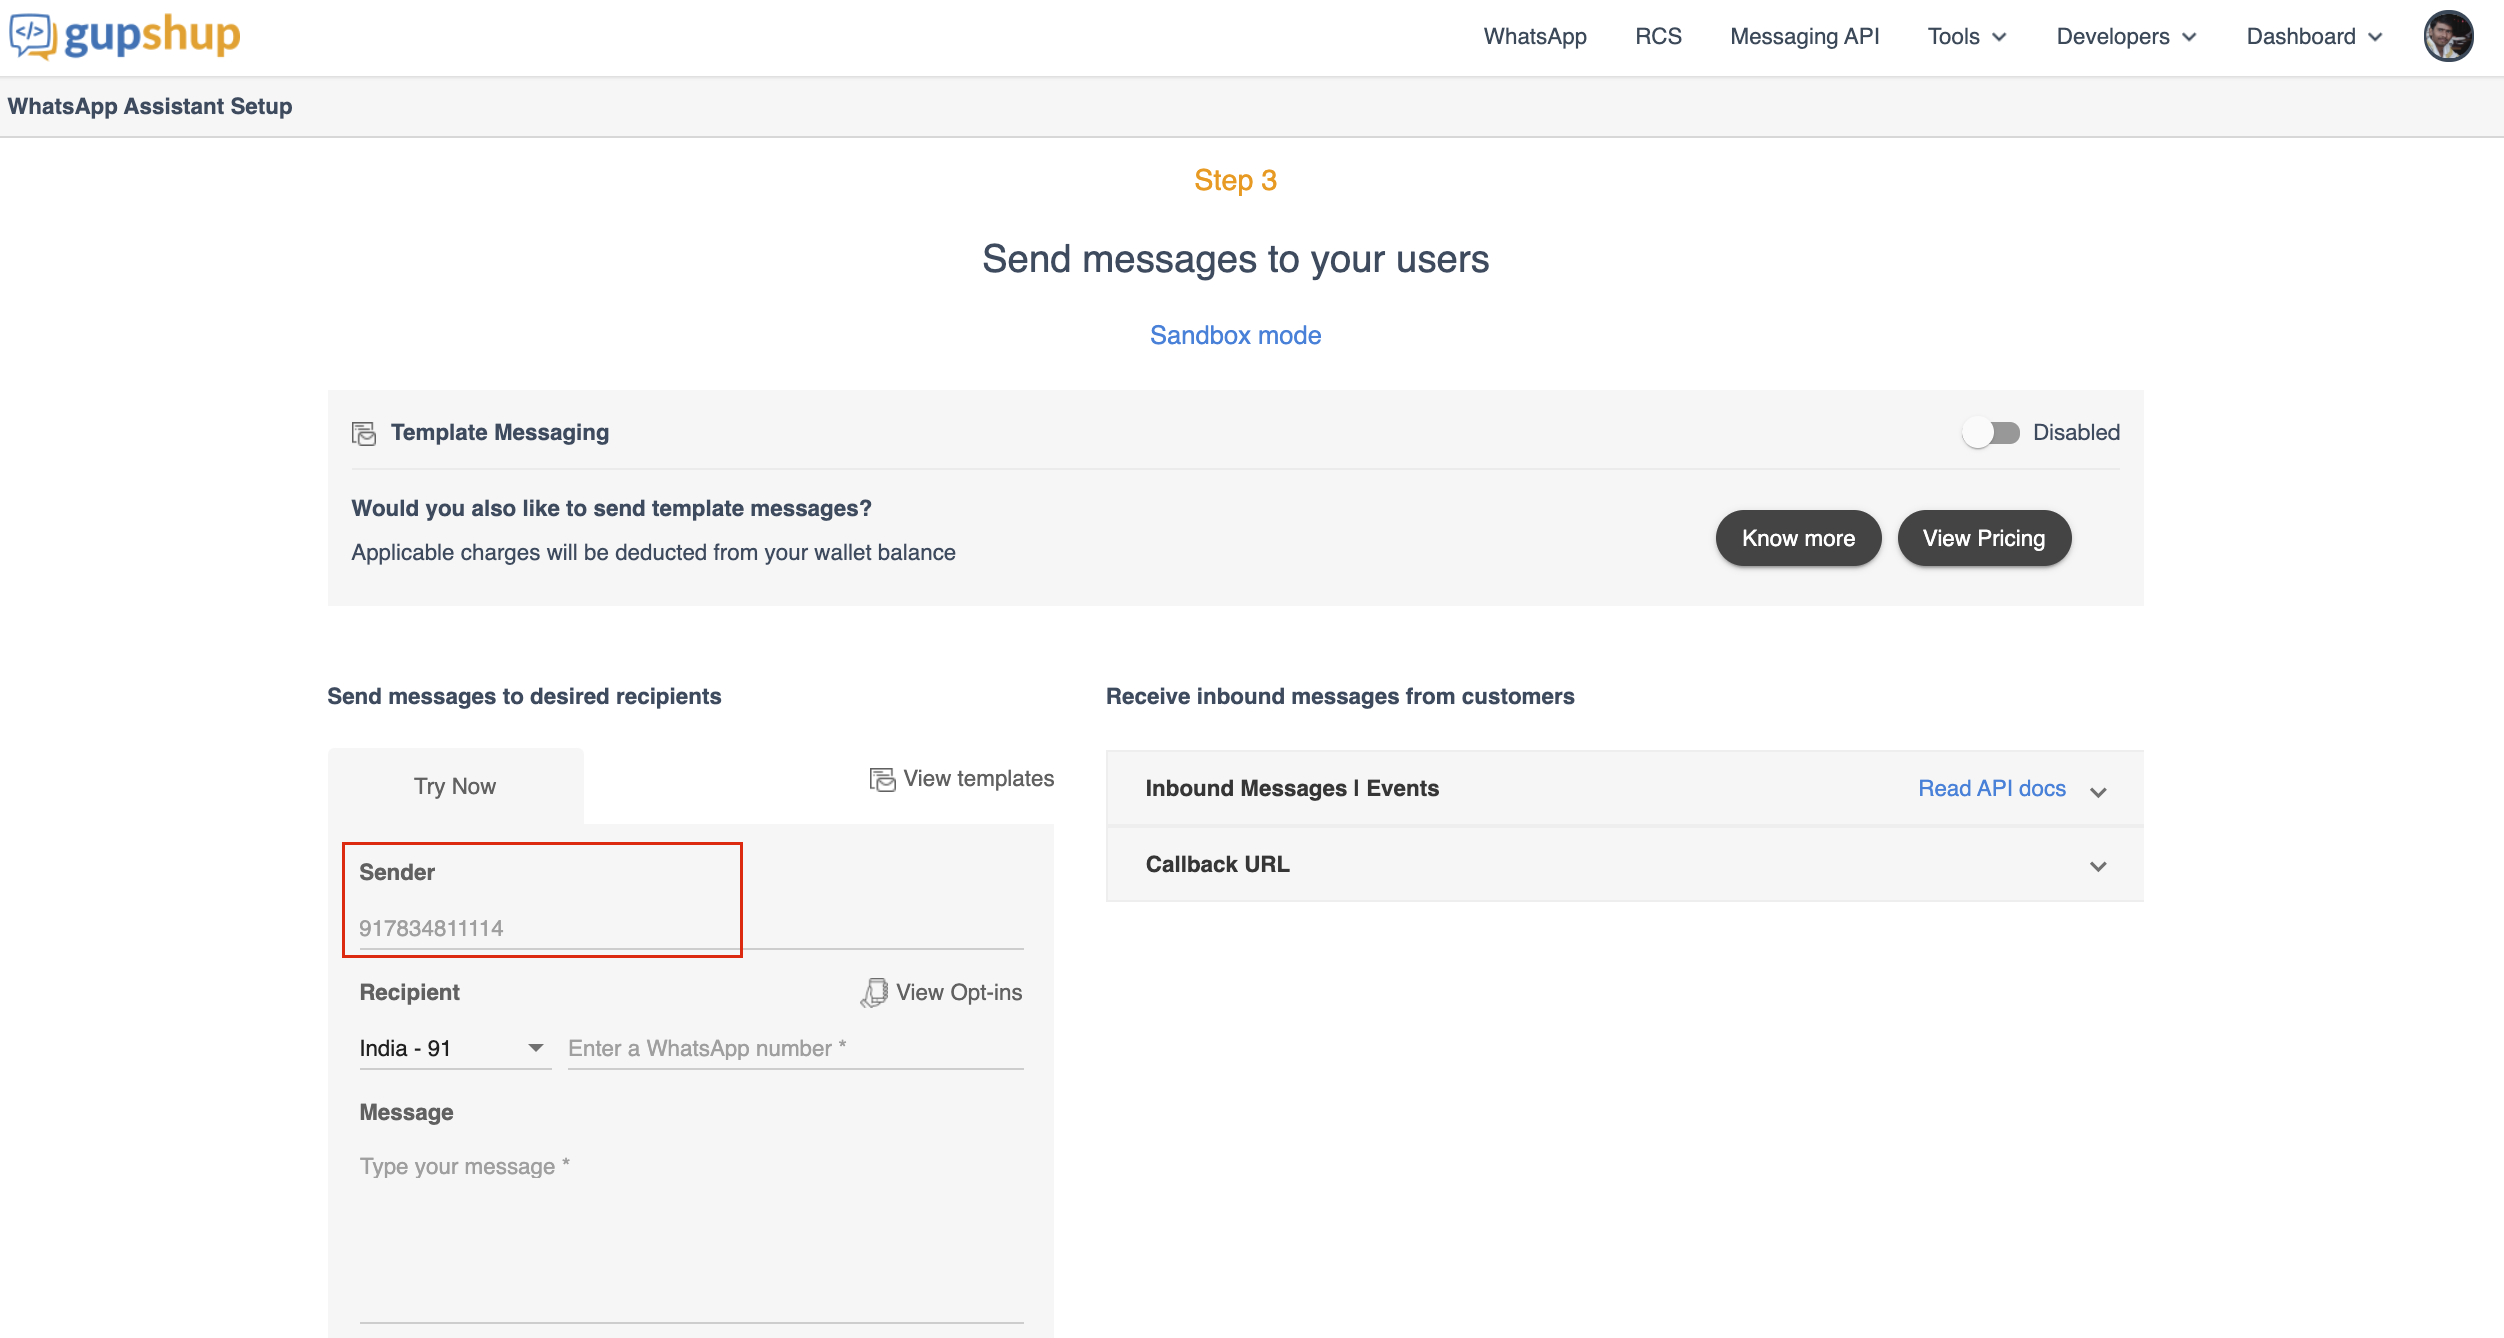
- Click on Next to go on step-3
- Copy the 'Sender Number' and 'apikey'

- Now go to your workspace
- Navigate to channels and enable 'WhatsApp by Gupshup'

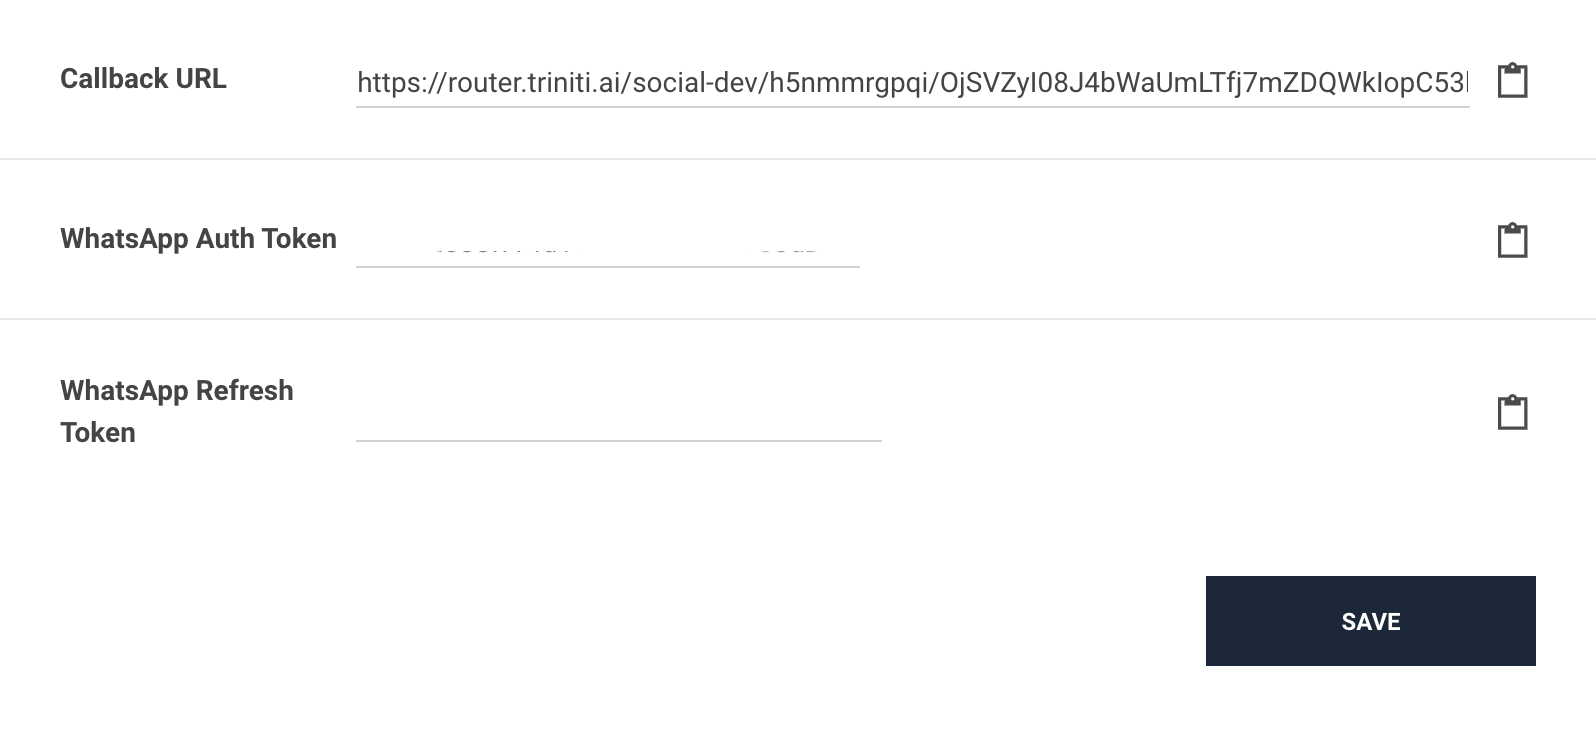
- Paste the 'apikey' in the 'WhatsApp Auth Token' field and 'sender number' in the 'WhatsApp Refresh Token' field.
- Click on save
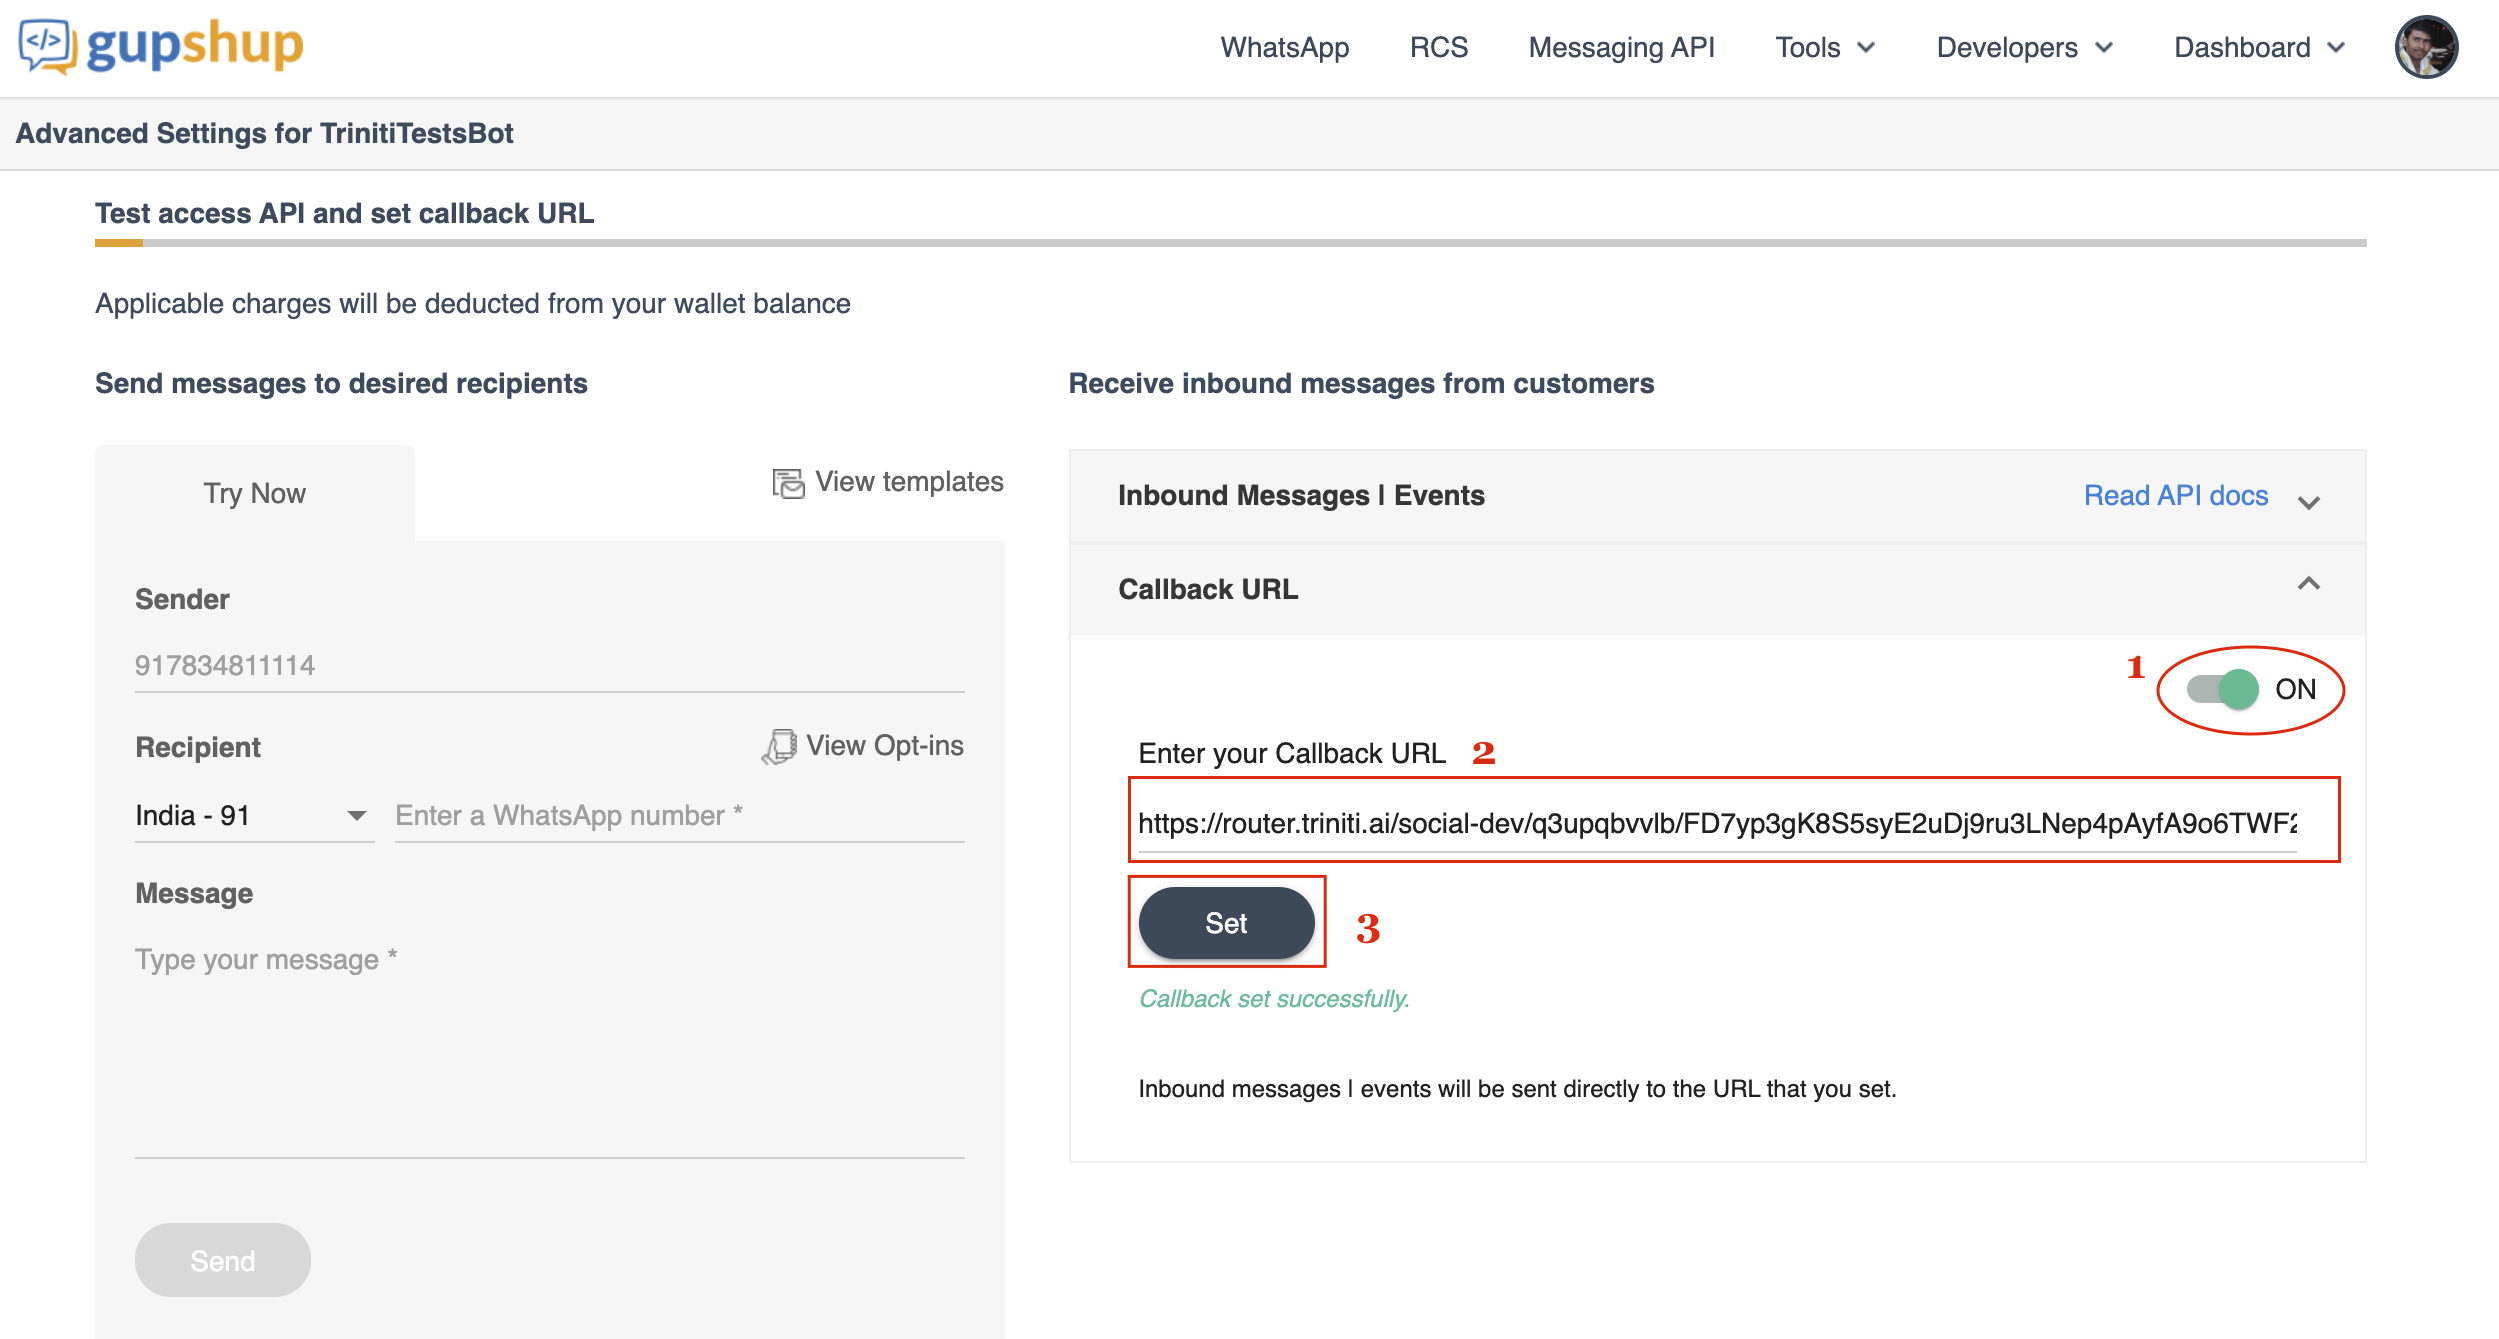
- Copy the 'Callback URL' from triniti.ai
- Goto Gupshup platform
- Enable the 'Callback URL', paste the callback URL and click on 'Set'.
Congratulations! you have successfully configured the WhatsApp channel for your bot.
You can interact with the bot through WhatsApp by any one of the mechanisms below that will be provided after creating the bot in the 2nd step:
| Scan QR code from your phone to initiate WhatsApp chat. | Save the contact 917834811114 on your phone and send a WhatsApp message to it saying "PROXY bot_name" | Go to the given URL from your phone to initiate chat (https://signupforservices.com/whatsappassistant/#/optin?bId=d0ebcd0a-d14f-466a-80e6-974e97deb8a7&bName=bot_name&s=URL&lang=en_US). |
Embed code in your website (<script async src='https://www.buildquickbots.com/gsui/js/embedScript/gs_wa_widget.js' data-appid='d0ebcd0a-d14f-466a-80e6-974e97deb8a7' data-appname='bot_name' data-source='WEB' data-env='PROD' data-lang='en_US'></script>) |
Note: "bot_name" that you have just created on Gupshup.
Managing WhatsApp by Nexmo
Today, more than 1.5 billion people in over 180 countries use WhatsApp to stay in touch with friends and family anytime and anywhere. Businesses all over the world have already been using WhatsApp informally to communicate with customers, whether about product enquiries or transactional updates.
We have enabled the WhatsApp by Nexmo, Nexmo provides innovative cloud communication APIs that enable applications and enterprises connect to their customers via voice and SMS. Leverage the Nexmo Platform to innovate your business communications. Reach customers with marketing or other broadcast messages.
To test the WhatsApp Nexmo channel: Please enable the "Whatsapp by Nexmo channel", save the number "+6531632959" in your WhatsApp contact and send a message followed by the command "Open your_workspace_name" to start the conversation on WhatsApp with the bot.
To enable the WhatsApp by Nexmo you will be needed a Nexmo account. You can enable WhatsApp channel in your bot by following these steps:
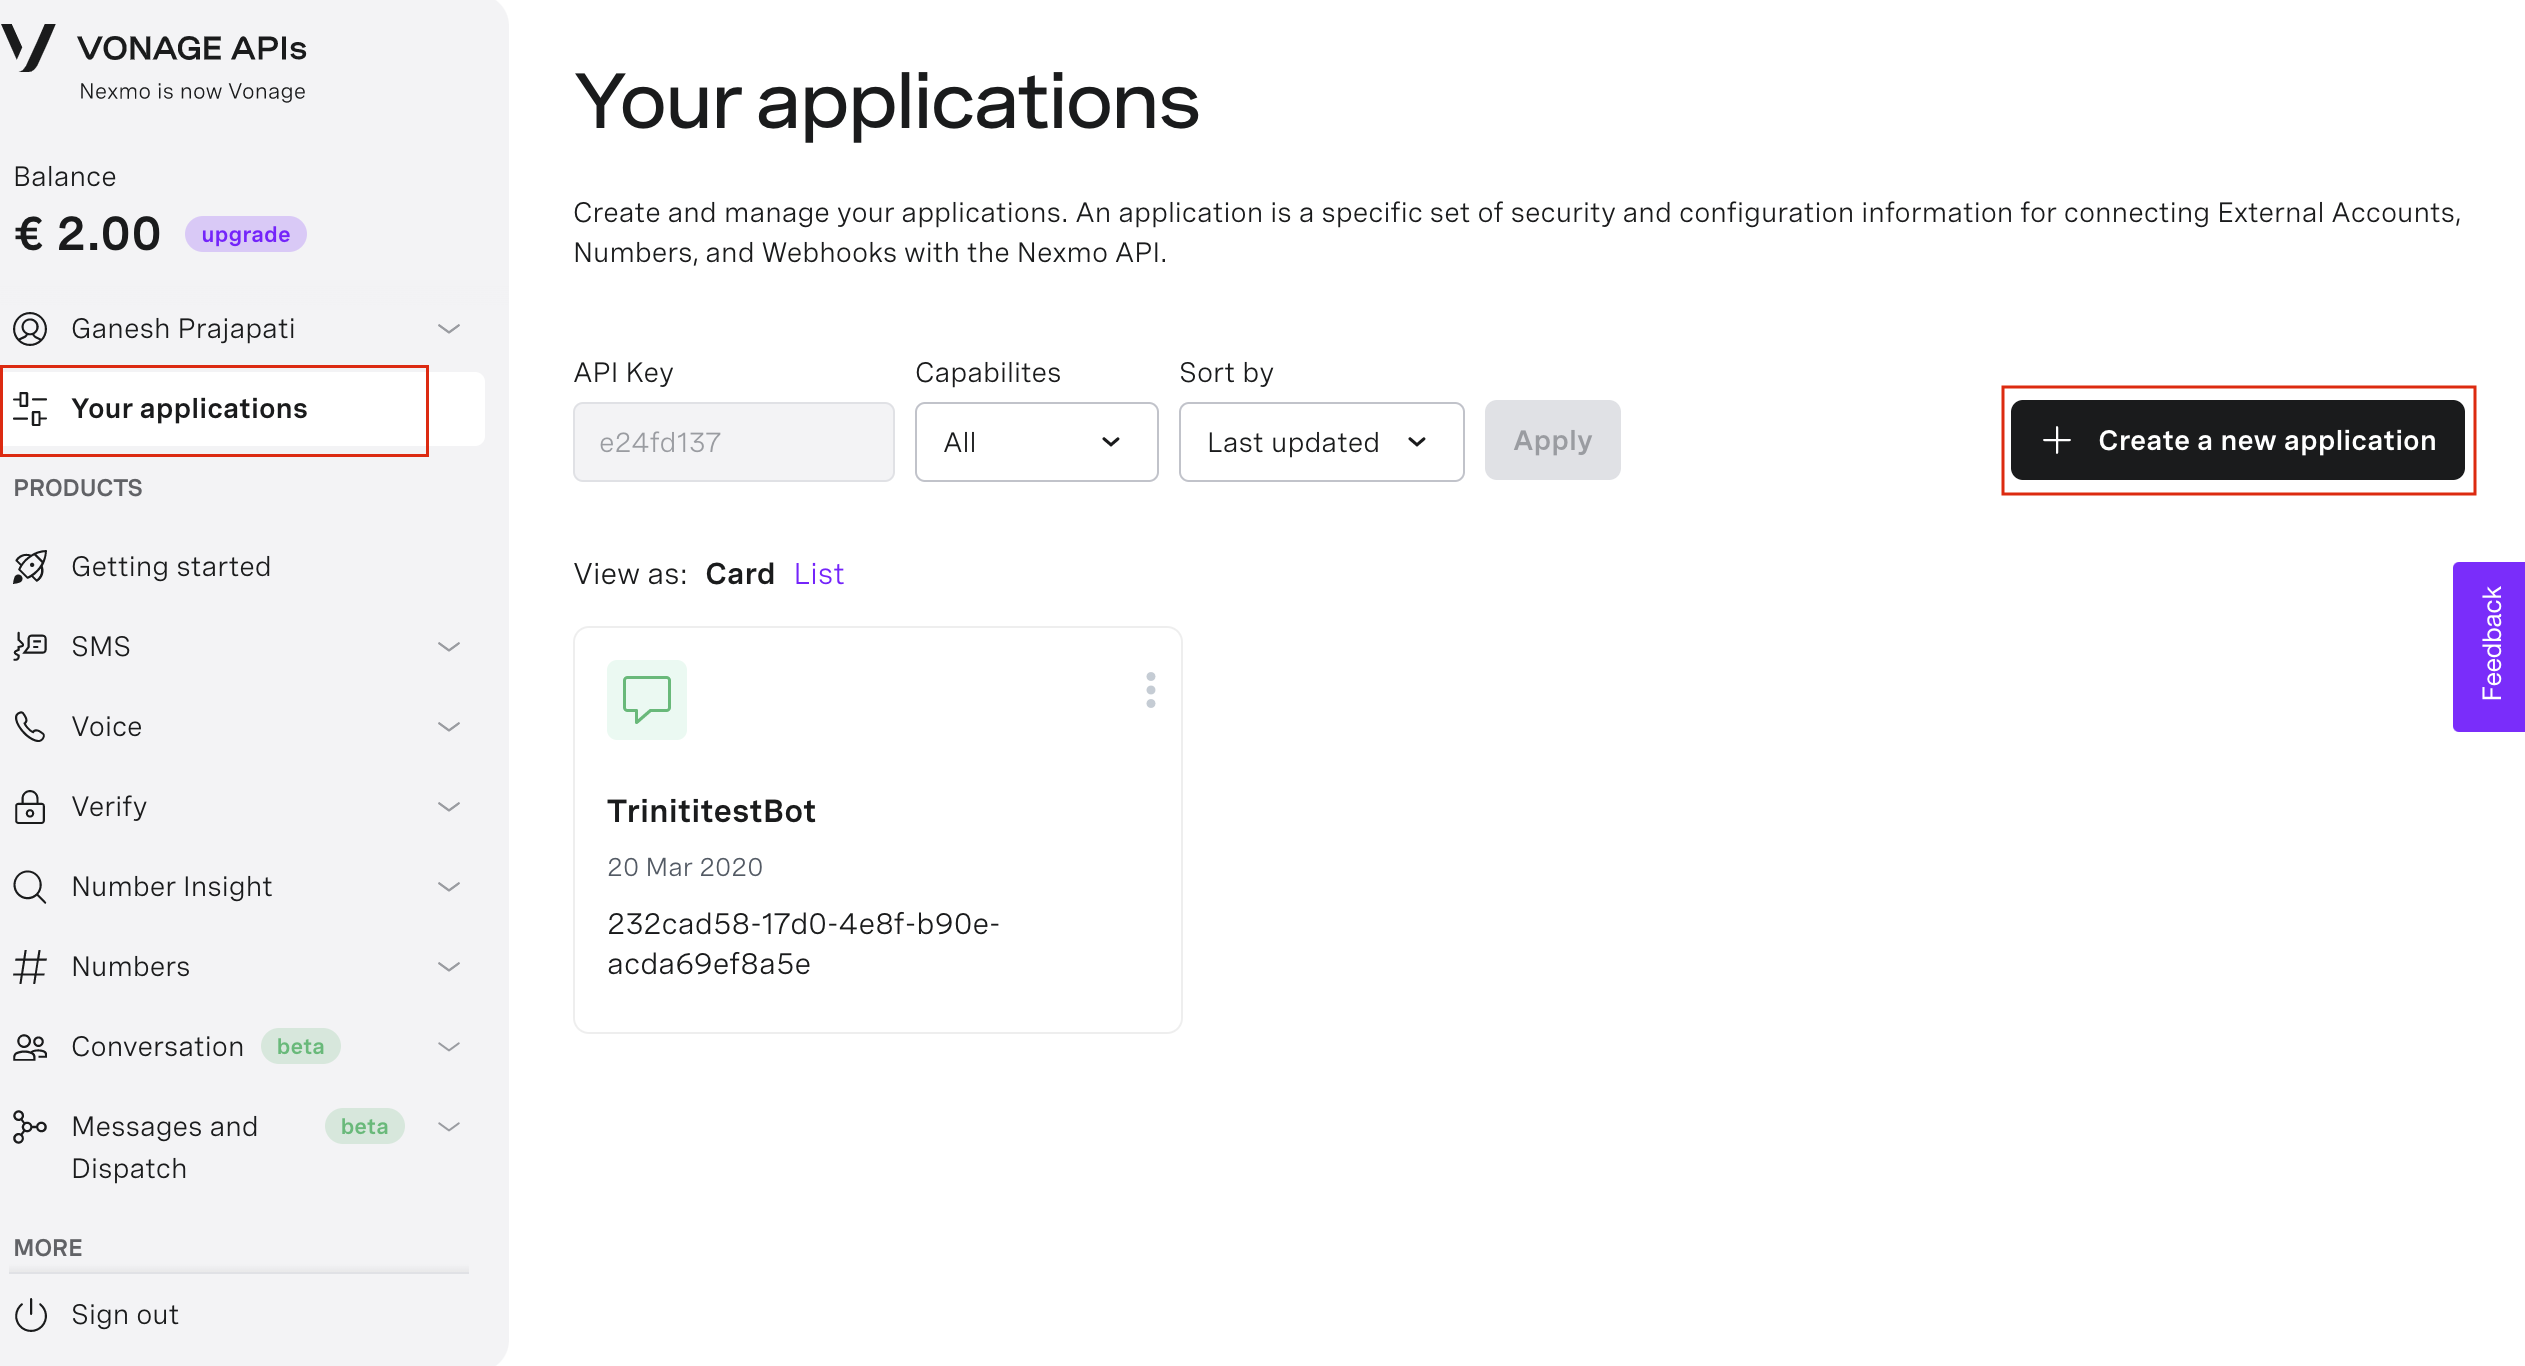
- Goto Nexmo dashboard
- Navigate to 'Your applications'
- Click on 'Create a new application'
- Enter the application name and click on 'Generate public and private key' (A private key file will be downloaded.)
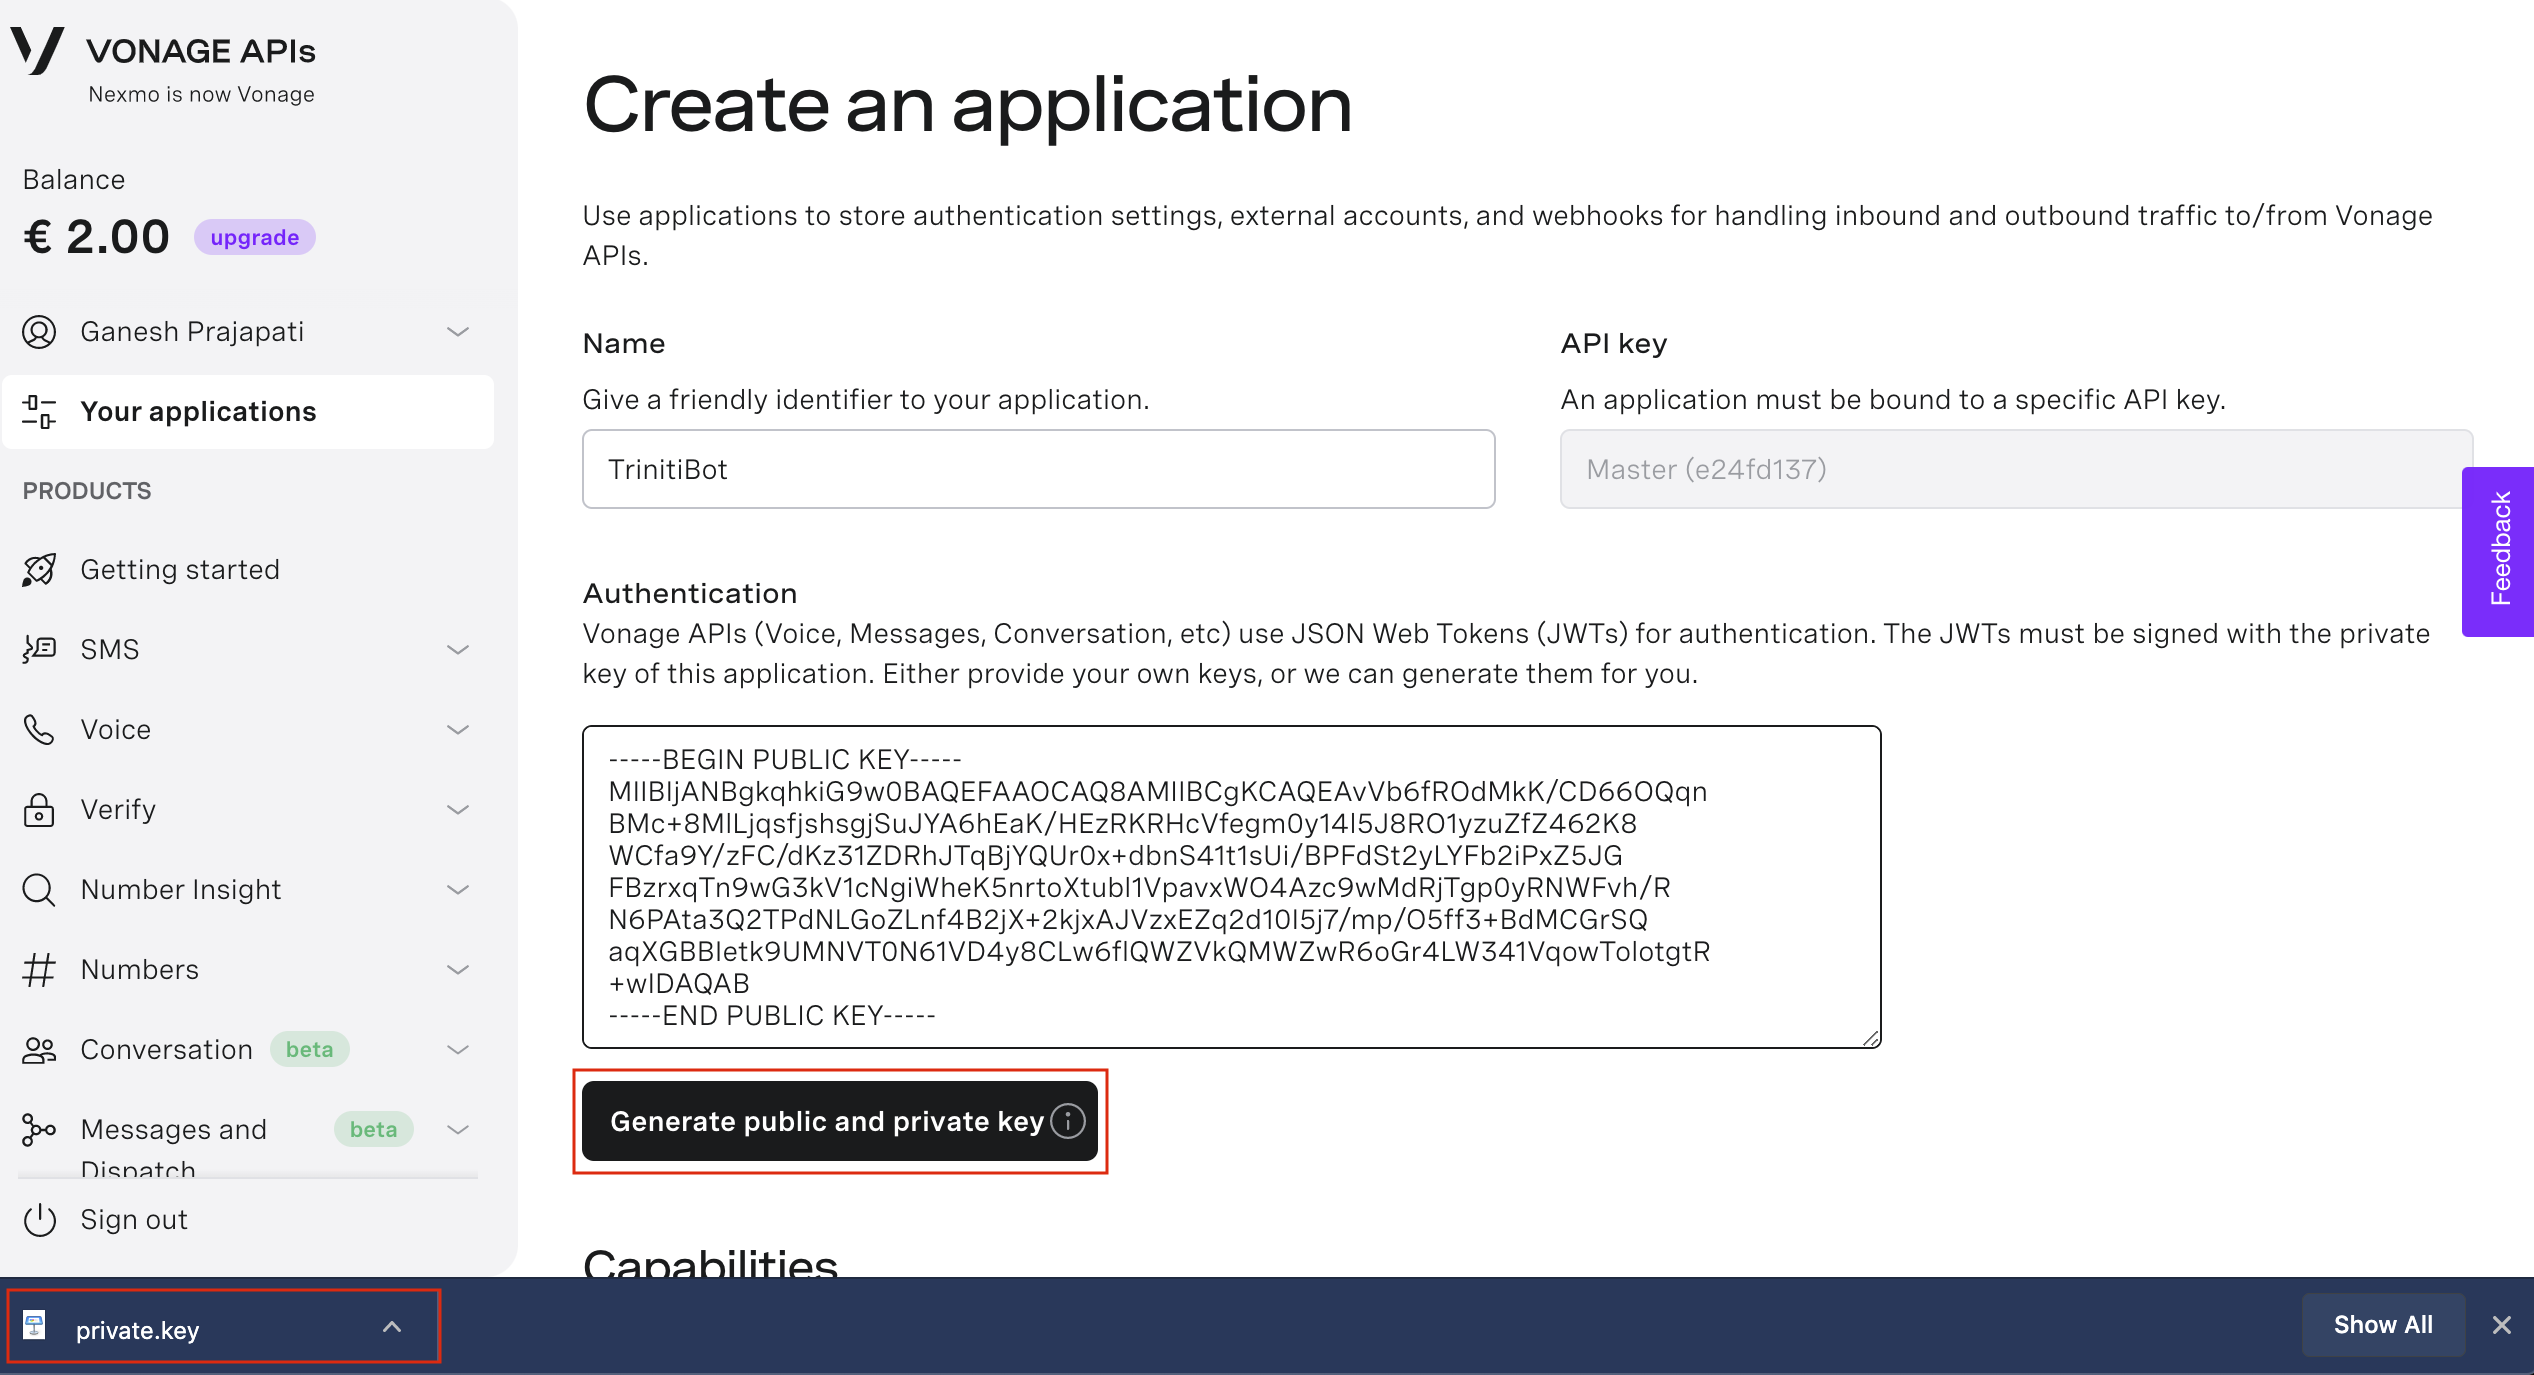
- Click on 'Generate new application'
- Copy the 'Application ID'
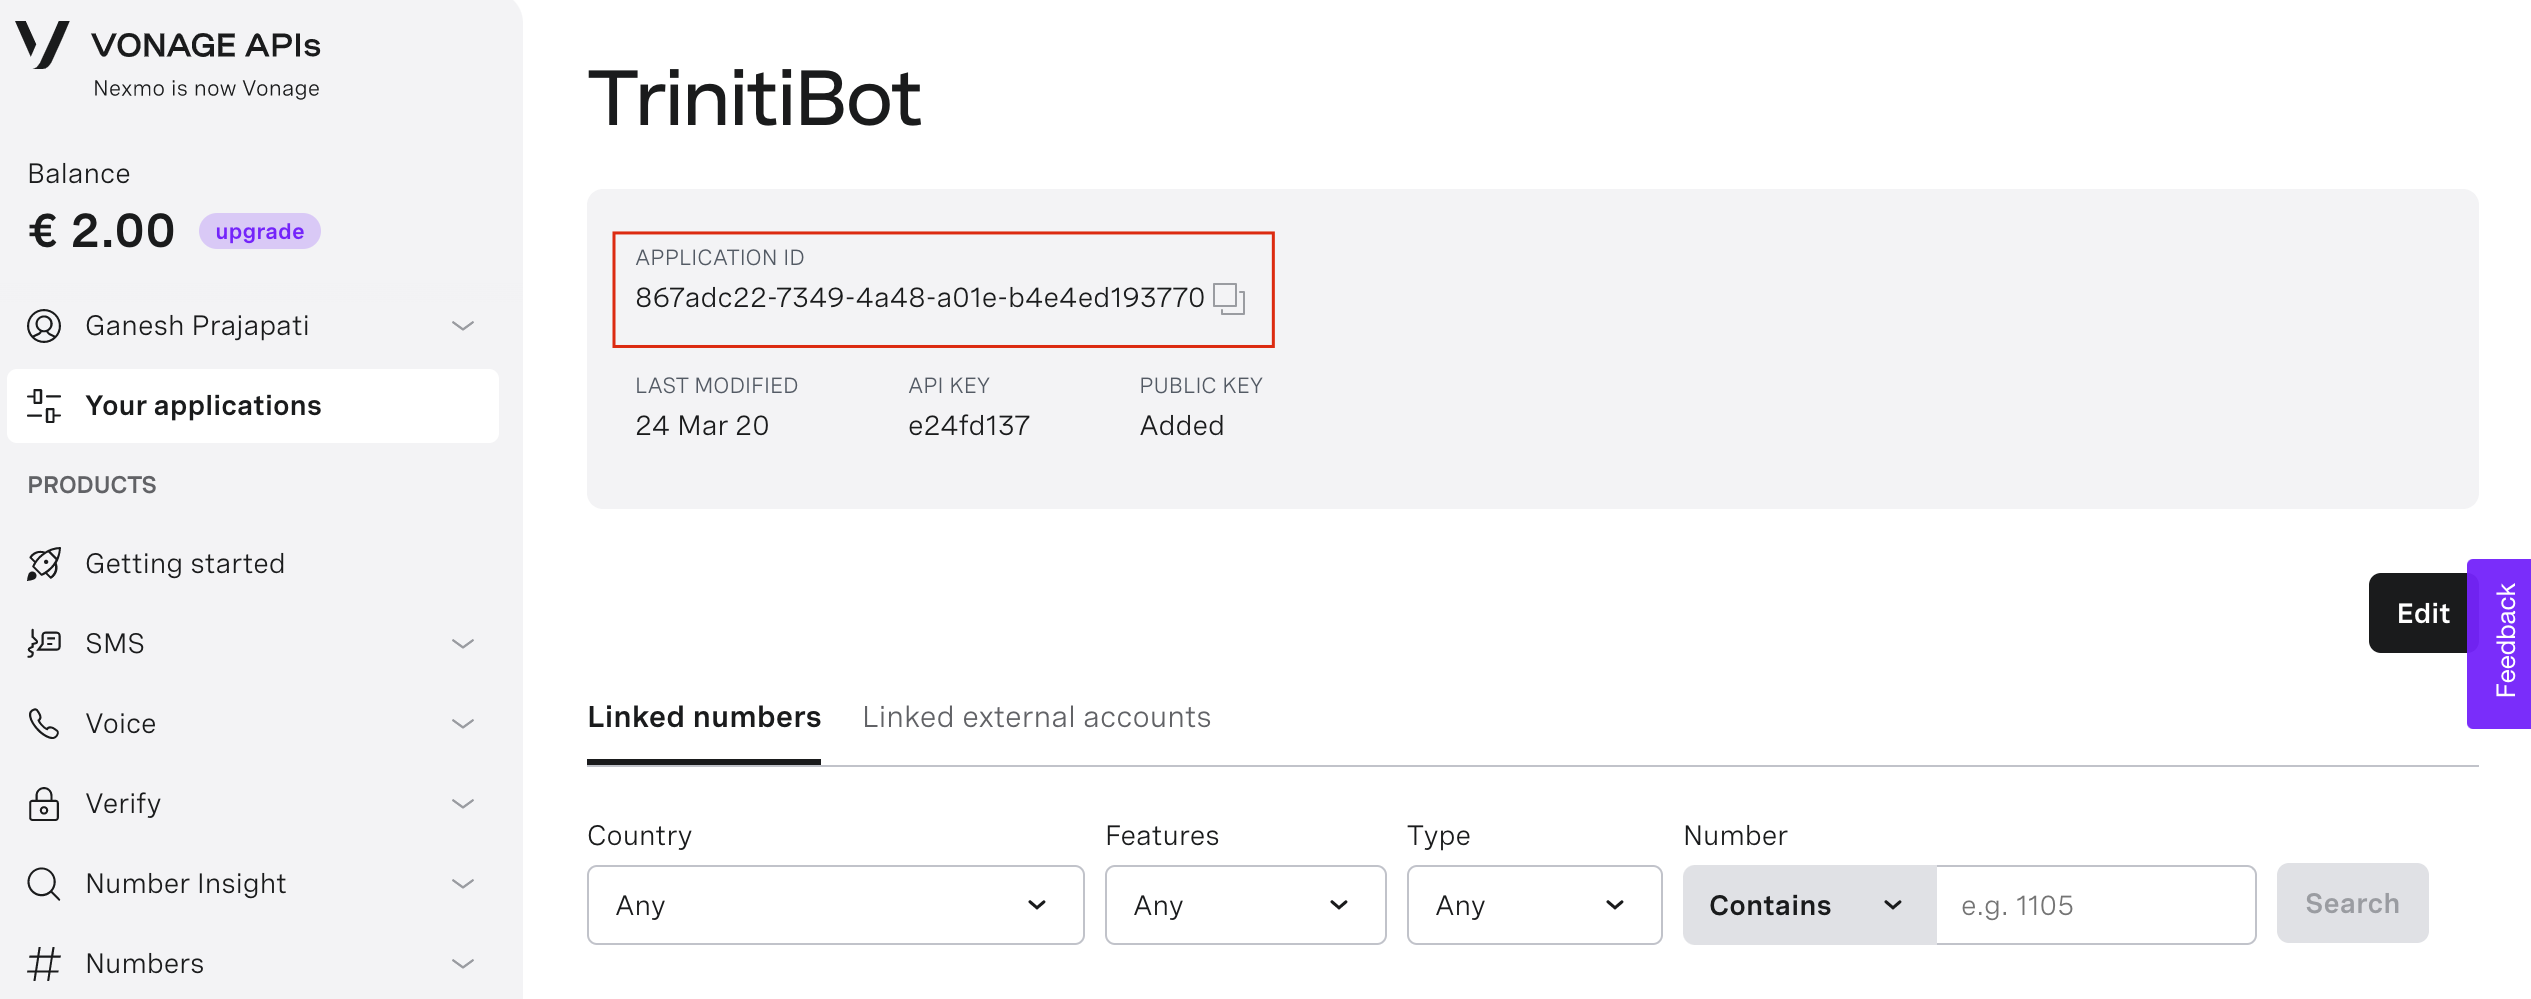
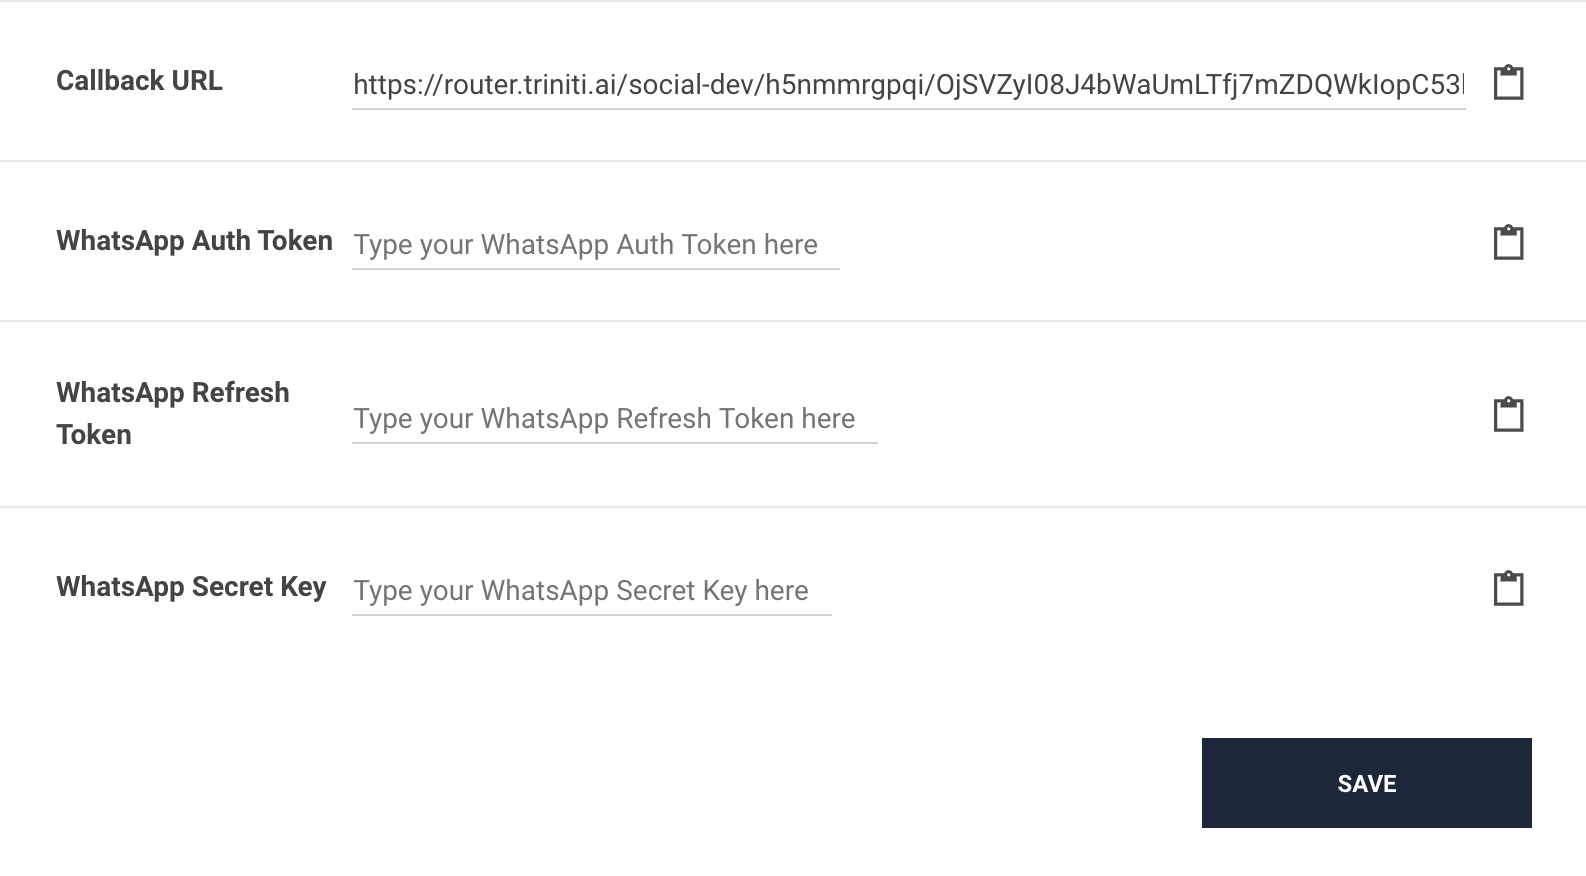
- Goto your workspace and enable the 'WhatsApp by Nexmo' channel
- Paste the 'Application ID' in 'WhatsApp Auth Token' field on triniti.ai
- Open the downloaded file (private.key) and copy the private key & paste in 'WhatsApp Secret Key'
- Enter the number in 'WhatsApp Refesh Token' field and click on Save
- Copy the 'Callback URL' from triniti.ai
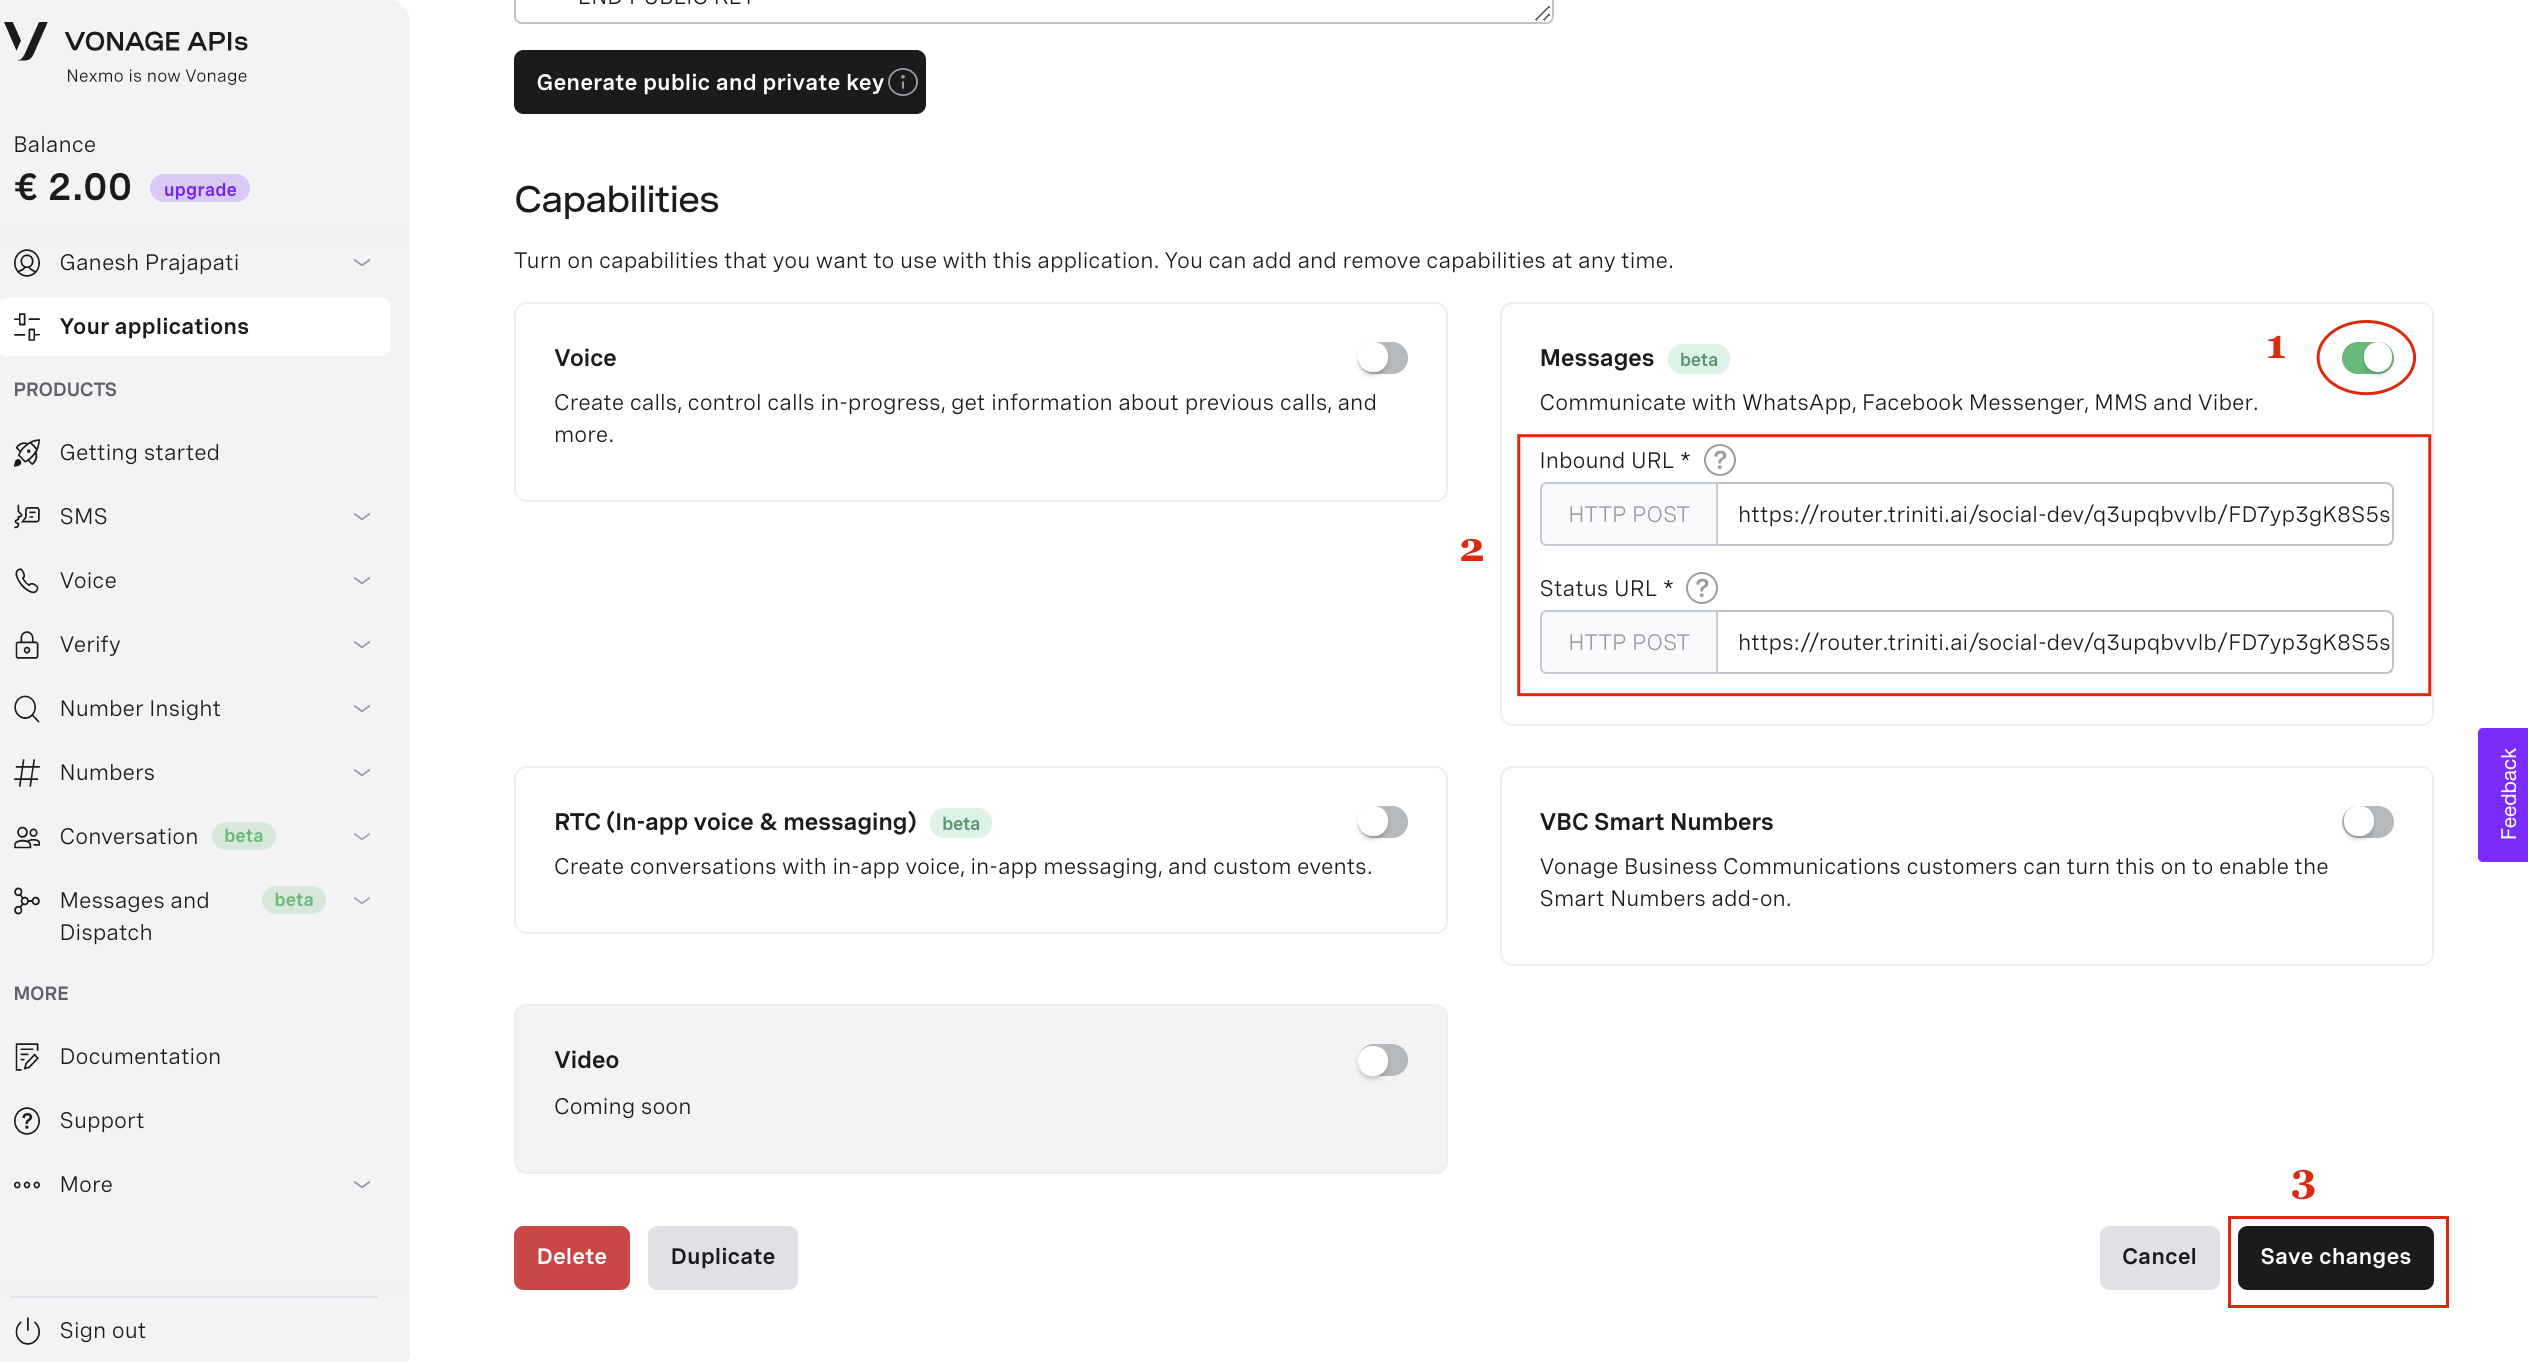
- Goto Nexmo dashboard, click on Edit of the created application
- Enable 'Messages' paste the call back URL in 'Inbound URL' and paste same in 'Status URL' field as well and click on Save changes.
Congratulations! you have successfully configured the WhatsApp for your bot.
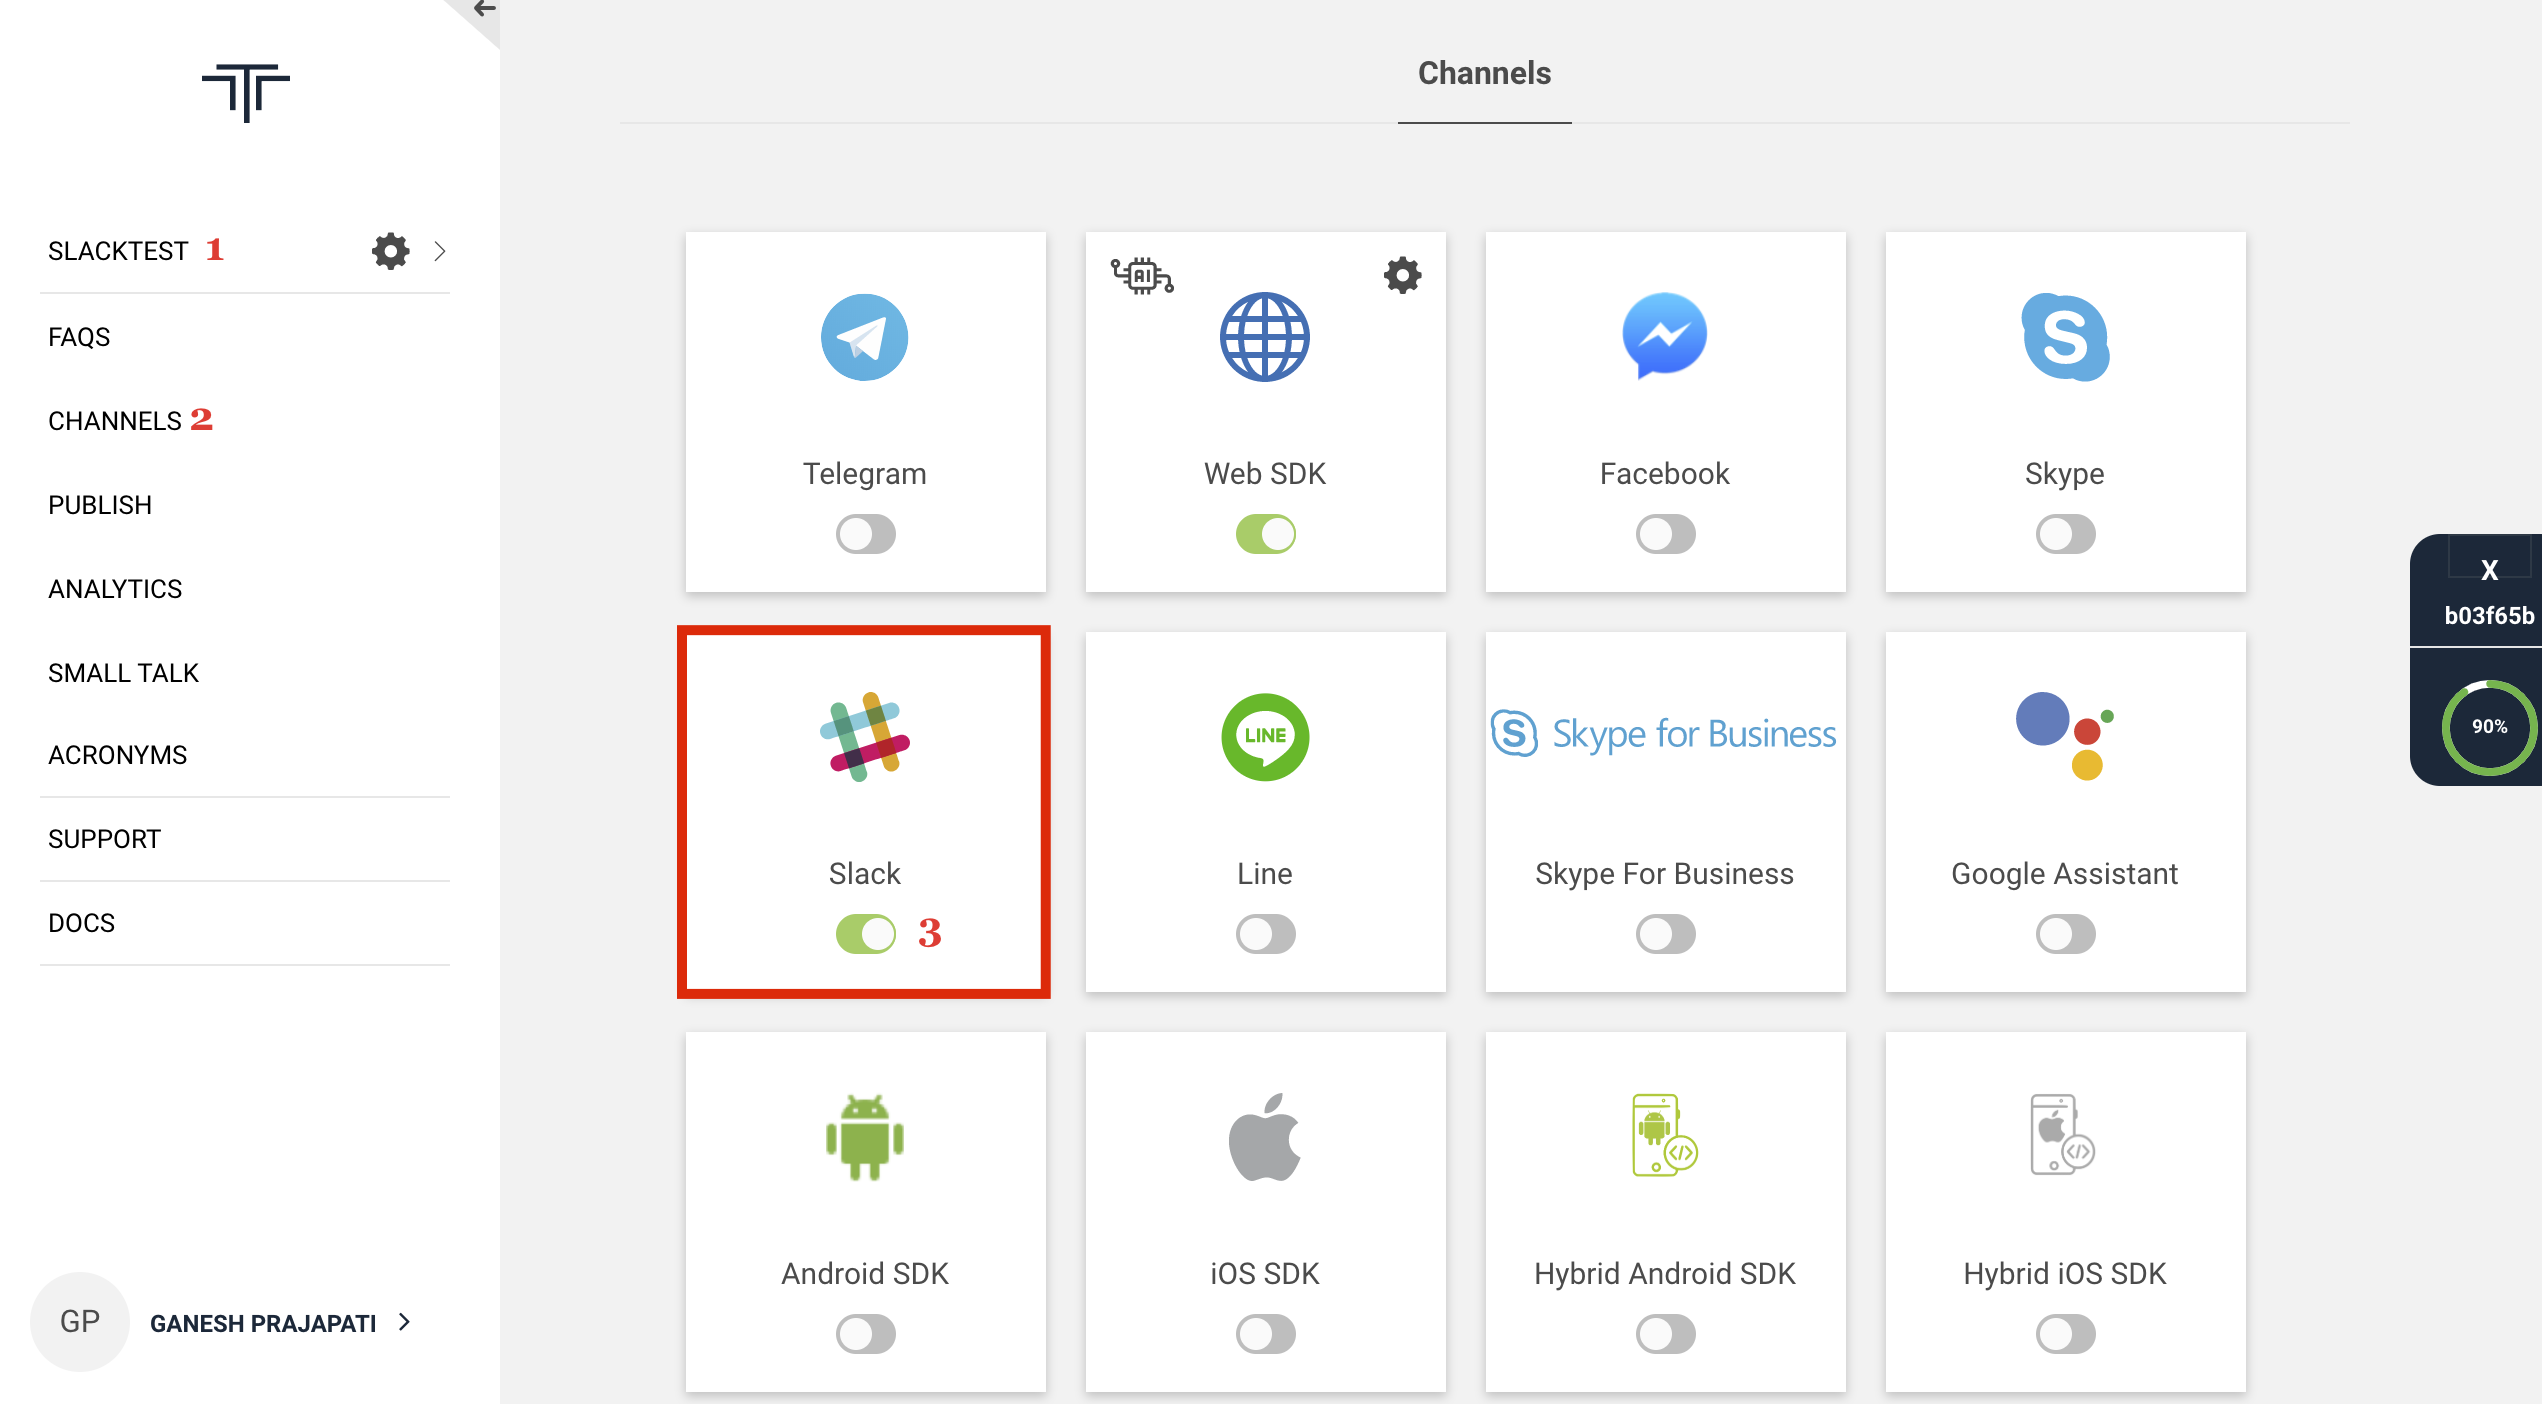
Managing Slack
Slack is like a chatroom for your whole team. It is a computer application that was created as a way for organizations to communicate both as a group and in personal one-on-one discussions. Slack is also in our channels bucket list, users can interact with the bot on slack also. To add the slack in your bot follow these steps:
Enable Slack Channel
- Login to triniti.ai page
- Select your workspace
- Goto channels and enable Slack channel
Configure Slack Bot You will be needed of:
- Slack Workspace
- Slack App
1. Create Slack Workspace
- Goto Create Slack Workspace
- Enter your email id & verify
- Please Enter all the mandatory details
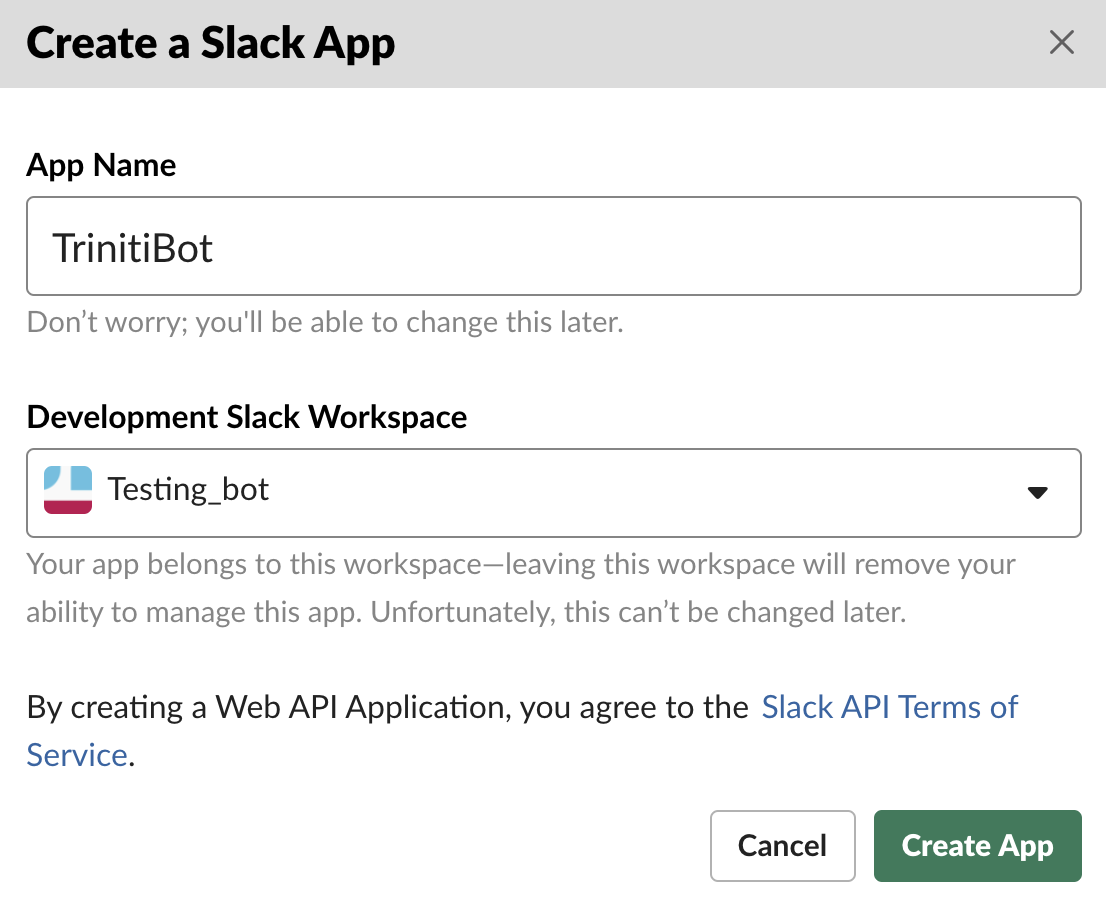
2. Create Slack App
- Goto Create Slack App
- Enter your App name, select workspace & click on Create App
Now let's configure your slack App and integrate with our triniti.ai.
- After clicking on Create App, you will be redirected to Basic Information Page
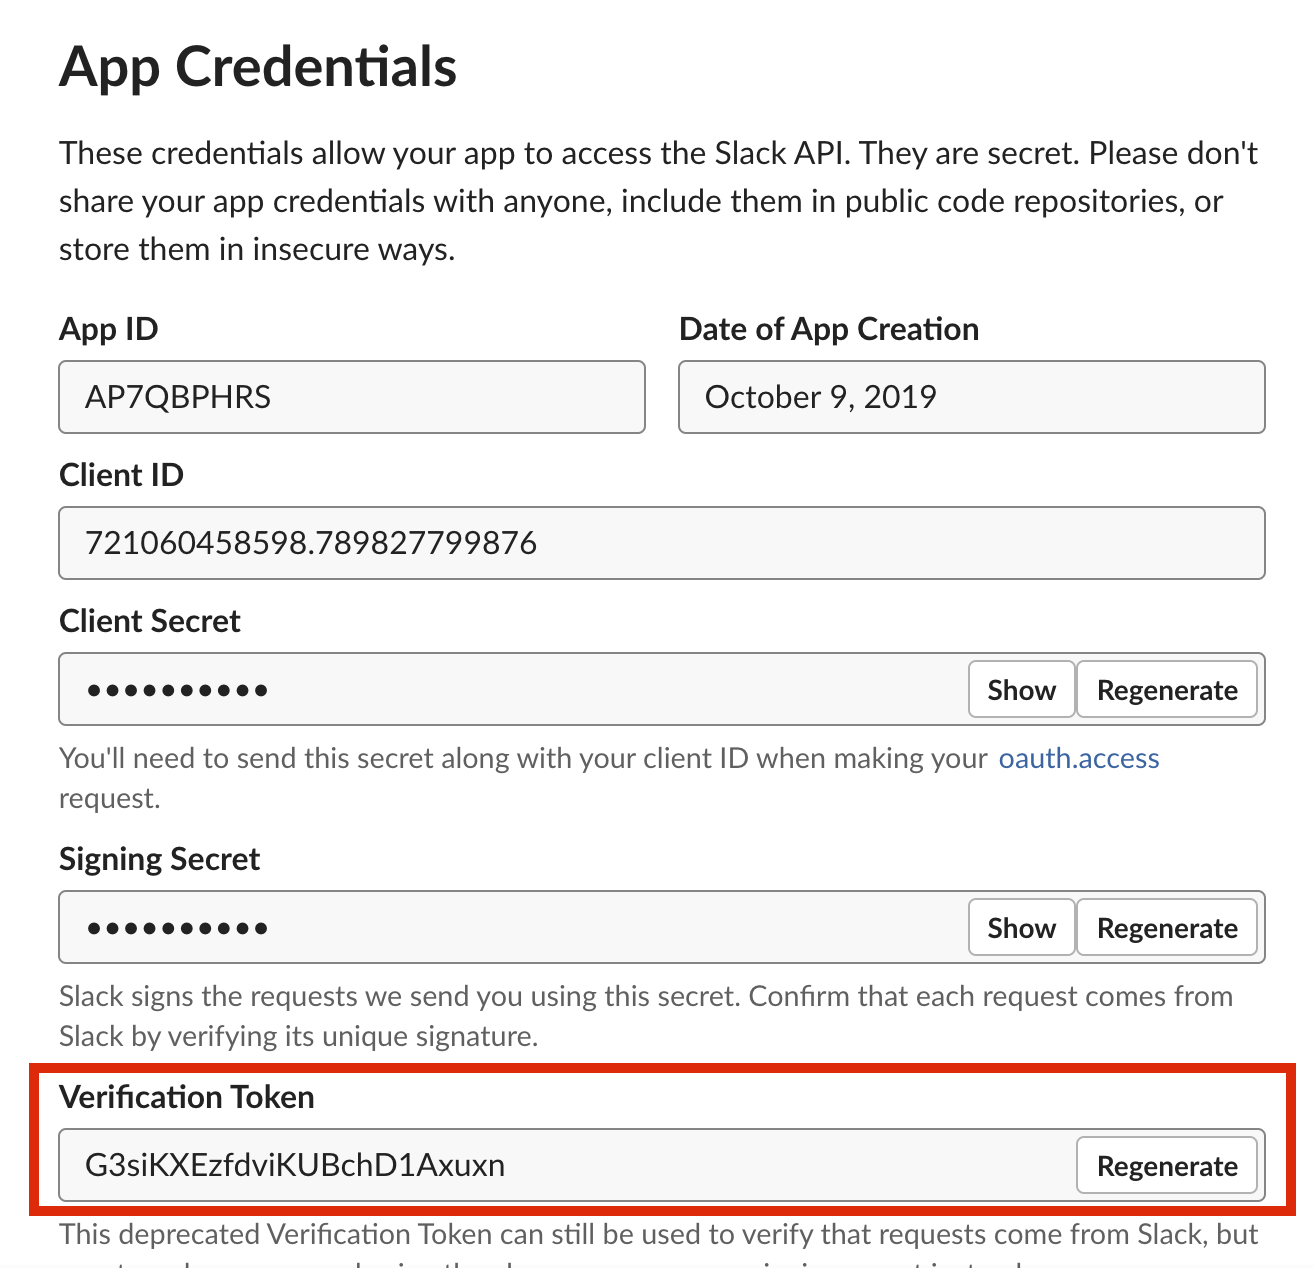
- Scroll down and goto 'App Credentials', Copy 'Verification Token' and paste it under 'Slack Client Secret' on triniti.ai page
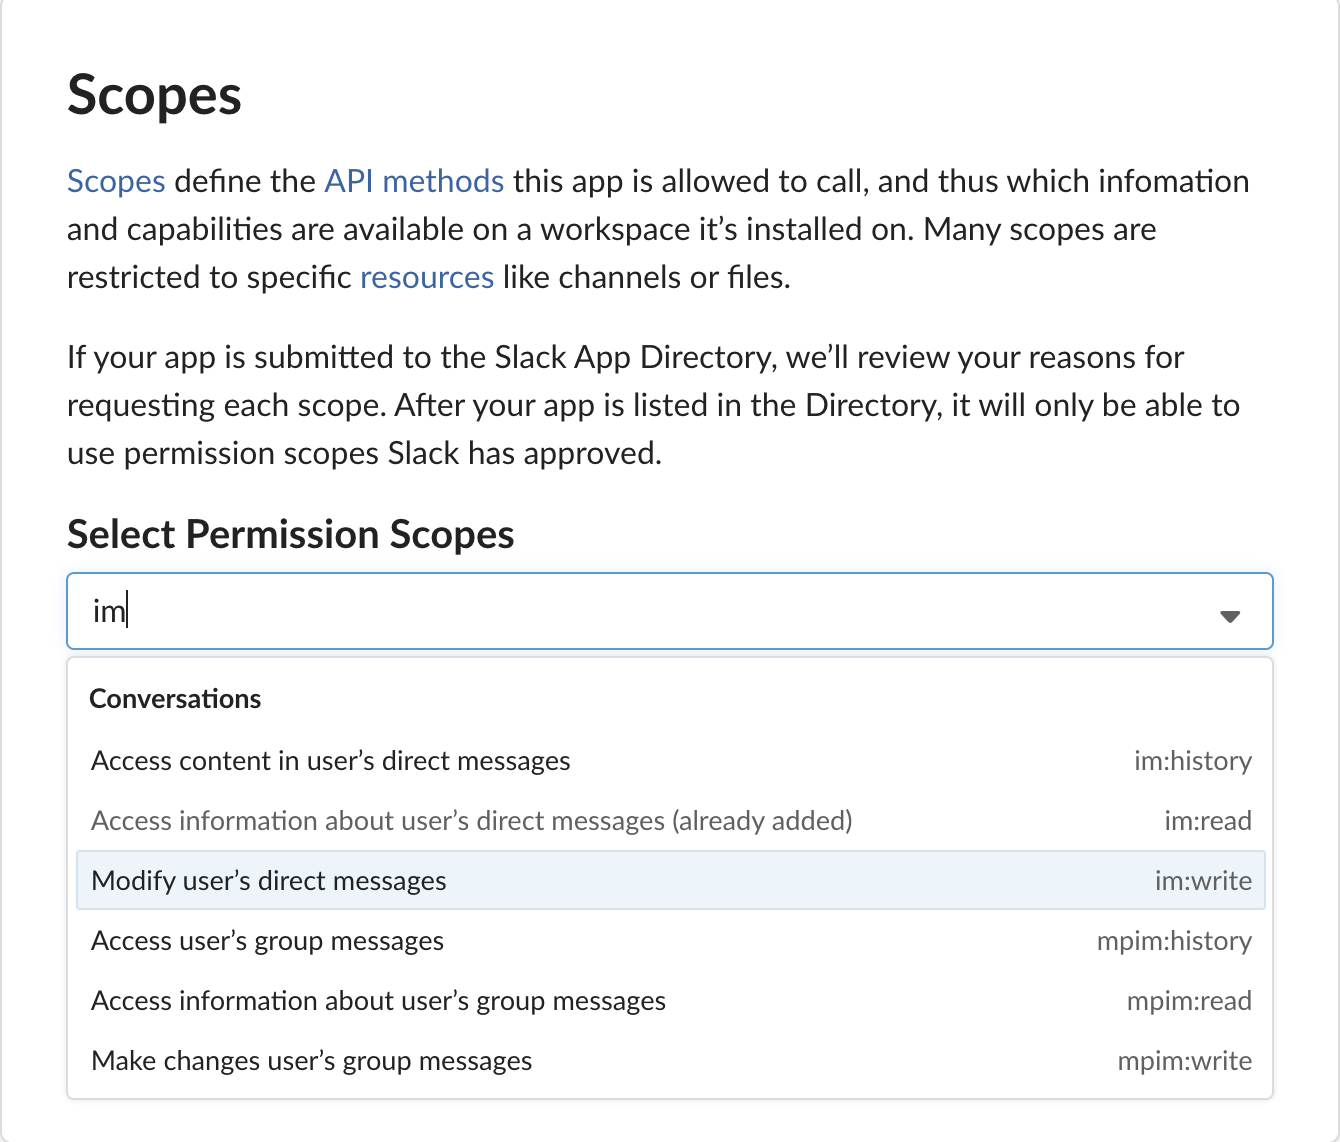
- Navigate to OAuth & Permissions, Scroll down go to Scopes and search for chat:write:bot in drop down list of Select Permission Scope and add it and also search for im:read , im:write, users:read and add these too, and click on Save Changes.
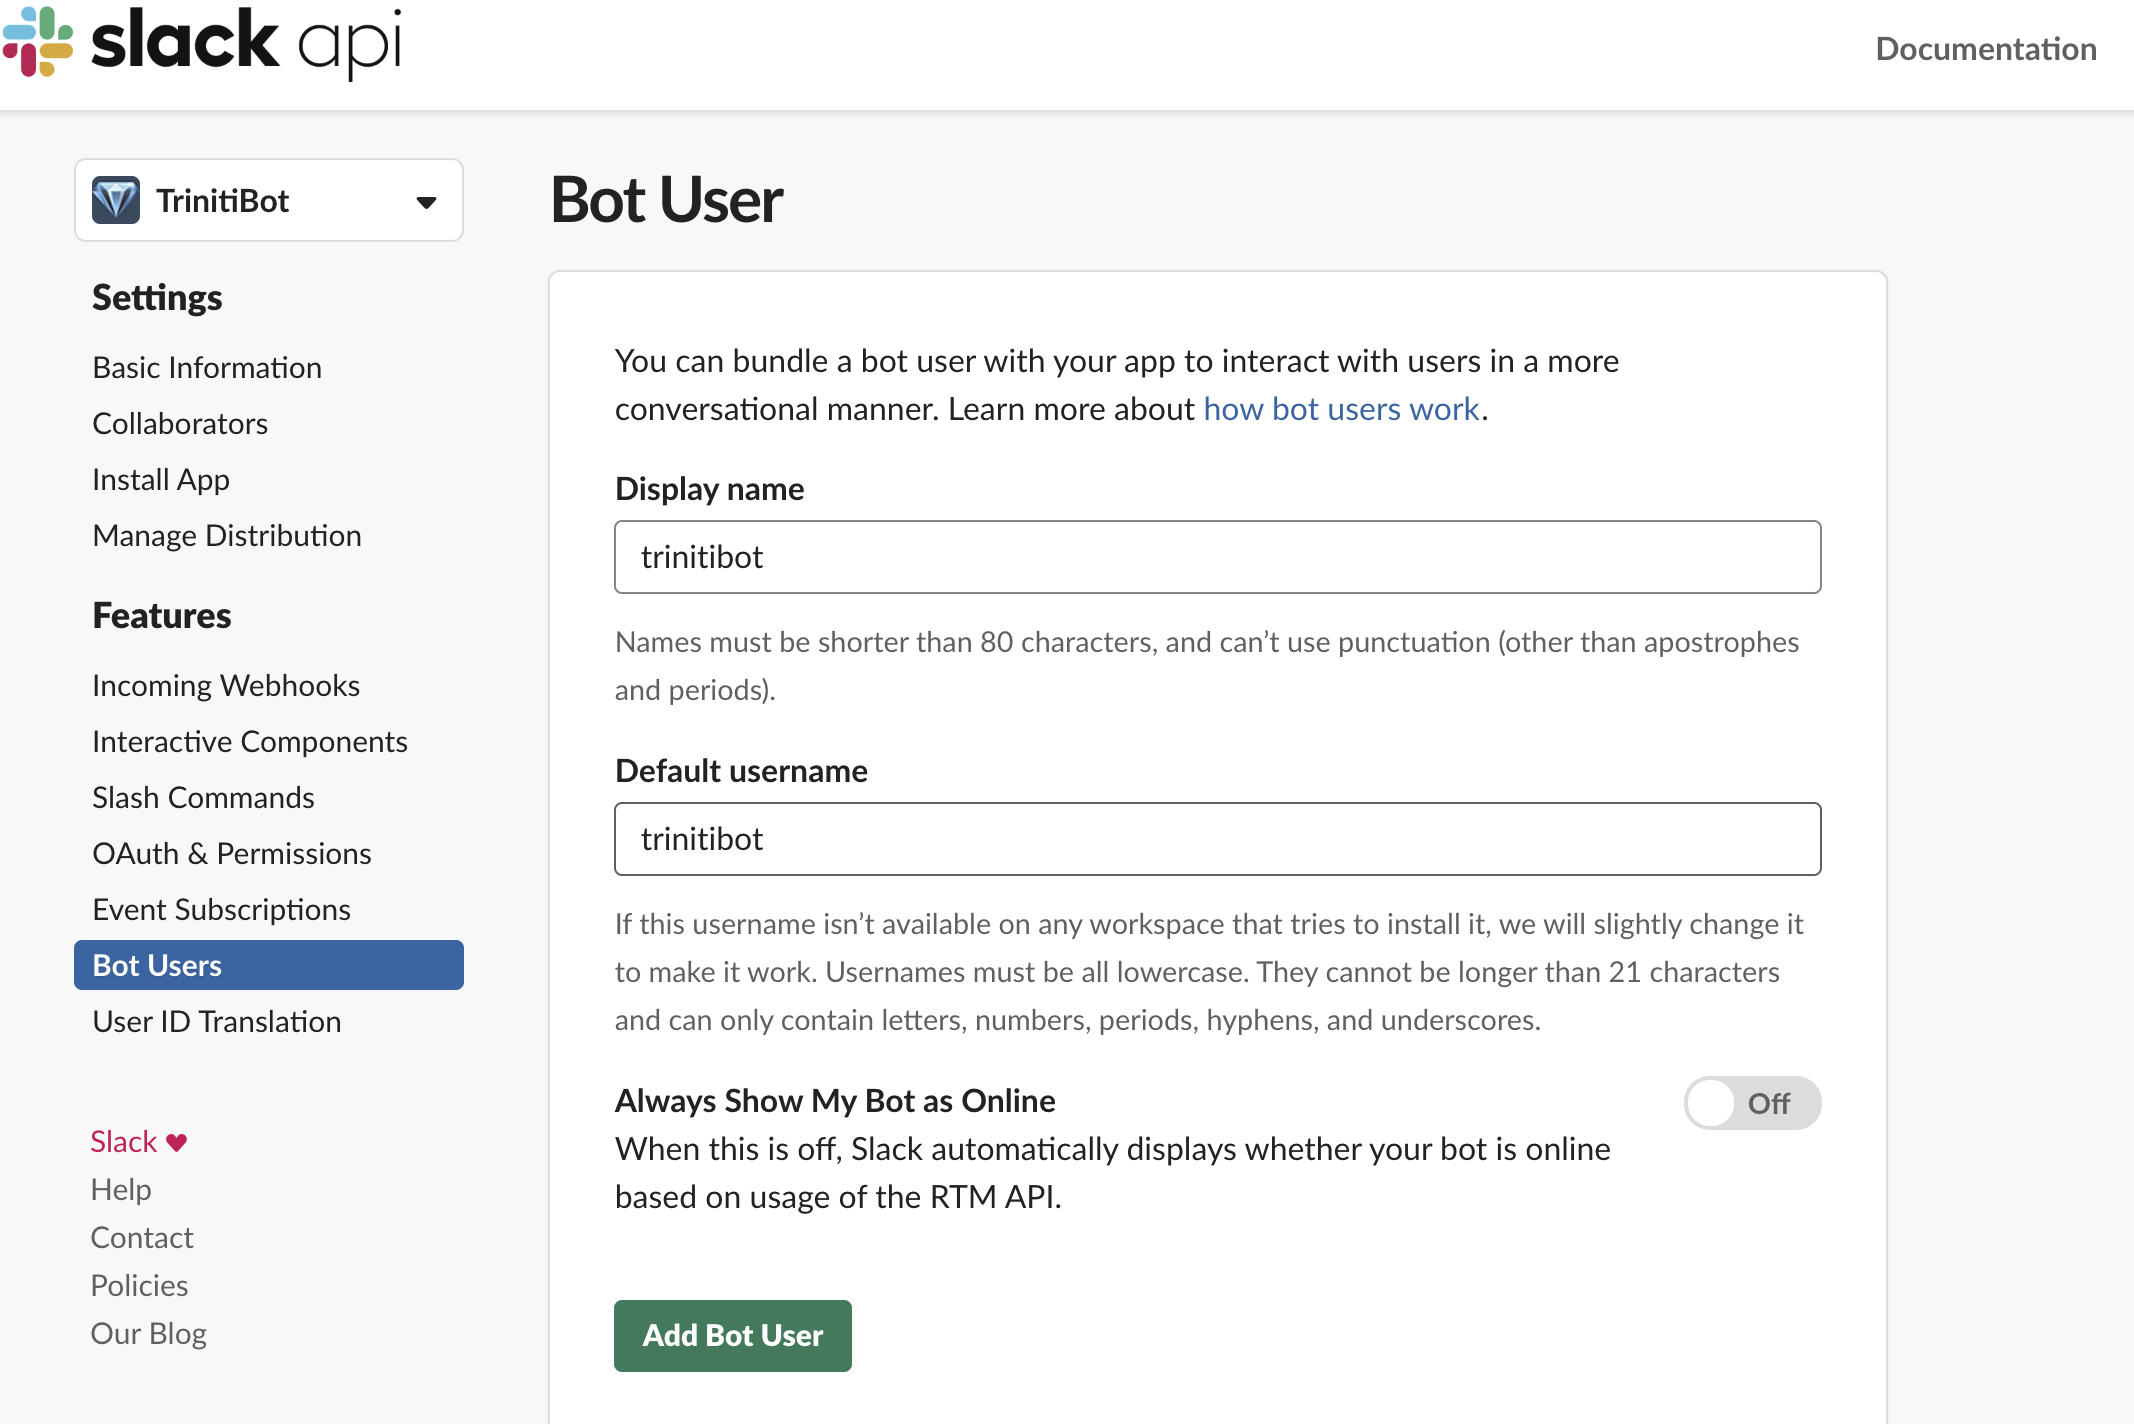
- Navigate to Bot Users & click on Add Bot User. It will get verified by slack then click on save changes
- Navigate to 'Install App', Click on Install App to Workspace

- On the next page click on Allow
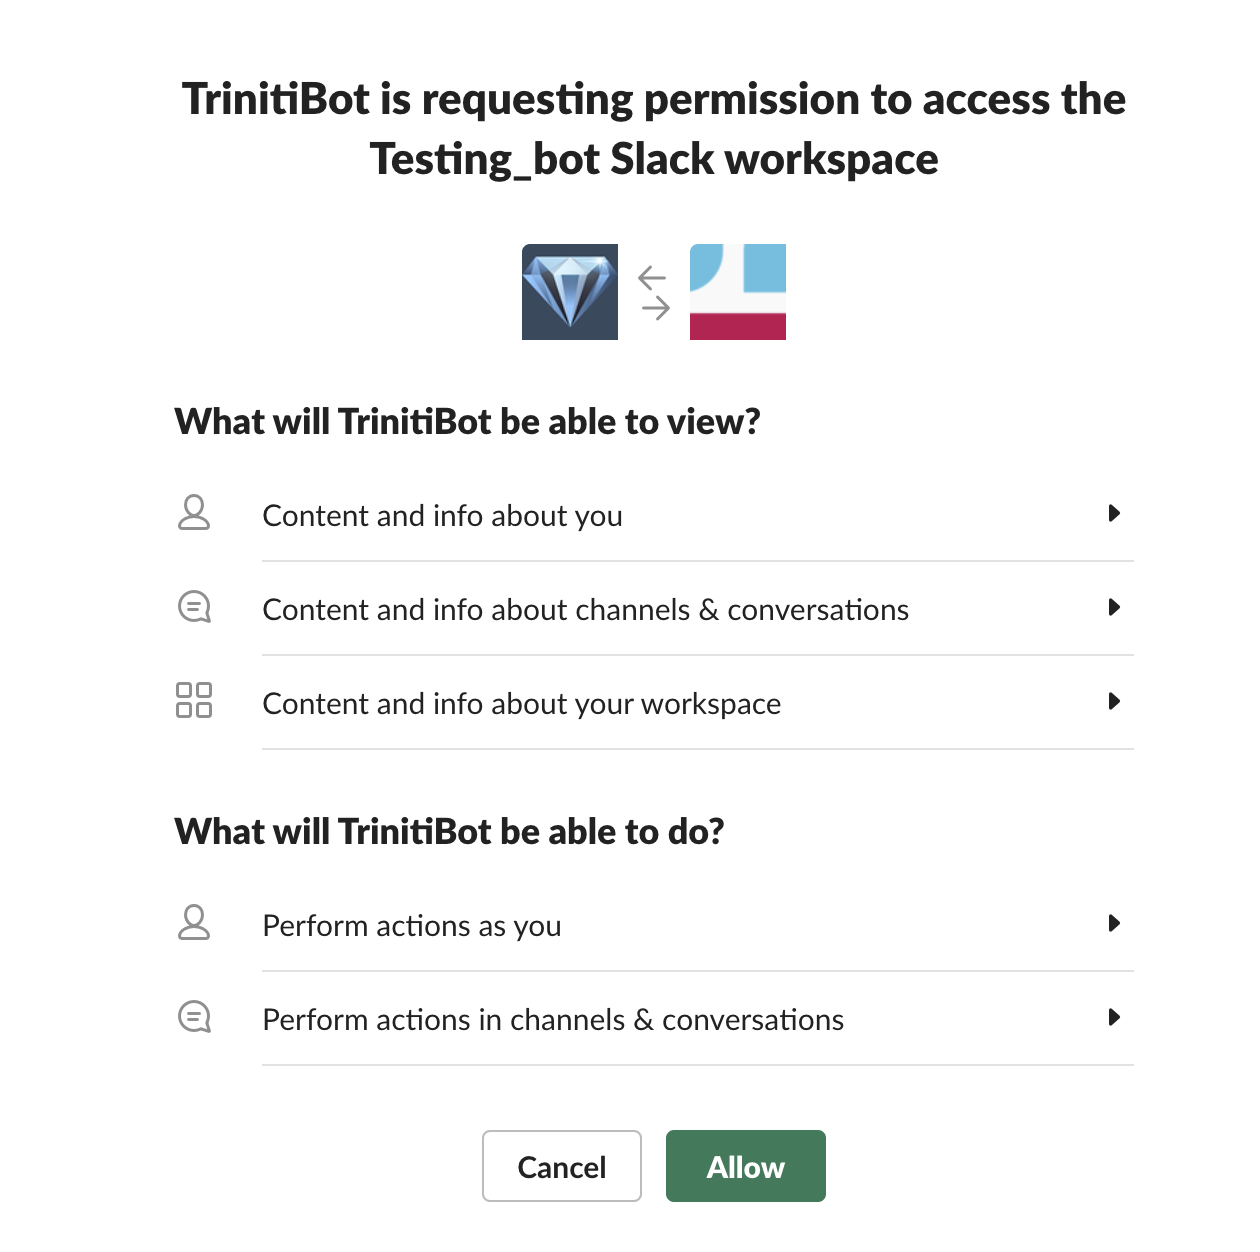
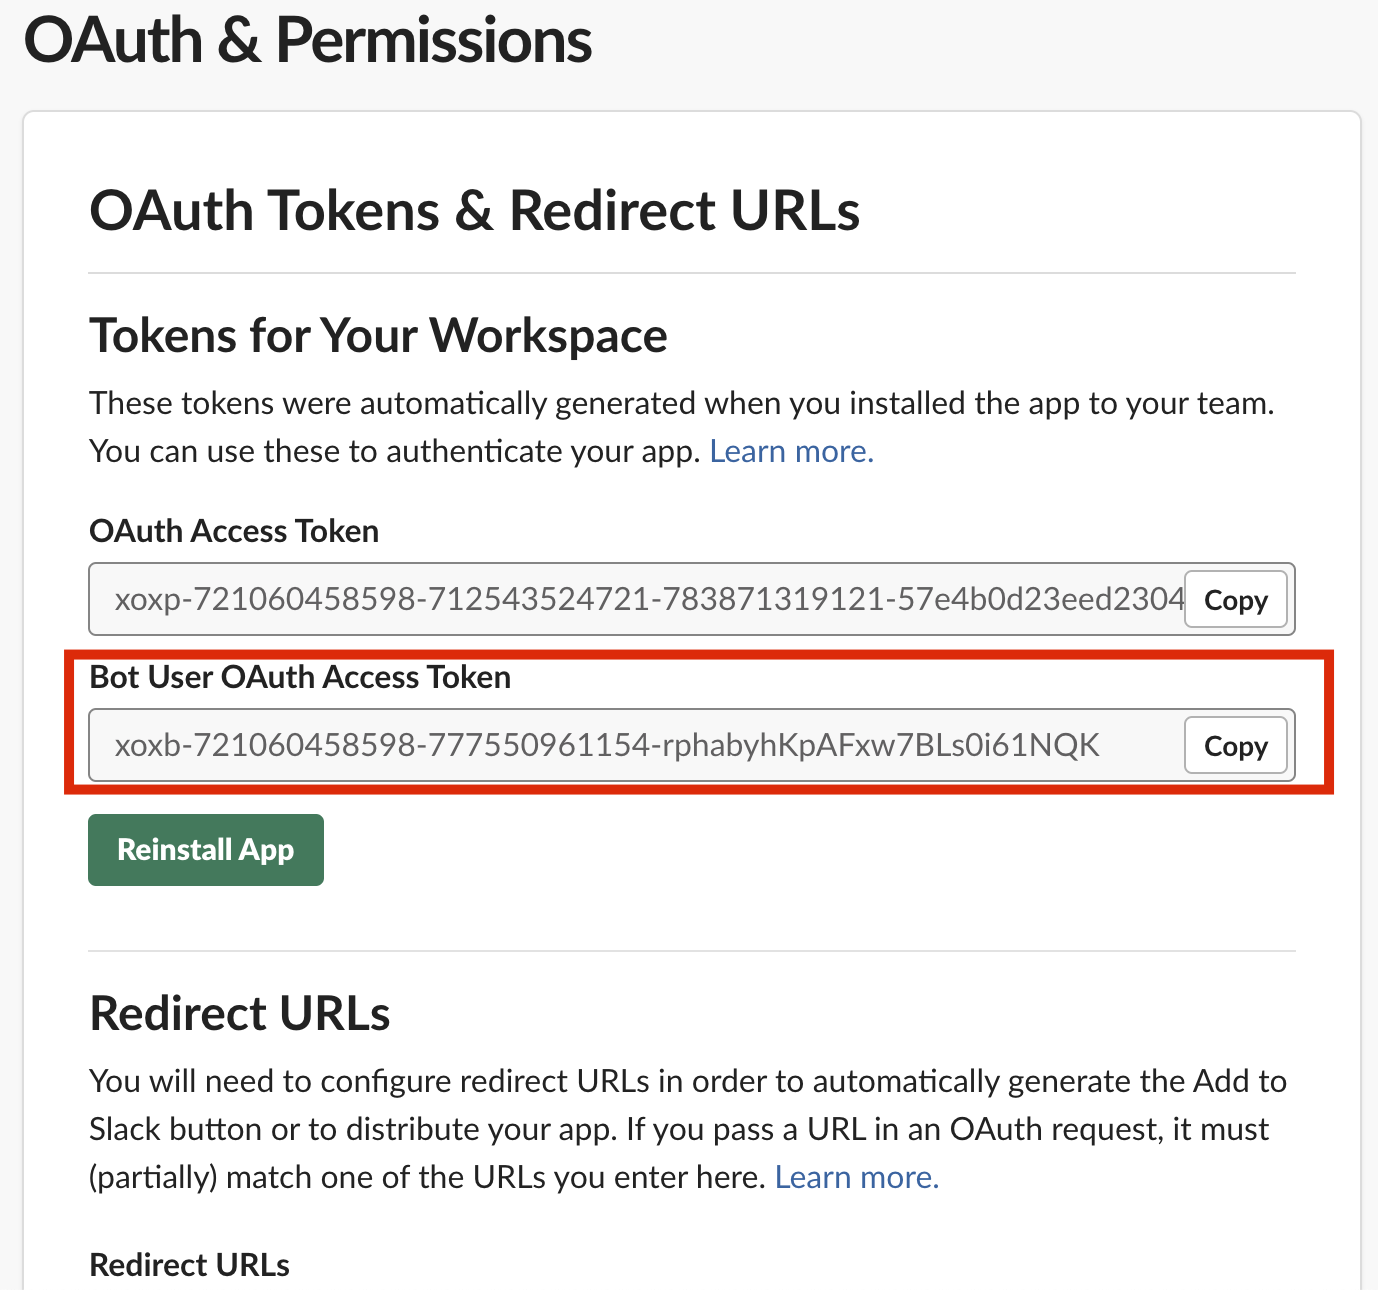
- On clicking Allow, you will see 'OAuth Tokens & Redirect URLs', Copy the "Bot User OAuth Access Token" and paste it under 'Slack Auth Token' on triniti.ai page
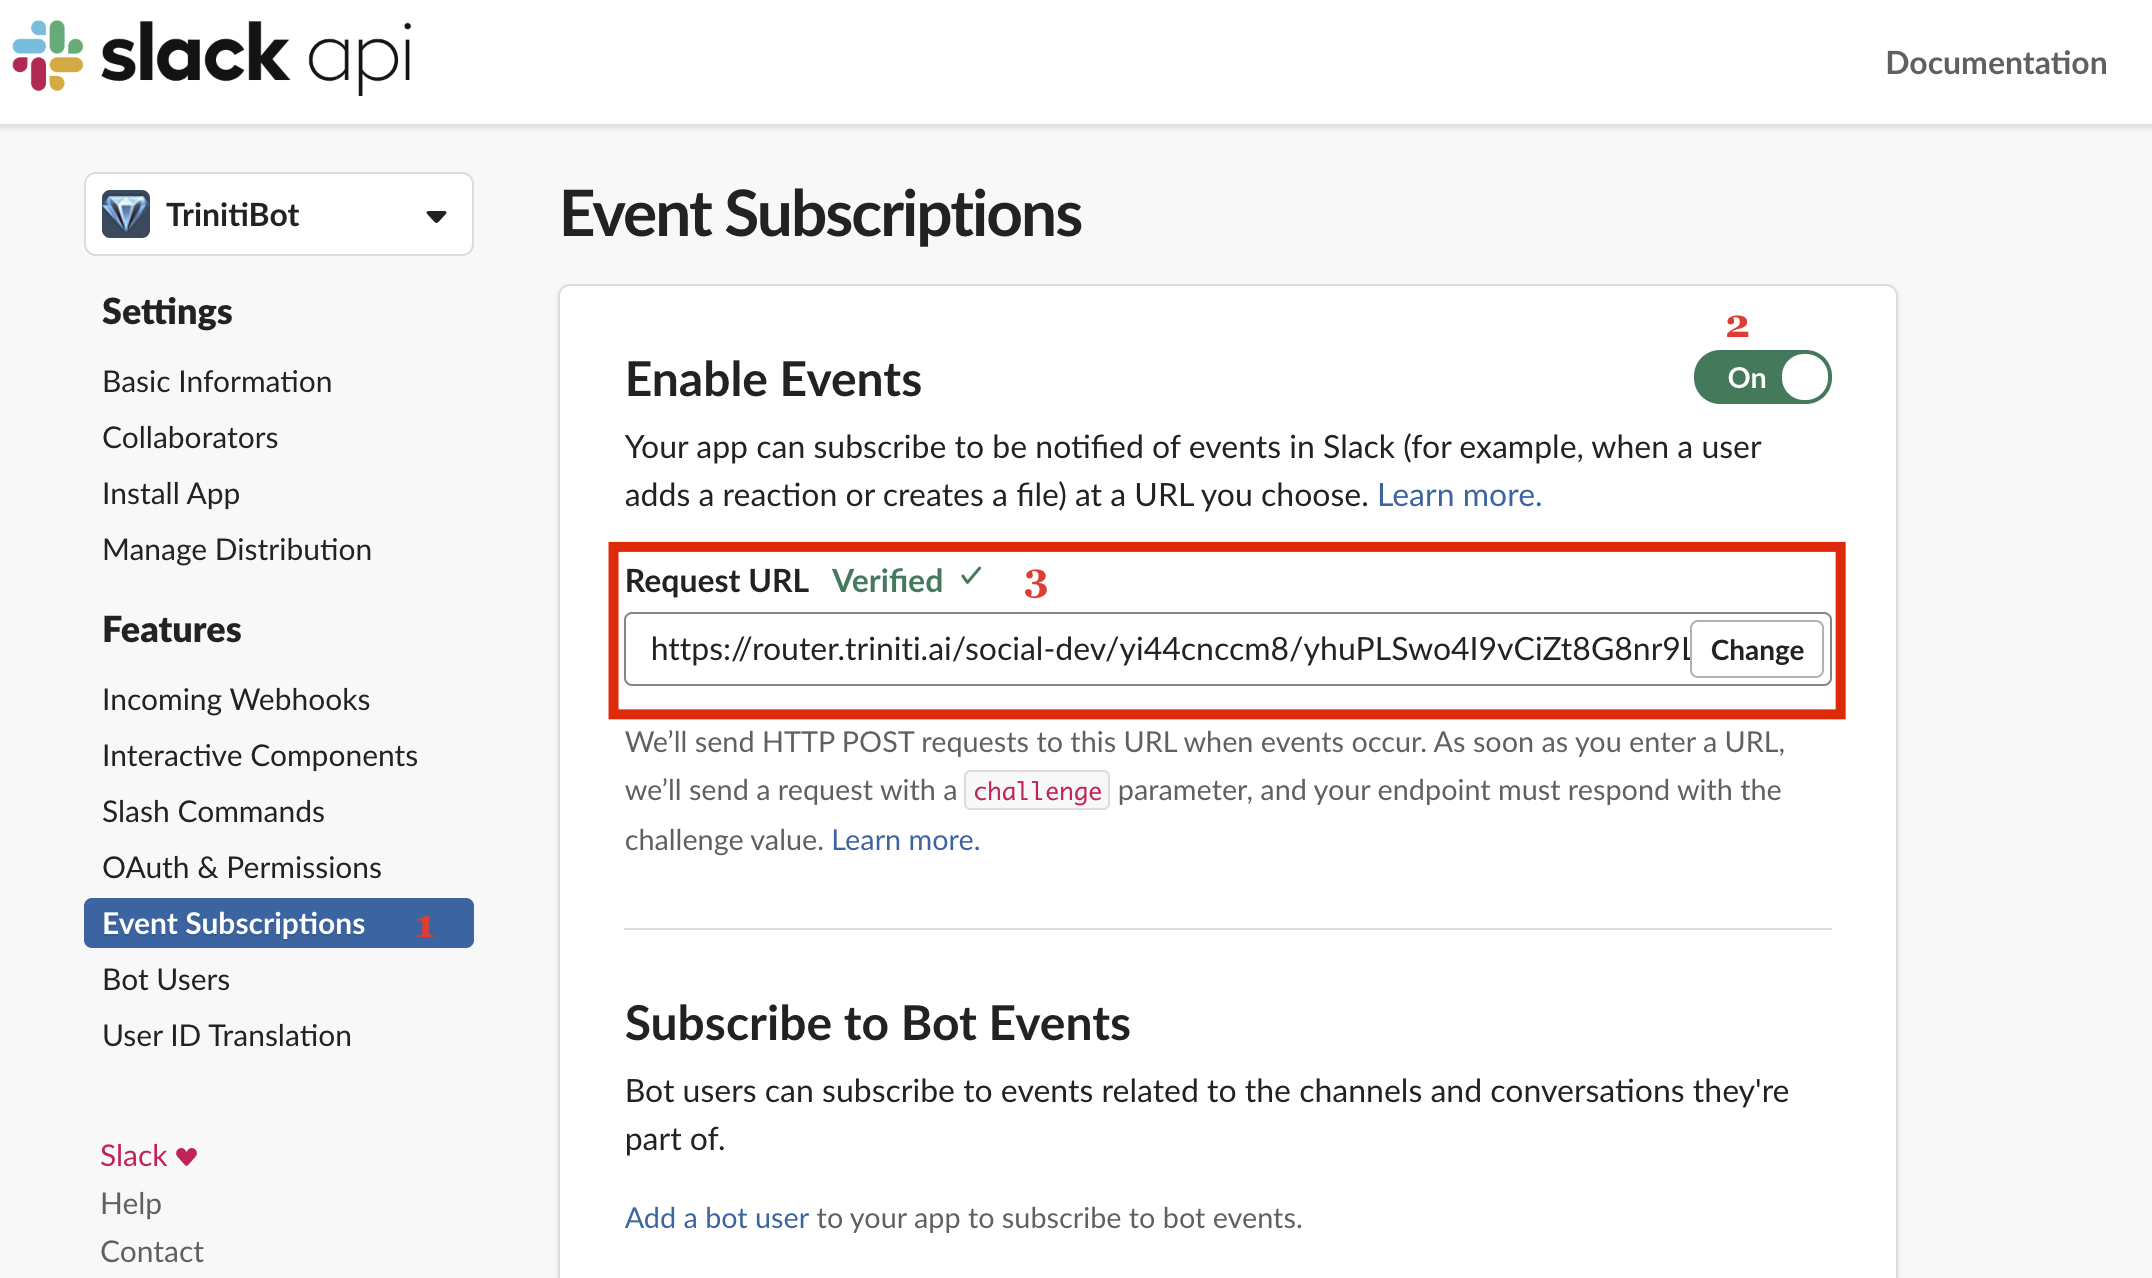
- Navigate to 'Event Subscription', toggle on the 'Enable Events', In the Request URL field paste the Request URL copied from the trinti.ai
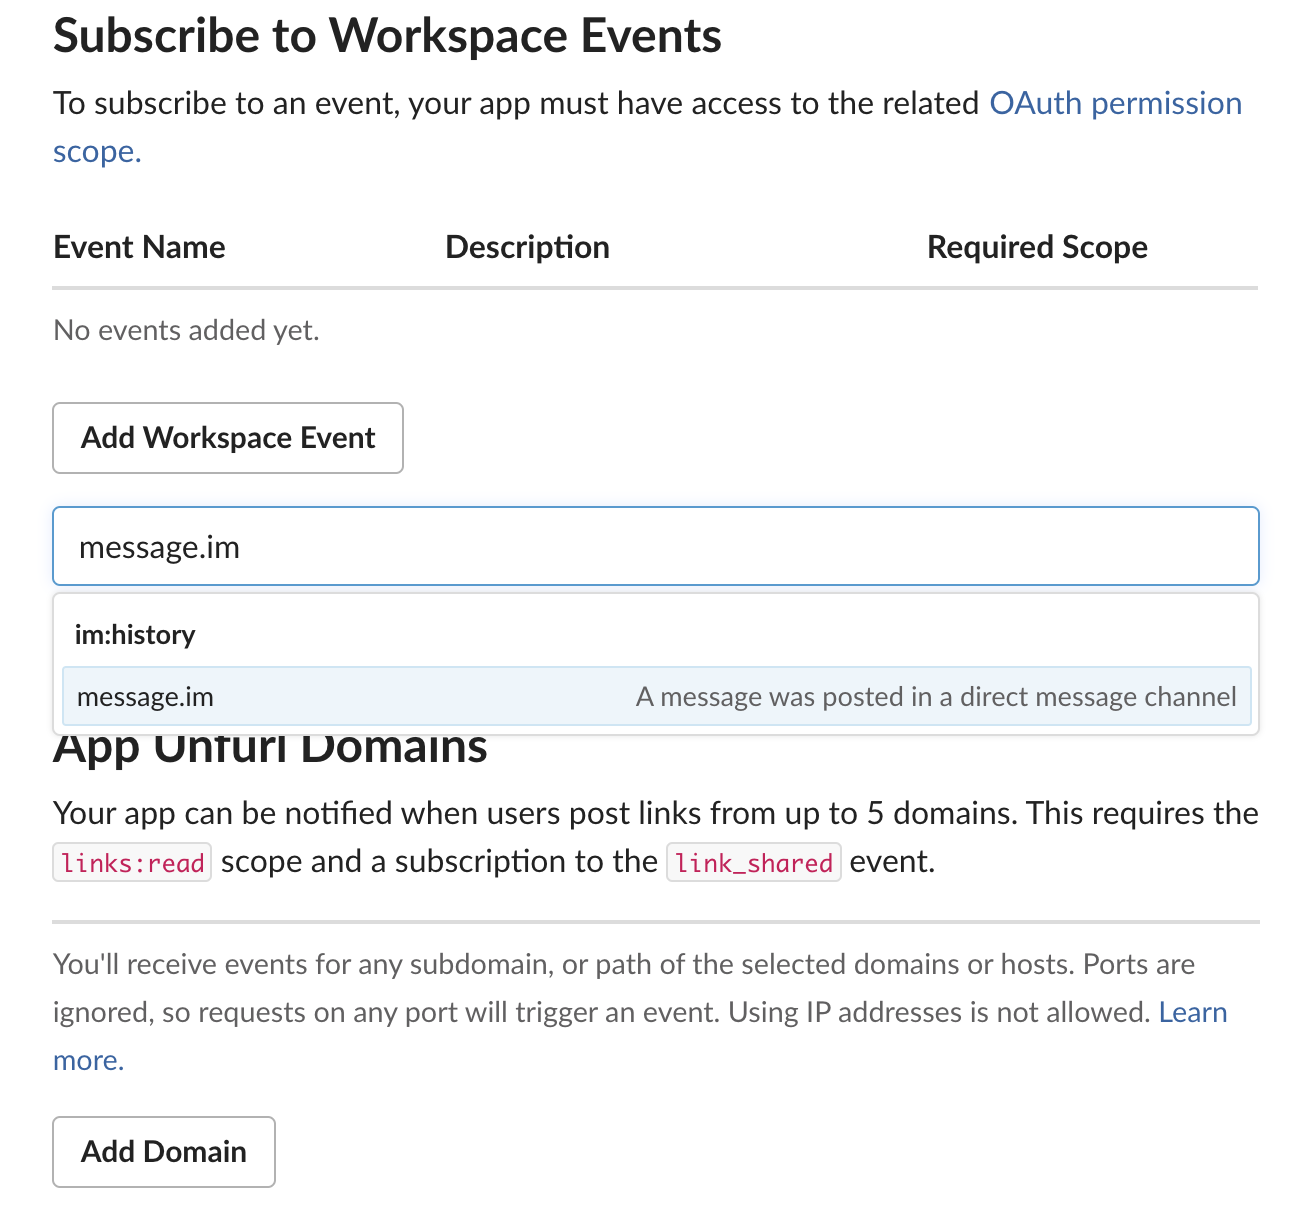
- Once the url gets verified, on the same page go to Subscribe to Bot Events, click on the 'Add Bot User Event' and add message.im bot user event and save it.
- Navigate to Interactive Components, enable the Interactivity and paste the same Request URL (which you pasted for Event Subscriptions), click on save changes.

Note: If you do any changes after setup then it will ask to Reinstall the app as shown in screenshot, please reinstall the app clicking on the 'Please reinstall your app' in the alert or you can Reinstall app from the Install app tab.

- Once all setup done, then Open your Slack and login with your credentials for the same workspace
- Click on Add more apps
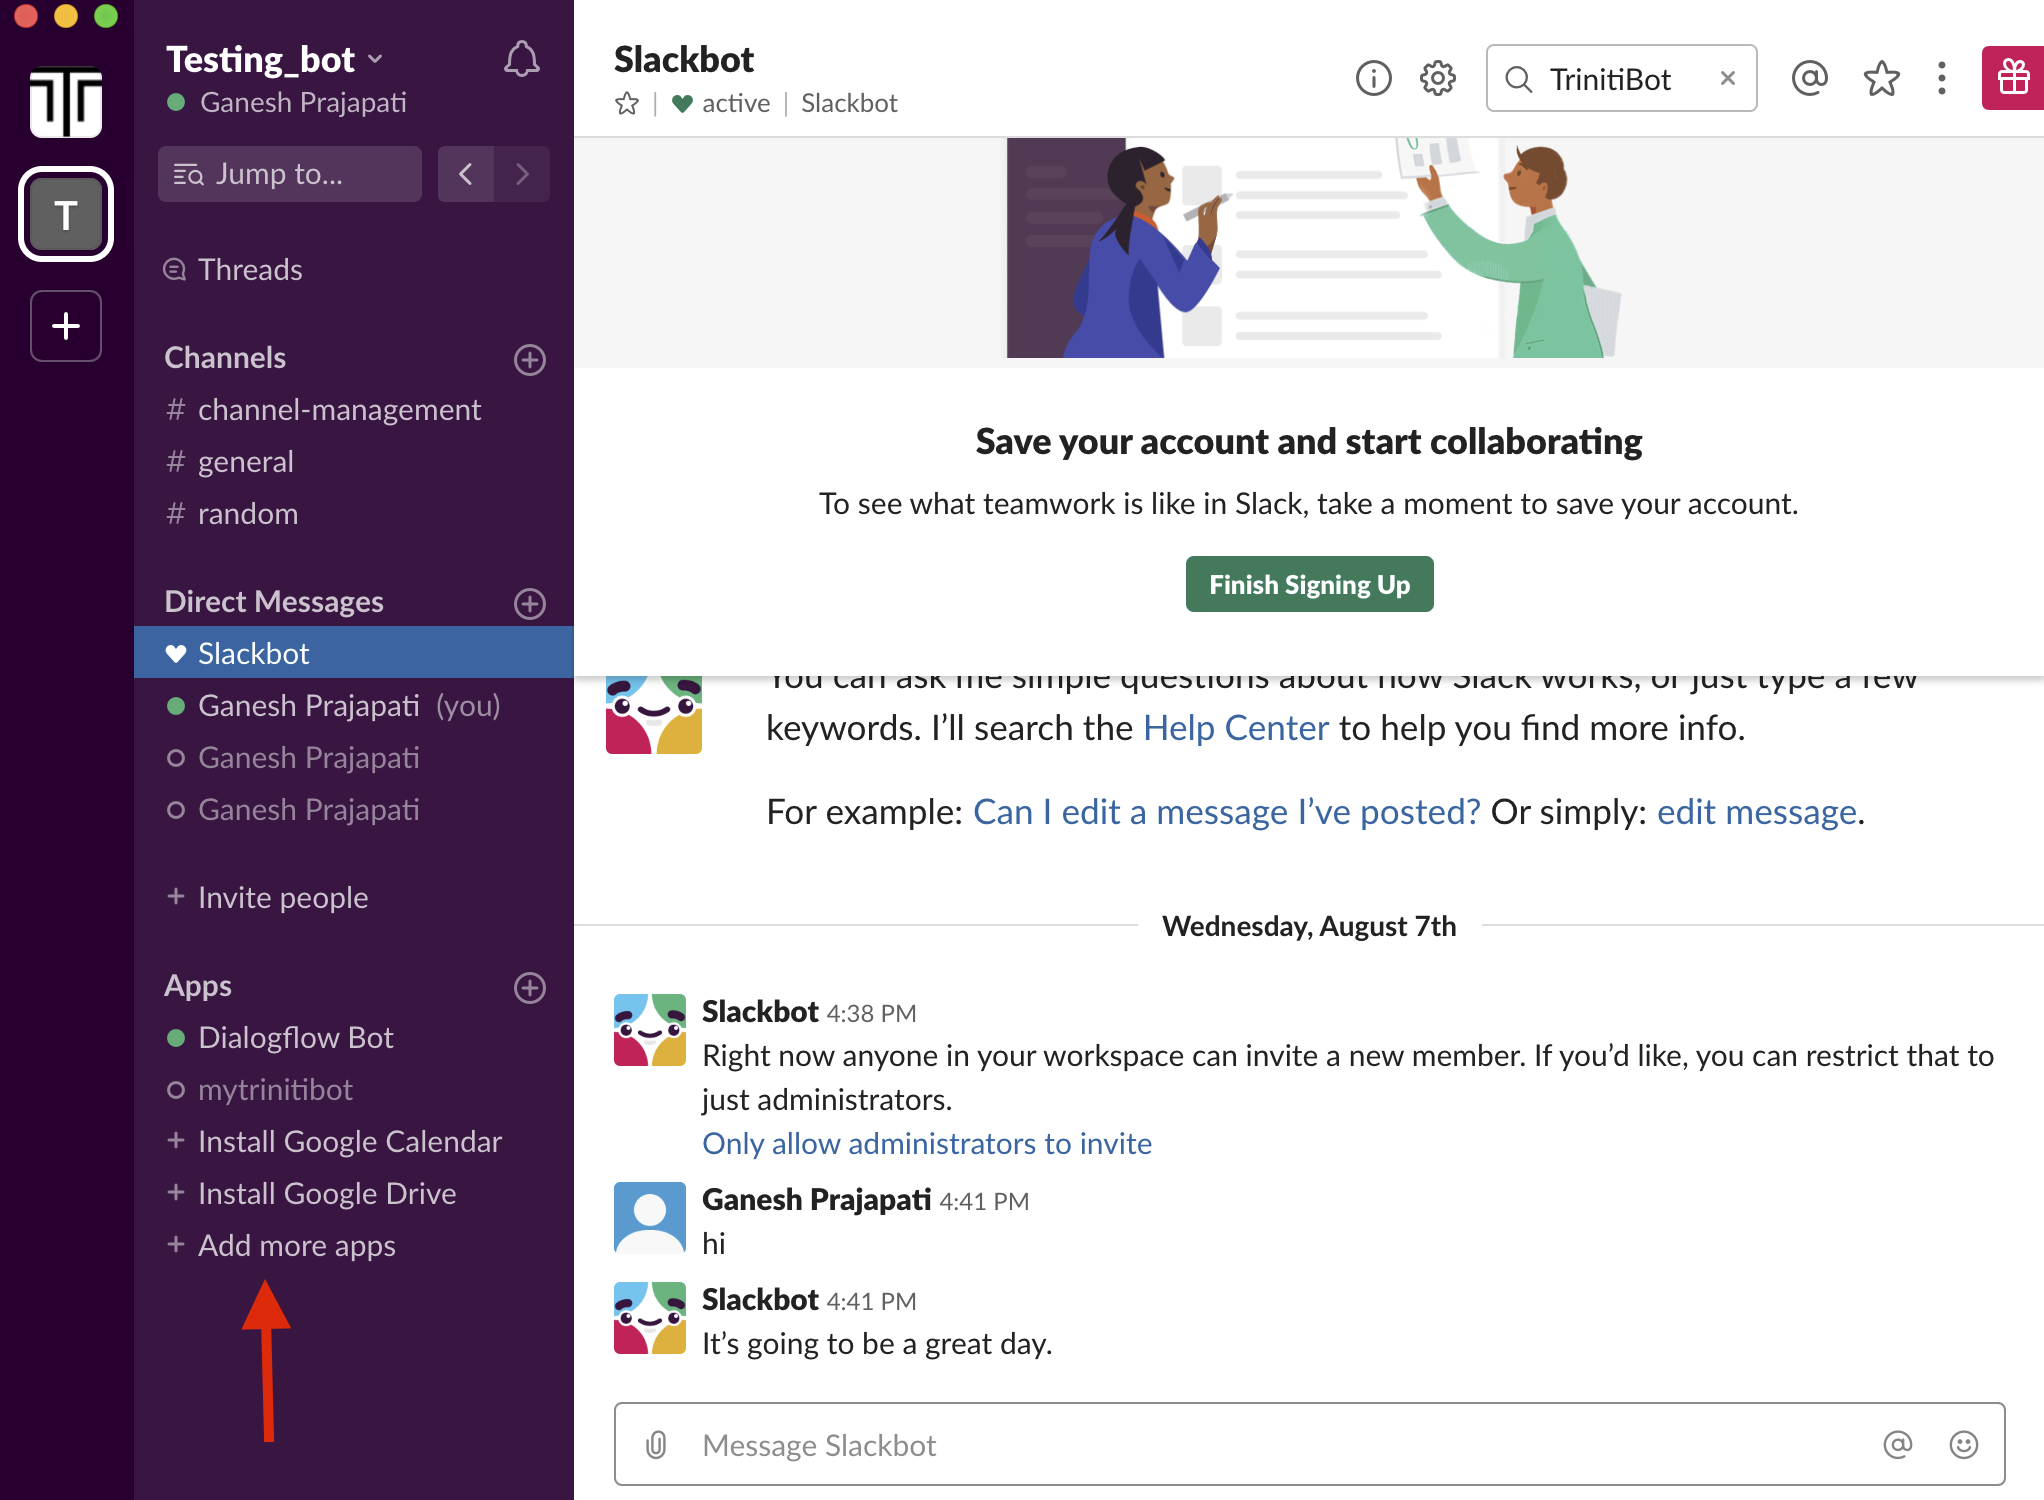
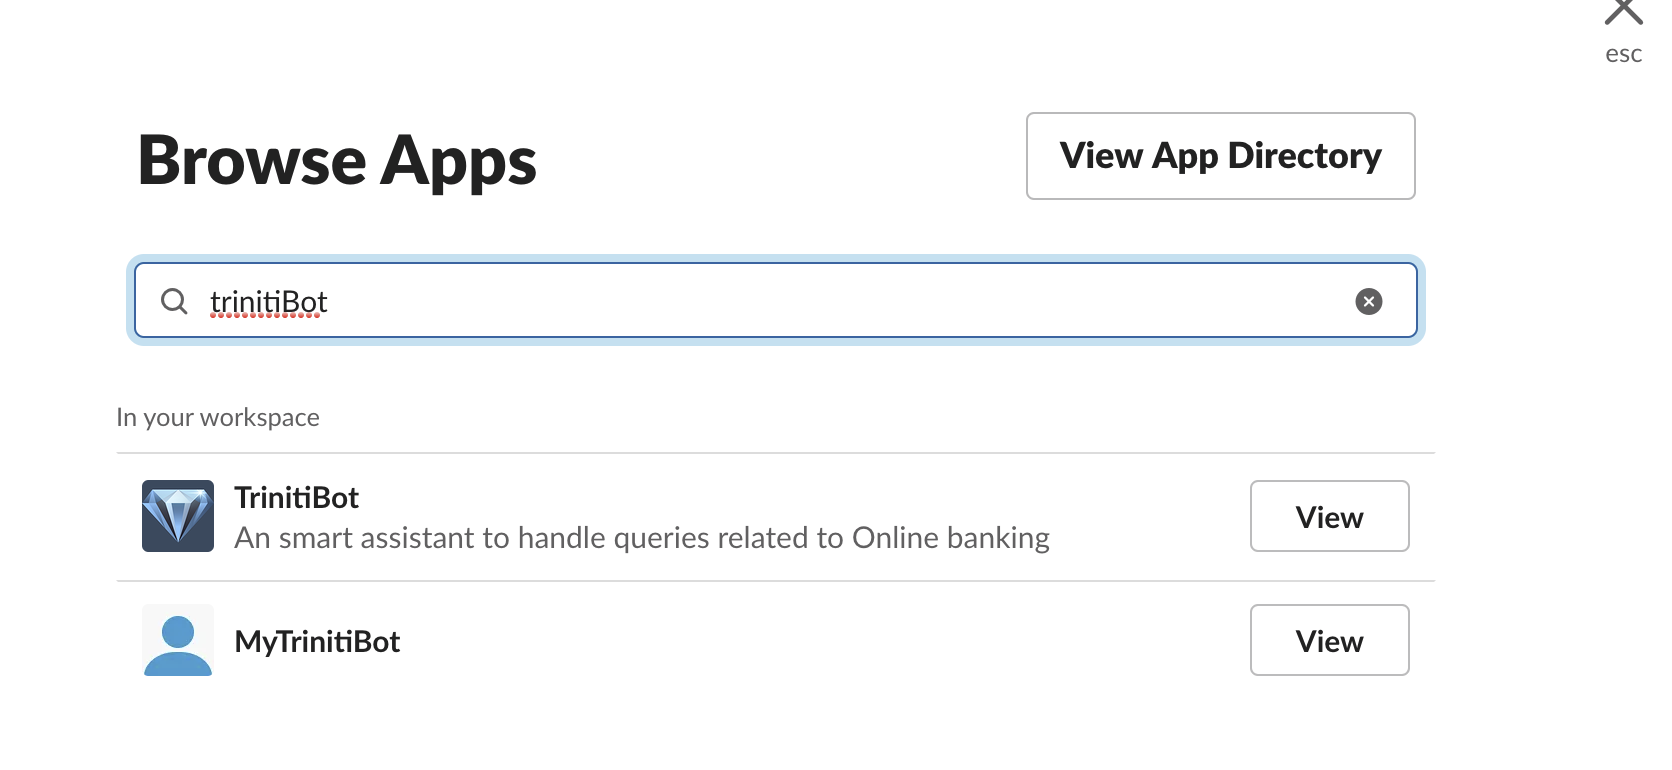
- Search for your bot by entering your bot name
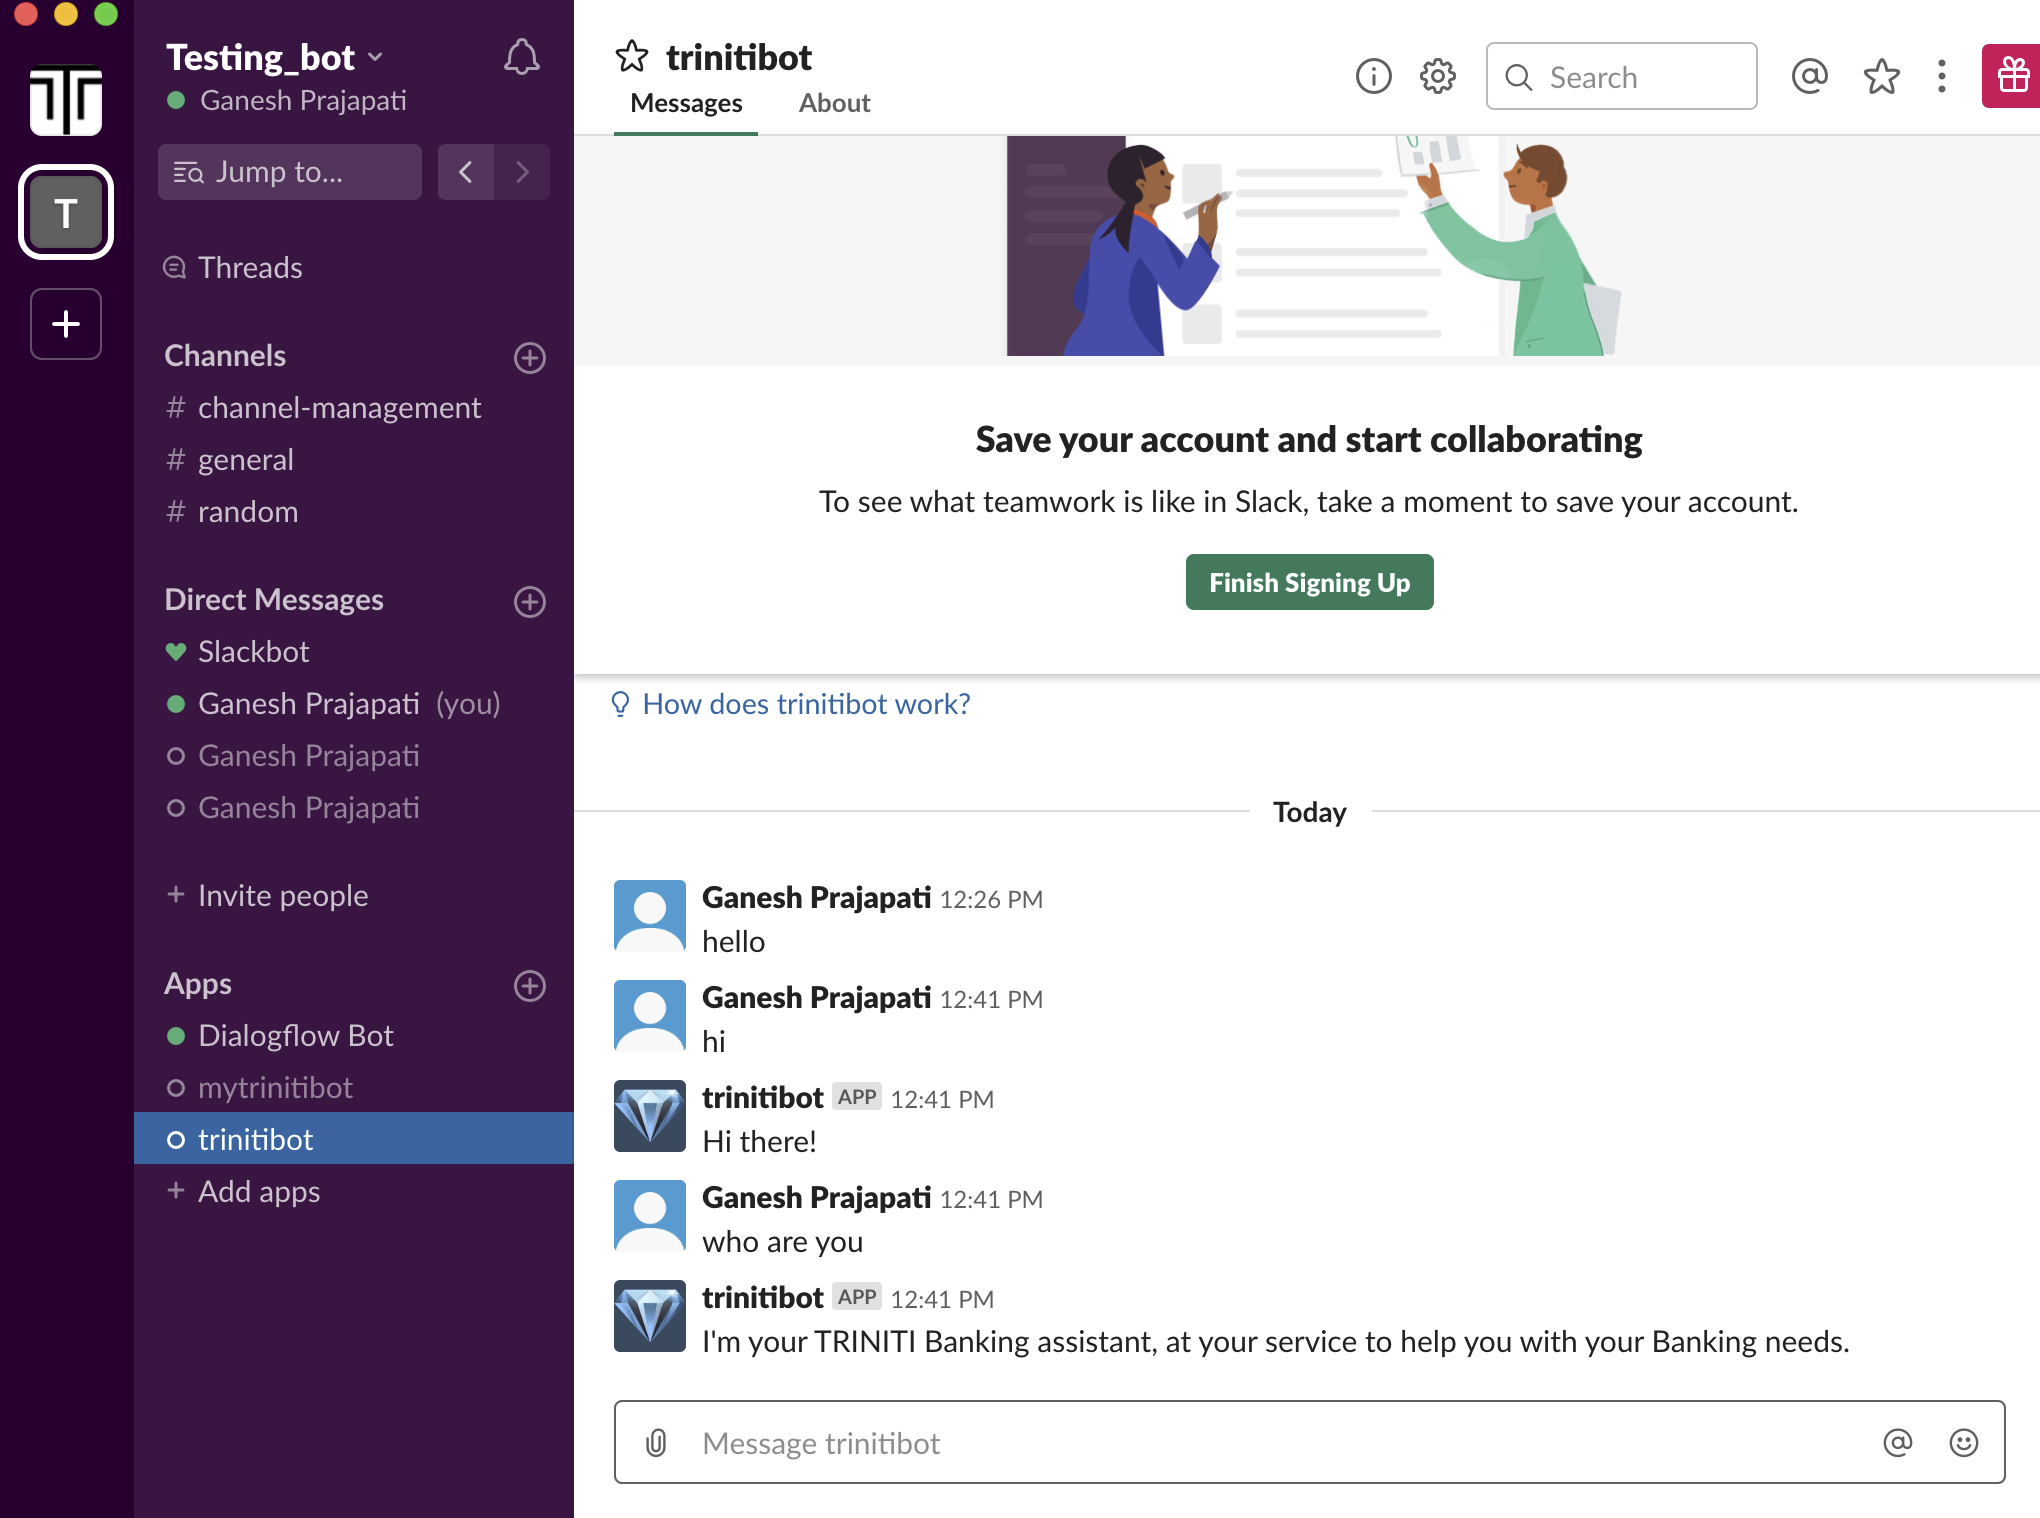
- Congratulations your bot setup is completed. Now you can interact with your bot.
Managing Line
Line is a freeware app for instant communications on electronic devices such as smartphones, tablets, and personal computers. Line is the fastest growing mobile messenger app in the world, and is free & easy to use. The bot can answer the user's query on the line channel as well. You can enable & configure the line channel for your bot by following these steps:
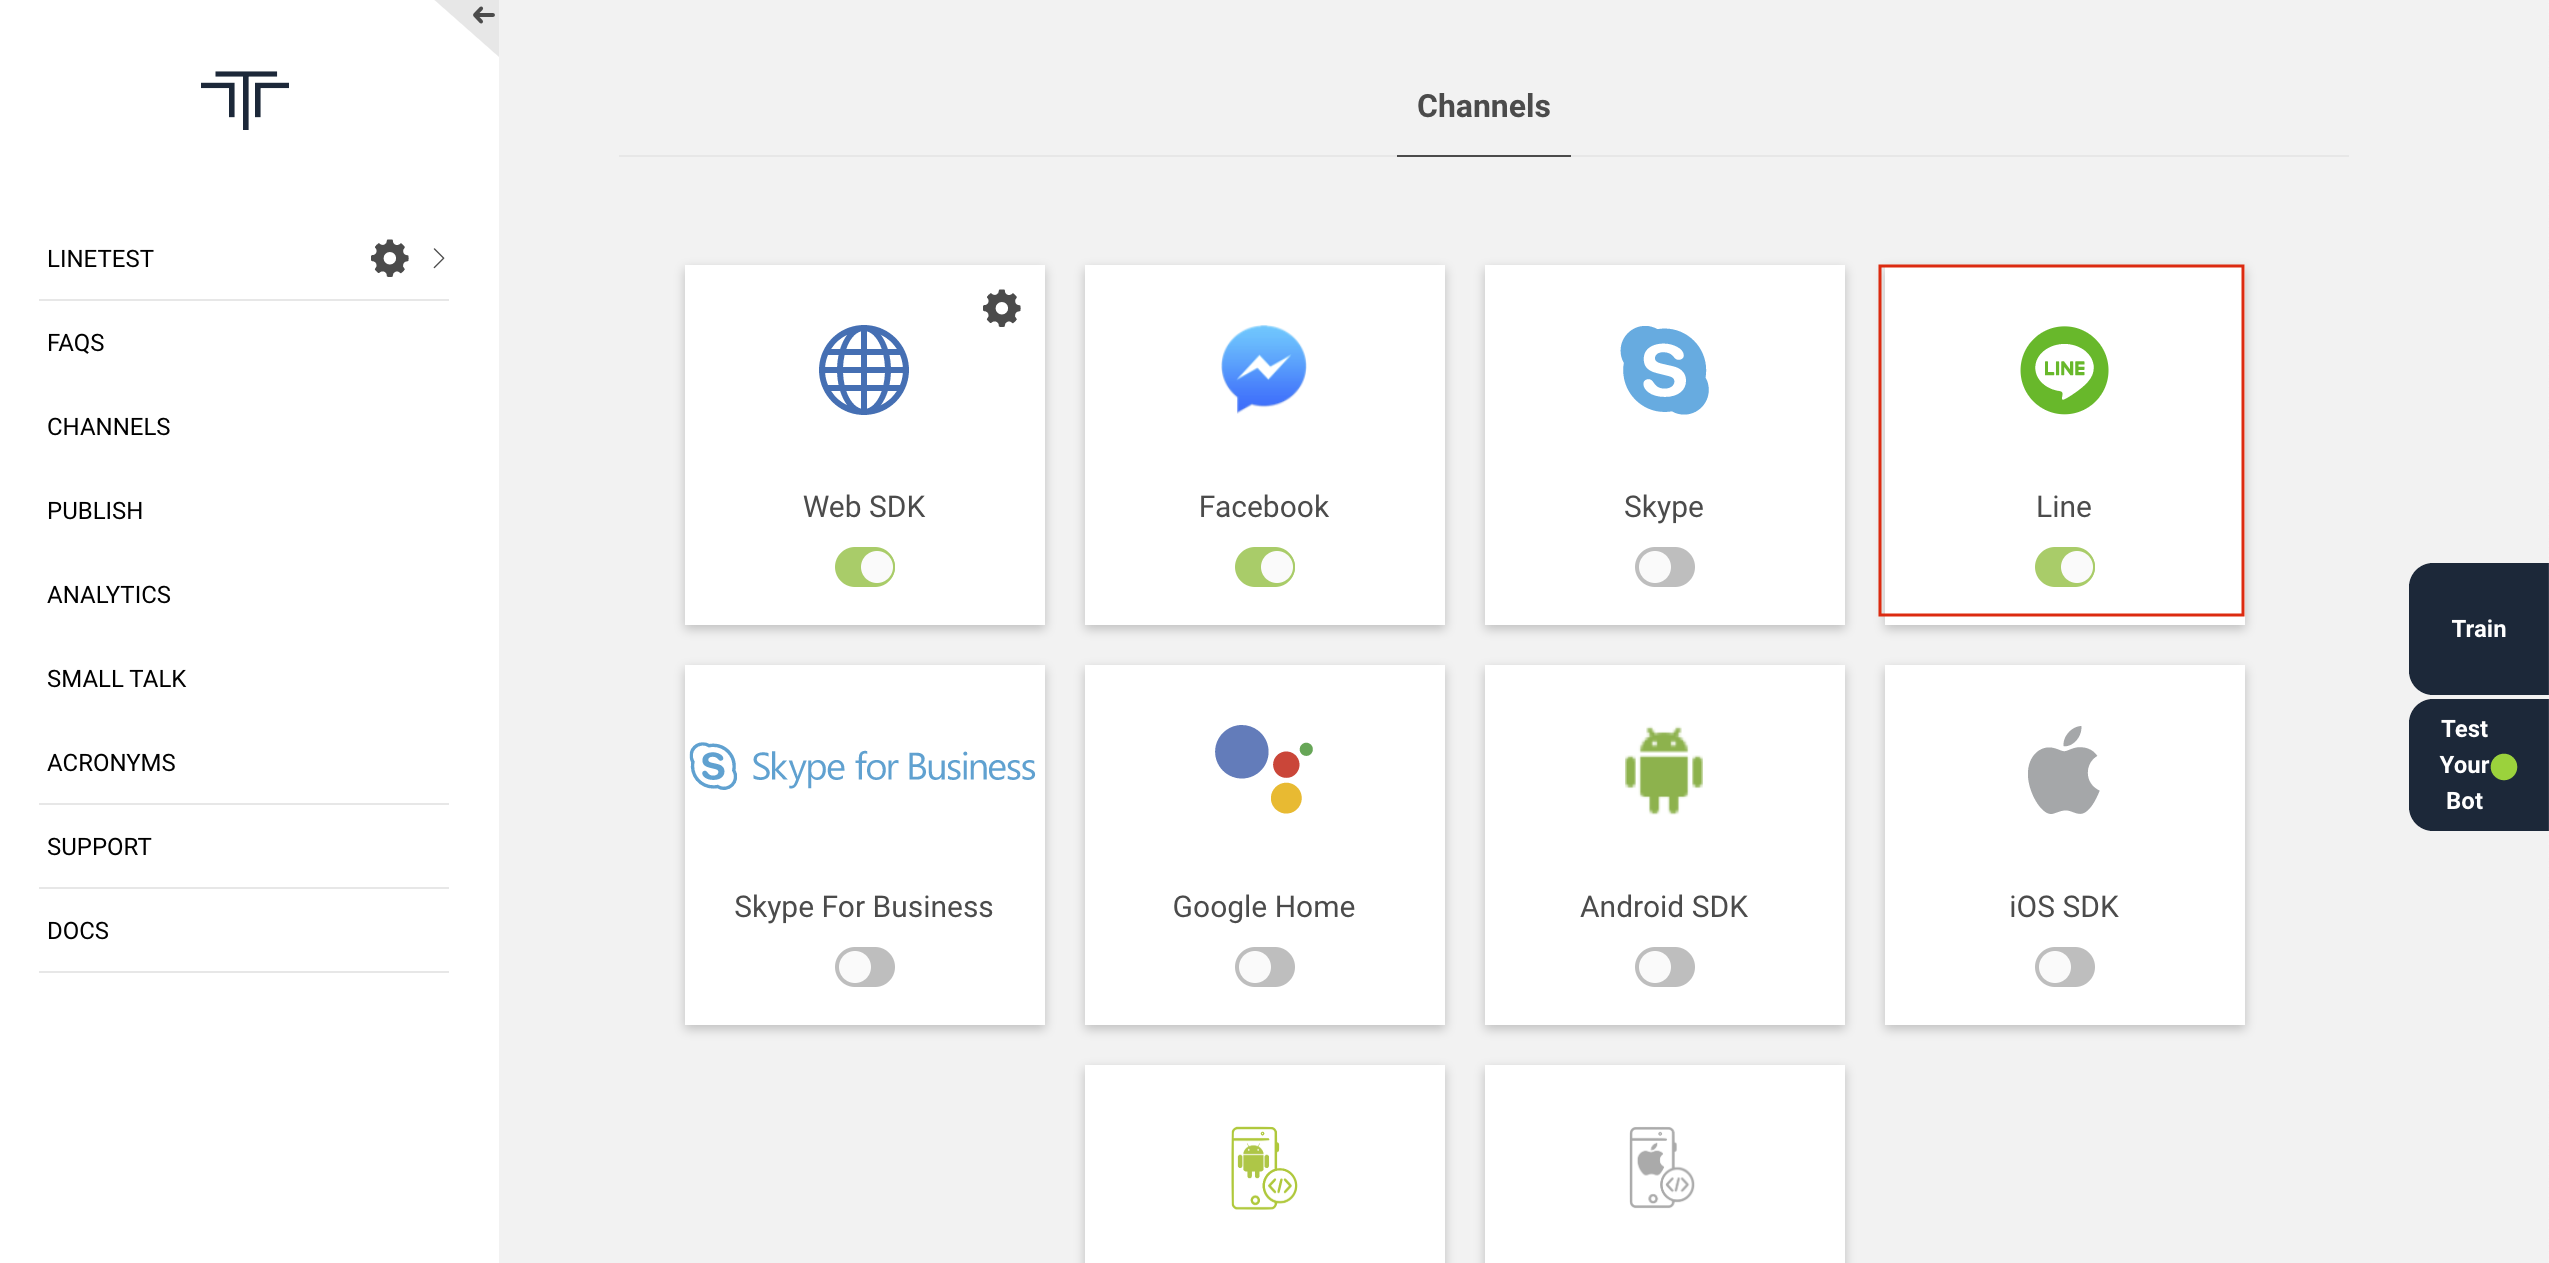
Enable the LINE Channel
- Login to triniti.ai admin portal
- Create a workspace
- Goto Channels
- Enable LINE their
Setup a new Line bot in Line developer portal Create a new Line Bot. This is used as an identity of our bot - for our users, chatting with bot looks exactly like chatting with the Line contacts.
Create a new Line bot Visit Line Developer portal and log in using your Line account credentials if you already have, otherwise install Line in your phone, create an account and log in to the portal.
- Select Messaging API and click on Start Now
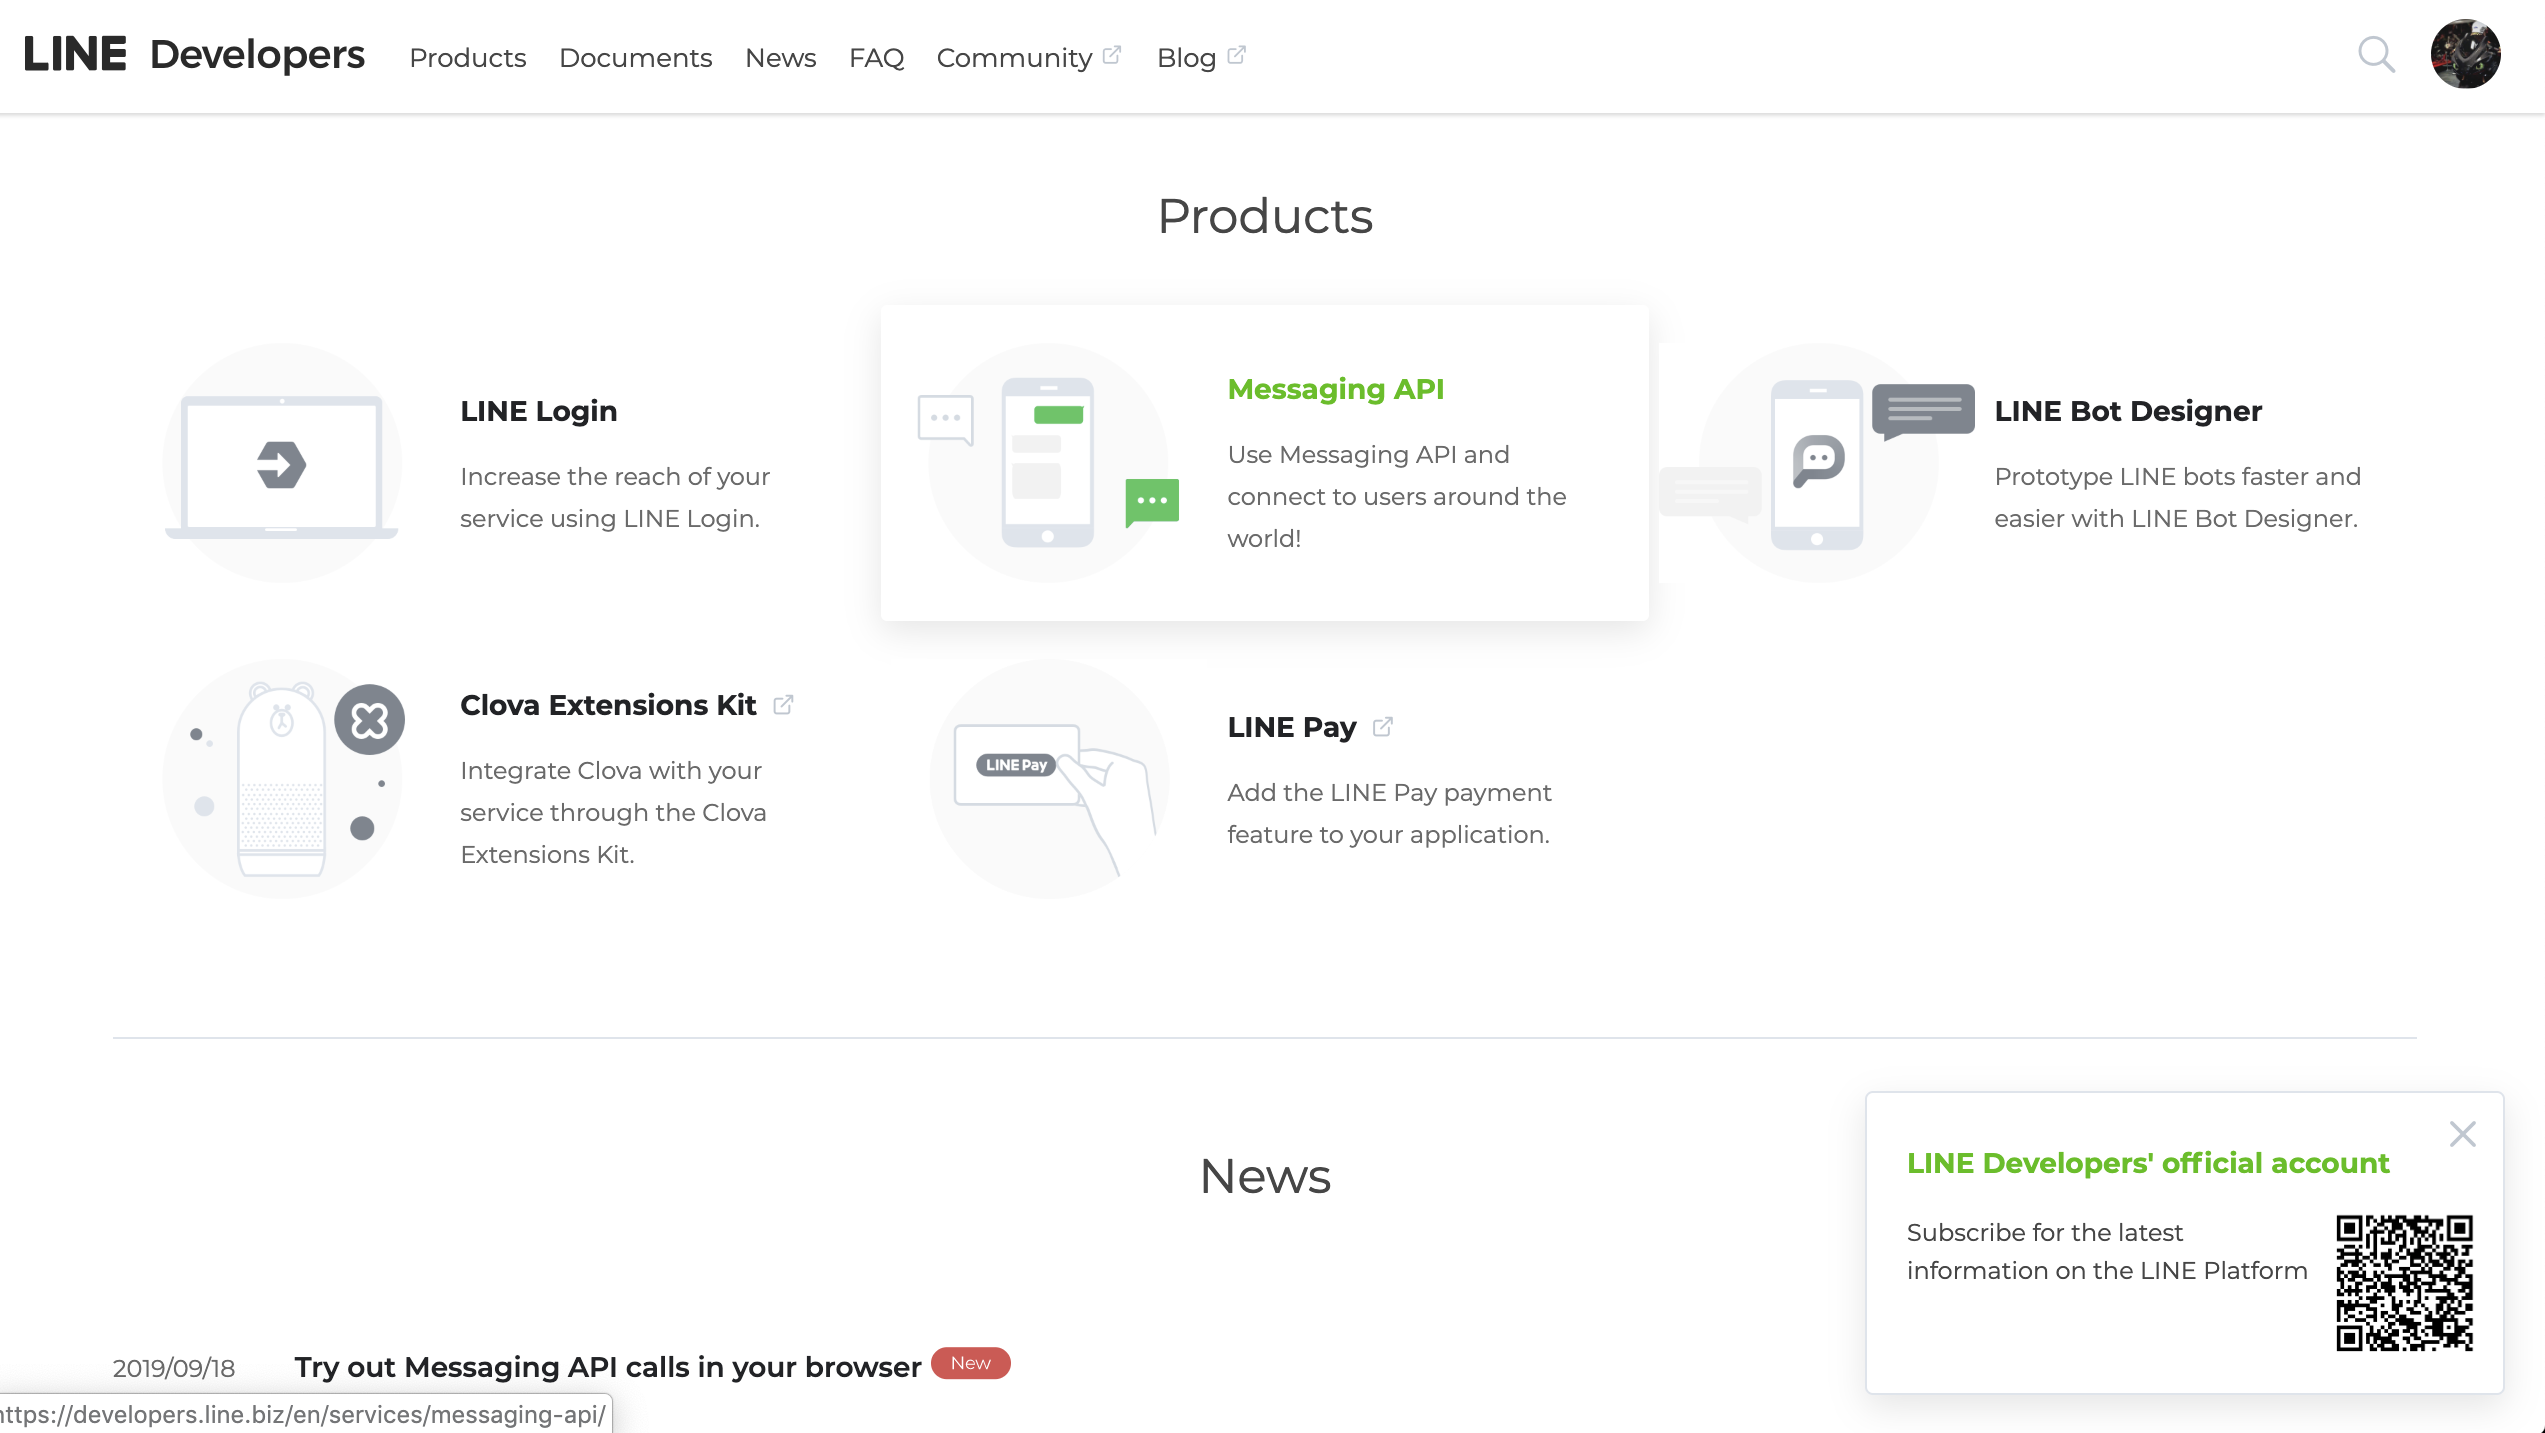
- Click on "Create new provider” from the Select Provider.
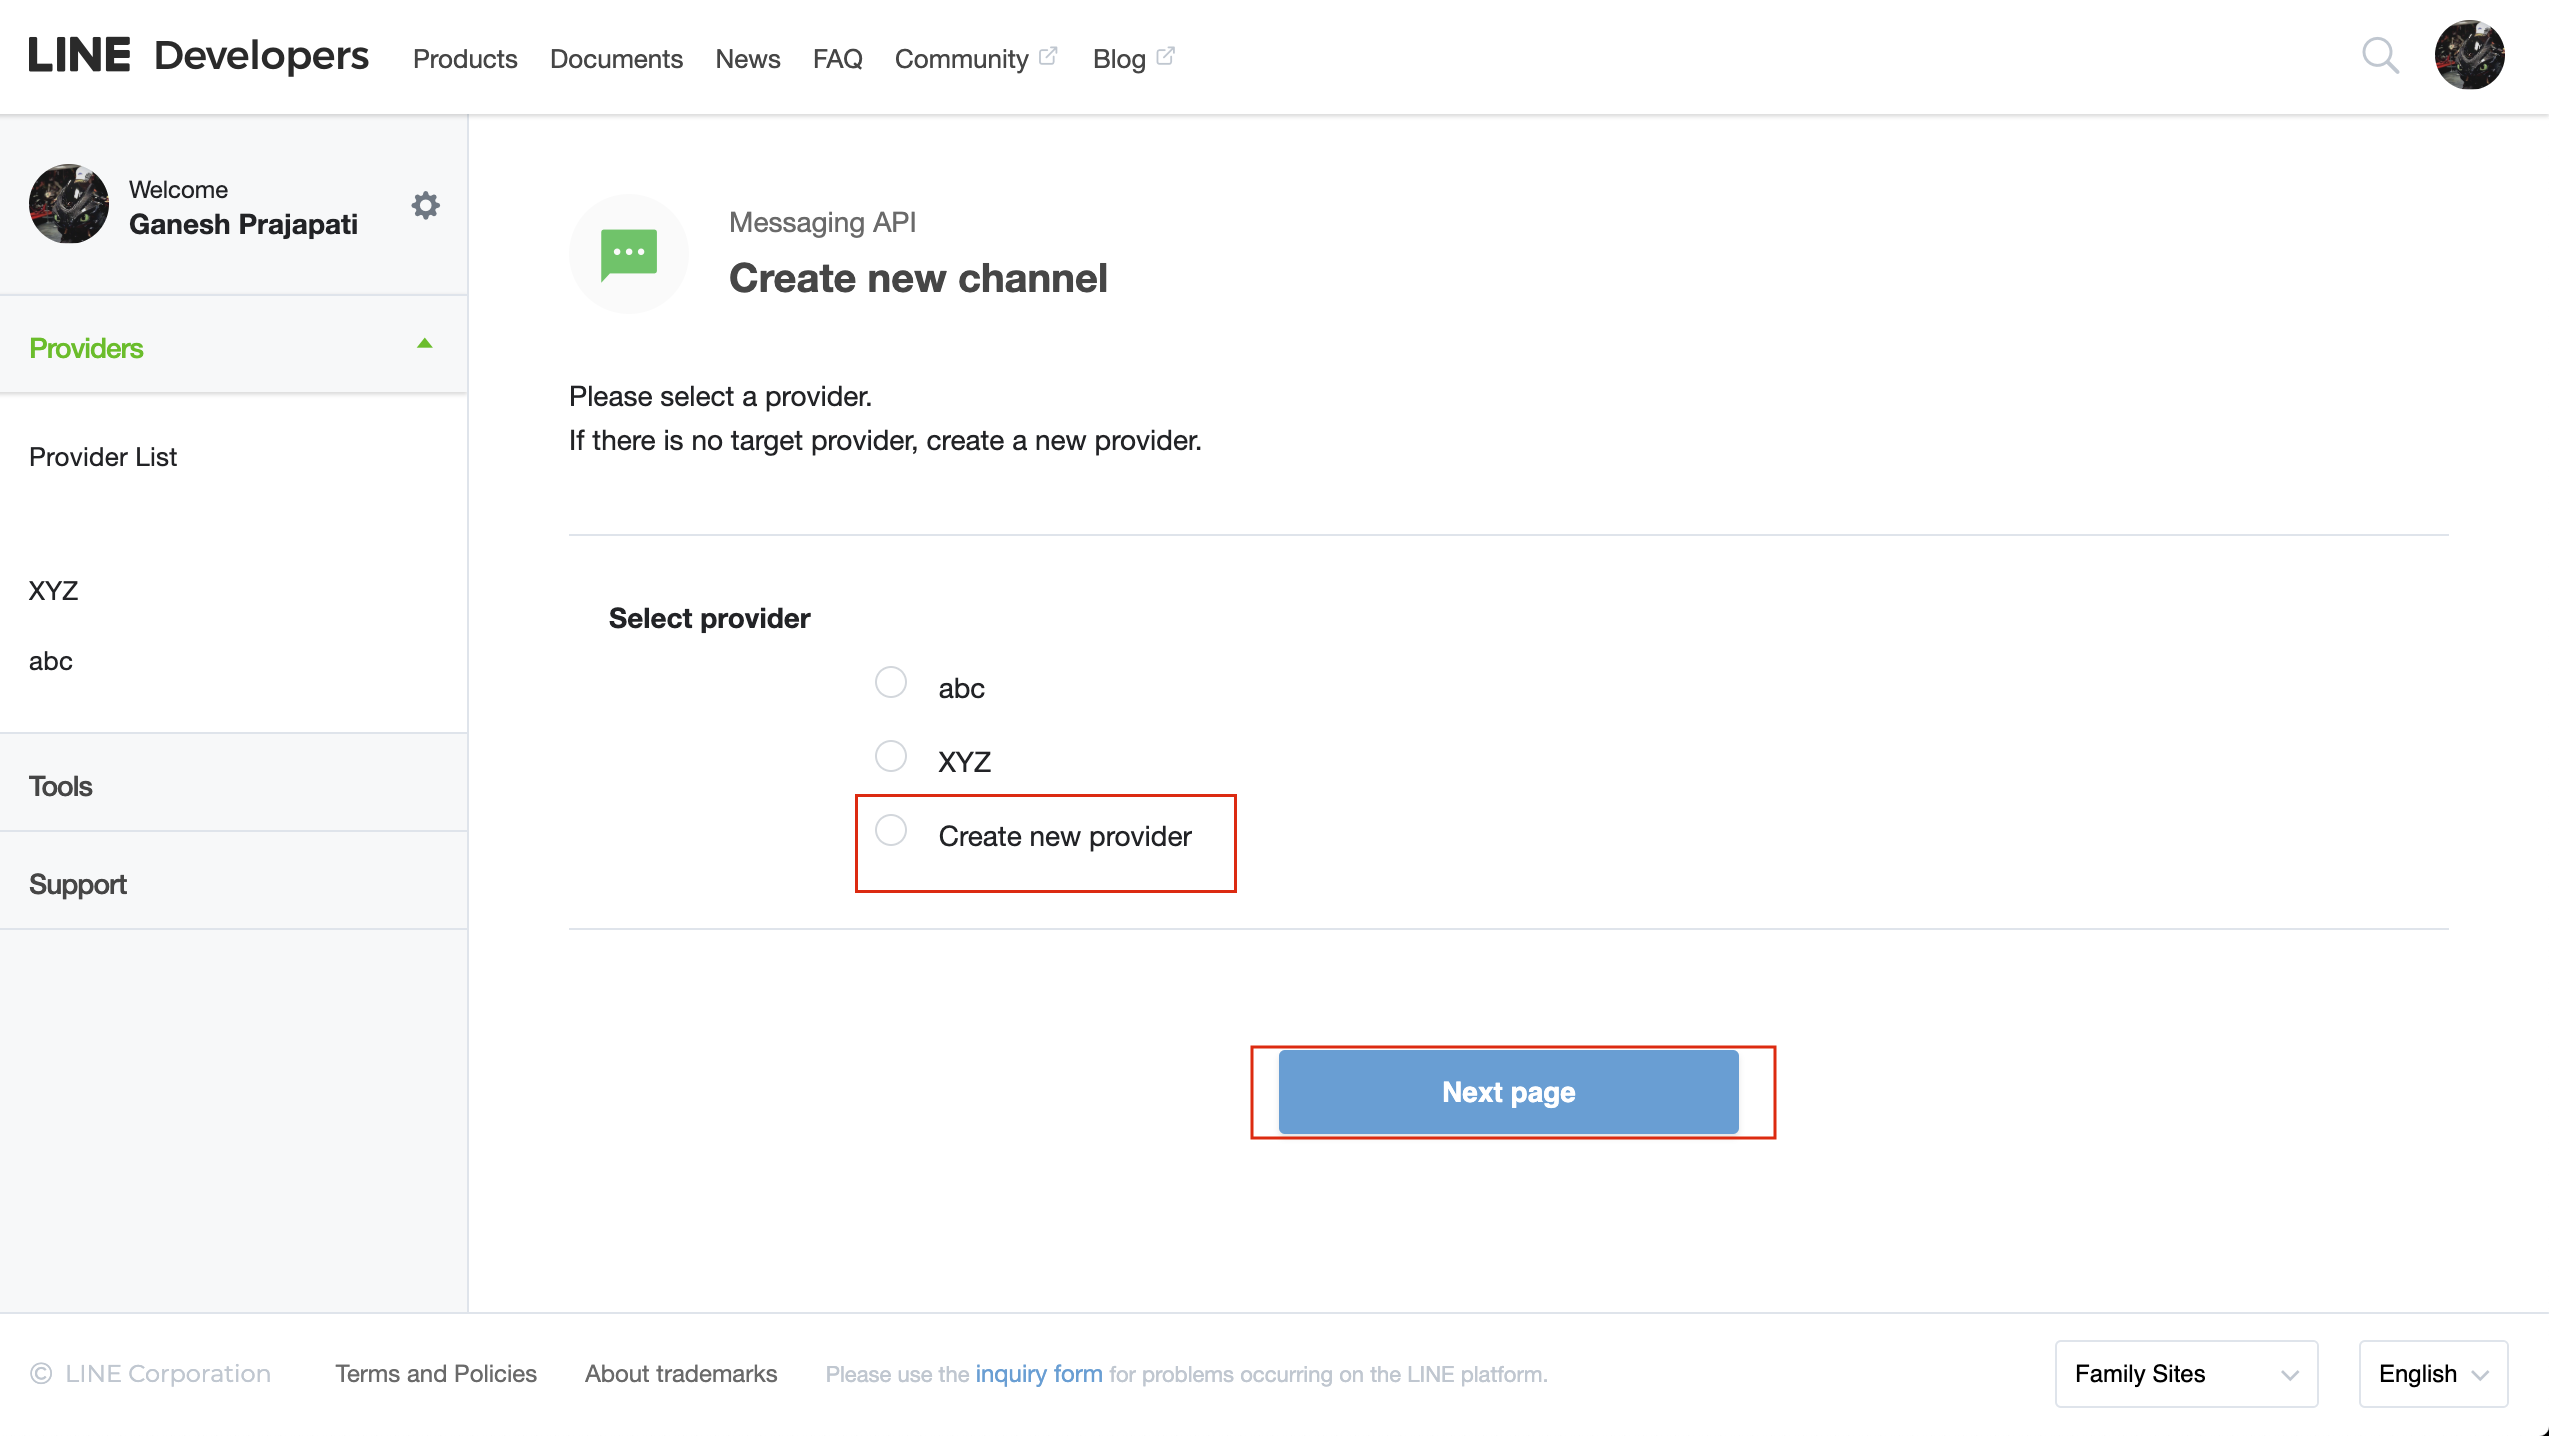
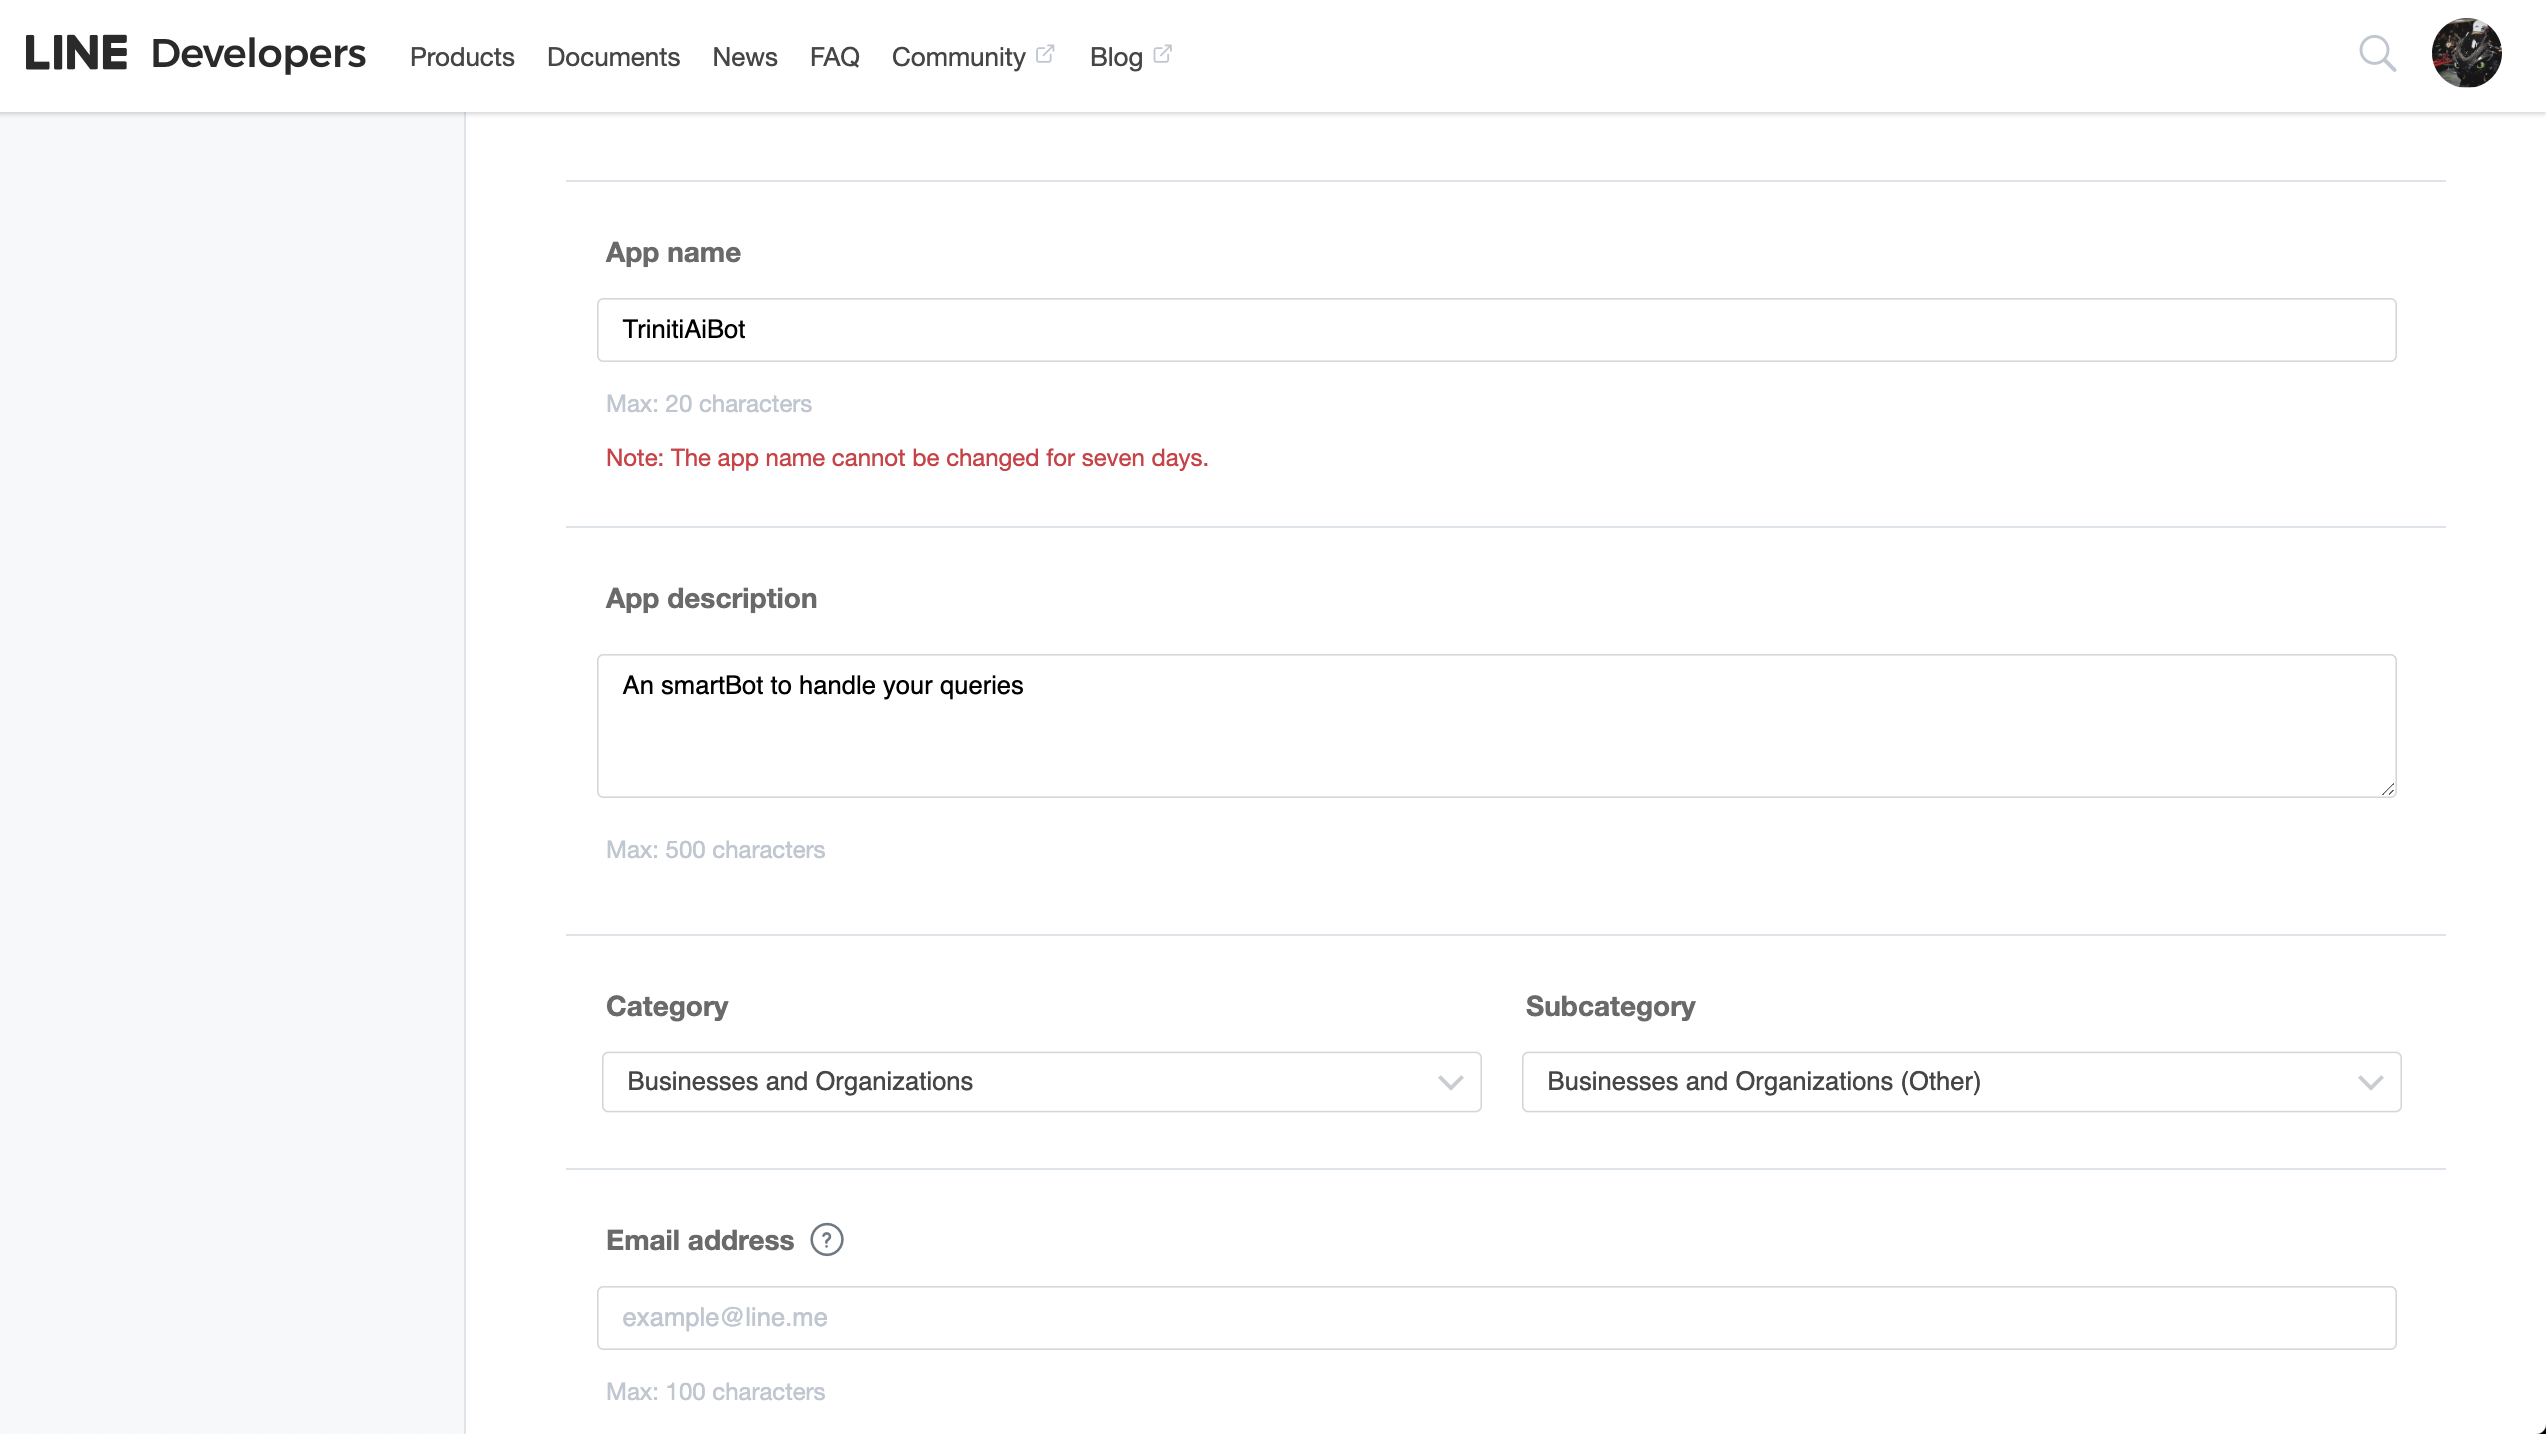
- Enter the Provider name, click on Next. Please enter all the mandatory details on next page and click on Confirm.
- Cross verify your entered details, Accept terms & conditions and click on Create
- Select the provider form provider list on next page
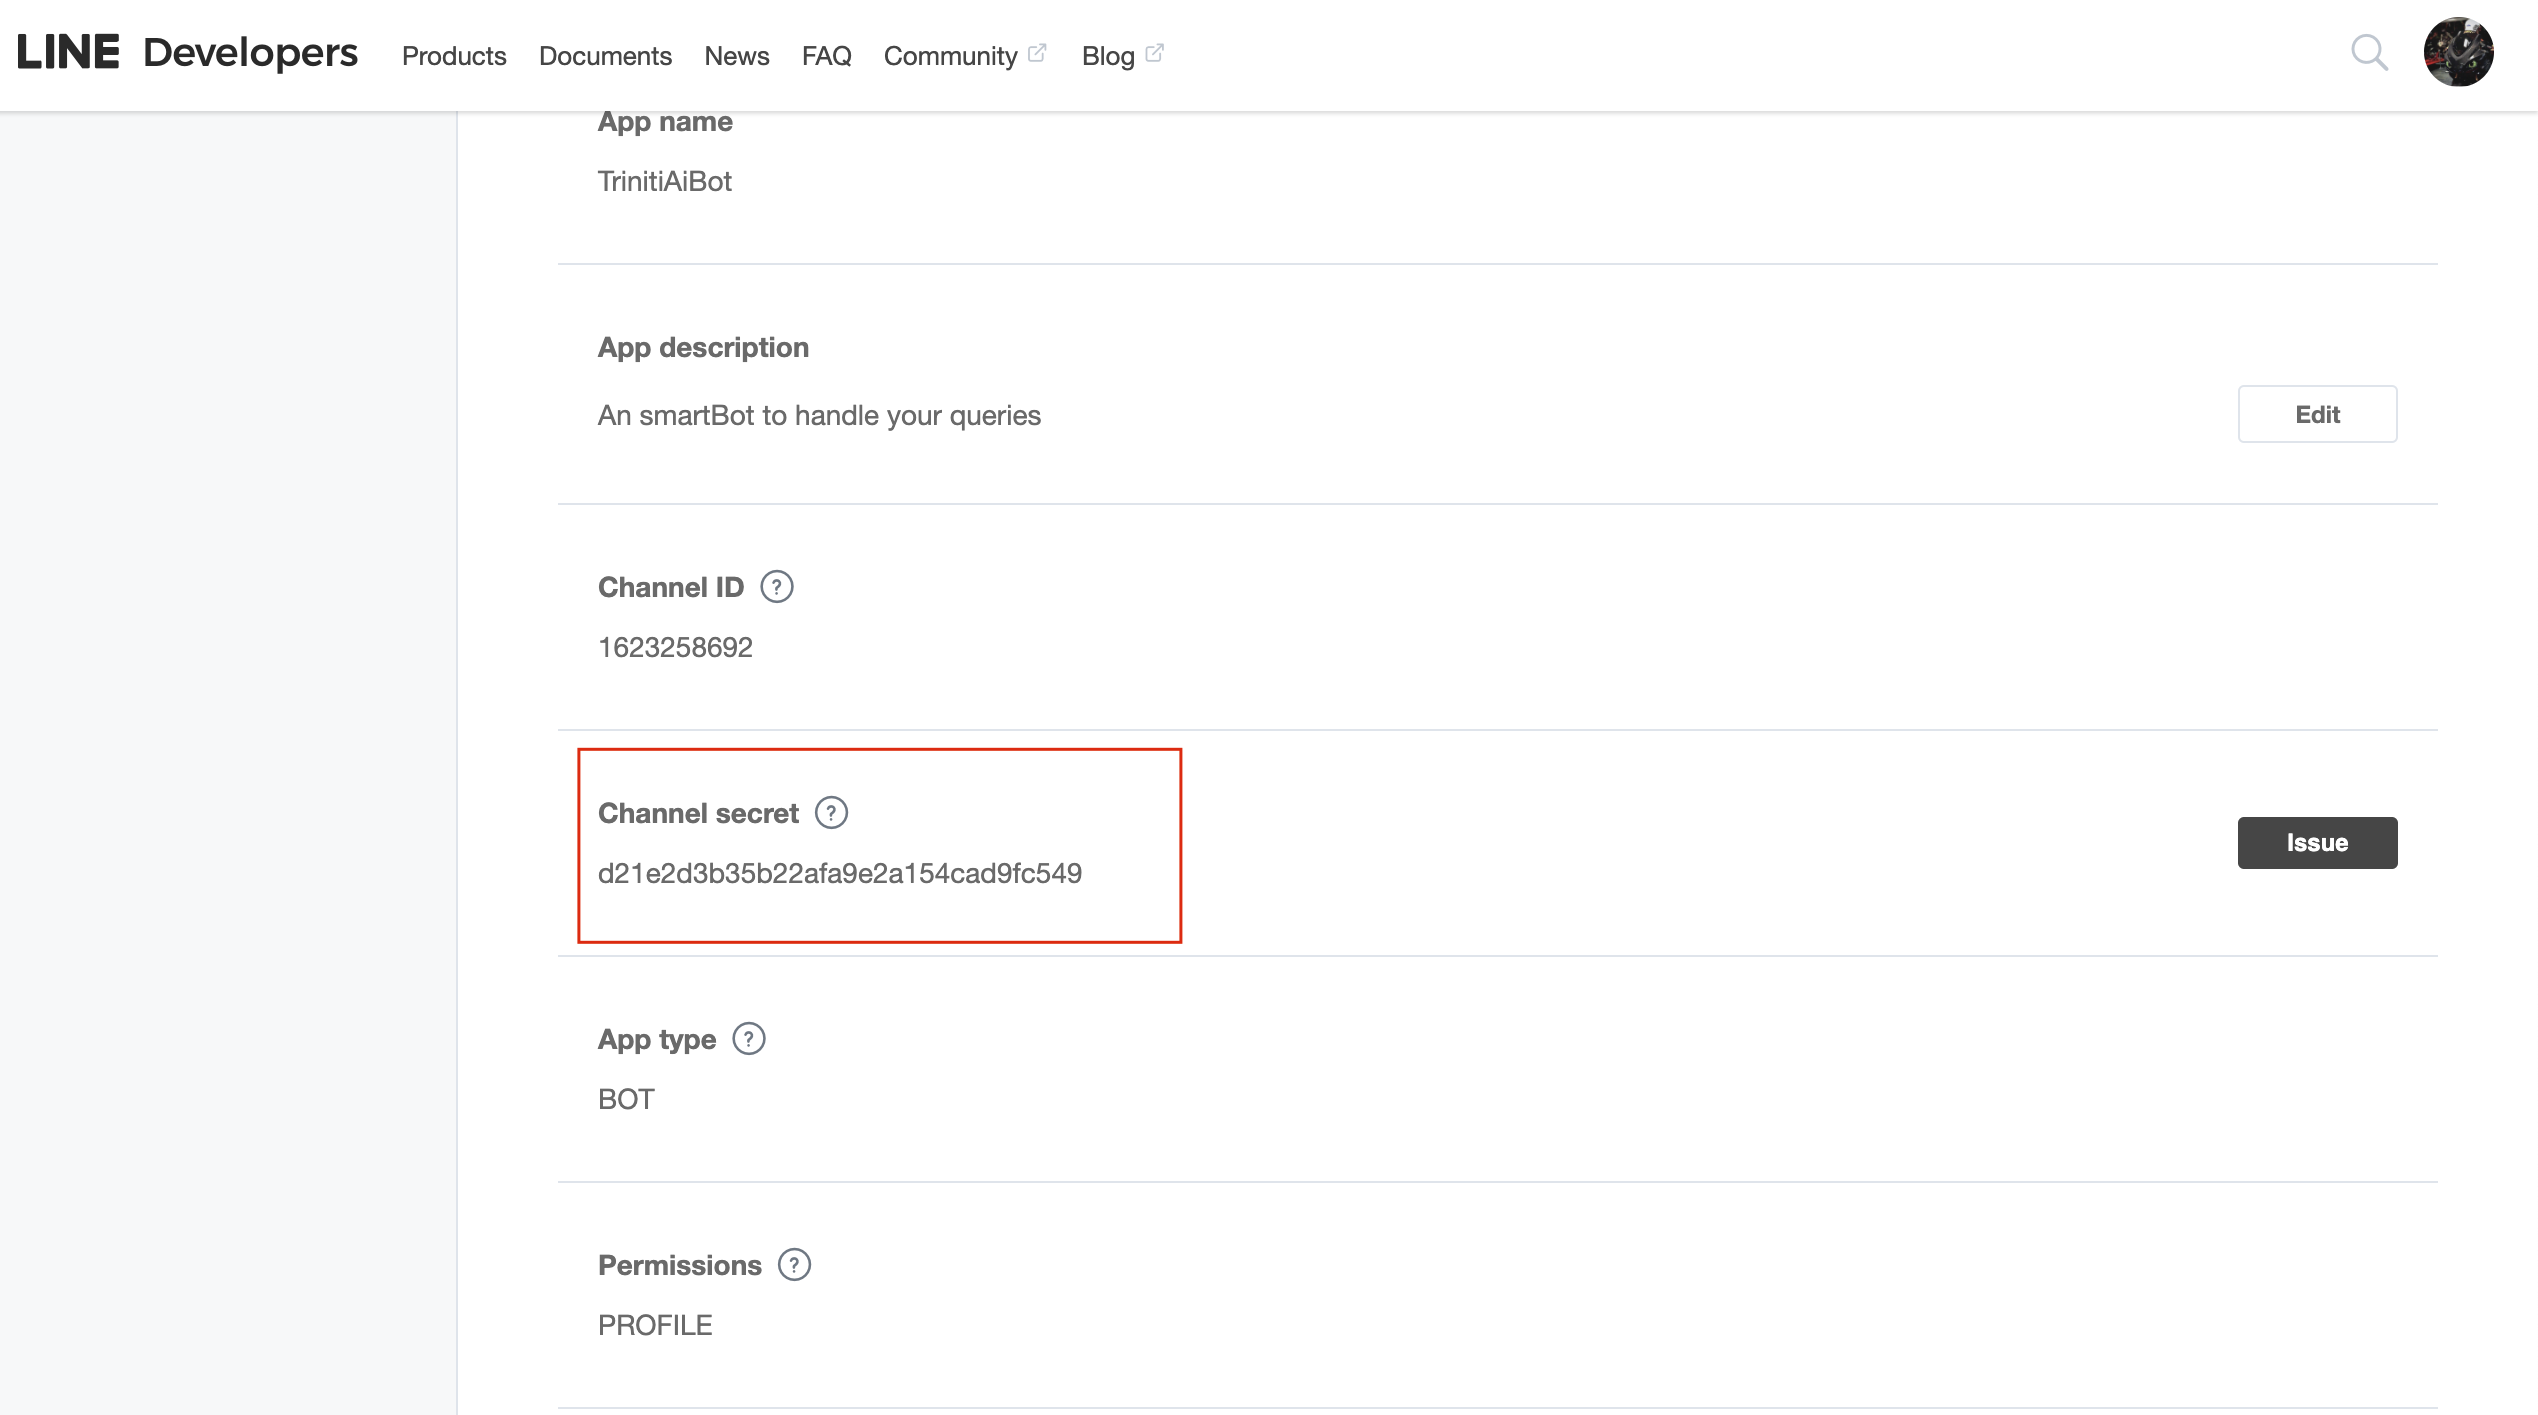
- Copy the Secret key from Basic Information and paste it in "Channel secret" field on triniti.ai page
- Scroll down to "Messaging Settings", under "Channel access token (long-lived)" click on issue to generate the Access token, select validity and issue.
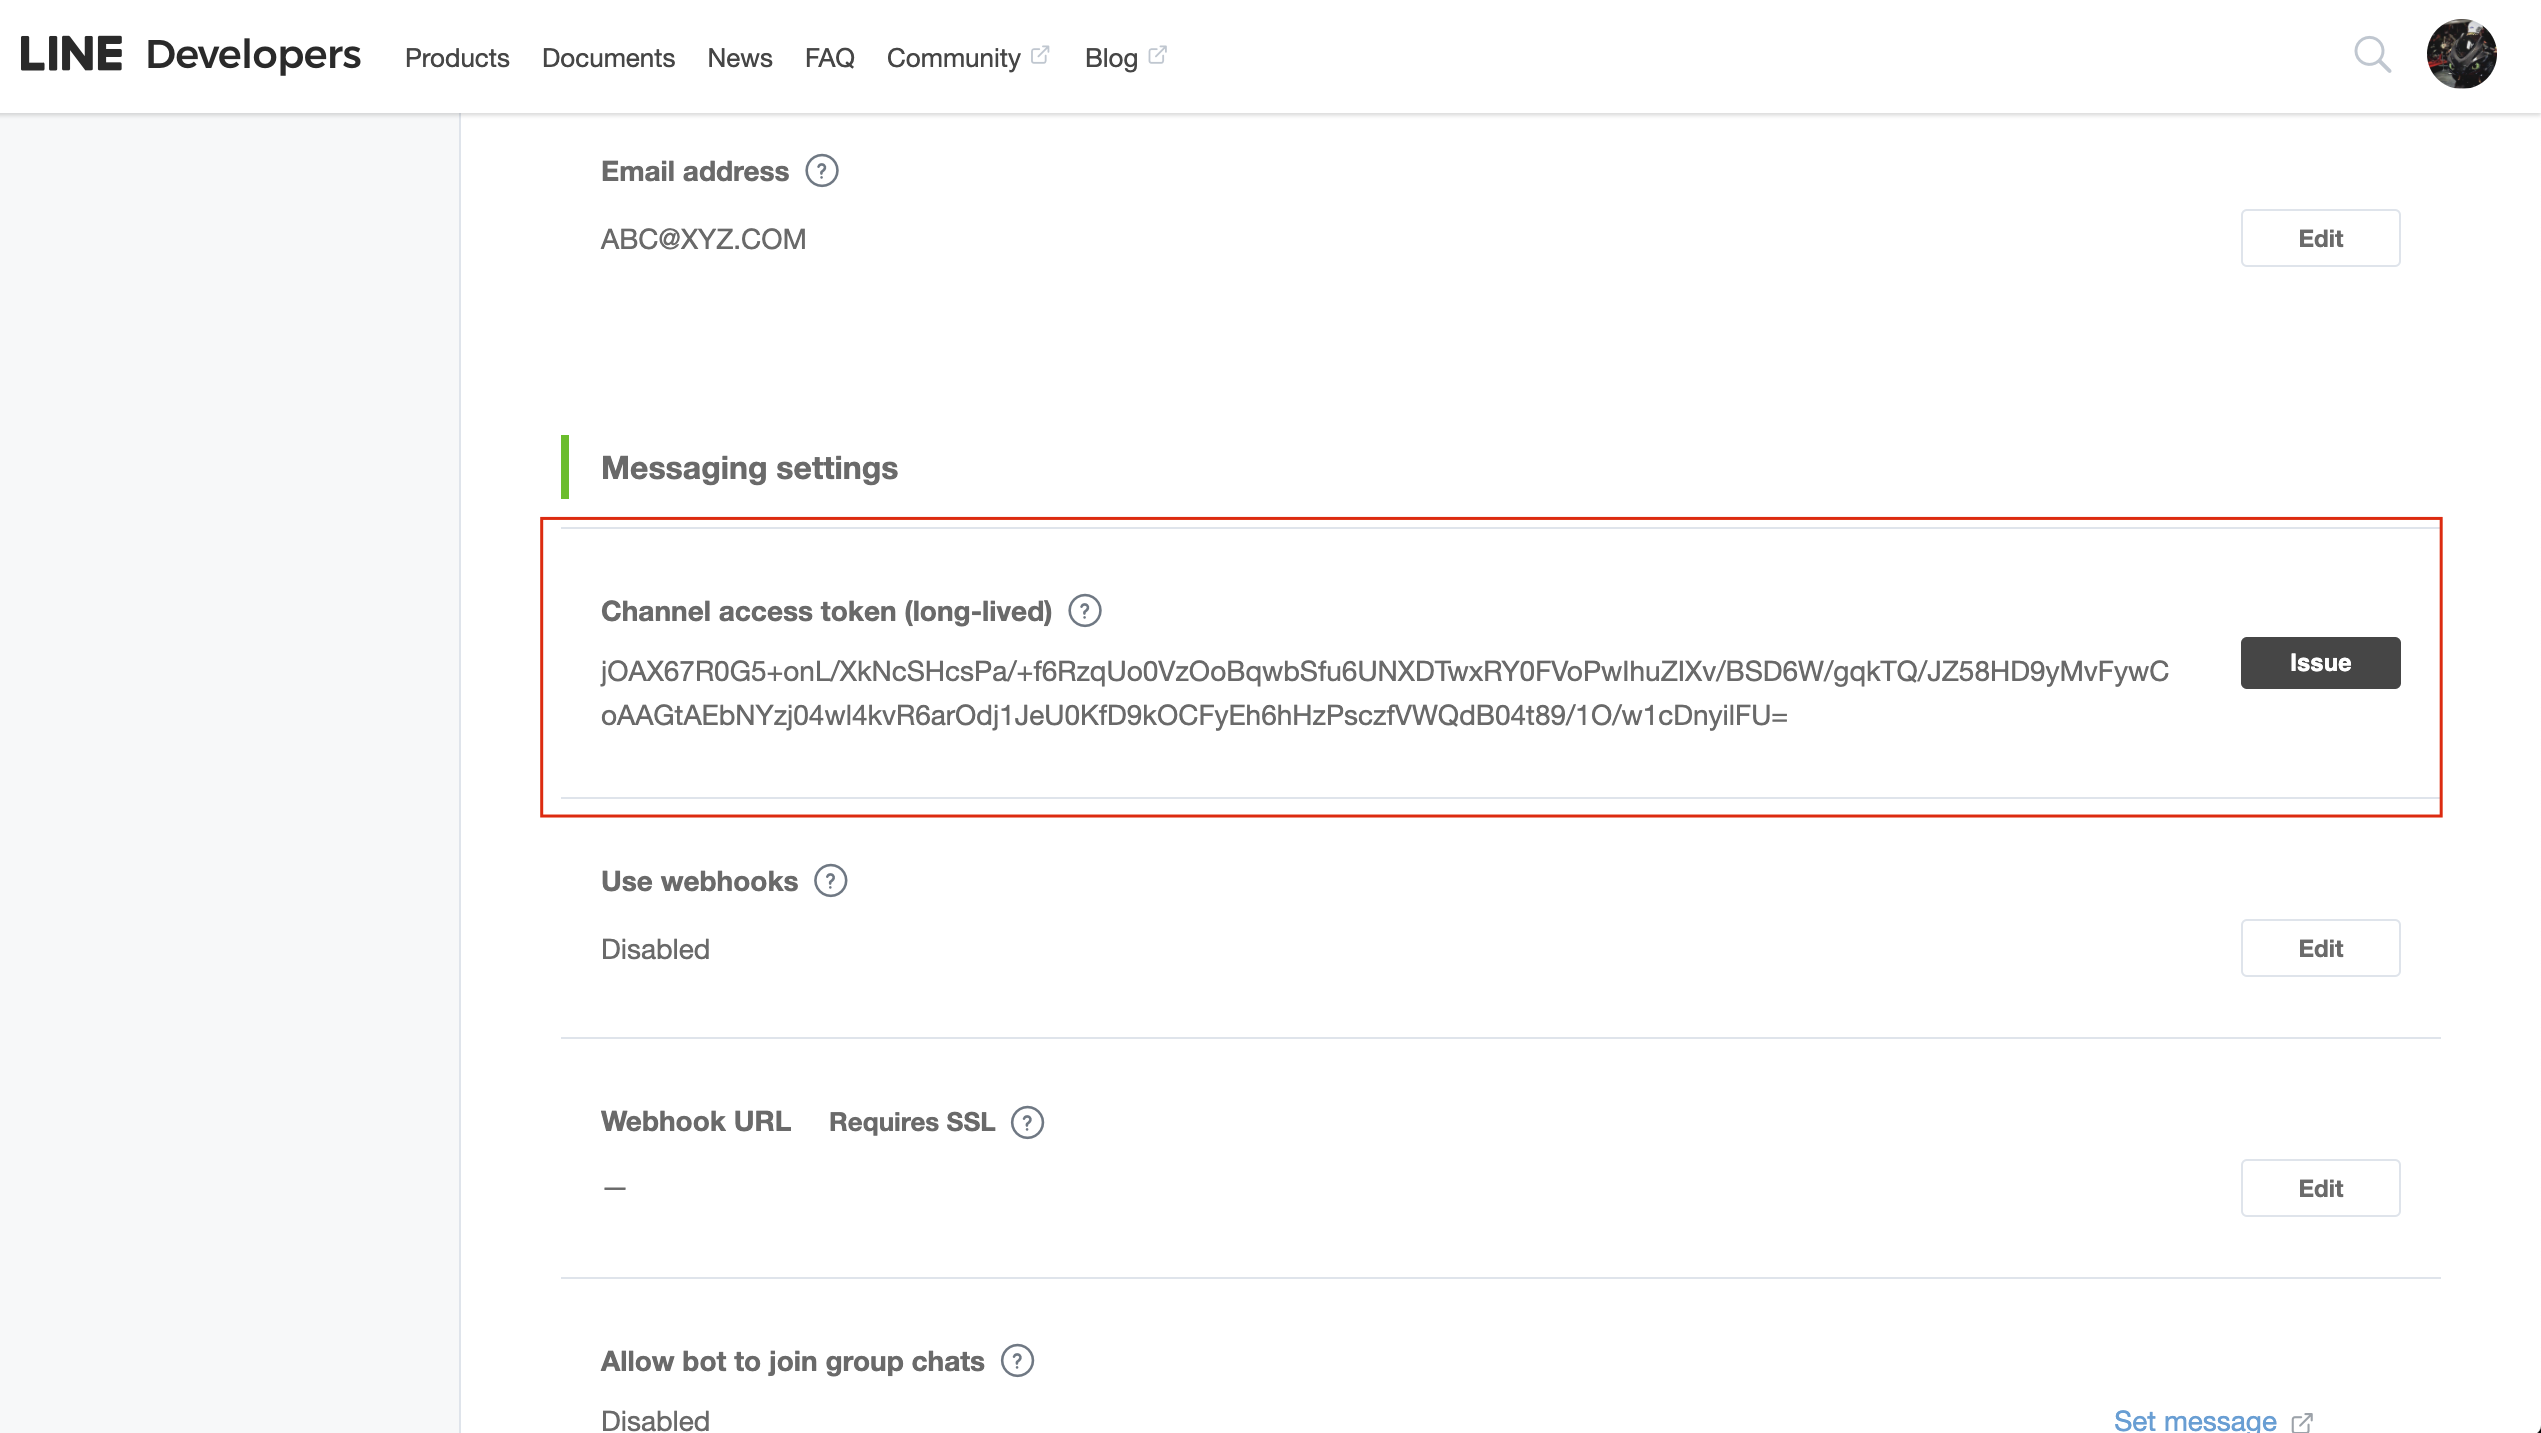
- Copy that Channel Access Token and paste it in Channel Access Token field on triniti.ai page
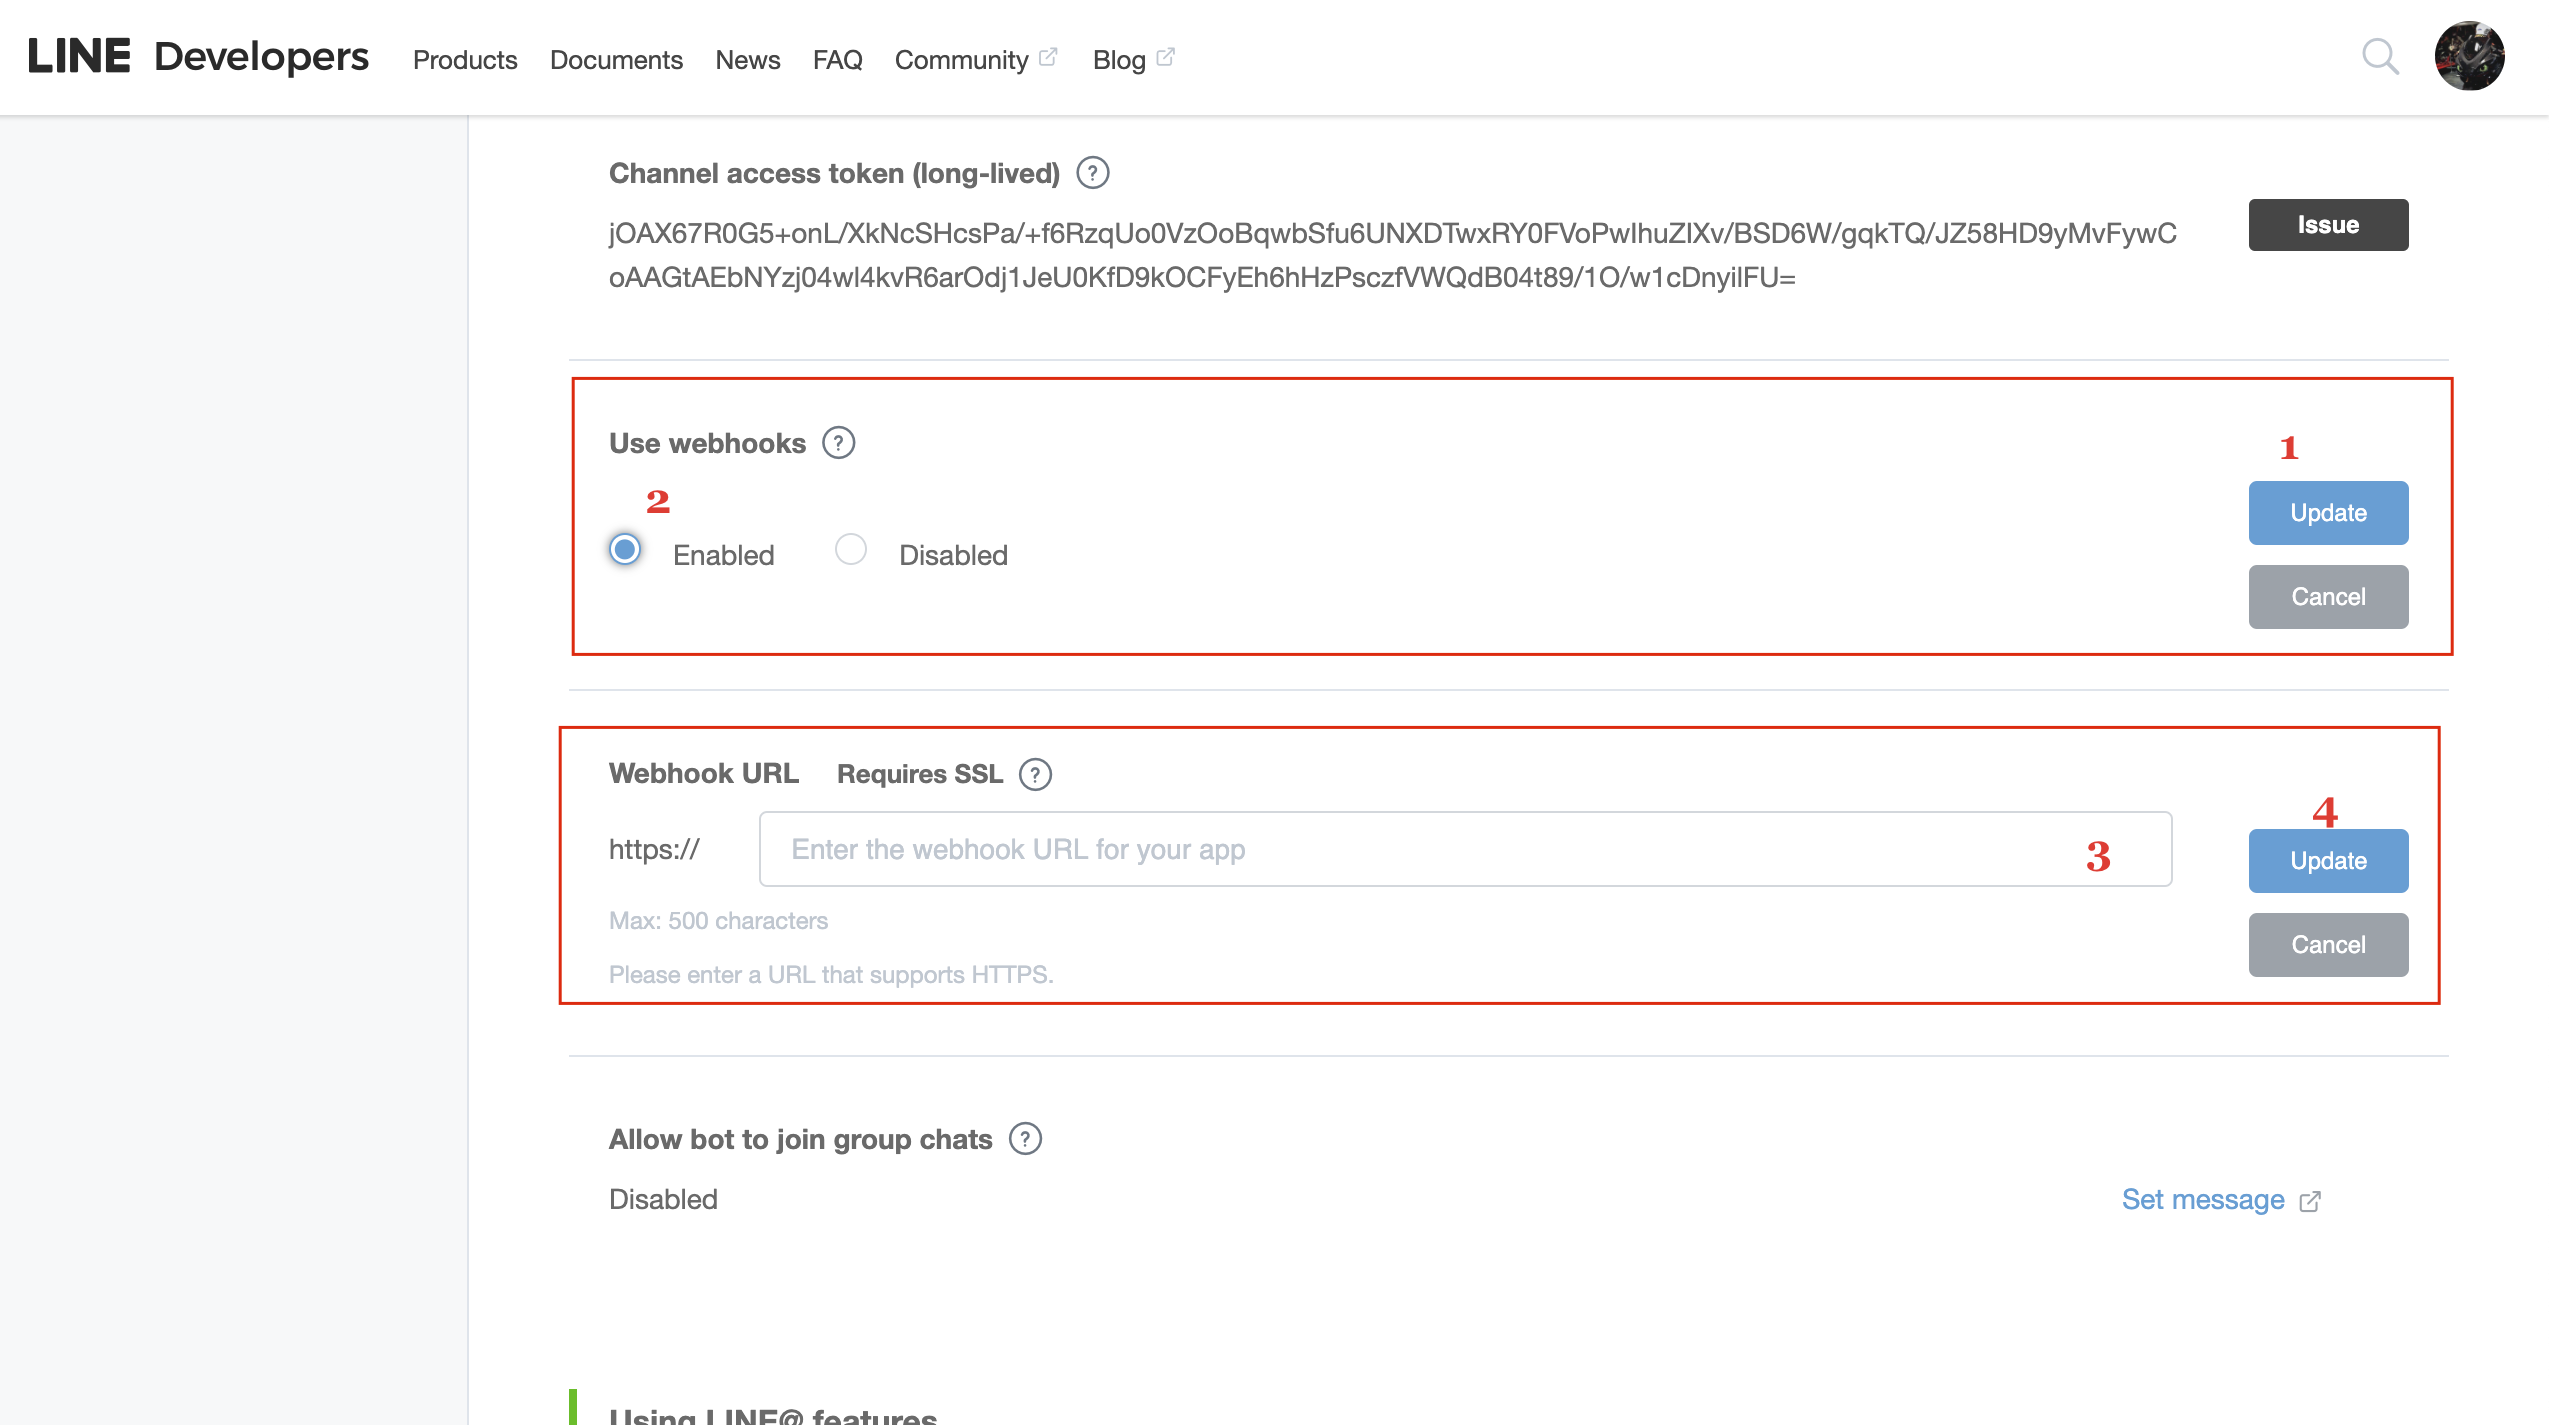
- Below that click update under "Use Webhooks", click on "Enabled"
- Under "Webhook URL", paste the Callback URL copied from triniti.ai page while enabling LINE channel
- Click on Update, click on verify if callback URL is correct it will show success below to Webhook URL otherwise it will show Error.
Note: You need to save 'channel access token' and 'secret key' on triniti.ai page while enabling the channel, before pasting the Webhook URL
- You need to disable "Auto-reply messages" and Greeting messages
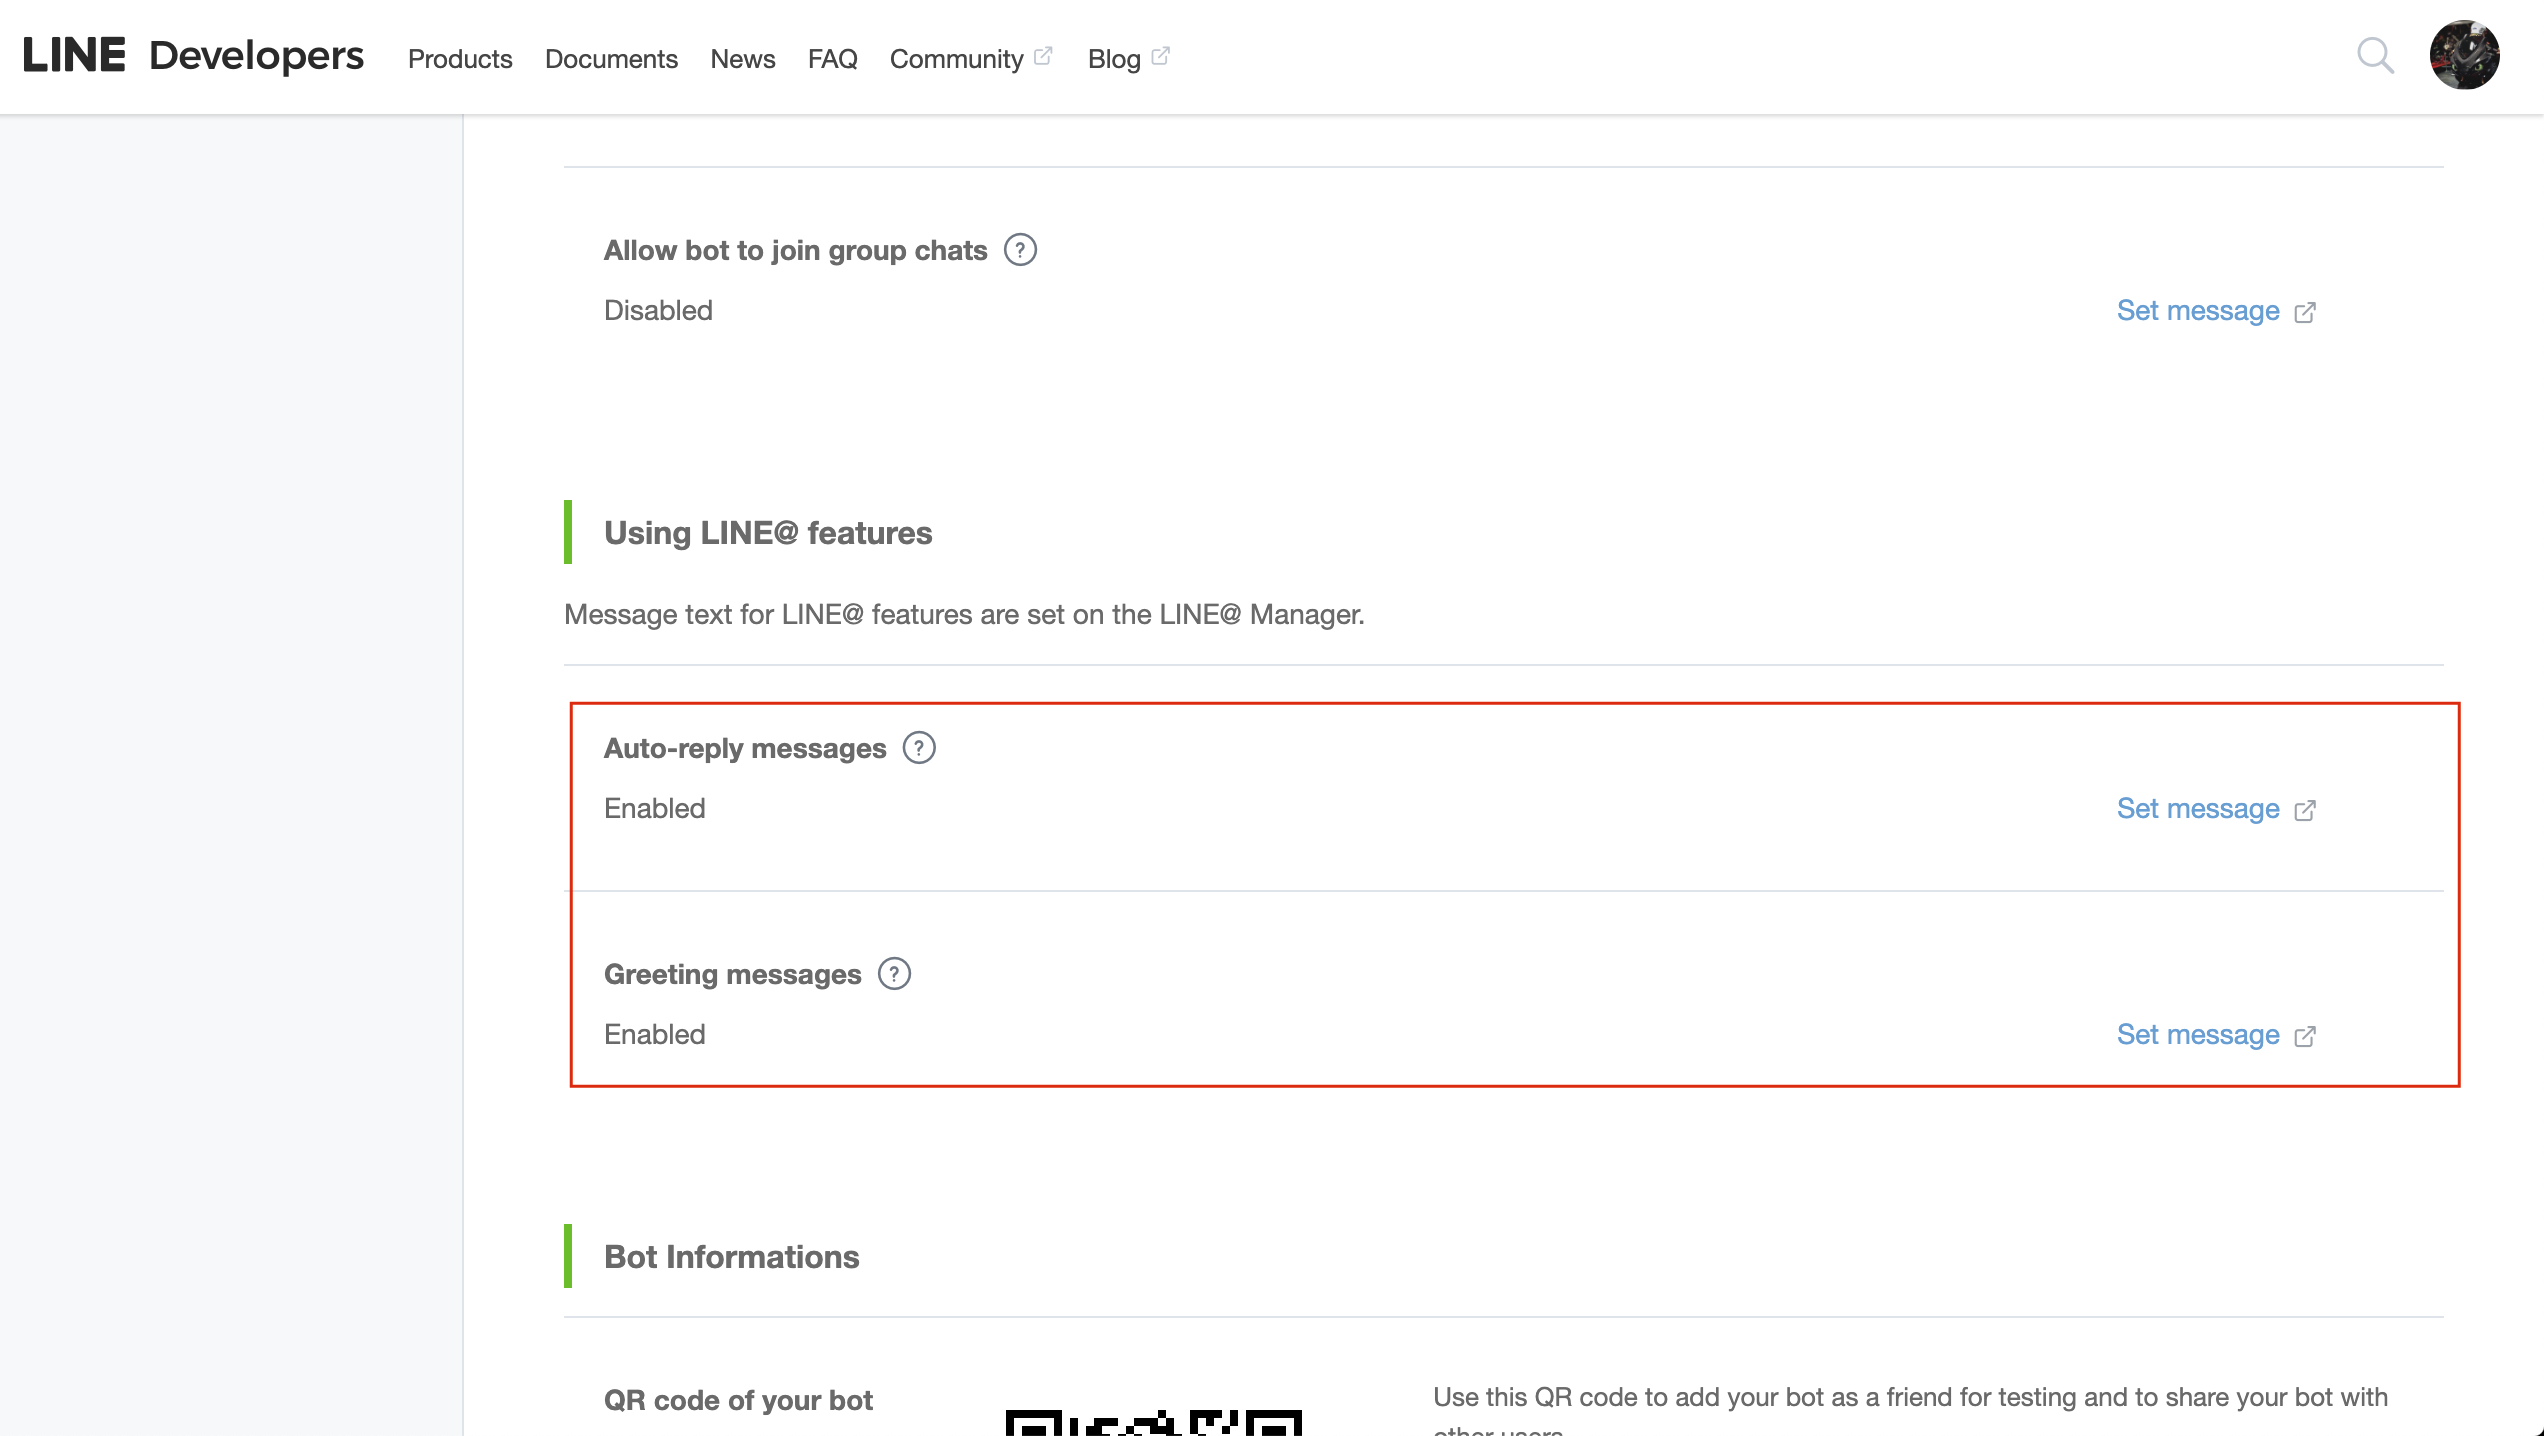
- Click on "Set message", you will be redirecte to following page
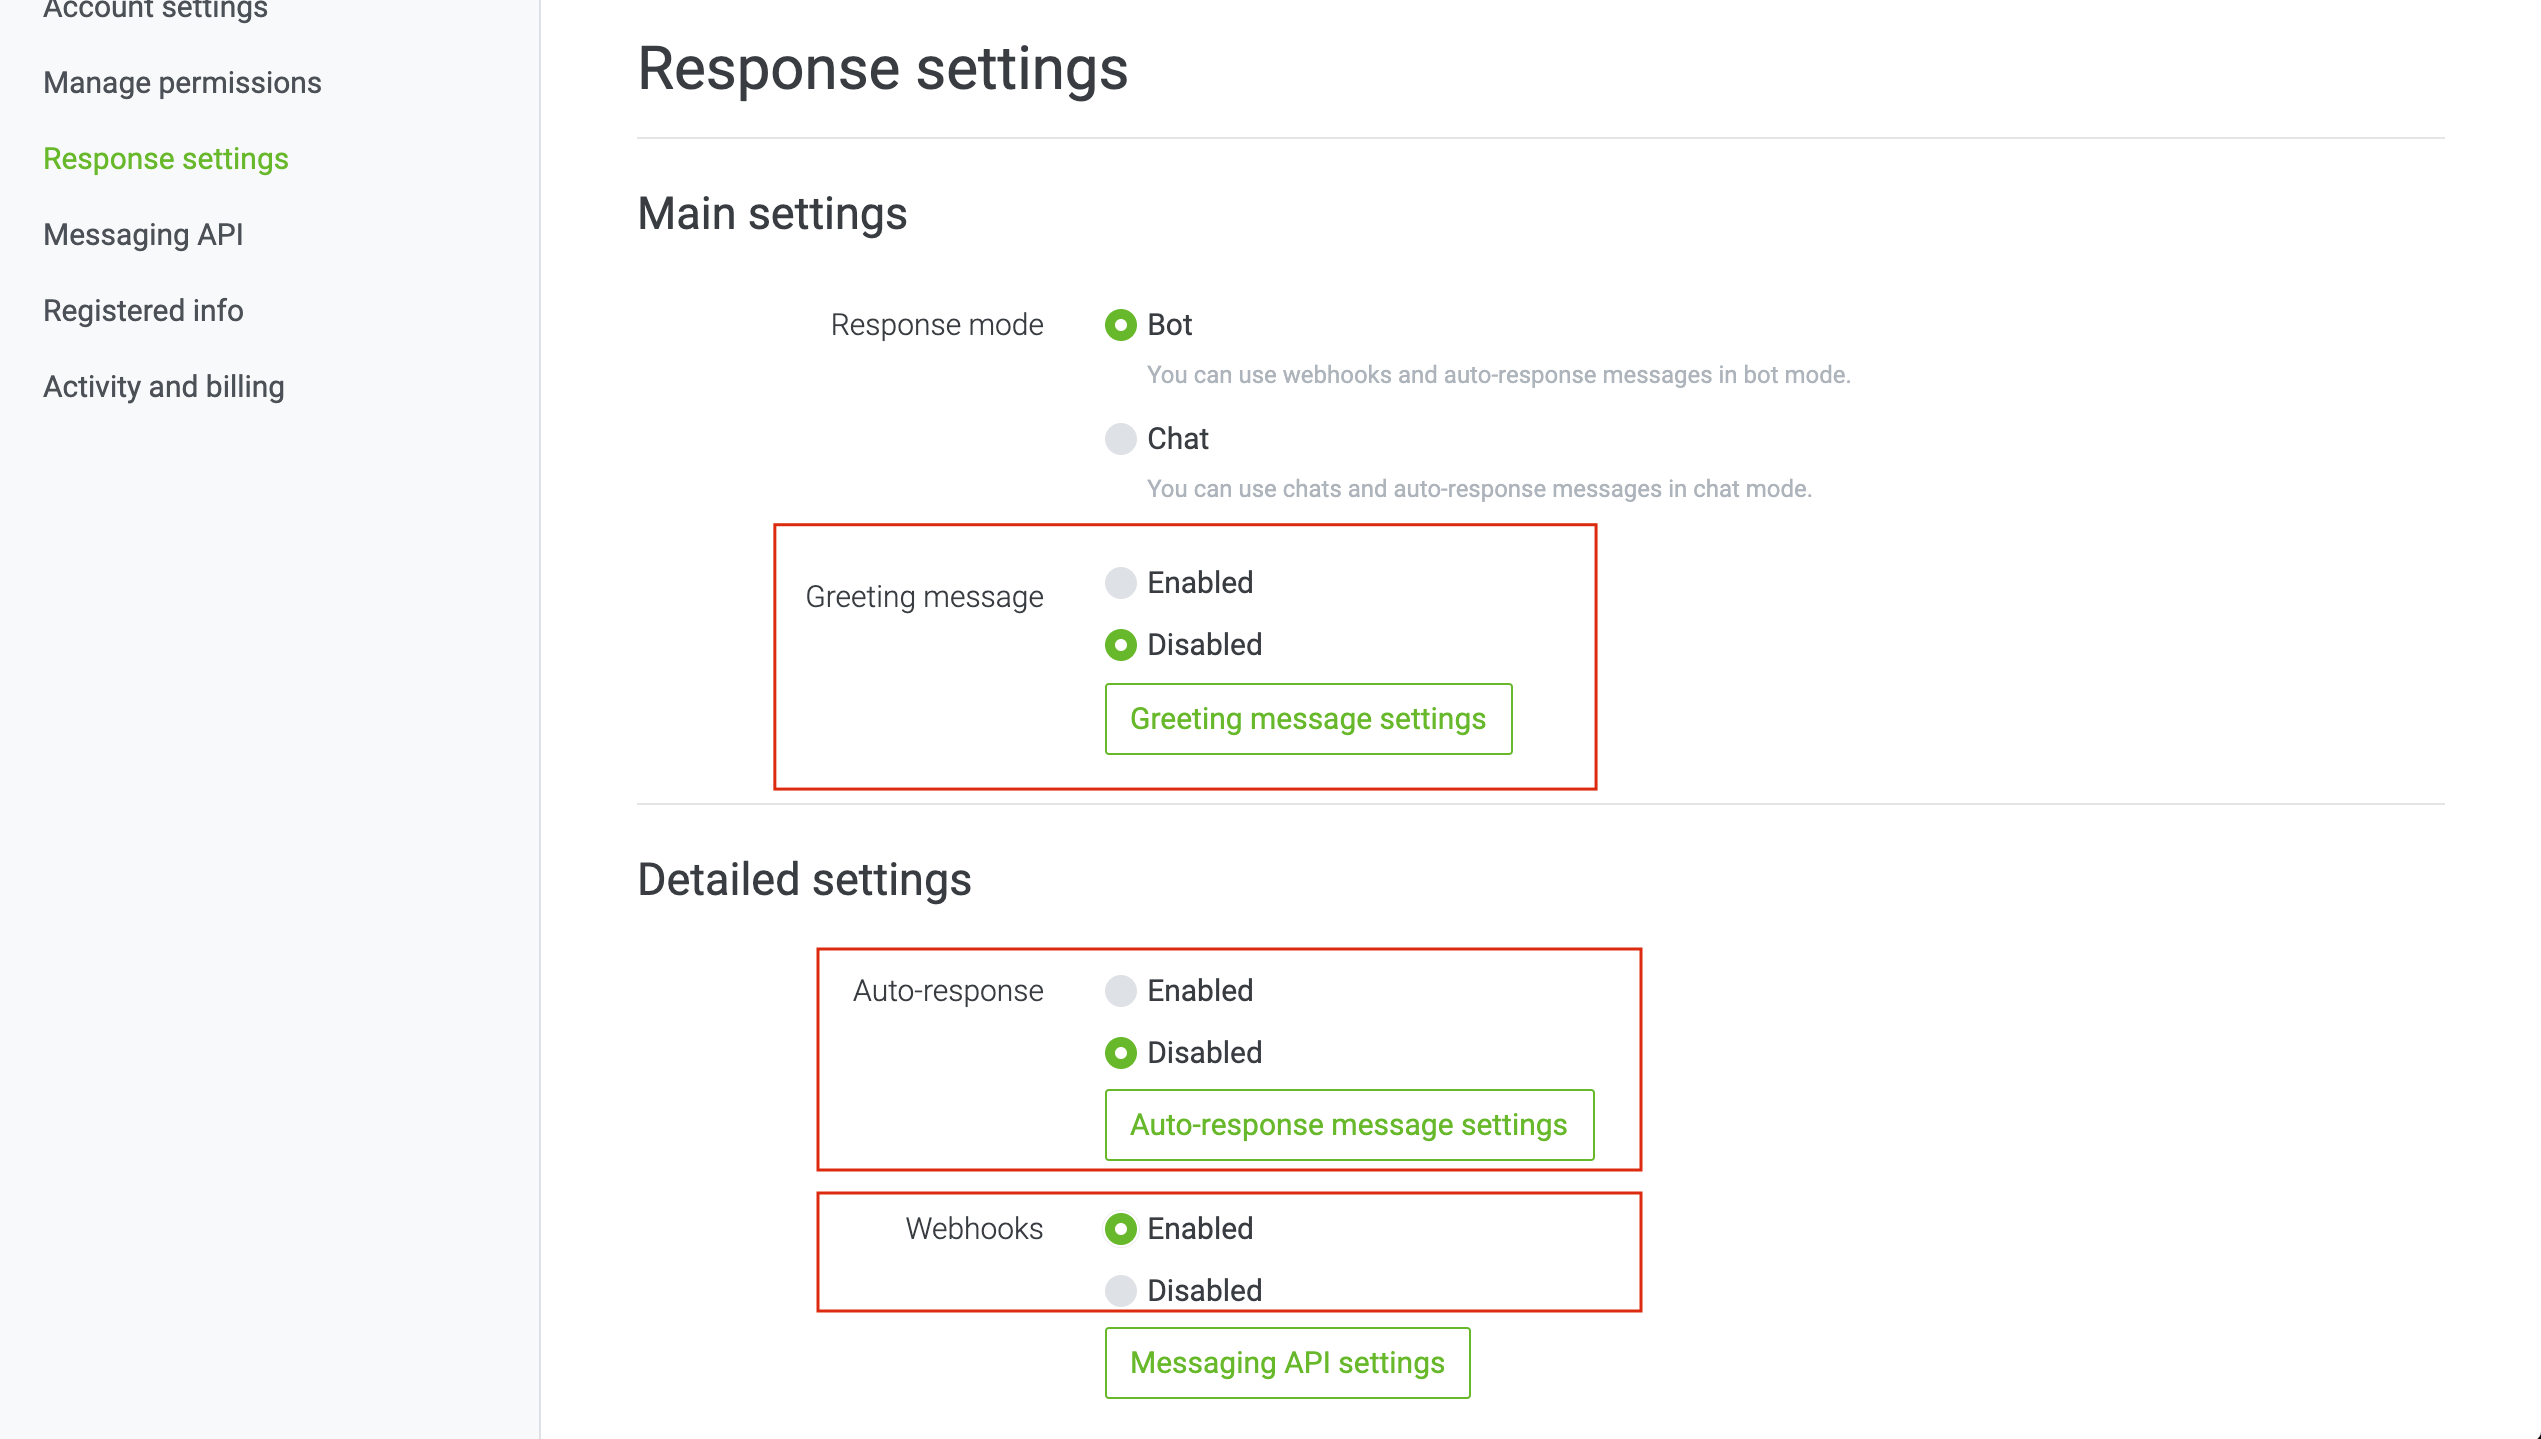
- Disable Greeting message, Disable Auto-response and Enable webhooks
Congratulations! Your bot has been successfully created.
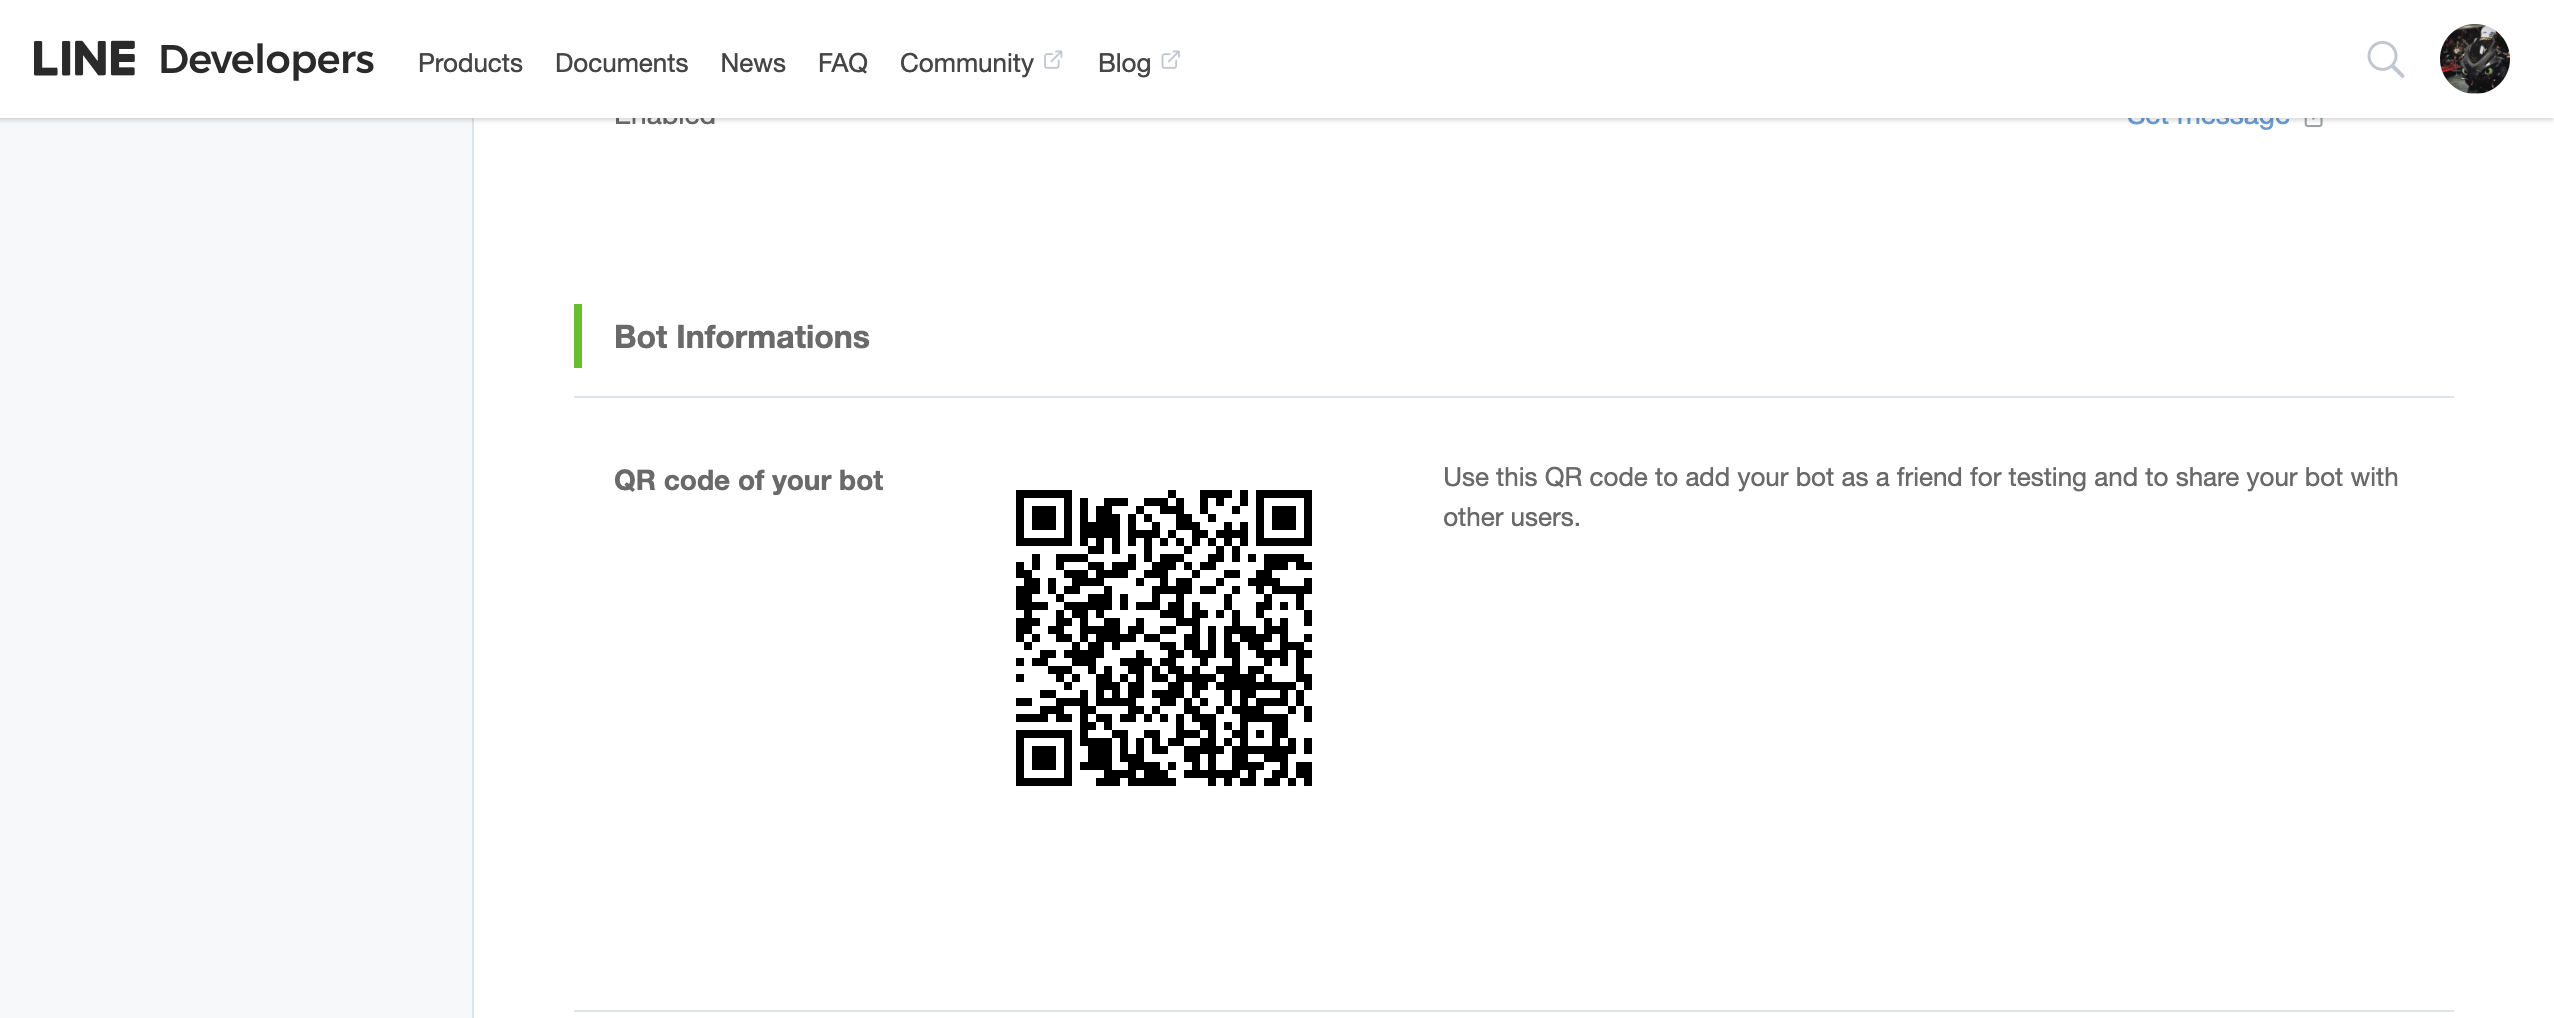
- Go back to previous page (Developer portal), Scroll down Under Bot Informations, Scan the QR code from your LINE app to add the bot in your contact list and save this QR to share your bot with friends, you can also share your Basic ID to add in contacts
Managing Telegram
Telegram, is a cloud-based instant messaging and voice over IP service. Users can send messages and exchange photos, videos, stickers, audio and files of any type. We also do support telegram channel, you can enable telegram channel for your bot by following these steps:
Enable Telegram Channel
- Login to triniti.ai page
- Select your workspace
- Goto channels and enable Telegram channel
Create a new Telegram bot
- Go to "Play Store" on your Android phone or "App Store" in your iPhone and install "Telegram" app.
- Open the app, follow the required steps and create a telegram account.
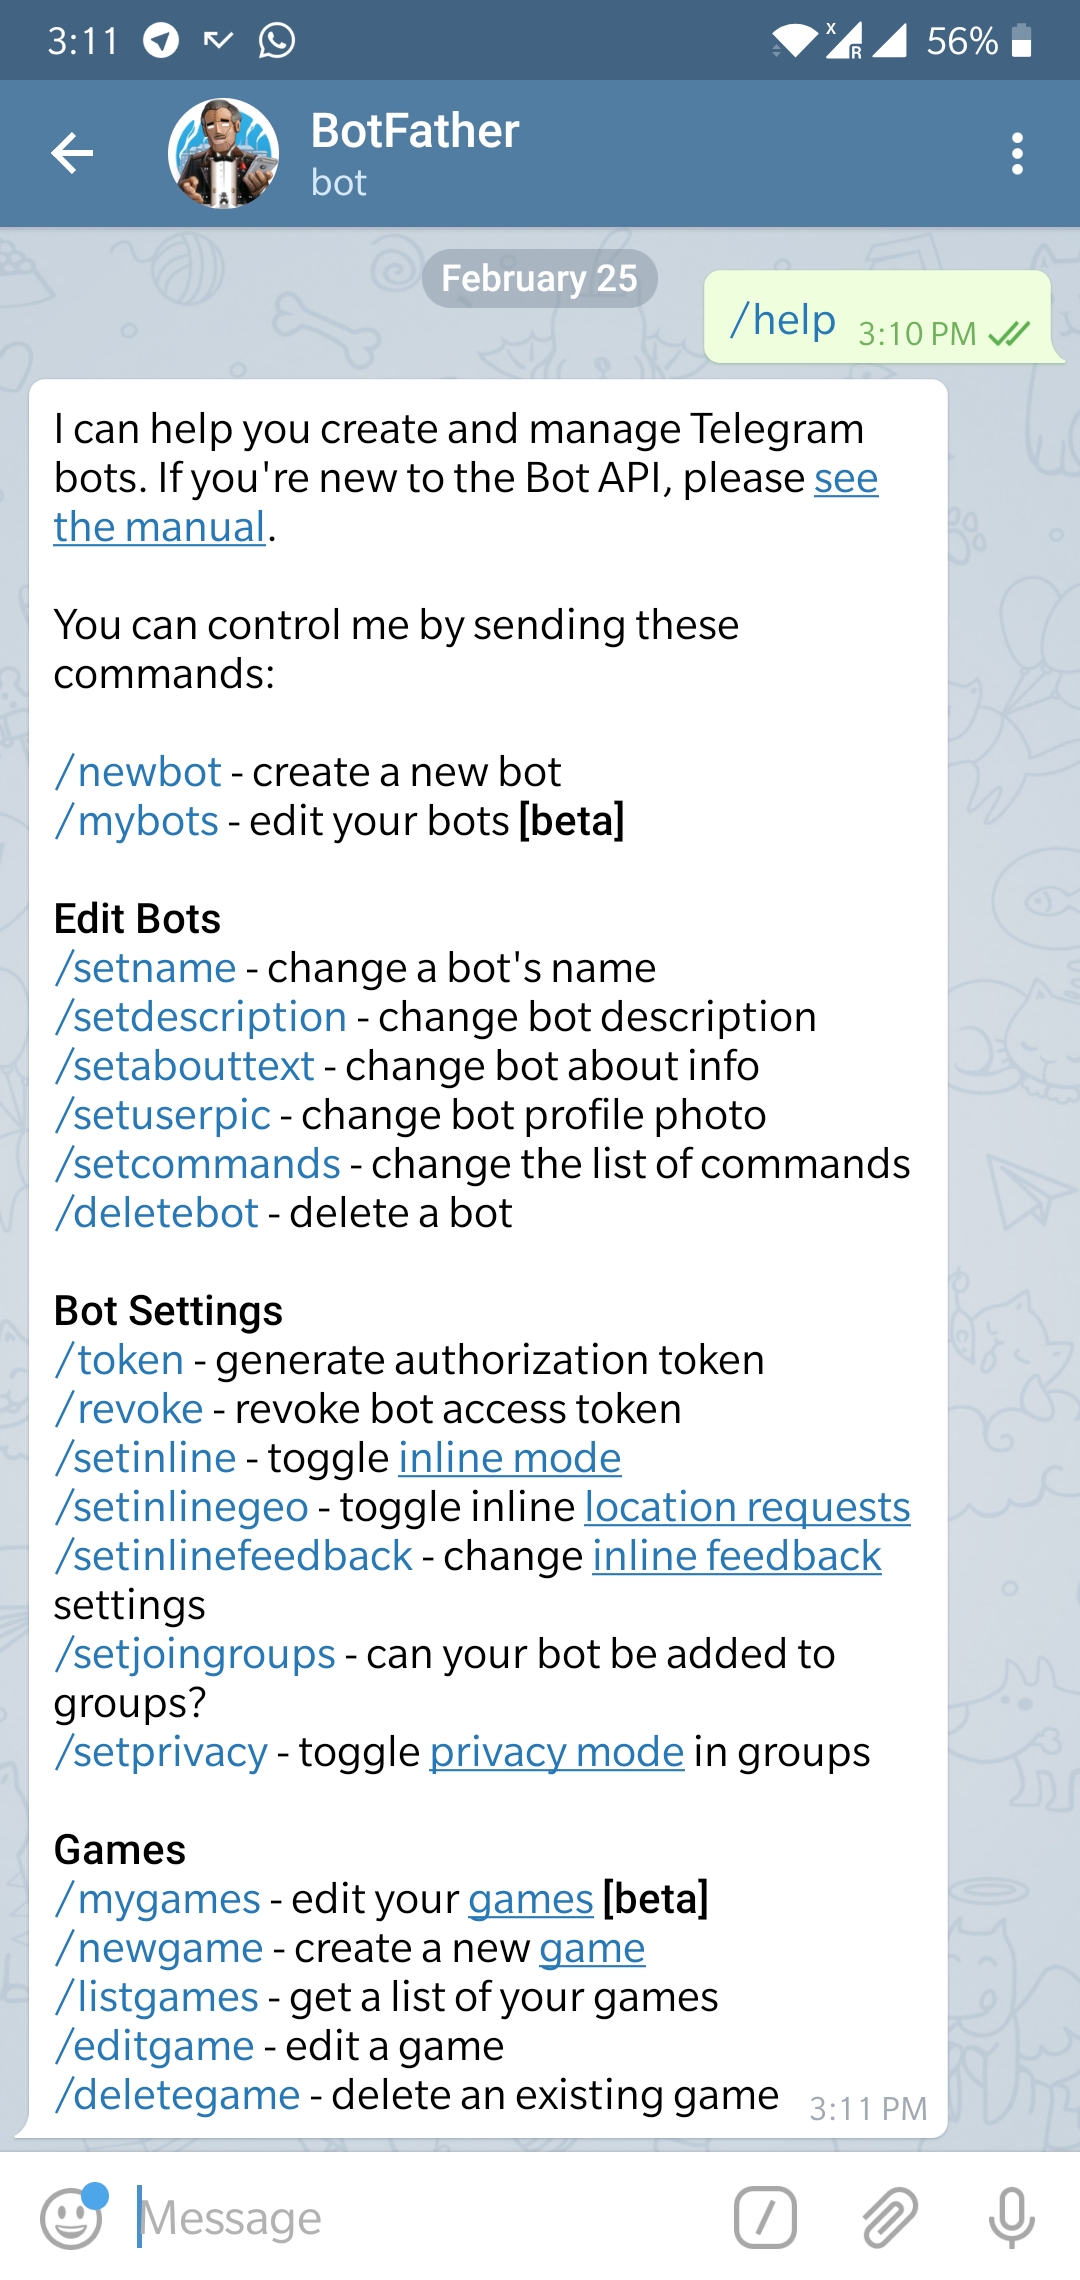
- Go to the telegram search bar on your phone and search for the “botfather” telegram bot (he’s the one that’ll assist you with creating and managing your bot).
- Type "/help" to see all possible commands the botfather can handle.
- Click on or type "/newbot" to create a new bot.
- Follow the instructions and set up "Display name" and "Username" for your bot.
Note: The "Display name" and "Username" must end with case-insensitive "bot". For example: "triniti_test_bot", "trinitiBot".
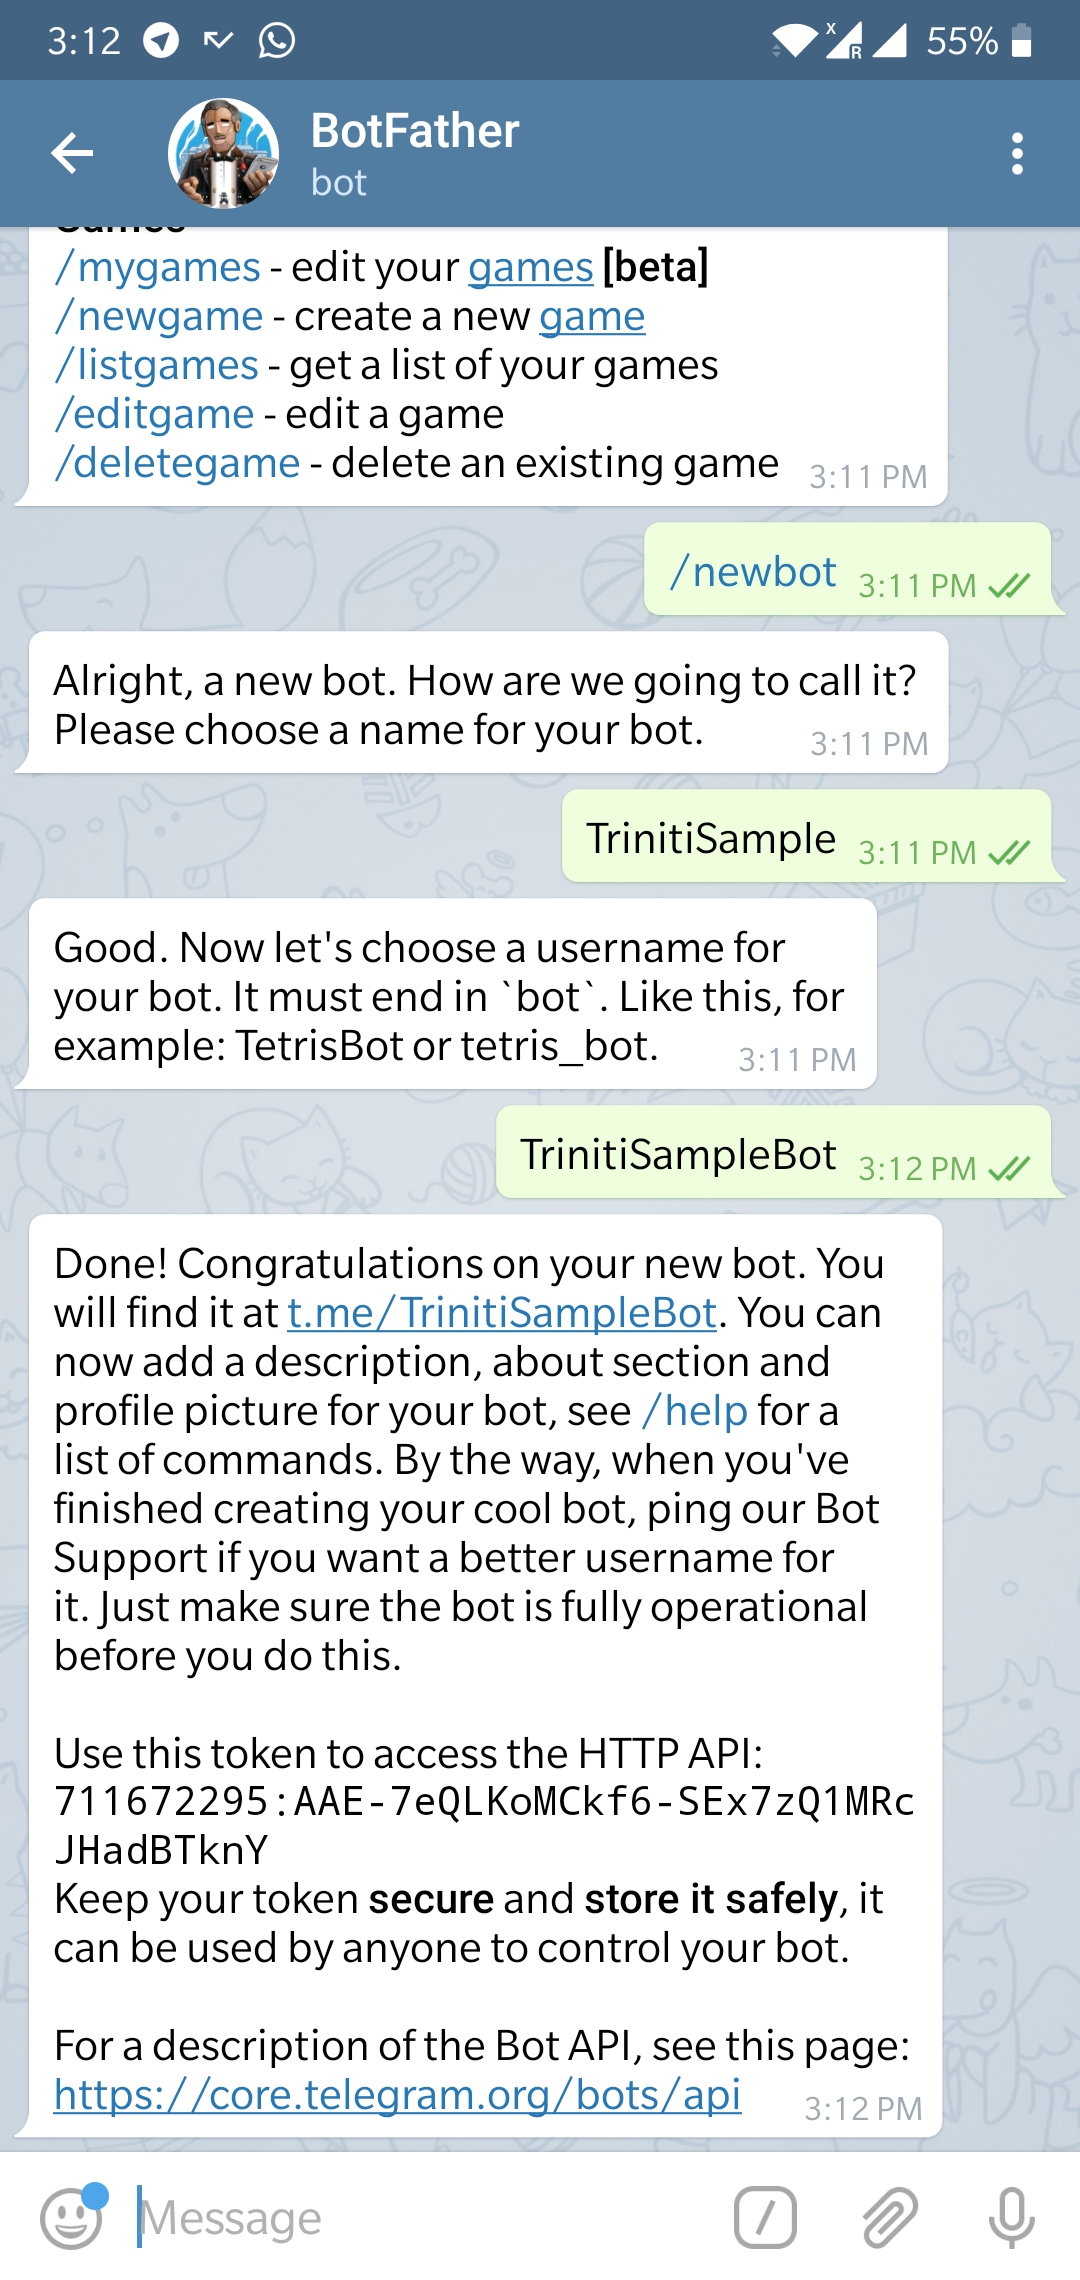
You should see a new API token generated for it Ex; 270485614:AAHfiqksKZ8WmR2zSjiQ7_v4TMAKdiHm9T0 note this token down and keep if safe.
Congratulations! You have created your telegram bot.
- Paste the API token in Telegram token field of telegram channel on triniti.ai
Link your Telegram Bot to Microsoft Bot Framework
- Log in to Microsoft Bot Framework
- Fill all the neccessary details:
- Display Name
- Bot handle
- Description
- Enter the 'Callback URL' copied from triniti.ai page, while enabling channel and paste it in 'Message endpoint' under Configuration
- Enable Streaming Endpoint and click on 'Create Microsoft App ID and password'
- You will be redirected to Azure portal
- Click on 'New registration' under App registrations, to register your bot on botframework
- Provide all the neccessary details and click on register
- Copy the Application id and go back to Bot framework portal
- Paste the Application ID under the field "Paste your app ID below to continue" and click on Register
- Select Telegram from Add a Featured channel
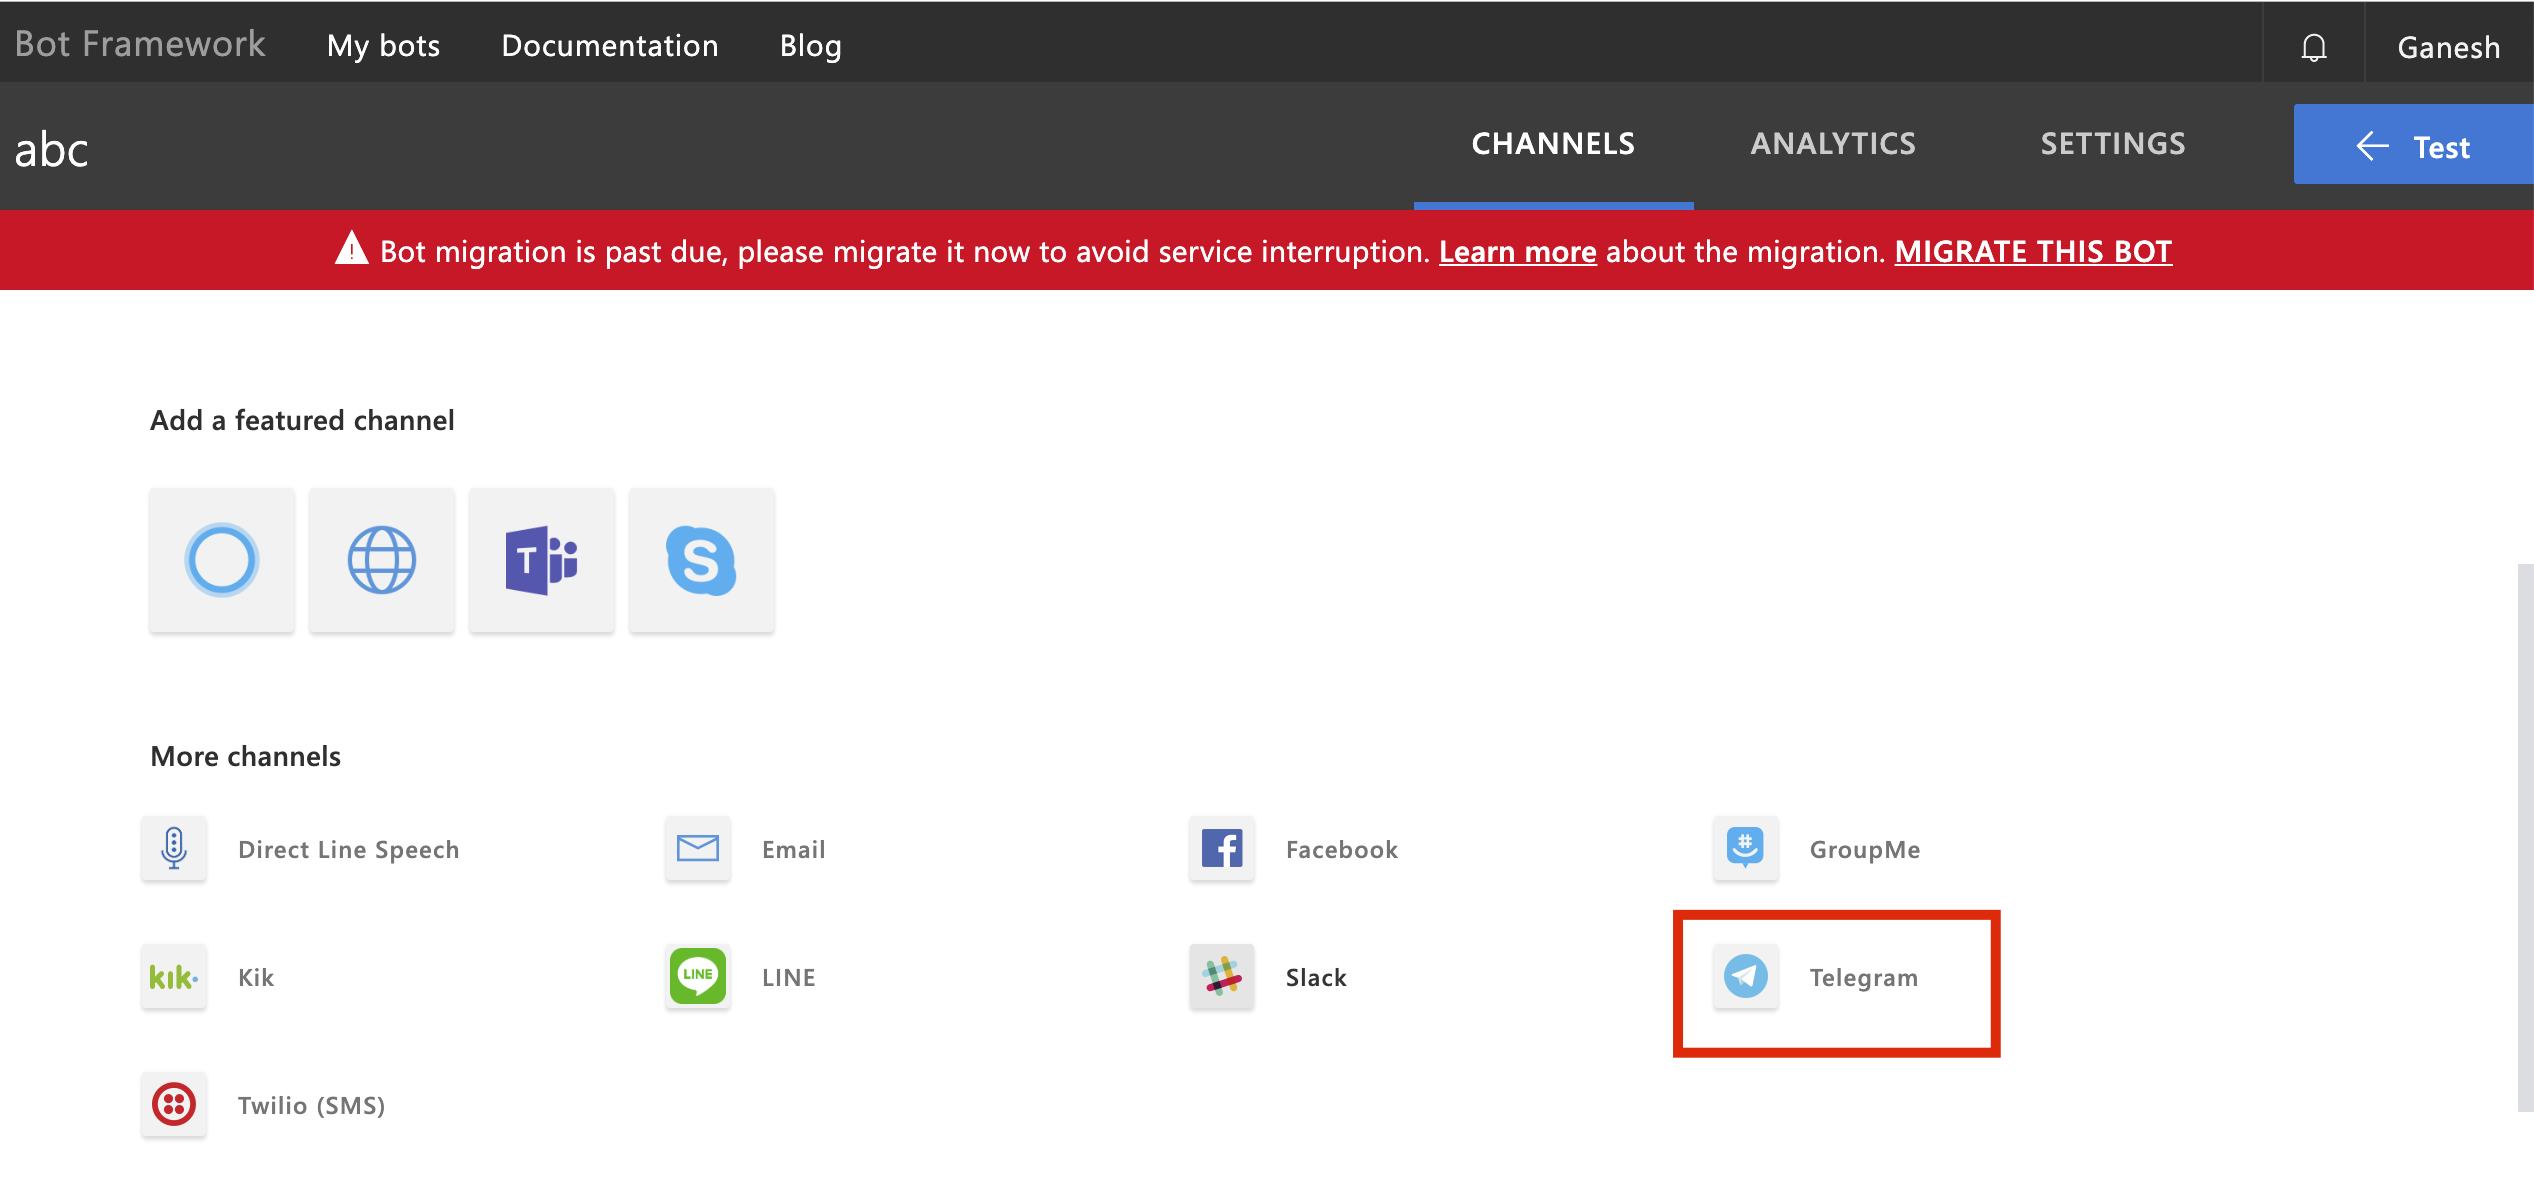
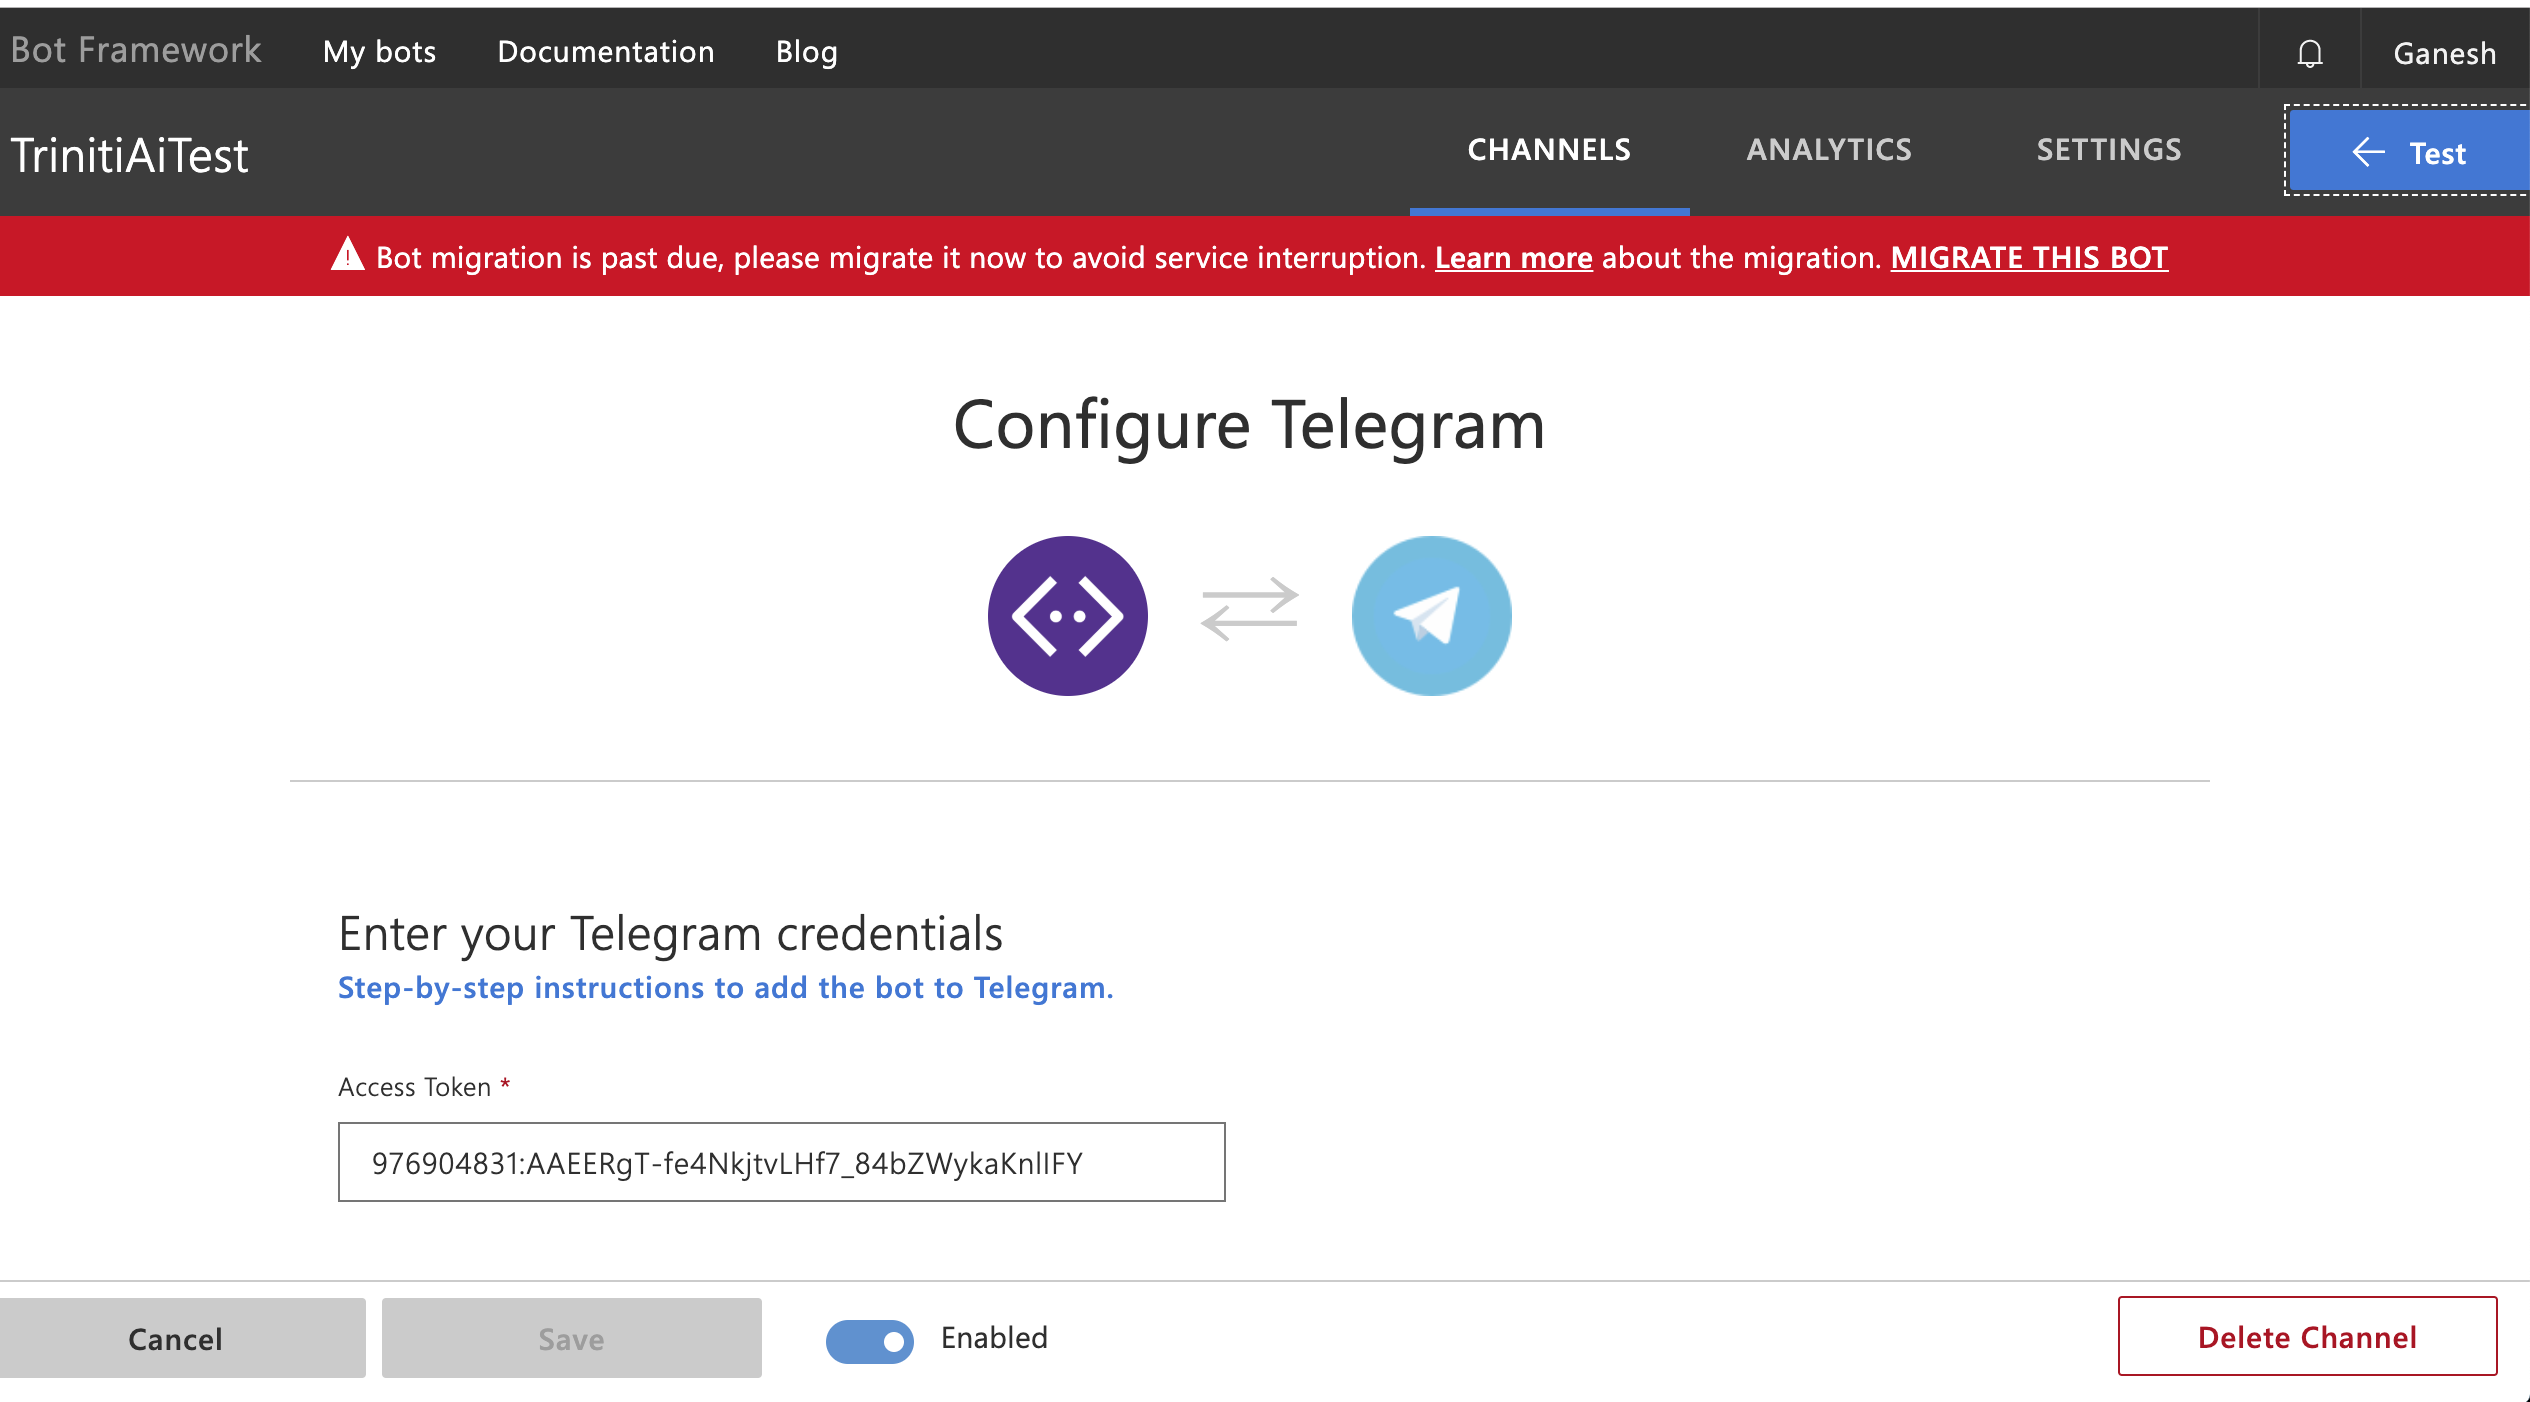
- Click on channels, click on Telegram and paste the Access Token(which you got from botFather) and click on Save
Congratulations! Bot setup is now complete.
Add bot in your Telegram app Search for your newly created bot on Telegram from the search bar by typing: "@Username". Now you can interact with your bot.
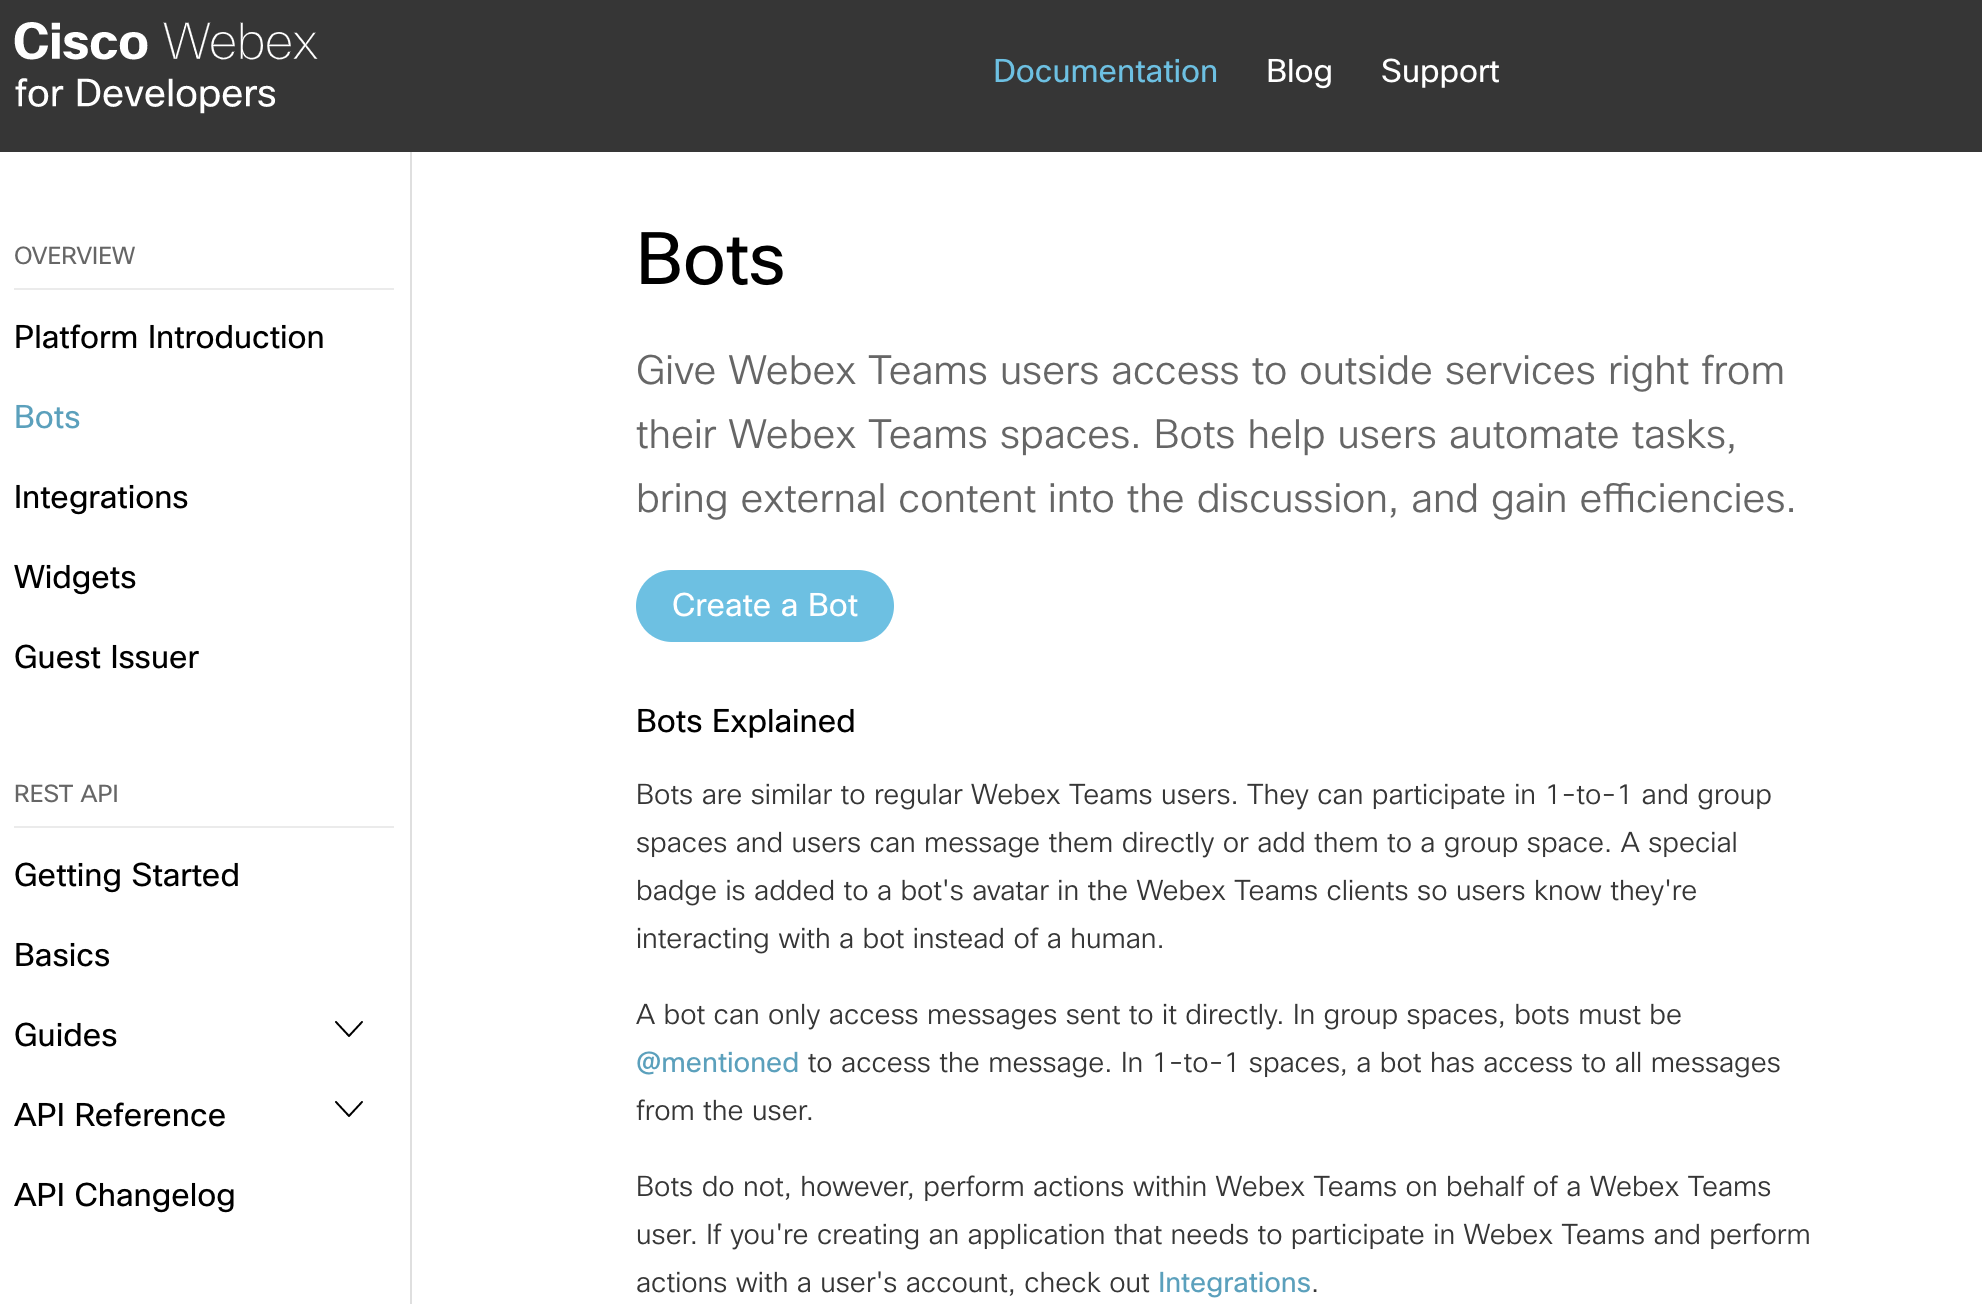
Managing Webex
A Webex meeting is an online meeting that allows you to virtually meet with other people, without leaving your home or office. We are also supporting the Webex channel for the bot. You can enable & configure the WebEx channel for your bot by following these steps:
Enable Webex on Triniti.ai
- Goto your workspace on triniti.ai portal
- Goto channels
- Enable the Webex channel
Create Webex Bot
- Goto Webex Developer Portal and signup (if you don't have developer account)
- Please enter your email id to initiate your signup process.
- Upon finishing signup you will be redirected to your "Personal Room" dashboard
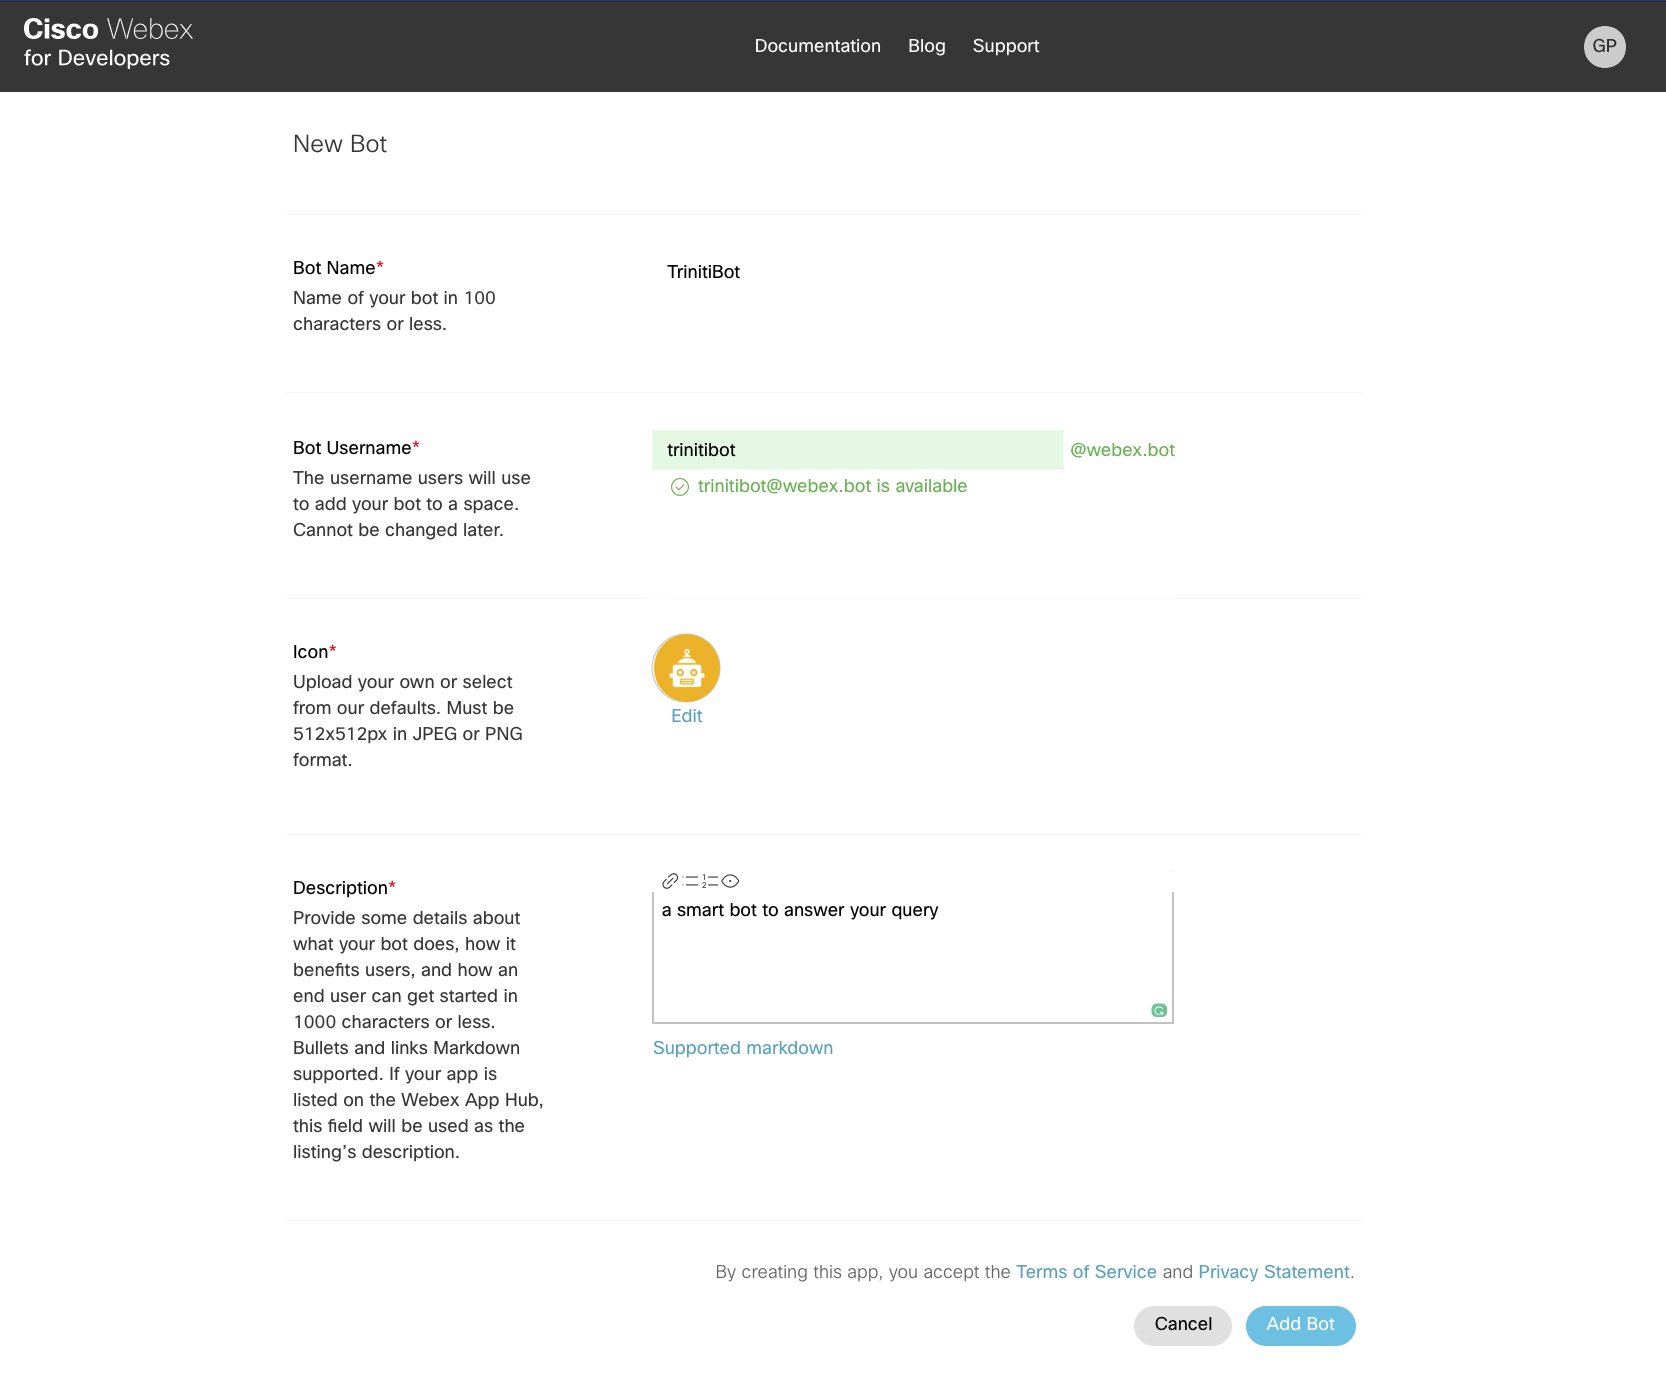
- Now goto Create a Bot portal, you will be redirected to the following page. (Please make sure you are logged in )
- Please click on "Create a Bot" on that page, On the next page please enter all the mandatory details about your bot and click on 'Add Bot'.
- Once bot successfully created, you will be redirected to a page where you will get the required details to configure your bot with trinit.ai
- Please copy the 'Bot's Access token' & paste in 'Webex Auth Token' on triniti.ai
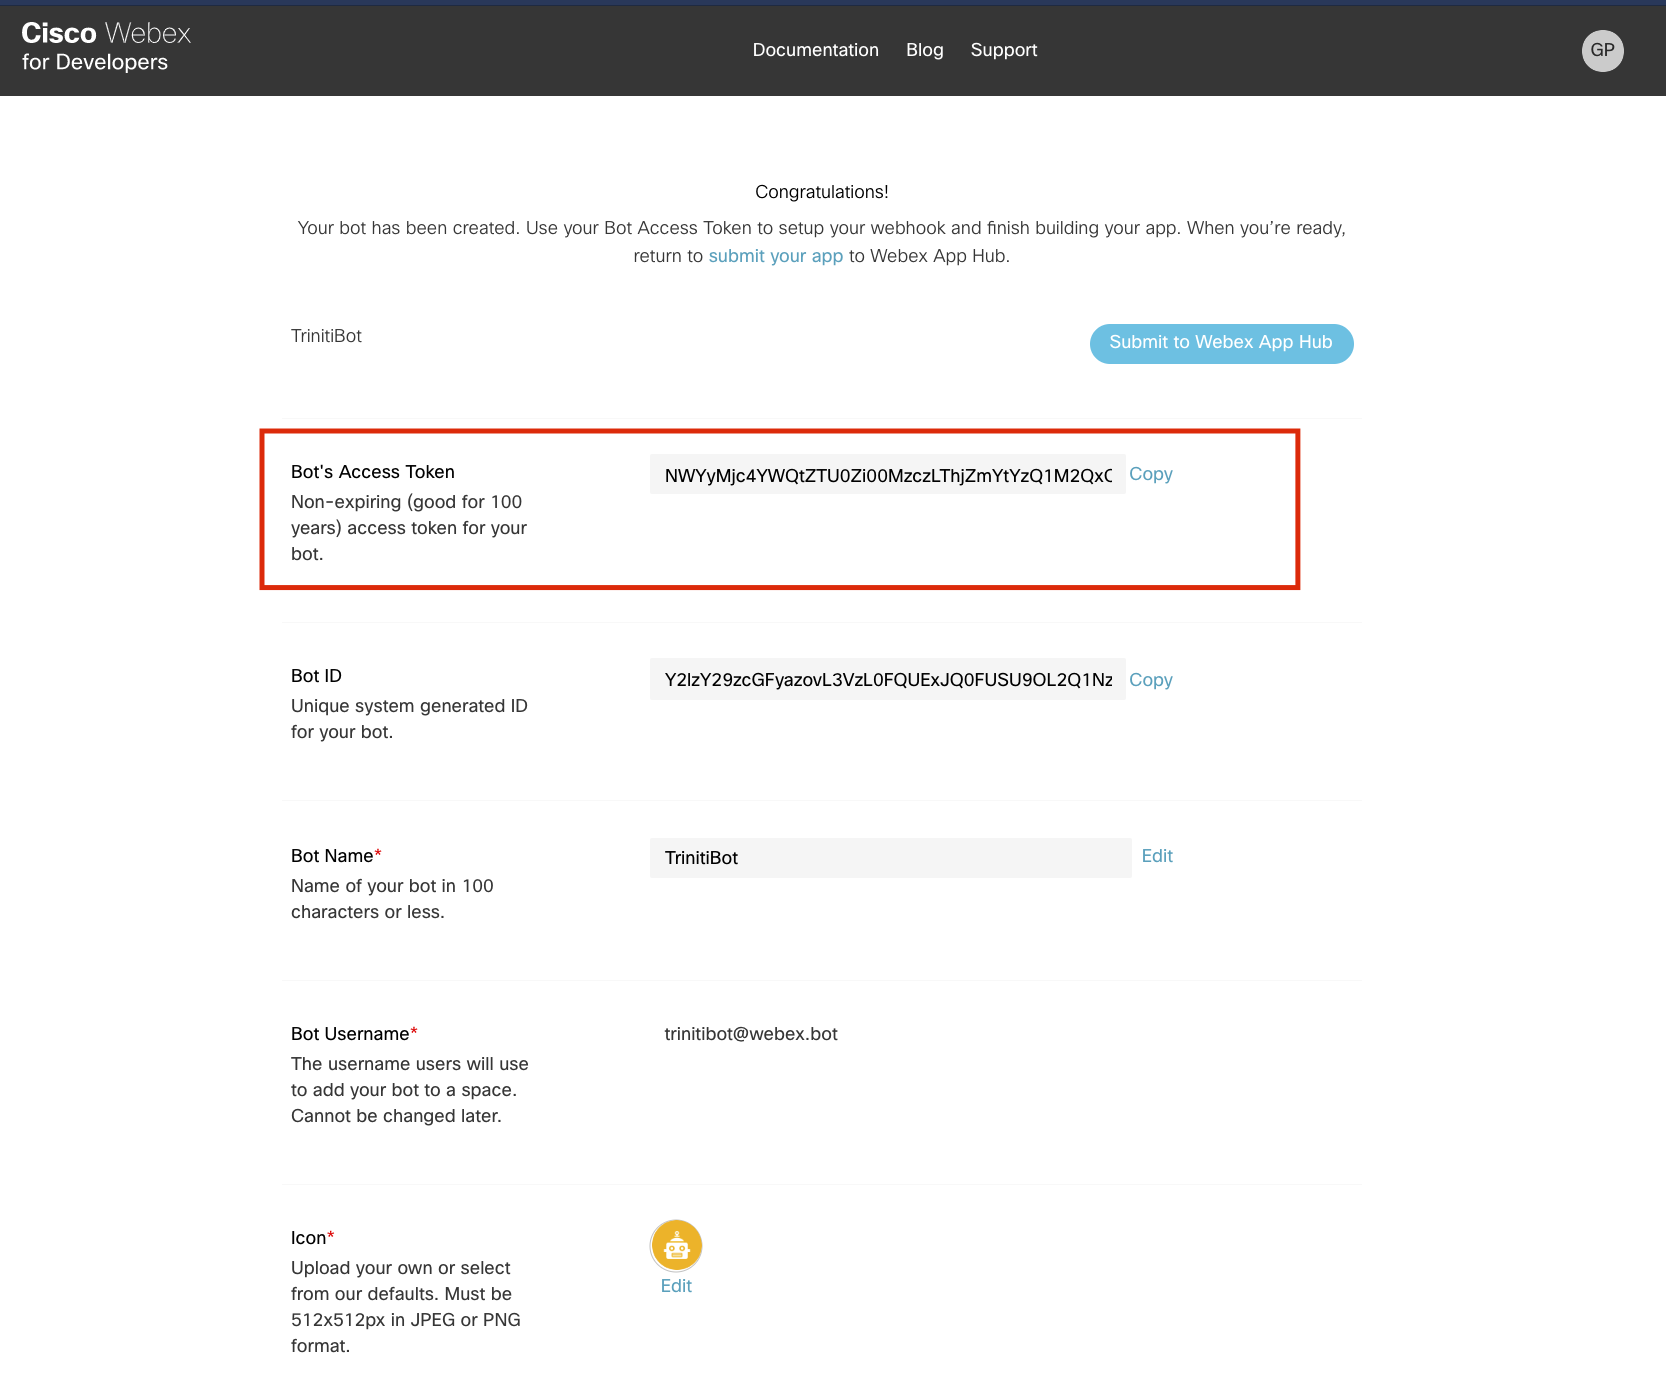
- Copy 'Bot Username' and paste in 'Bot Username' on triniti.ai
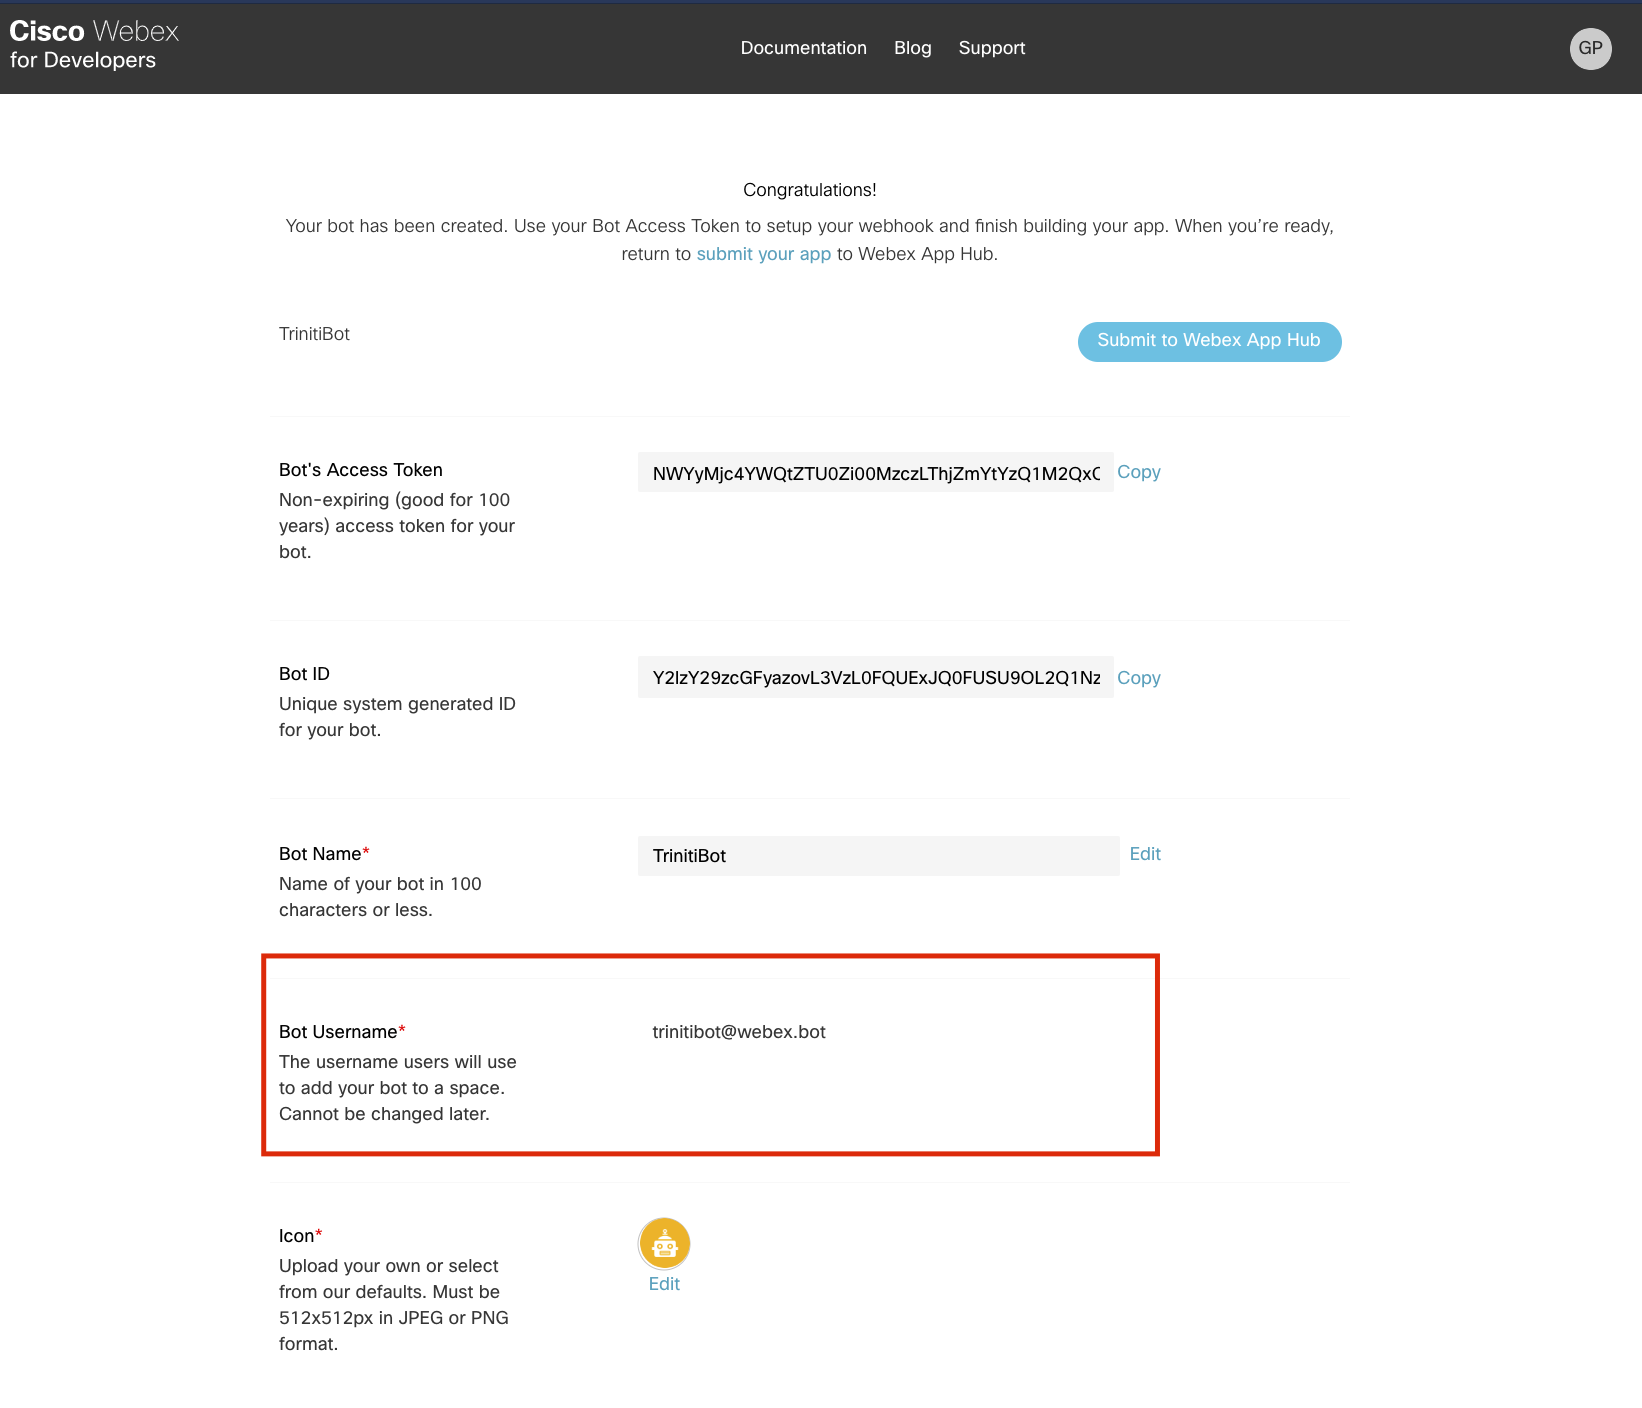
- Copy 'Bot Name' and paste in 'Bot Name' on triniti.ai
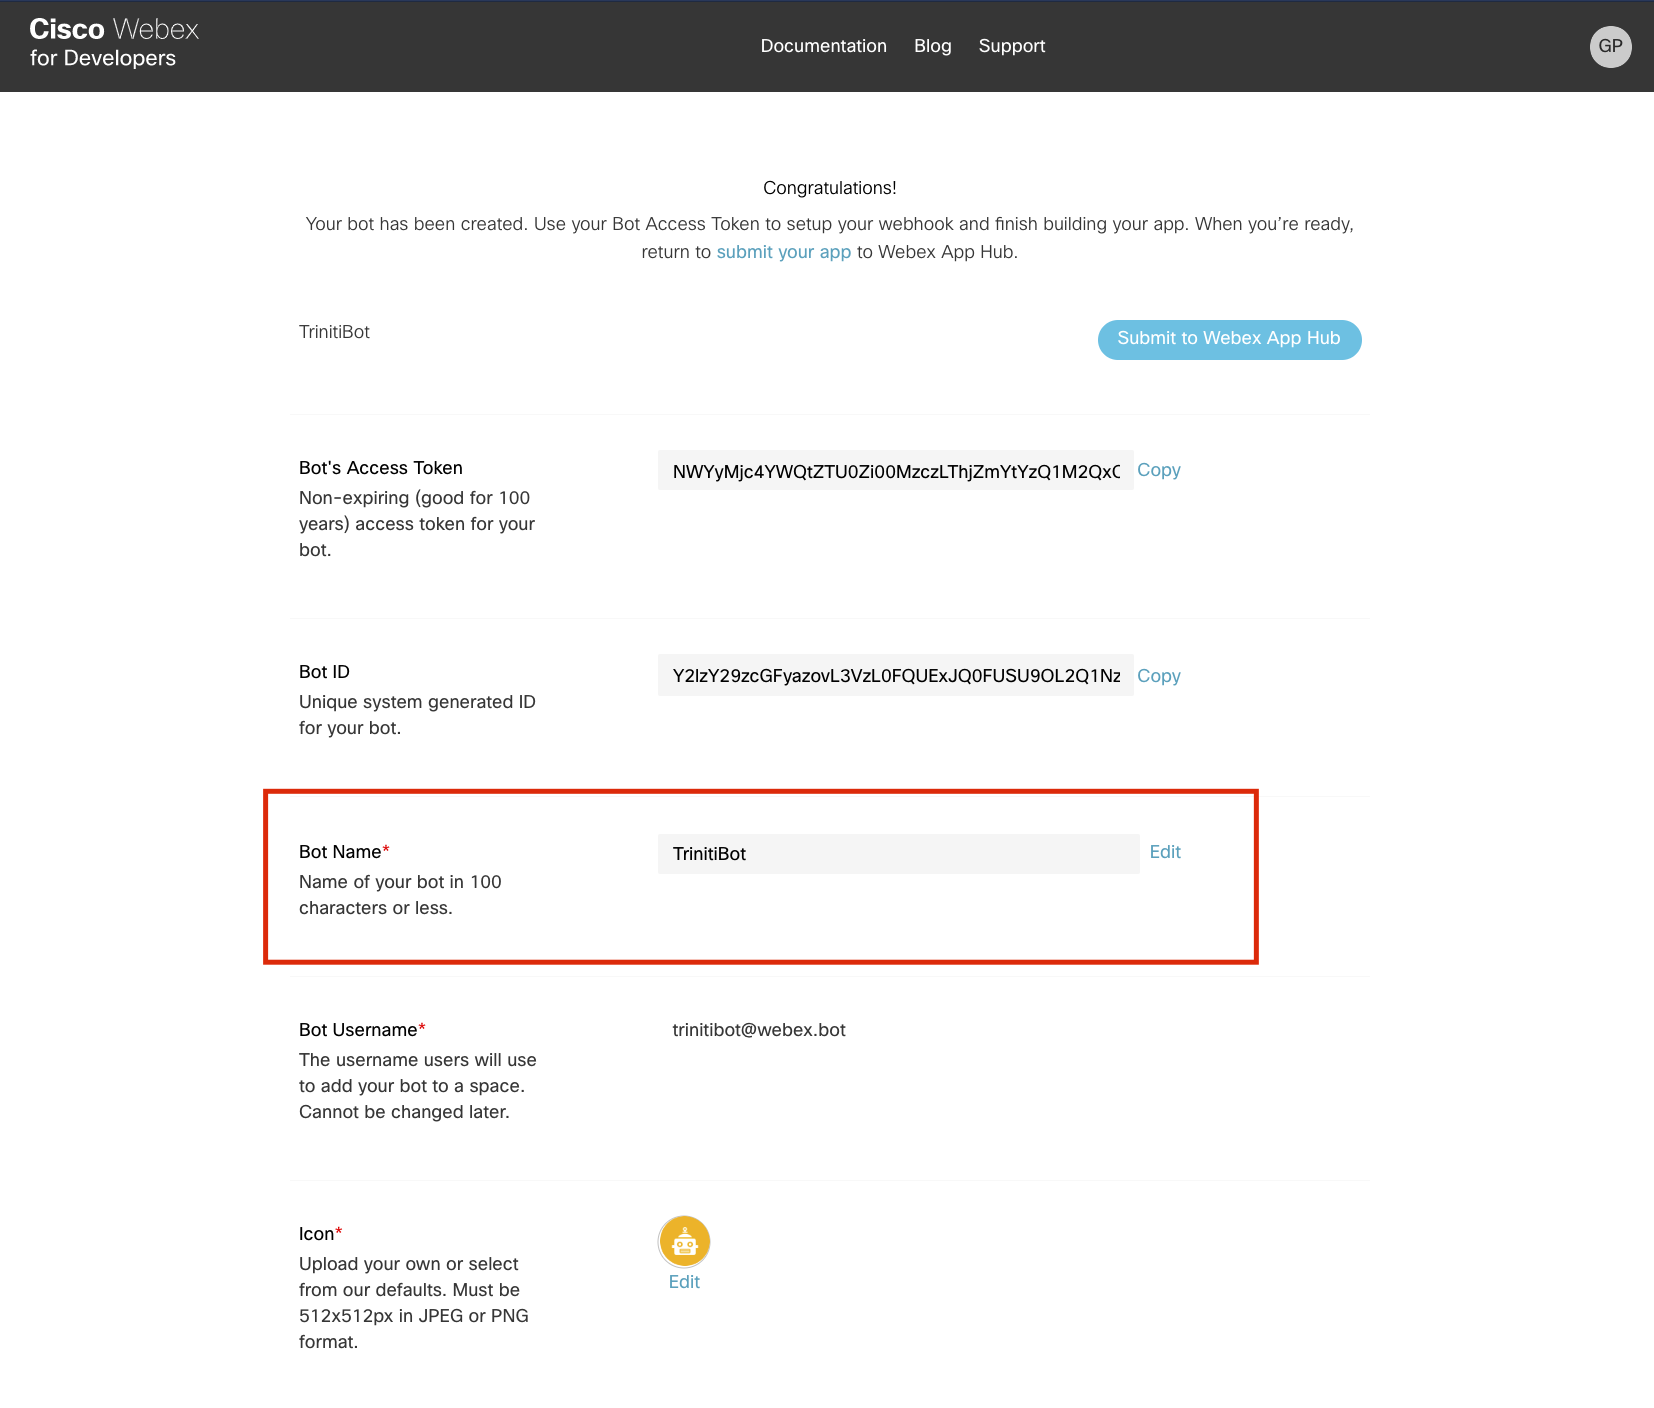
- After entering all the required details on triniti.ai, click on 'SAVE'
Now your basic setup is done, and it's time to register your callback URL.
Callback URL Setup
- Goto Create a webhook
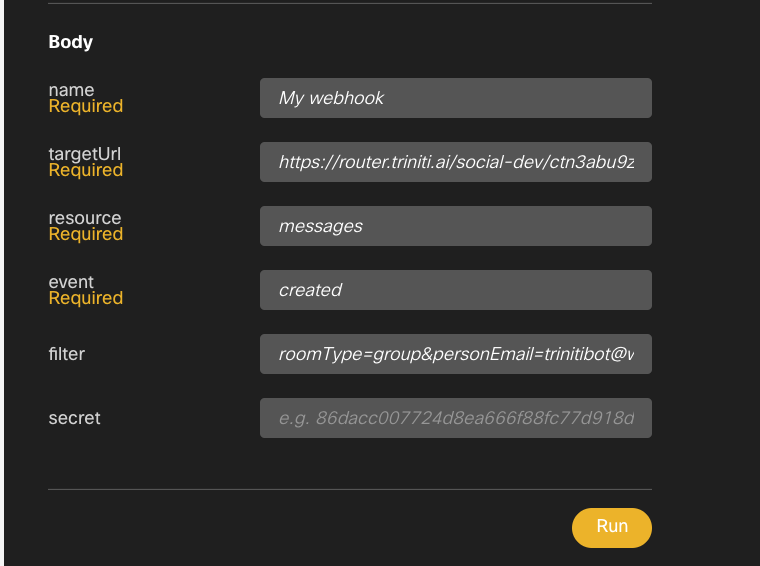
On the next page please enter the following details in Body section:
1. To reply direct messages individually:
- name: Give any name to your webhook URL.
- targetUrl: Copy the callback URL from triniti.ai & paste in this field.
- resource: Enter "messages" in this field.
- event: Enter "created" in this field.
(Please leave the fields blank which are not mandatory(eg; filter, secret, etc.))
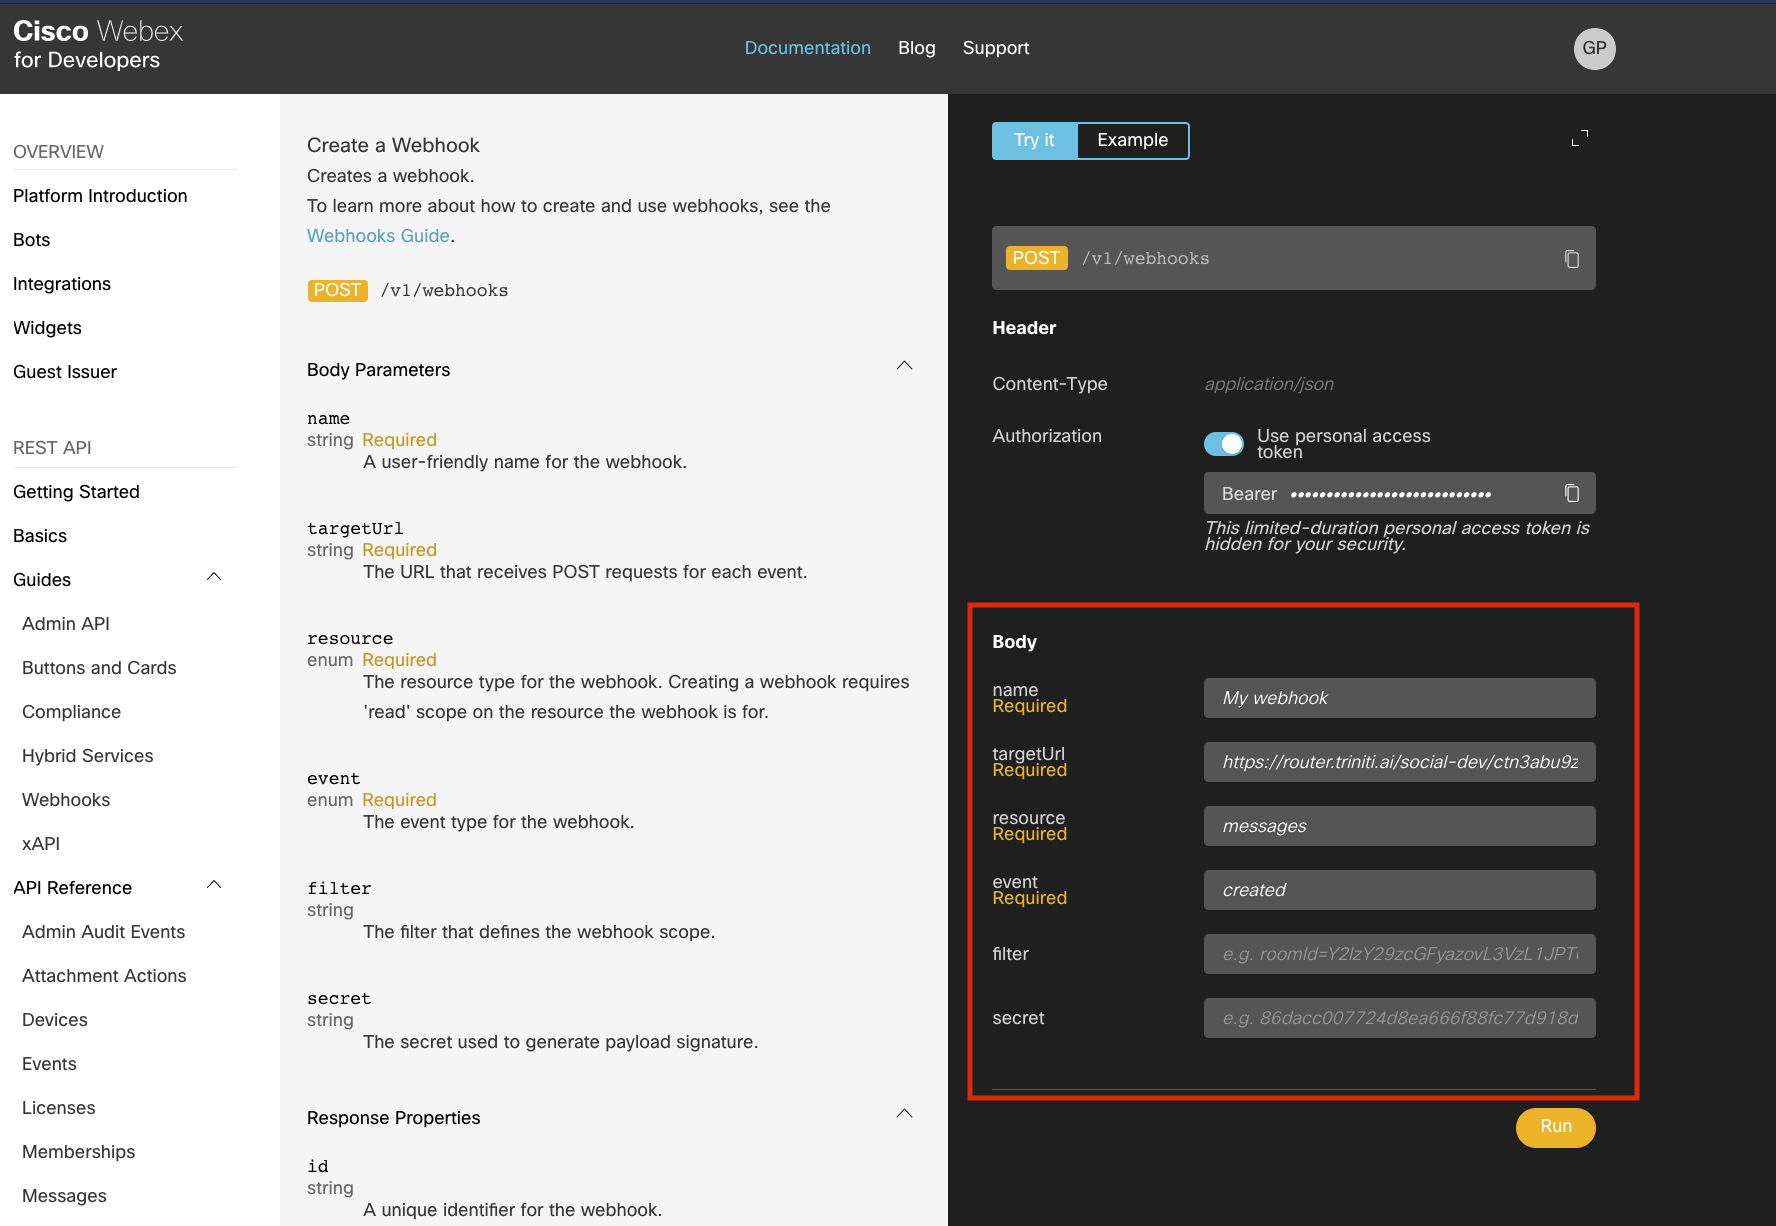
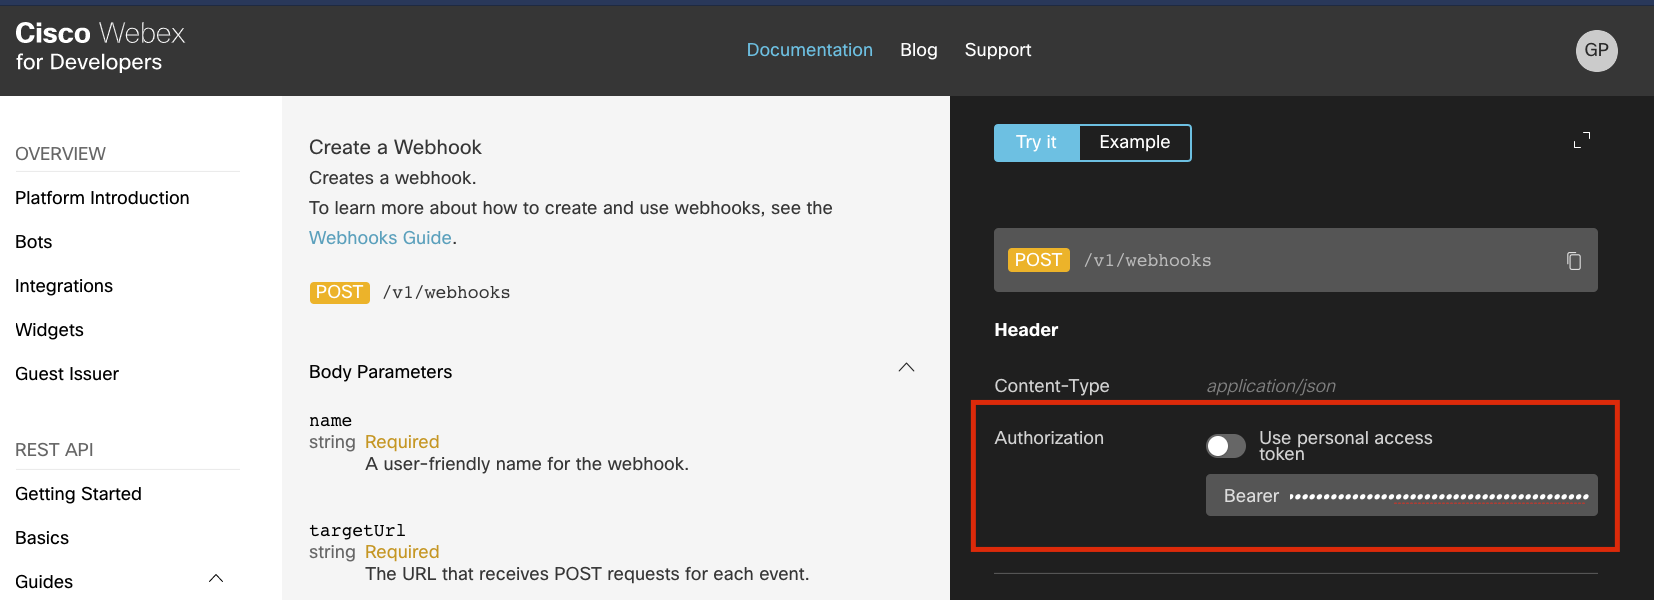
- Toggle off the 'Use personal access token' in 'Authorization' under Header and paste your 'Bot's Access Token'.
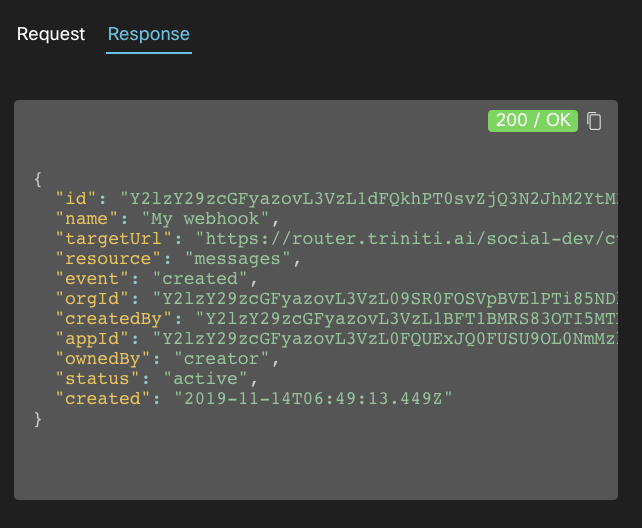
- Click on Run
- After clicking on Run you'll get the response 200/OK status as shown on following page, if the webhook URL is correct.
2. To reply in a Group:
- name: Give any name to your webhook URL.
- targetUrl: Copy the callback URL from triniti.ai & paste in this field.
- resource: Enter "messages" in this field.
- event: Enter "created" in this field.
- filter: Enter "roomType=group&personEmail={ Bot Username }" in this field. (Please leave blank 'secret' field)
- Toggle off the 'Use personal access token' in 'Authorization' under Header and paste your 'Bot's Access Token'.
- click on Run
- Once your webhook successfully registered, you can add your bot to any space/individually as a contact.
- In group please mention the bot with '@' to get reply from the bot.
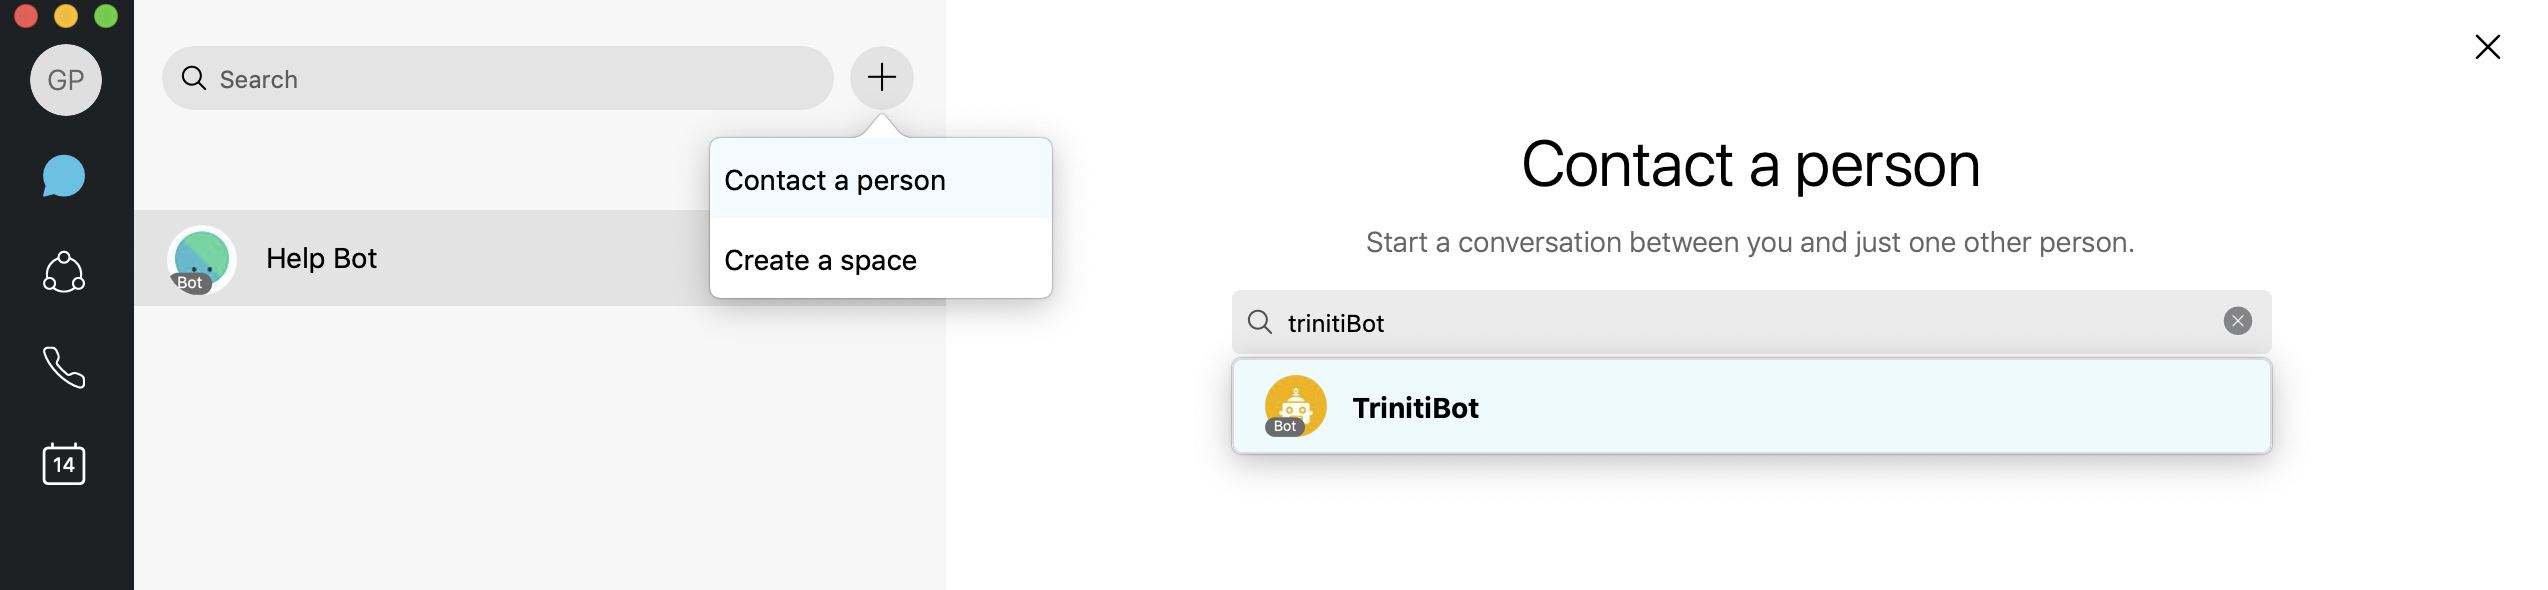
Congratulations! your complete bot setup is done, Now let's interact with our smart AI Webex bot.
- Goto your 'Webex Teams', click on 'Contact a Person', Enter your 'Bot Name' and start interacting with your smart AI bot.