A Triniti.ai Guide
This tutorial walks you through the Triniti.ai features, functionalities including managing your account, process of building and maintaining a workspace from scratch. It also provides you the best practices in designing a workspace. It will also guide you through various channel setup, handling FAQs, Smalltalks, and more.
Manage Your Account
Create New Triniti.ai Account
To experience our Triniti.ai platform & our feature you will be needed to have a Triniti.ai account. It is a simple step of creating a new account on Triniti.ai. You can register to Triniti.ai by following these steps.
- Open a new tab from your browser.
- Type in https://developer.triniti.ai
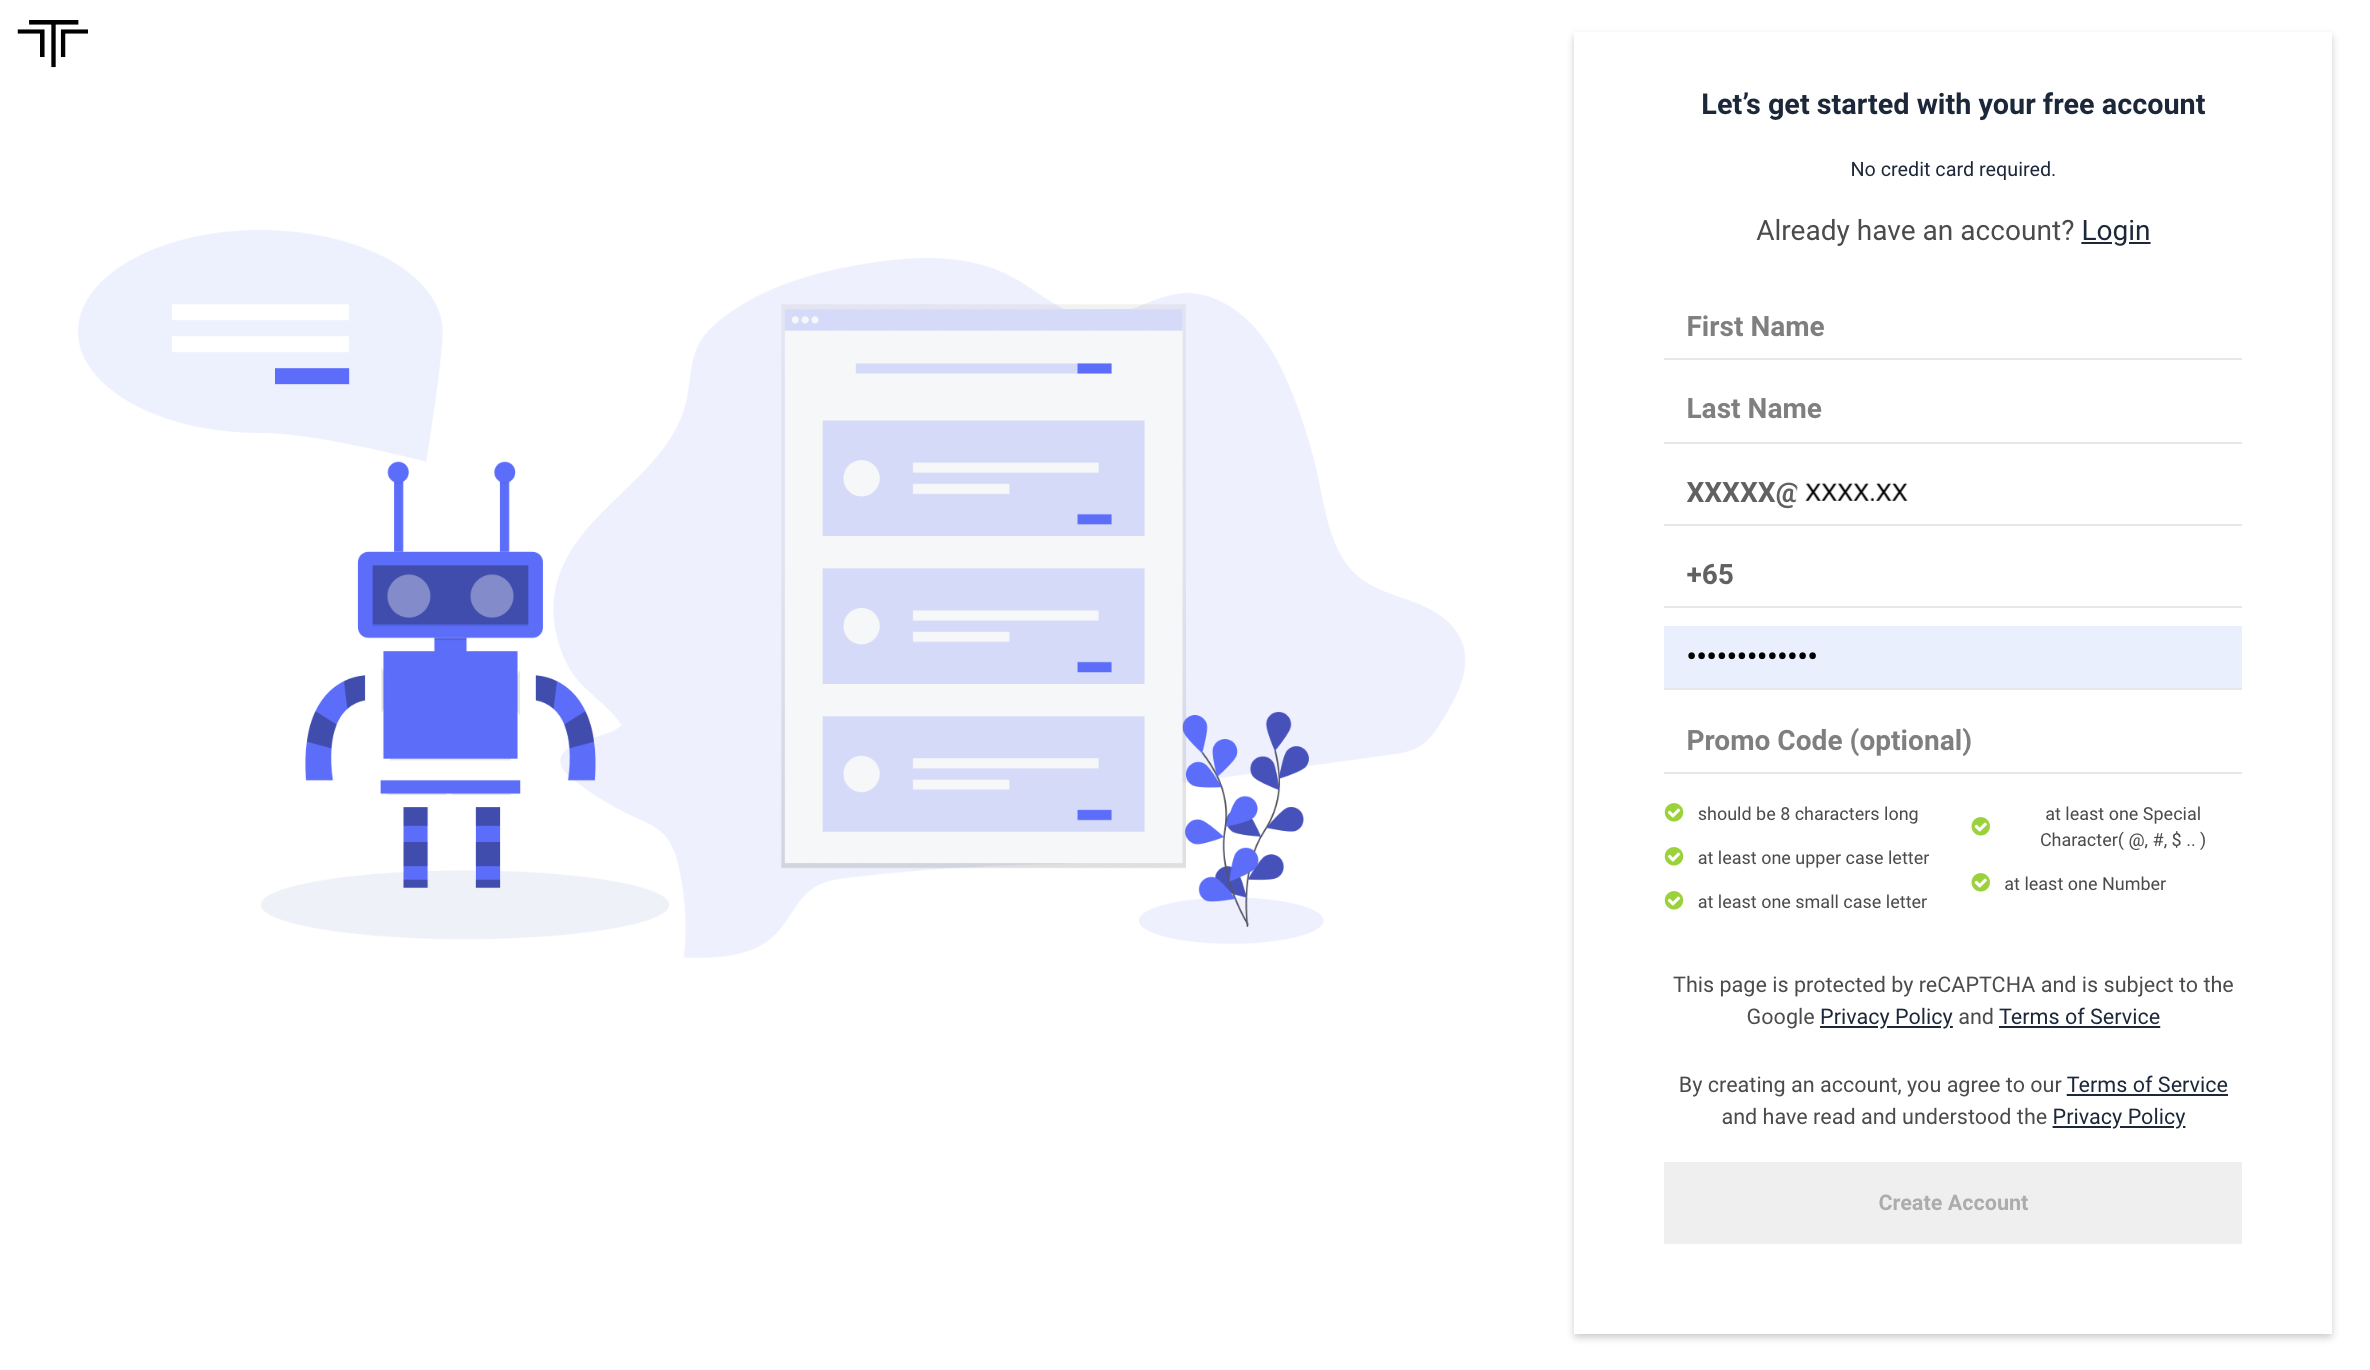
- Click on Create Account on the top.
- Enter all the mandatory details (First name, Last name, Business Email id, Phone number, your desired password & Promo Code(if you have any)).
Note:
- At the moment, we accept only sign-ups using corporate/business email ids. Triniti.ai portal does not recognize emails created via free services such as example@gmail.com, example@yahoo.com or any other similar Id(s).
- Your password should be:
- 8 characters long
- at least one ‘upper case letter’ (ie; A-Z)
- at least one ‘small case letter’ (ie; a-z)
- at least one ‘Special Character’(ie; @, #, $, ! ... )
- at least one ‘Number’ (ie; 0-9)
*** Once you fill in the form, carefully go through the Terms of Services & Privacy policy. By clicking on ‘Create Account’, you are giving us an acknowledgment that you have successfully read our Terms of Services & Privacy policy.
- Click on the “Create Account” button.
- A verification email will be sent to the email address you have used, to create your triniti.ai account. Note: Still, you can log in and create your workspace, add faqs, but for the train, you will have to verify your account.
- Open the email & click on the “Verify Email” button.
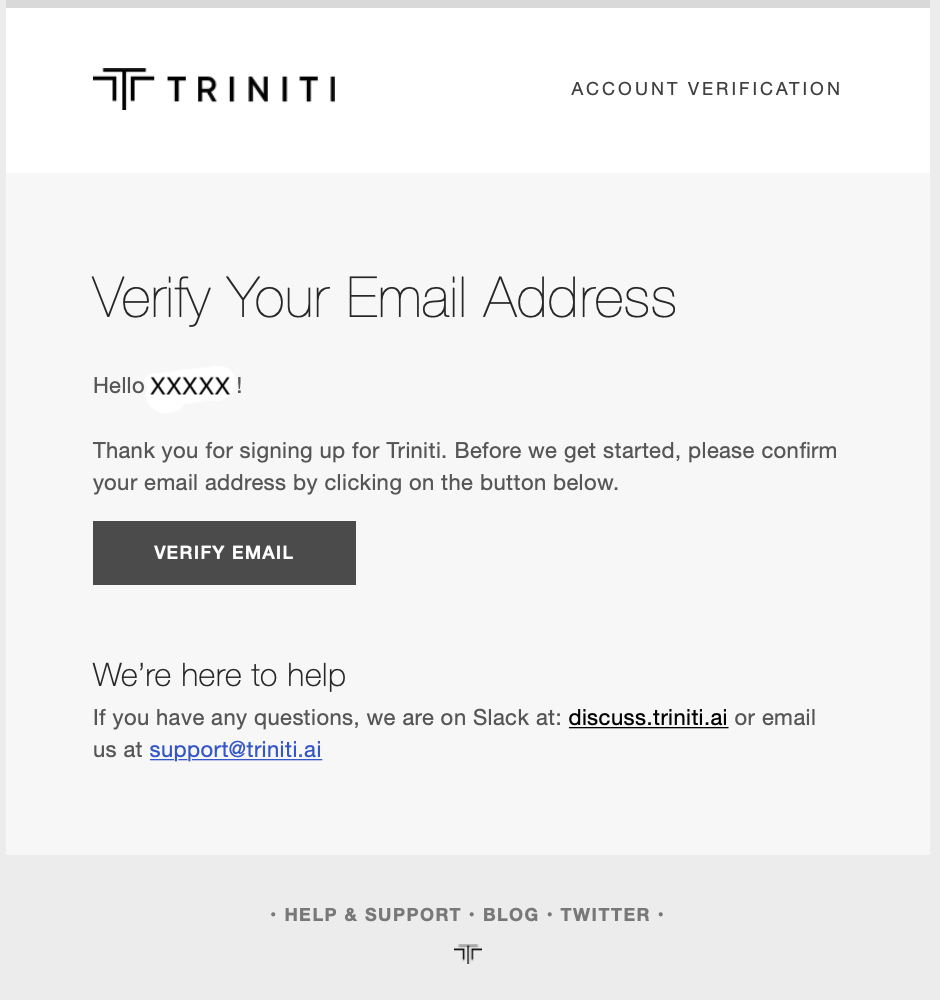
- After verification, you will be redirected to the login page automatically.
Congratulations! You have created your triniti.ai account successfully. We are so happy to welcome you on board. Eagerly looking forward to collaborating and grow along with you!
Login to Your Triniti.ai Account
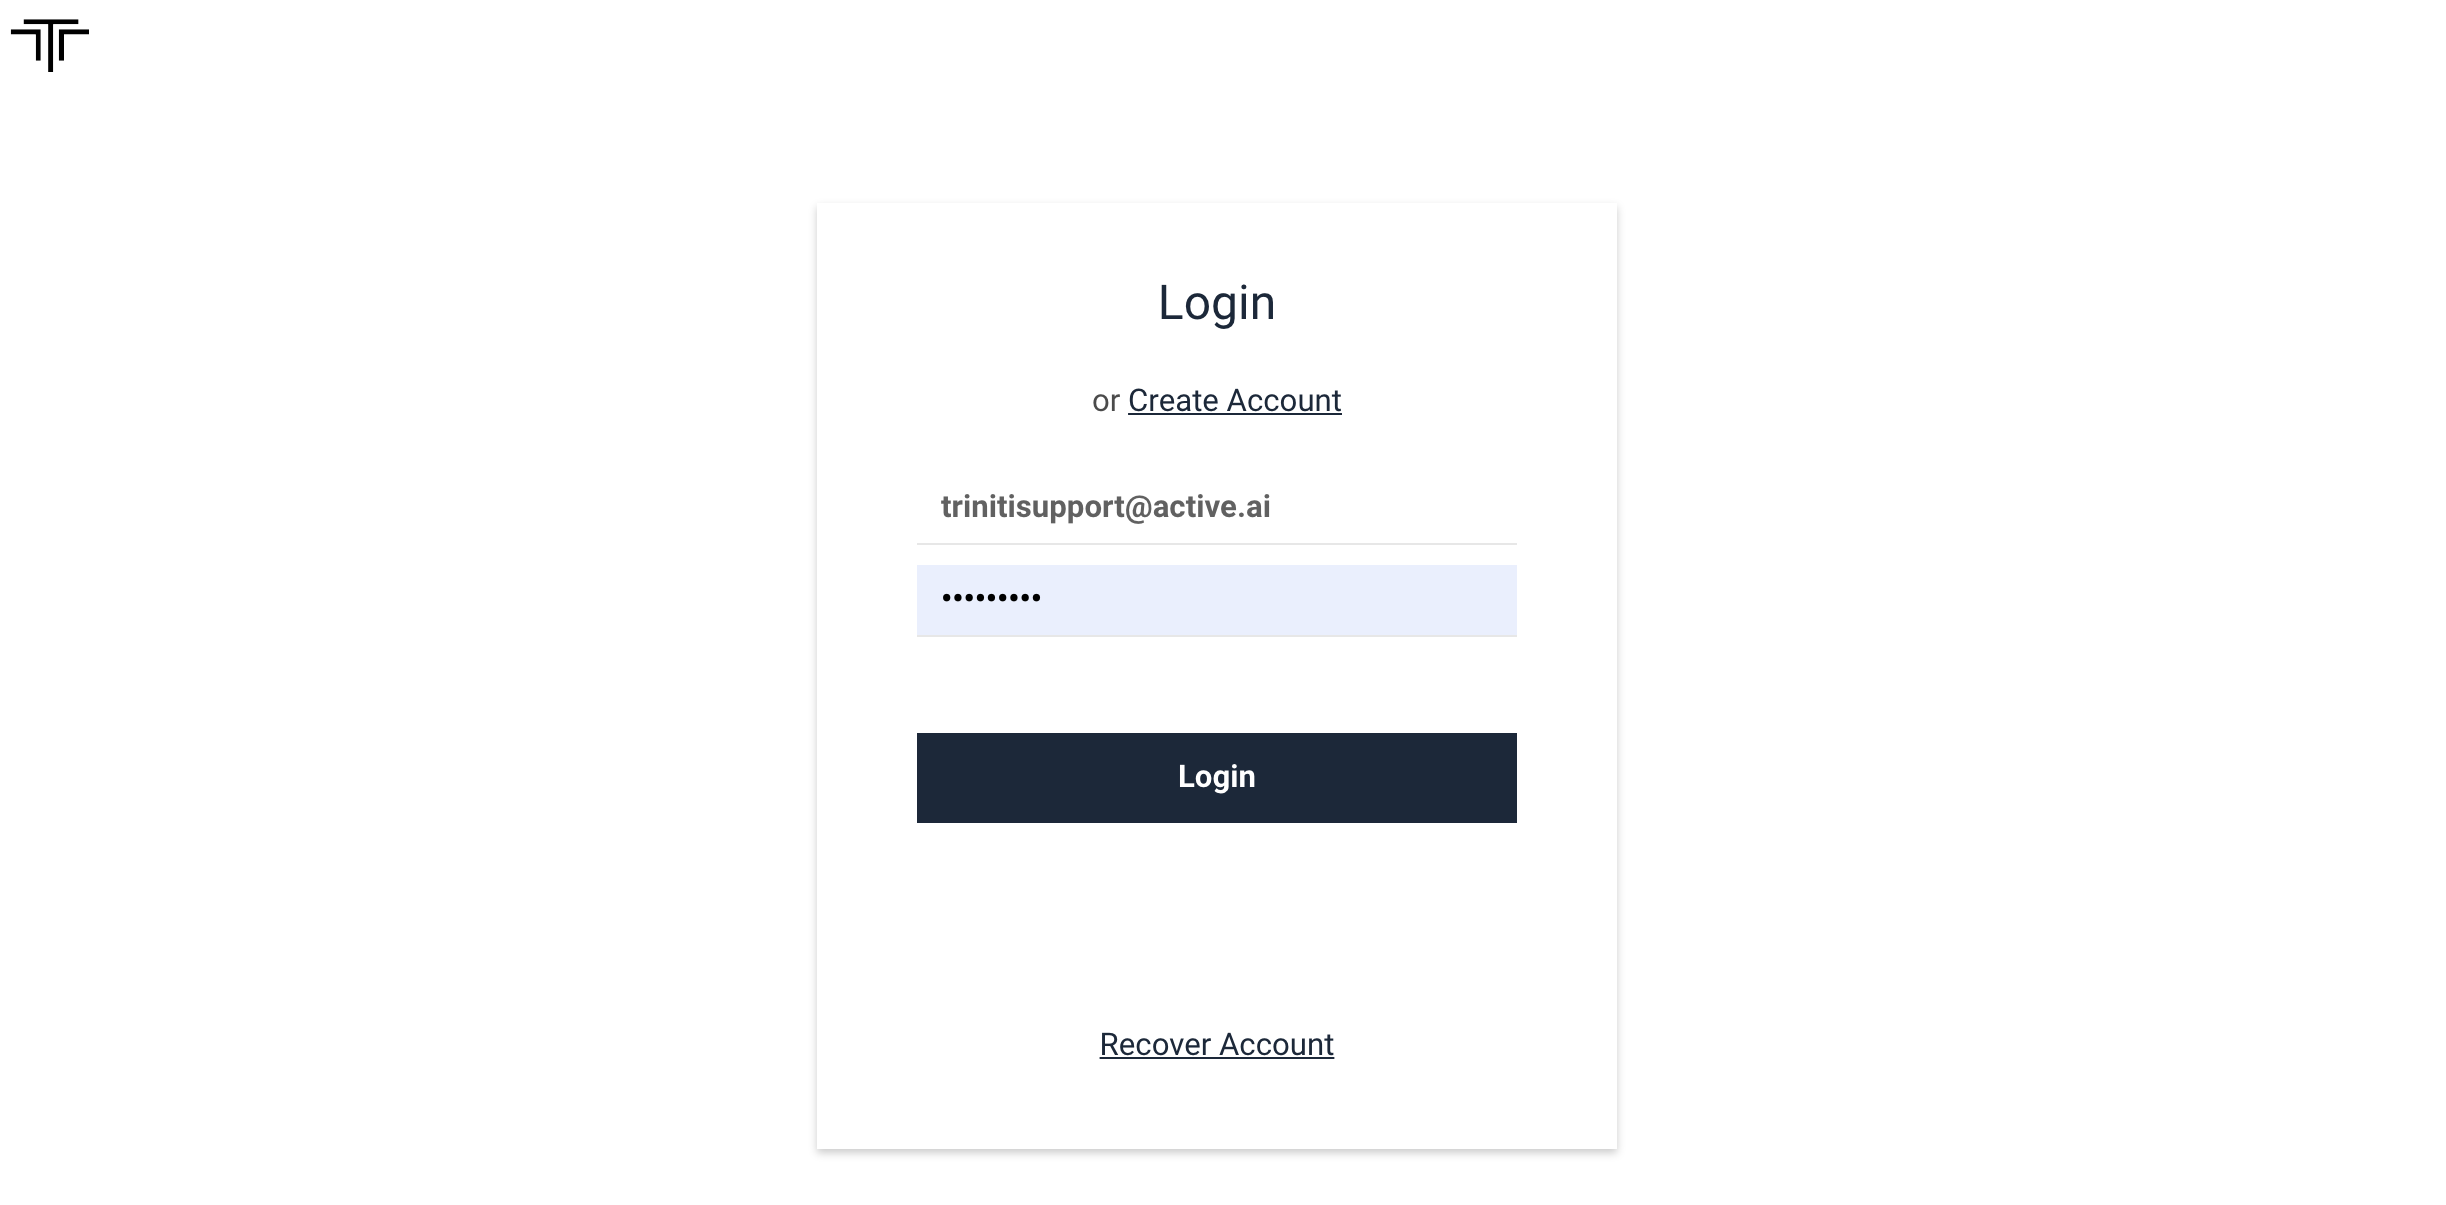
To access all the features and experince the Triniti.ai platform you will have to login with the account which you have created earlier. You can login to Triniti.ai platform by following these steps:
- If you already have an account, Goto Triniti.ai portal
- Enter your credentials (Business email & password)
- Click on Login
Recover Your Triniti.ai Account
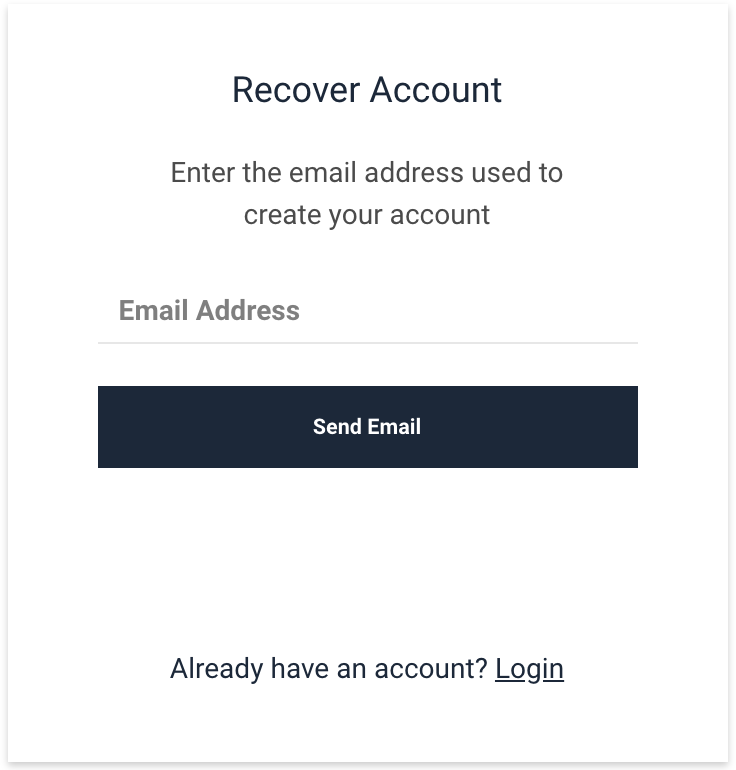
If you have forgot your password or your account has been locked then you can recover your account by following these steps:
- Goto Recover account or
- You can click on "Recover Account" on the Login page itself.
- Enter your registered business email id and click on "Send Email".
 |
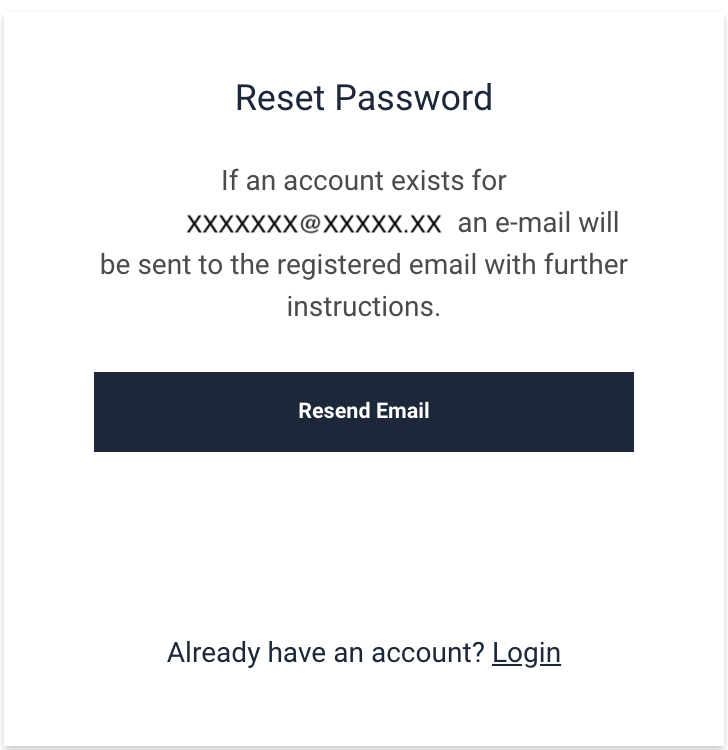 |
- You will receive an email to reset your password, please follow the instructions and click on RESET PASSWORD
- Enter your new password, confirm the password & click on save.
 |
 |
Now you can login with your new password to Triniti.ai portal.
Create Your First Workspace
Workspace, as the name indicates, is a space that triniti.ai provides you for you to do the bot building process. It is similar to a digital folder that you will be provided with, upon purchase to start with building your bot. Before you could start, make sure you have a Triniti.ai account. If you do not have an account, click on Create an account This section describes how to create and try out your first triniti.ai workspace.
- Open a new tab and log in to triniti.ai portal.
- Once you have gained access to our triniti.ai dashboard, click on “Create Workspace”.
- Enter the 'Workspace Name', Select your 'country' & click on 'Next' button
- Select 'Workspace Type', 'Domain' that you want to create & click on the 'Continue' button.
- Choose a 'Plan'
- Choose a knowledgbase import options (Optional)
- Once you have chosen your plan, on the next step either you can Import your FAQs or can add later, then click on 'Create'. Congratulations! You have now created your very first workspace.
Note:
Workspace Type: We provide two types of workspace.
- Cognitive QnA: In this type of workspace, you can configure only FAQs and Small talk, this is apt for information only Conversational AI bots. This workspace will not support transaction flows via intents.
- Cognitive QnA + Conversational AI: This type of workspace, supports the full Conversational AI capabilities including both QnA(FAQs) and intents.
Domain: Along with different base data sets to bootstrap your workspace. (Just that the questions will be treated in that domain and our bot will understand words that make sense in that domain.)
- Retail-Banking
- Insurance
- Custom
Plan: We provide multiple plans in order to target your specific needs. Please go through the features section to understand our offerings. We have the following payment plans.
Depending on the plan you choose, the costs may vary. Please look into the pricing section for details.
Manage Workspaces
Managing the workspace is a better practice to make your bot more interactive and enabling more user interactable features so that users can easily interact with the bot and get their respective responses to the query. The bot will perform any action based on your workspace configuration to give a response to the user's query. You can manage the settings of the workspace that how your bot should react, analyze & give response, also you can manage messages for some scenarios where bot can send the same messages to the user if don't find any related response for the user's query, more important you can share your workspace with user's as well like your colleagues, etc.
Managing Settings
This section will help you to configure your bot to be more interactive to the user and give the appropriate response instantly. In settings, you can set the AI, Knowledgebase, security-related settings and also can enable the customer support fallback so that the user can directly interact with a human agent. You can manage the settings of your bot as per your requirement by going to the "Workspace Settings".
- Goto your workspace
- Navigate to settings
- Adjust the settings (As per your requirements)
- Click on save
1. CREDENTIALS (You can use your workspace credentials wherever it is required)
- Workspace ID
- API Key
- API secret
- Version
2. AI
Settings |
Description |
|---|---|
| Auto suggest limit | It will show the suggestions on keypress, you can set the suggestions limitmax to 5. |
| Minimum Smalltalk Confidence | It will set the Smalltalk confidence. |
3. BOT
Settings |
Description |
|---|---|
| Audit anonymous user | You can also audit the anonymous user by enabling this setting. |
| Display welcome message | You can choose the option to display or not to display the welcomemessage. |
| User session timeout | The bot session timeout can be set by this option. |
4. COGNITIVEQNA
Settings |
Description |
|---|---|
| Default Fallback | It will give suggestions on fallback. |
| Minimum knowledgebase confidence | The confidence for your knowledge base, can set from thissetting. |
| Similar suggestion | It will show the suggestion after the response, similar to the previousutterance. |
5. CUSTOMER SUPPORT
Settings |
Description |
|---|---|
| Chat Agent Provider | Users can chat with the human agent and it can be enabled by this setting. You can either select Zendesk or Livechat. |
| Customer support fallback | To enable chat with a human agent you will have to enable this setting. |
| Number of failed comprehension | After how many failed responses the human agent chat should be triggered, can be done from this setting. |
| Provider license key | To enable the human fallback you will have to enter the Licence key of the respected chat agent provider. |
6. SECURITY
Settings |
Description |
|---|---|
| Allowed domain | This feature is for security purpose, you can enable only those domain(s) which you want to be used for your workspace. |
Managing Messages
In the messages section, you can configure the messages to show on the bot for some scenarios that bot cannot handle from their end. So you can configure some messages to show on the bot for these kinds of cases. Suppose if your bot has some issue that is not able to answer the user's query then you can configure a message(like "We are experiencing some difficulty in processing. Could you please try again later?") to show on the bot in those scenarios. You can manage the messages that will be shown on the bot for that respected case by following these steps:
- Goto your workspace settings
- Navigate to messages
- Click on SAVE after modifying any messages
1. BOT
Settings |
Description |
|---|---|
| Multi Query Recognition | If the user will ask multiple queries at once then the bot will respond based on the message that is set here. |
| Multi Query Continuation | After finishing the response of one query from multiple queries the bot will send the message that is set in this section. |
| Default Server Error | The default server error message will be shown if the bot is not able to understand the query or not able to connect to the server. |
| Feedback Response | You can set the message for the feedback as well. |
| Unable to classify | The bot will reply with this message if the bot is not able to classify the query. |
| Default answer if utterance not matched | The bot will send this response if the utterance doesn't match in the knowledgebase. |
2. CUSTOMER SUPPORT
Settings |
Description |
|---|---|
| Live Agent Unavailable | The bot will reply to this message if not any human agent is available. |
| Live Agent Default Error | For live agent the default error message can be set here. |
| Live Agent Signoff | If the human agent has signed off then the bot will send this response to the user. |
| ext to end the chat with live agent | You can set a text that if the user will type that text the chat will end with a live agent. |
| User Live Agent Handoff | The message will be shown if the human agent is about to start the chat. |
| Live Agent Decline | The bot will send this response when the human agent will disconnect the chat. |
Managing Templates
The templates are the combination of text with some components or some graphical pictures. You can add a template for your bot to show on bot launch or fallback. It will be more attractive for the user instead of normal text. Suppose you are showing a welcome template on bot launch in the textual format "Hi! I am your Smart Assistant! What shall we look at first?", so instead of normal text you can add a picture or any different component to make the same welcome message more attractive. In this section, you can manage the "Welcome Template" & "Live Agent Template".
1. Welcome Template:
It's a template that will be shown on the bot launch to the user by greetung them. You can configure a welcome template for your bot by adding the components to make your bot looks cool. Normally your bot will greet the customer with a welcome message in textual format but you can add the card, image or button along with the text to greet the customer.
2. Live Agent Template:
The template which will be shown on fallback (If the bot is not able to respond to the query). When the bot will not be able to understand the user's query then the bot will give some options like Chat with a live support agent or Continue to chat with me, etc. You can also configure a template as per your choice & requirement so if the bot will not able to classify the query will show the live agent template to take the user's choice.

You can configure the template as per your requirement by adding any component from the following template components:
- Text
- Card
- Image
- Button
- List
- Carousel
- Video
To know more about template configuration, please refer Configuring the templates.
Managing Users
You can add your colleagues or anyone with whom you want to share your workspace from the "manage users" section in the workspace settings by adding their Email Id & granting the access as Member, Admin or Viewer. You can also change or revoke access after adding for those people whenever you want.
- Goto workspace settings
- Navigate Manage users
- Enter Email ID, whom you want to share the workspace
- Workspace owner can give access to the user as an Admin, Viewer or Member for the workspace.
Deleting Workspace
Workspace owners can delete the unnecessary or not required workspace anytime. It will delete everything the workspace including knowledgebase & bot from other users also with whom that workspace is shared NOTE: Only workspace owner can delete the workspace. The Member or Viewer of the workspace can not delete the workspace.
- Goto you all workspaces
- Click on the settings icon of the workspace which you want to delete.
- Click on DELETE

Manage FAQs
The FAQs (Frequently Asked Questions) are the customer-specific questions that might be asked by the users. FAQa are usually about the business oriented product offerings. FAQs are usually interrogative in nature.You can add FAQs to your workspace as per your requirements so that bot will give a response of those FAQs which user will ask to your bot. A FAQ will consist of the User Asks (that user may ask) and a Bot response (that your bot will respond for that particular utterance).
Adding New FAQs
You can add the FAQs either manually by entering the question(user asks), answer(bot response) or import a CSV file of your FAQs. You can also add the variants for the FAQs, by predicting how customers can ask the same question in another way. It will be helpful for the bot to give a proper response for the same intention.
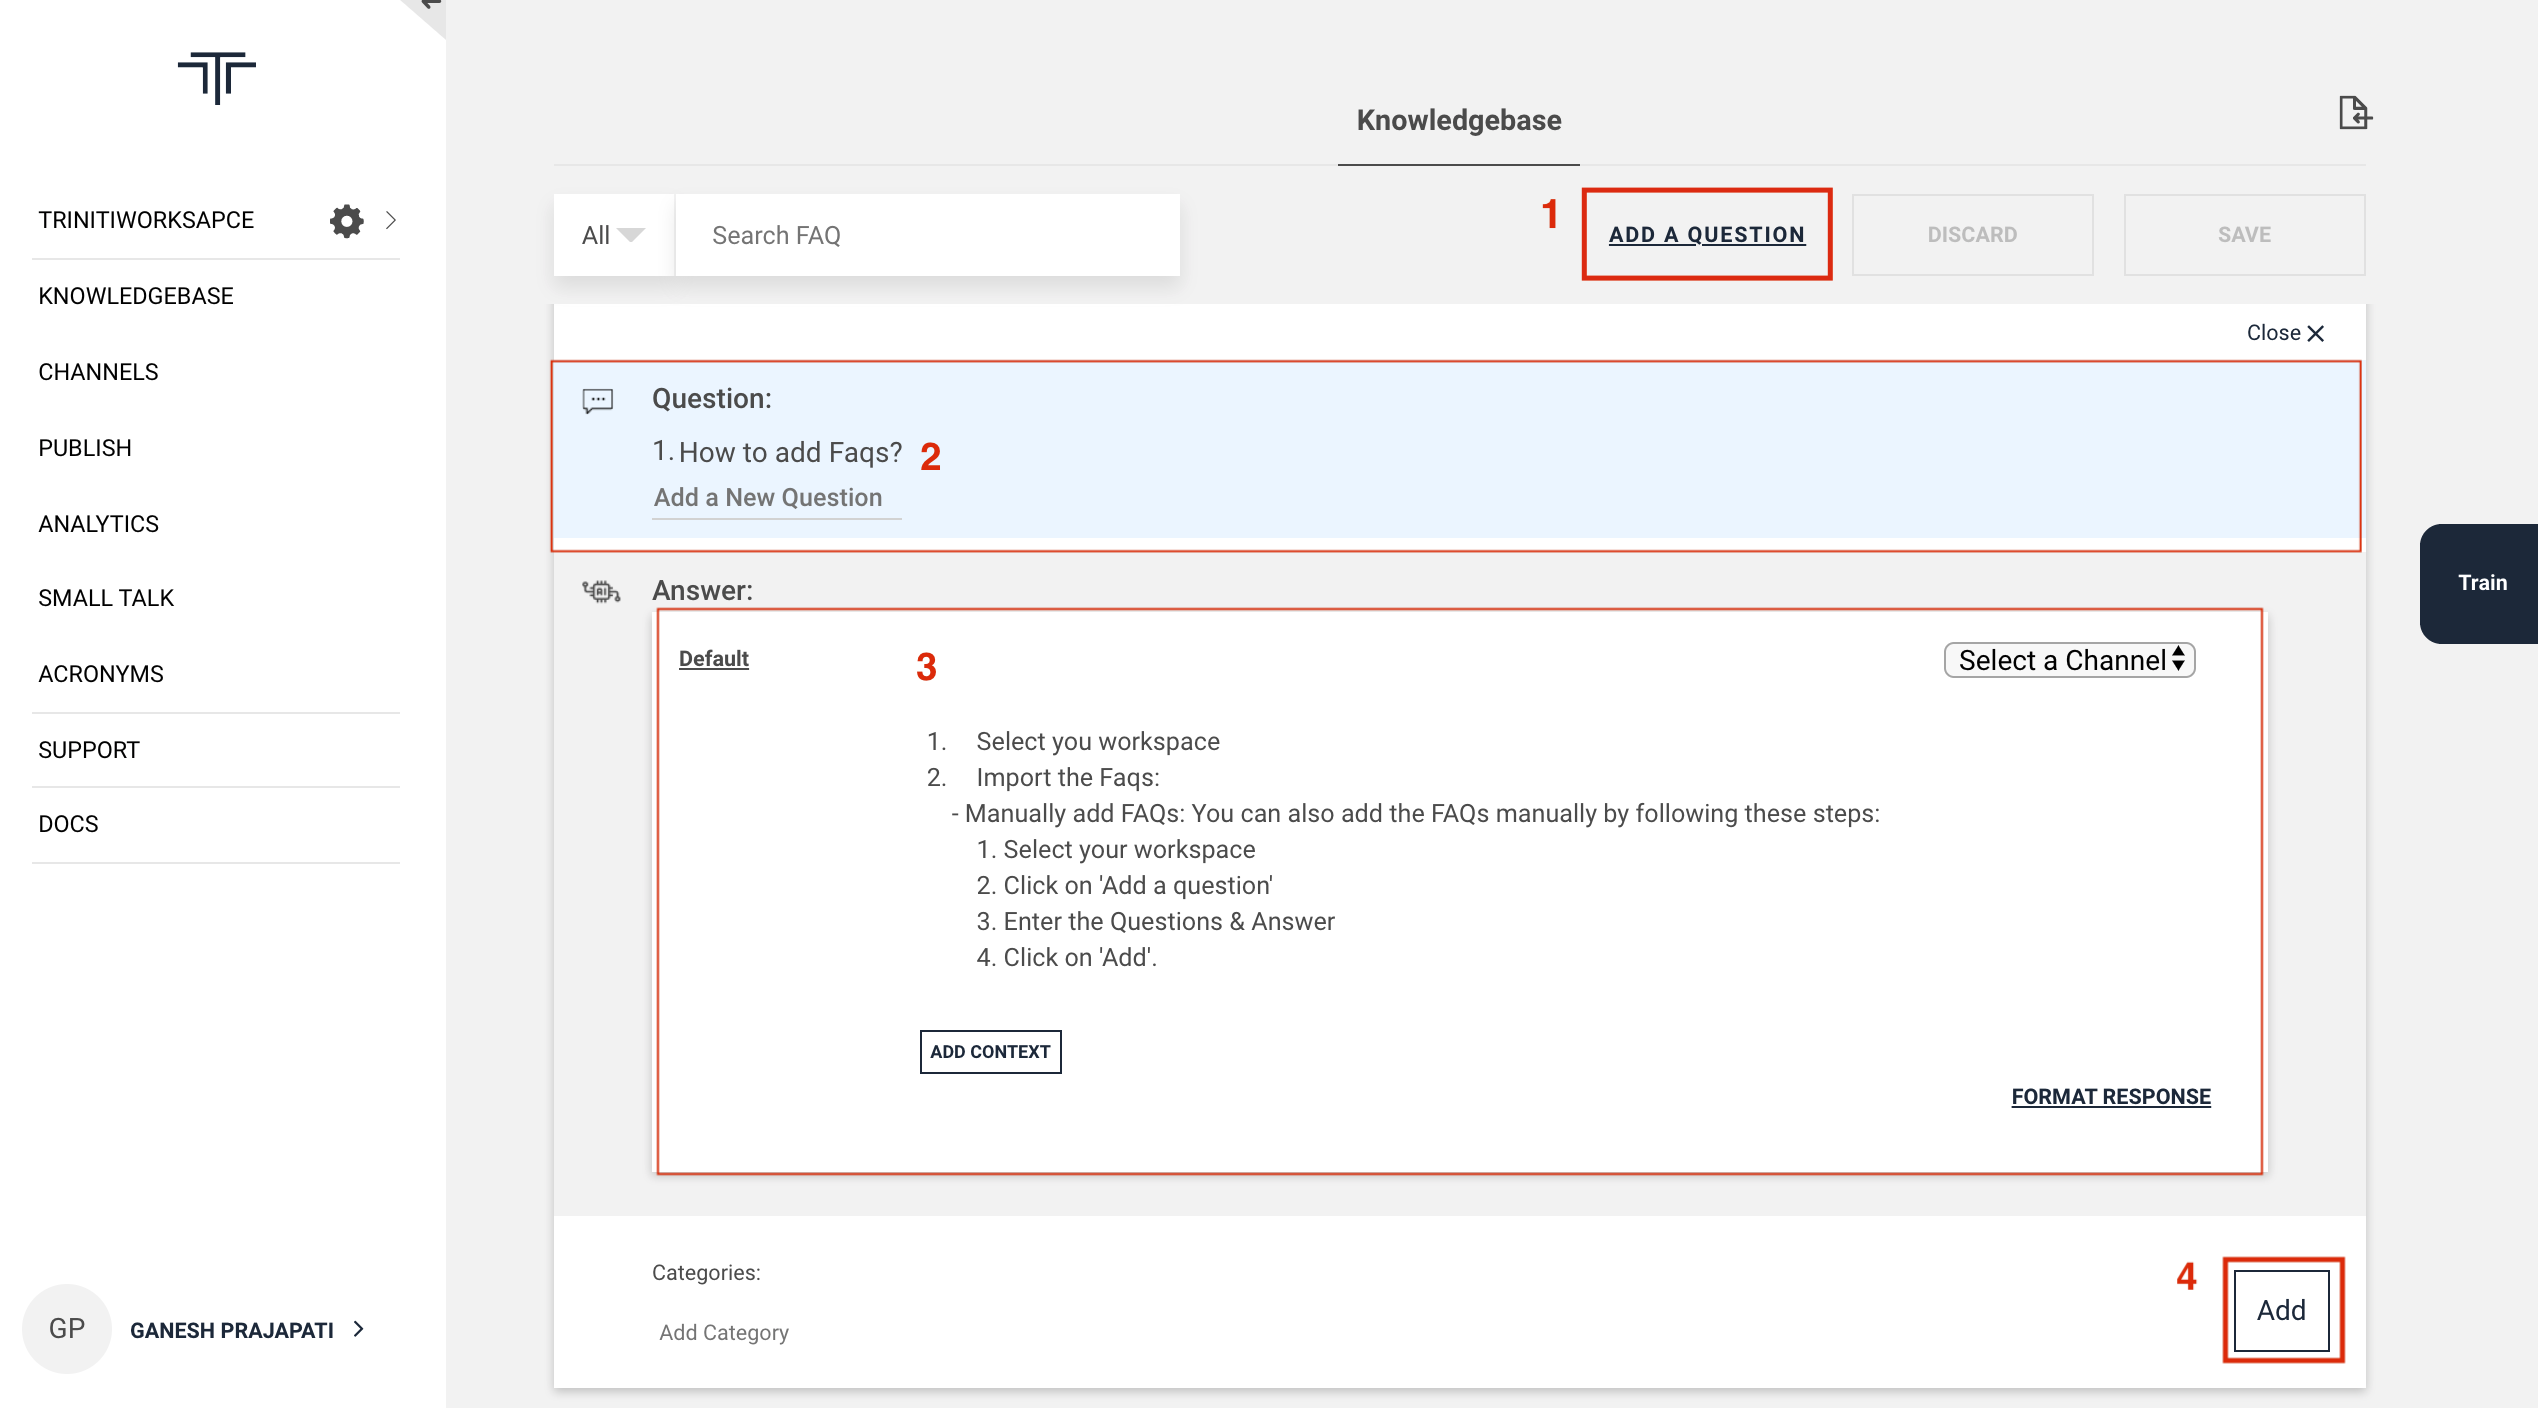
- Manually add FAQs:
You can add the FAQs manually by following these steps:
- Select your workspace
- Click on 'Add a question'
- Enter the Question & Answer in the respective sections
- Click on 'Add'.
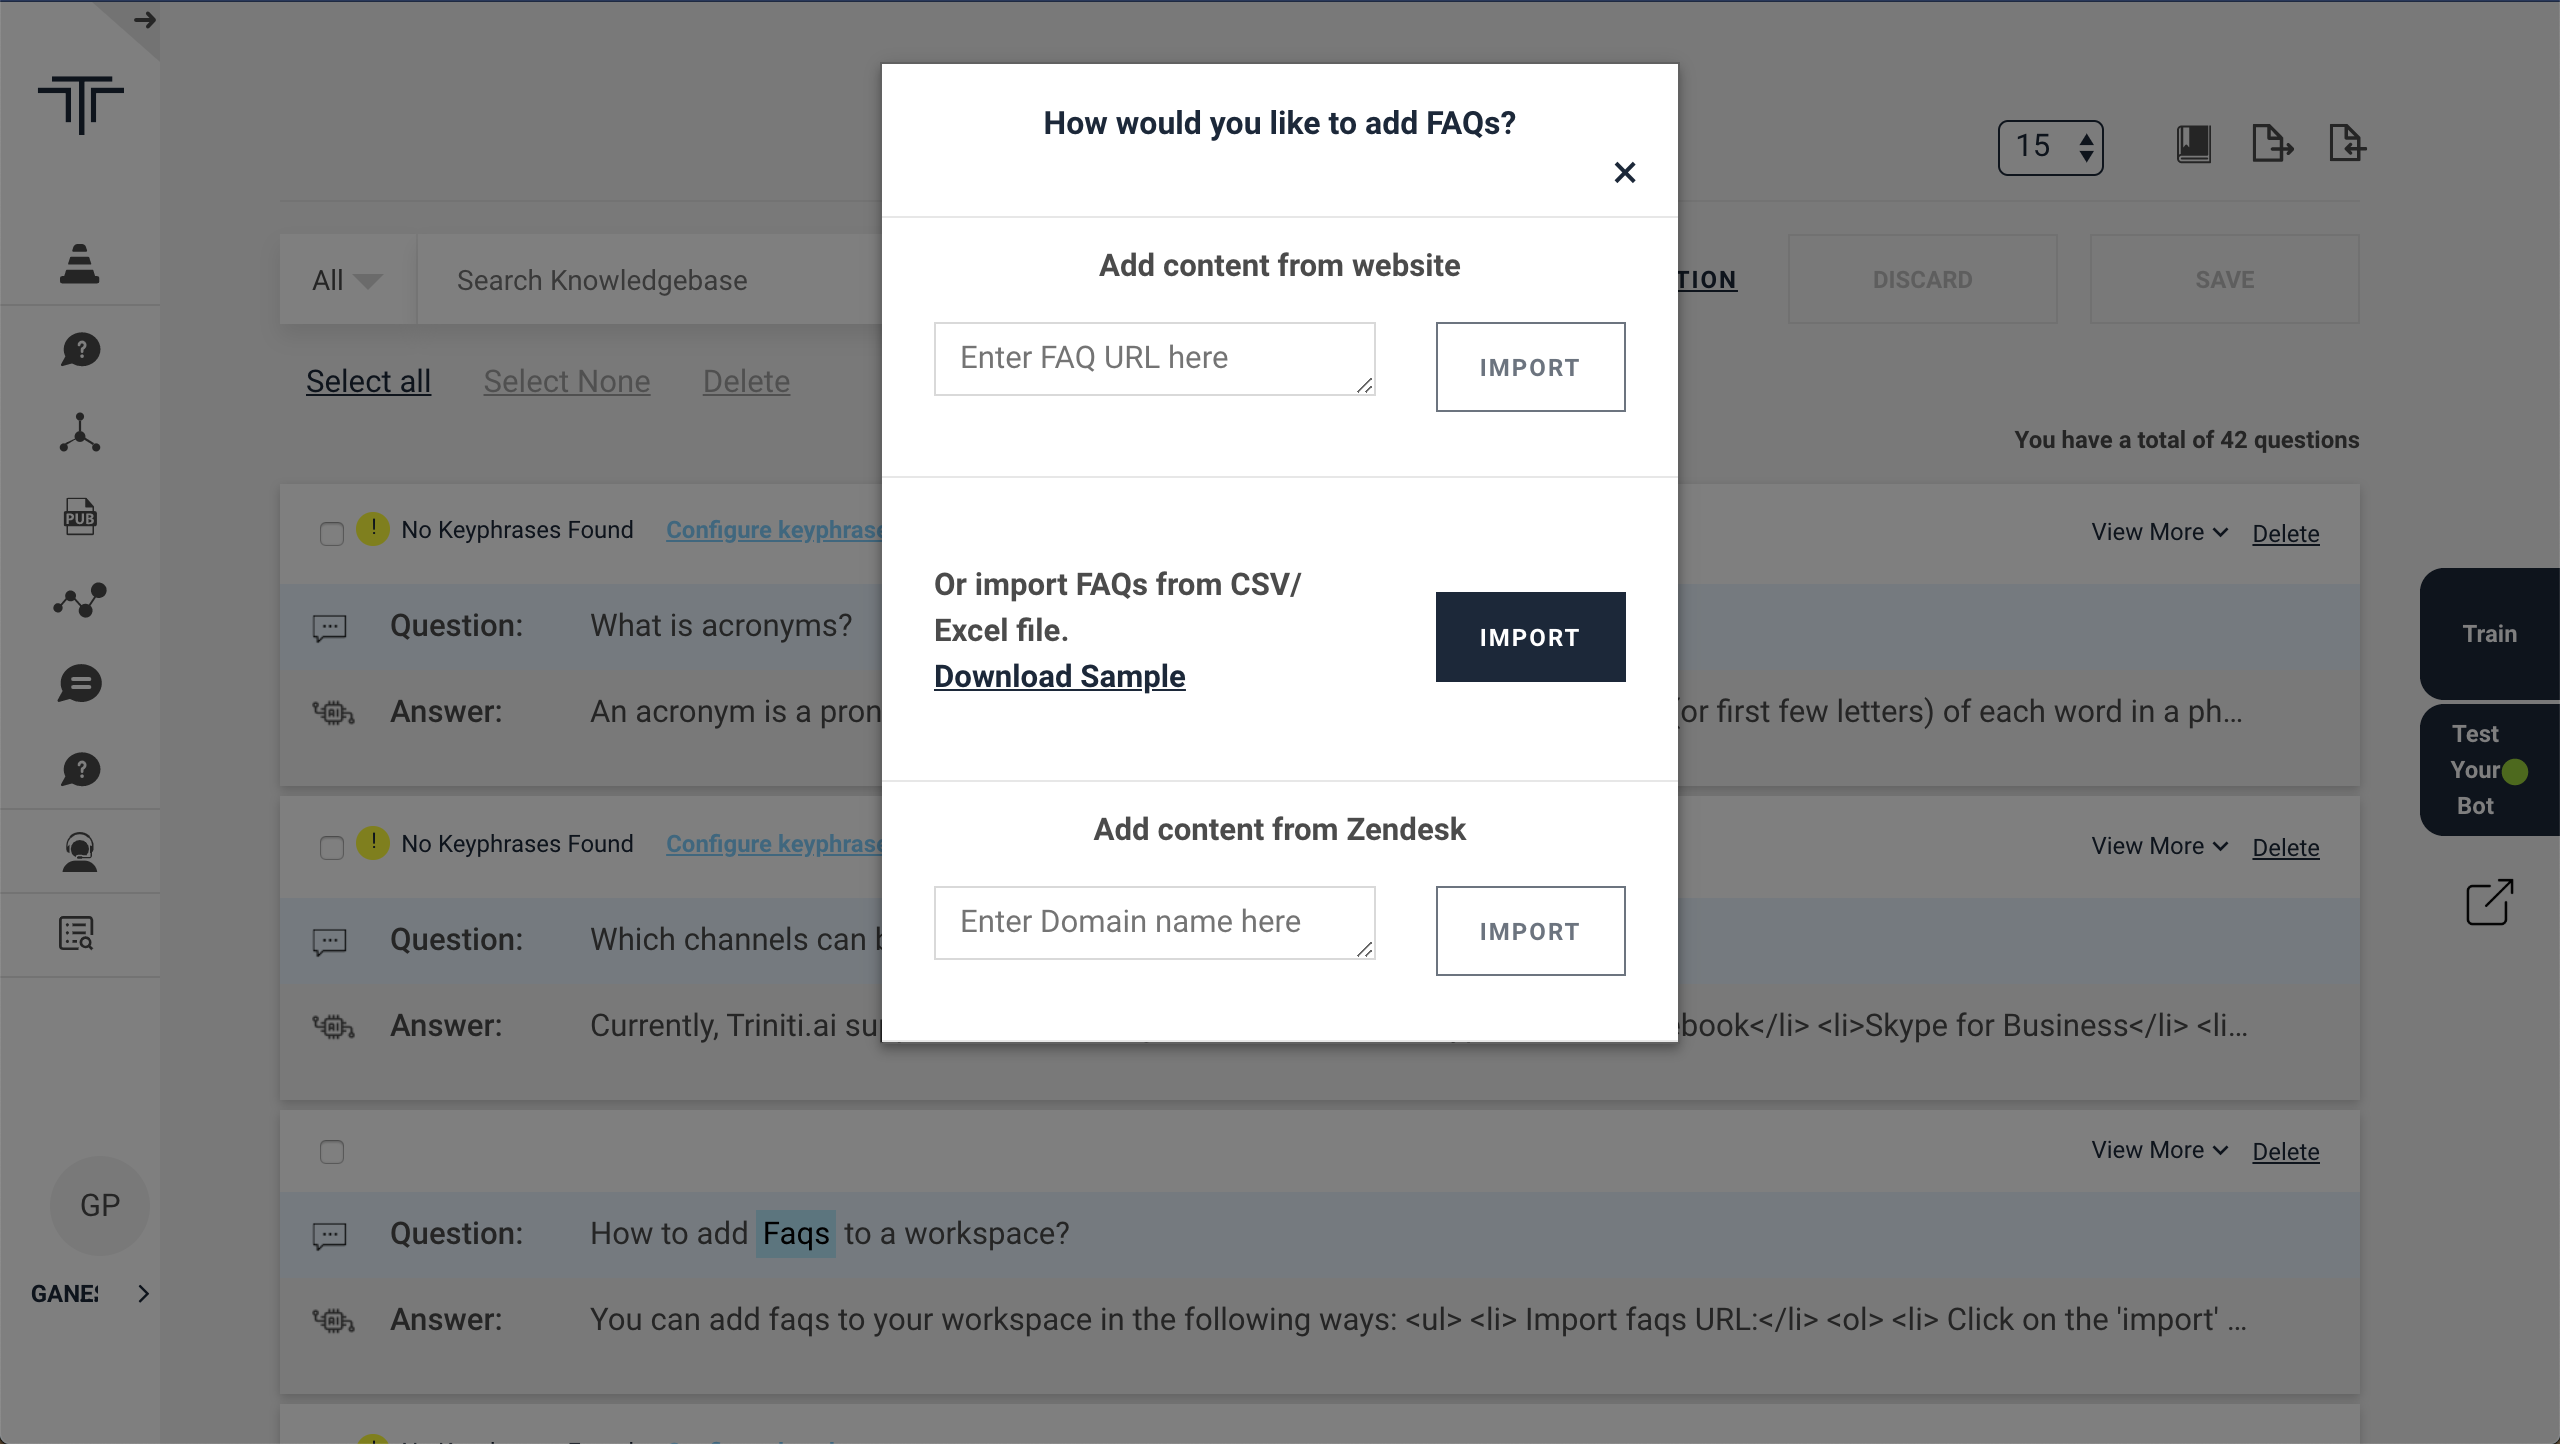
Importing FAQs
We are supporting three types of import to add the FAQs in your knowledgebase.
- Import from website URL: Some of the customers have their FAQs that are added to their organizational website. So you can import those FAQs in your knowledge base by providing that FAQ page URL.
- Import Zendesk Knowledgebase: Zendesk has some articles in their knowledge base, if you want to import those articles in your knowledge base then you can import those articles by providing the 'subdomain' name.
- Import CSV/Excel: You can also prepare a CSV/Excel file that contains all the FAQs and can import that CSV/Excel file to add those FAQs in your knowledge base. (The CSV/Excel file should contain atleast id, questions & answers columns in the same sequence.)
You can add FAQs in your knowledge base by following these steps:
- Goto your workspace
- Click on 'Import' icon
- Import the Faqs:
- FAQ page URL: You can import the FAQs from your website's faqs page URL, which have the structures faqs.
- CSV/Excel: You can import the CSV/Excel file of the FAQs. (The file should have atleast id, question & answer columns in the same sequence.)
- Add Contents from Zendesk: You can also import the articles from zendesk by providing the domain name. After pasting the URL or selecting the CSV/Excel file or entering the domain name, click on the "import" button.
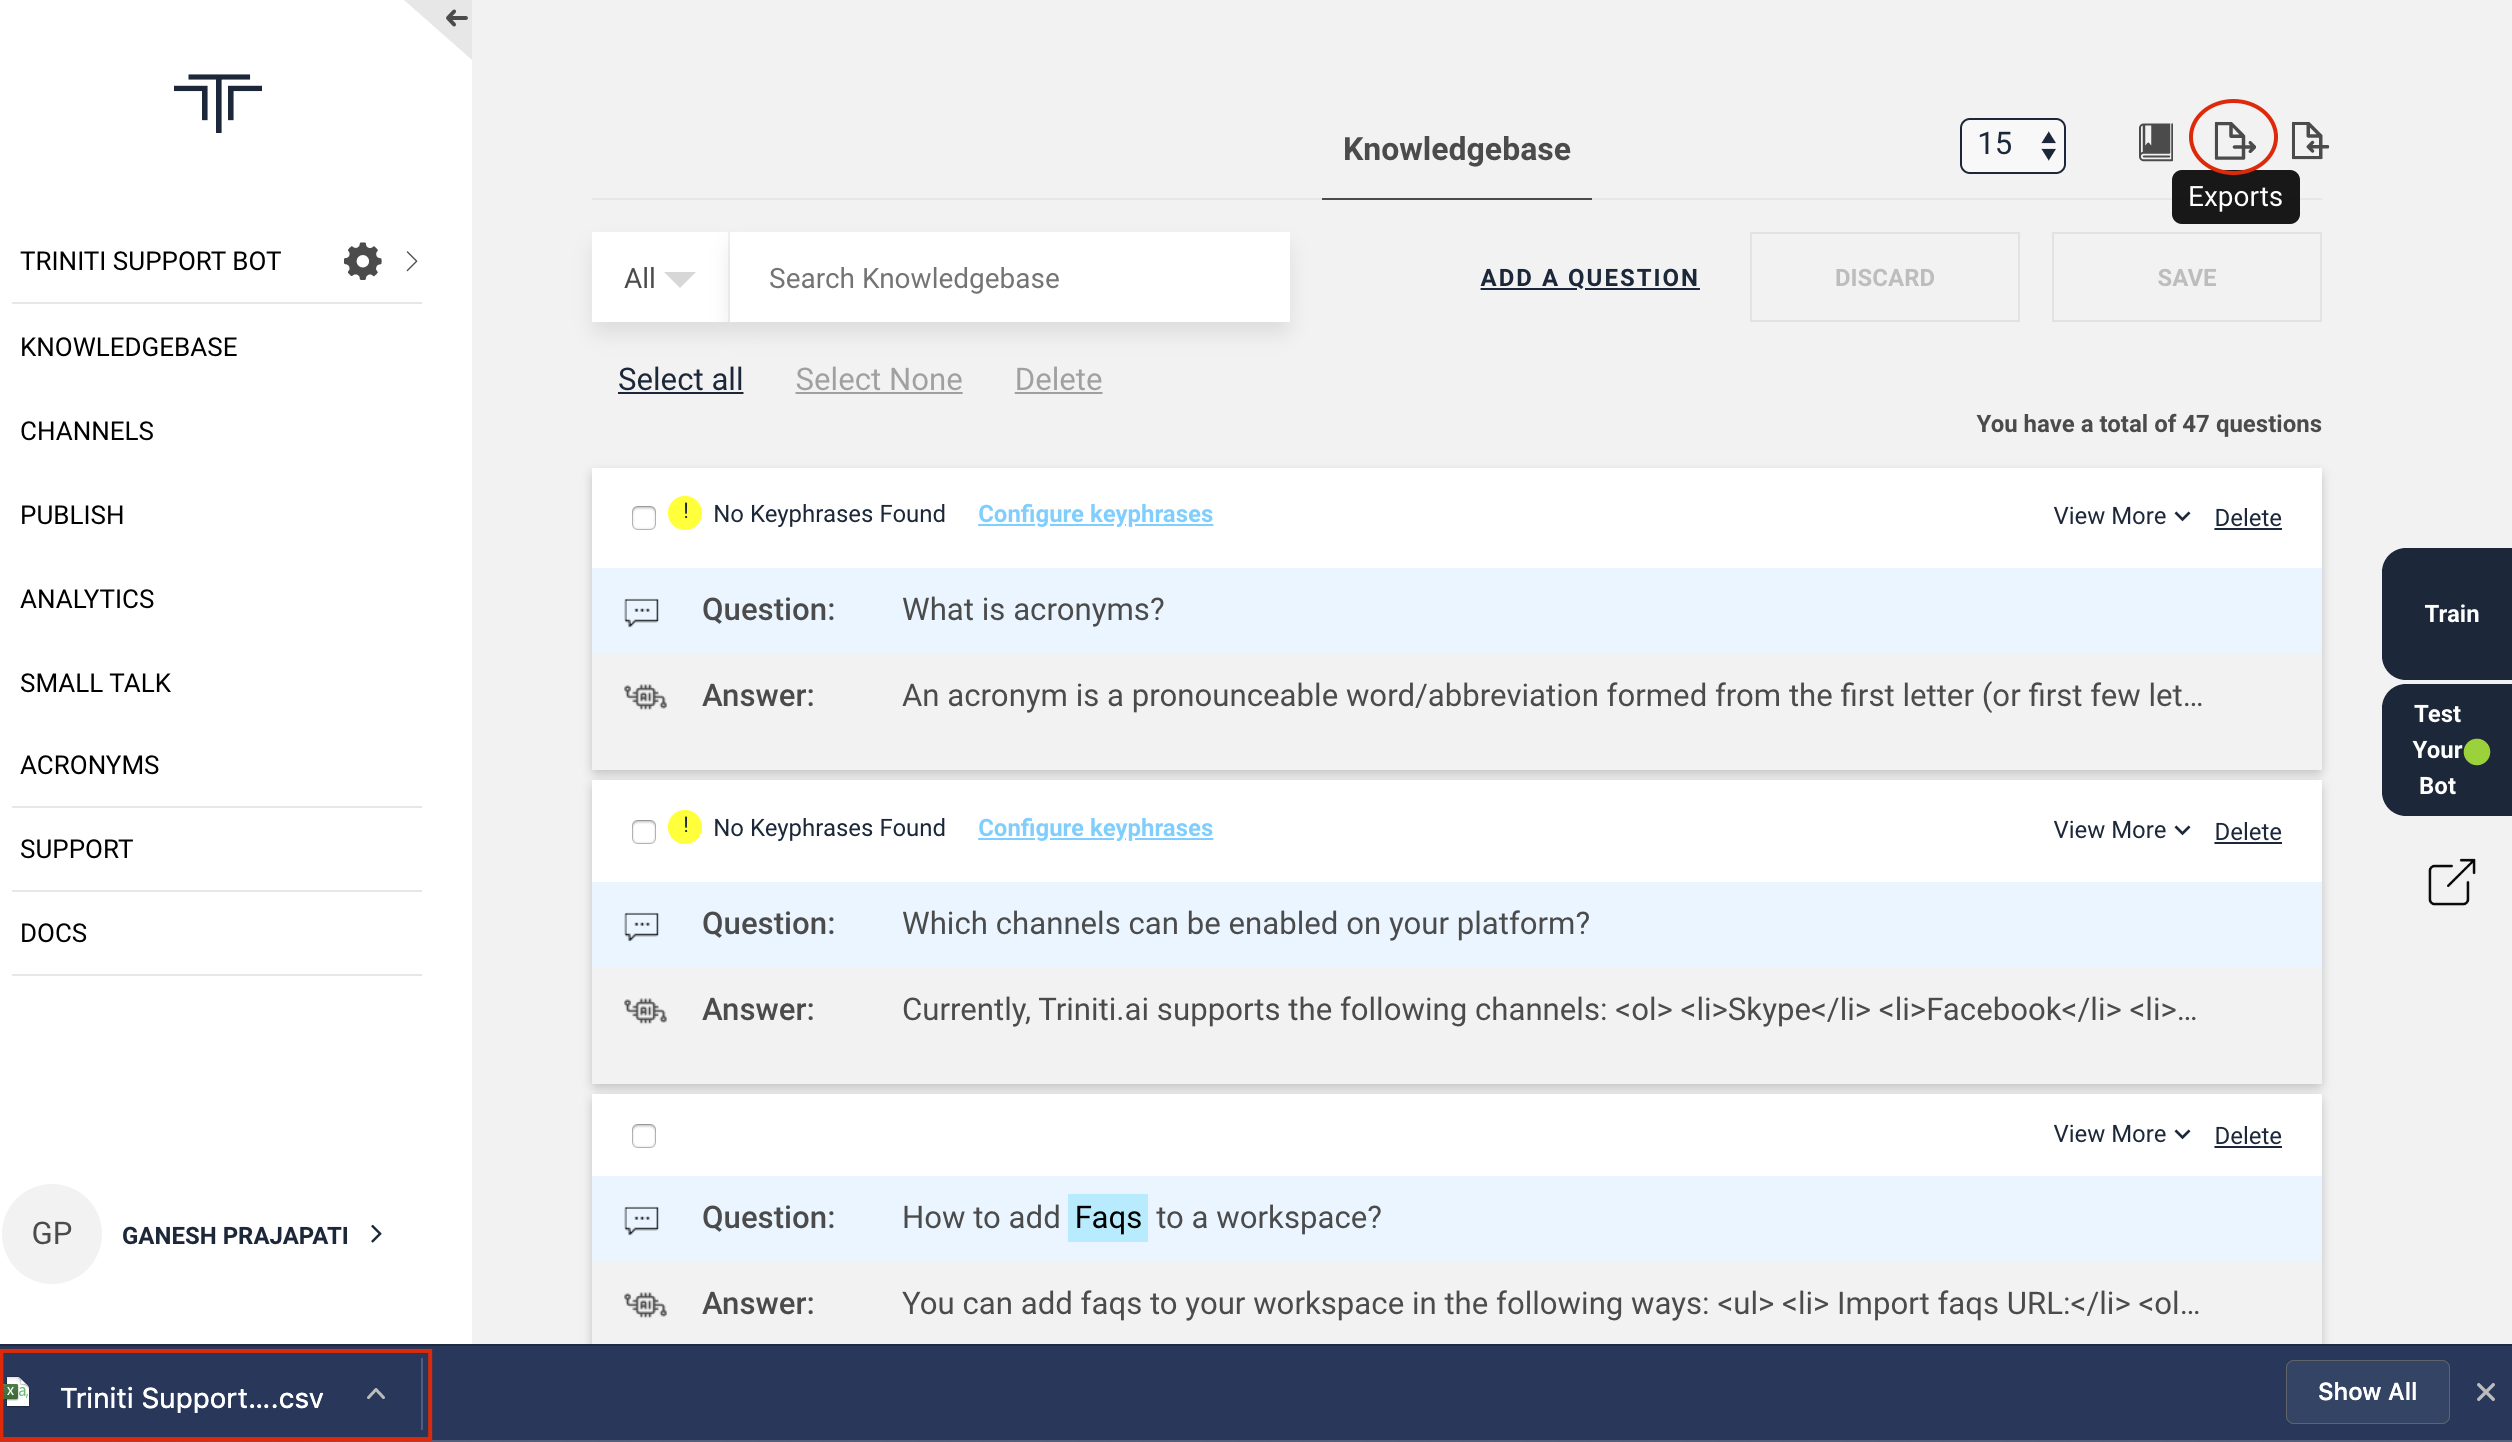
Exporting FAQs
If you want to use the same knowledgebase containign all the FAQs that you have added earlier in another workspace or want to keep those FAQs, then you can export those FAQs by following these steps:
- Goto your workspace
- Click on 'Export' icon in knowledgebase It will download a CSV file containing id, questions, answers, products, etc columns.
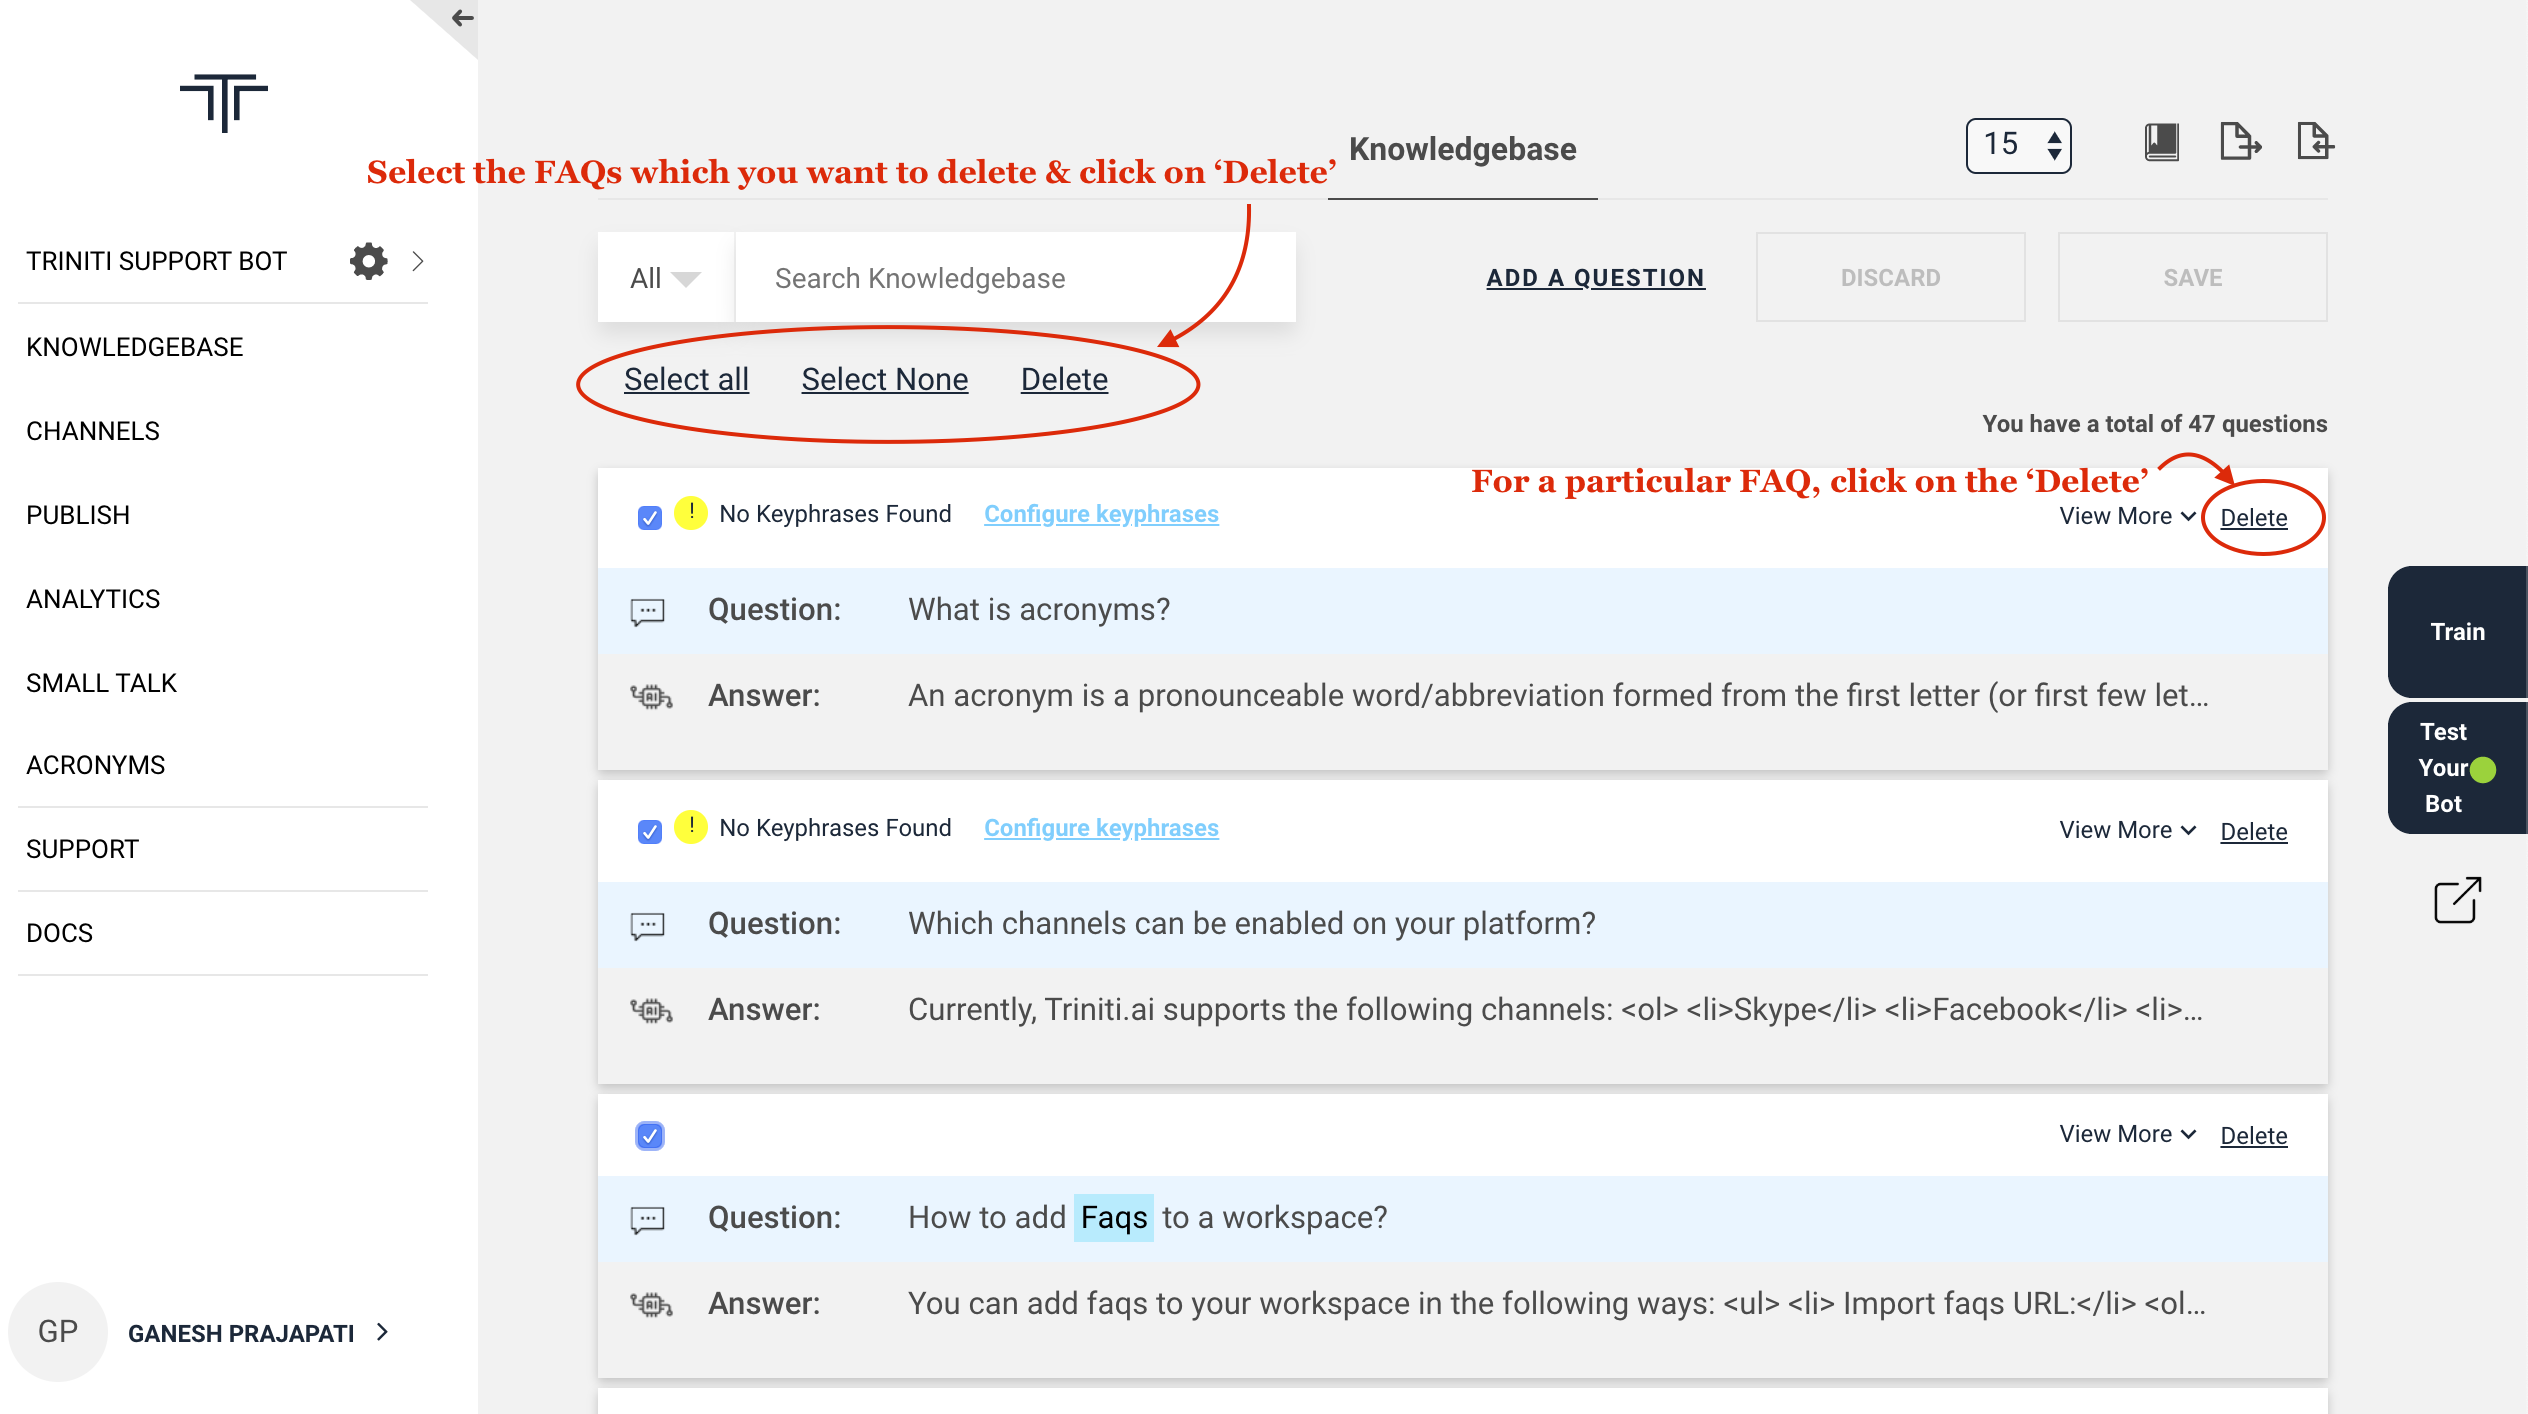
Deleting FAQs
If you want to remove some unneccessary FAQs or duplicate FAQs, so you can remove those FAQs from your knowledgebase. You can delete a particular, multiple or all FAQs by selecting the FAQs which you want to delete by following these steps:
- Goto your workspace
- Select the FAQs which you want to delete
- Click on 'Delete option' or click on the 'Delete' option of a particular FAQ.
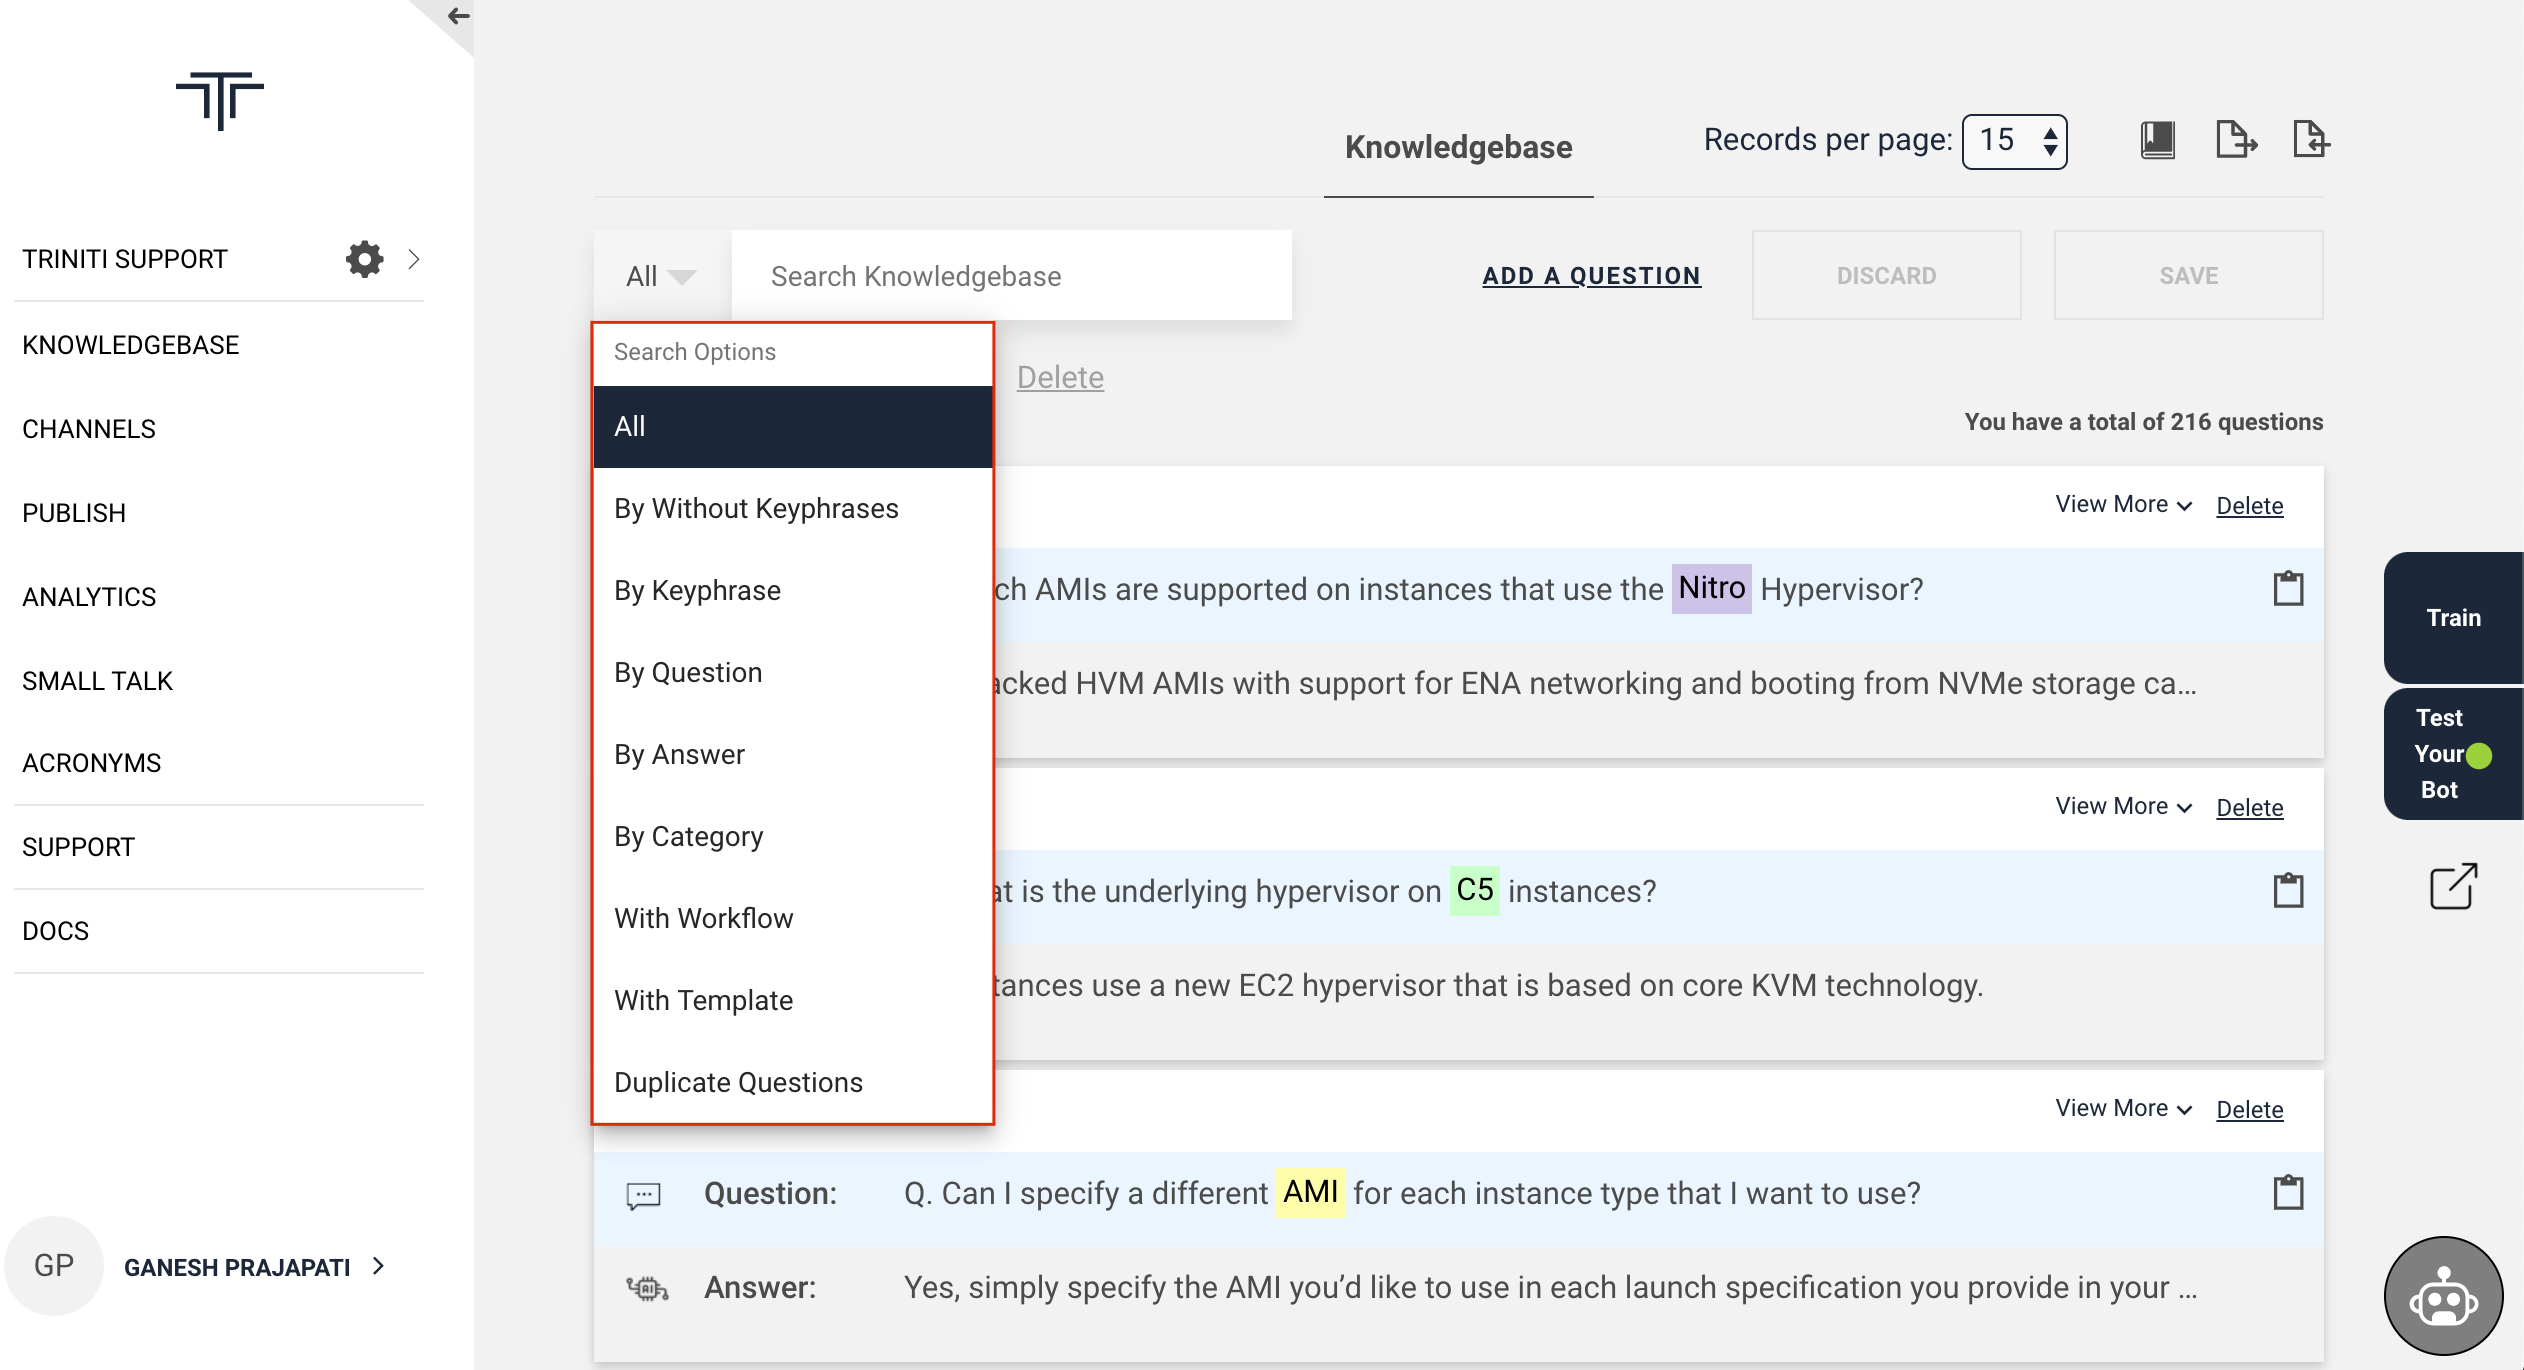
How to search for the FAQs in knowledgebase?
Searching for a particular FAQ is a very hectic job, but we have made your job easy by enabling this feature to search for the FAQs very quickly. You can search for FAQs in the knowledgebase with various search options:
Search Options |
Description |
|---|---|
| All | It will search the FAQ among all the FAQs in your knowledge base. |
| By Questions | With this option you can search for the FAQ by questions in the knowledgebase. |
| By Answers | It will help you to find the FAQ by its answer in the knowledgebase. |
| By Categories | If you have added categories to your FAQs then you can search for those FAQs by selecting categories option in the knowledgebase. |
| By Keyphrases | If you want to search the FAQs based on key phrases that you have added in your knowledge base, then you can go with this option. |
| Without keyphrases | If you want to search the FAQs that don't have any key phrases in your knowledge base, then you can go select this option. |
| With Workflows | In your knowledge base if you have configured workflows in any of the FAQ then to search those FAQs you can try this option. |
| With Templates | For some of the FAQs you have added templates and you want to search those FAQs then you can search with this option in your knowledge base. |
| Duplicate Questions | You can search for the duplicate questions in you knwoledgebase by selecting this option. |
Formatting FAQ Responses
The response will be rendered on the bot normally in a textual format. You can add a text response in your FAQs by entering the responses in the bot Response section. If you are not selecting any template so by default is Text. You can format the FAQs response in three ways:
- Text
- Templates
- Workflow
Configuring the templates
Template editor supports formatting the FAQ response from the bot to render a good look and feel to your bot responses so that the conversations will be more interactive & user-friendly. You can format the responses as Text, Card, Image, Carousel, List, Button, Video & Custom, etc by following these steps:
1. Text Template
It will show the responses in textual format, if you want to show some responses in the text following with some components then you can configure text template by following these steps:
- Goto your workspace
- Click on 'Add a Question'
- Enter the question
- Click on 'Format Response' in the answer section
- Select 'Template Editor'
- Click on 'Manage Template'
- Select 'Text' from the templates list
- Enter the response
- Click on the 'Save'

2. Button Template
If you want your user to get the response by clicking on a button or suggested option, so you can configure a button template by following these steps:
- Goto your workspace
- Click on 'Add a Question'
- Enter the question
- Click on 'Format Response' in the answer section
- Select 'Template Editor'
- Click on 'Manage Template'
- Select 'Button' from the templates list
- Enter the title
- Click on 'Add Button'
- Enter button name
- Add anyone among Postback, External URL, Web URL
- Click on the 'Save'
Note:
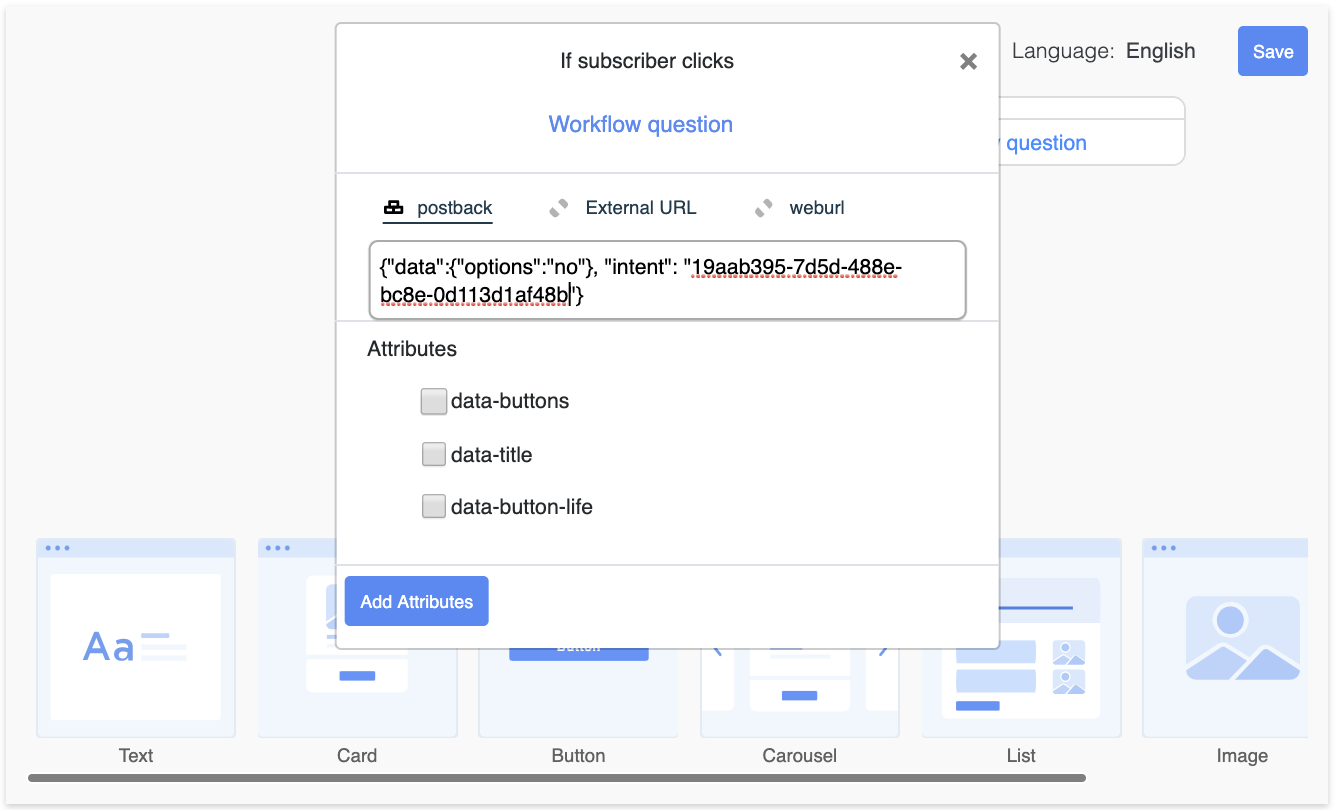
1. Postback: Postback is the request body which the server gets once the user clicks on any postback type button or quick reply. The bot expects it to be of JSON type with either 'intent' or 'type' and 'data'. The postback data will be the intent_name/intent_id or a FAQ question that you want to show the user on clicking this button. You will have to add the intent_name/intent_id or FAQ in JSON format as shown below. You can add postback data in two ways with a valid postback:
With FAQ |
With Intent |
|---|---|
{ "data": { "FAQ":"<ANY TRAINED FAQ UTTERANCE>" }, "type":"MORE_FAQ"} |
{ "data": { "options": "no" }, "intent": "faq_id/intent_id"} |
Where;
- "FAQ": Any trained utterance of your knowledgebase
- "options": Used to connect multiple nodes based on the value in workflow connections tab
- "intent": Any faq_id or intent_id which should be any intent or workflow faq.
2. External URL: External URL is the website URL on which you want to redirect the user on clicking this button. It will open the URL in a new tab. 3. Web URL: Web URL will open the entered website URL in the bot itself.

3. Card Template
If you want to show some cards in your response with text or other components, then you can configure a card template by following these steps:
- Goto your workspace
- Click on 'Add a Question'
- Enter the question
- Click on 'Format Response' in the answer section
- Select 'Template Editor'
- Click on 'Manage Template'
- Select 'Card' from the templates list
- Enter the image URL or upload an image
- Add a heading, description, button (Optional)
- Click on the 'Save'
4. Image Template
If you want to show images in your responses or for a particular utterance then you can add the image template in your response by following these steps:
- Goto your workspace
- Click on 'Add a Question'
- Enter the question
- Click on 'Format Response' in the answer section
- Select 'Template Editor'
- Click on 'Manage Template'
- Select 'Image' from the templates list
- Enter the image URL or upload an image
- Click on the 'Save'

5. Carousel Template
Carousel is a kind of list component in which a slider slides the images horizontally, where you can give the multiple options listing in the carousel to choose from the various options. You can configure the carousel template by following these steps:
- Goto your workspace
- Click on 'Add a Question'
- Enter the question
- Click on 'Format Response' in the answer section
- Select 'Template Editor'
- Click on 'Manage Template'
- Select 'Carousel' from the templates list
- Configure the carousel template by entering the details (Image, Heading, Description, Button, etc.)
- Click on the 'Save'

6. List Template
If you want to show various options to choose from, then you can add those various options in a list. You can configure the list by following these steps:
- Goto your workspace
- Click on 'Add a Question'
- Enter the question
- Click on 'Format Response' in the answer section
- Select 'Template Editor'
- Click on 'Manage Template'
- Select 'List' from the templates list
- Configure the list template by entering the details (Image, List Title(optional), Item Heading, Item Description, Item Image, Button for the item, etc.)
- Click on the 'Save'
7. Video Template
Even you can add a video for the response to show the user for any particular utterances by following these steps:
- Goto your workspace
- Click on 'Add a Question'
- Enter the question
- Click on 'Format Response' in the answer section
- Select 'Template Editor'
- Click on 'Manage Template'
- Select 'Video' from the templates list
- Enter video URL, Heading, Description, Button(Optional)
- Click on the 'Save' Note: You can copy the youtube link from the URL bar.
Managing Workflow
Workflow helps to define step by step conversation journeys. The intents and entities derivation is mandatory to identify the correct response to the user, but all the needed information may not be available all the time, during these cases workflow can be configured to prompt the user for more input that is needed to respond correctly.
In a workflow, each entity is handled by a node. A node will have at least a prompt and a connection. A prompt is to ask for user input and connection to link to another node. In a typical workflow that handles n entities, there would be n+2 nodes (One node per entity with a start and a cancel node).
In the workflow, we expect user inputs in a sequence, but by design, a workflow can handle any entities in any order or all in a single statement. Out of the box, workflow supports out of context scenarios. Ex: If a user asks, How to apply for a debit card?, the defined workflow can ask for the various card selection like Rupay Card, Master Card, Visa Card, etc. To know more please refer manage fulfillment via workflows section
Configure a workflow:
Generally we configure workflows to communicate from both end i.e; user & bot (User will ask any query then the bot will ask for some input from the user). But in some cases we don't want the user to enter any input to respond to their queries, so we are supporting two types of workflows:
1. Enquiry Type Workflow:
In the Enquiry type of workflows, we give the options to users to select for the response instead of asking for any input by typing from the user. Ex; If the user asks to the bot "I want to know about credit card", then the bot will show the various options related to the user's query like "Vanilla Credit Card, Student Credit Card, Balance Transfer Credit Card, Rewards Credit Card etc.". So the user can select one of these options for which they want to know.
To configure a Enquiry type workflow please follow these steps:
- Goto your workspace
- Click on 'Add a Question'
- Enter the question
- Click on 'Format Response' in 'Answer' section
- Select 'Workflow'
- Select 'Workflow Type' as 'Enquiry'
- Configure the workflow by adding the nodes, responses, validation & connection
- Click on apply (On each node after configuring to save node configurations.)
- Click on Save (to save workflow.)

2. Transactional Type Workflow:
In transaction workflows, the conversation happens from both sides to give the proper response. The bot will also ask the user for some inputs to give the appropriate response for the user's query. It will be used for any lead generation process or any transaction-based task. Ex; If the user asks to the bot "Apply for a credit card", then the bot will ask for the required details from the user to enter like "choose a card, enter name, enter email, etc."
To configure a transactional workflow please follow these steps:
- Goto your workspace
- Click on 'Add a Question'
- Enter the question
- Click on 'Format Response' in 'Answer' section
- Select 'Workflow'
- Select 'Workflow Type' as 'Transactional'
- Configure the workflow by adding the nodes, responses, validation & connection
- Click on apply (On each node after configuring to save node configurations.)
- Click on Save (to save workflow.)

Note:
Nodes: The steps which you want to add for the conversational journey(i.e; Lead Generation) will be represented by a node in the workflow. You can add multiple nodes as the steps are needed in your workspace. Ex; If you want to capture the user's Name, Phone, Email for the credit card application. So you can add four nodes asking Name, Phone, Email & your bank API, etc. It consists of three sections:
Definition: You can add the definition(description) of the node like step name & what is the step for, etc. To know more please refer Defining Workflow
Validation: You can add the validations for the data entered by the user on a particular step(like email, phone, etc validations) by navigating to the validation section in the same node. To know more please refer Handling Validations
Connection: You can connect multiple nodes with a node by providing the condition and the node to go on fulfilling that condition by navigating to the connection section of the same node. To know more please refer Connections
Definition |
Validation |
Connection |
|---|---|---|
Bot response for both the workflows
The bot will respond to the added query as per the configured workflow as shown below:
Enquiry Type Workflow |
Transactional Workflow |
|---|---|
 |
 |
Redirecting FAQs to Workflows
If you want your user to redirect on a workflow response like on an inquiry, lead generation or raise service request flow from a faq. Eg; User is asking queries on the bot and for some question you want the user to raise a service request then you can redirect the user on the service request workflow where the user will give all the required information as configured in that workflow. You can configure this functionality by referring to these steps:
- First, configure a workflow(inquiry or transactional) as per your requirement
- Add a faq on which you want to redirect the user on workflow response
- Then follow these steps:
- Goto your workspace
- Click on 'Add a Question'
- Enter the question
- Click on 'Format Response' in 'Answer' section
- Select 'Template Editor'
- Select 'Button template' & add button heading
- Click on 'Add Button'
- Enter the Question/workflow name in the button name
- Enter the intentId(faqId of the workflow) in the intent value under postback payload
- Click on save
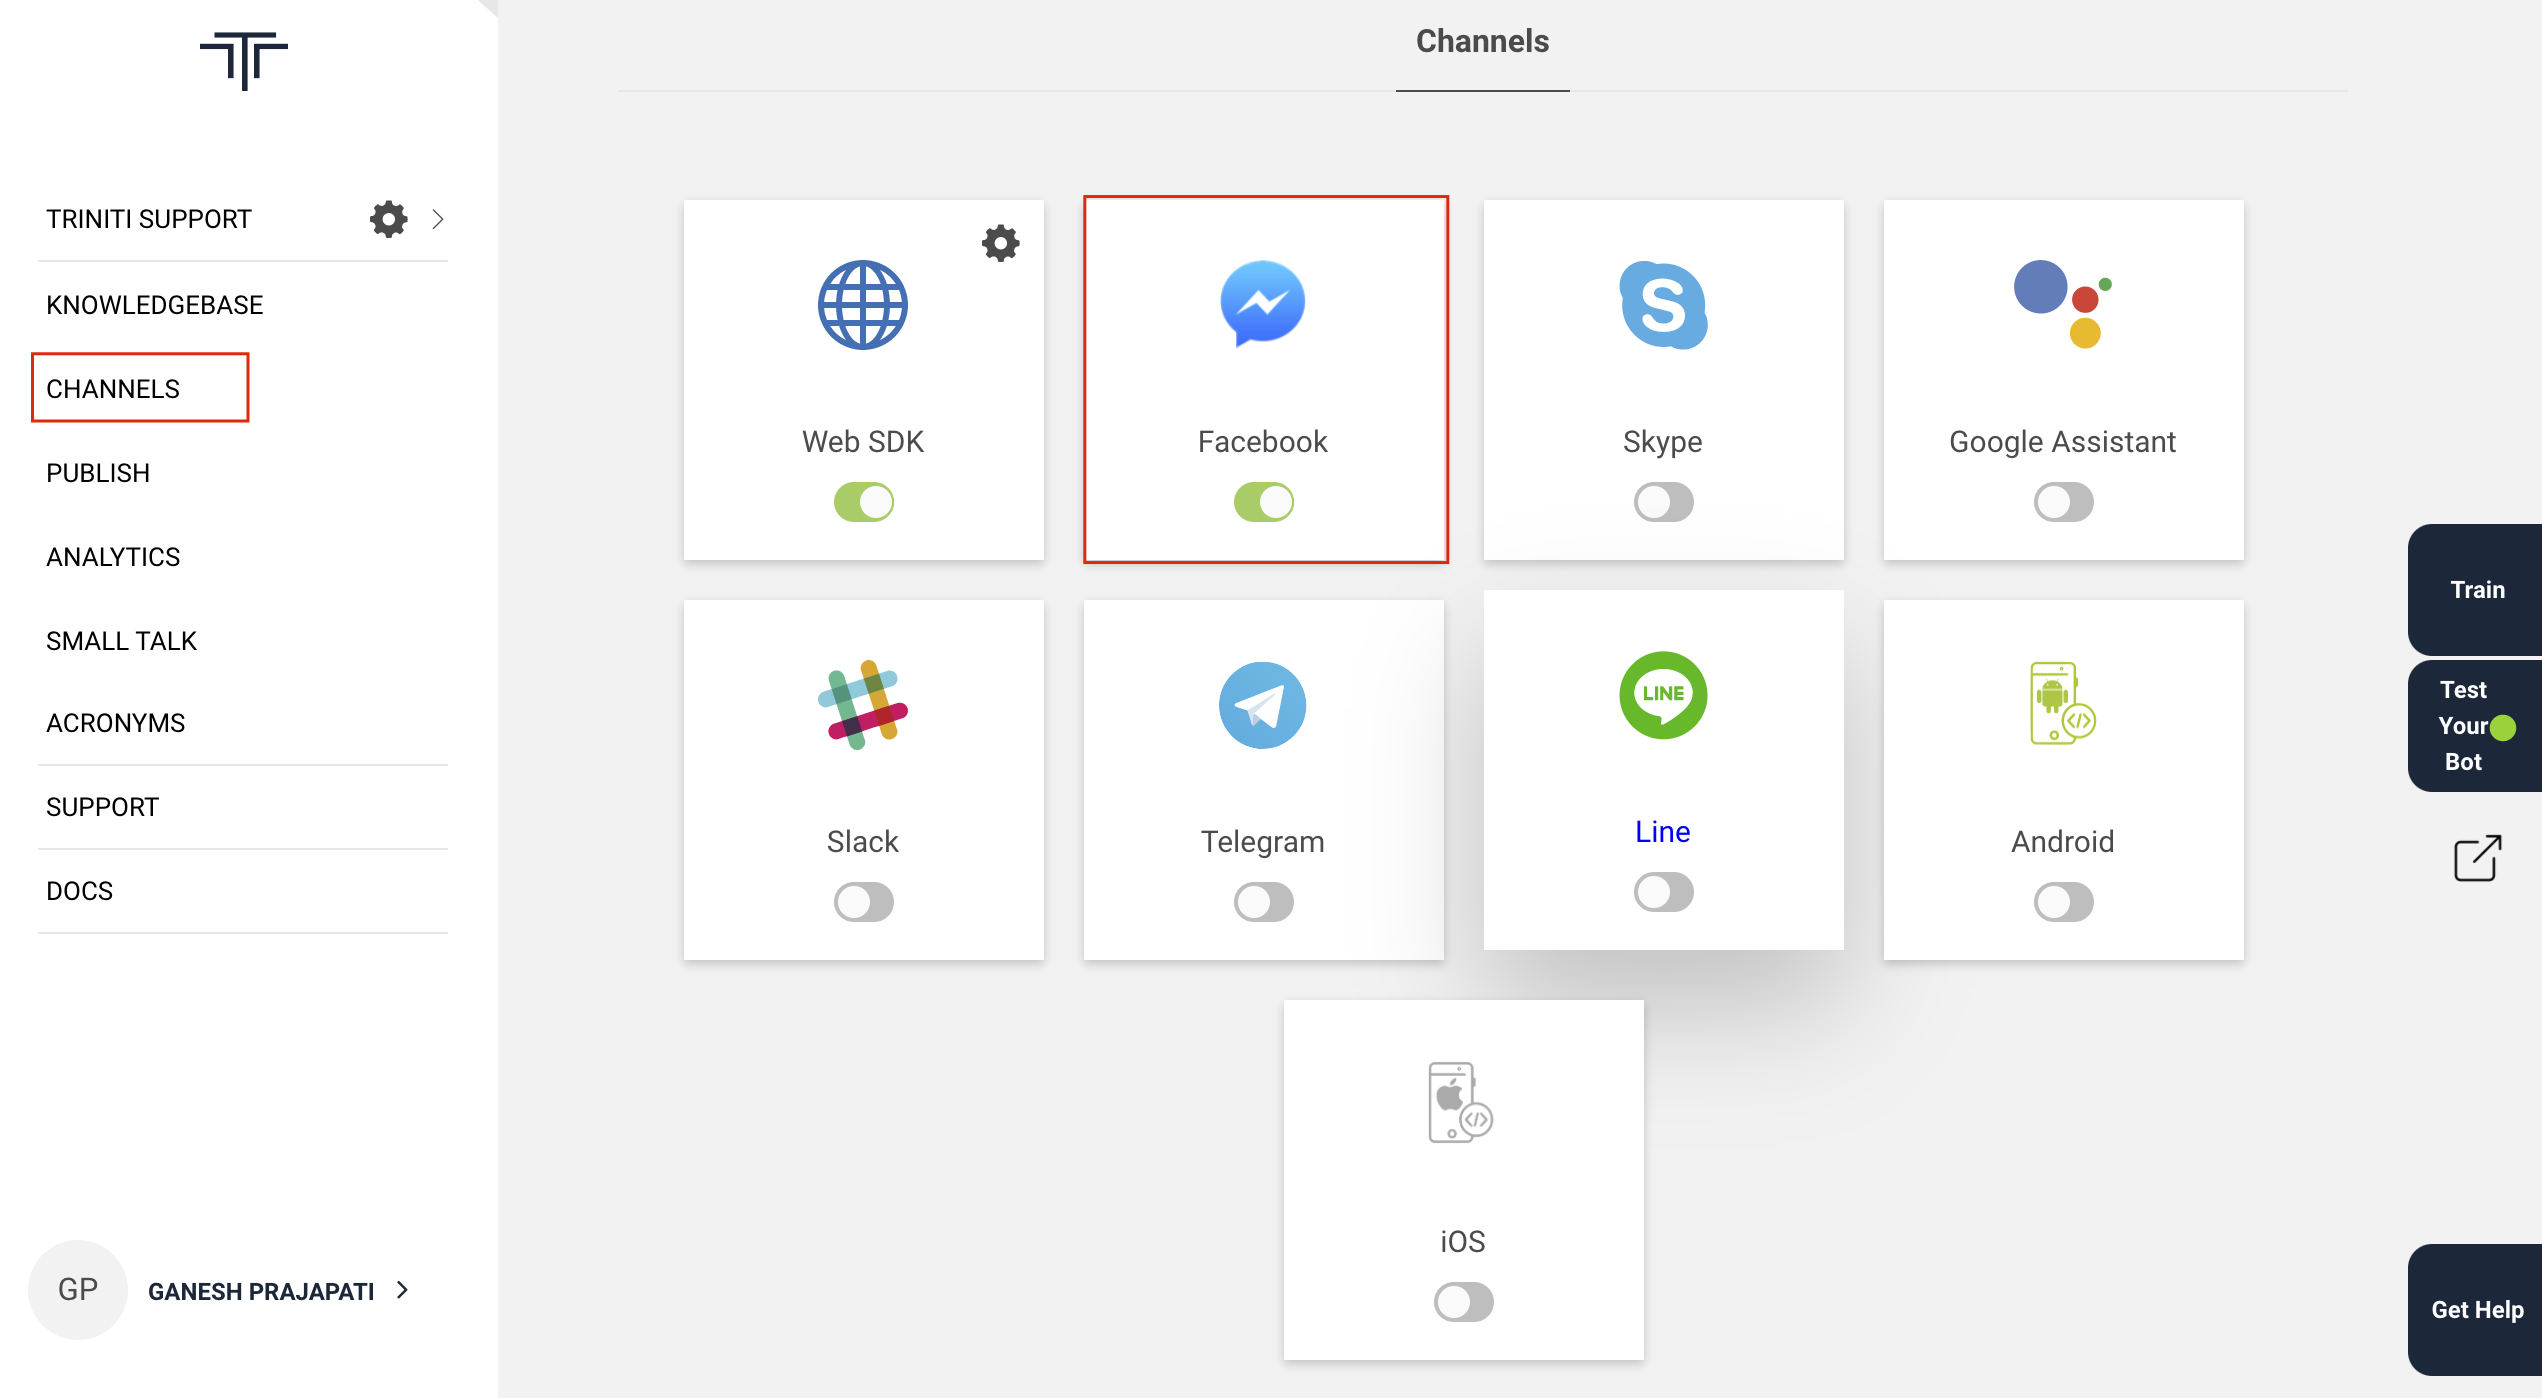
Setting up Channel Specific Responses
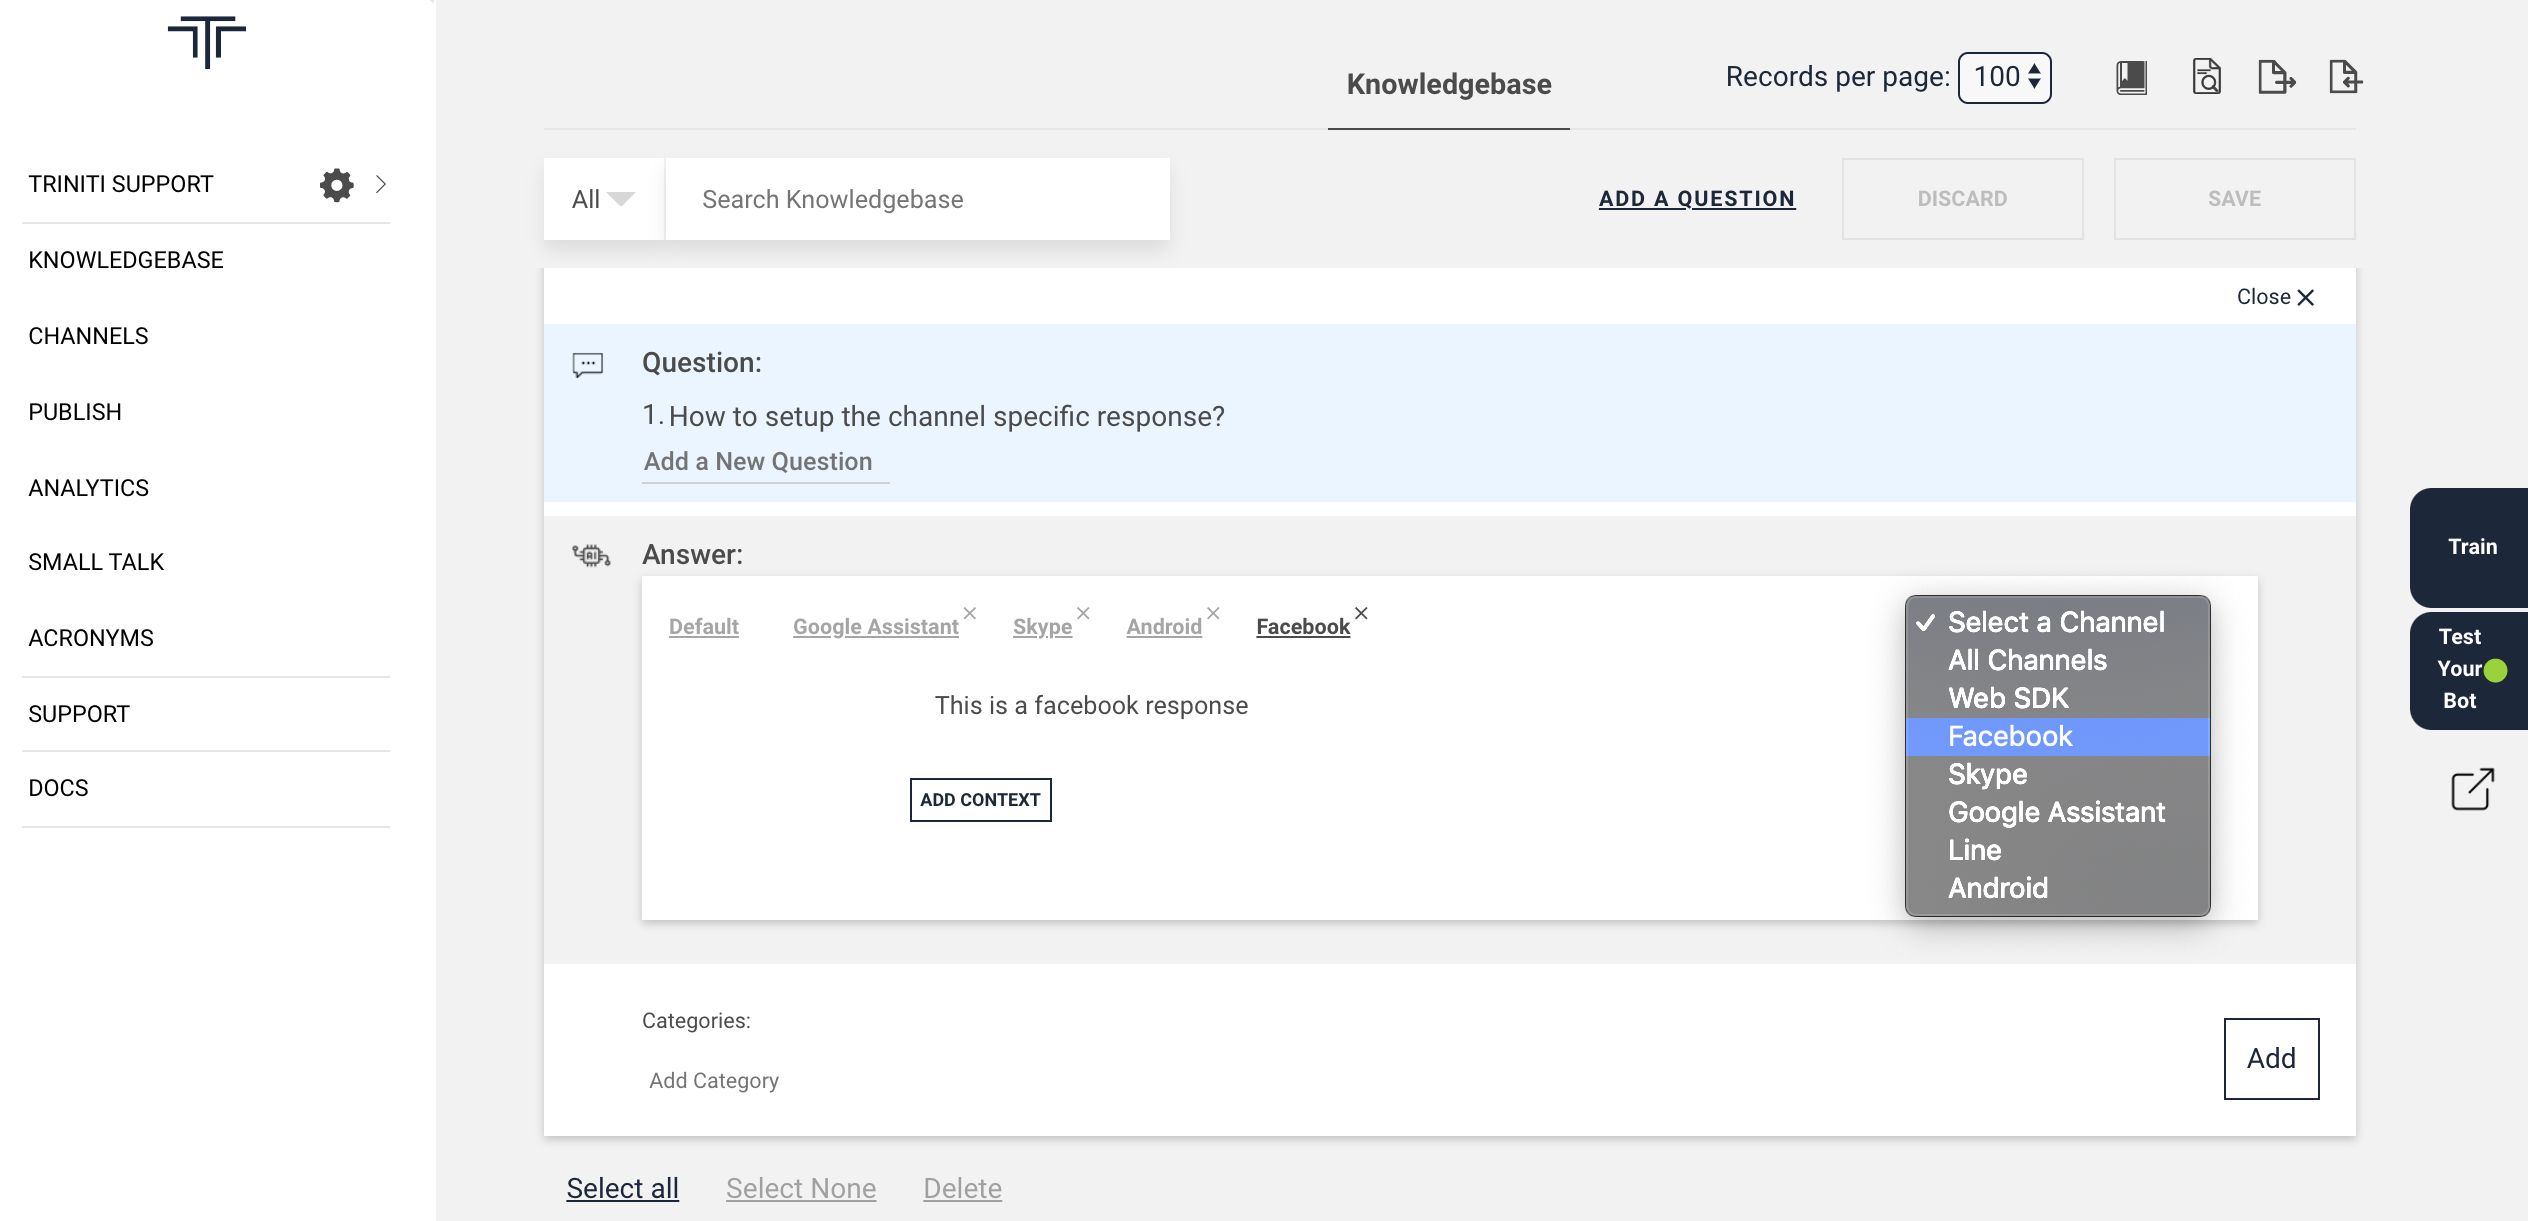
We have a feature to add channel-specific responses. If you want a different kind of or indifferent way of response for specific channels then you can do that also on this platform. Eg; If you want to show the "This is web SDK response" for a question but for the same question you want to show the response "This is the Facebook response" for Facebook users then you can do that easily by following these steps:
- Goto your workspace
- Add a question
- Add a response for default web SDK
- Choose a channel from channels list on the top right corner of the response section (The channels list will show all the enabled channels)
- Enter the response for the particular channel
- Click on Add (Save the faq)
The same question will show channel-specific responses as per the responses set for specific channels.
Styling FAQ Responses
If you want to make your customers pay more attention to the bot responses then you can style your responses in a way so that the responses can be more readable, easily understandable and more attractive. So that you can engage the customers on your bot to interact and spend little more time on the bot. So we have an option for the FAQ response styling, with the help of this guided tutorial you can style your responses and make more attractive.
You can use standard HTML attributes to style your bot responses.
HTML format |
Preview |
|---|---|
Redirect the user on dialer pad/calling on clicking the given phone number.Eg; You can call us on the given number <a href="tel:your_phone_number"> your_phone_number</a>On clicking the phone number it will take the user on the dialer and ask to call on the given number |
|
- Bold Text: <strong> This is a response in bold </strong> or <b> This is a response in bold</b> - Italic Text: <em> This is an Italic response </em> - Text with underscore: <u> This is a response with underscore</u> - Strikethrough Text: This is a <s>response</s> with strikethrough text |
|
| - Font color: | |
<span style="color: rgb(226, 80, 65);"> This is a response with red color</span>or<font color=”red”> This is a response with red color</font>- Font size:<font size="4"> This is a response with font size 4</font> |
|
- Link/Hyperlink (word specific): You can bind a link/url in a word using <a href> </a>. Eg; New to triniti.ai<a href="https://developer.triniti.ai" target="_blank"> Create an account</a> for free - Link/Hyperlink (default):Just paste the URL or link, our AI engine will bind the url in a text 'here'. Eg;To know more about Triniti.ai please click https://triniti.ai/ Note: There should be sinlge space before & after the url/link. |
|
- Text alignment(center): <p style="text-align: center;"> This response at the center</p>- Text alignment(right): <p style="text-align: right;"> This is right side</p>- Text alignment(left): <p style="text-align: left;"> This is left side</p>- Blockquote: <blockquote> <p>This is a quoted response</p></blockquote> |
|
- Unordered List (Default Bullet points): <ul> <li>One</li> <li>Two</li> <li>Three</li></ul> - Unordered List (Circle points): <ul style="list-style-type: circle;"> <li>One</li> <li>Two</li> <li>Three</li></ul> - Unordered List (Disk points): <ul style="list-style-type: disc;"> <li>One</li> <li>Two</li> <li>Three</li></ul> - Unordered List (Square points): <ul style="list-style-type: square;"> <li>One</li> <li>Two</li> <li>Three</li></ul> |
|
- Ordered List (Default Numbers): <ol> <li>One</li> <li>Two</li> <li>Three</li></ol> - Ordered List (Uppercase Alphabets): <ol style="list-style-type: upper-alpha;"> <li>One</li> <li>Two</li> <li>Three</li></ol> - Ordered List (Lowercase Alphabets): <ol style="list-style-type: lower-alpha;"> <li>One</li> <li>Two</li> <li>Three</li></ol> - Ordered List (Uppercase Roman): <ol style="list-style-type: upper-roman;"> <li>One</li> <li>Two</li> <li>Three</li></ol> - Ordered List (Lowercase Roman): <ol style="list-style-type: lower-roman;"> <li>One</li> <li>Two</li> <li>Three</li></ol> |
|
- Image: If you want to add an image between your responses like some icon (eg; info icon) then you can use this HTML format otherwise you can use template editor for the images. Eg;This is a response with an info(<img alt="info_icon"src="https://img.icons8.com/metro/2x/info.png" width="50" height="50">) icon. |
|
- Table(With border):<table border=1> <tbody> <tr> <th>serial number</th> <th>description</th> </tr> <tr> <td>1.</td> <td>One </td> </tr> <tr> <td>2.</td> <td>Two</td> </tr> <tr> <td>3.</td> <td>Three</td> </tr> </tbody></table> |
|
- Table(Without border):<table> <tbody> <tr> <th>serial number</th> <th>description</th> </tr> <tr> <td>1.</td> <td>On </td> </tr> <tr> <td>2.</td> <td>Two</td> </tr> <tr> <td>3.</td> <td>Three</td> </tr> </tbody></table> |
Fine Tuning FAQs
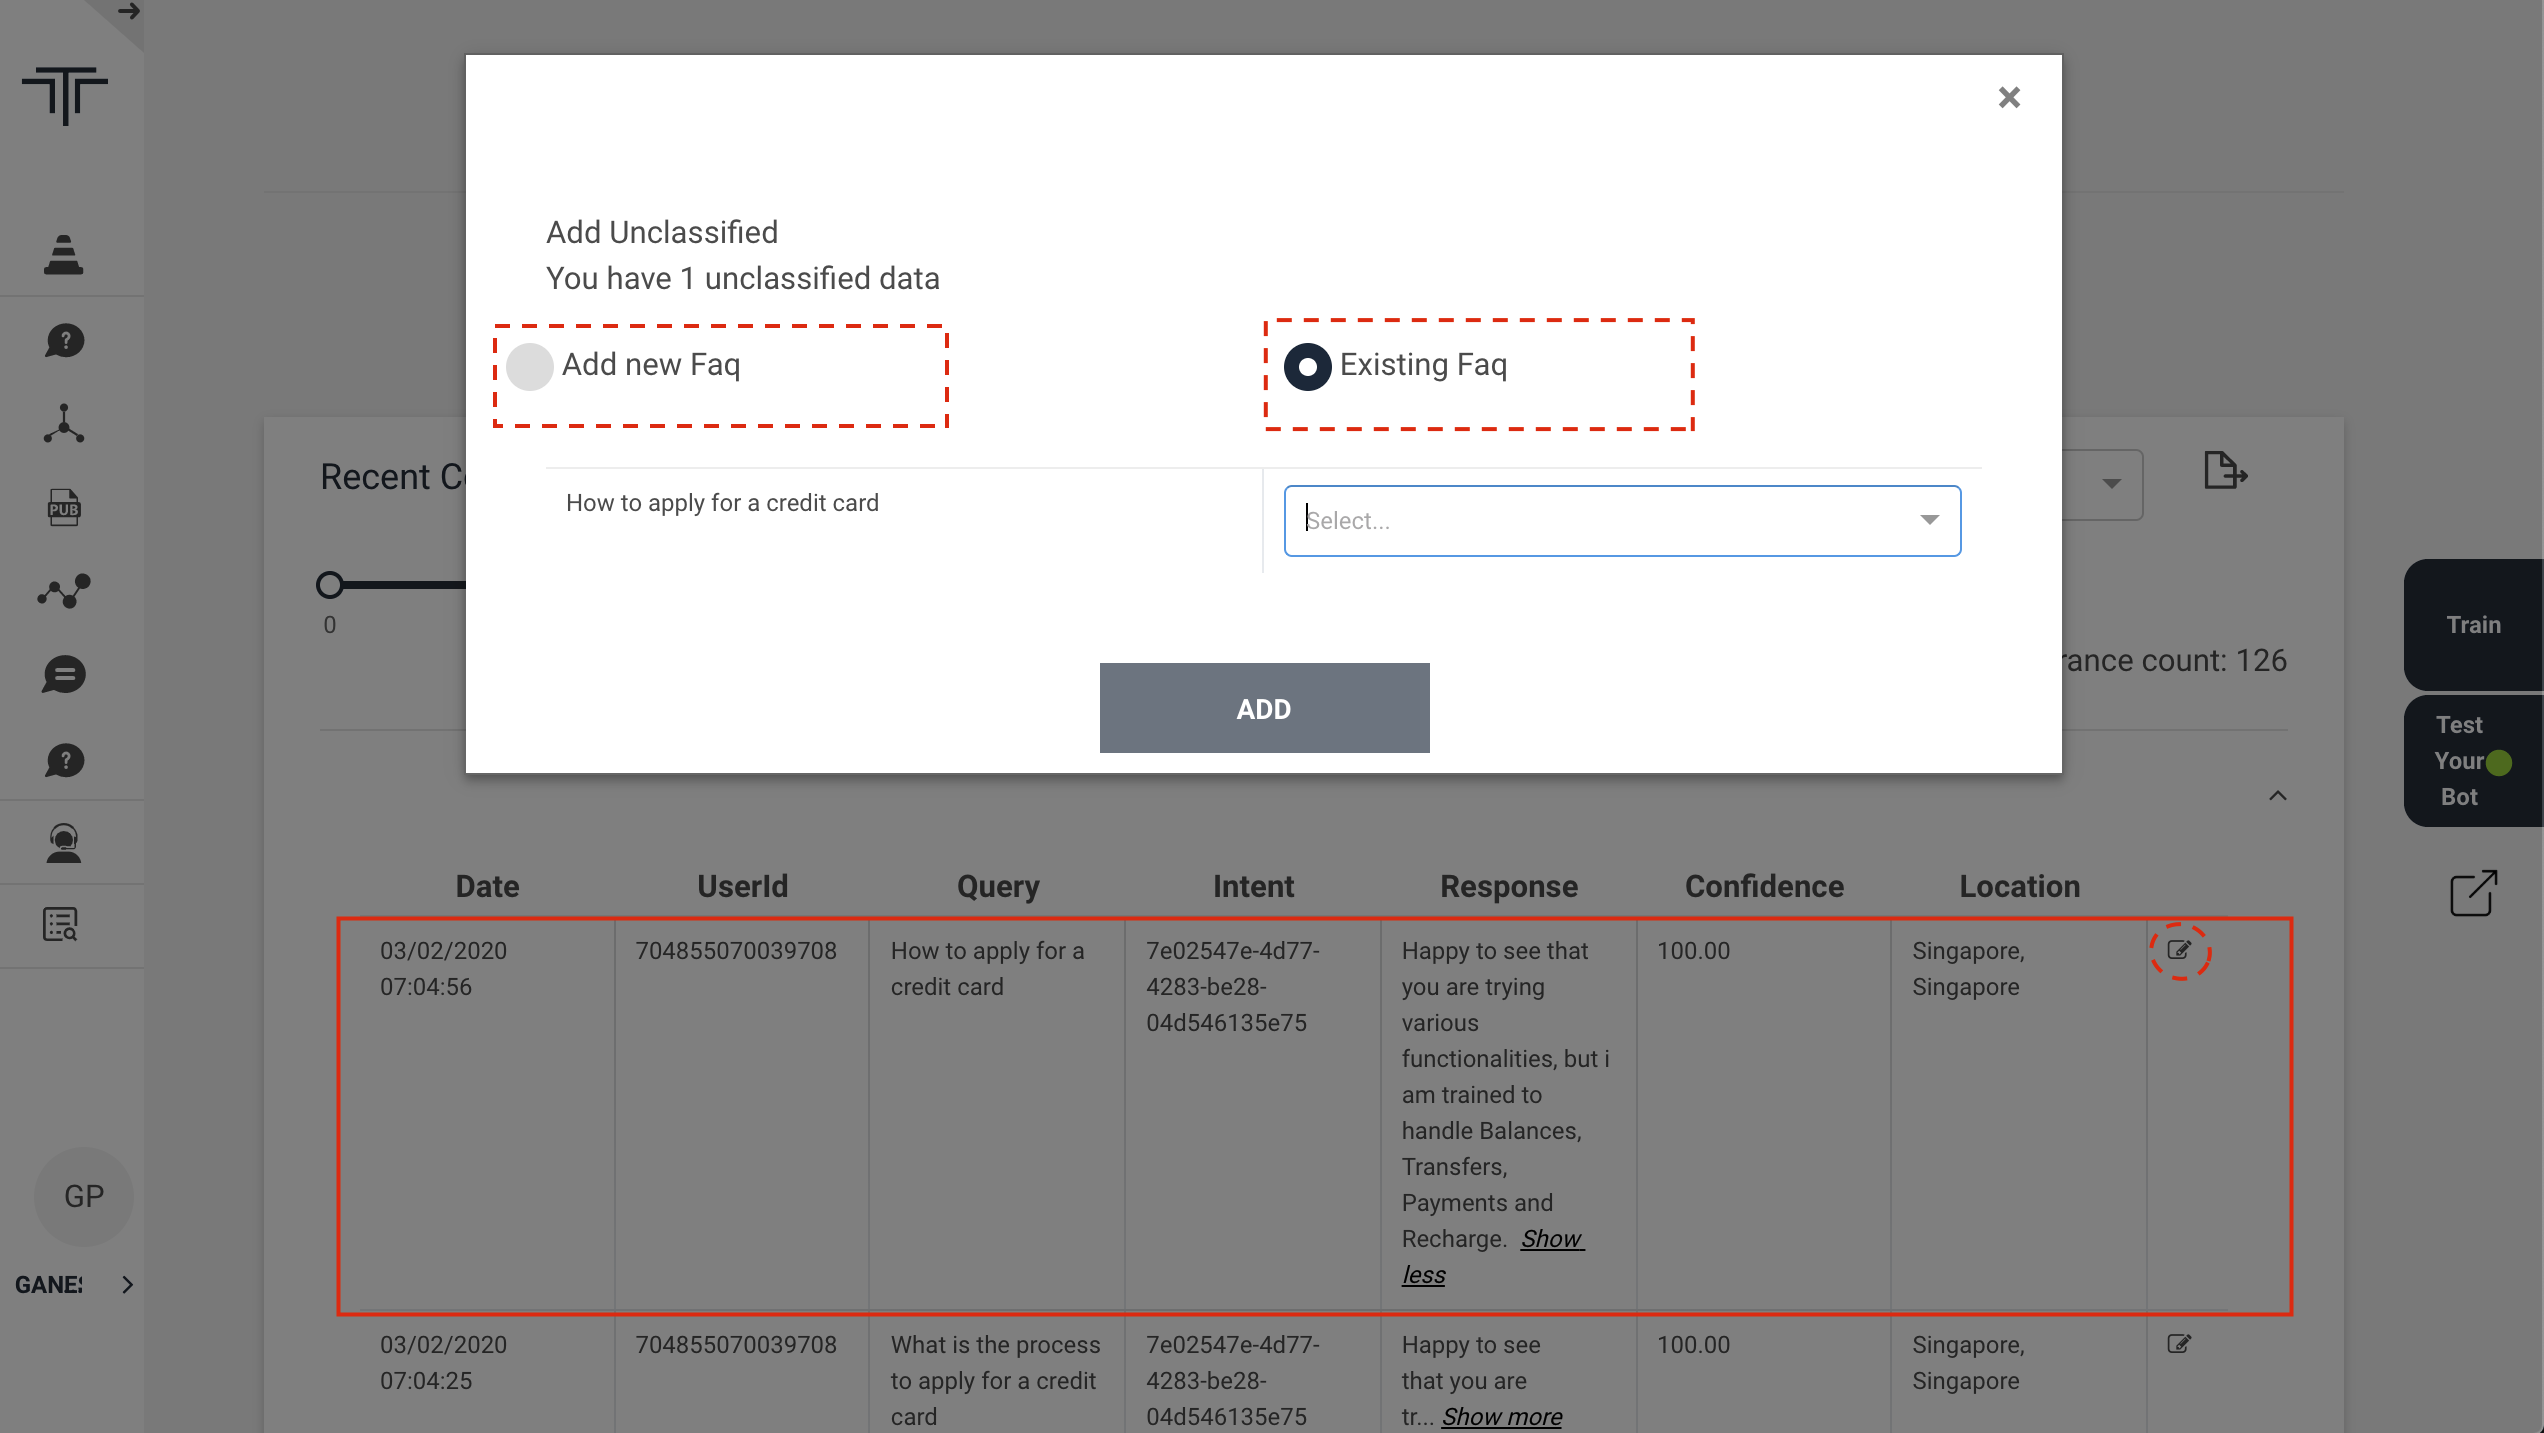
If you have any unclassified utterances that are not in your knowledgebase or the unanswered question by bot to the user then you can add those utterances in your knowledgebase or update the question so that bot can give a proper response by following these steps: 1. Add New FAQ: You can add those utterances as a new FAQ if those FAQs are not relevant to the anyone of the utterance present in your knowledge base.
- Click on edit icon of the particular utterance (which you want to add)
- Select 'Add new Faq' It will redirect you to the knowledgebase page by adding that utterance as a question.
- Enter the response(answer) for that utterance
- Click on Add It will add that utterance as a new FAQ in your knowledgebase
2. Existing FAQ: If the utterance is relevant to an utterance that is present in your knowledgebase which has the same response, then you can add that utterance in the existing FAQ by following these steps:
- Click on edit icon of the particular utterance (which you want to add)
- Select 'Existing Faq'
- Select the existing faq (Which has the same response.)
- Click on Add It will add that utterance as a variant in the existing faq.
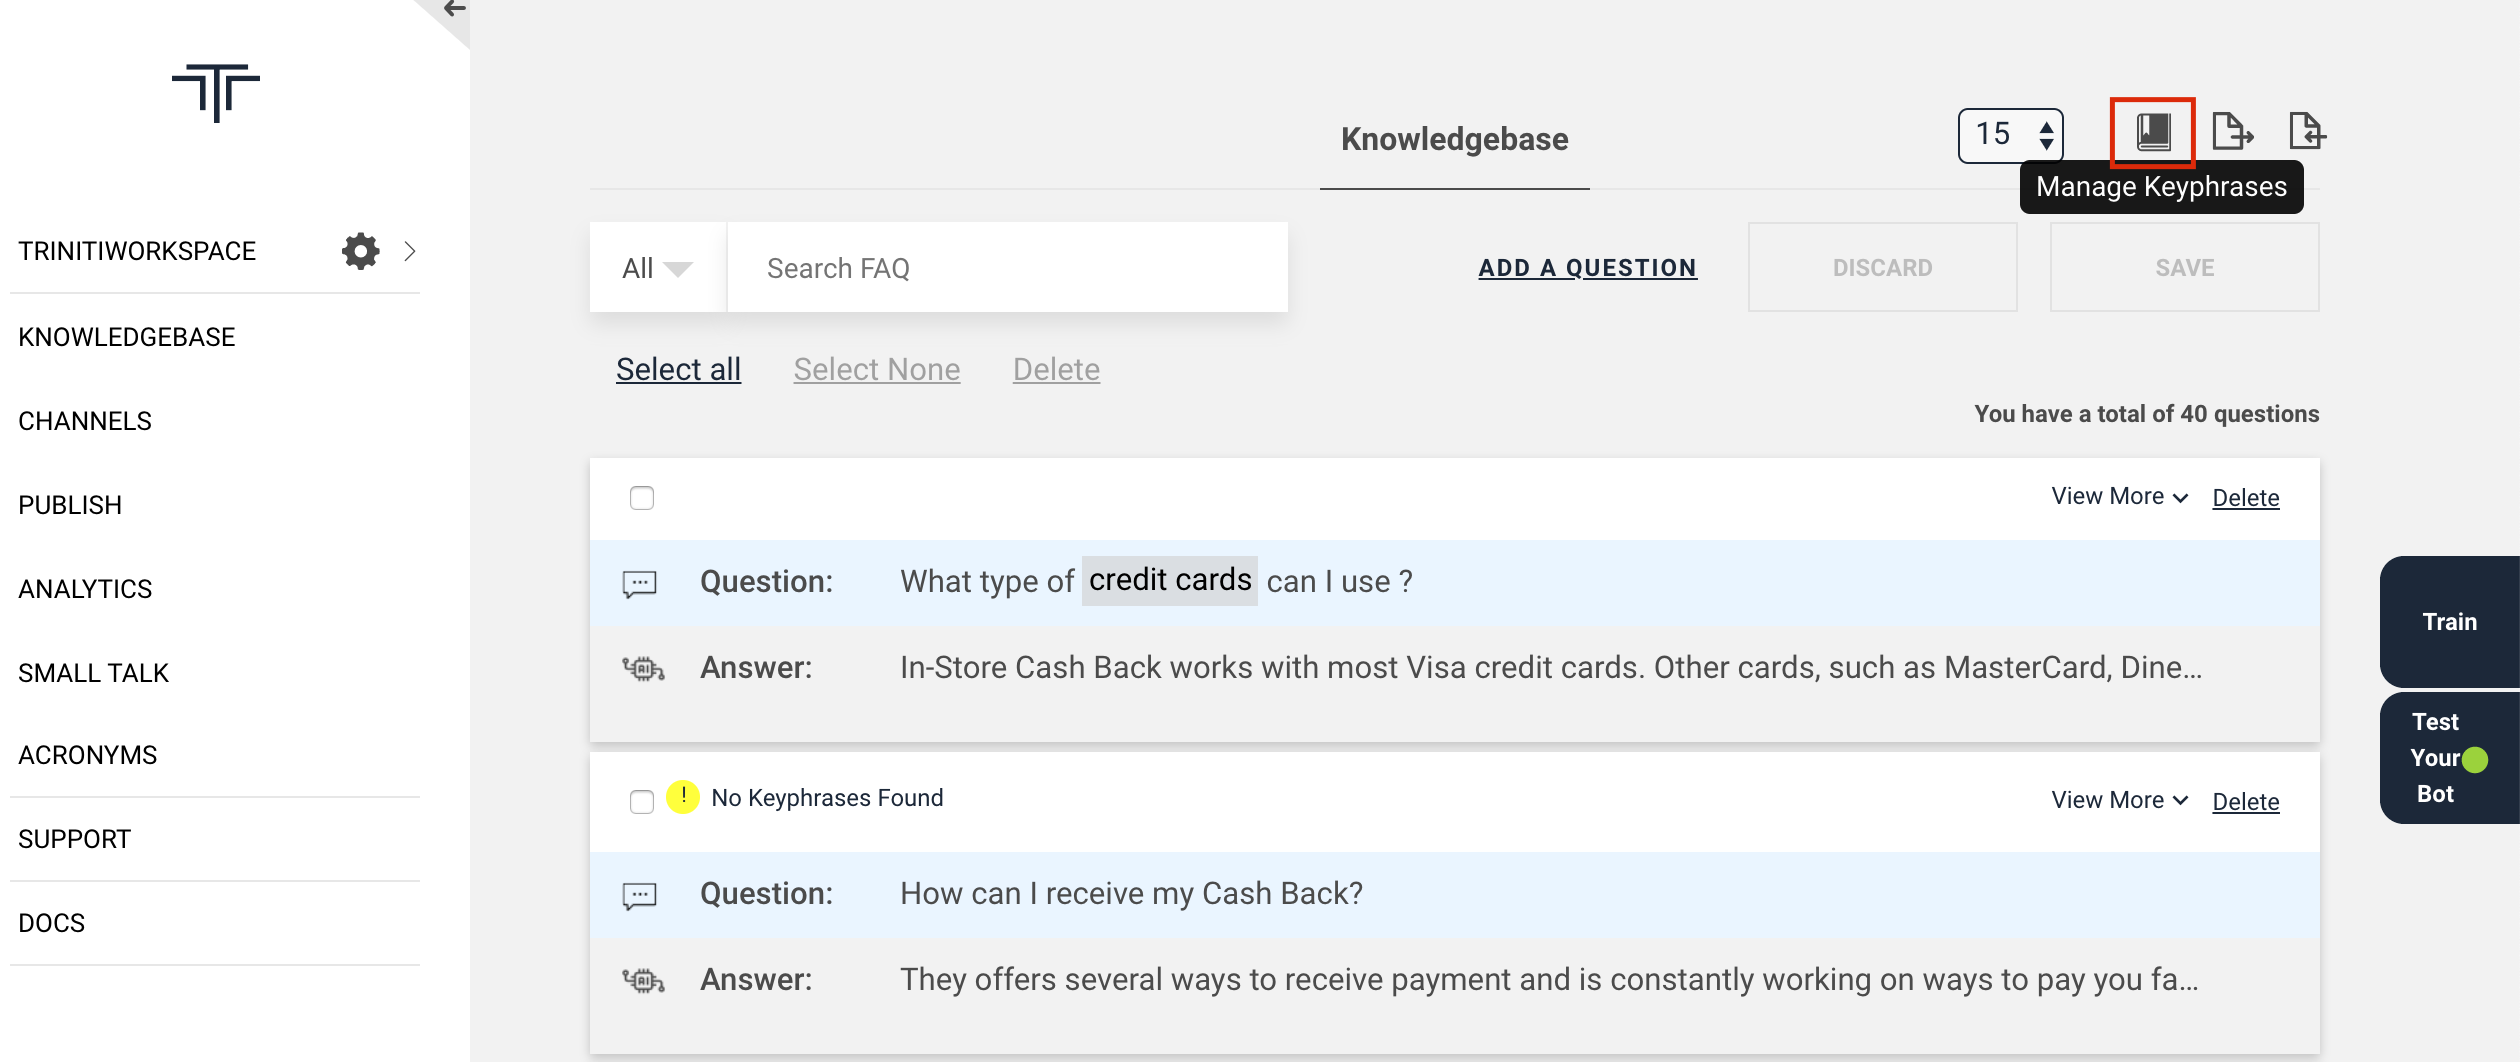
Manage Keyphrases
Keyphrases are significant phrases in a FAQ like a product e.g credit card or an action e.g apply. CognitiveQnA uses keyphrases to improve the accuracy of responses and tags them automatically during the training phase. A Keyphrase is a word/phrase that must be present in the user's query to consider and predict a question as potential candidate for deriving the desired response. Example “How to pay by credit card” can have a “credit card” as the key phrase. Since users may type the key phrase in different ways you may also want to declare “credit crd”, “CC” as variants to these Keyphrases so they are all treated equally. Keyphrases are used to narrow down the potential candidates against which the CognitiveQnA module runs matches. Quality Key phrases are important for accurate responses of the bot.
Kephrases Guidelines
- Post adding/modifying/deleting keyphrases, Training AI data is required.
- Maximum three words are permitted under keyphrases where the single space(s) should be replaced _ (underscore).
- Root value of the keyphrase should not contain the single or multiple space rather should be replaced with _ (underscore). Note: By default the Cognitive Q&A module generates Keyphrases automatically. But it is important that you review these for best performance.
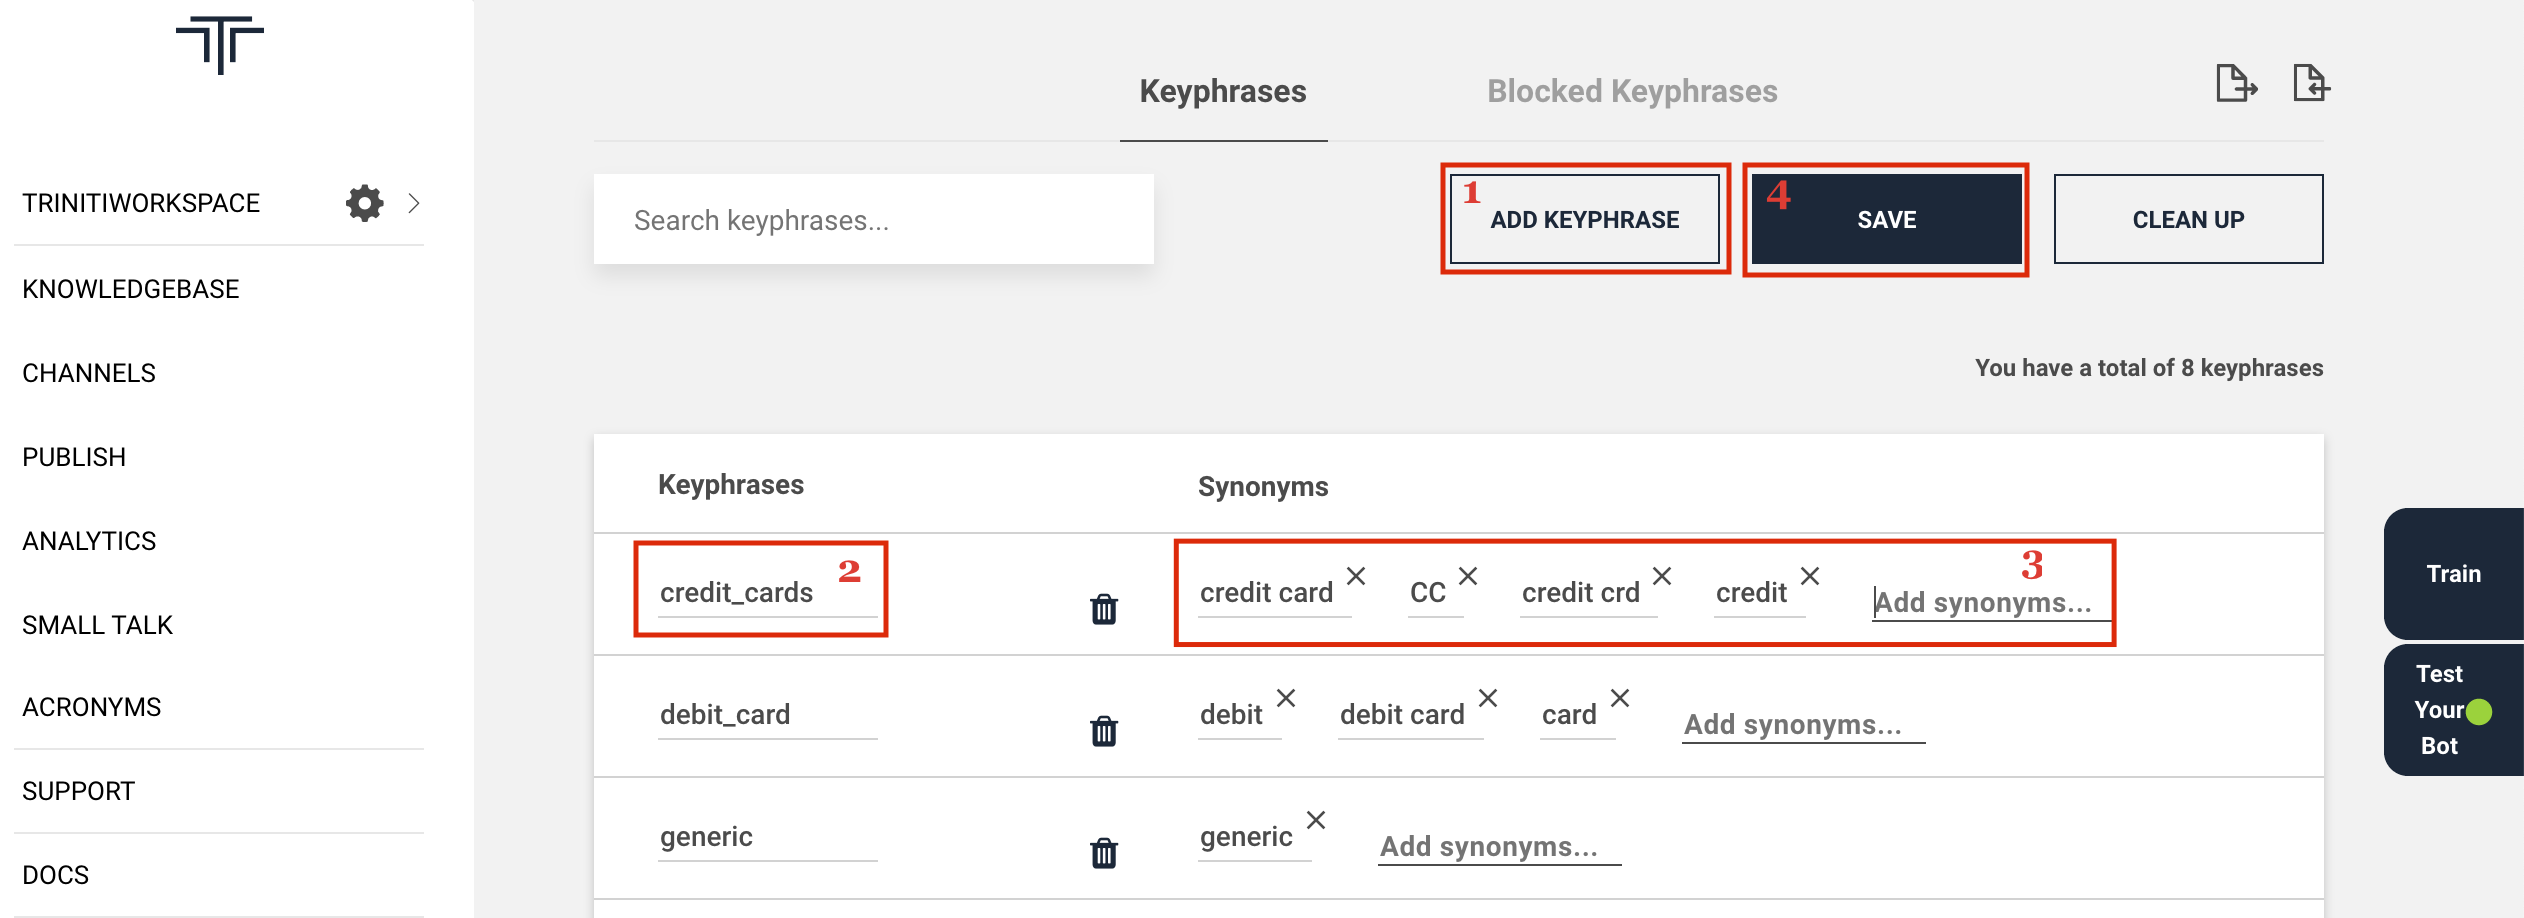
Adding Keyphrases
You can either add the keyphrases manually by entering the key phrase & the respective synonyms or import a CSV file of keyphrases. Manually adding the keyphrases: To add keyphrases, one has to follow below steps:
- Goto your workspace
- Click on manage keyphrases
- Click on 'Add keyphrase'
- Add Keyphrase
- Add synonyms Since users may type the key phrase in different ways you may also want to declare “credit crd” “CC” as variants to this Keyphrases so they are all treated equal.
- Click on Save
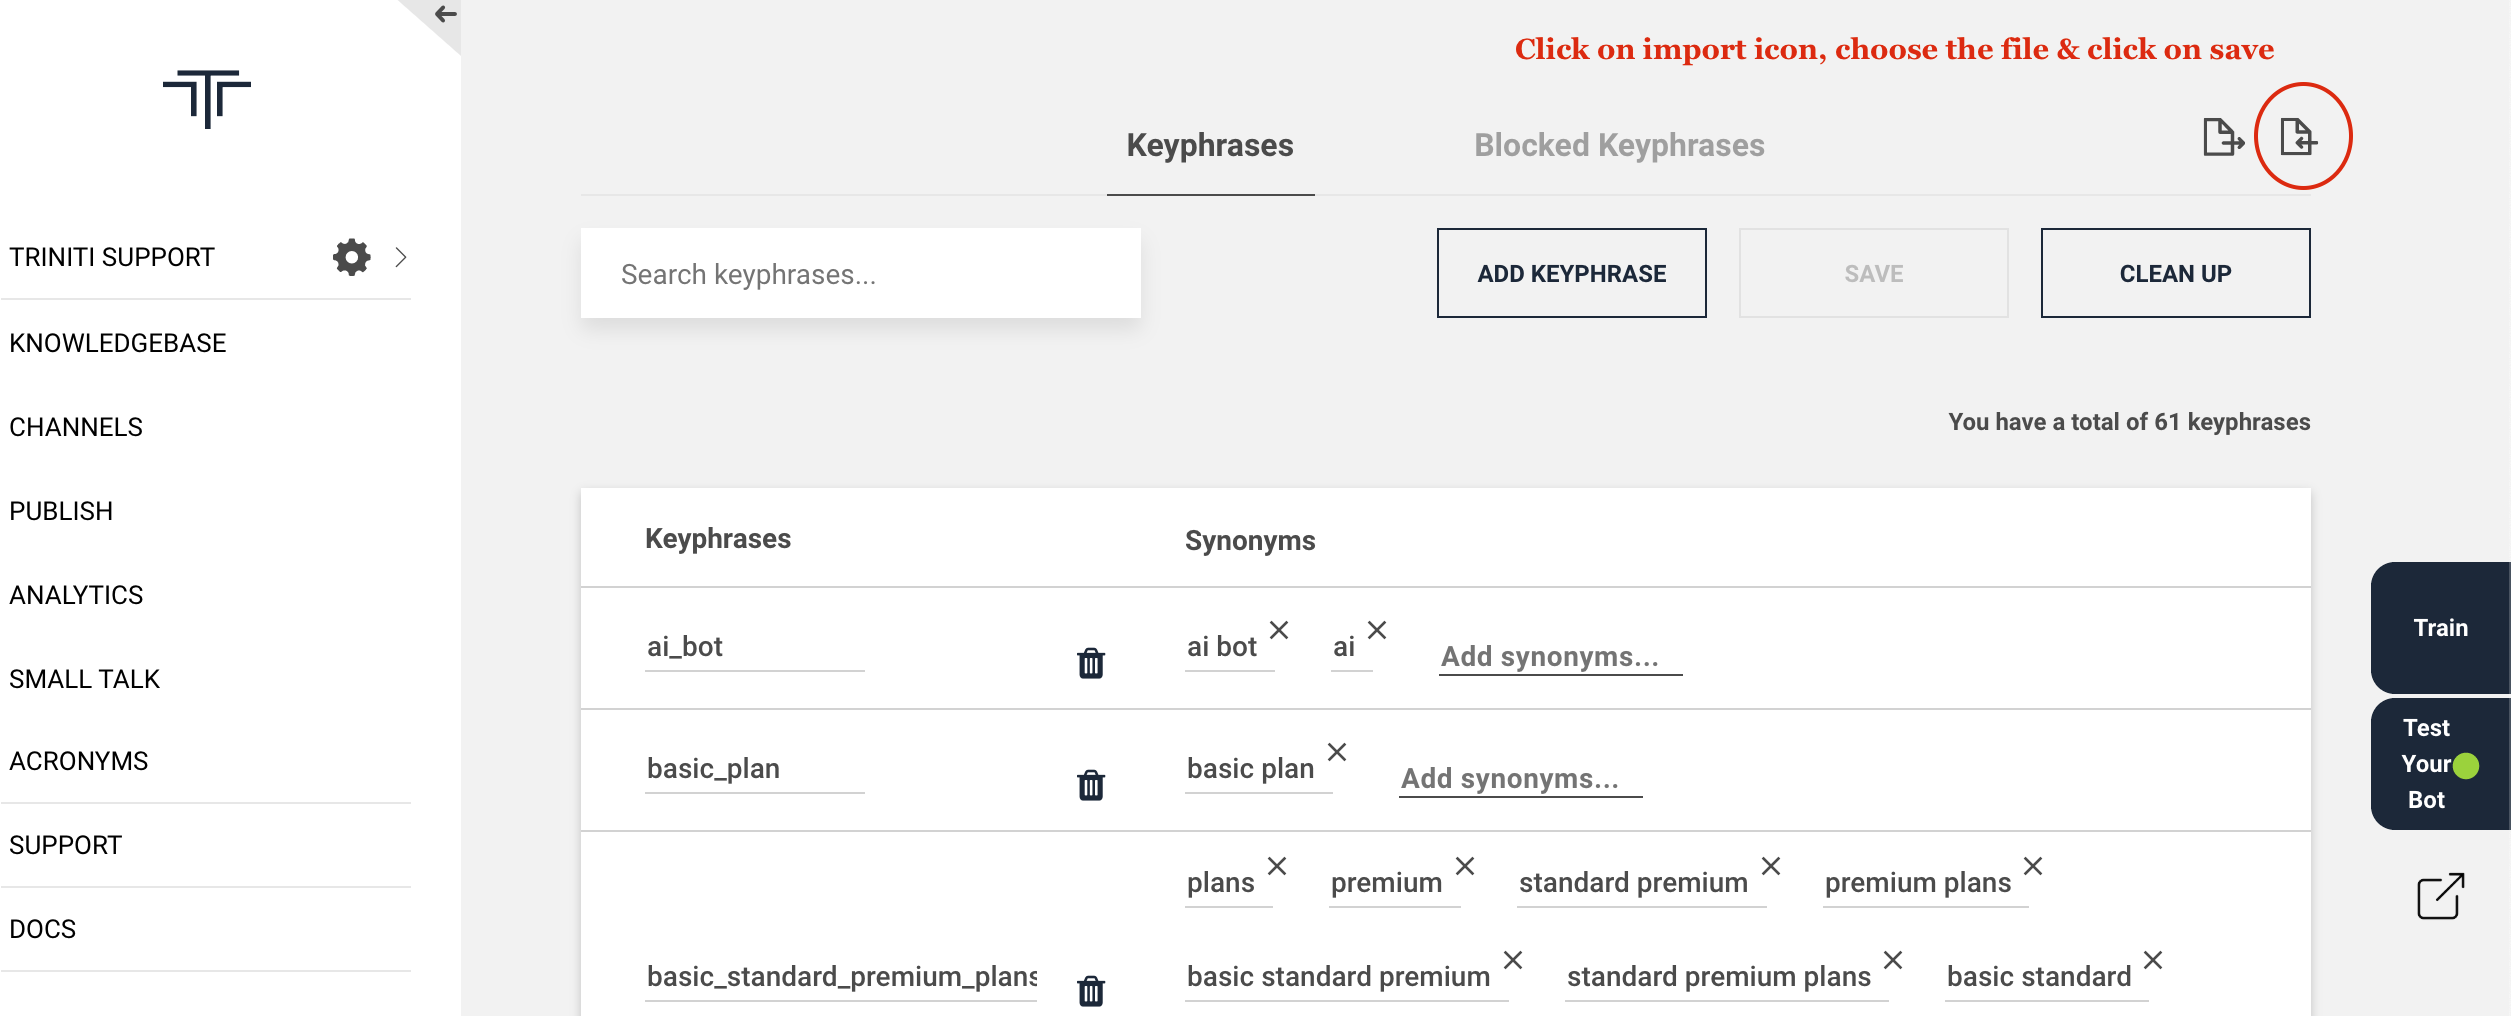
Importing Keyphrases
You can even import the CSV file of keyphrases to add into your knowledge base by following these steps:
- Goto your workspace
- Click on manage keyphrases
- Click on the 'import' icon
- Choose the CSV file of keyphrases from your system (It should have atleast keyphrase name & synonyms columns)
- Click on save
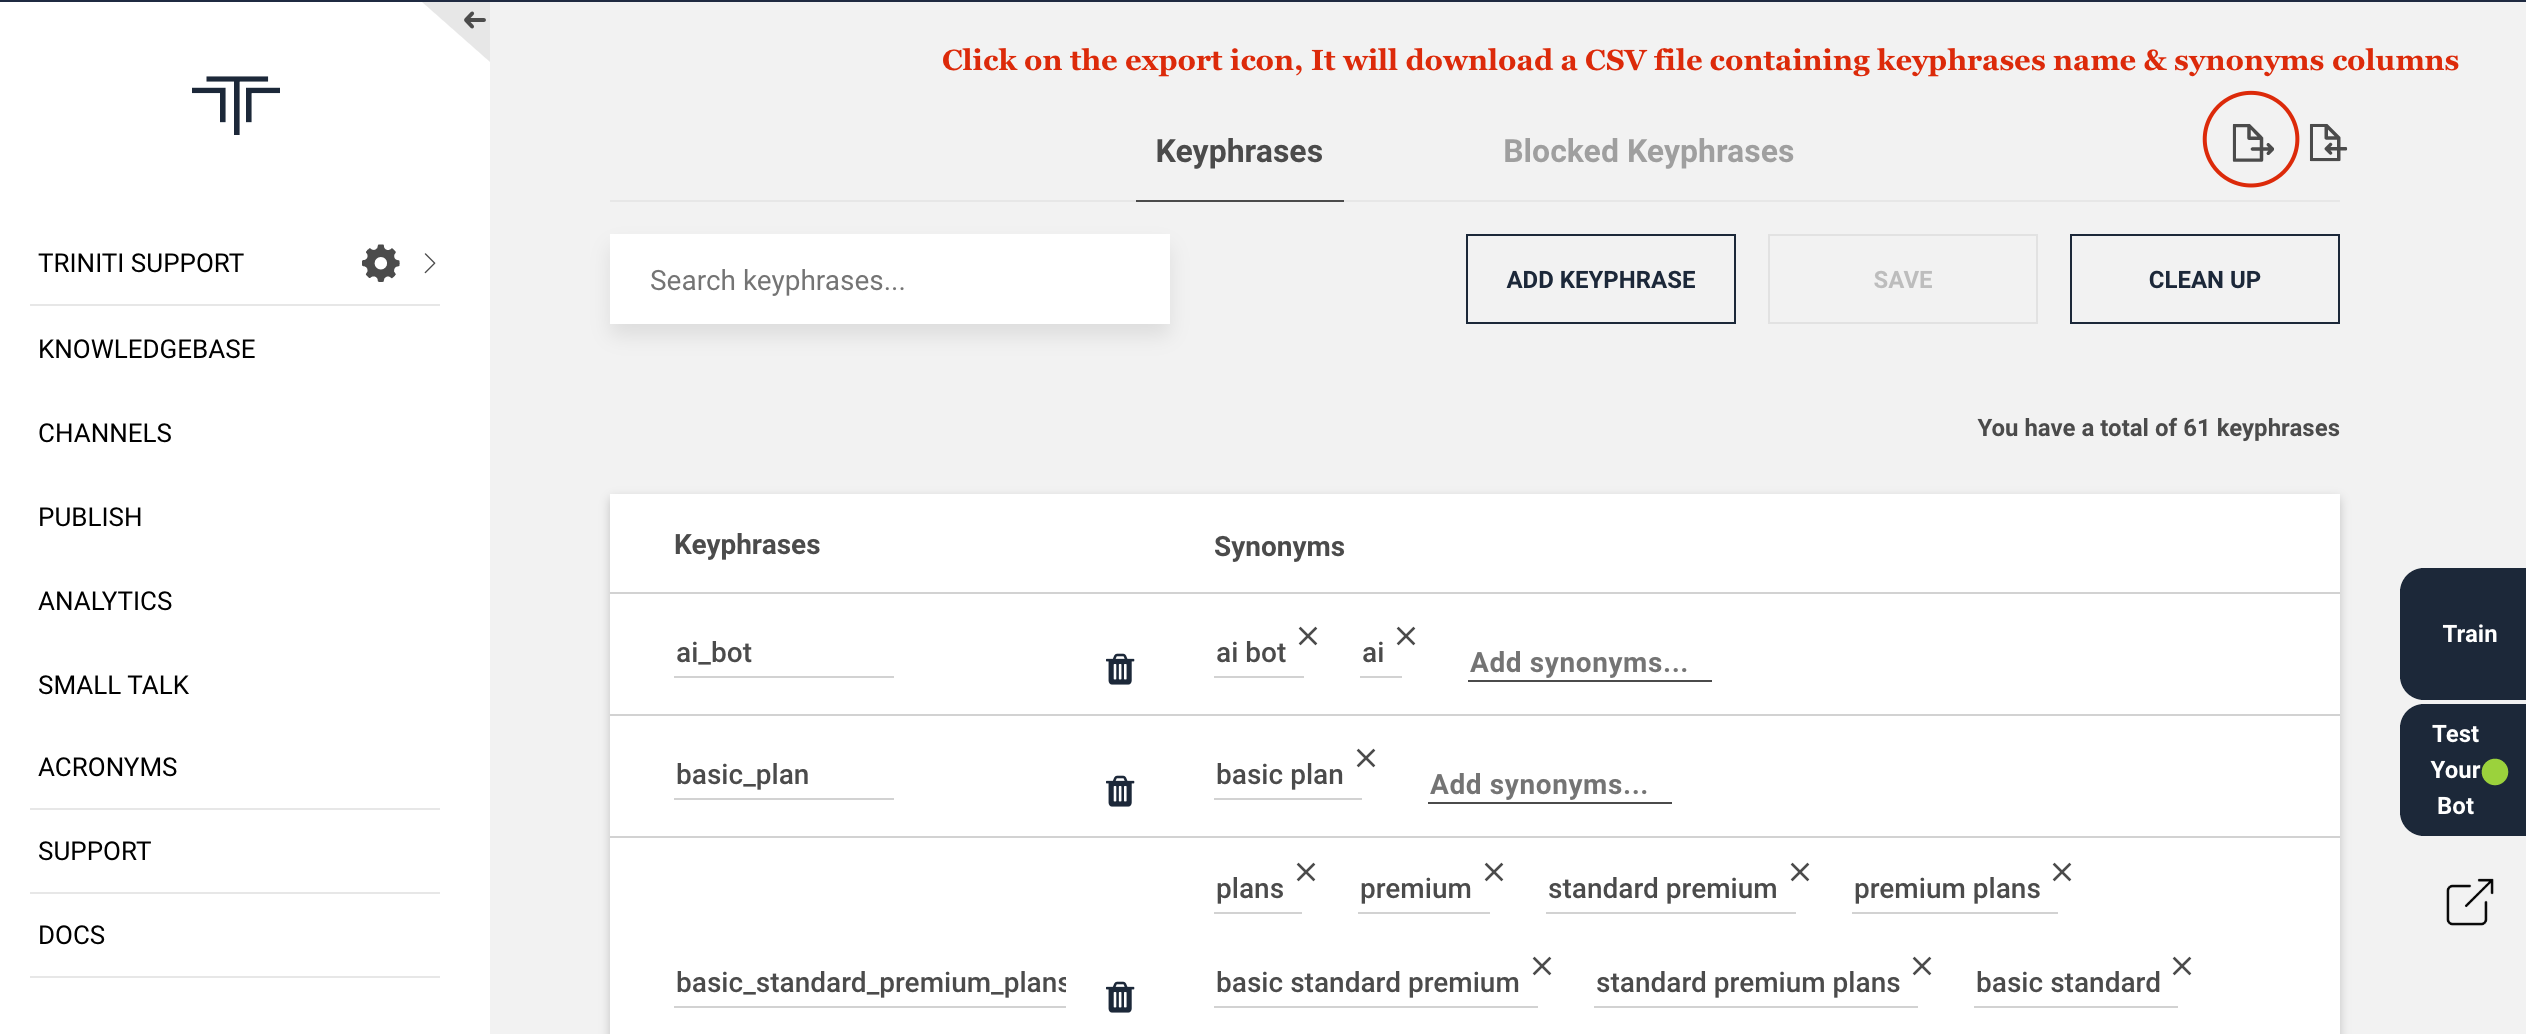
Exporting the keyphrases
If you want to use the same keyphrases in another workspace or want to keep the saved keyphrases then you can export the keyphrases by following these steps:
- Goto your workspace
- Click on manage keyphrases
- Click on the 'export' icon It will download a CSV file containing 'name' & 'synonyms' columns
Deleting Keyphrases
If you don't want some of the keyphrases that you have saved or the keyphrases generated by our AI engine then you can remove those keyphrases by following these steps:
- Goto your workspace
- Click to manage keyphrases
- Click on the delete icon of the respective keyphrase that you want to delete
- Click on save

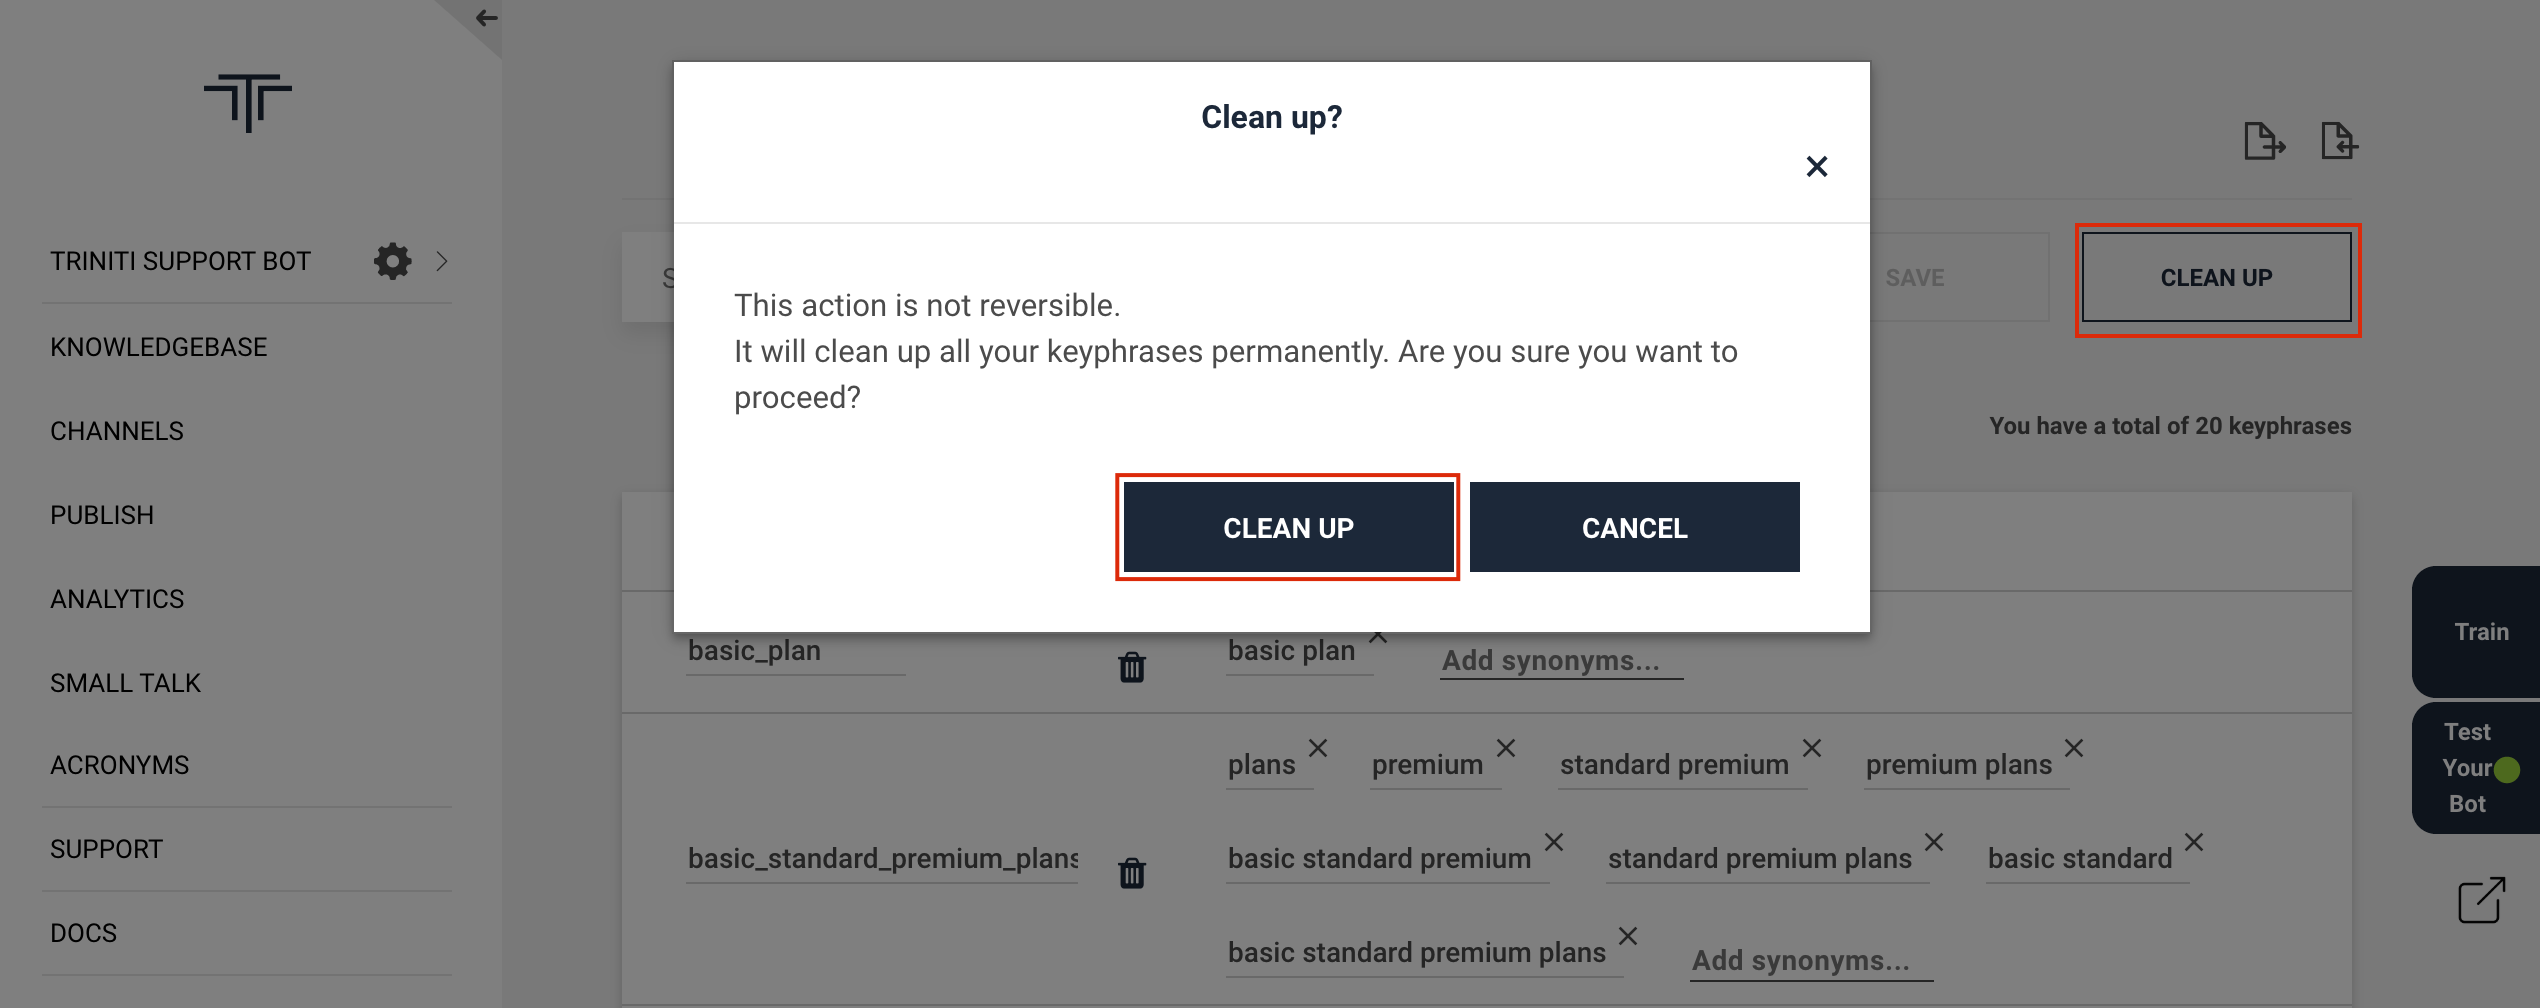
Cleaning up keyphrases
Cleanup is the process where the keyphrases that you have added will be removed from your knowledgebase and also from our database. When you train your knowledgebase then our AI engine will again generate the keyphrases from your knowledgebase automatically. You can perform the clean up operation on your keyphrases by following these steps:
- Goto your workspace
- Click on manage keyphrases
- Click on the 'Clean up' button
- Select Clean up on the popup It will remove all the saved keyphrases by you from our database & your knowledgebase as well.
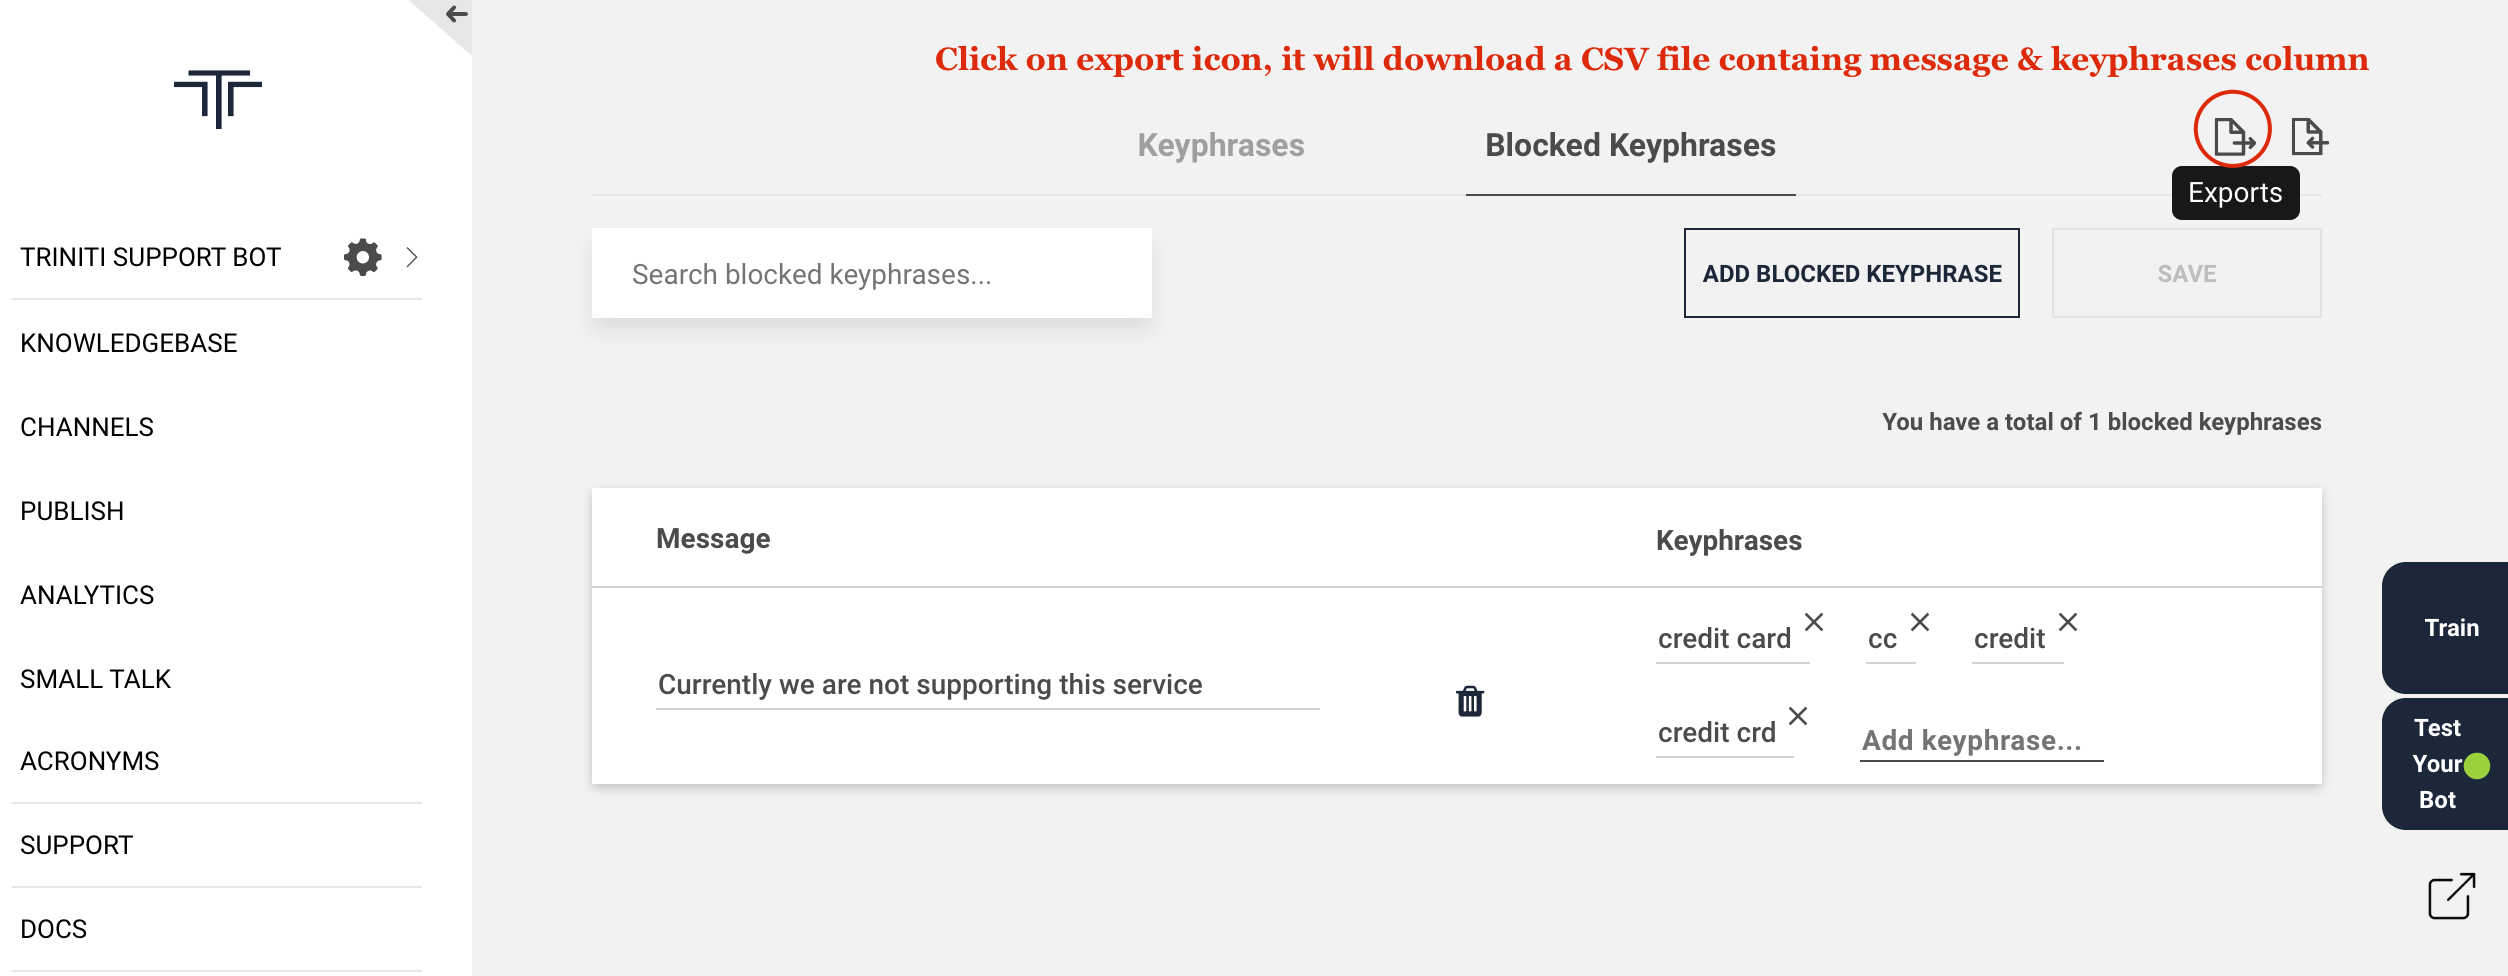
Adding Blocked Keyphrases
If your organization is not supporting some of the features or services and you want to let your users know that you don't have those types of services or features then you can add some key phrases from those kinds of queries in blocked keyphrases. Blocked keyphrases feature allows you to add the keyphrases for which you don't want to show the error message and you can show some message like "Currently we are not supporting this service". You can add blocked keyphrases by following these steps:
- Goto your workspace
- Click on manage keyphrases
- Navigate to 'Blocked Keyphrases'
- Click on 'Add Blocked Keyphrases'
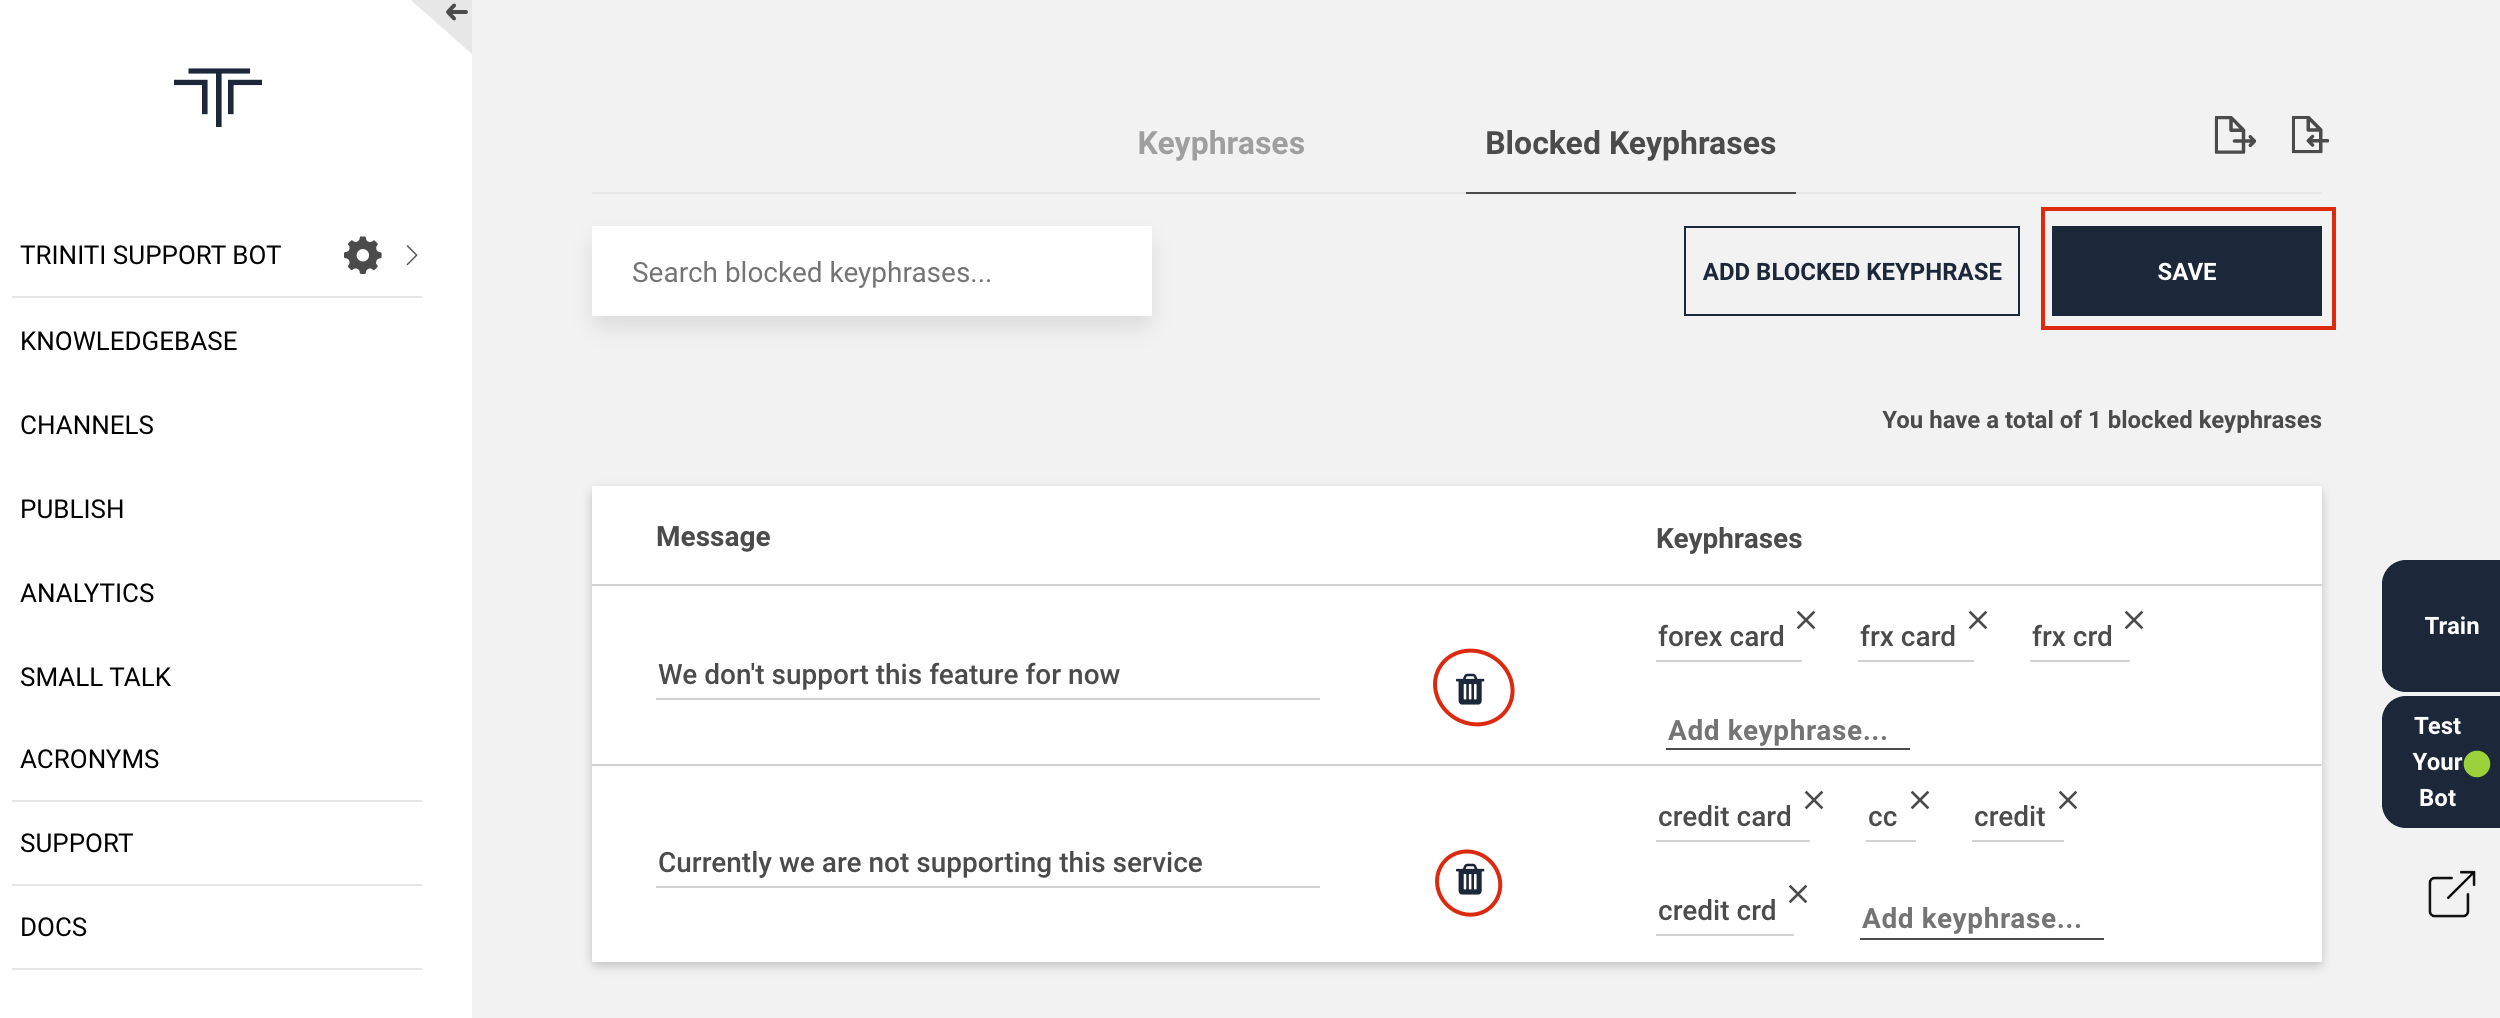
- Enter the message
- Add keyphrases
- Click on save
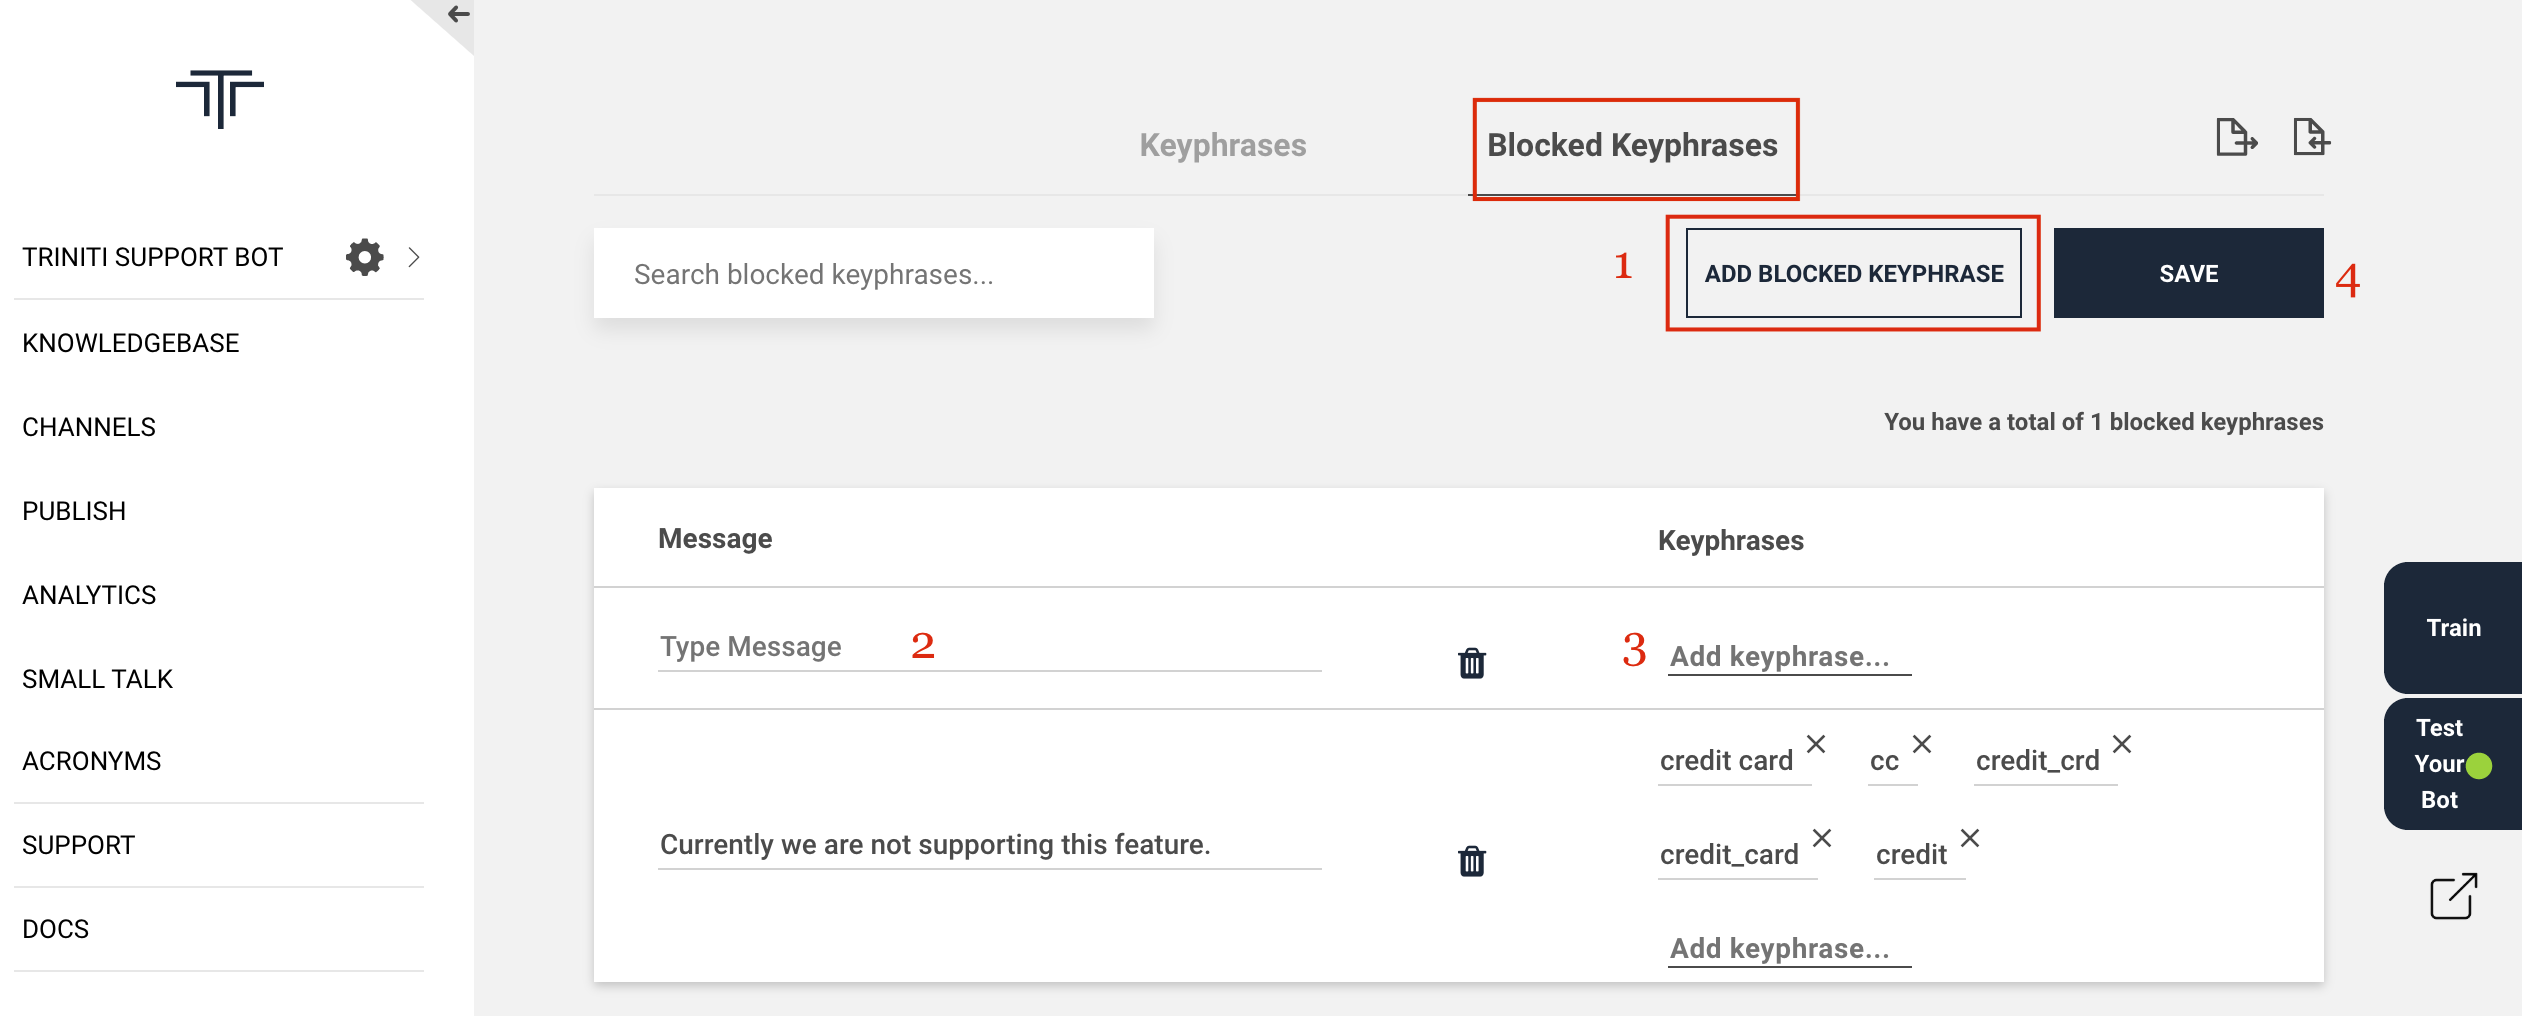
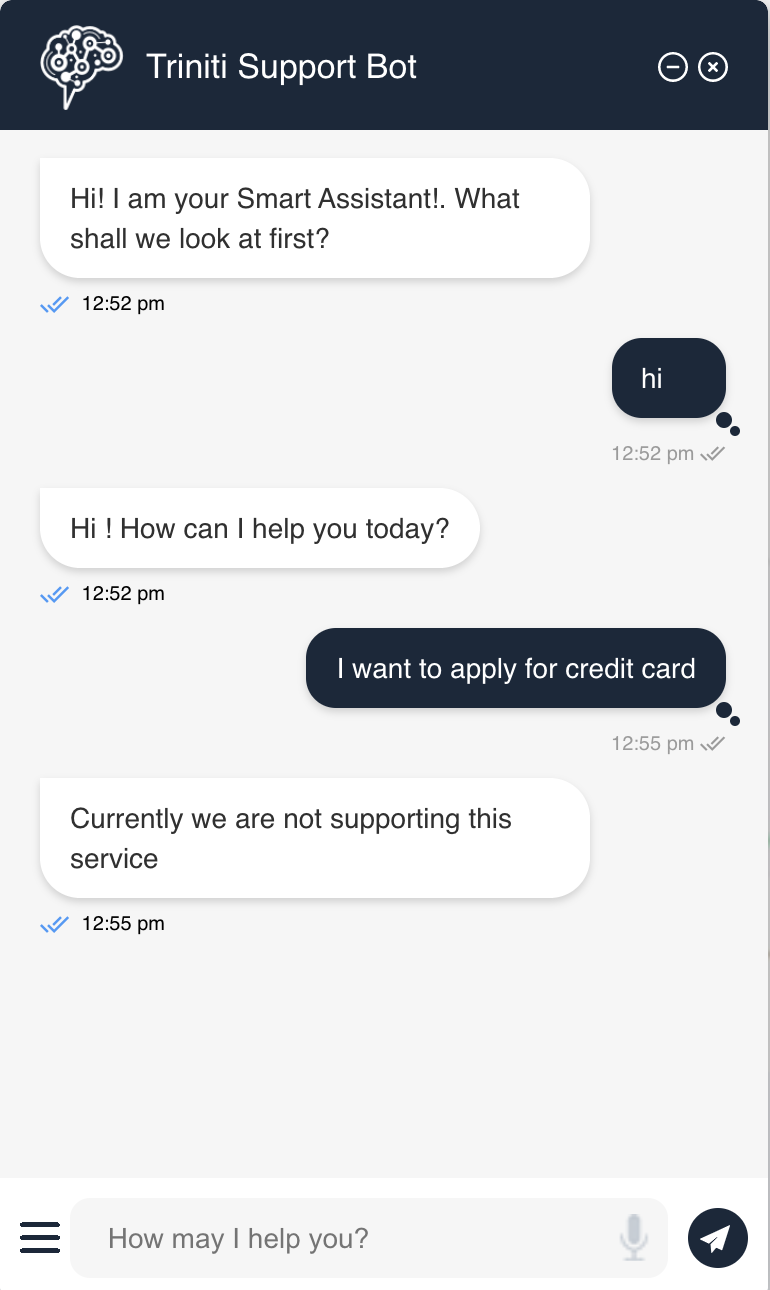
So if any user tries to ask a query that contains the added blocked keyphrase then the bot will show the added message respective to that blocked keyphrase. Ex; If a bank doesn't support credit card or doesn't have credit card service then you can add "credit card" in blocked keyphrases with a message that will be shown like "Currently we are not supporting this service" to the user when the bot will find this keyword in their queries.
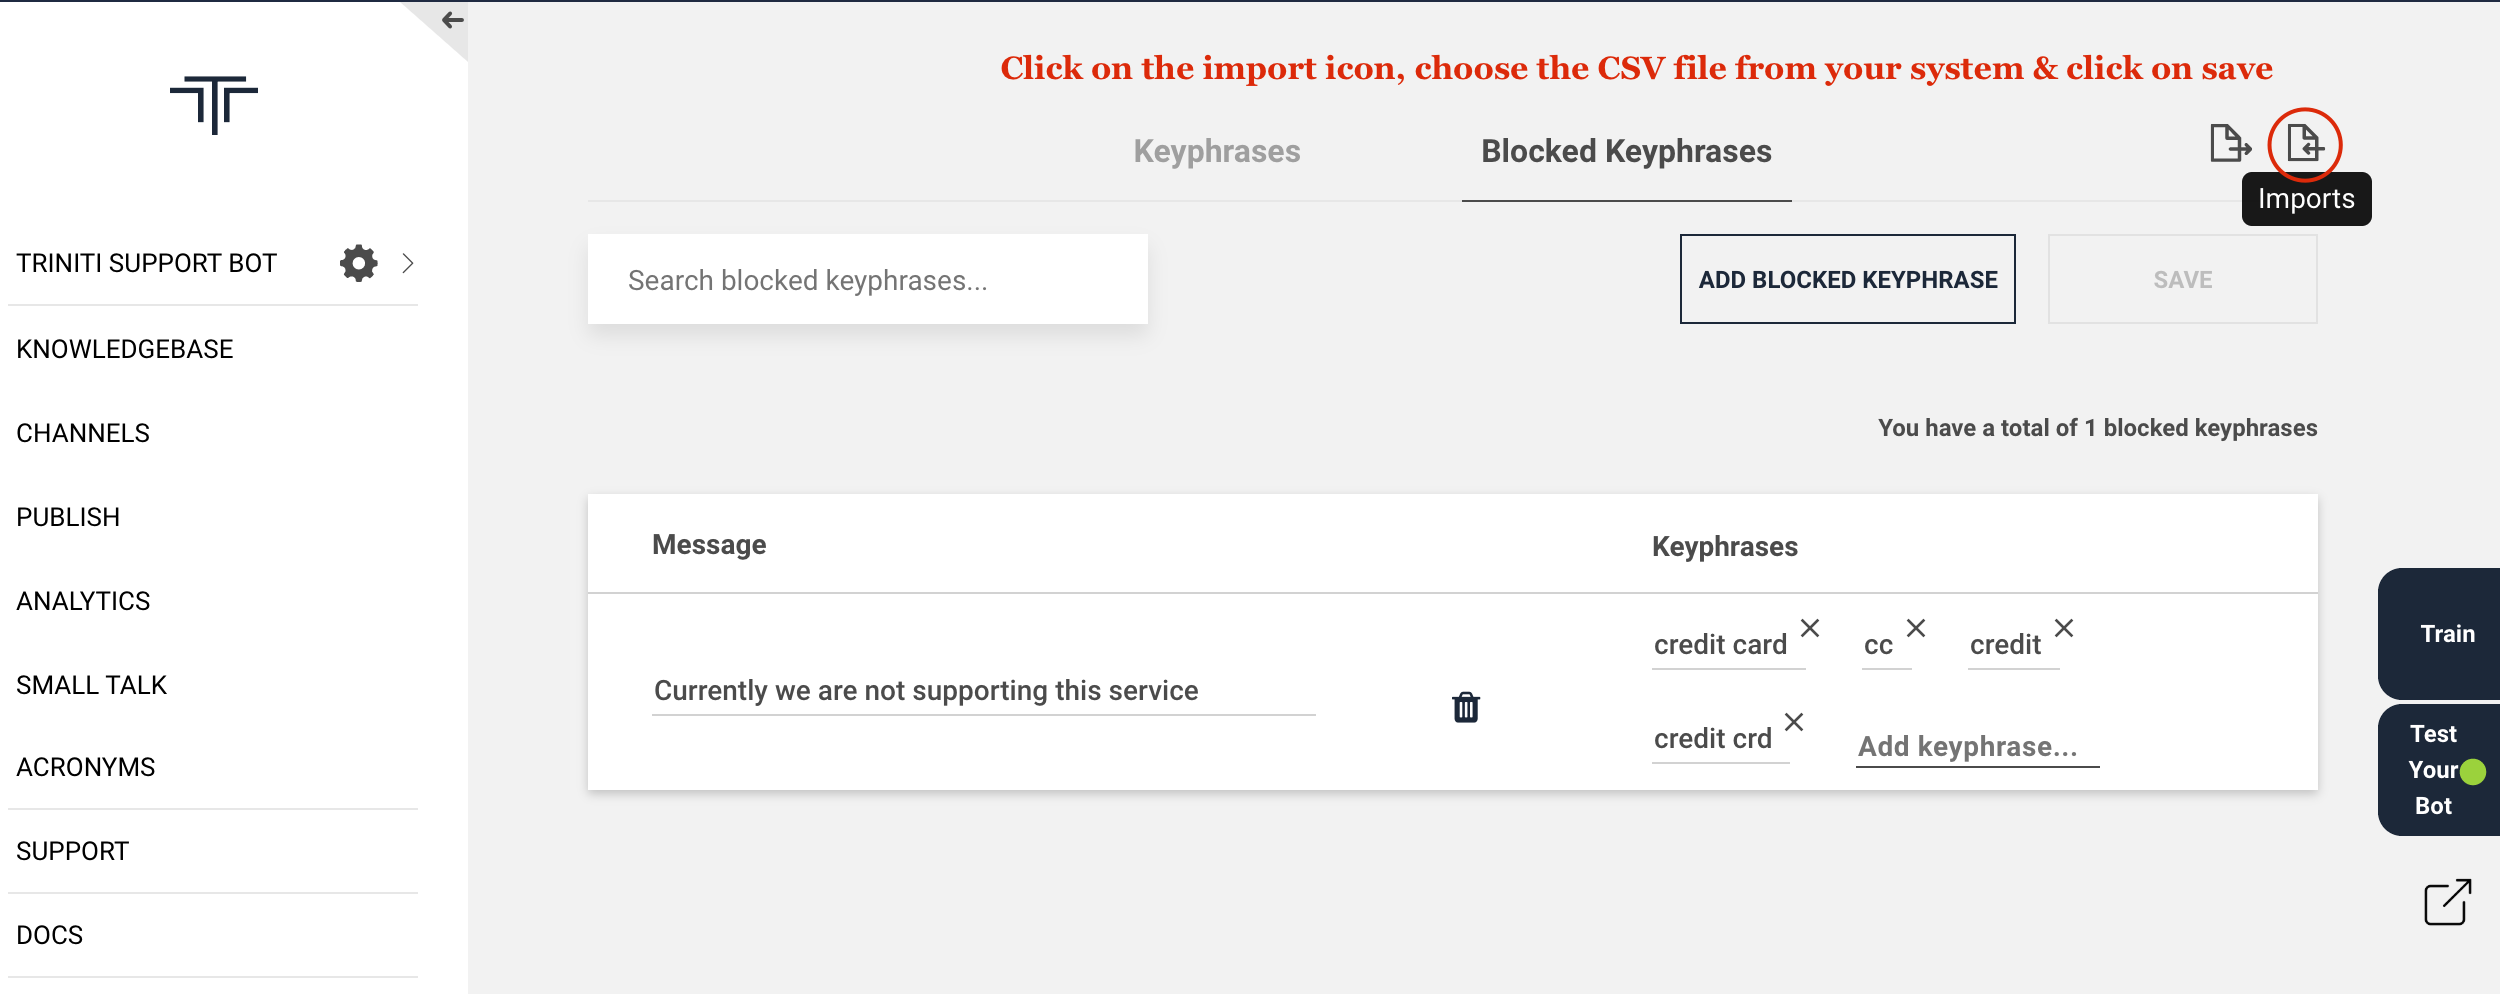
Importing Blocked Keyphrases
You can even import the CSV file of blocked keyphrases containing message & keyphrase columns to add into your knowledge base by following these steps:
- Goto your workspace
- Click on manage keyphrases
- Navigate to 'Blocked Keyphrases'
- Click on the 'import' icon
- Choose the CSV file of blocked keyphrases from your system (It should have atleast message & blocked keyphrase columns)
- Click on save
Exporting Blocked Keyphrases
If you want to use the same blocked keyphrases in another workspace or want to keep the saved blocked keyphrases then you can export the blocked keyphrases by following these steps:
- Goto your workspace
- Click on manage keyphrases
- Navigate to 'Blocked Keyphrases'
- Click on the 'export' icon It will download a CSV file containing message & keyphrase columns.
Deleting Blocked Keyphrases
If you want to remove some of the blocked keyphrases that you have saved then you can remove those blocked keyphrases by following these steps:
- Goto your workspace
- Click on manage keyphrases
- Navigate to 'Blocked Keyphrases'
- Click on delete icon of the blocked keyphrase which you want to delete
- Click on save
Manage Small Talk
Small talks are the friendly conversations and informal type of discourse that does not cover any functional topics of conversation or any transactions. SmallTalk data can include questions like "Hi", "Who are you" and "What is your name". Small Talk is stored in two separate categories namely; Base and Custom. Base Small Talks are provided as part of the System. Custom Small Talks are those which are created by the business users for enriching the customer experience based on the self-learning reports.
Small Talk Guidelines
- All the greetings, bot capability questions, and bot introduction questions possibly are asked by the users should be thought of
- Customer-specific Small Talks should be provided by the business user along with the appropriate neutral answers
- Small Talk works based on the lookup, thus all different variations to a query should be included and mapped with appropriate answers
- Smilies can be used in the answer for which Unicode mapping should be provided in the bot configuration.
Adding Small Talk
You can add the smalltalks manually by providing the smalltalk as 'User asks' & the respected response as 'Bot Answers'. or you can import a CSV file containing atleast 3 columns (category, questions, answers, etc).
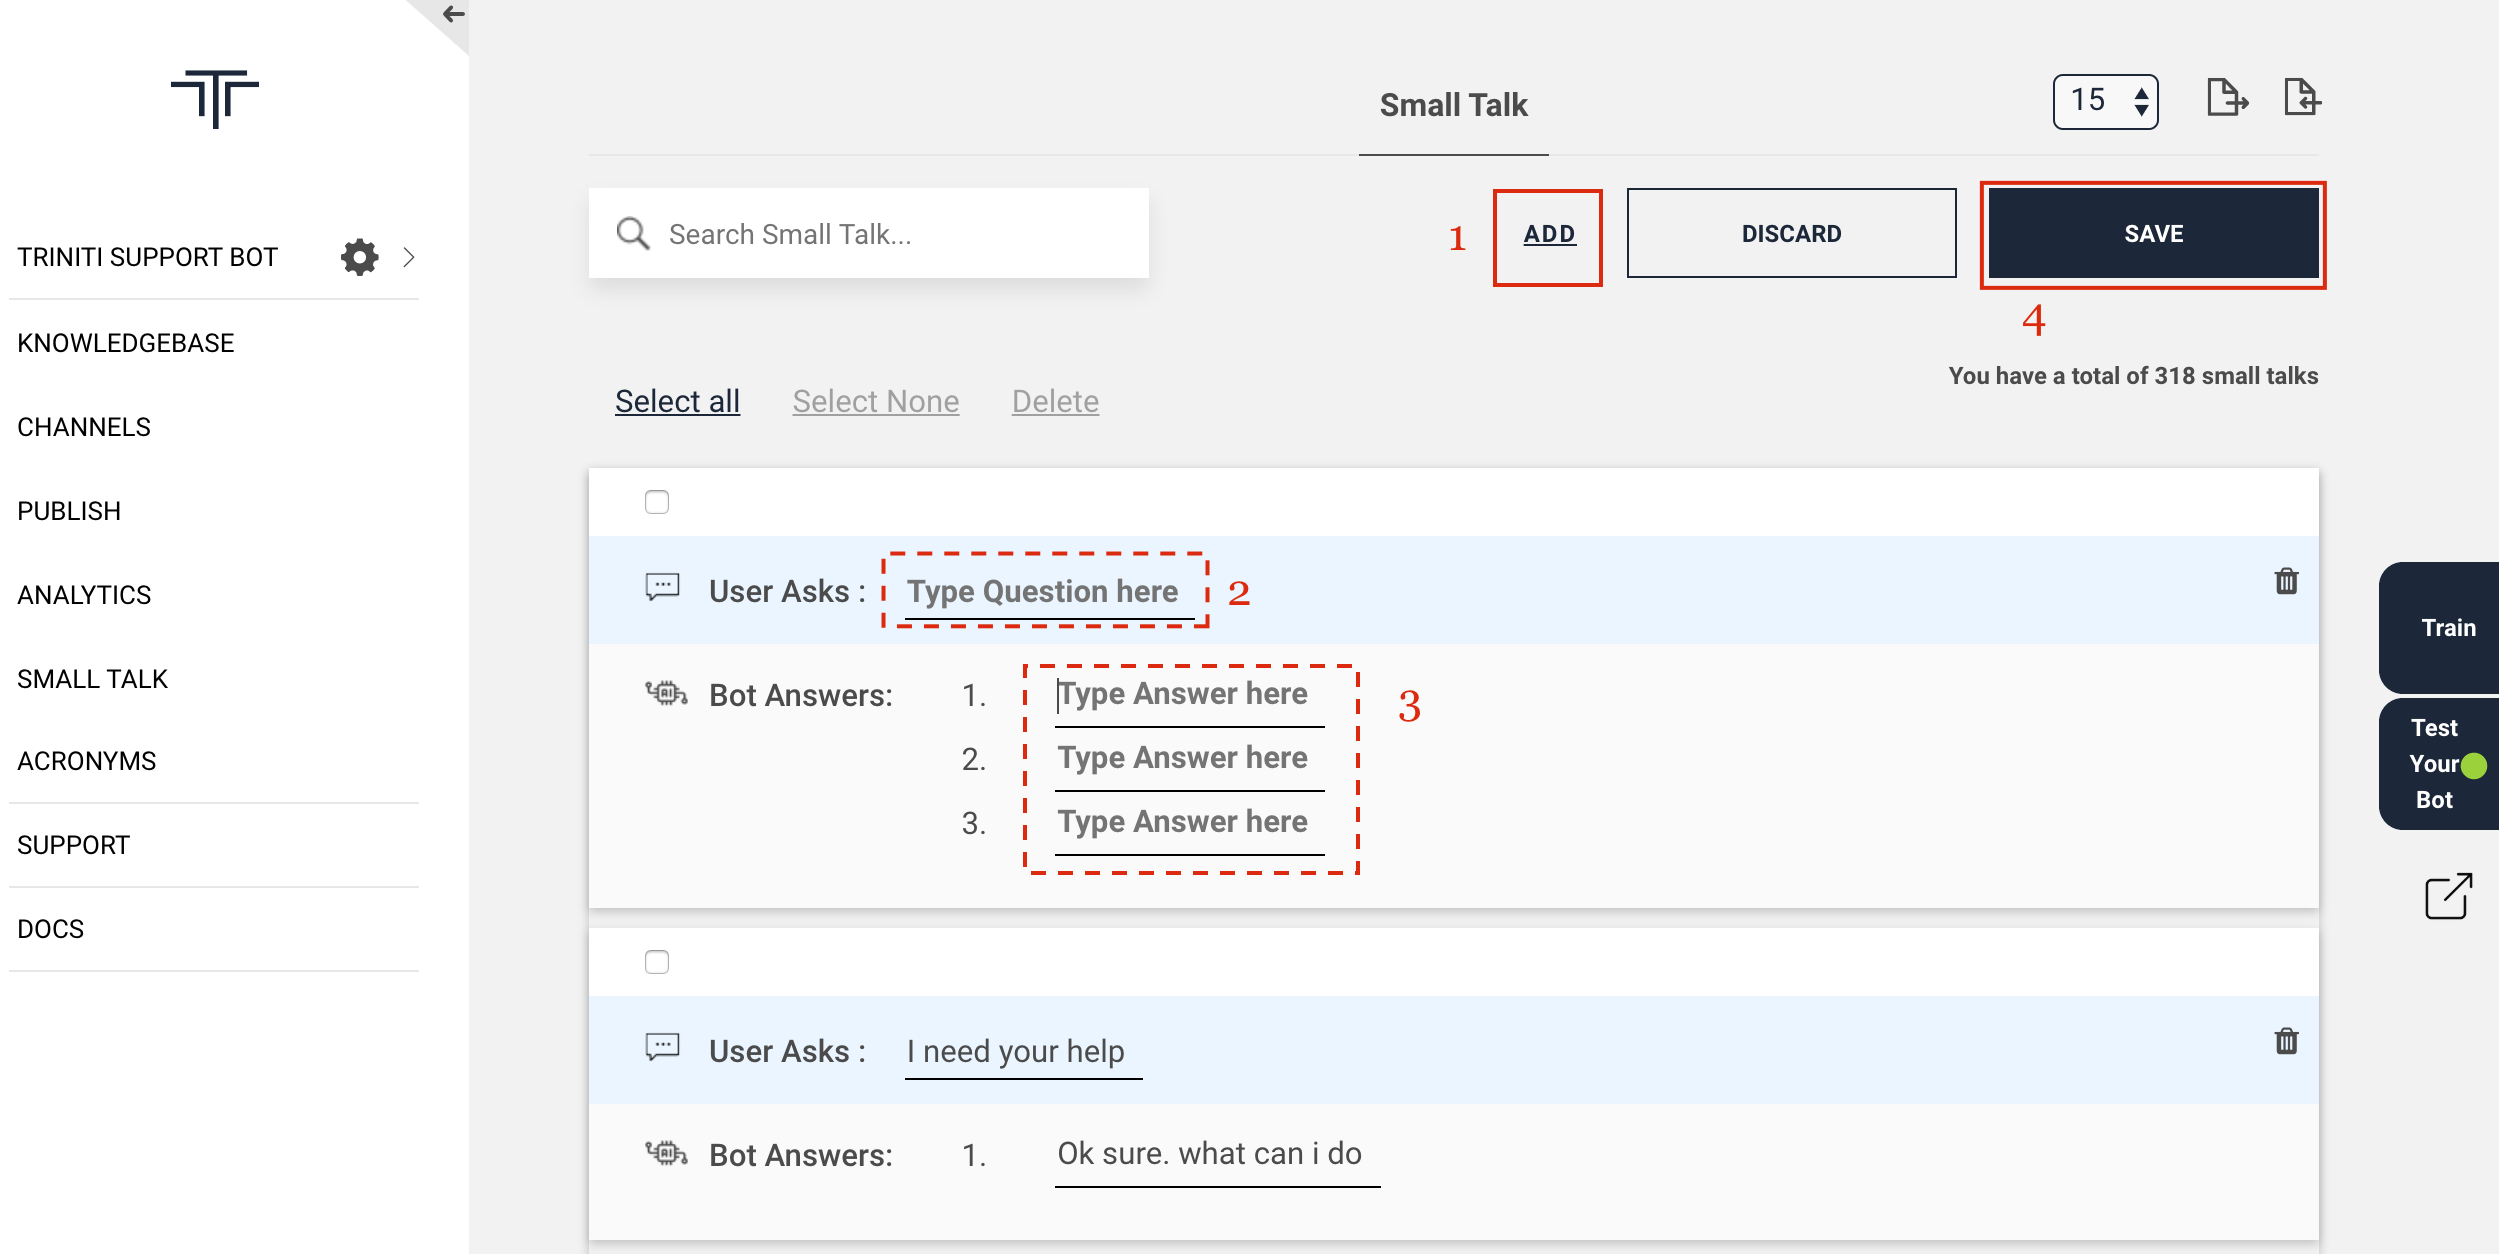
Manually add small talks: You can add the small talks manually by following these steps:
- Goto your workspace
- Navigate to Small Talk
- Click on ADD button
- Enter User asks (question)
- Enter Bot Answers (answer), you can add multiple answers for question.
- Click on SAVE
Importing Small Talk
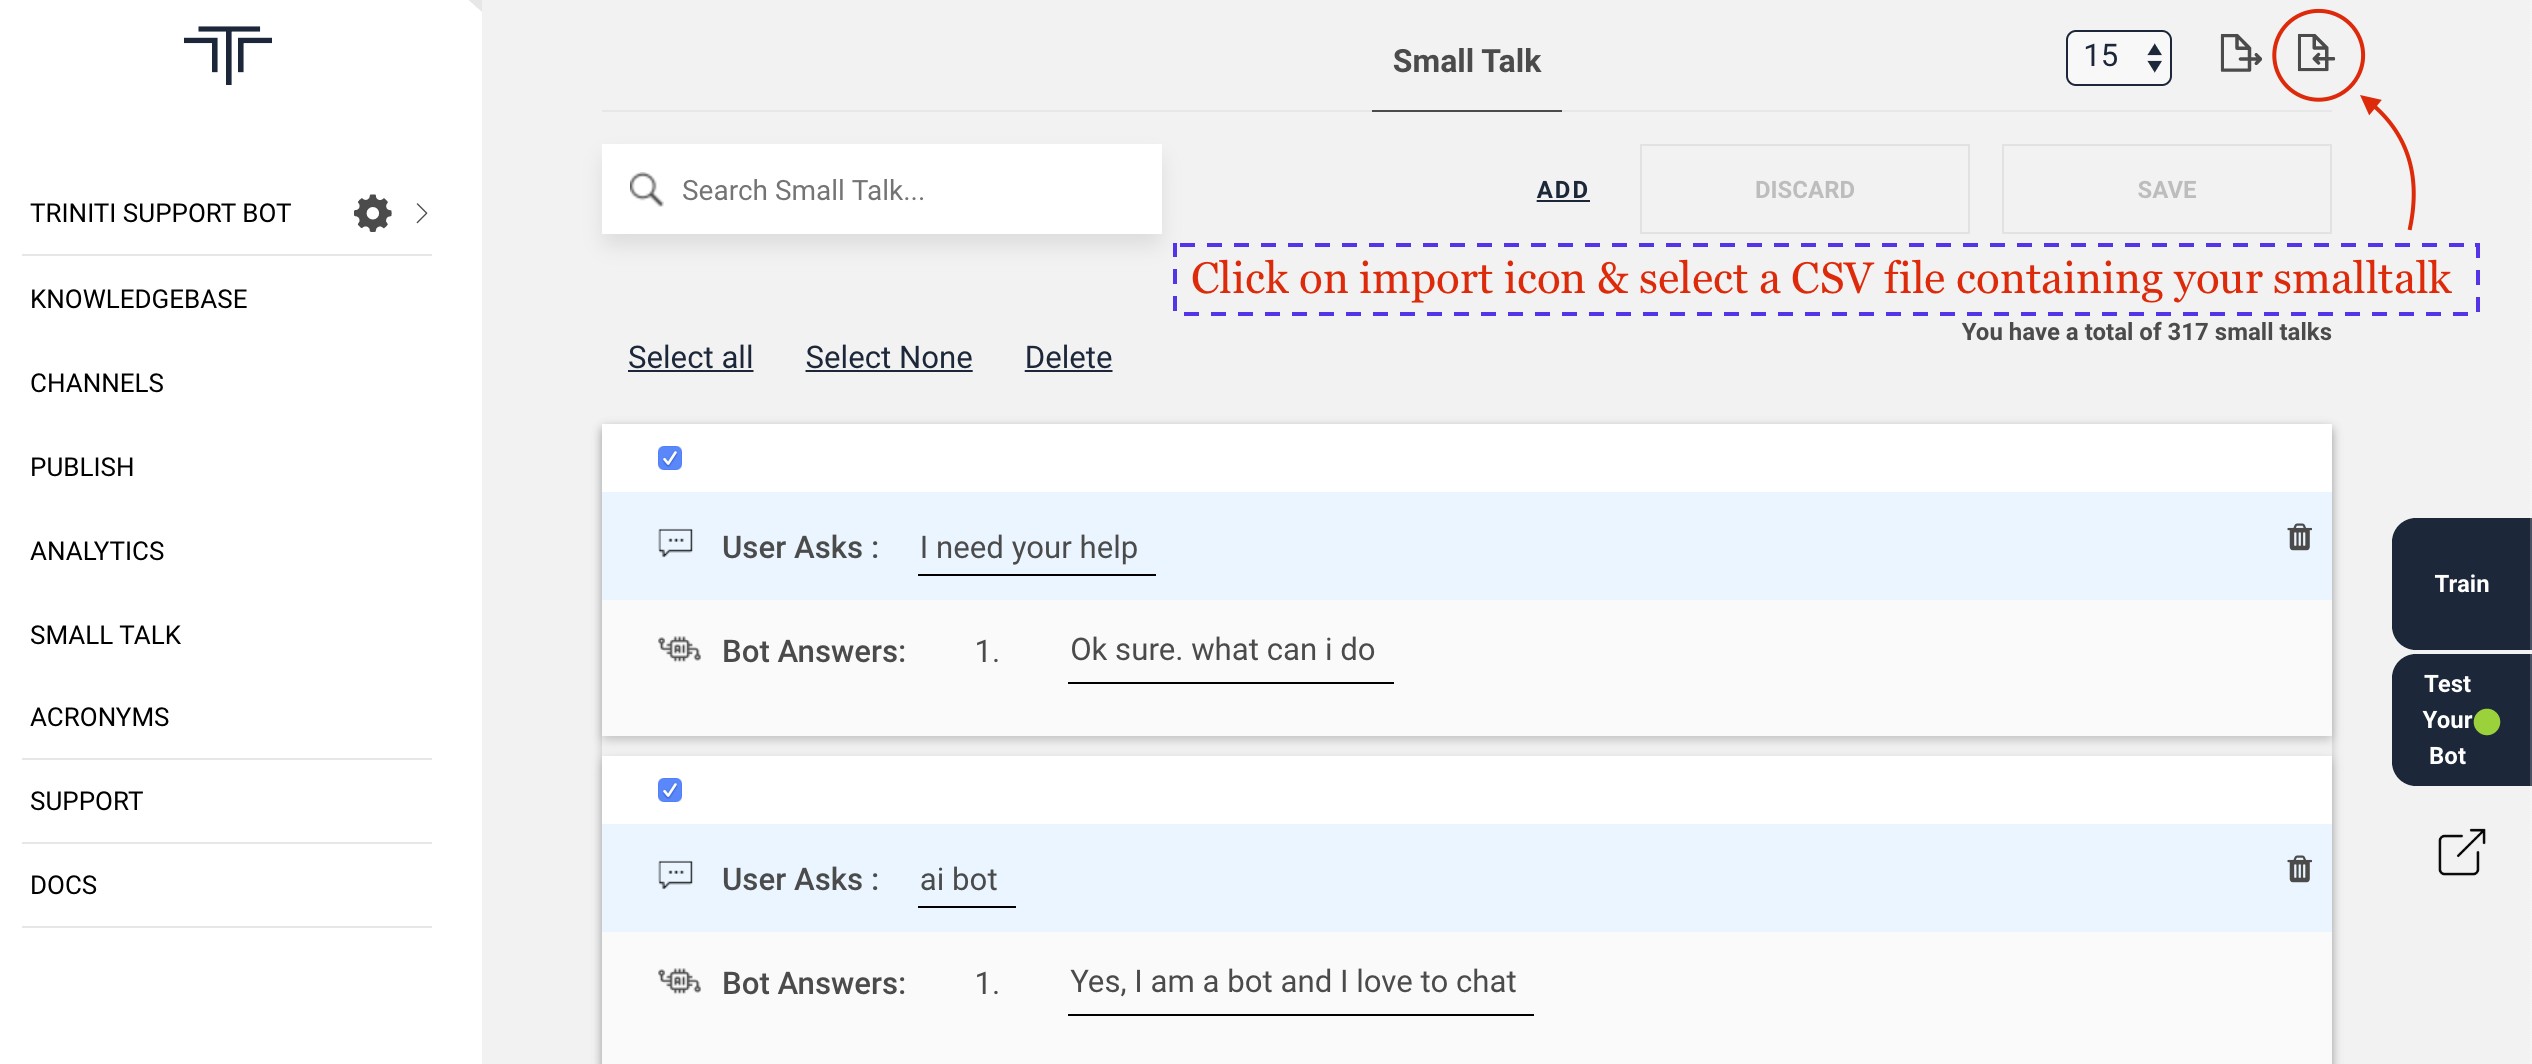
If you have the file of smalltalk or want to import from a file then you can import the CSV file of smalltalk which should contain atleast 3 columns(category, questions, answers, etc.) by following these steps:
- Goto your workspace
- Navigate to Small Talk
- Click on import icon
- Select a CSV file containing category, question, answer, etc columns.
- Click on save
Exporting Small Talk
If you want to use the same smalltalks in another workspace or wnat to keep the smalltalks then you can export the smalltak by following these steps:
- Goto your workspace
- Navigate to Small Talk
- Click on export icon It will download a CSV file containing categories, questions, answers & rId columns.
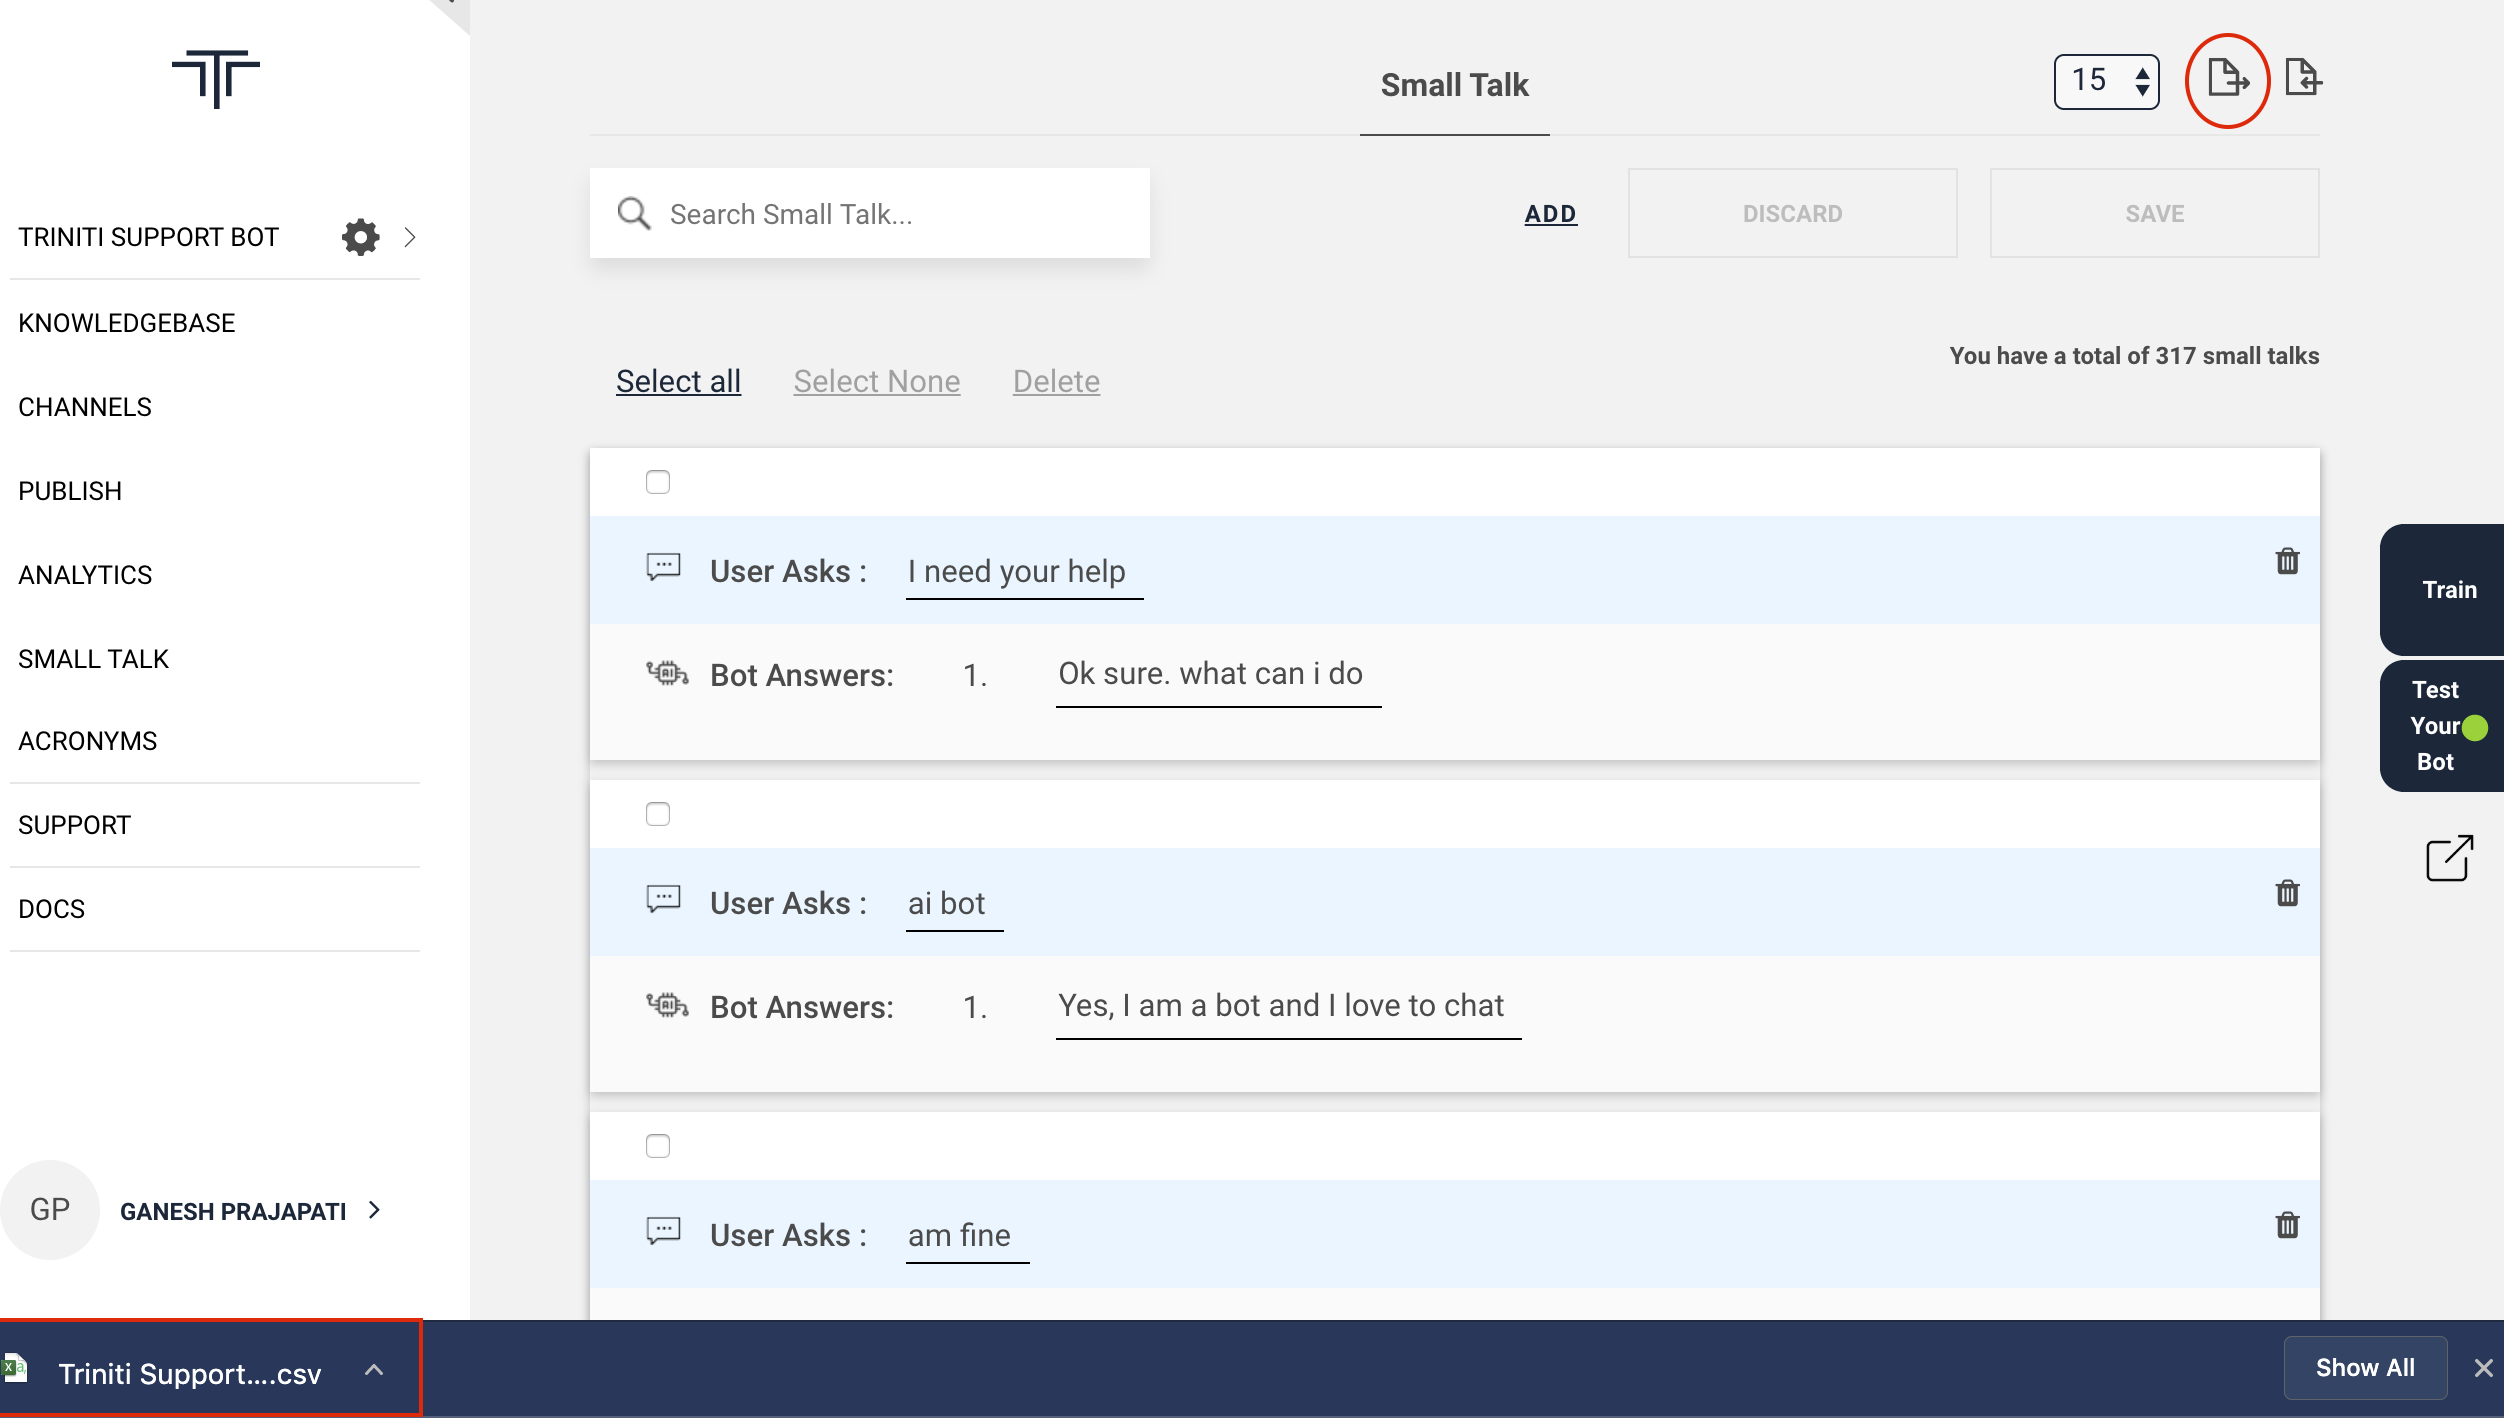
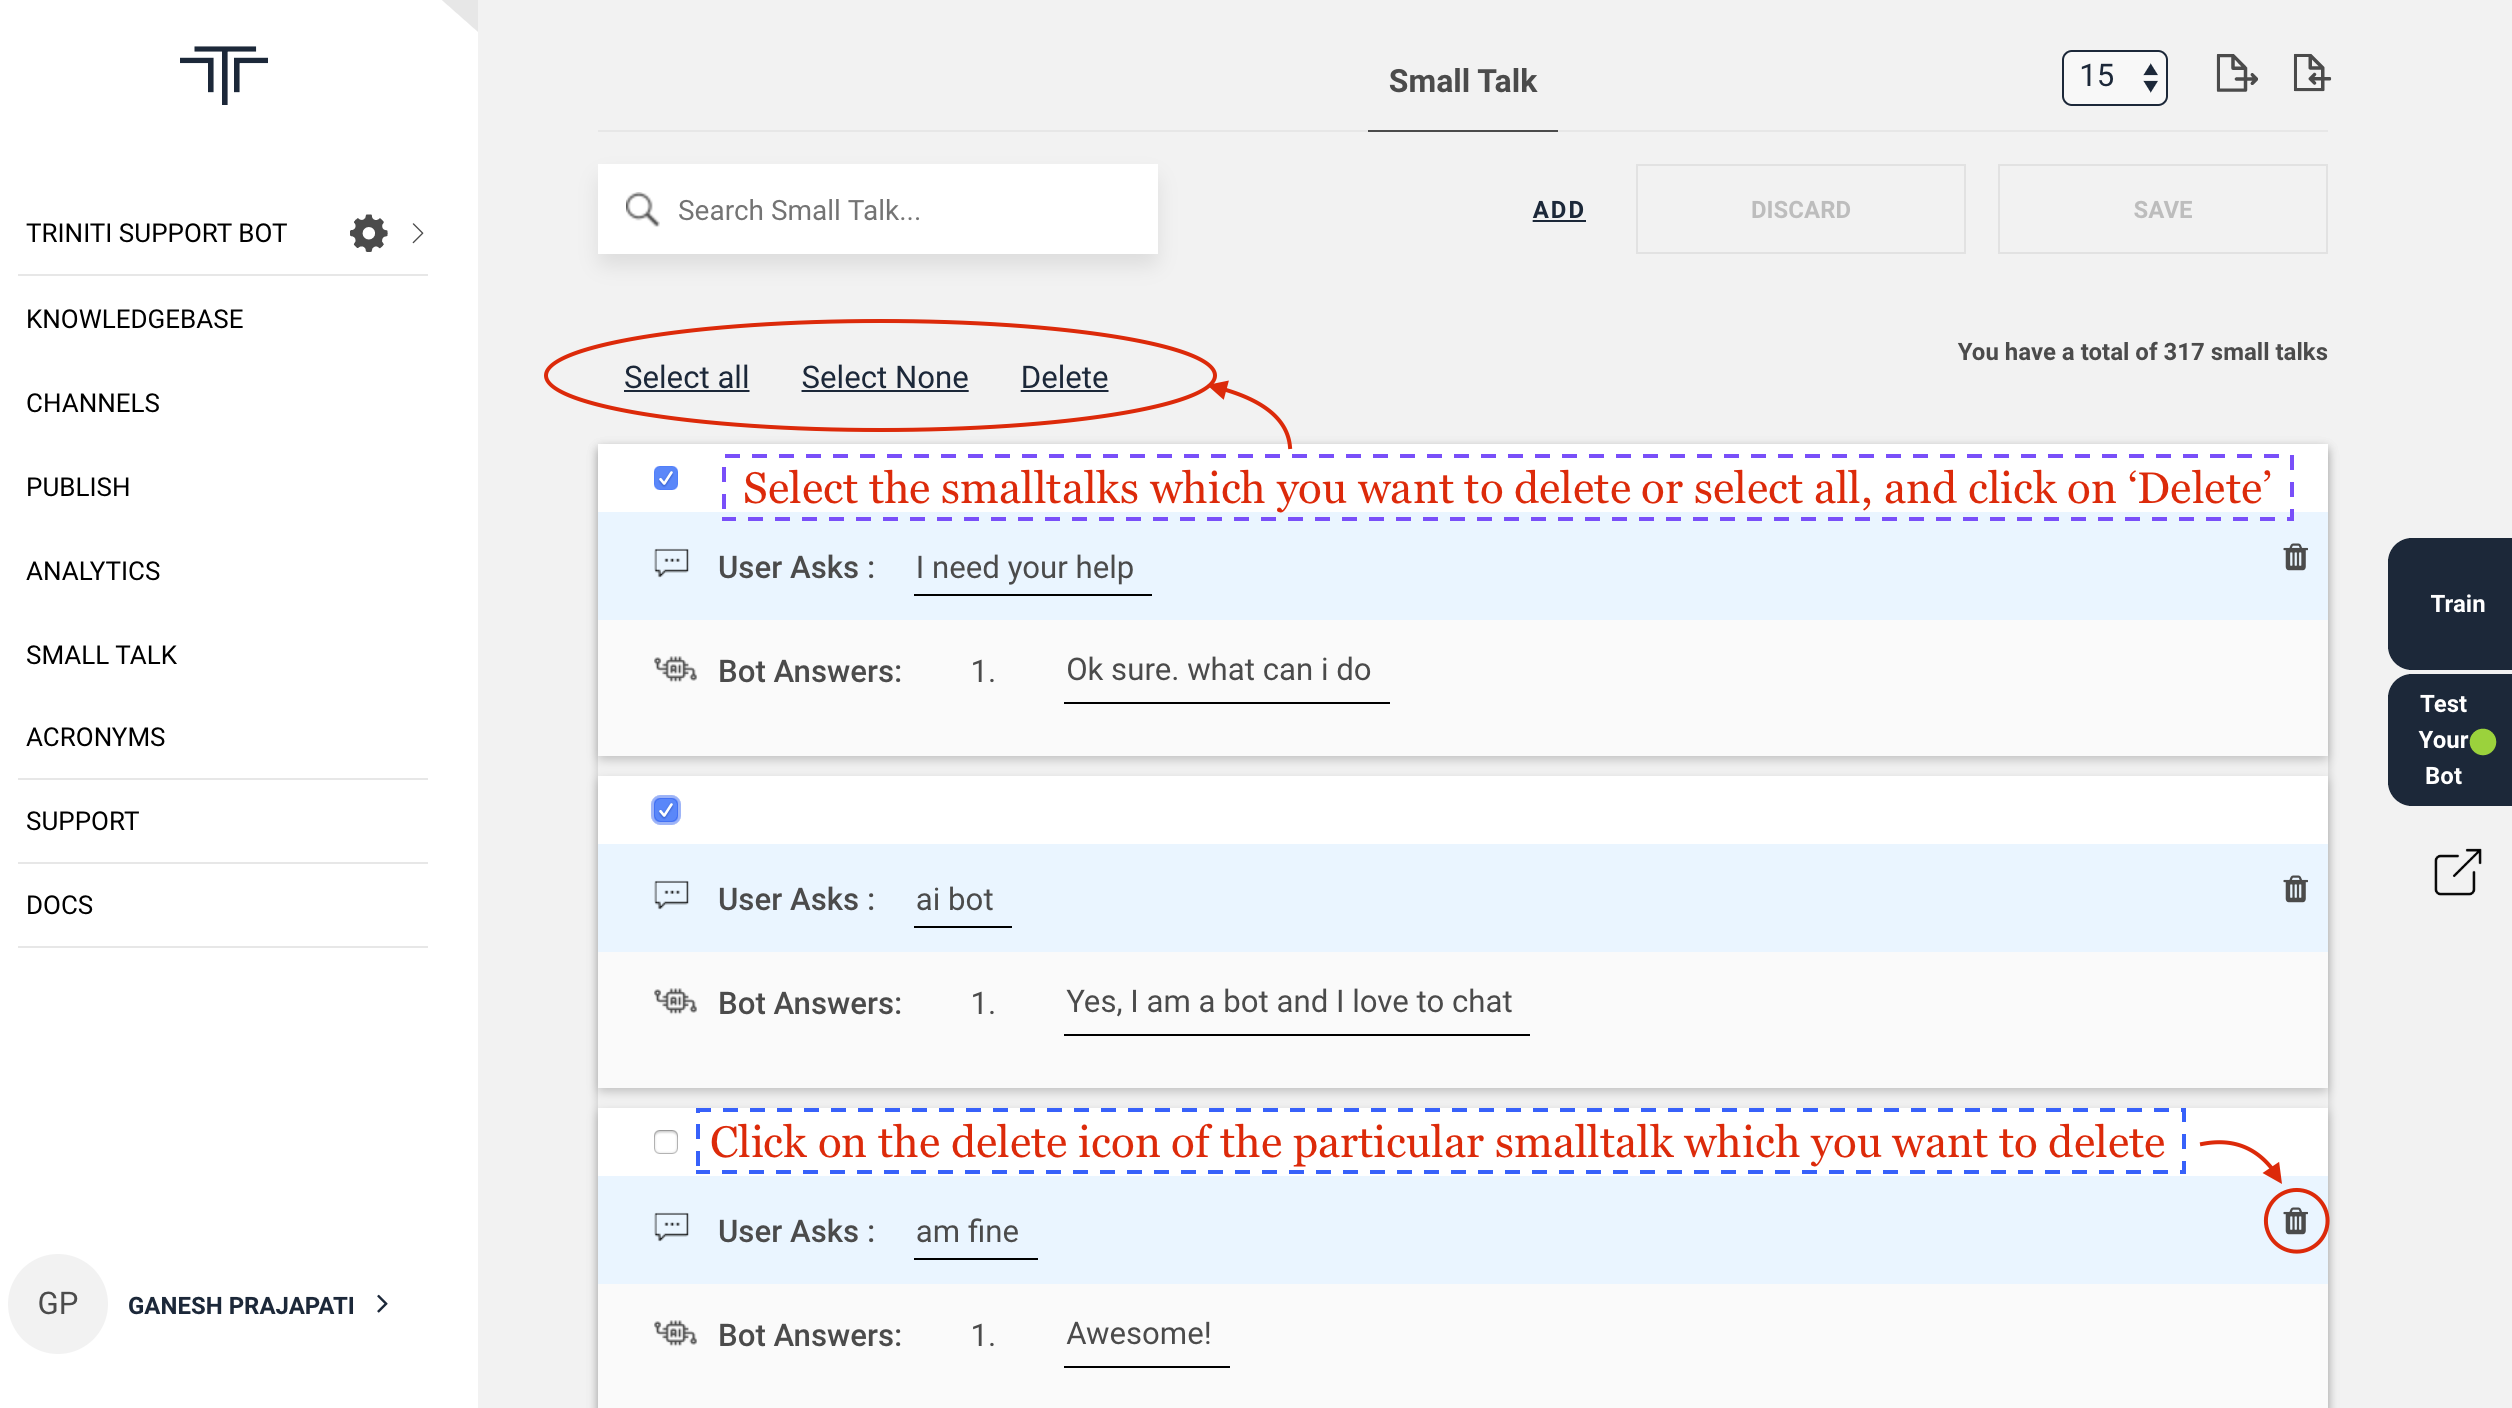
Deleting Small Talk
If you don't want to keep some of the smalltalks then you can remove those smalltalks, you can delete a particular, multiple or all smalltalks by following these steps:
- Goto your workspace
- Navigate to Small Talk
- Click on delete icon of the particular smalltalk which you want to remove
- Or select multiple/all to delete in a bulk
- Click on save
Manage Acronyms
Acronyms are custom ways to provide an alias to certain words to improve the vocabulary of the bot. An acronym is a pronounceable word/abbreviation formed from the first letter (or first few letters) of each word in a phrase or title. Because in general, the "WHO" can signify many objects, like; a. world health organization; b. it can be the question word.
The variations which need to be corrected has to be one word only. As currently Conversational AI only supports one word (input variant – i.e. bill payment) to many words (root word/phrase – i.e. bill payment) and not the other way around (i.e. bil pyment (input variants) cannot be mapped to root word/phrase bill payment. Three types of corrections happen at the spellcheck level:-
- Acronym to abbreviation
- Map the regular expression words with the same value to stop the auto-correction
- Spell typo to correct word mapping
Ex;
- balance=balnc,blance (spell typo correction)
- Amit=Amit, amit (regular expression)
- account=ac.,a/c, acc, ac (acronym)
Acronyms Usage:
Acronyms file is useful to correct the three types of single token-based corrections before user input gets processed by any other modules. This helps to prepare the training data without creating variations at the typo errors or acronyms based variations. In return, such variations will become redundant.
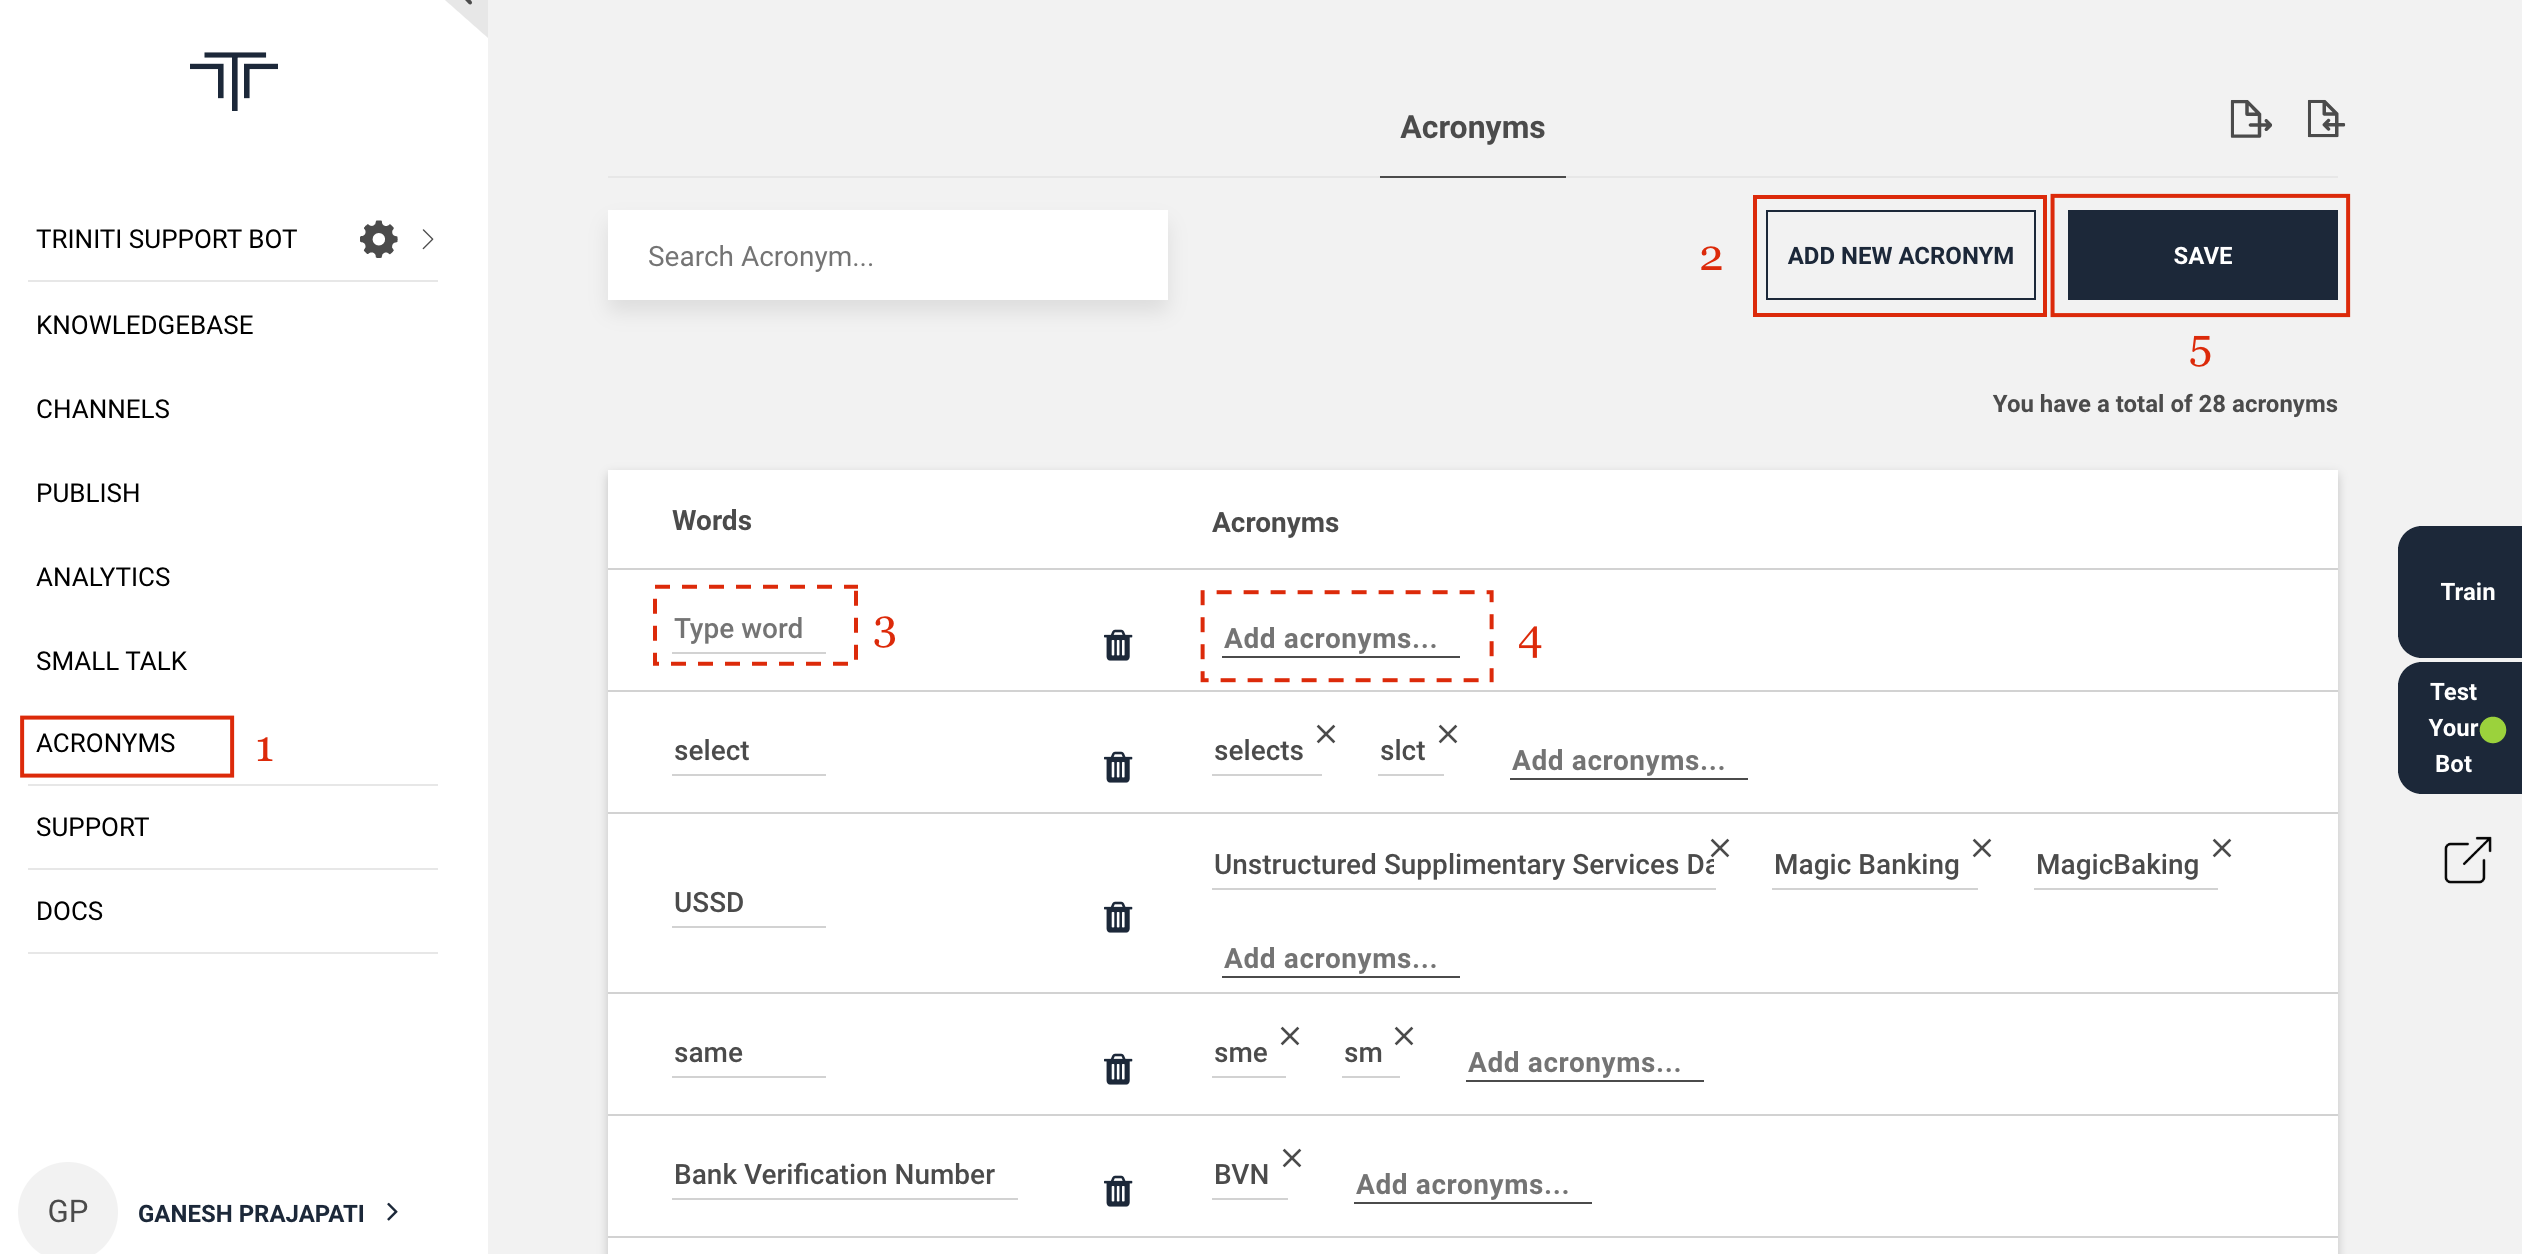
Adding acronyms
You can add acronyms manually by adding the word & the respected acronyms, you can add multiple acronyms for the single word by following these steps:
- Goto your workspace
- Navigate to Acronyms
- Click on ADD NEW ACRONYMS
- Add the word in Words section
- Add respective acronyms for that word in Acronyms section
- Click on SAVE
Importing Acronyms
You can even import a CSV file of acronyms containing words name & acronyms columns by following these steps:
- Goto your workspace
- Navigate to Acronyms
- Click on import icon
- Select a CSV file of the acronyms containing name & acronyms columns.
- Click on Save

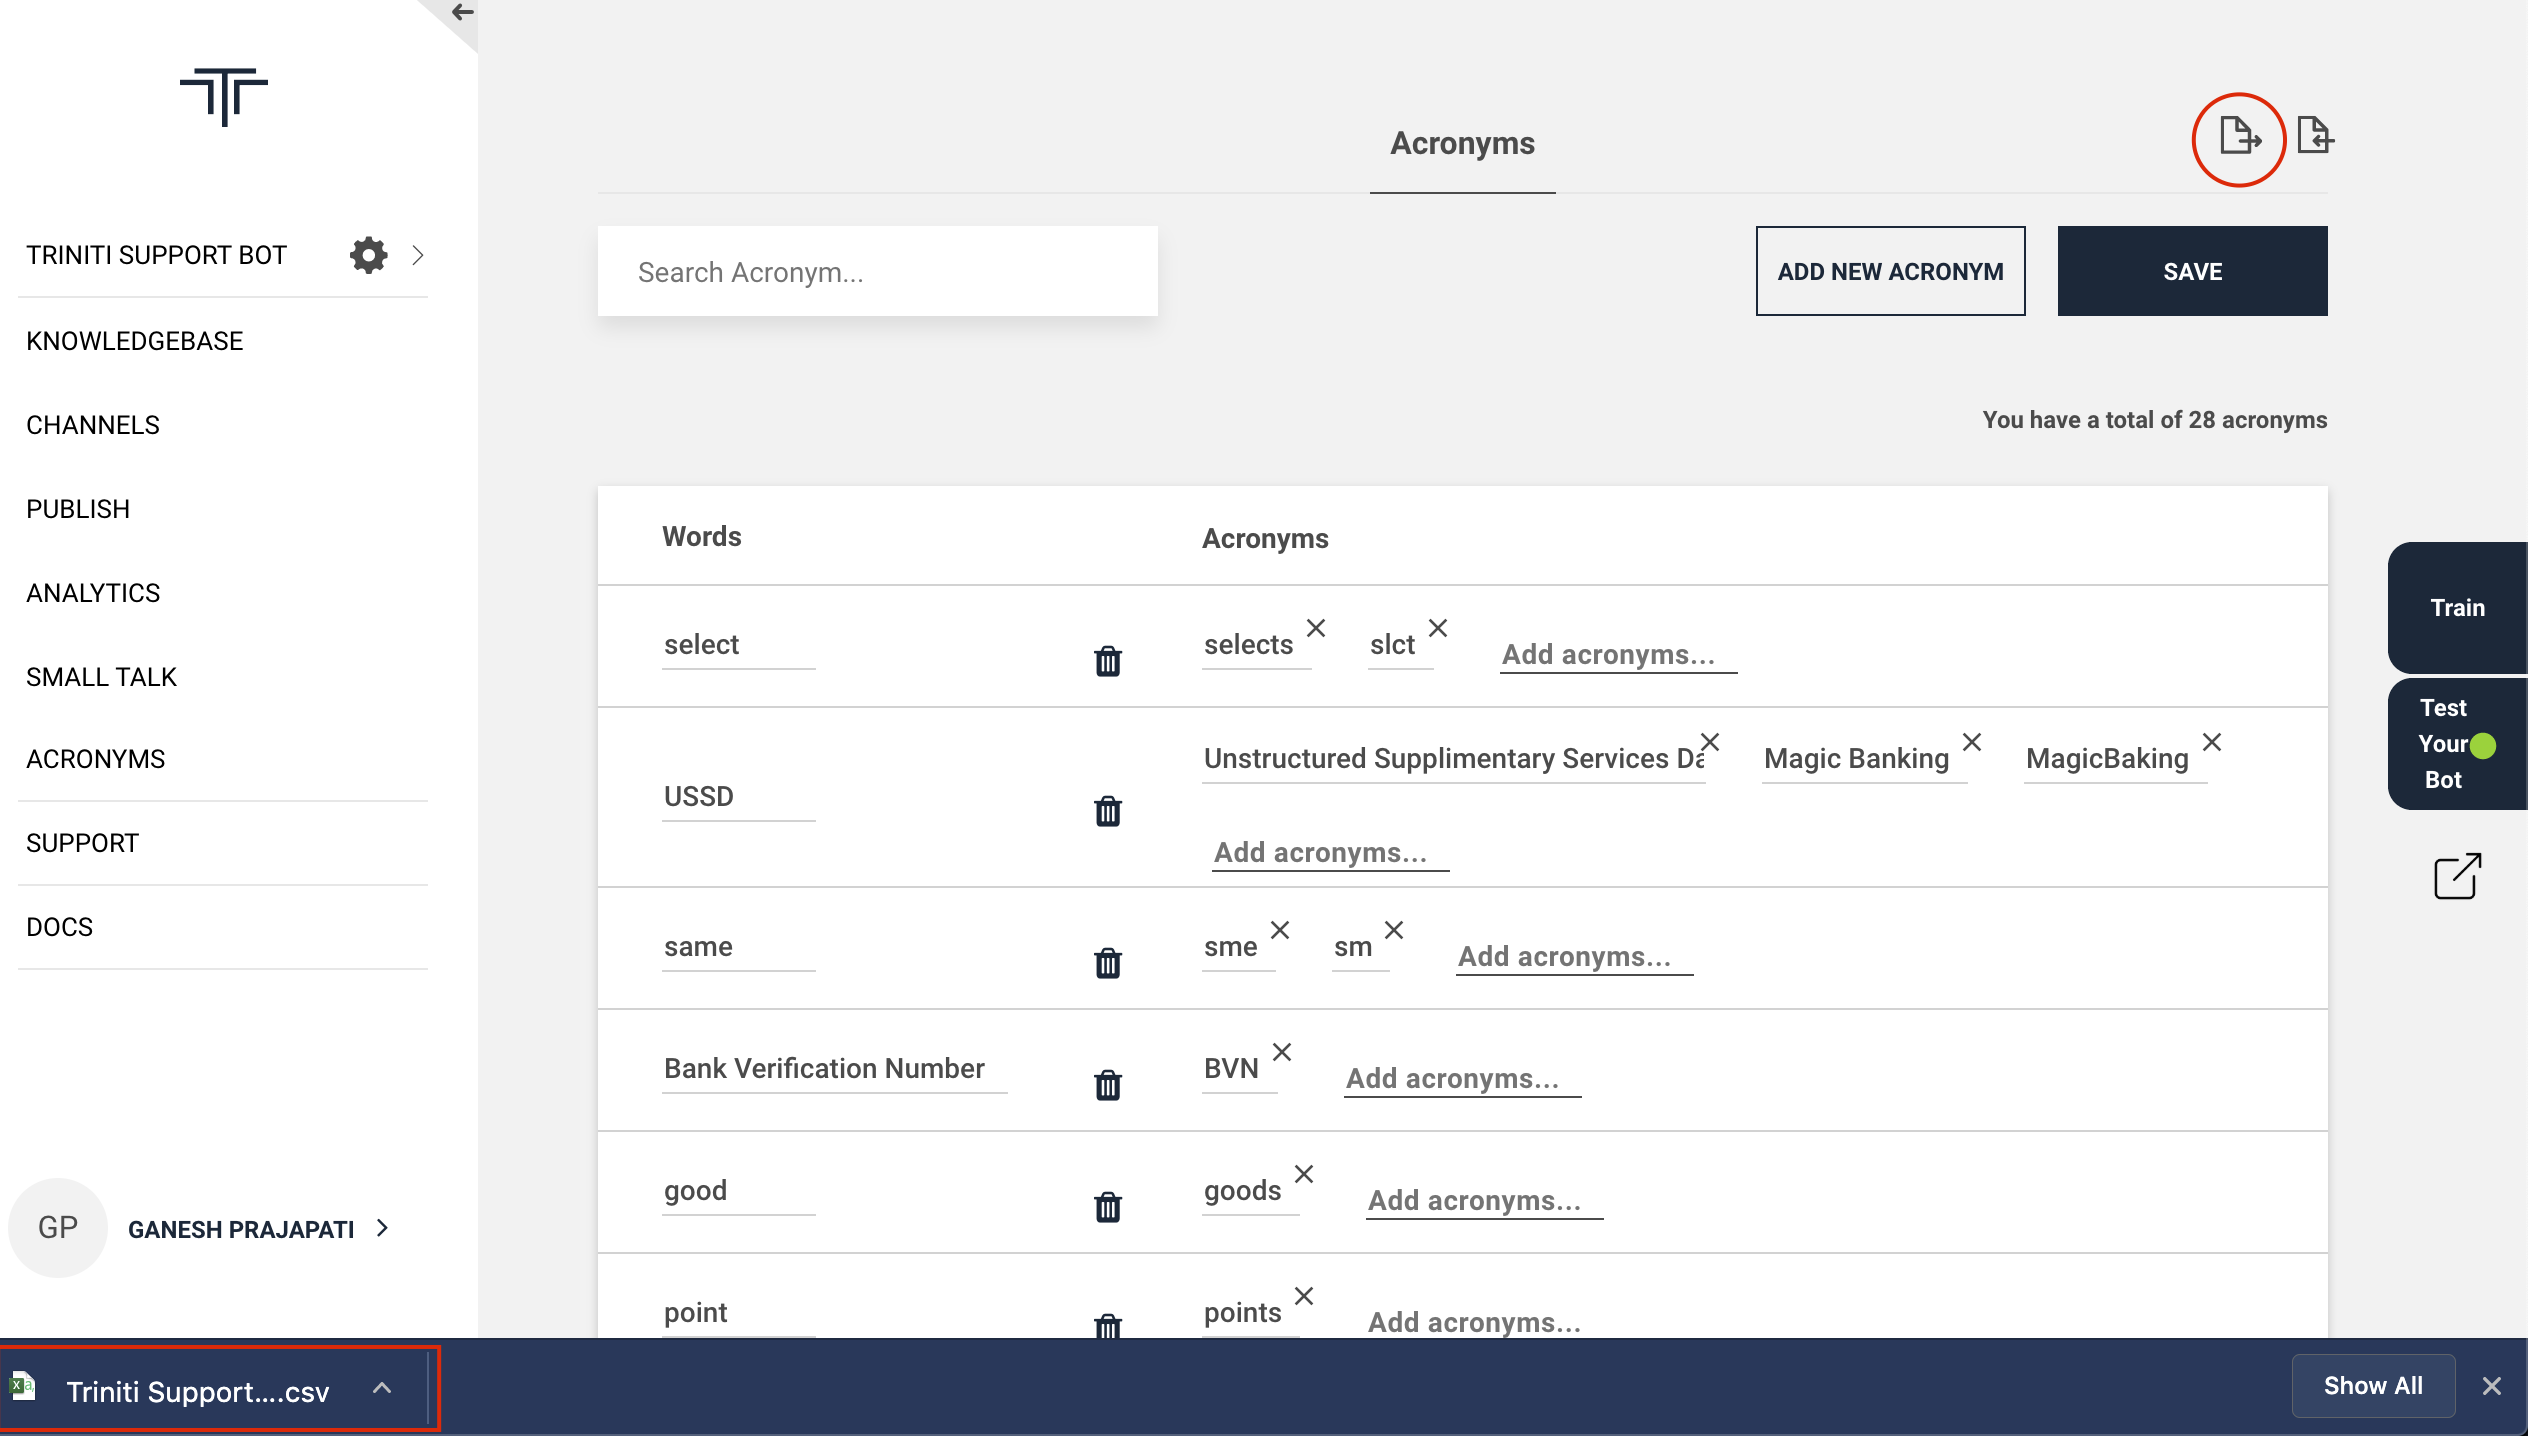
Exporting Acronyms
If you want to use same acronyms that you have added earlier, so you can export those acronyms by following these steps:
- Goto your workspace
- Navigate to Acronyms
- Click on export icon It will download a CSV file containing name & acronyms columns.
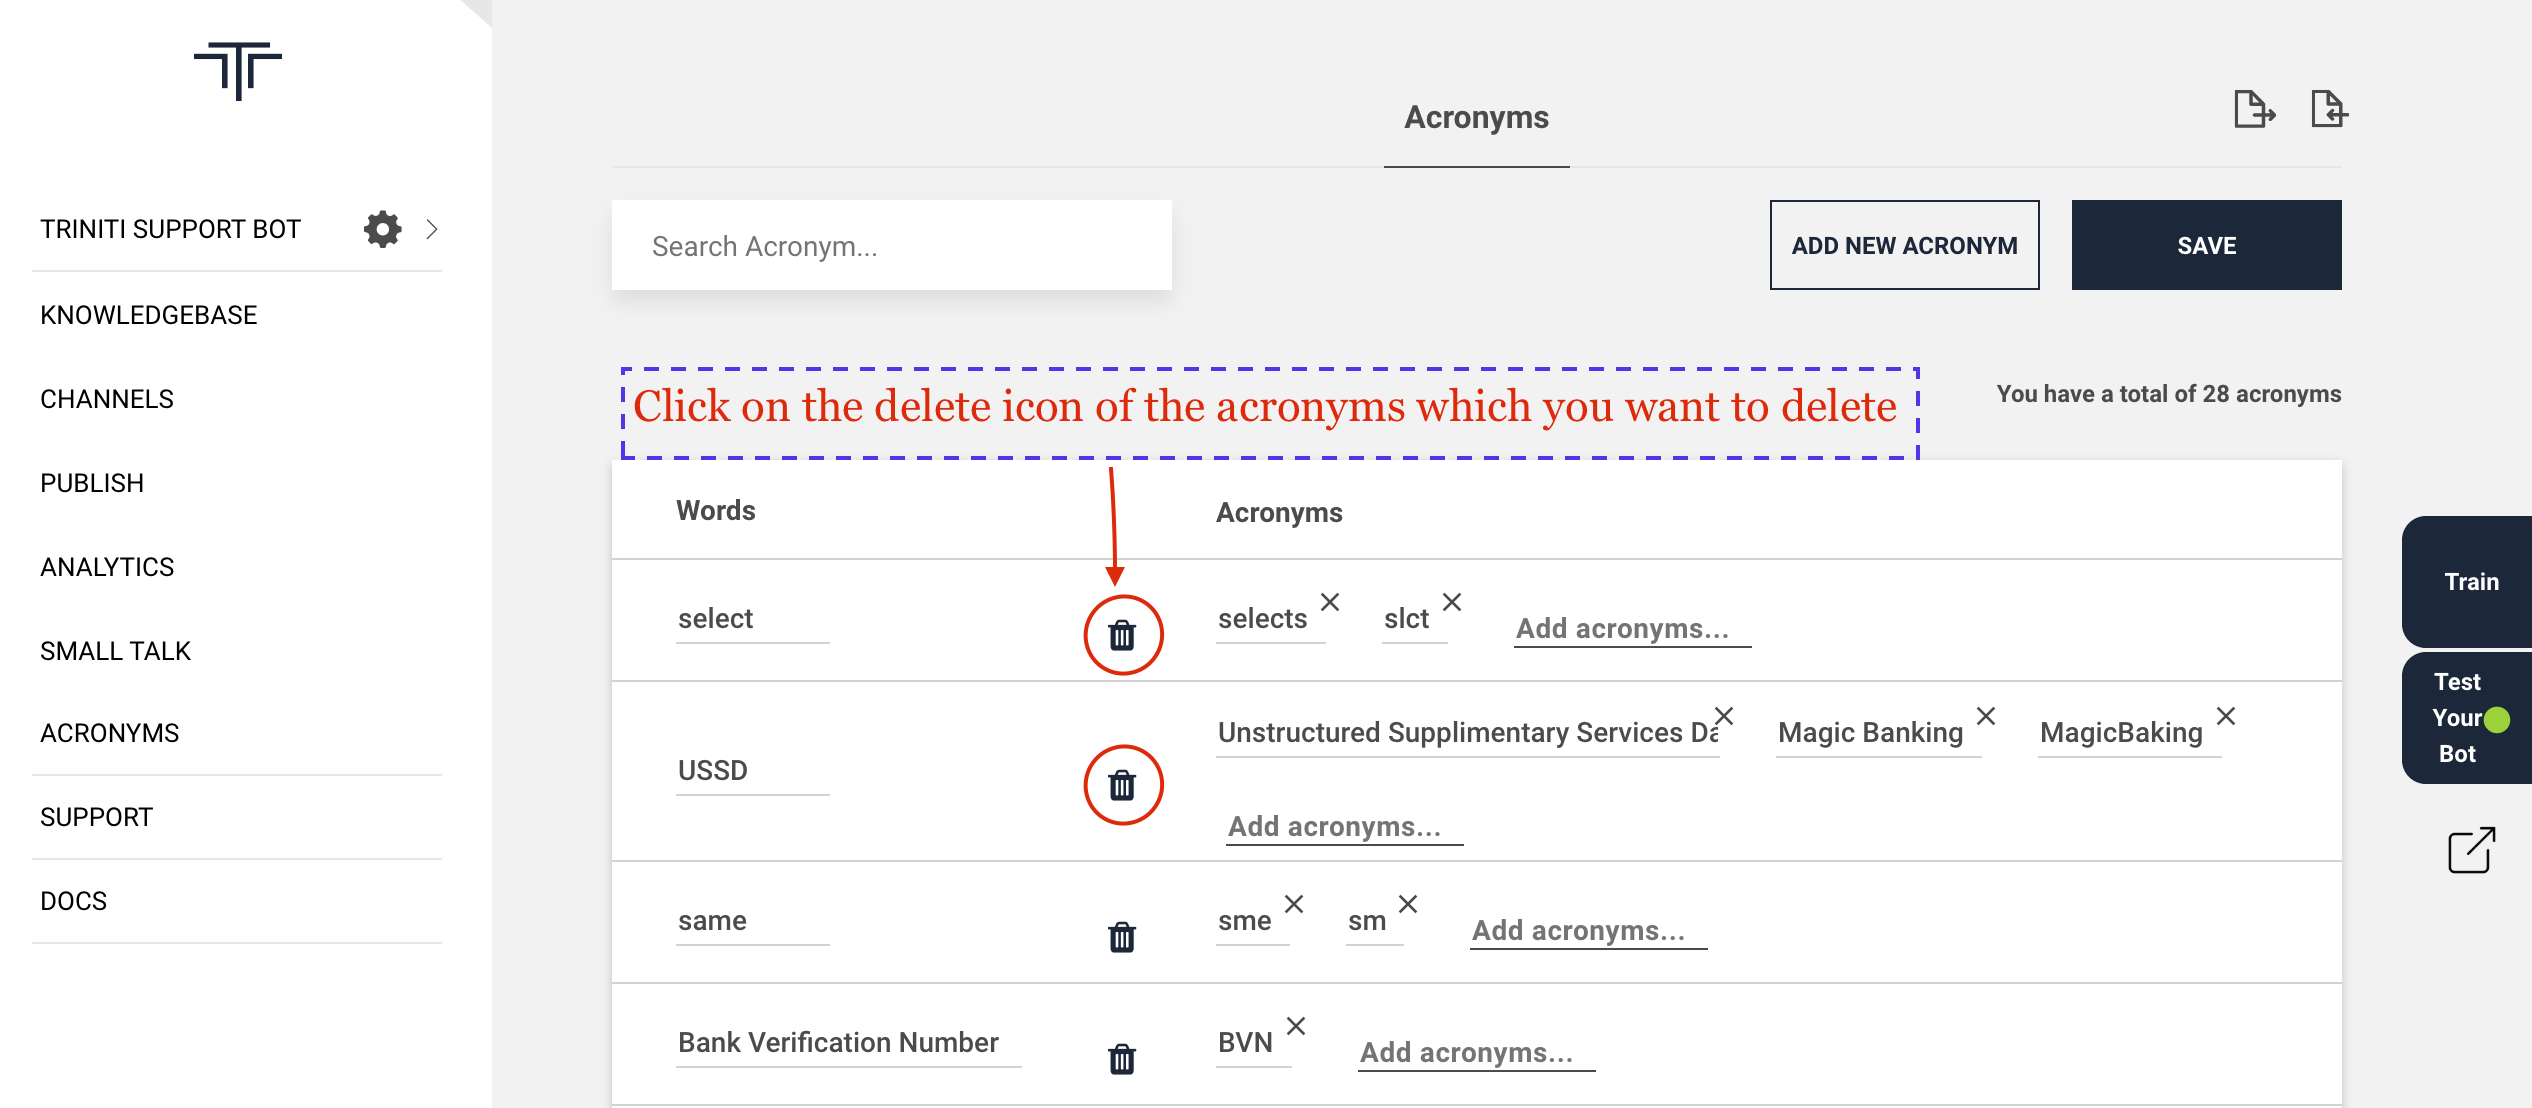
Delete acronyms
If you don't want to keep some of the acronyms in your worksapce then you can remove those acronyms by following these stpe:
- Goto your workspace
- Navigate to Acronyms
- Click on delete icon of the particular acronyms
- Click on save
Manage Fulfillment via Workflows
Workflow Editor
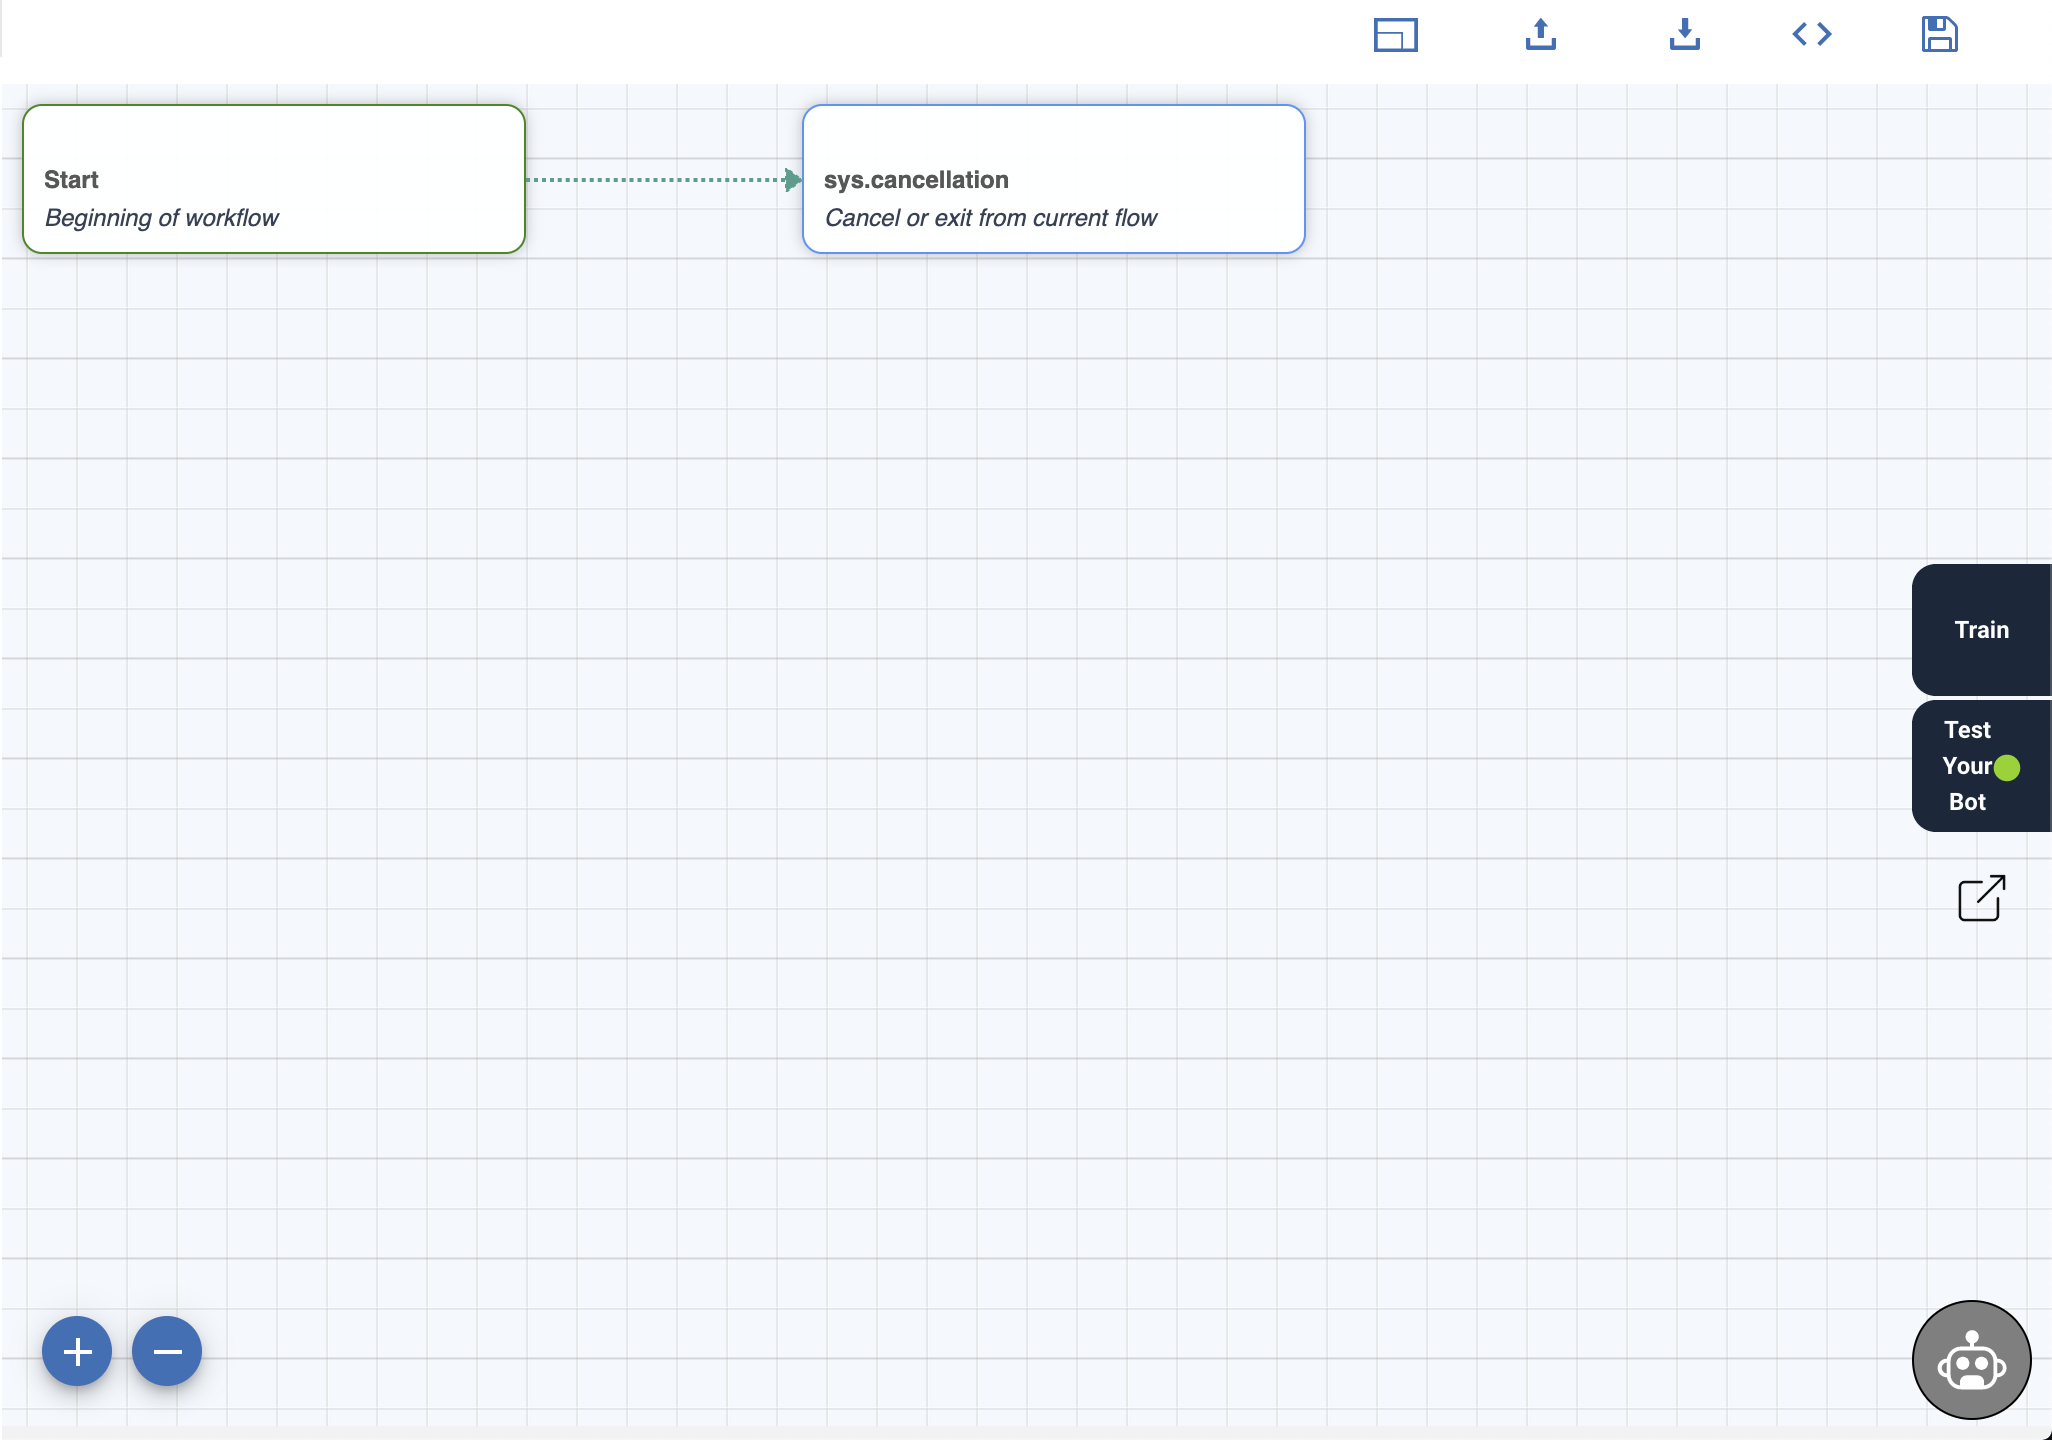
The Workflow Editor as the name suggests is a GUI to create/edit a new/existing workflow. Workbook A workbook is where you will design the complete flow for a particular intent. Each workbook can have multiple nodes to define the flow. The figure below shows a new workbook only with a Start node and the toolbar.
Toolbar Toolbar exists in the top right corner of the workflow editor, which comprise of
Icon |
Description |
|---|---|
 |
Full Screen: To make the editor occupy full screen or go back to the standard window. |
 |
Download: To downloads the AiFlow file. The AiFlow file can be imported for other workflow or in the other workspace. |
 |
Upload: This can be used in case a pre-designed AiFlow file is available and needs to be uploaded to show a workflow in the editor. |
 |
Debug Workflow: To view the source code of the AiFlow file and JSON workflow for the debugging purpose. |
 |
Save Workflow: To save the workflow. |
Node Node is one step of the process to complete a flow. Each node is attached to one entity. Moreover, every node has three responsibilities.
- Ask input from the user
- Verify inputs
- A route to the next node
Each node except the start node has four buttons on the right-hand side upper corner to open Definition, Validation, Connection and Delete. For the start node, there is no Validation.
Icon |
Description |
|---|---|
| Definition: To give your node name, enter message to show on that step. | |
| Validation: To validate the user input. | |
| Connection: To have conditional branching to another node. | |
| Delete: To delete the particular node. |
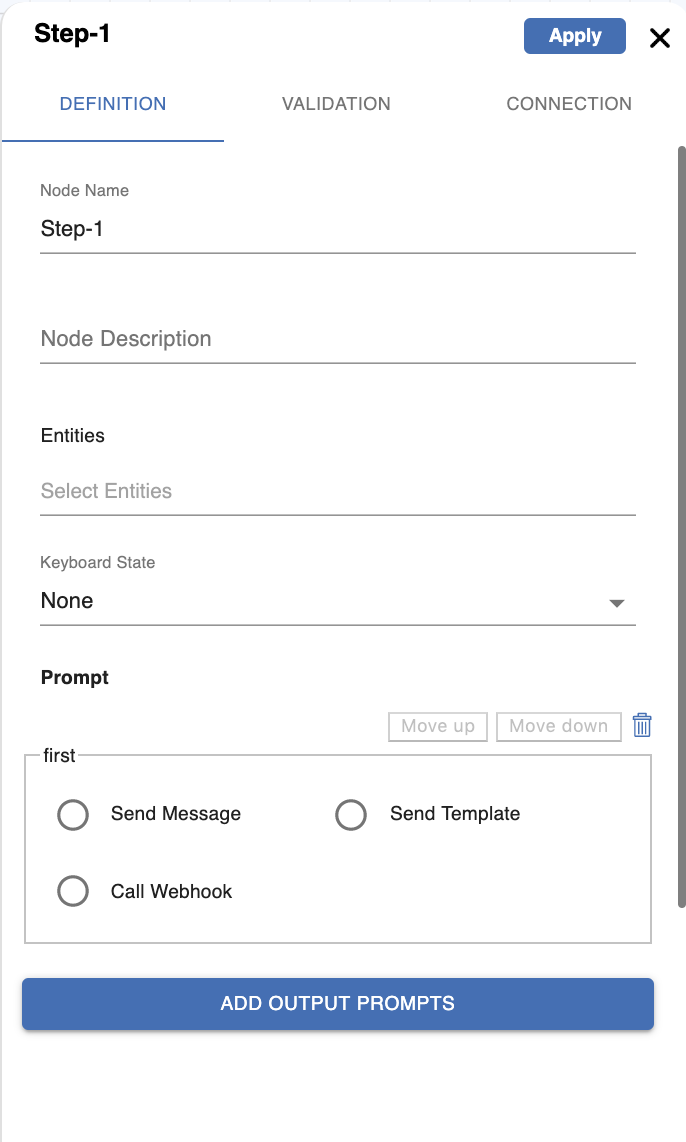
Definition Tab
This category contains the following keys:
Keys |
Description |
|---|---|
| Node Name | Name of the node. |
| Node Description | A brief description of what the node does. |
| Entities | The entity to be handled by the node. |
| Prompt | Messages to send to the user to ask for the entities. |
See Prompts for more information.
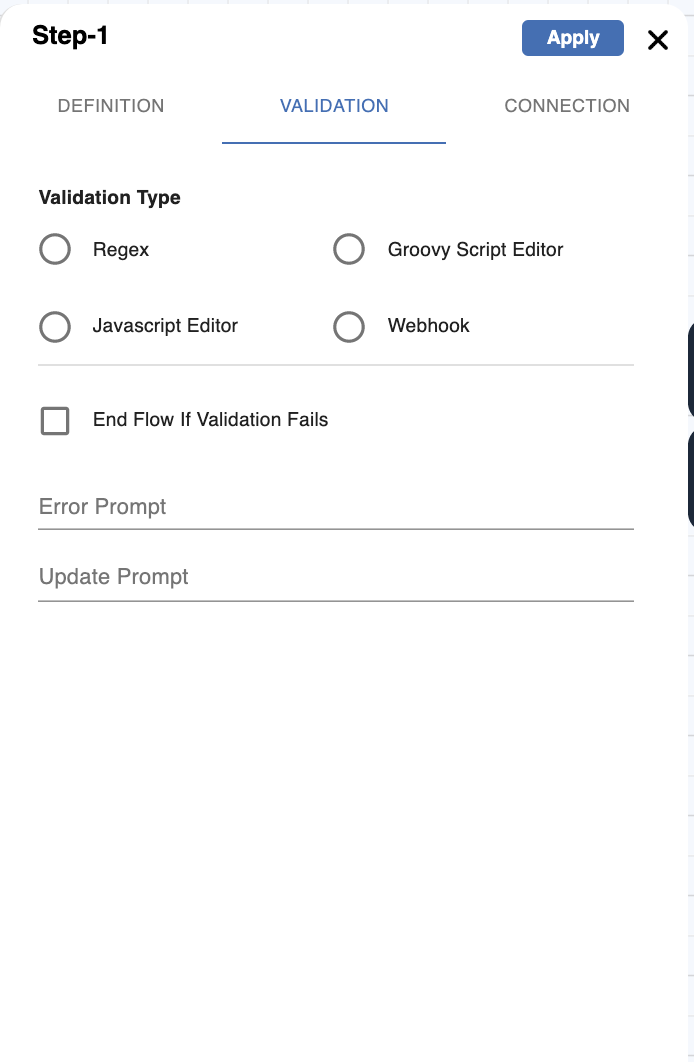
Validation Tab
This category contains the keys participating in the validation of user inputs:
Keys |
Description |
|---|---|
| Validation Type | It defines the type of validation of the user inputs e.g. regex validation, camel route validation, etc. |
| Login Session Required | If checked, the key secured in JSON is set to true, meaning that the user will have to be logged in as part of validation for this node. |
| End flow if validation fails | If checked, the flow will end altogether in case the validation of the current node fails. |
| Error Prompt | This static error text message is displayed if the user fails the validation. |
| Update Prompt | This static text message is displayed if the user updates the value. |
See Handling Validations for more information.
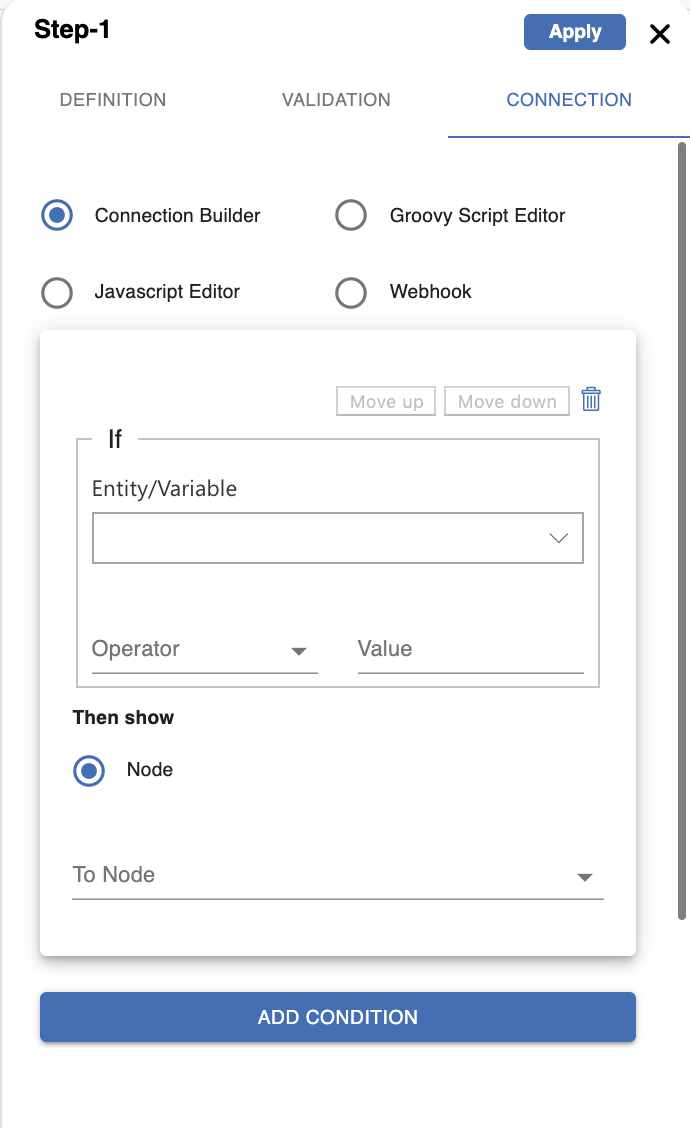
Connection Tab
This section can be configured to have conditional branching to another node and is reflected in the script section of the input definition in JSON.
Definition Tab |
Validation Tab |
Connection Tab |
|---|---|---|
 |
 |
 |
Defining a Workflow
Workflow helps to define conversation journeys. The intent and entity might be enough information to identify the correct response, or the workflow might ask the user for more input that is needed to respond correctly. For example, if a user asks, What is the status of flight?, defined workflow can ask for the flight number.
In a workflow, each entity is handled by a node. A node will have at least a prompt and a connection. A prompt is to ask for user input and connection to link to another node. In a typical workflow that handles n entities, there would be n+2 nodes (One node per entity with a start and a cancel node). Even though while designing a workflow we expect user inputs in a sequence, but by design, a workflow can handle any entities in any order or all in a single statement. It out of the box supports out of context scenarios or updates and many other features. See Features to check the list of workflow features.
Sequence of Execution
The workflow like any other bot conversation starts with an utterance made by the user, followed by Triniti's intent identification and consequently followed by start/init node of the workflow. Every node has the jobs of slot-filling (getting the entity value from the user), validating user input and moving on to the next node.
As one might imagine, to fulfill above process, each node has a "prompt" to ask a user for an utterance (to get the entity it is expecting), a "validation" process to validate the entry and finally a "connection" to jump to another node to further the flow. Hence, the Sequence of implementation involving User and Workflow is:
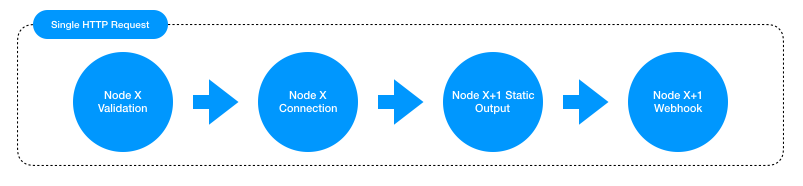
Sample Scenario:-
- User says: I want to book a flight from Delhi to Singapore.
- Since the workflow has been configured as the fulfillment of the intent identified here (let's say "txn-bookflight"), the init (start) node is called. The connection of this node is executed, and the next linked node is called. (Hence the start node has only "connection")
- The node connected to the start node gets called by the "connection" part of the start node. Let's call this node X for easier understanding. For this node (and all nodes from hereon) first prompt is executed.
- Prompt has the responsibility of prompting the user to enter an utterance to resolve and expected entity for the current node (node X).
- Once the user enters the utterance, validation of the X node is executed to validate the entity value entered by the user as part of the text.
- On successful validation, the control moves on to connection of node X, where a logical decision is made to know which node to branch on from the current node (X).
- On successful execution of connection, the underlying framework has now resolved the node to be branched onto. Let's call this node X+1.
Now steps 4 through 7 will be sequentially executed for each node until the user ends the flow or there is some failure in any of the above steps or the flow itself ends successfully. Find the detailed description of Prompts, Validations and Connections in the following text.
Prompts - User Input
Prompt defines how to ask for the required information or reply to the user. You can define it in the following ways:
- Send Message
- Send Template
- Call Webhook
Send Message
If you want to respond with a text message, choose Send Message options and add a message in Message Content text box. A message can include workflow variables using curly braces. For example, if you have name as a variable in the workflow context, to use it in the message, your message would look like Hi {name} , how can I help you?
Send Template
Sometimes it’s a better user experience to ask or show information using templates. For that you have the option to choose from:
- Card
- Buttons
- Carousel
- List
- Image
To use one of the templates as prompt, choose Send Template in prompt and click ‘Create Template’ button. That will show you a dialog like in the figure below. See Templates for complete list with details.
Call Webhook for Prompt
You can define a webhook to return a dynamic response. Webhook defined will get a request with the event workflow_webhook_pipeline. See Webhooks for more information.
Handling Validations
If you want to validate user input before proceeding to next node, you have option to do that using one of the following:
- Regex
- Groovy Script
- JavaScript
- Webhook
Validation using Regex
For a typical node which expects a single simple entity like mobile number or email etc, you can use a regex to validate the input. For example, if you expect only Gmail email addresses as an input, you can use define a regex like ^[A-Z0-9._%+-]+@gmail\\.com$. Any valid Java regex will work.
Validation using Groovy Script
You can define validation code in Groovy script. Request and workflow variables are exposed along with the Webhook request object as wRequest (Refer WorkflowRequest class in GitHub). Groovy validation script needs to return status (success/error) with other optional fields like workflow_variables and global_variables as JSON response.
Sample Groovy Script
import groovy.json.JsonSlurper
import java.text.SimpleDateFormat
import java.text.DateFormat
import java.util.Date
import java.text.ParseException

if (sys_date != null) {
    DateFormat df = new SimpleDateFormat("dd-MM-yyyy");
    Date now = new Date()
    try {
        Date date = df.parse(sys_date);
        if (date < now) {
            return new JsonSlurper().parseText(' {"status":"error"}')
        } else {
            return new JsonSlurper().parseText(' {"status":"success", "workflow_variables": {"travel_date": "' + date.format('yyyy-MM-dd') + '"}}')
        }
    } catch (ParseException pe) {
        return new JsonSlurper().parseText(' {"status":"error"}')
    }
} else {
    return new JsonSlurper().parseText(' {"status":"error"}')
}
See Scripting via Groovy for more information.
Validation using JavaScript
Like Groovy script, you can also define validation code in JavaScript. Request and workflow variables are exposed along with the Webhook request object as wRequest (Refer WorkflowRequest class in GitHub). Validation script needs to return status (success/error) with other optional fields like workflow_variables and global_variables as JSON response.
Sample Javascript
function test() {
    if (sys_amount == '7000' && wRequest.bot.languageCode == 'en') {
        return {
            'status': 'success',
            'workflow_variables': {
                'travel_year': '2019'
            }
        };
    } else {
        return {
            'status': 'error'
        };
    }
}
test();
See Scripting via JavaScript for more information.
Response expected from Groovy and JavaScript Validation Scripts:
{
  "messages": [...],
  "render": "<WEBVIEW|BOT>",
  "keyboard_state": "<ALPHA|NUM|NONE|HIDE|PWD>",
  "status": "<success|error|2faPending|2faSuccess|2faFailure|pending|loginPending>",
  "expected_entities": [],
  "workflow_variables": {
    "entity_1": "value_1",
    "entity_2": "value_2"
  },
  "global_variables": {
    "entity_3": "value_3",
    "entity_4": "value_4"
  }
}
Validation using Webhook
For complex cases, you can define a webhook to validate user input. Webhook defined will get a request with the event wf_validation or wf_u_validation. See Webhooks for more information.
Connections
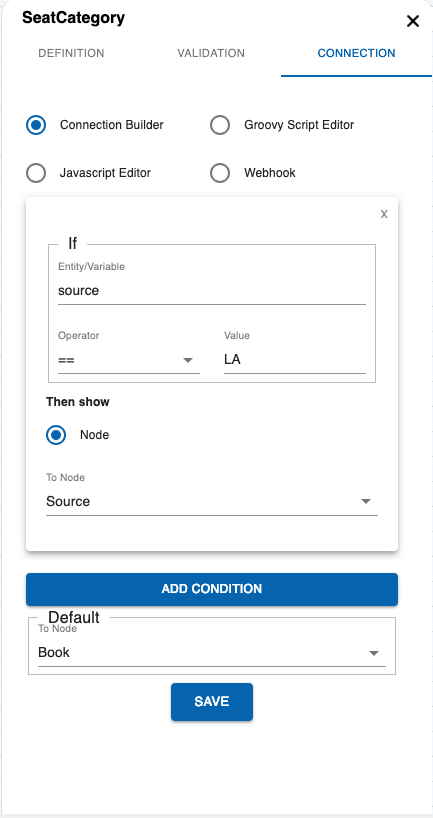
Based on the current input and other previous inputs, you can instruct what to do next. For that, you have the following options to define the connections between the nodes. For example, at node A you asked for user's age and now based on that you want to take a call whether to allow him to book the tickets or not. These kinds of rules you can define in the connections. When even you create a new node from an existing node, an entry is added in the connection of that node. You can define the conditions there, or if there is only a single connected node, it's automatically added as the default next node. To define these connections you have these options:
- Connection Builder
- Groovy Script
- JavaScript
- Webhook
Connection Builder
Connection Builder is a GUI to define simple routing. It's the best option to go while defining a mockup of the flow or for simple use cases where routing is only based on entities or just a default routing. Whenever you create a new node from any existing node that new node entry is added to the parent node connection builder as default routing. If multiple nodes are added from a node, then you need to define the conditions to route to each node and can keep one as the default fallback node.
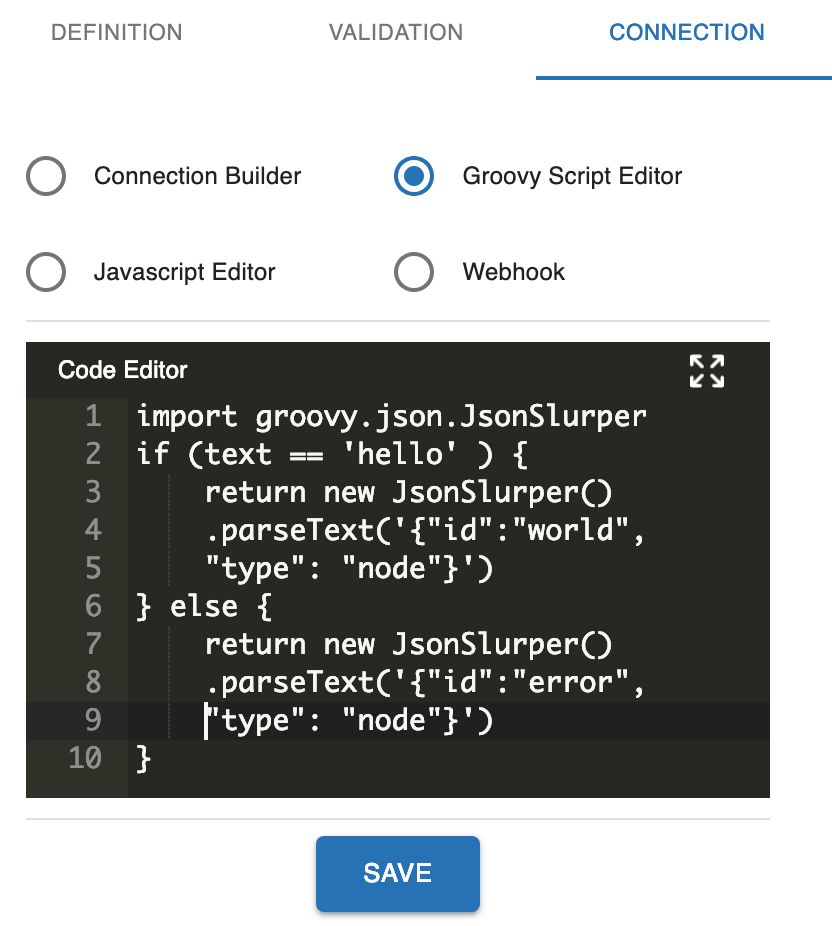
Groovy Script
You can use a Groovy script to define routing. The groovy script needs to return the response in JSON format. For example, as per below code snippet, if text is hello go to the node with id world else to the node with id error.
import groovy.json.JsonSlurper
if (text == 'hello' ) {
    return new JsonSlurper().parseText('{"id":"world", "type": "node"}')
} else {
    return new JsonSlurper().parseText('{"id":"error", "type": "node"}')
}
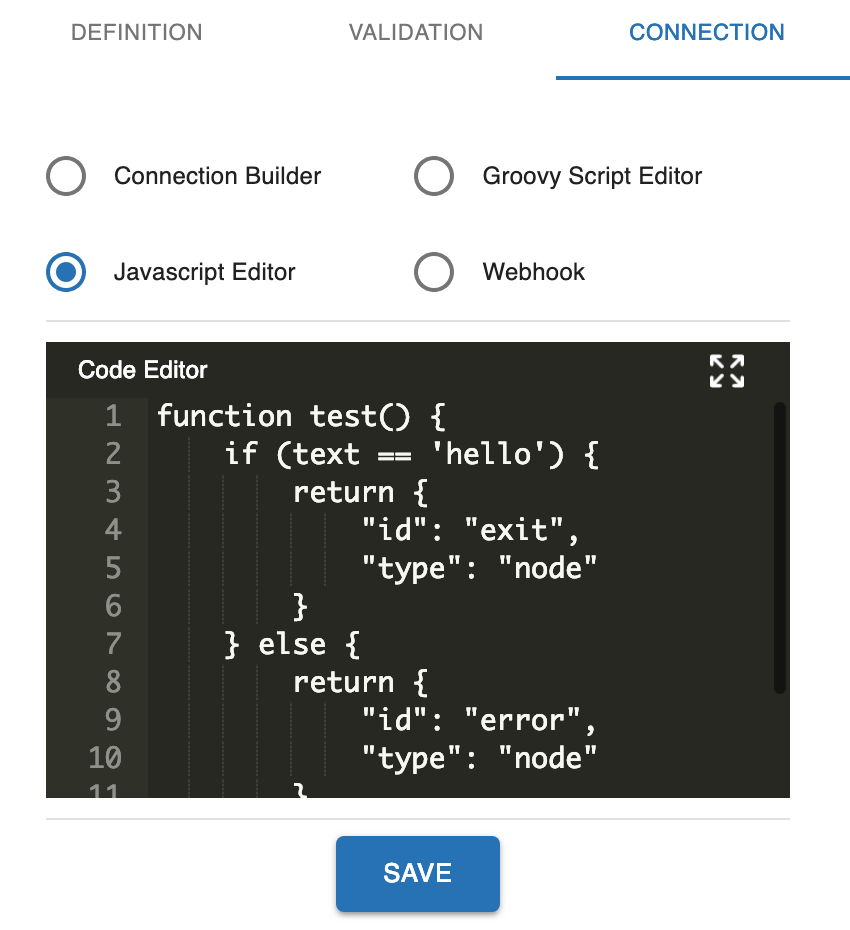
JavaScript
Similar to Groovy, routing can be achieved using Javascript function like:
function test() {
    if (text == 'hello') {
        return {
            "id": "exit",
            "type": "node"
        }
    } else {
        return {
            "id": "error",
            "type": "node"
        }
    }
}
test();
Connection Webhook
You can define a webhook to define a dynamic routing. Webhook defined will get a request with the event wf_connection. See Webhooks for more information. The property of "webhook" as a tool to call API is useful here in case the connection needs extensive coding or in case the developer wants to exercise language discretion.
Scripting via JavaScript |
Scripting via Groovy |
|---|---|
 |
 |
Templates GUI
Button payload data to be in JSON format with data and intent. Data could be any JSON object. For example:
{
    "data": {
        "flight-no": "AI381"
    },
    "intent": "txn-bookflight"
}
Features
- Workflow Cancellation
- Amend inputs
- Workflow Context
- Global Context
- Handling multiple inputs in a single statement
- Visualize flow
- Partial state save (Coming Soon)
- In step login
Debugging Workflows
~Comming Soon~
Workflow FAQs
Q. What can I do if I need to add a static prompt as well as a dynamic template?
A. You can use a combination of Send Message and Call Webhook to show a static text message followed by a dynamic template (or even text) sent from the API implementation. You can also use Call Webhook to do any number of text-template combinations.
Q. When is the text in update and error prompts in the "validation" tab of a node displayed?
A. Error prompt tells the user if for a particular node validates the entity entered by the user as incorrect. Similarly, update prompt is to let the user node if an older entity (the node that has already been executed) gets updated. Update Prompt gives the update message of the entity (node) that has been updated and not of the current node.
Q. What is the postback? What is the format to define that?
A. Postback is the request body which the server gets once the user clicks on any postback type button or quick reply. Morfeus expects it to be of JSON type with either 'intent' or 'type' and 'data'. For example this is a valid postback:
{
    "data": {
        "flight-no": "AI381"
    },
    "intent": "txn-bookflight"
}
Q. How do I point a button to an FAQ?
A. You can create a postback type button with following postback data:
{
    "data": {
        "FAQ": "<<ANY TRAINED FAQ UTTERANCE>>"
    },
    "type": "MORE_FAQ"
}
Manage Fulfillment via Webhooks
A webhook is nothing but an endpoint or an API that can be summoned to fulfill a particular task or in AI terminology, a particular intent. The primary motive to have a webhook as a mode of fulfillment is to call an API that can be written in any programming language and be hosted on a server and be accessible irrespective of the scope of the classes calling it. We'll go through this feature to see how it can be leveraged to define a fulfillment for your intent.
Defining a Webhook
A webhook is reasonably easy to define. It just requires a URL and a secret key that is used to validate the requester of the API is accessed. Triniti.ai leverages the use of this feature to support vanilla fulfillment via webhooks and as part of other fulfillment as well, namely, Workflow. One can define a webhook as fulfillment for intent and in the same way a webhook can be called for a particular node's implementation within a workflow. Refer Workflows for a better understanding of workflow basics.
Webhook Signature
A Webhook signature has two components, namely, * Webhook Url : the URL of the webhook/API called to fulfill the intent. * Webhook Secret Key : a string value that is used to validate the requester by matching the values of the secret key in the signature and the one defined in the API. See Security for more information on how to secure your webhook using security key.
To create a fulfillment via webhook for a particular intent you can click on the Call Webhook button seen at the bottom of the page once you navigate to any intent, along with other fulfillment options.
Conversational Workflow Framework
Please refer to the article on workflow for the detailed understanding of dialog flow management in Triniti.ai.
Other than acting as a method of fulfillment for an intent all by itself, webhook can also be leveraged to support certain parts of steps within a workflow. As we know that workflow is essentially a sequential and logical implementation of steps (nodes), it might be required to have multiple logical checks to be made to decide which step (node) to call next. It may not always be the best idea to perform these tasks within the static scripts within a node, or worse in multiple nodes. This is where webhooks come into the picture.
You can define a webhook to implement prompt, validation or connections of a node in a workflow. The definition/signature of the webhook is the same as above, i.e., a URL and a secret key, just the purpose changes.
Webhook Request
Your webhook to receive a POST request from Triniti.AI. For each message from a user, this webhook will be called, depending on webhook is configured for across bot or per intent. This request format is chosen to simplify the response parsing on the service side to handle multiple channels.
A request to comprise of following fields to give you details about the bot, user profile, user request, and NLP. For text requests, request body to have all the enabled fields for NLP, for postback requests you may get few of them.
Generic Webhook Request Format
{
    "id": "mid.ql391eni",
    "event": "wf_validation",
    "user": {
        "id": "11229",
        "profile": {}
    },
    "bot": {
        "id": "1874",
        "channel_type": "W",
        "channel_id": "1874w20420077206",
        "developer_mode": true,
        "sync": true
    },
    "request": {
        "type": "text",
        "text": "mumbai"
    },
    "nlp": {
        "version": "v1",
        "data": {
            "processedMessage": "mumbai",
            "intent": {
                "name": "txn-bookflight",
                "confidence": 100.0
            },
            "entities": {
                "intentModifier": [{
                    "name": "intentModifier",
                    "value": null,
                    "modifiers": []
                }],
                "source": [{
                    "name": "source",
                    "value": "mumbai",
                    "modifiers": null
                }]
            },
            "debug": [{
                "faq-subtopic-confidence": 0.0,
                "faq-topic-confidence": 0.0
            }],
            "semantics": [{
                "sentence-type": "instruction",
                "event-tense": "present",
                "semantic-parse": "location:DESCRIPTION[]"
            }]
        }
    },
    "workflow": {
        "additionalParams": {
        },
        "workflowVariables": {
            "modifier_intentModifier": "",
            "modifier_destination": ""
        },
        "globalVariables": null,
        "requestVariables": {
            "intentModifier": "null",
            "source": "mumbai"
        },
        "nodeId": "Source",
        "workflowId": "bf9f3713-7921-4927-8a40-5876b1012543"
    }
  }
Request Body
| Property | Type | Description |
|---|---|---|
| user | Object | User object. User details acquired from that particular channel |
| time | String | Timestamp of the request |
| request | Object | Request object. User Request Details |
| nlp | Object | NLP object. Natural Language Processing information about the request |
| id | String | Unique ID for each request |
| event | String | Event Type |
| bot | Object | Bot object. Bot details |
| workflow | Object | Workflow object. Only for requests made from workflow. |
User Profile
| Property | Type | Description |
|---|---|---|
| id | String | Channel User ID |
| profile | Object | Profile information acquired from the Channel |
Bot Details
| Property | Type | Description |
|---|---|---|
| id | String | Triniti AI Bot ID |
| channel_type | String | Channel type |
| channel_id | String | Channel ID for the Bot |
| developer_mode | Boolean | Developer or Live mode |
| language_code | String | Bot language code |
| sync | Boolean | Channel is sync or async |
Natural Language Processing
| Property | Type | Description |
|---|---|---|
| version | String | Triniti API version |
| body | Object | NLP body fields depends on Triniti API version |
Workflow Object
| Property | Type | Description |
|---|---|---|
| workflowId | String | Unique ID for workflow |
| nodeId | String | Unique ID for workflow node |
| requestVariables | Object | Local request variables |
| workflowVariables | Object | Variables persisted across workflow |
| globalVariables | Object | Variables persisted across session |
| additionalParams | Object | Some additional data |
You can use Webhook Java library to parse the request.
Webhook Response
Webhook response has most of the generic components, but some are specific to its implementation within the workflow. Following is the expected webhook response structure. Generic Webhook Response Format
{
    "messages": [{
        "type": "text",
        "content": "<text_message>",
        "quick_replies": [{
            "type": "text",
            "title": "Search",
            "payload": "<POSTBACK_PAYLOAD>",
            "image_url": "http://example.com/img/red.png"
        }, {
            "type": "location"
        }]
    }, {
        "type": "list",
        "content": {
            "list": [{
                "title": "",
                "subtitle": "",
                "image": "",
                "buttons": [{
                    "title": "",
                    "type": "<postback|weburl|>",
                    "webview_type": "<COMPACT,TALL,FULL>",
                    "auth_required": "",
                    "life": "",
                    "payload": "",
                    "postback": "",
                    "intent": "",
                    "extra_payload" :"",
                    "message": ""
                }]
            }],
            "buttons": []
        },
        "quick_replies": []
    }, {
        "type": "button",
        "content": {
            "title": "",
            "buttons": []
        },
        "quick_replies": []
    }, {
        "type": "carousel",
        "content": [{
            "title": "",
            "subtitle": "",
            "image": "",
            "buttons": []
        }],
        "quick_replies": []
    }, {
        "type": "image",
        "content": "",
        "quick_replies": []
    }, {
        "type": "video",
        "content": "",
        "quick_replies": []
    }, {
        "type": "custom",
        "content": {}
    }],
    "render": "<WEBVIEW|BOT>",
    "keyboard_state": "<ALPHA|NUM|NONE|HIDE|PWD>",
    "status": "<SUCCESS|FAILED|TFA_PENDING|TFA_SUCCESS|TFA_FAILURE|PENDING|LOGIN_PENDING>",
    "expected_entities": [],
    "extra_data": [],
    "audit": {
        "sub_intent": "",
        "step": "",
        "transaction_id": "",
        "transaction_type": ""
    }
}
You can use Webhook Java library to form the response. It has provision to accept responses of multiple types, namely :
- Text: a simple text response
- List: a vertical list-like-template showing list of cards/pictures.
- Button: a button that on being clicked sends back a response to the bot.
- Carousel: a horizontal-list-like-template showing a scrollable list of cards/pictures.
- Image: a simple image
- Video: a simple video
Templates
1. quickReplyTextTemplate
Sample :
{
  "button":["Select"],"title":"XXXX 5100"
}
2. imageTemplate
Sample :
{
  "image":"imgs/card.png"
}
3. buttonTemplate
Sample :
{
  "buttons" : [ {
    "title" : "yes"
  } ]
}
4. carouselTemplate
Sample :
[
  {
    "buttons" : [ {
      "title" : "yes"
    }
                ],
    "image" : "https://beebom-redkapmedia.netdna-ssl.com/wp-content/uploads/2016/01/Reverse-Image-Search-Engines-Apps-And-Its-Uses-2016.jpg",
    "title" : "head",
    "subtitle" : "subtitle"
  }
]
5. listTemplate
Sample :
{
  "list": [
    {
      "image": "imgs/card.png",
      "buttons": [
        "button"
      ],
      "subTitle": "XXXX 5100",
      "title": "VISA"
    },
    {
      "image": "imgs/card.png",
      "buttons": [
        "button"
      ],
      "subTitle": "XXXX 5122",
      "title": "VISA"
    },
    {
      "image": "imgs/card.png",
      "buttons": [
        "button"
      ],
      "subTitle": "XXXX 5133",
      "title": "VISA"
    }
  ]
}
6. videoTemplate
Sample :
{
  "video": "https://www.w3schools.com/html/mov_bbb.mp4"
}
7. custom
This type can have user-defined JSON payload to render a user-defined template. The above templates are what is provided to the user by triniti.ai, but the user is free to define his/her own templates/response types and populate them from his/her API.
Other components of response:
- render: tell where to render the response, as part of webview (a new dialog box with text fields coving the entire chat space) or generally as part of chat window (like any other chat inside the window).
- keyboard_state: type of keyboard for the response (ALPHA|NUM|NONE|HIDE|PWD)
- status: shows the status of the API call (success/failure).
- expected_entities: is a list of string with all the entities that the intent is expecting to be picked up by the AI engine.
- extra_data: extra data that one wants to be the part of the response.
- audit: step ID. defined for auditing purposes.
As part of Workflow, Webhook responses have some additional fields, namely :
- goto: if the user wants to branch to another step after the logical execution of the current step, this feature can be used for the backend to understand which step it needs to execute next.
- gotoType: pass the type of goto you are defining (e.g., to branch to another step, type = "node")
- gotoLinkedType: tell the backend if the user wants to have some linking to his logical decision outcome. It is used for back-editing. If the user wants to revisit a particular step to get the entity filled with another value, this feature can be used (e.g., gotoLinkedType = "backlink")
- expected_entities: this feature we've discussed above as part of webhook fulfillment but this is also handy in case of workflow as this can tell the server that a particular entity needs to be filled before crossing the current step. It is particularly helpful in case of validation where in case of failure one can define the entity name so that the server makes it a point to get that entity populated by the user before moving on.
Security
The HTTP request to contain an X-Hub-Signature header which contains the SHA1 signature of the request payload, using the app secret as the key, and prefixed with sha1=. Your webhook endpoint can verify this signature to validate the integrity and origin of the payload.
Please note that the calculation is made on the escaped Unicode version of the payload, with lower case hex digits. For example, the string "äöå" will be escaped to "\u00e4\u00f6\u00e5". The calculation also escapes '/' to '\/', '<' to '\u003C', '%' to '\u0025' and '@' to '\u0040'. If you calculate against the decoded bytes, you will end up with a different signature.
Java sample code available at GitHub.
Manage Fallback to Human Agent
If your bot is not able to understand or classify the user's query then it can't be able to send the proper response to the user. But we have enabled a feature to provide a live human agent for the users to interact with. You can configure a human agent fallback to provide live human agent support, so that if the bot is not able to understand or classify the user's query then it will ask for the human agent support to the user.
We are currently supporting three customer support vendors that enable the live human agent interaction with the user.
- Zendesk
- LiveChat
- FreshChat
Configure Zendesk
Zendesk is an application that enables the users on your bot to chat live with your customer support (Live human agent). We are supporting the Zendesk as a Live agent fallback. If you want your customer to directly interact with the human agent and get their query resolved, then you can configure the Zendesk for your bot. Zendesk allows customer conversations to flow seamlessly across all channels. Zendesk makes better experiences for agents and customers.
Note: You will be needed to choose the 'Enterprise' plan to configure the zendesk with your bot to interact with a human agent.
To configure the zendesk zendesk as a human agent fallback for your bot please follow these steps:
- Login to your zendesk account or Create a zendesk account (If you don't have zendesk account)
- Go to profile
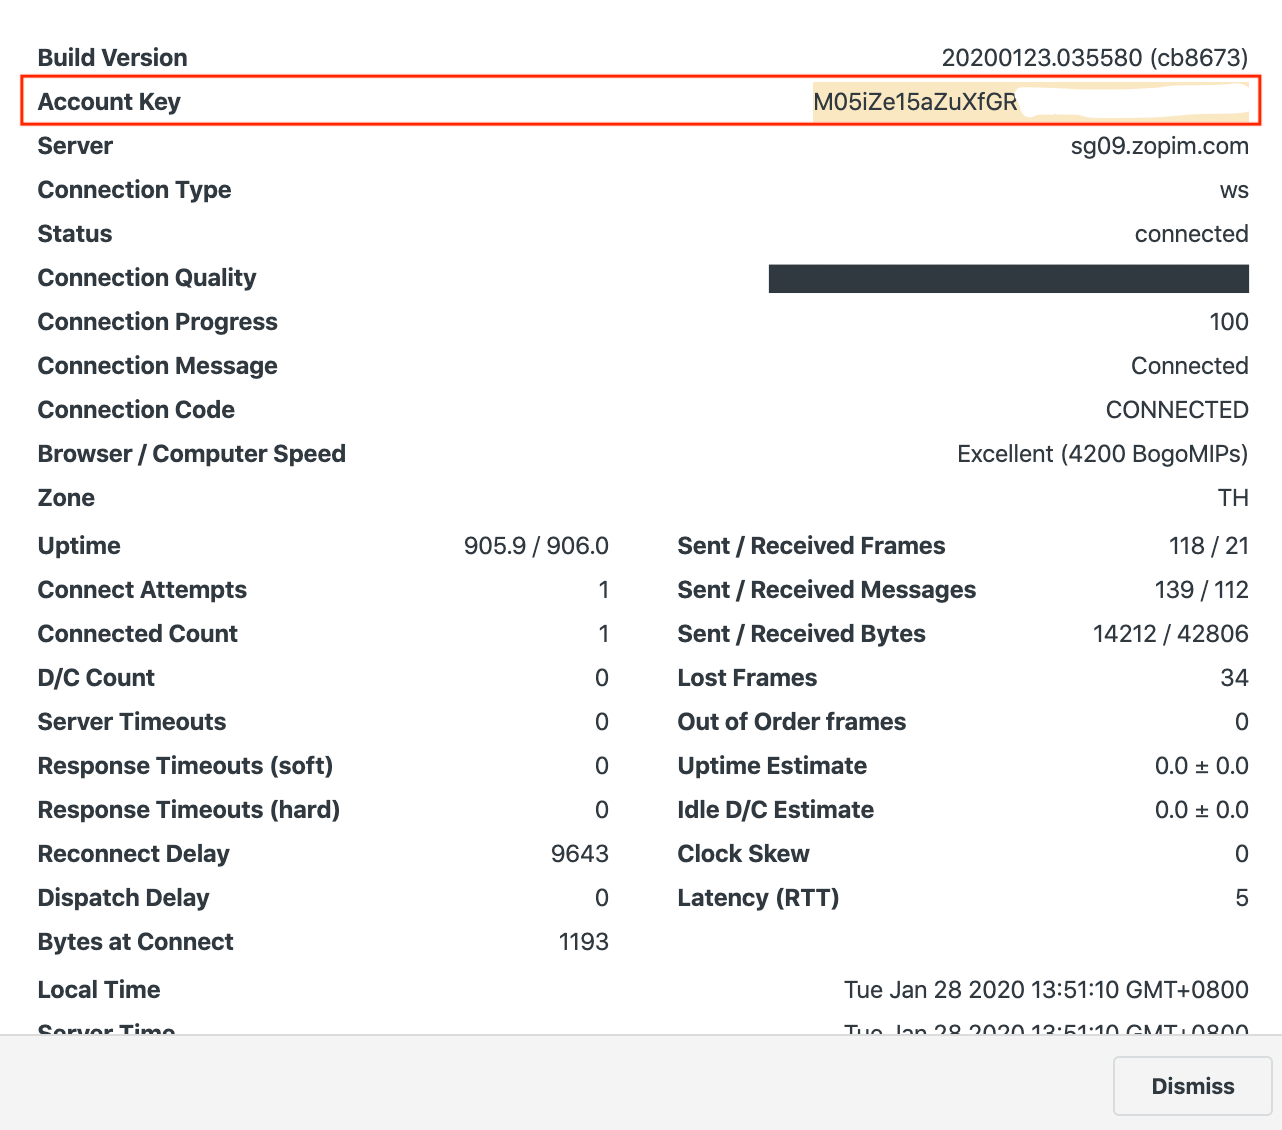
- Click on 'Check connection'
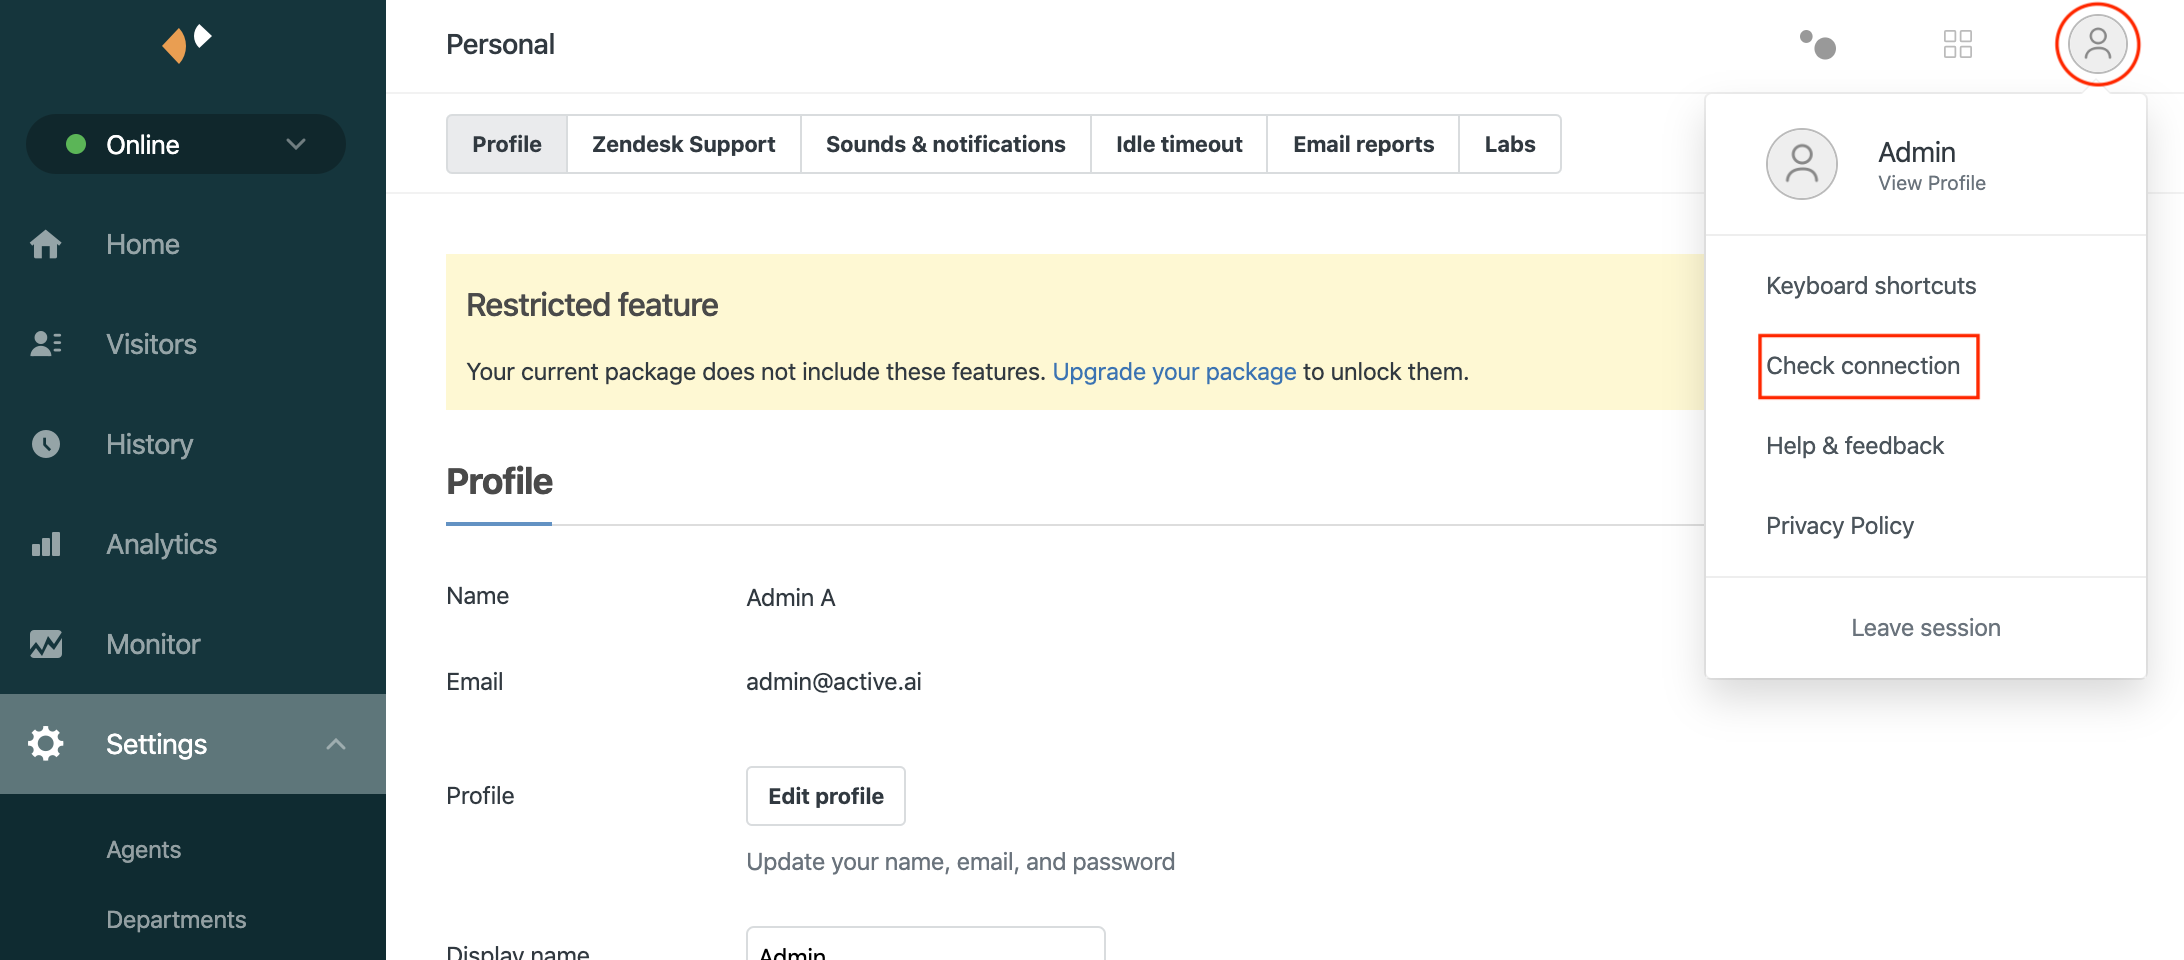
- Copy the 'Account Key'
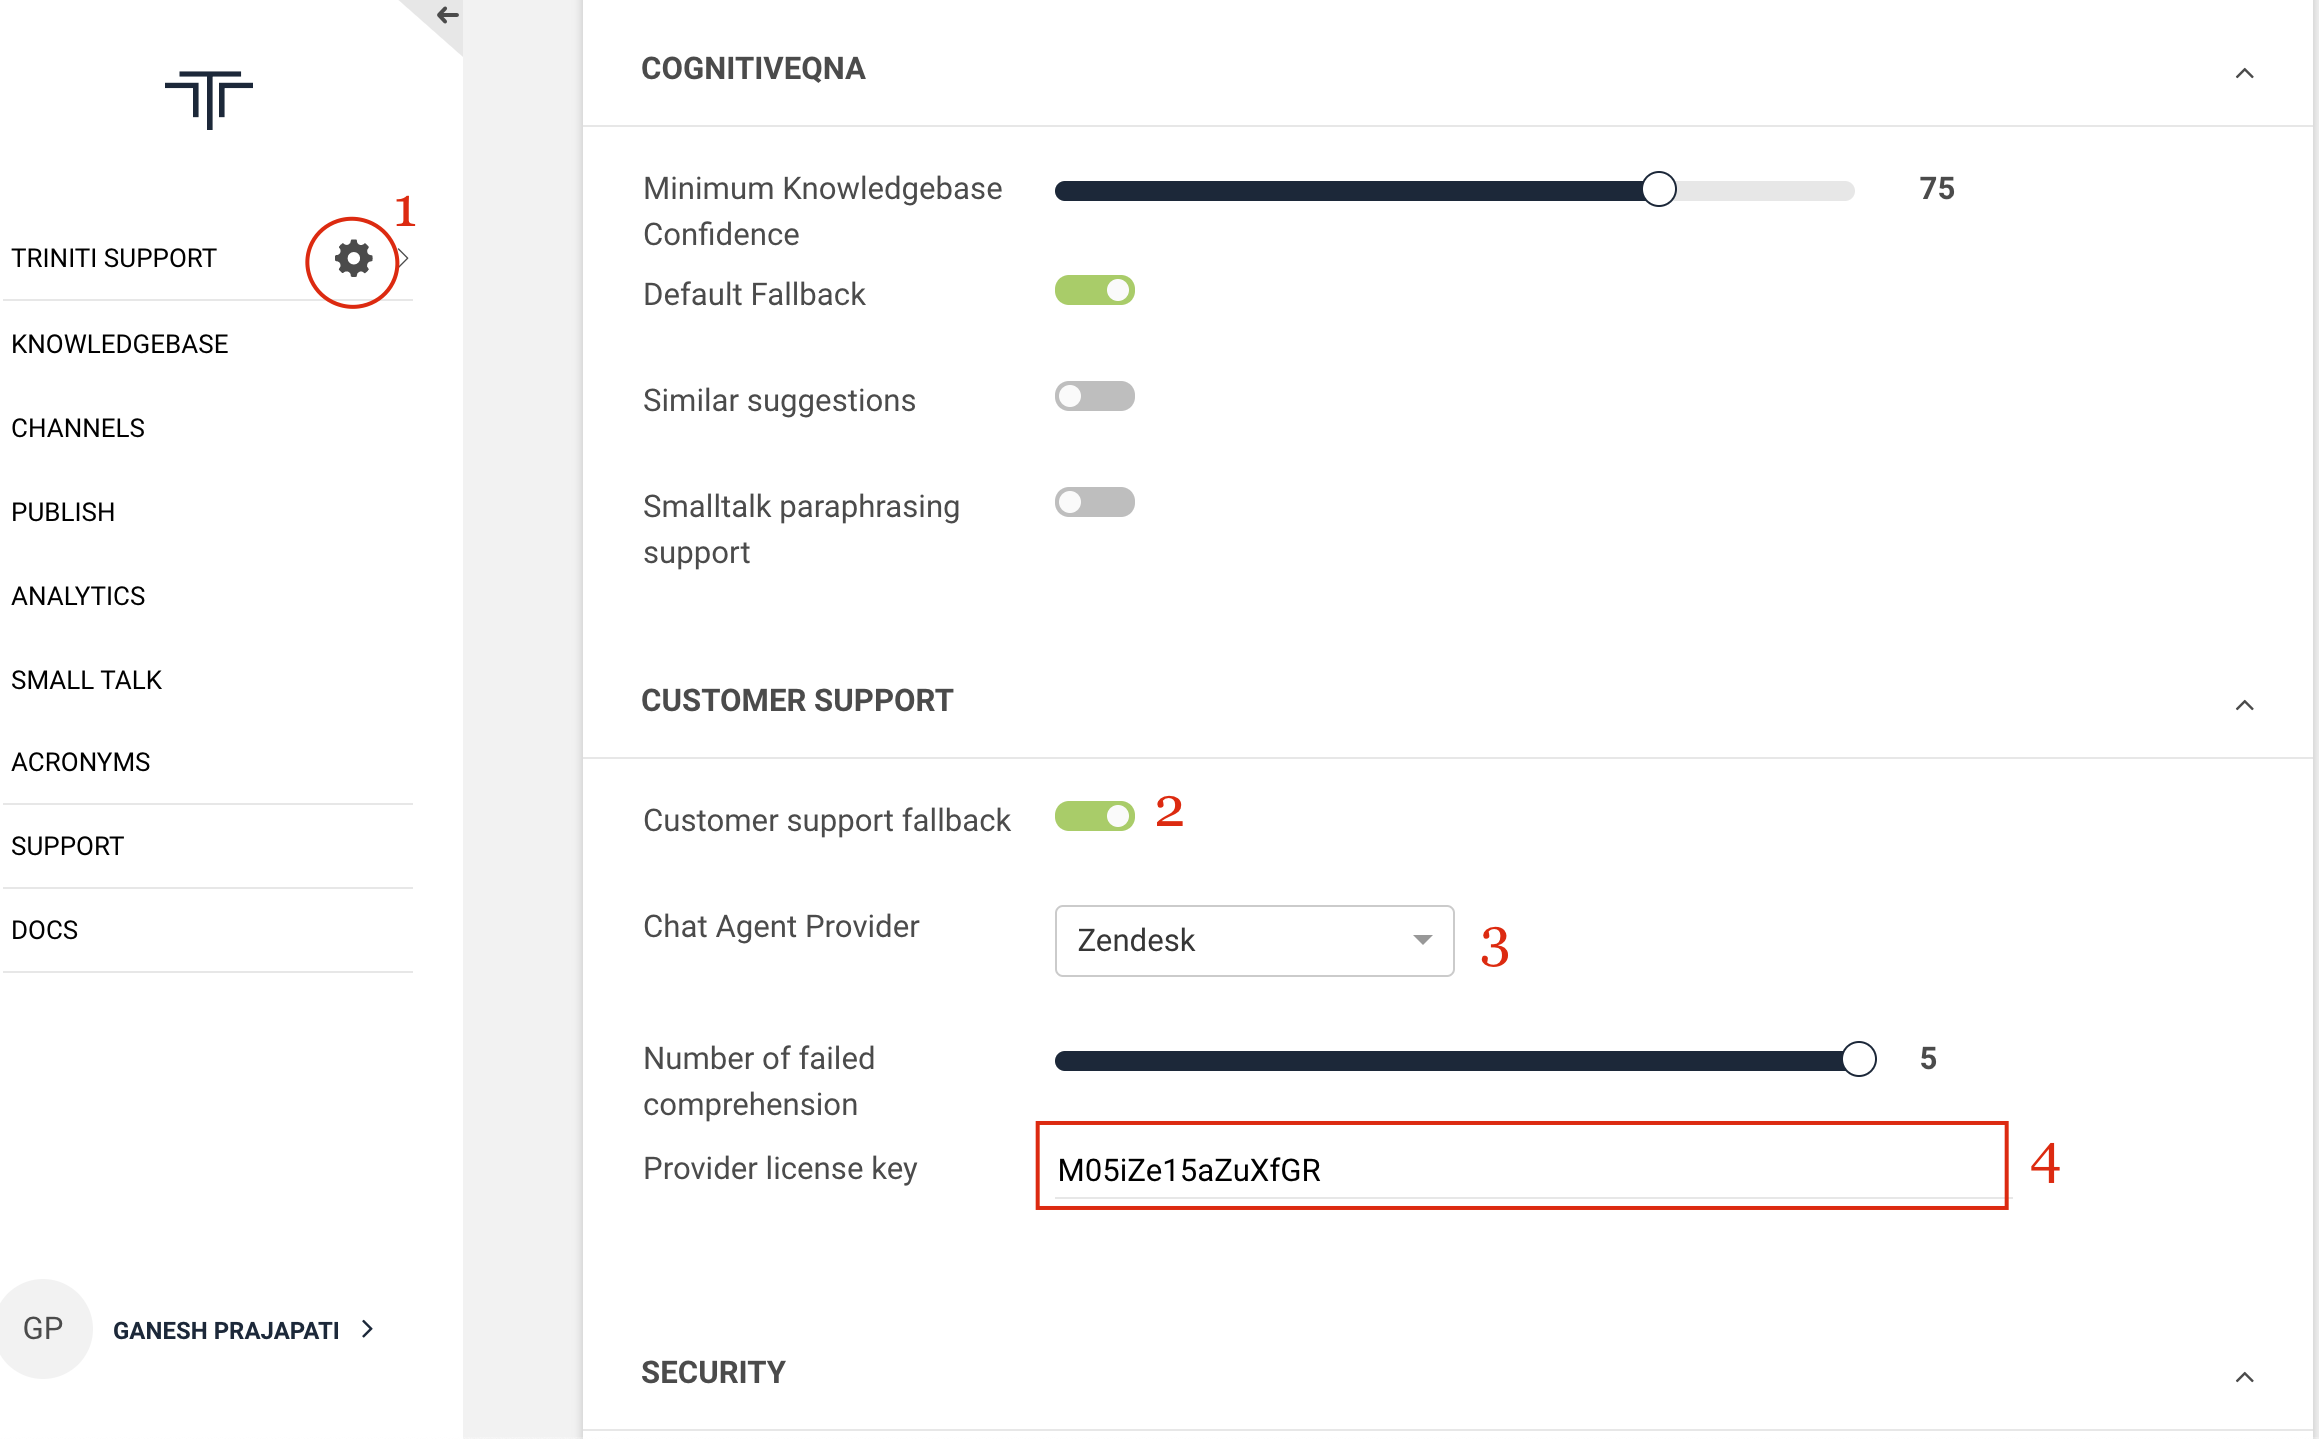
- Goto your workspace on triniti.ai portal
- Click on workspace settings
- Scroll down to the 'Customer Support'
- Enable the 'Customer support fallback'
- Select 'Zendesk' in 'Chat Agent Provider'
- Set the 'Number of failed comprehension' (After how many failed comprehension the bot should ask for live human agent.)
- Paste the 'Account Key' in 'Provider license key' field
- Click on save
Congratulations! You have configured your bot successfully with Zendesk to interact with your users with a live human agent.
Configure LiveChat
LiveChat is an application that enables the users on your bot to chat live with your customer support (Live human agent). We are supporting the LiveChat as a Live agent fallback. If you want your customer to directly interact with the human agent and get their query resolved, then you can configure the LiveChat for your bot. This tutorial will take you through the LiveChat configuration for your bot.
To configure your LiveChat, you will be required to have a LiveChat account (Create LiveChat account) & a LiveChat App. After creating your LiveChat account, Login with your credentials to the LiveChat portal and follow these steps to create a LiveChat App
Create a LiveChat App
On your dashboard click on 'Go to Apps'
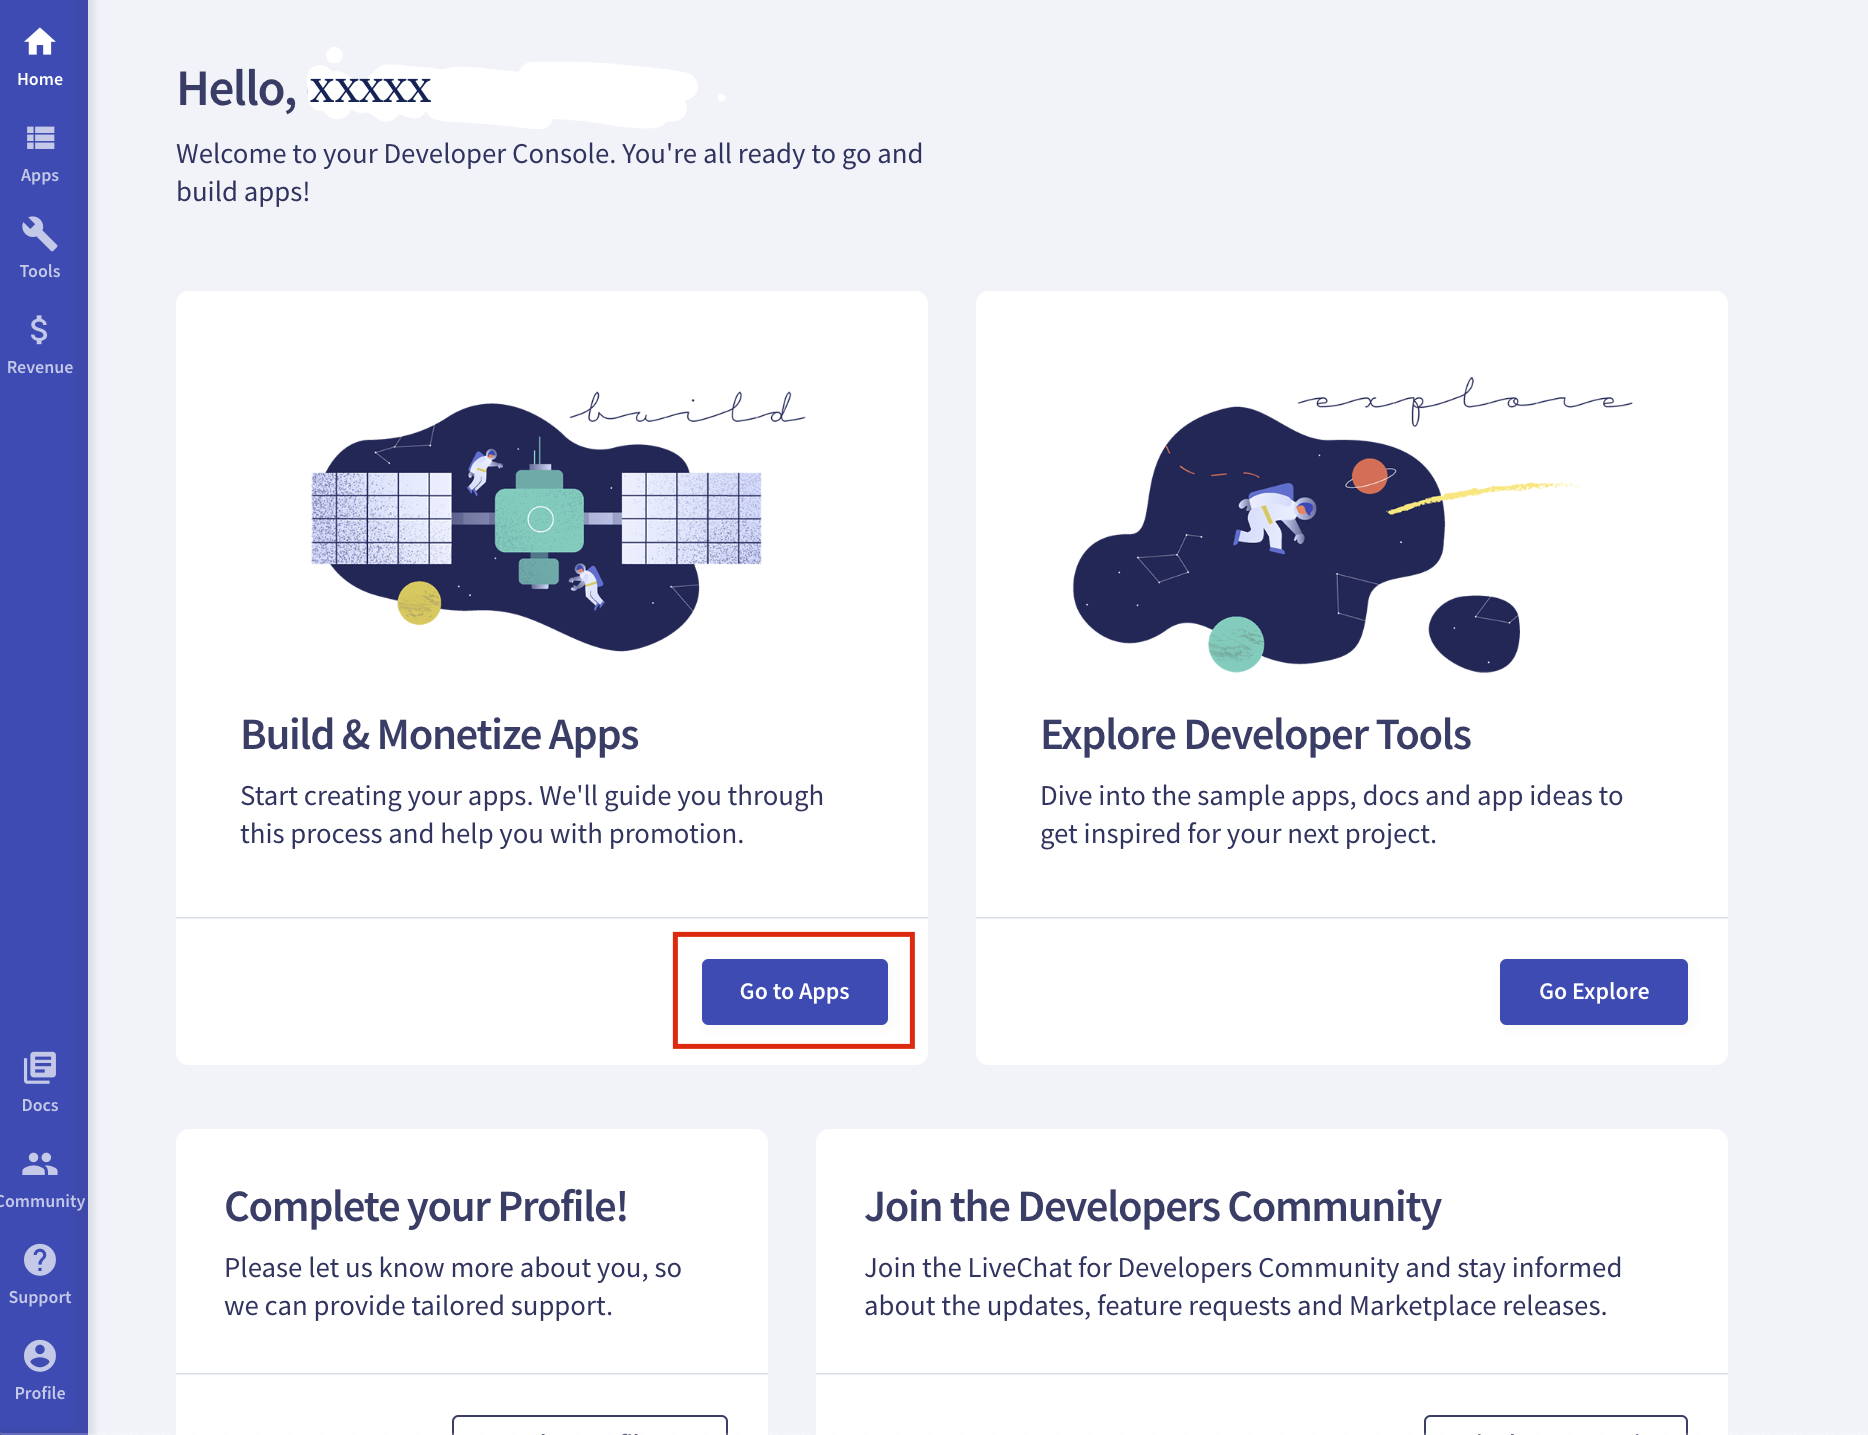
Click on 'Create new app', Enter App Name, Select App Template as 'Server-side webhook app' & click on Continue.
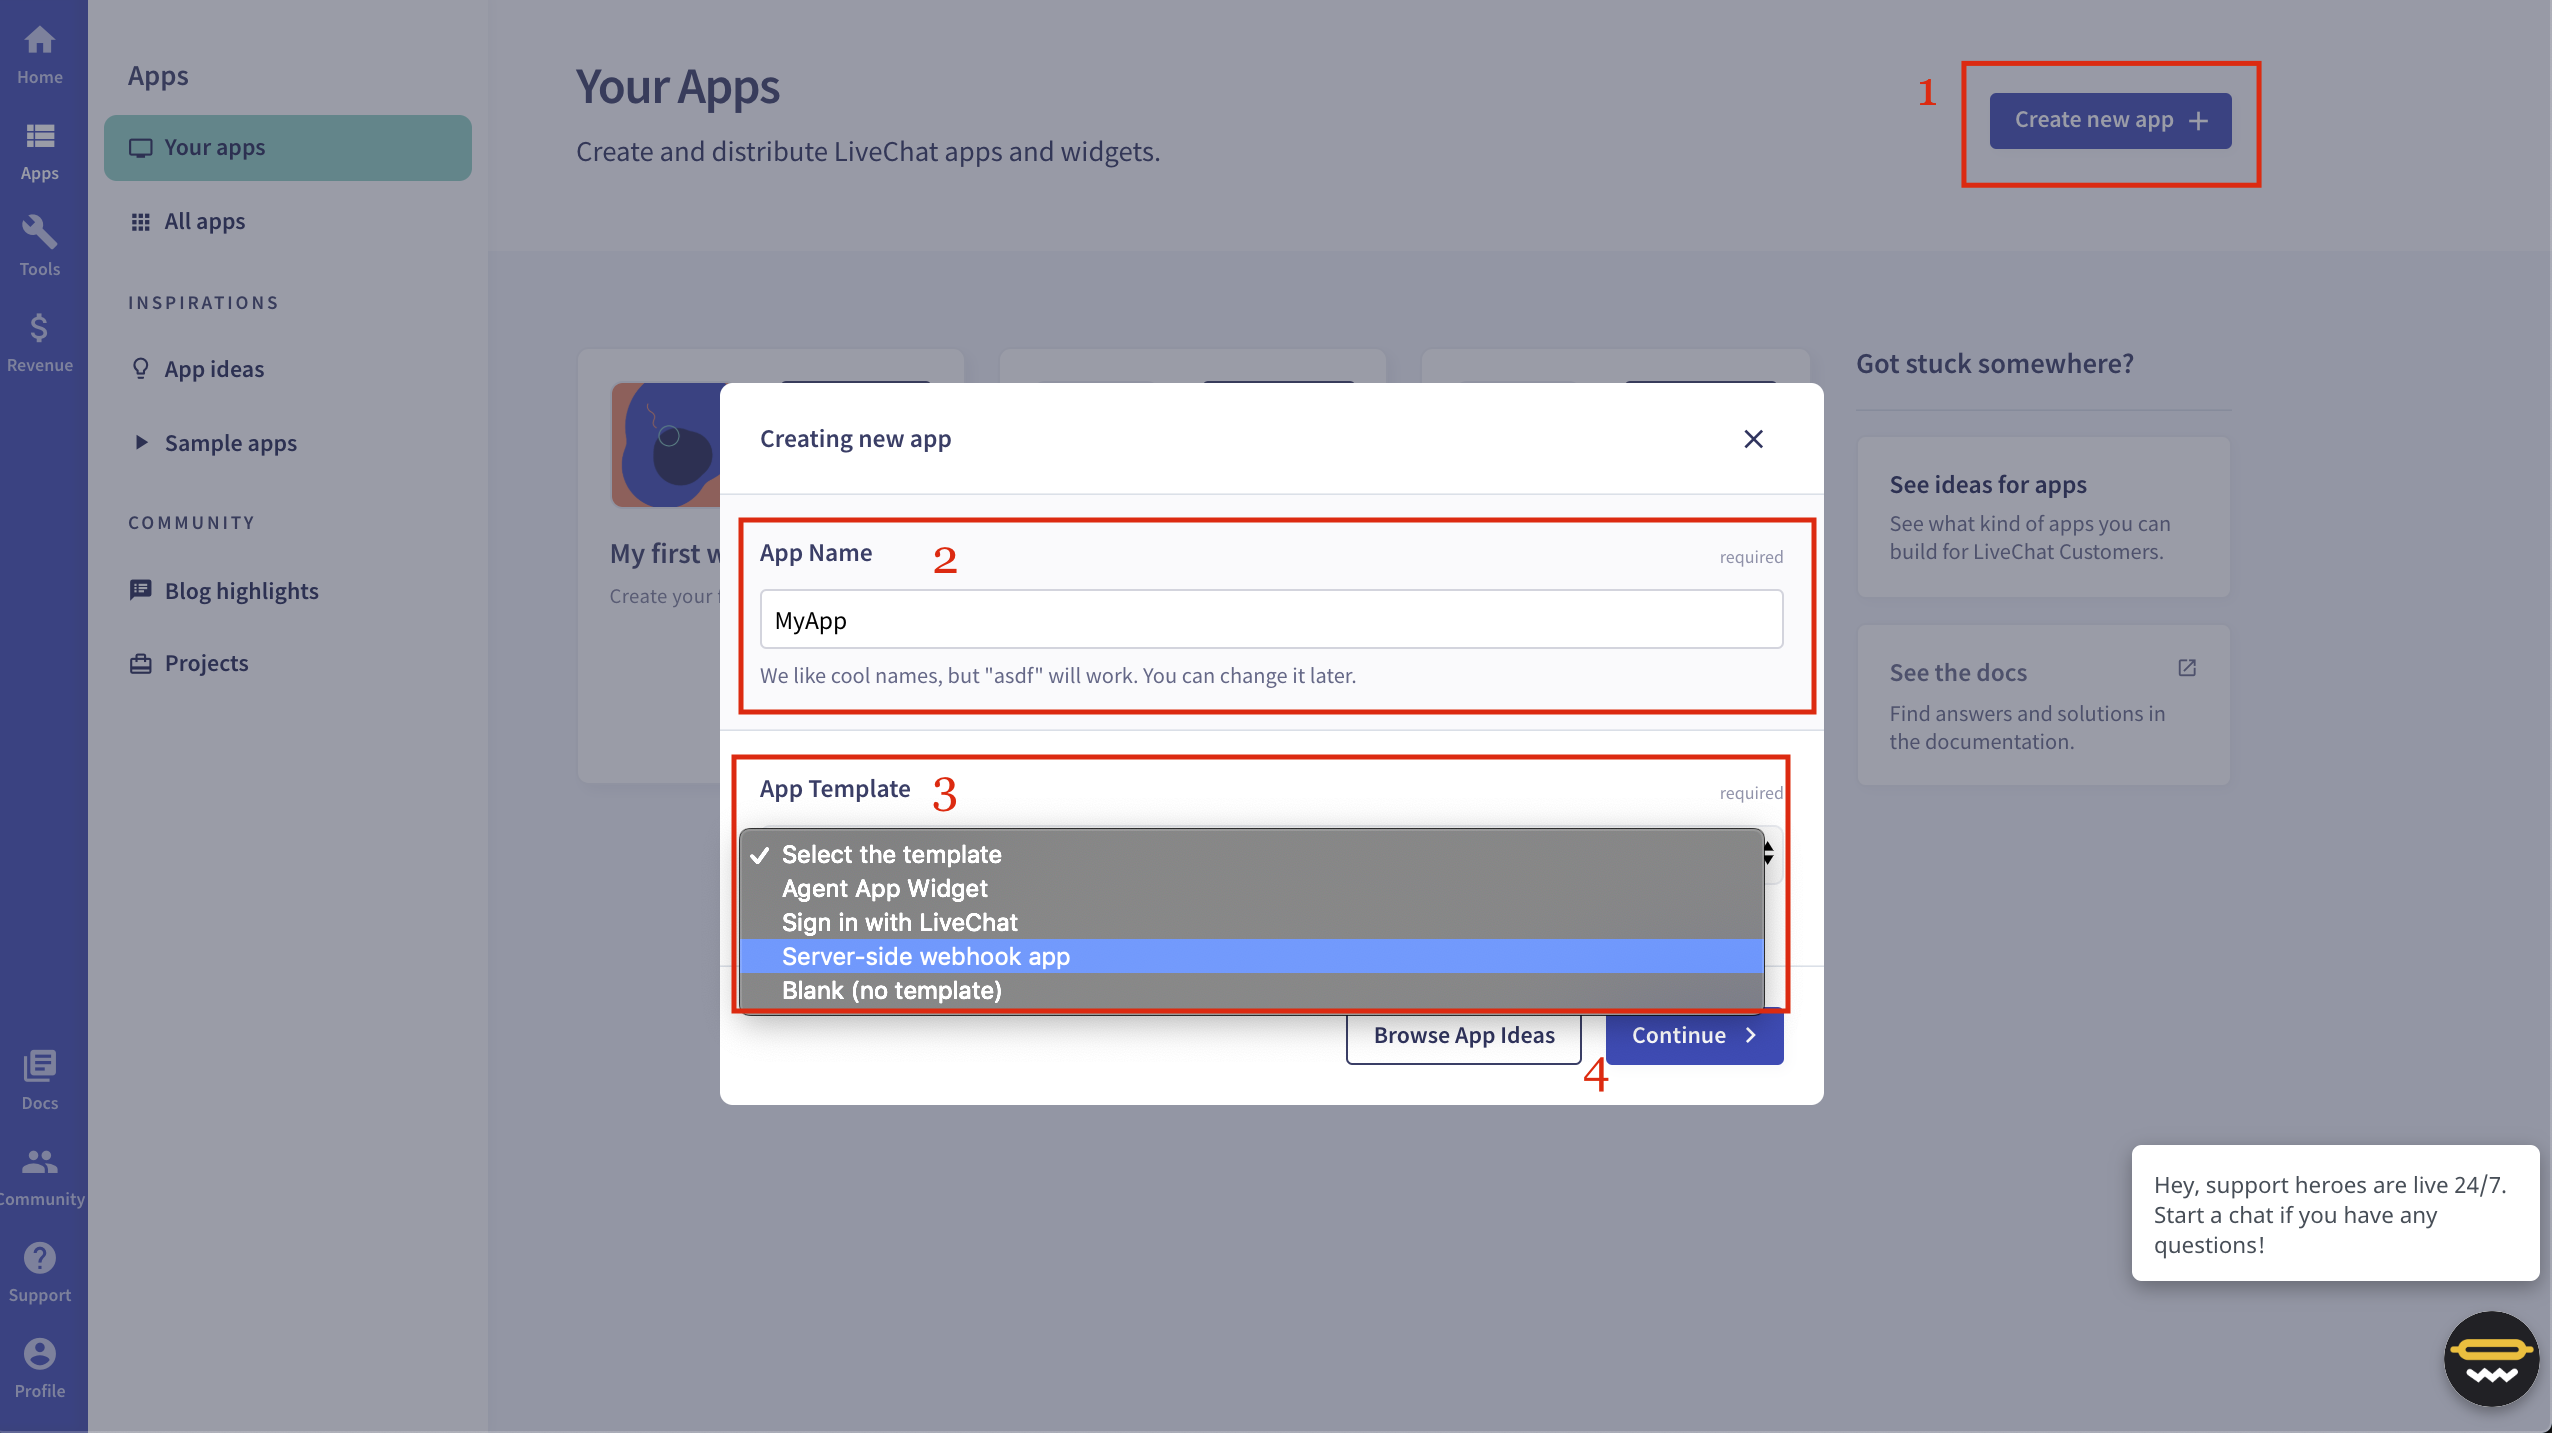
Congratulations! You have just created your first LiveChat App.
Configure the LiveChat App
- Login to your Triniti.ai portal.
- Goto your workspace settings.
- Scroll to 'CUSTOMER SUPPORT'
- Enable Customer support fallback
- Select Chat Agent Provider as 'LiveChat'
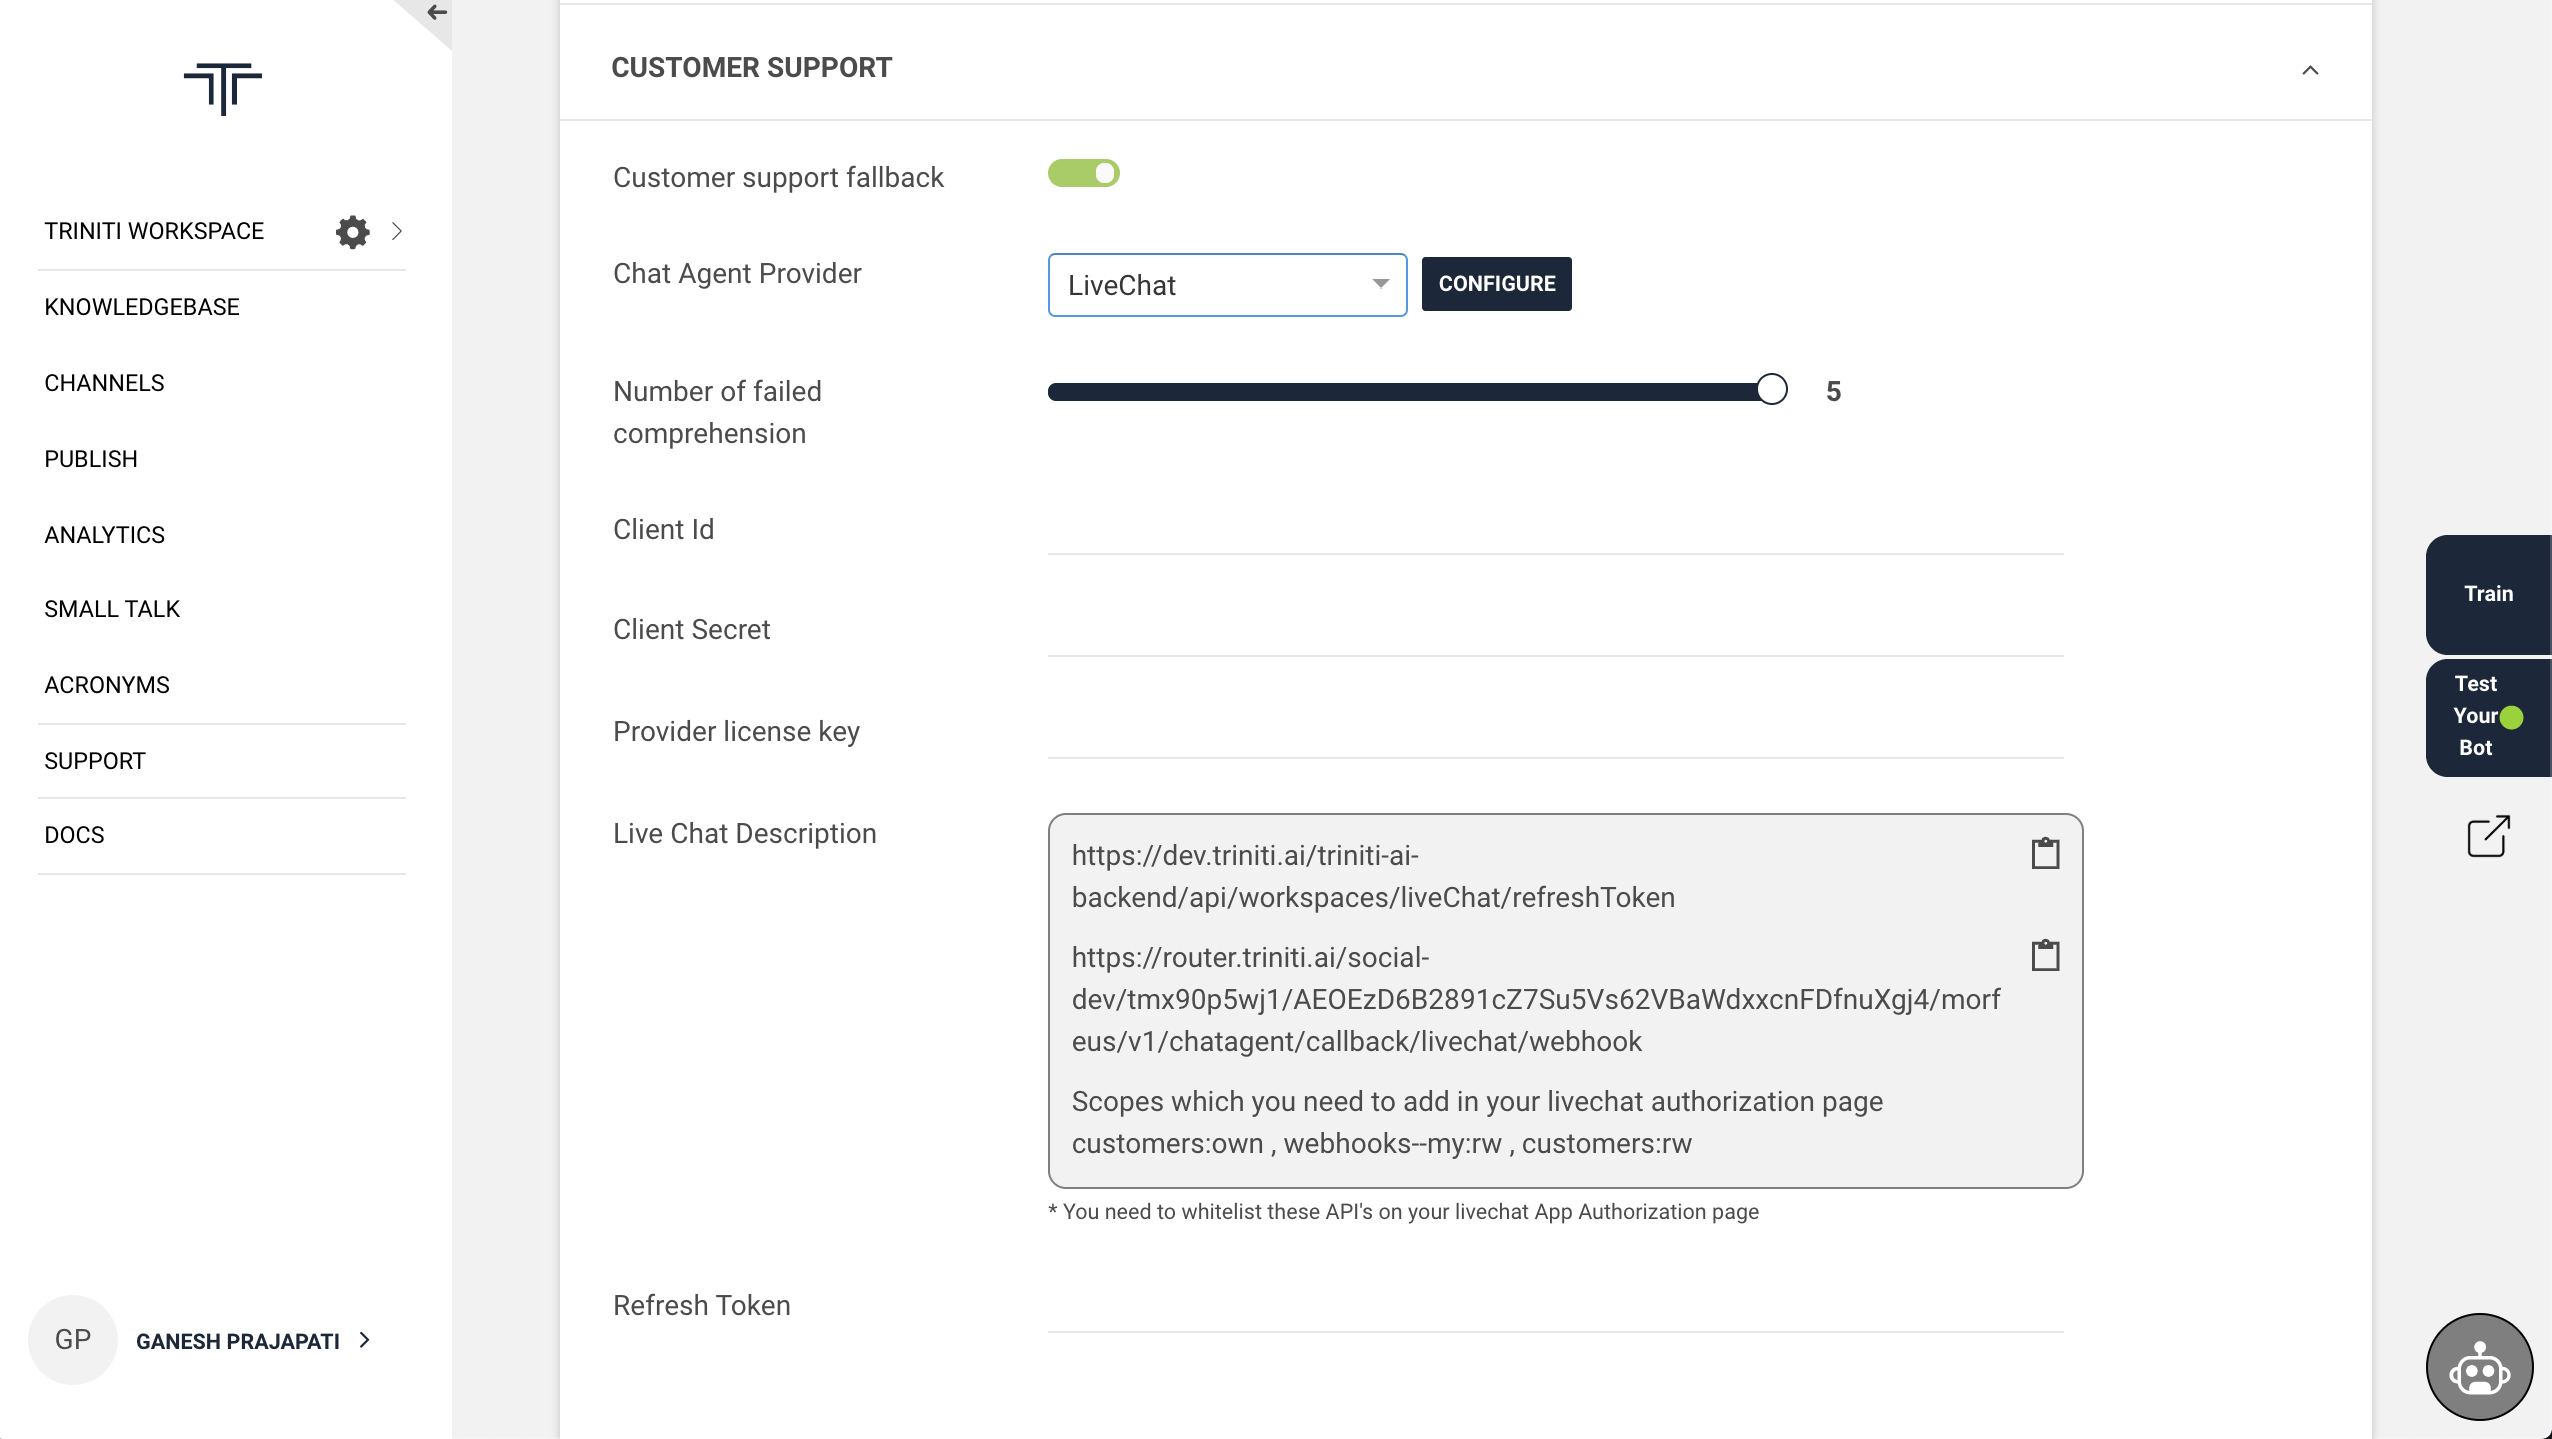
- Navigate to your LiveChat App
- Click on 'Building Blocks' then 'App Authorization' (Get started)
- Select 'Server-side app'
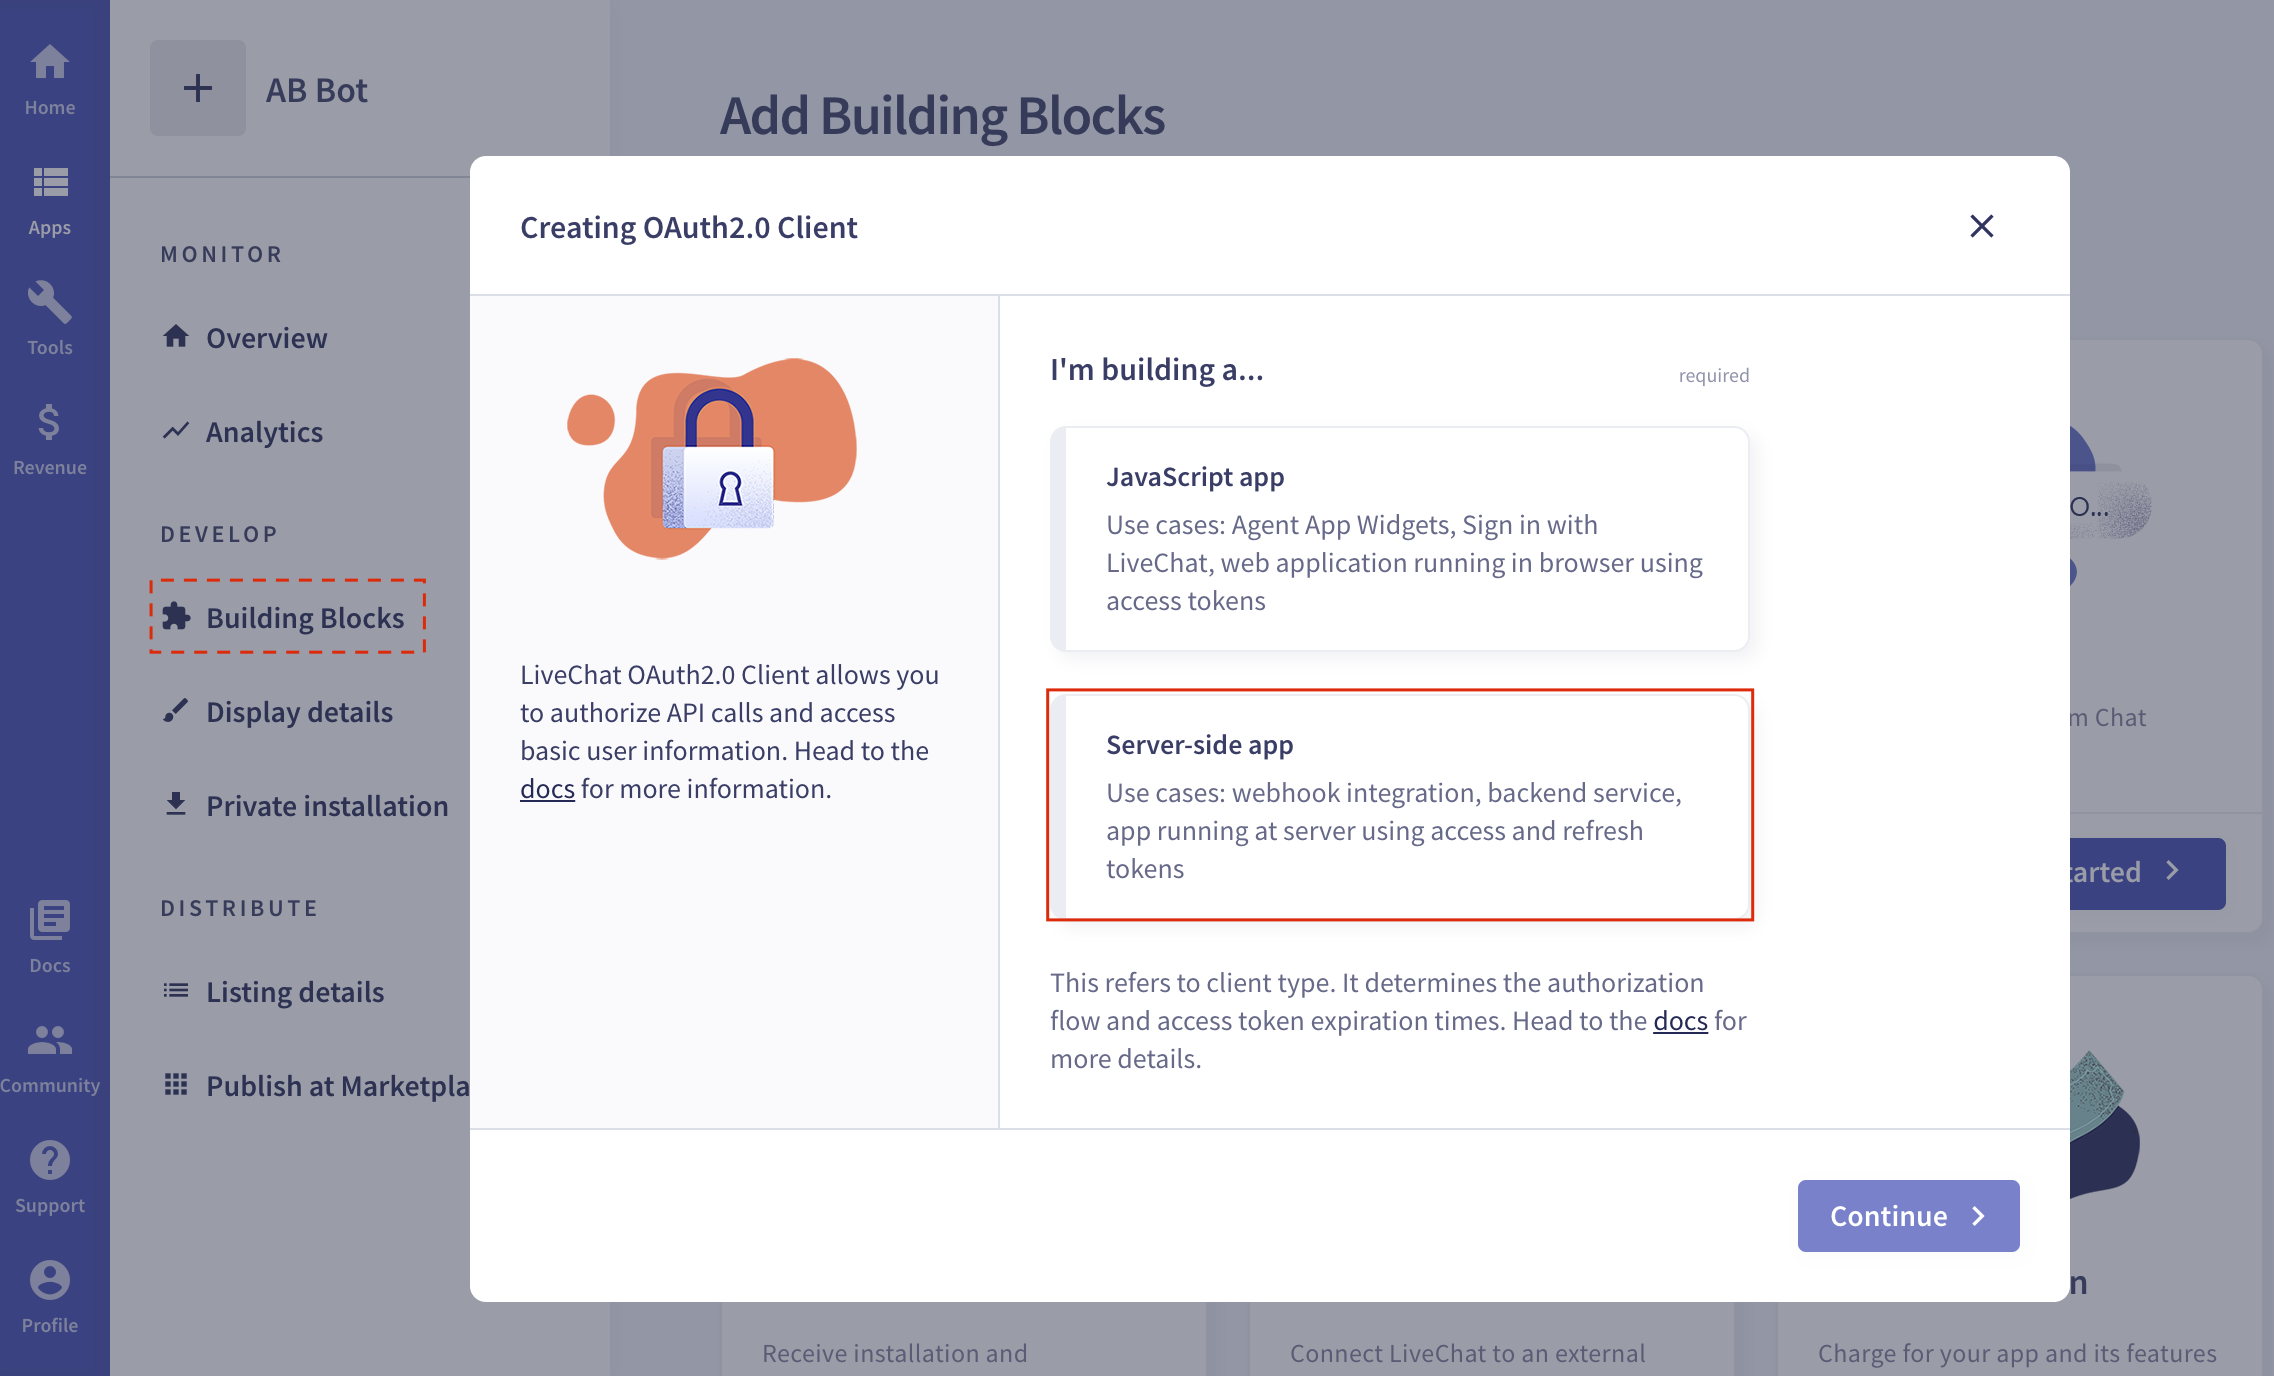
- Navigate to Authorization (App Authorization)
- Copy the Client Id & paste in Client Id field on your workspace settings
- Copy the Client Secret & paste in Client Secret field on your workspace settings
- Copy the 'License' and paste in 'Provider license key' field on your workspace settings
- Click on Save
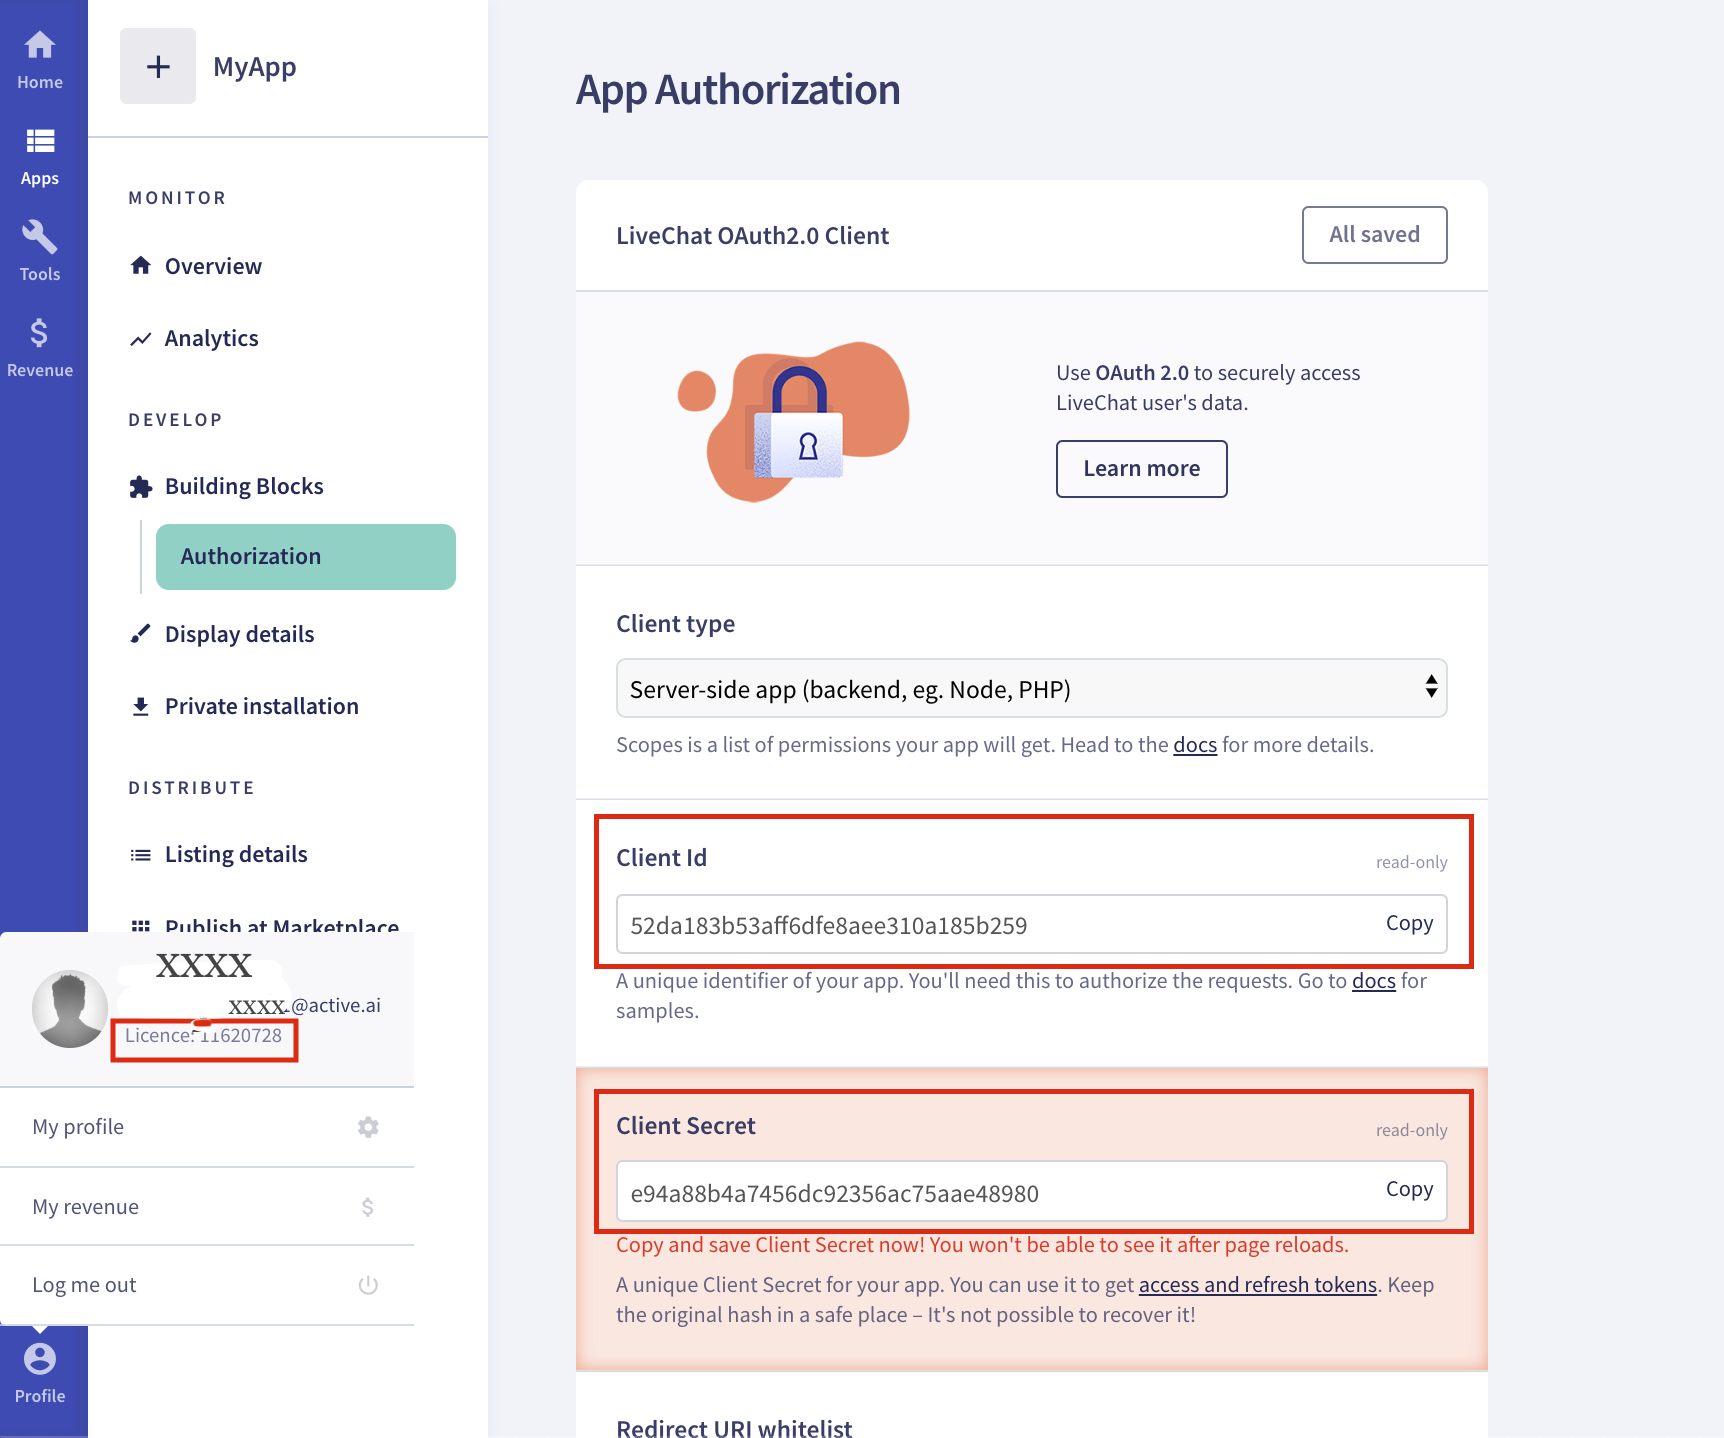
- Copy Refresh Token API & Webhook Endpoint URL that will be needed to whitelist on your LiveChat App to have a conversation with a live agent
Note: Please verify the API-key & API-secret with your workspace's API-key & API-secret before copying the Webhook Endpoint URL.
URLs to whitelist on the LiveChat App i. Refresh Token API https://dev.triniti.ai/triniti-ai-backend/api/workspaces/liveChat/refreshToken
ii. Webhook Endpoint URL https://router.triniti.ai/social/{API-key}/{API-Secret}/morfeus/v1/chatagent/callback/livechat/webhook*
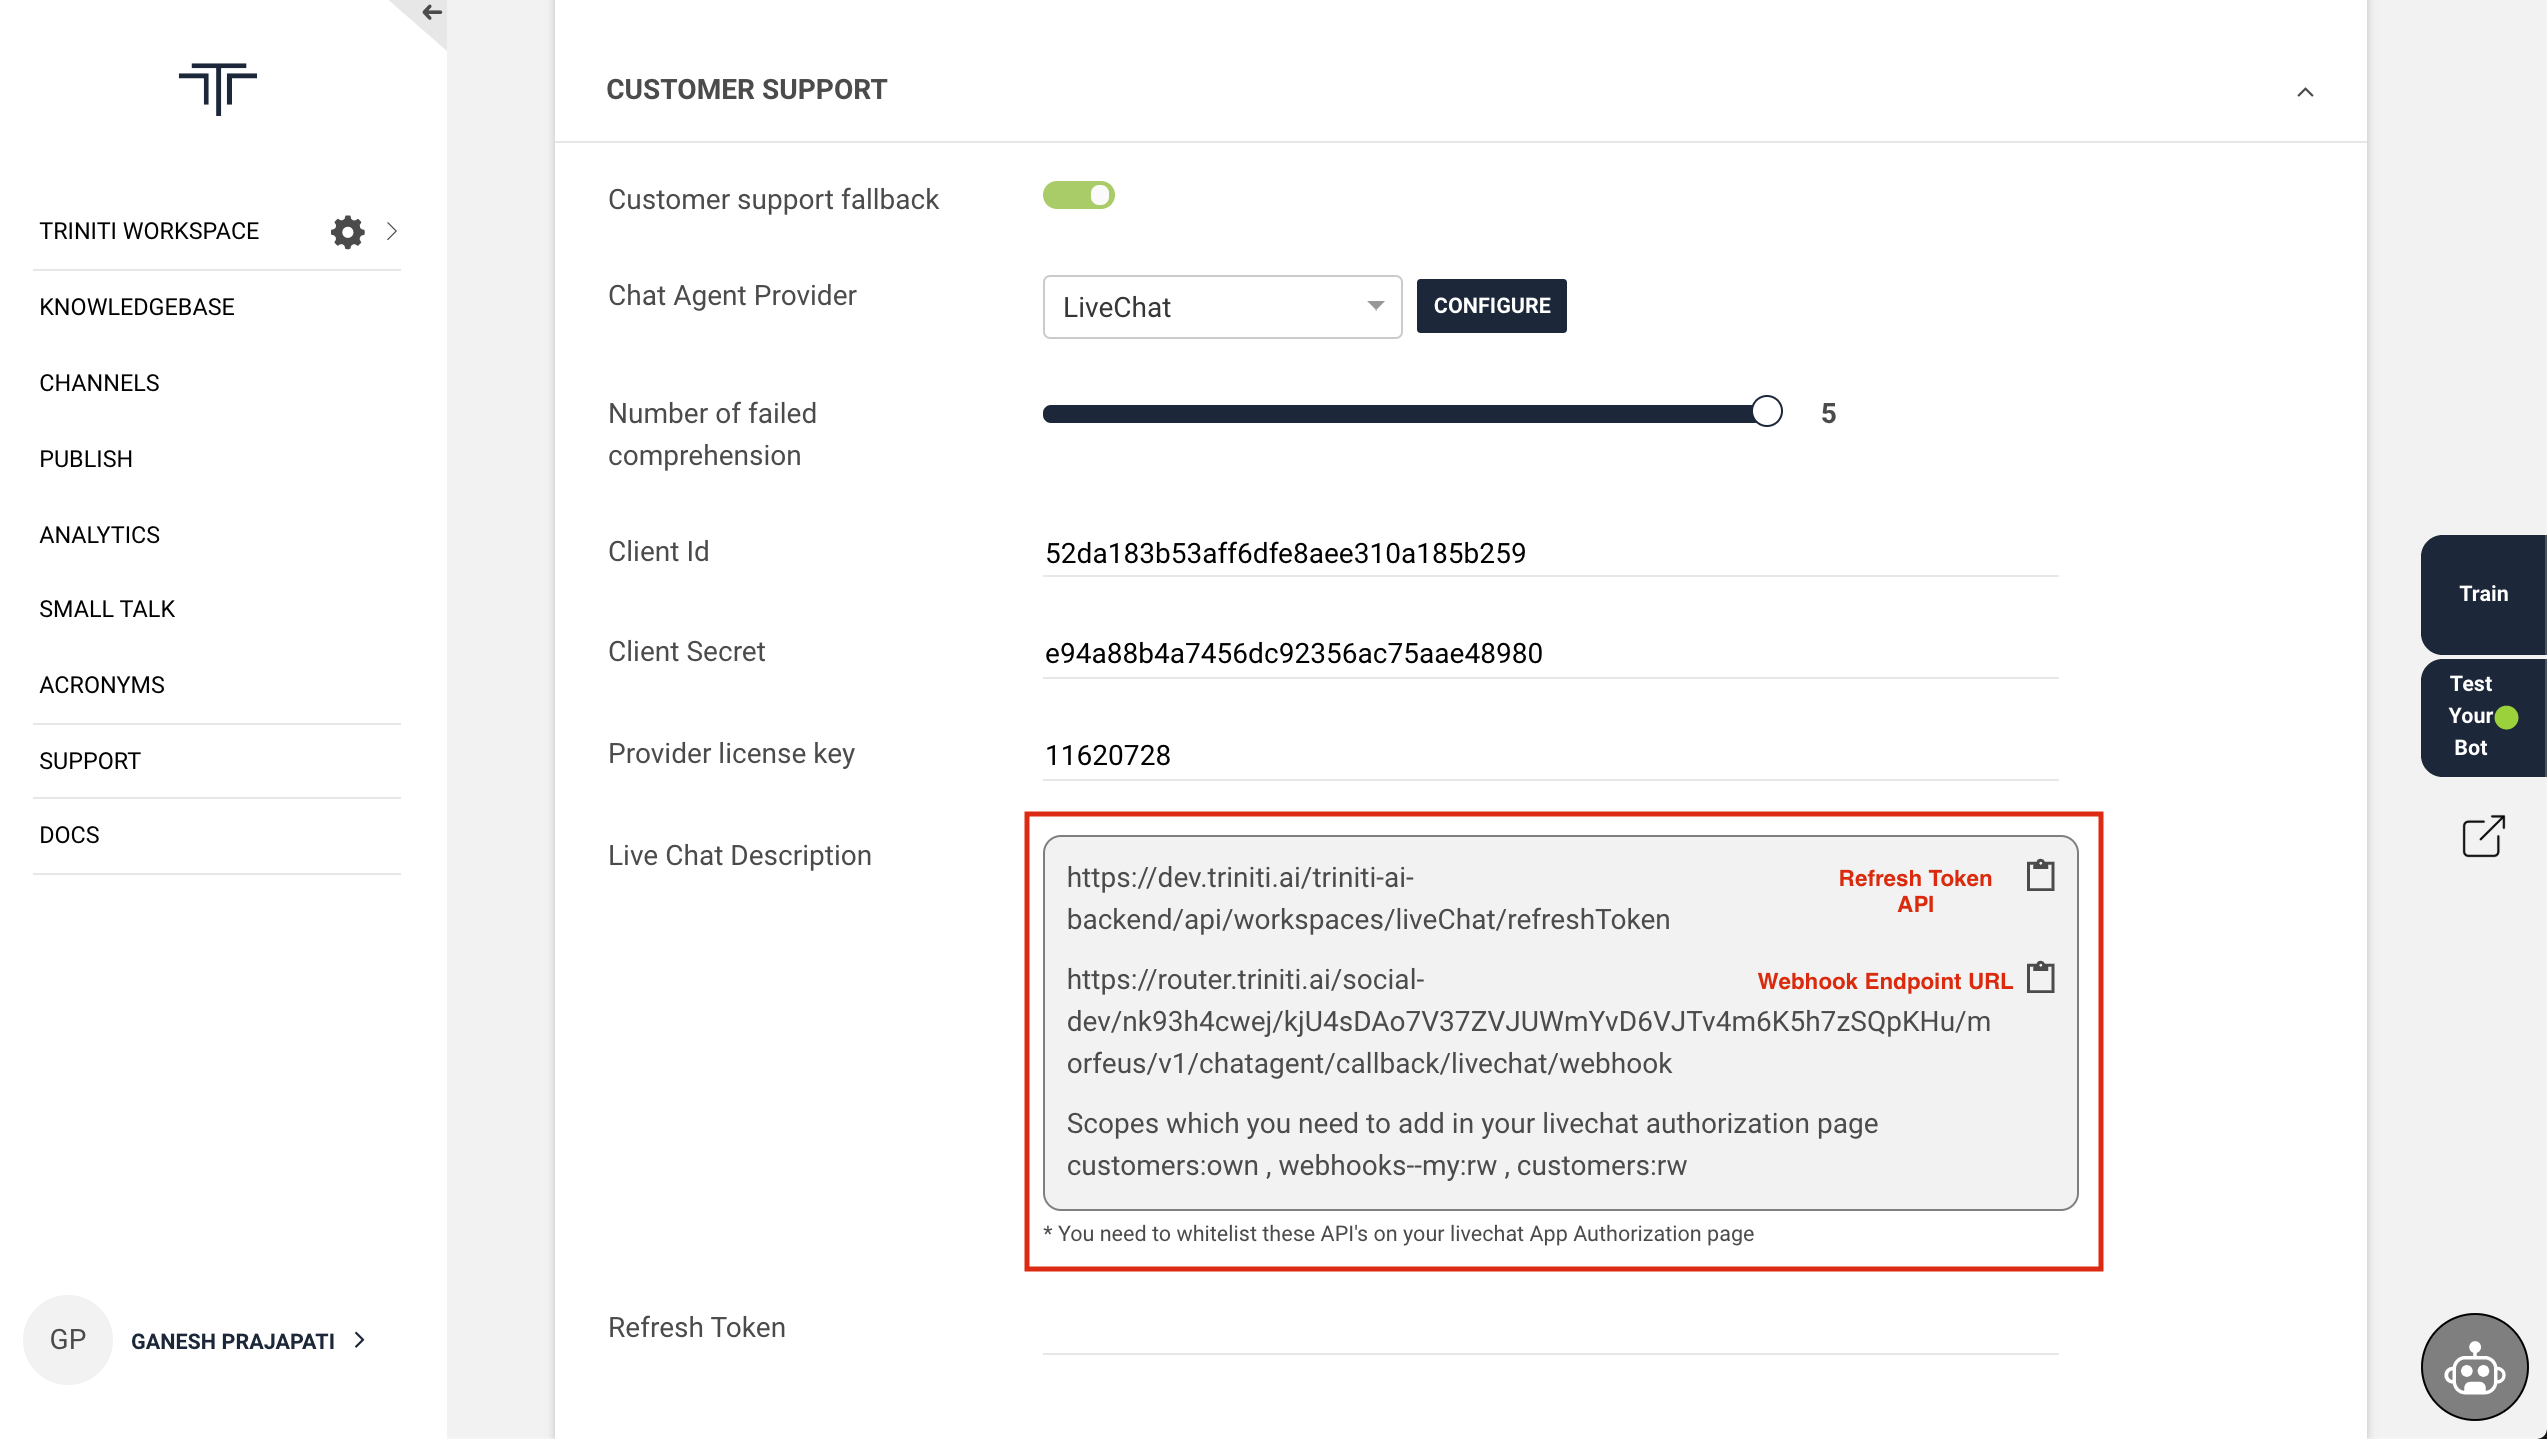
- Navigate to your LiveChat App
- Paste Refresh Token API & Webhook Endpoint URL in the 'Redirect URI whitelist' field, click on Add.
- Click on Save Changes.
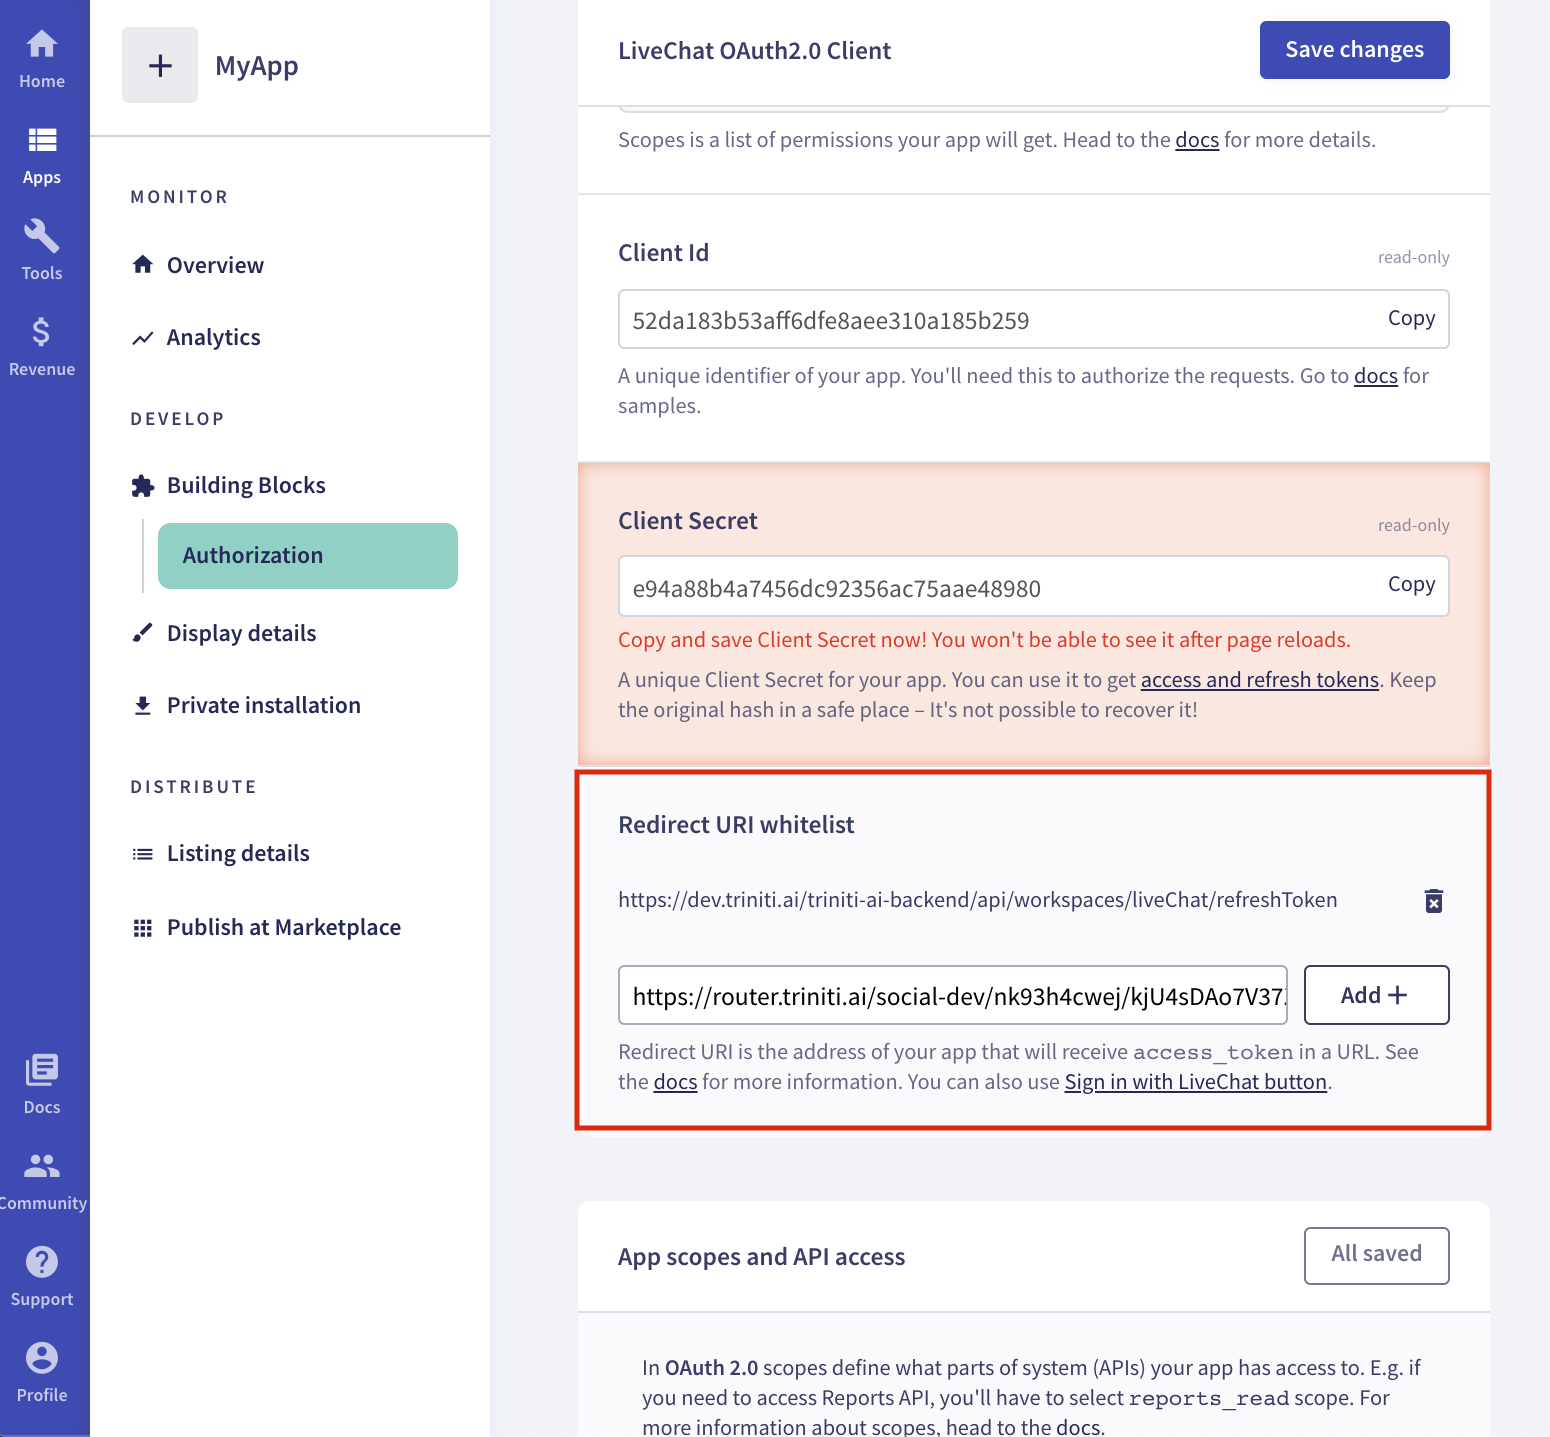
- Scroll to Access Scopes
- Add the following scopes:
- customers:own
- customers:rw
- webhooks--my:rw
- Click on Save changes
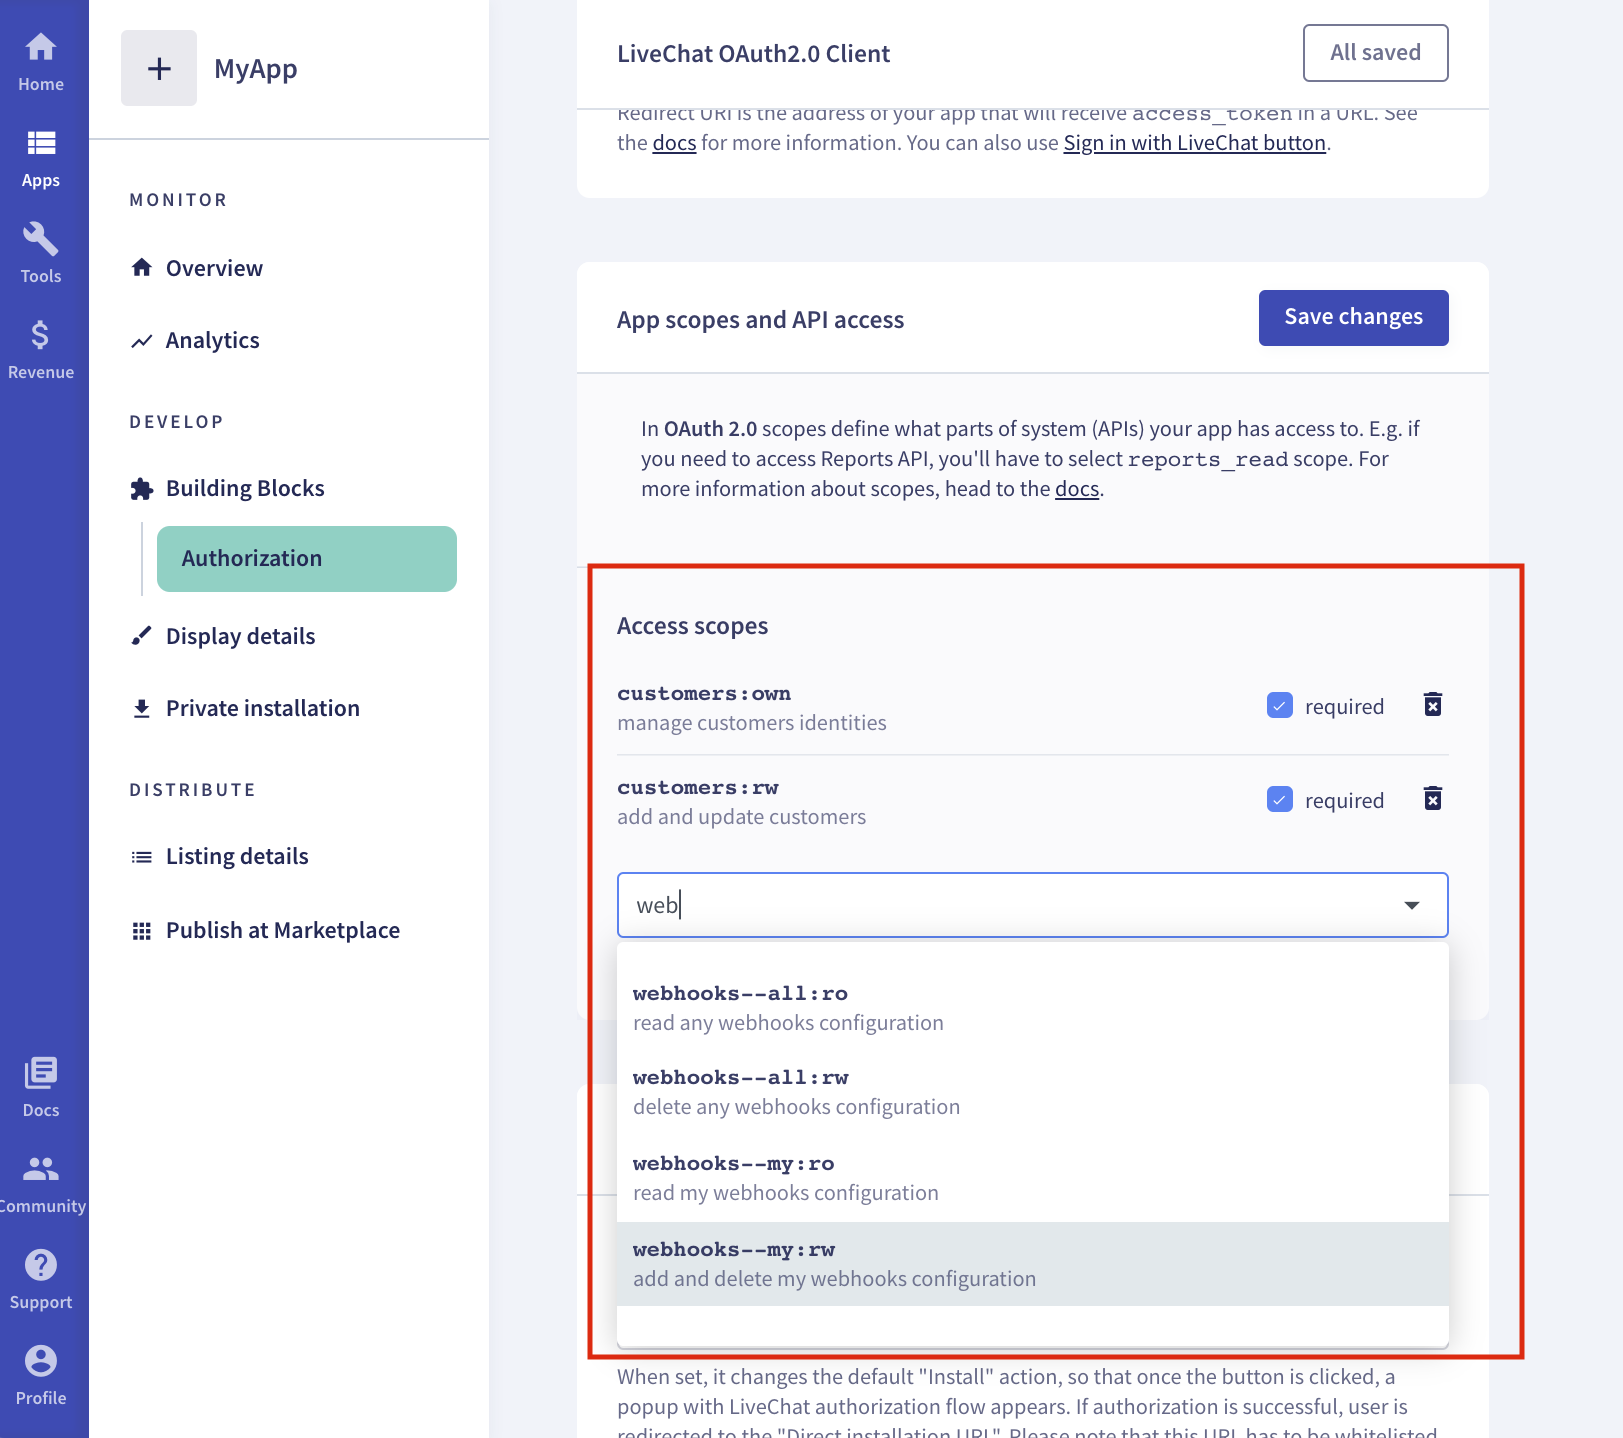
- After adding & saving all the required fields
- Navigate to your workspace settings
- Click on 'CONFIGURE'
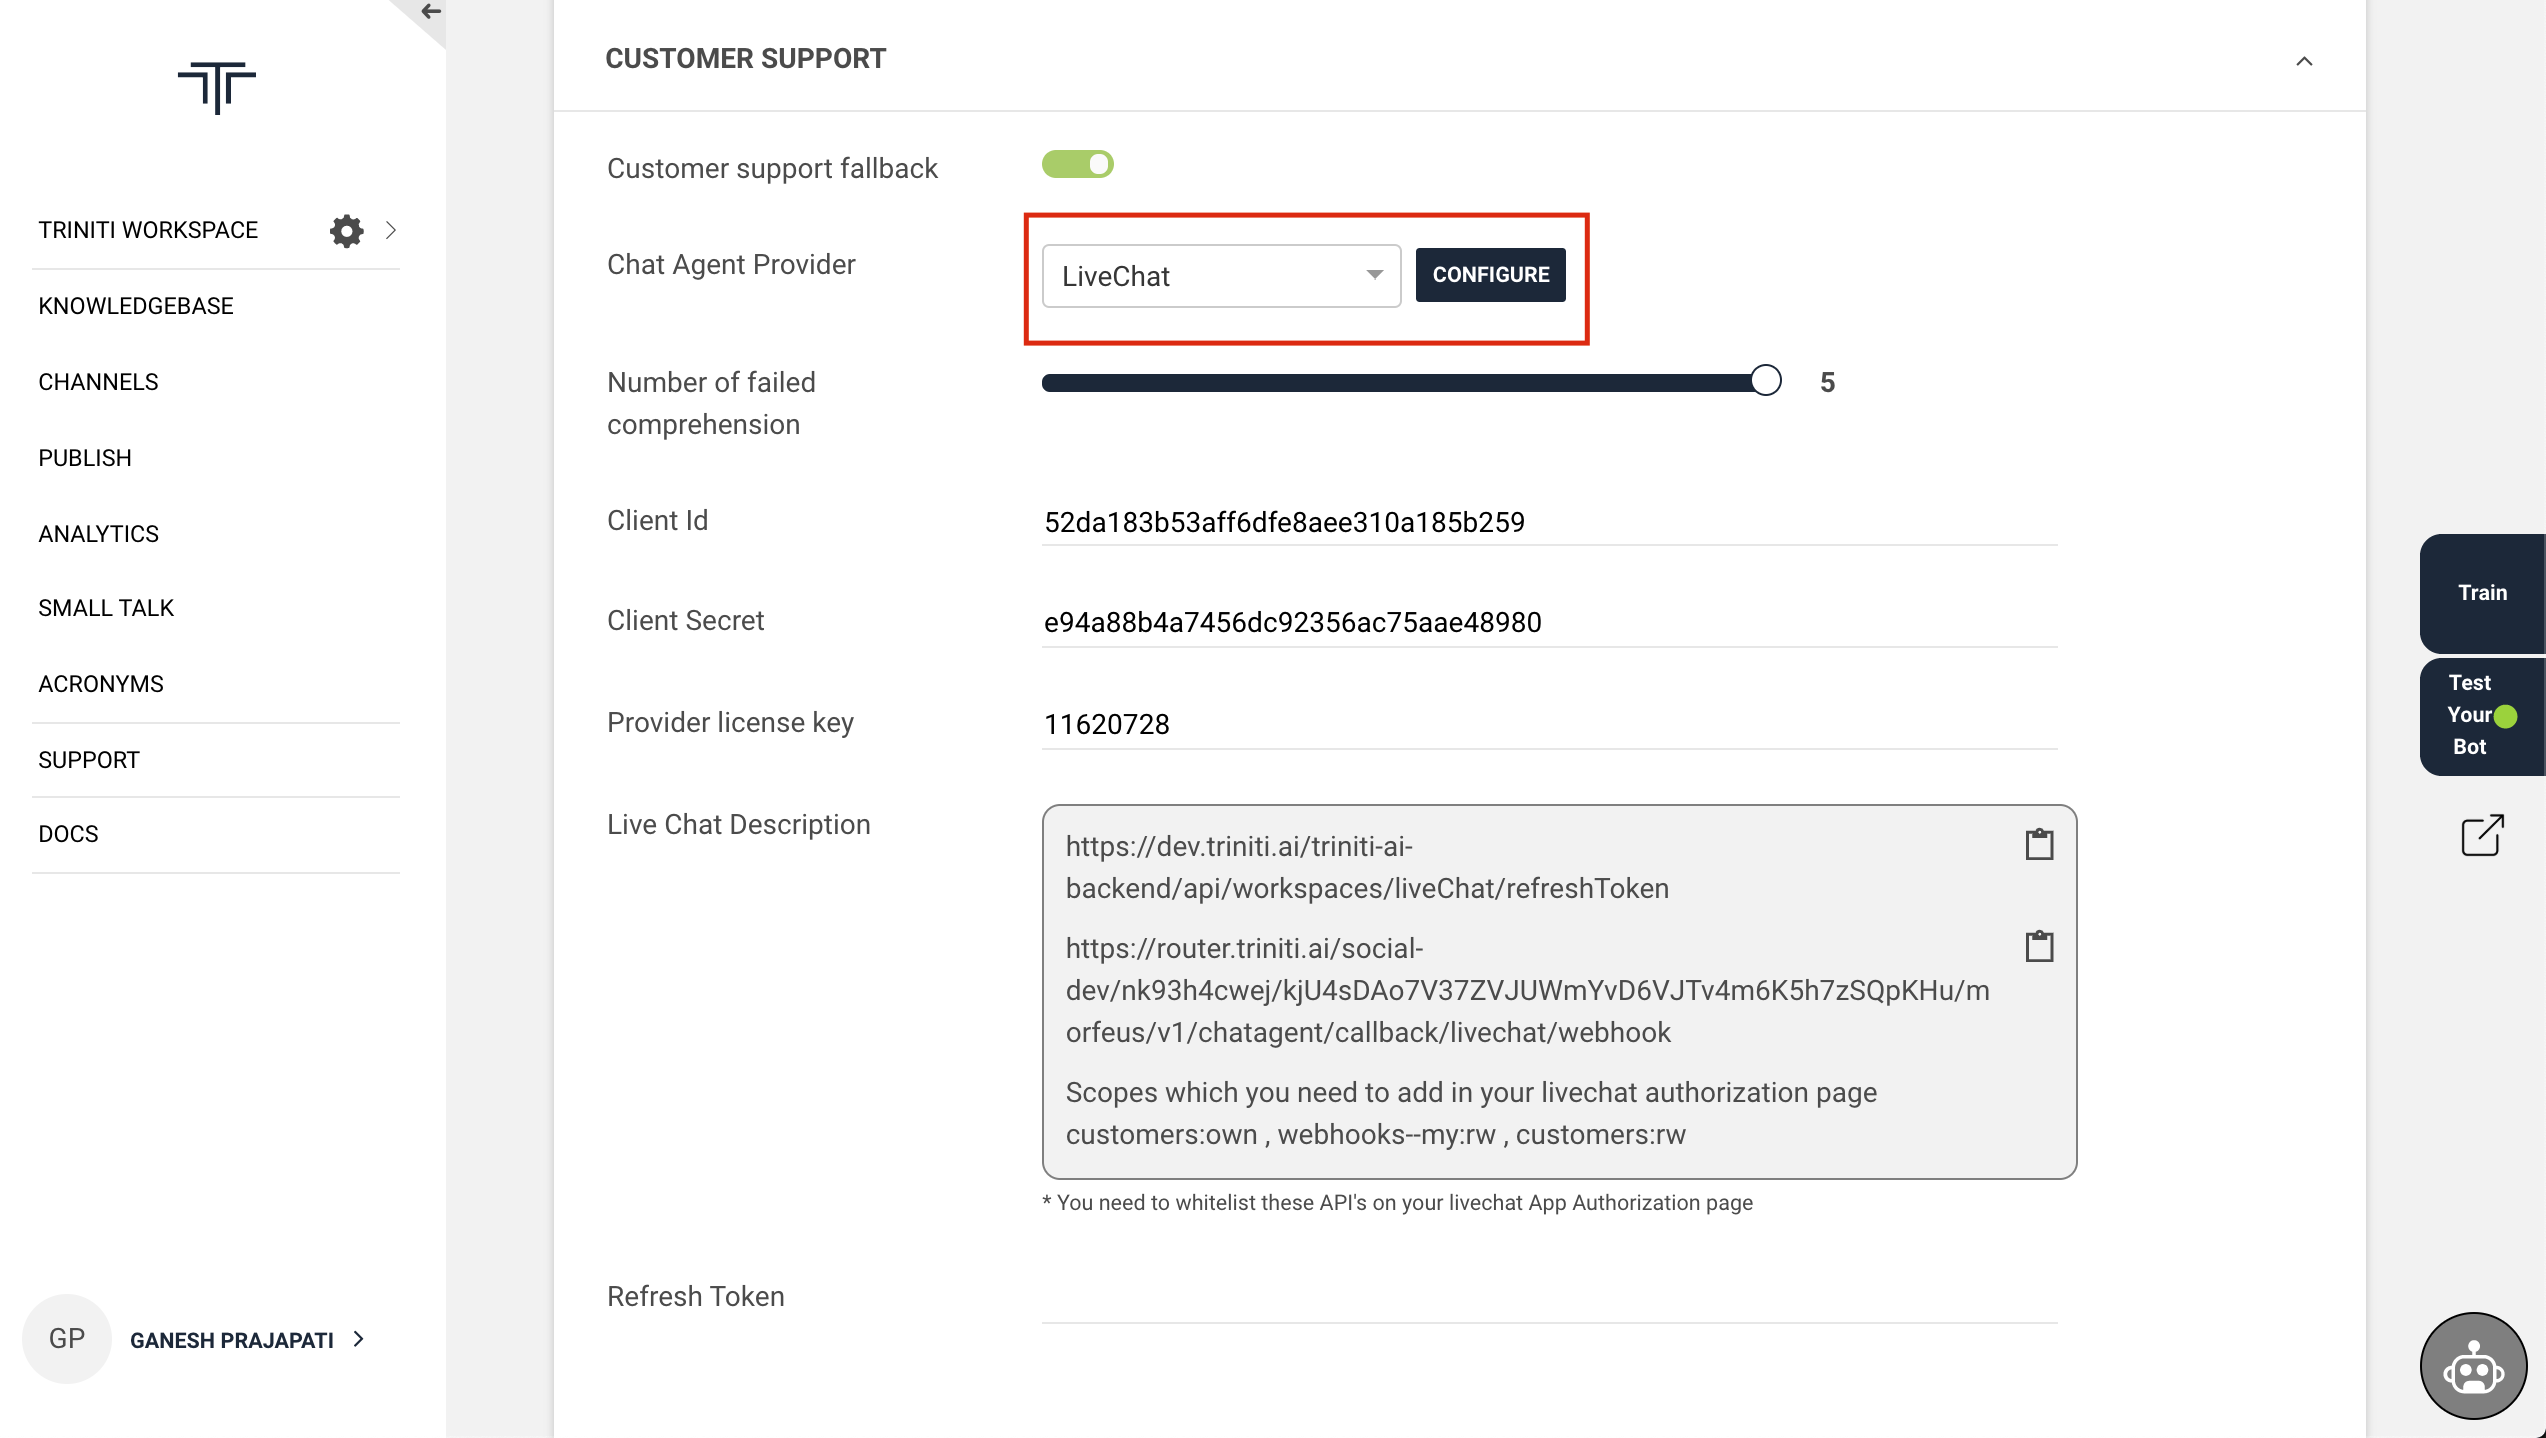
- When you will click on CONFIGURE, It will generate a Refresh Token.
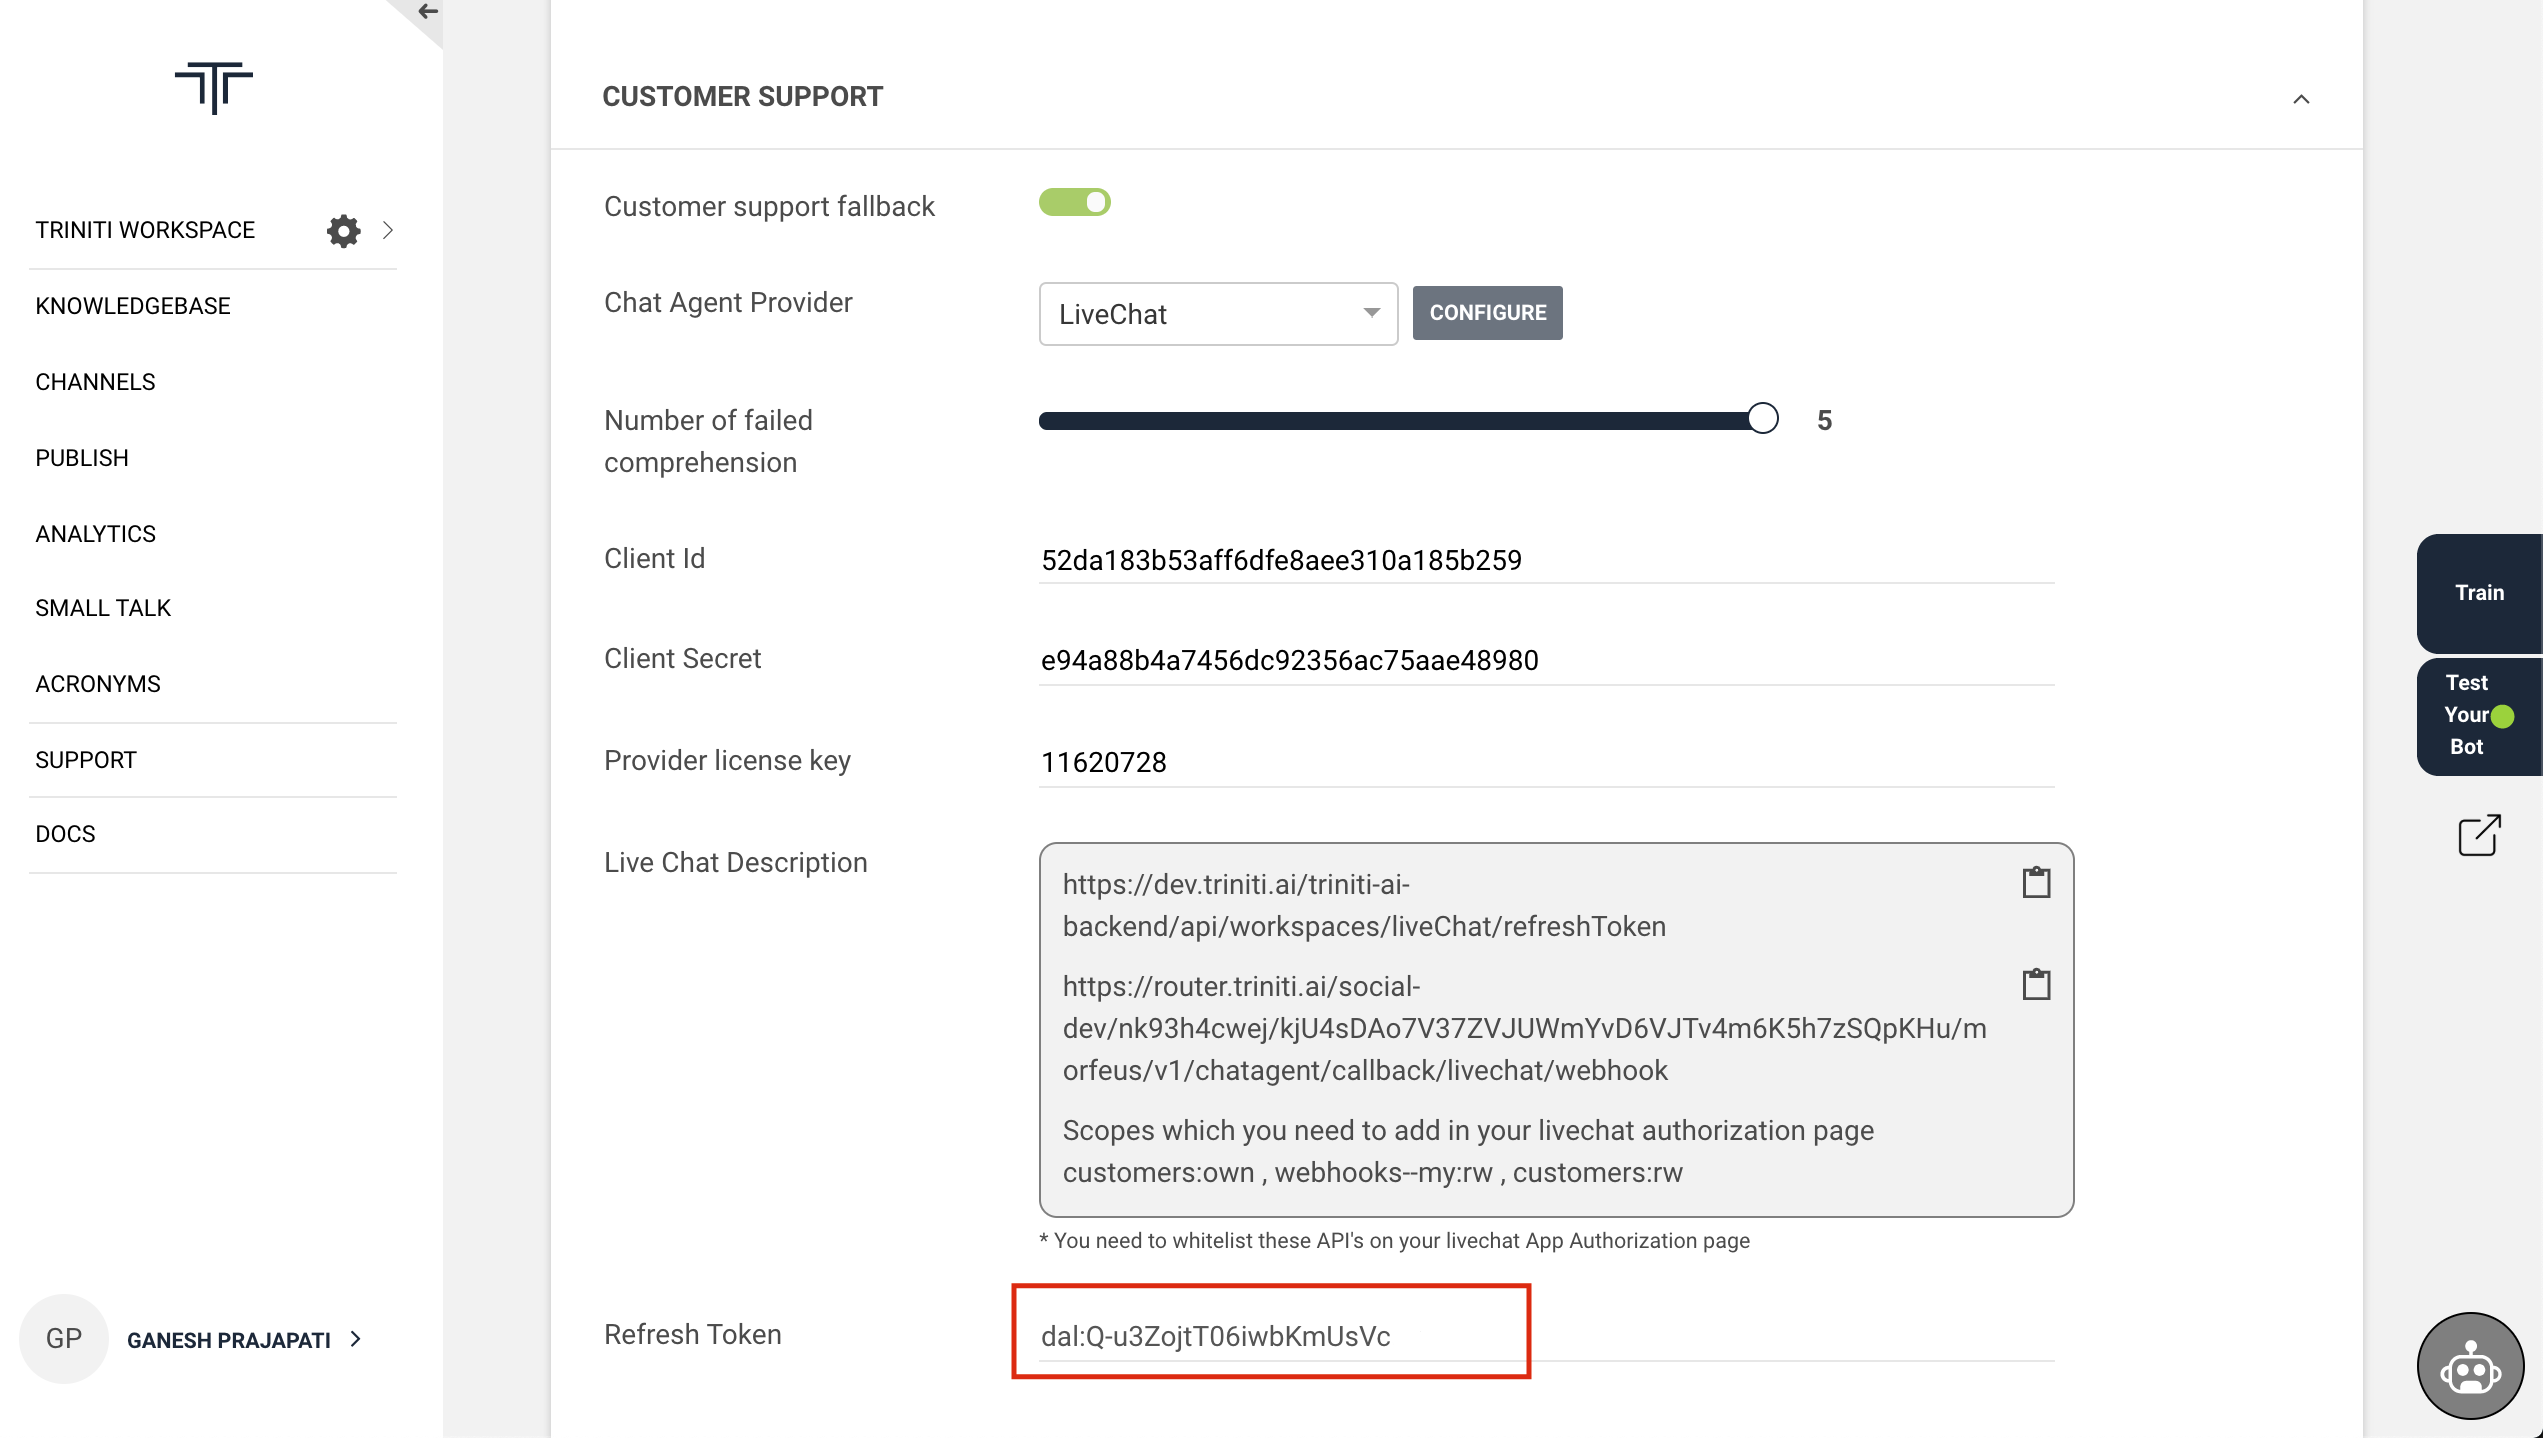
Congratulations! You have configured your bot successfully with your LiveChat App to interact with your users with a live human agent.
Configure FreshChat
We are supporting FreshChat also as a human support fallback. Freshchat is a live chat product that helps users to interact with the live human agent for your services/business. You can configure the FreshChat for your bot so that if bot is not able to classify the user's query it will ask the user to chat with the live human agent.
Please make sure that you have selected ' United States' Data Center while creating the account on FreshChat.
Note: You will have to upgrade your FreshChat App with the best suitable plan to get the API token & configure the webhook and these services as shown in the following picture. ie; You will be needed to select 'ESTATE' plan to get the API token & configure the webhooks.
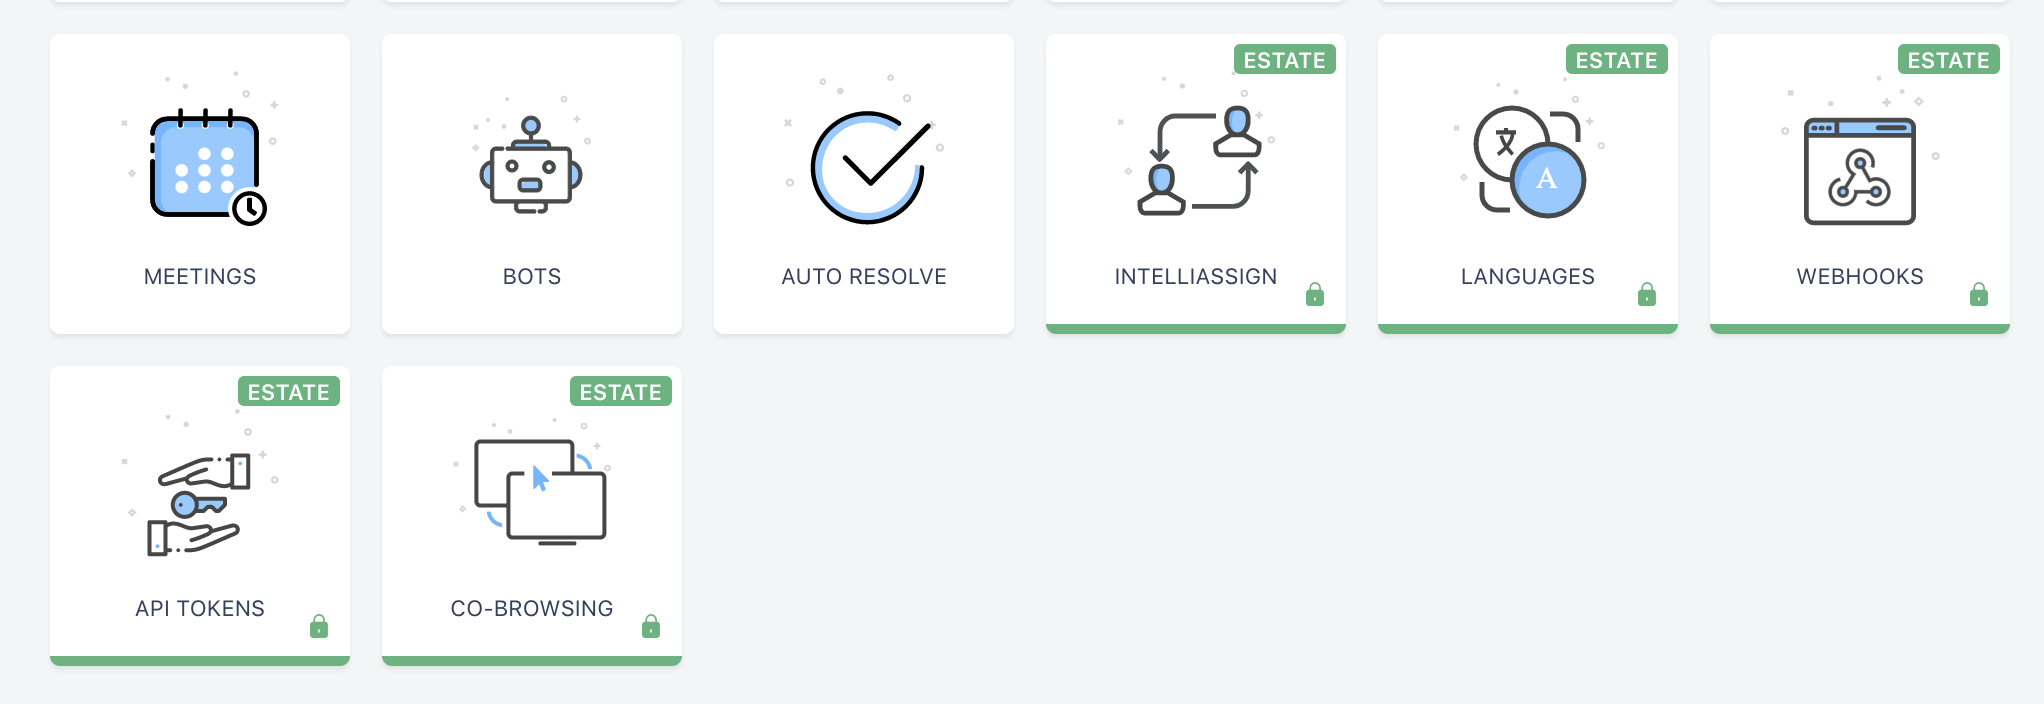
You can configure the FreshChat on your bot by following these steps:
- To enable the FreshChat as a human fallback agent on your bot:
- Goto your workspace
- Goto workspace settings
- Scroll down to 'Customer Support'
- Enable 'Customer Support Fallback'
- Select 'Chat Agent Provider' as 'FreshChat' Now you will have to enter the Client Secret & Provider License Key to make your user interact with the human agent.
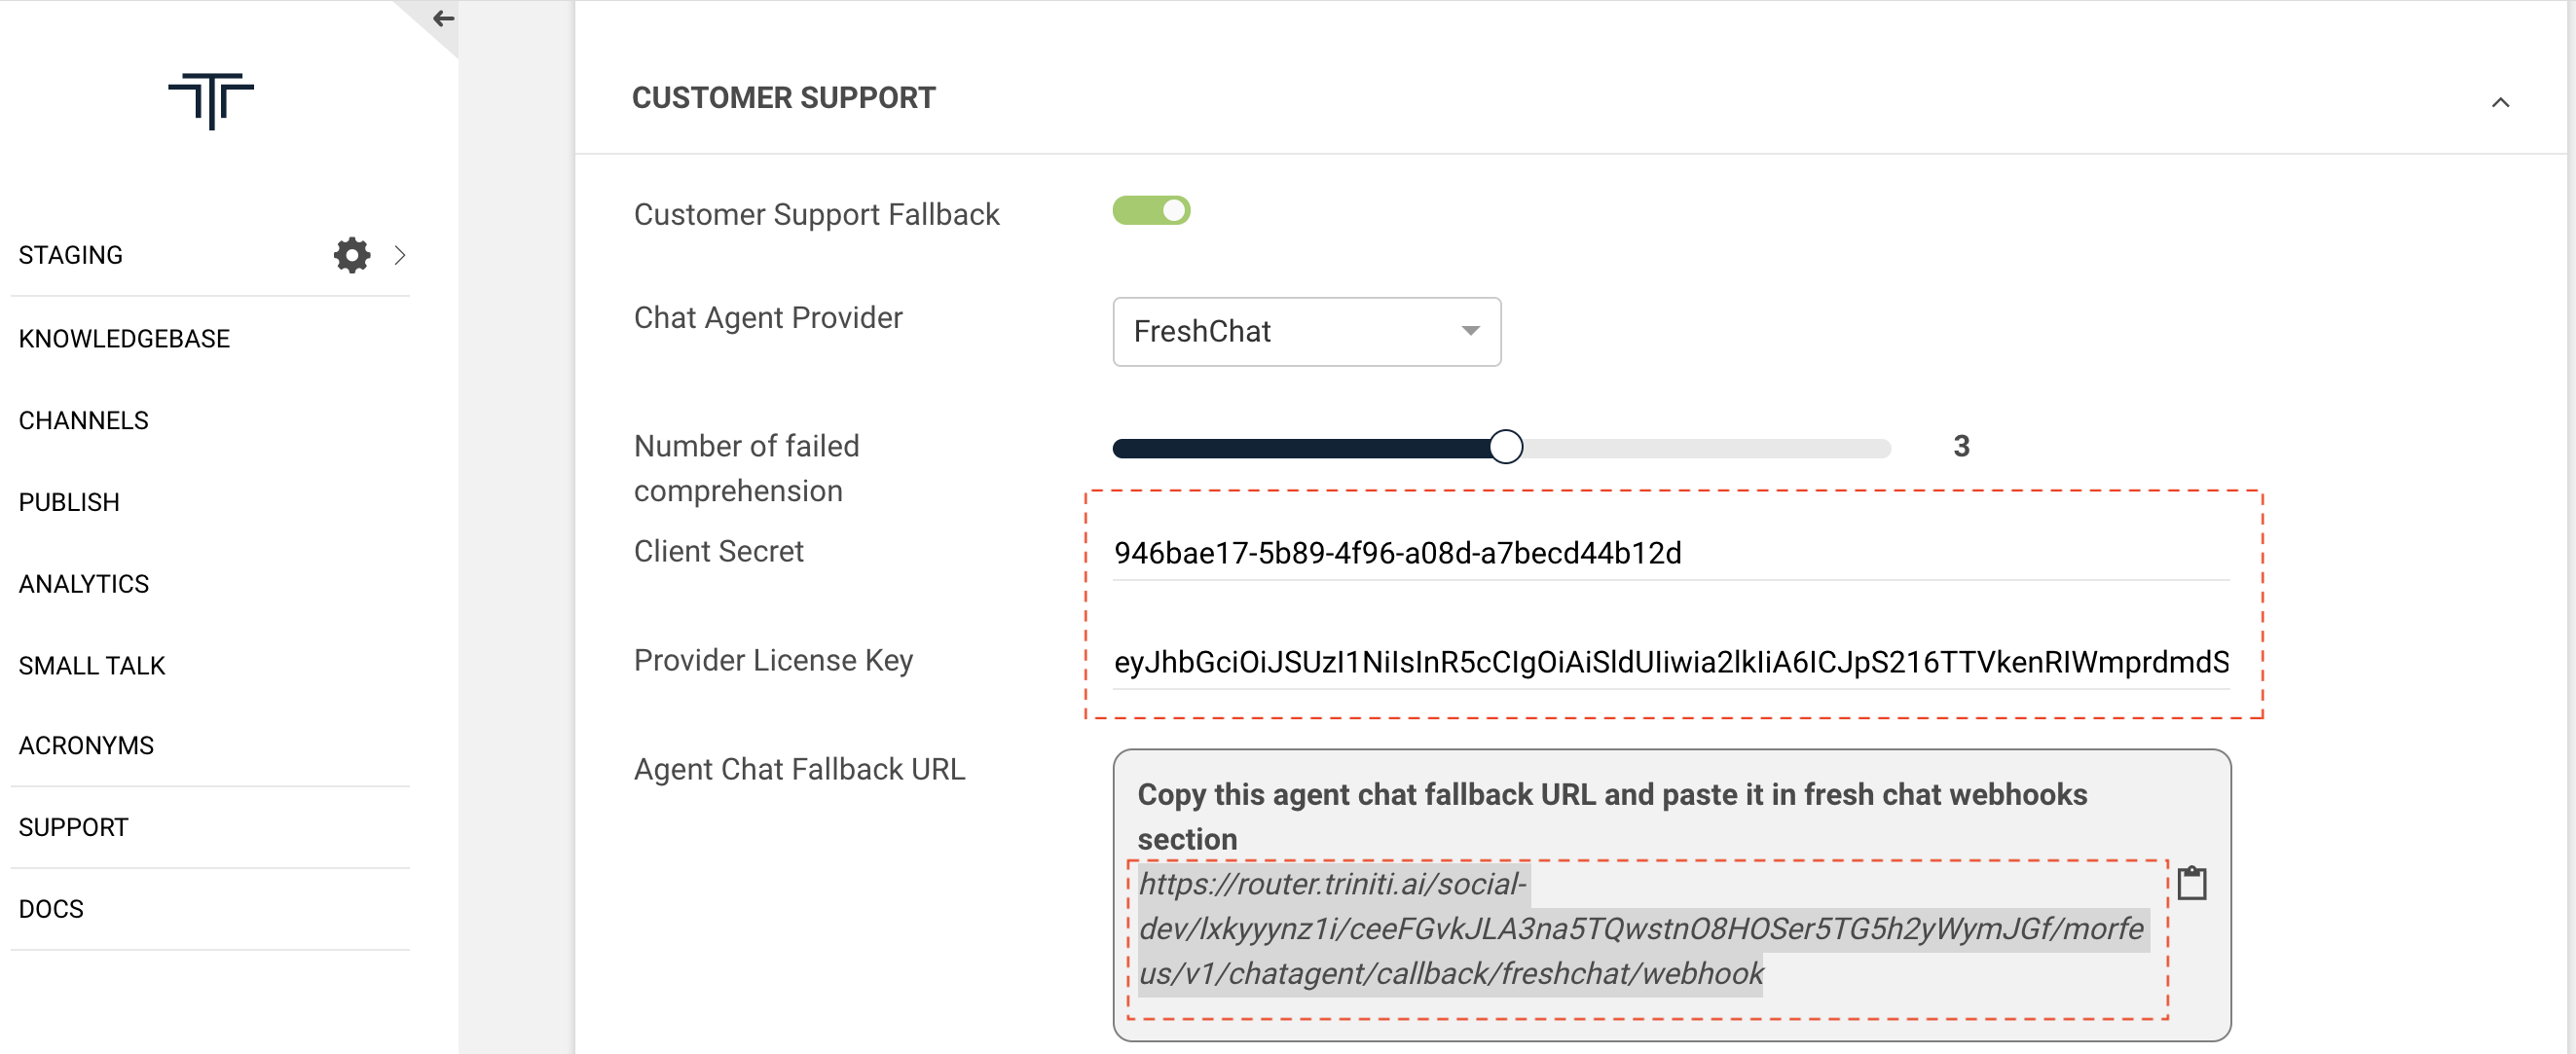
To get the Client Secret & Provider License Key, please follow these steps:
- Login to your FreshChat account or Create an account on FreshChat.
- Activate your account after signup by clicking on the 'Activate Account' button sent on your registered email id.
- Enter all the mandatory details (App Name, Your Name, etc.) on the next page and click on 'Next'. (You will be redirected to the FreshChat Dashboard.)
- Navigate to 'Settings'
- Click on 'Account Settings'
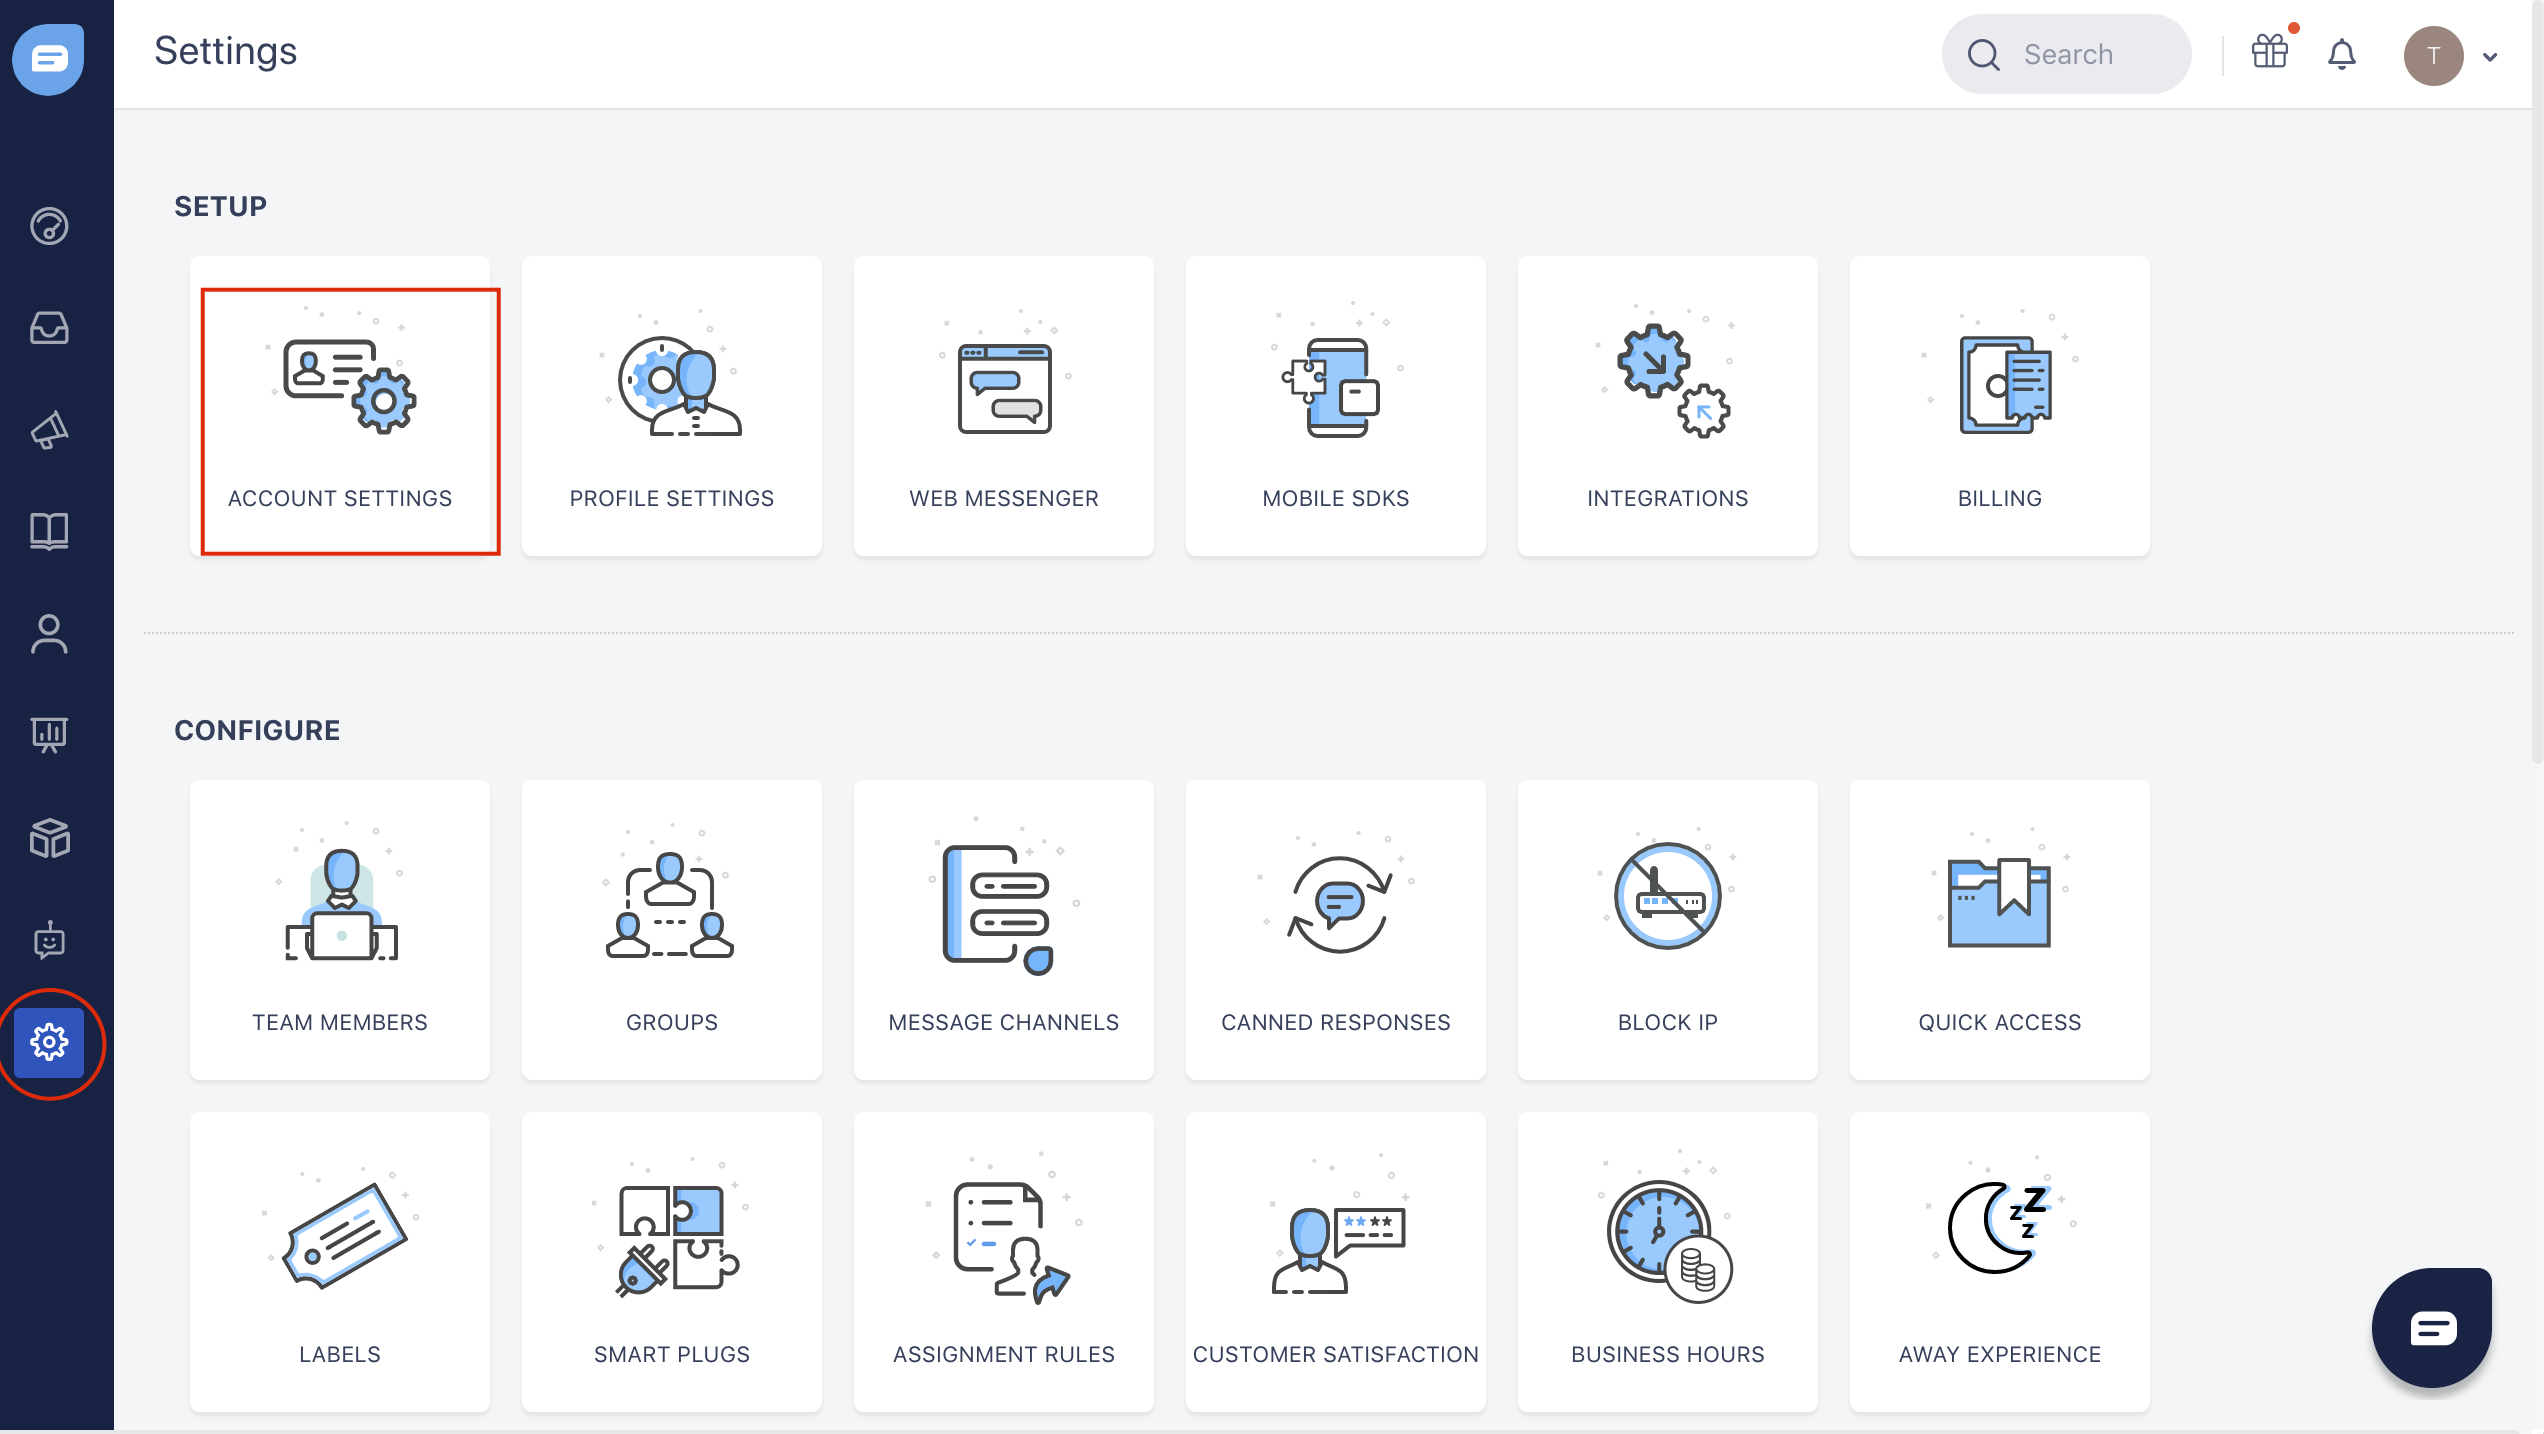
- Click on 'Integration Settings'
- Copy the 'App ID' & paste in 'Client Secret' field on triniti.ai
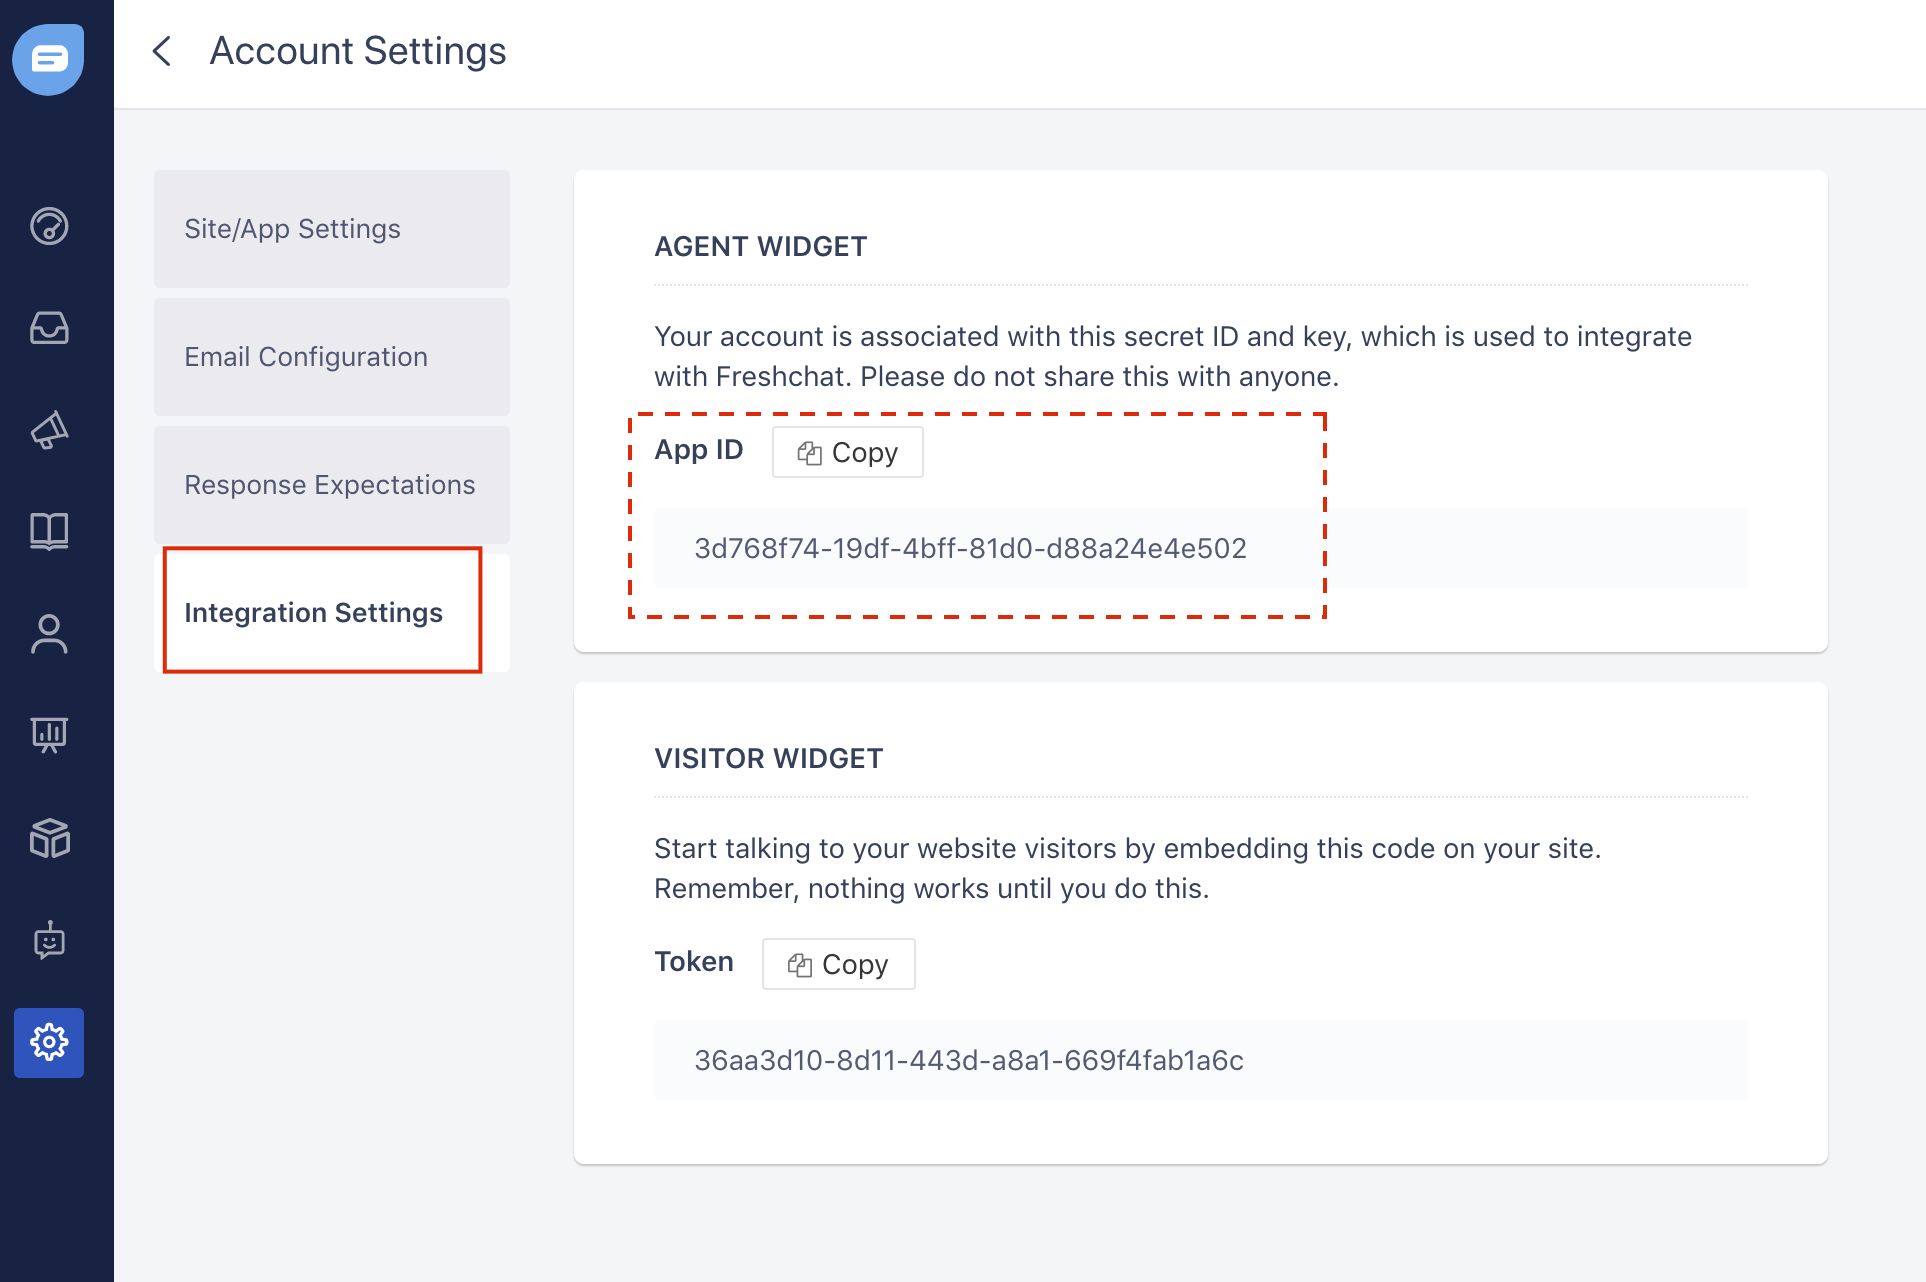
- Goto Settings
- Click on 'API Tokens'
- Click on 'Generate Token' to get the API token
- Copy the 'API Key' & paste in 'Provider License Key' field on triniti.ai
- Click on Save

- Copy the 'Agent Chat Fallback URL' (eg; https://router.triniti.ai/social/{API-key}/{API-Secret}/morfeus/v1/chatagent/callback/livechat/webhook)
Note: Please verify the API-key & API-secret with your workspace's API-key & API-secret before copying the agent chat fallback URL.
- Goto FreshChat Settings
- Click on 'Webhooks'
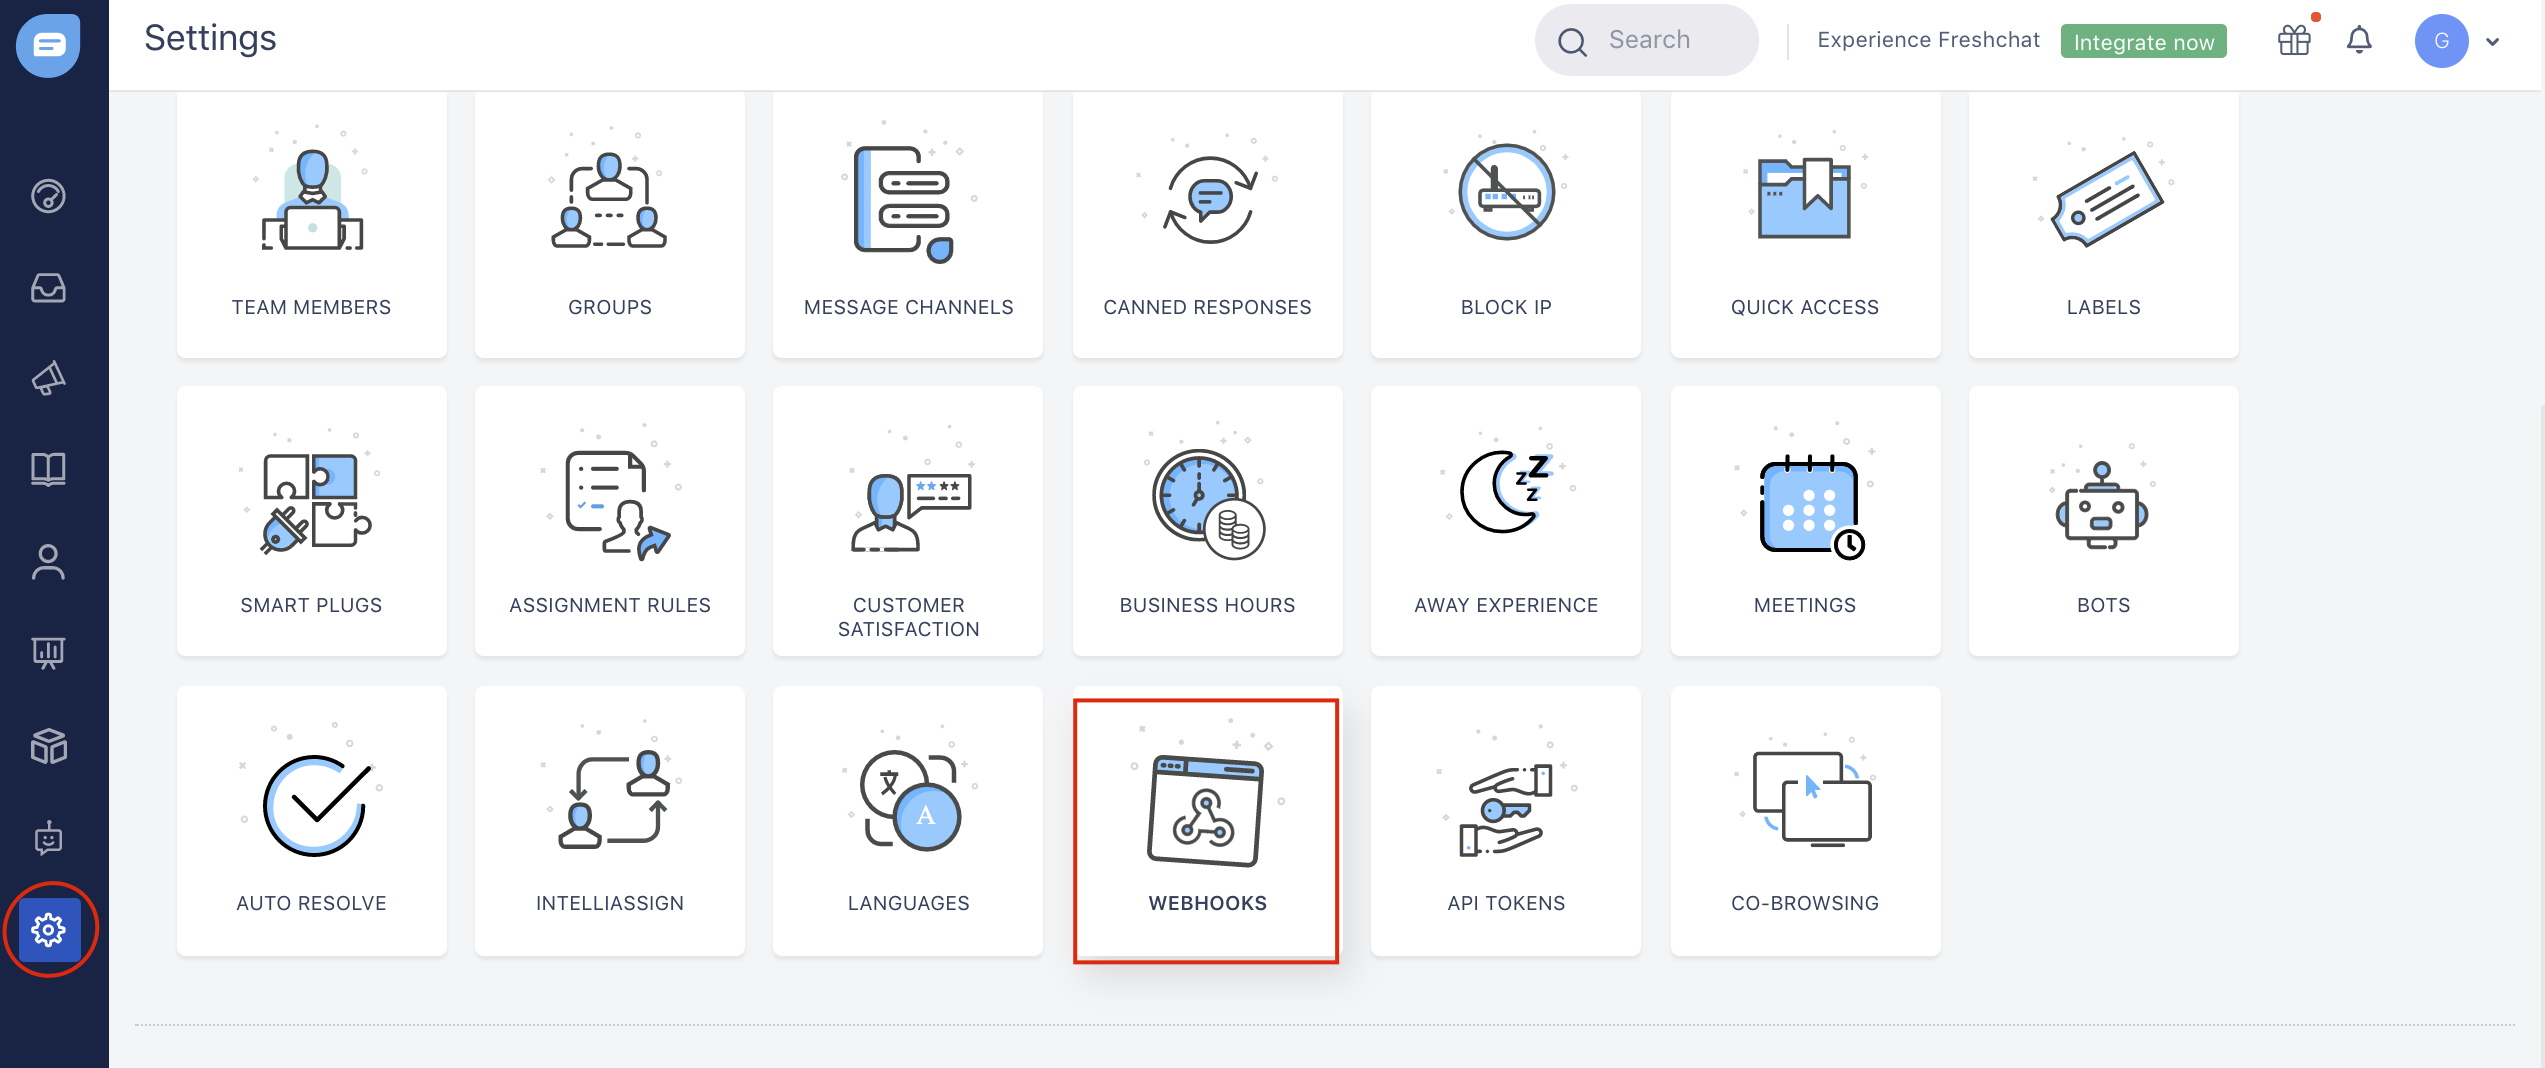
- Enable the webhooks
- Paste the 'Agent Chat Fallback URL' in 'Webhook' field
- Click on Save
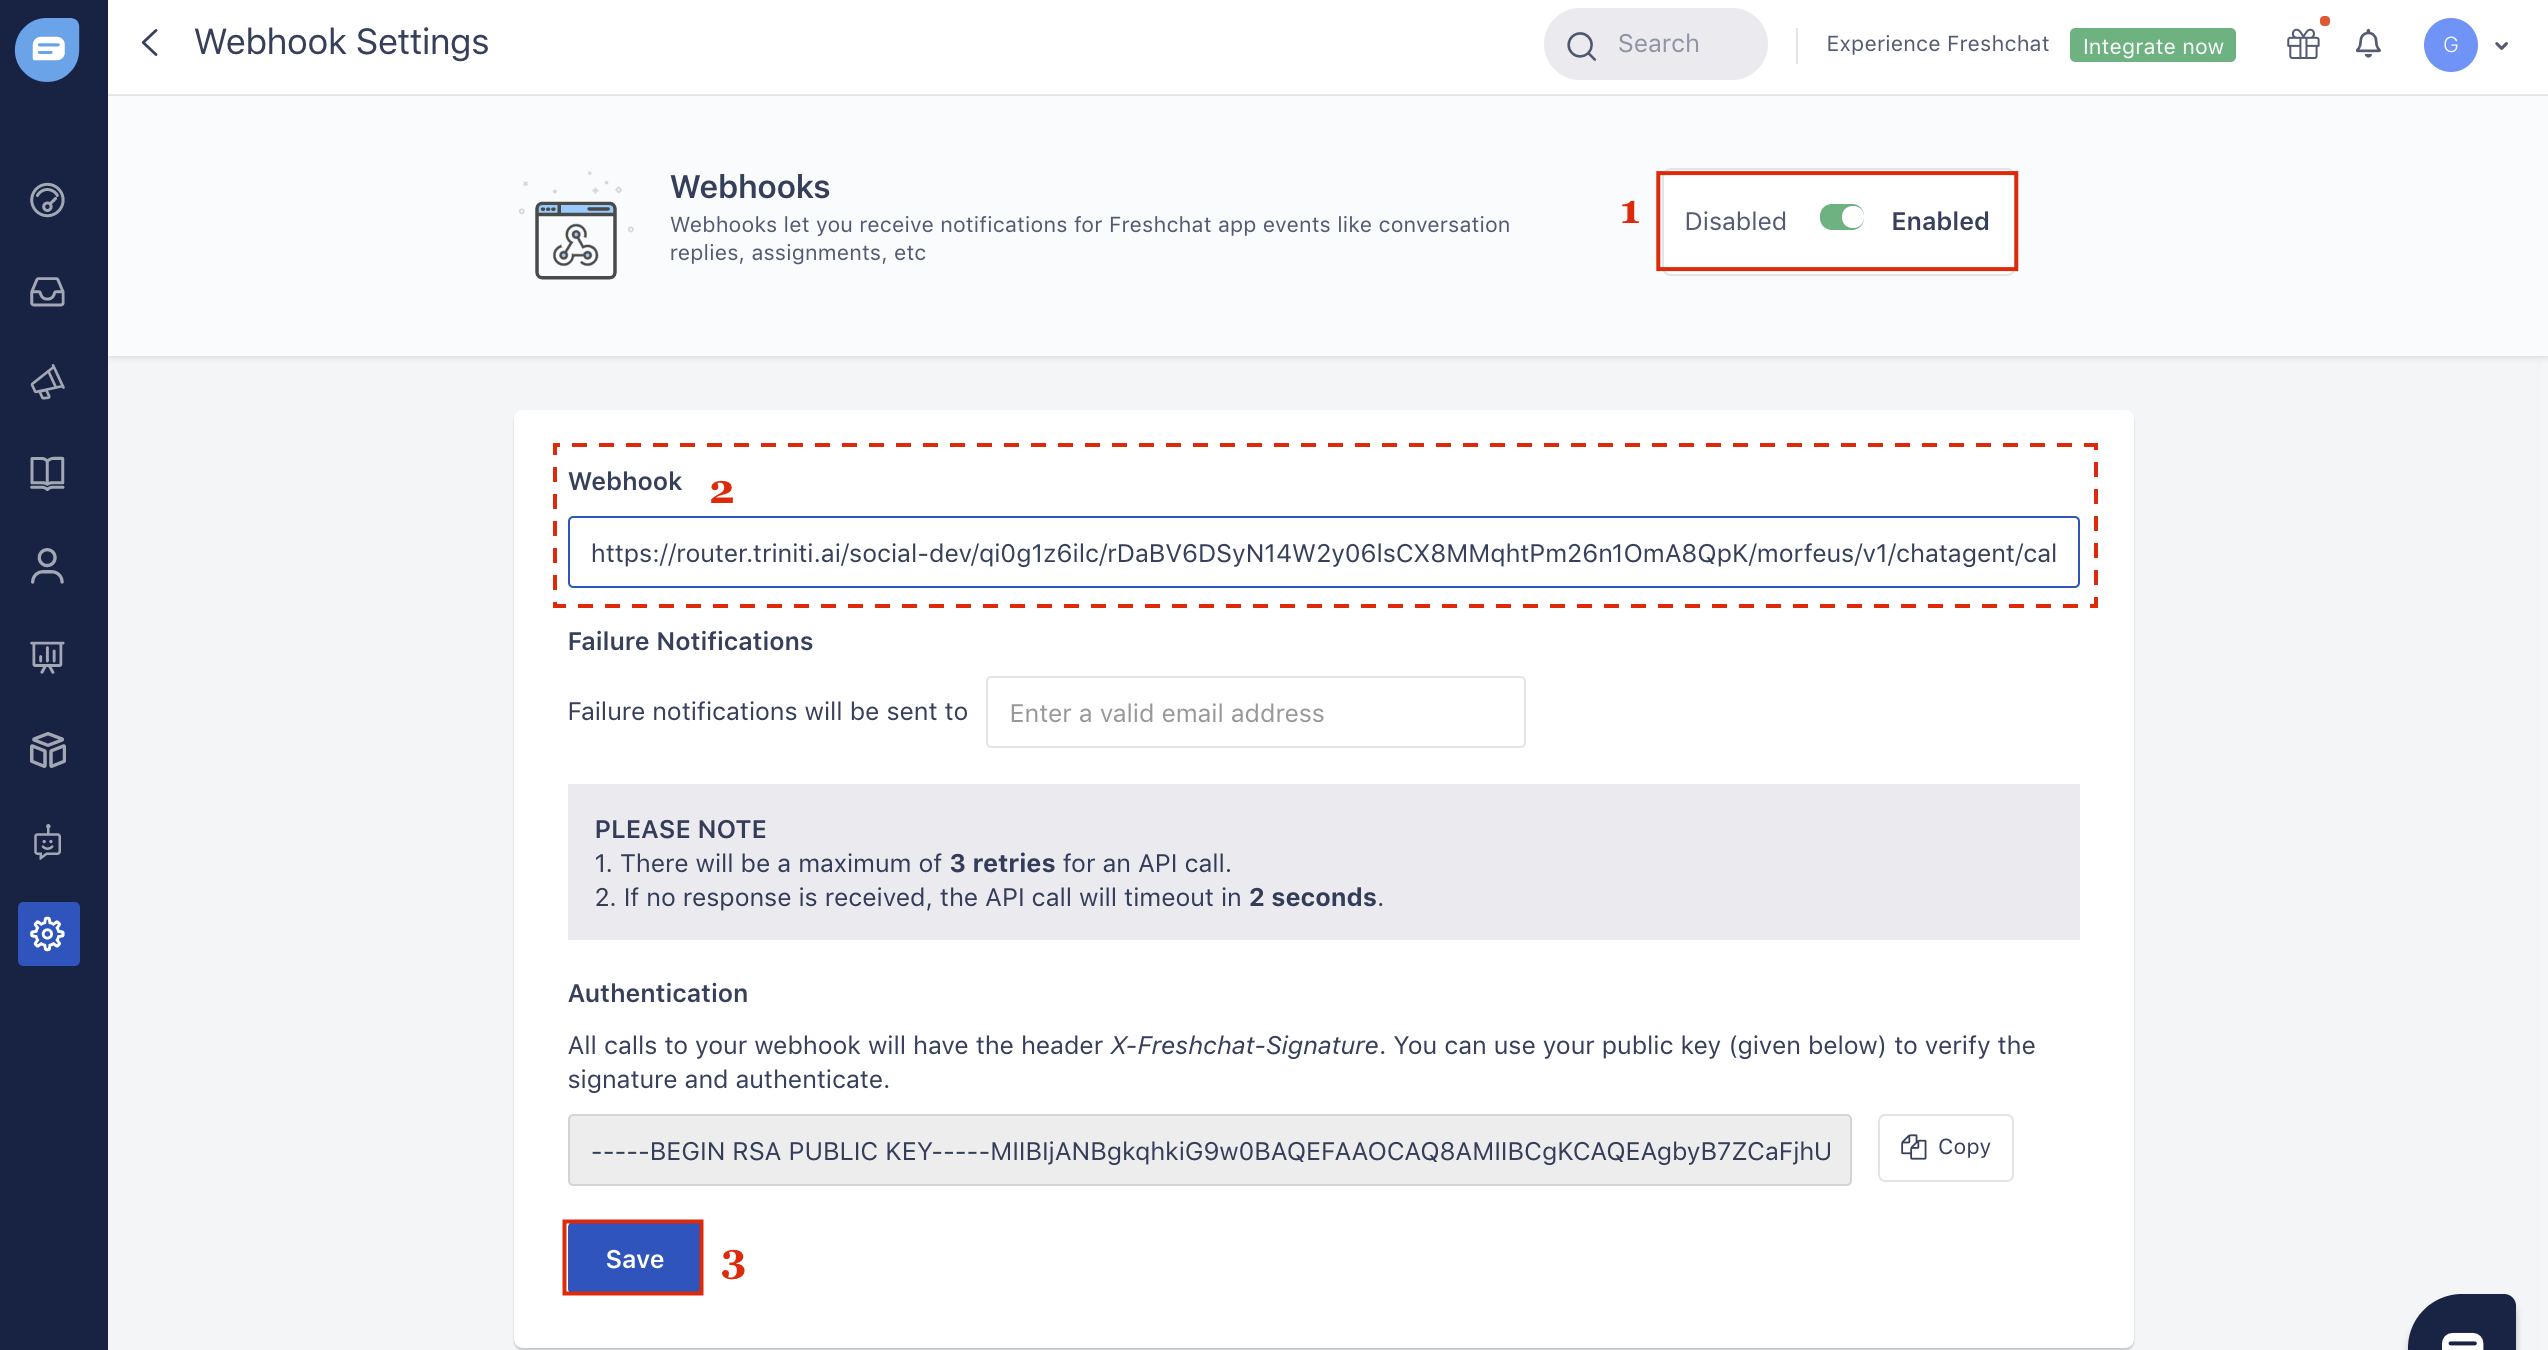
Congratulations! you have successfully configured the live FreshChat human agent for your bot.
Manage Analytics
Analyse Dashboard
Analytics will help to know the overall statistics of bot & AI Engine, which gives many details in terms of Users, Accuracy, Channels, Domain, etc. You can monitor the requests and responses of the bot to improve the services and serve the user better. We can check the number of users & new users registering on the bot, number of hits receiving on the bot, the accuracy of the knowledge base on a daily, weekly, monthly basis and for a particular date basis as well.
We can filter the report based on Date (Daily, weekly, Monthly, Yearly) with Domains (FAQ, SmallTalk, etc) & Channels(Web SDK, Facebook, Google Assitant, etc). Using this report, we can do detailed analysis on Accuracy obtaining, No of Logged-in Users, NewUsers, Total Session in range, Feedback percentage and many more.
We can filter the report based on Date (Daily, Weekly, Monthly, Yearly), Channels(WebSDK, Facebook, WhatsApp, etc.), Segments, etc.
Using this report, we can do detailed analysis on Accuracy obtaining, No of Logged-in Users, NewUsers, Total Session in range, Live Chat Redirections, Feedback and many more.
Active Users - Registered users who launched the bot or interacted with the bot during selected date range.
Logged in Users - Unique Users who logged in to the applications during selected date range.
New Users (Registered) - Newly registered users who launched the bot or interacted with the bot during selected date range.
Returning Users (Registered User) - Returning registered Users who launched the bot or interacted with the bot during selected date range but registered before the selected data range.
Total Users (Till Now) - All users including registered, blocked etc.
Logins - Total Login Attempts.
We can also analyze:
- How are the conversations performing?
You can check:
Messages
- Total messages
- Prelogin messages
- Post login messages
Sessions
- Total sessions
- Logged in sessions
- Anonymous sessions
Avg. Session Time
- Total avg sessions
- Logged in avg sessions
- Anonymous avg sessions
Channels
- Percentage of hits on the different channels
Conversations categorised
- Unclassified
- Unsupported
- FAQs
- Clicks
- Intents
- Smalltalks
How are the users interacting?
You can check:
- Feedback
- LiveChat Redirections
Customer Conversation History
You can monitor the queries that are being asked on the bot by users and can improve the bot based on that monitoring. It will make the job easy to understand the queries that are being asked more and improve the services. If you want to update or add any query you can do that from this page directly. You can apply a filter for the conversations in the following ways:
Filter |
Description |
|---|---|
| Search Converartion | You can search for the particular query by entering the query. |
| Intent Type | You can search on the basis of following intent: - Ambiguous - UnSupported- UnClassified- FeedBack |
| Channels | You can search the conversations on channels by selecting a particular channel. |
| Confidence | You can also search for the queries based on the confidence of the utterances. |
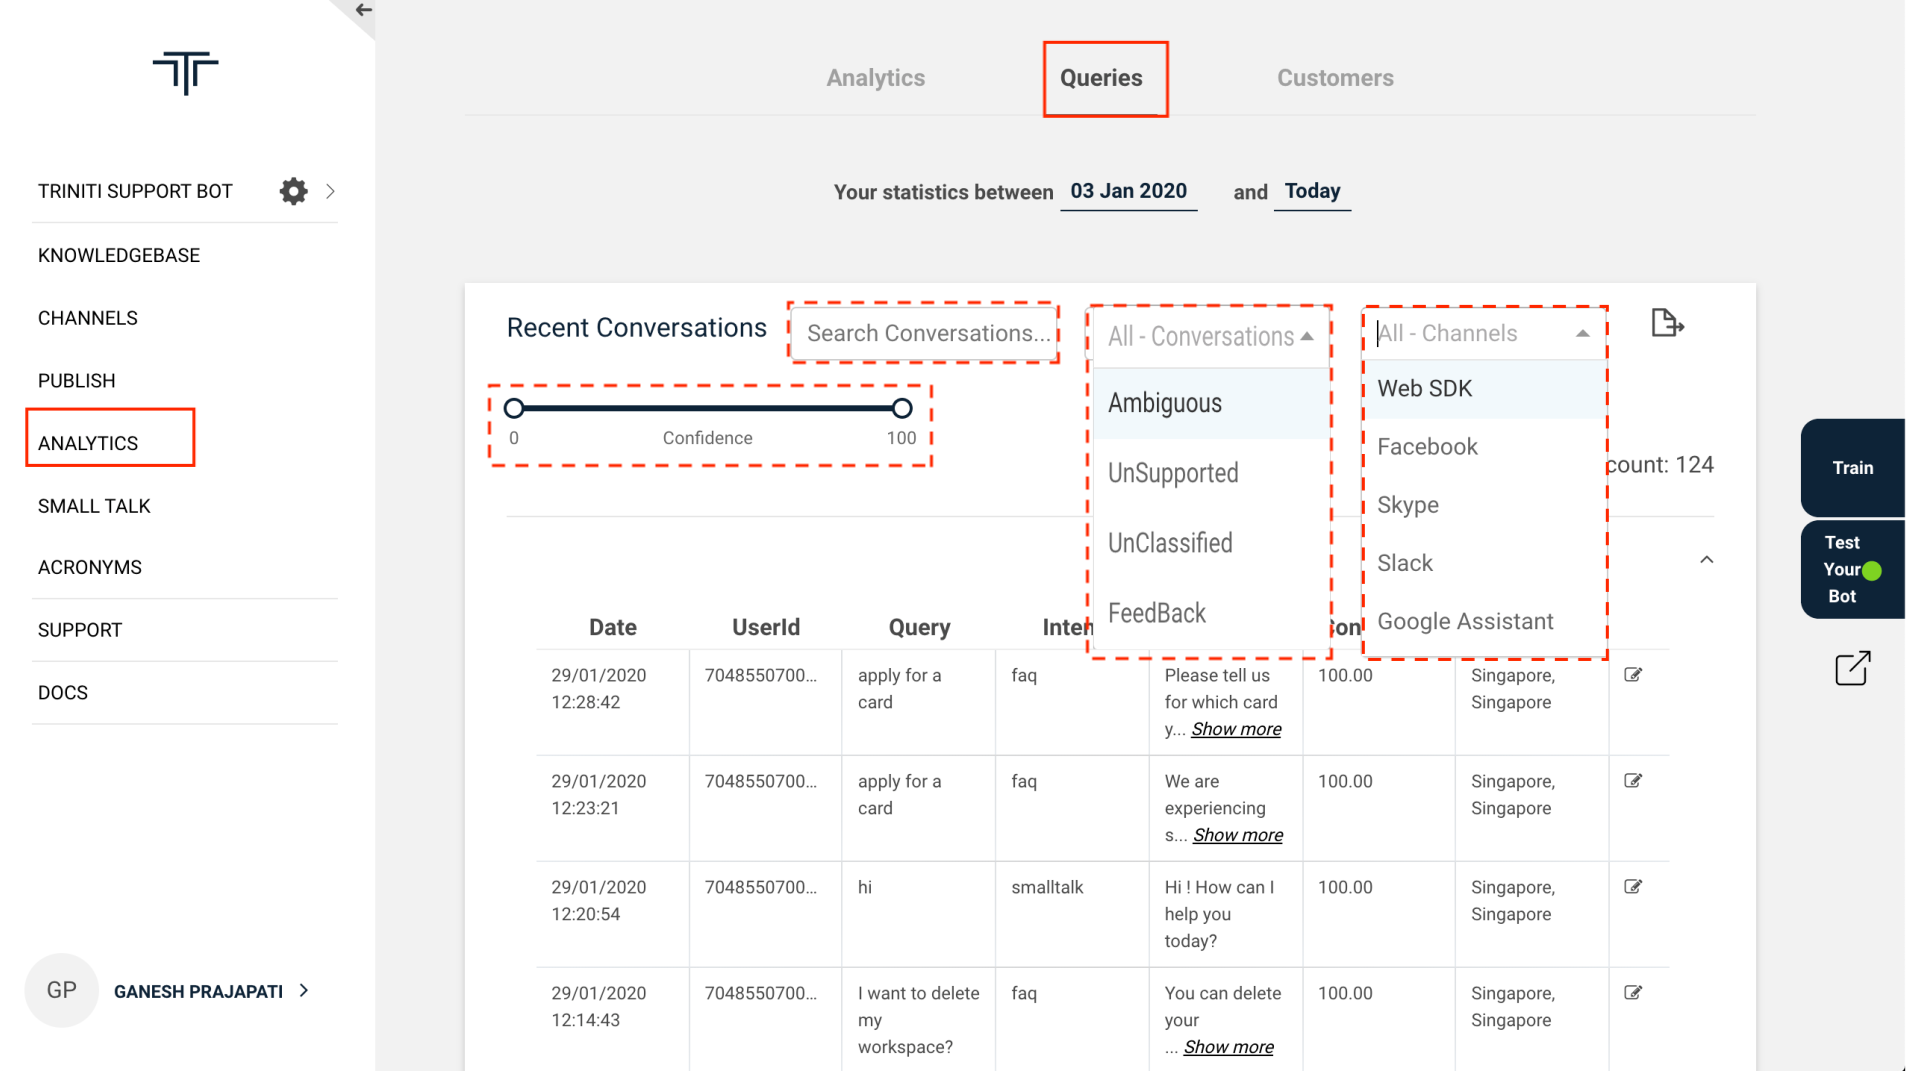
In this report you can analyse the following parameters:
Report Parameters |
Description |
|---|---|
| Date | The date of the asked query. |
| UserId | The user id of the interacted user. |
| Query | The utterance that has been asked by the user. |
| Intent | Type of the utterance that user has asked eg; faq, small talk, etc. |
| Reponse | The response was given by the bot to the user's query. |
| Confidence | Confidence of the utterances that bot has given the response. |
| Location | User's location, from where the user has interacted with the bot. |
To check the conversation history follow these steps:
- Goto your workspace
- Click on Analytics
- Navigate to Queries
Customer Profile
You can also monitor the Anonymous user's profile, registered user's profile and what they have chatted on the bot and more details like the location of the user, last access/login, messages sent by the user, for how much time the user was active on the bot, what chatting user has done on the bot, the complete information can see in "Customers" section of the "Analytics" page. You can even export the chat for further analysis or as the need for that chat.
Note:
- Anonymous Users: The users who has interacted with the bot without any login or authentication.
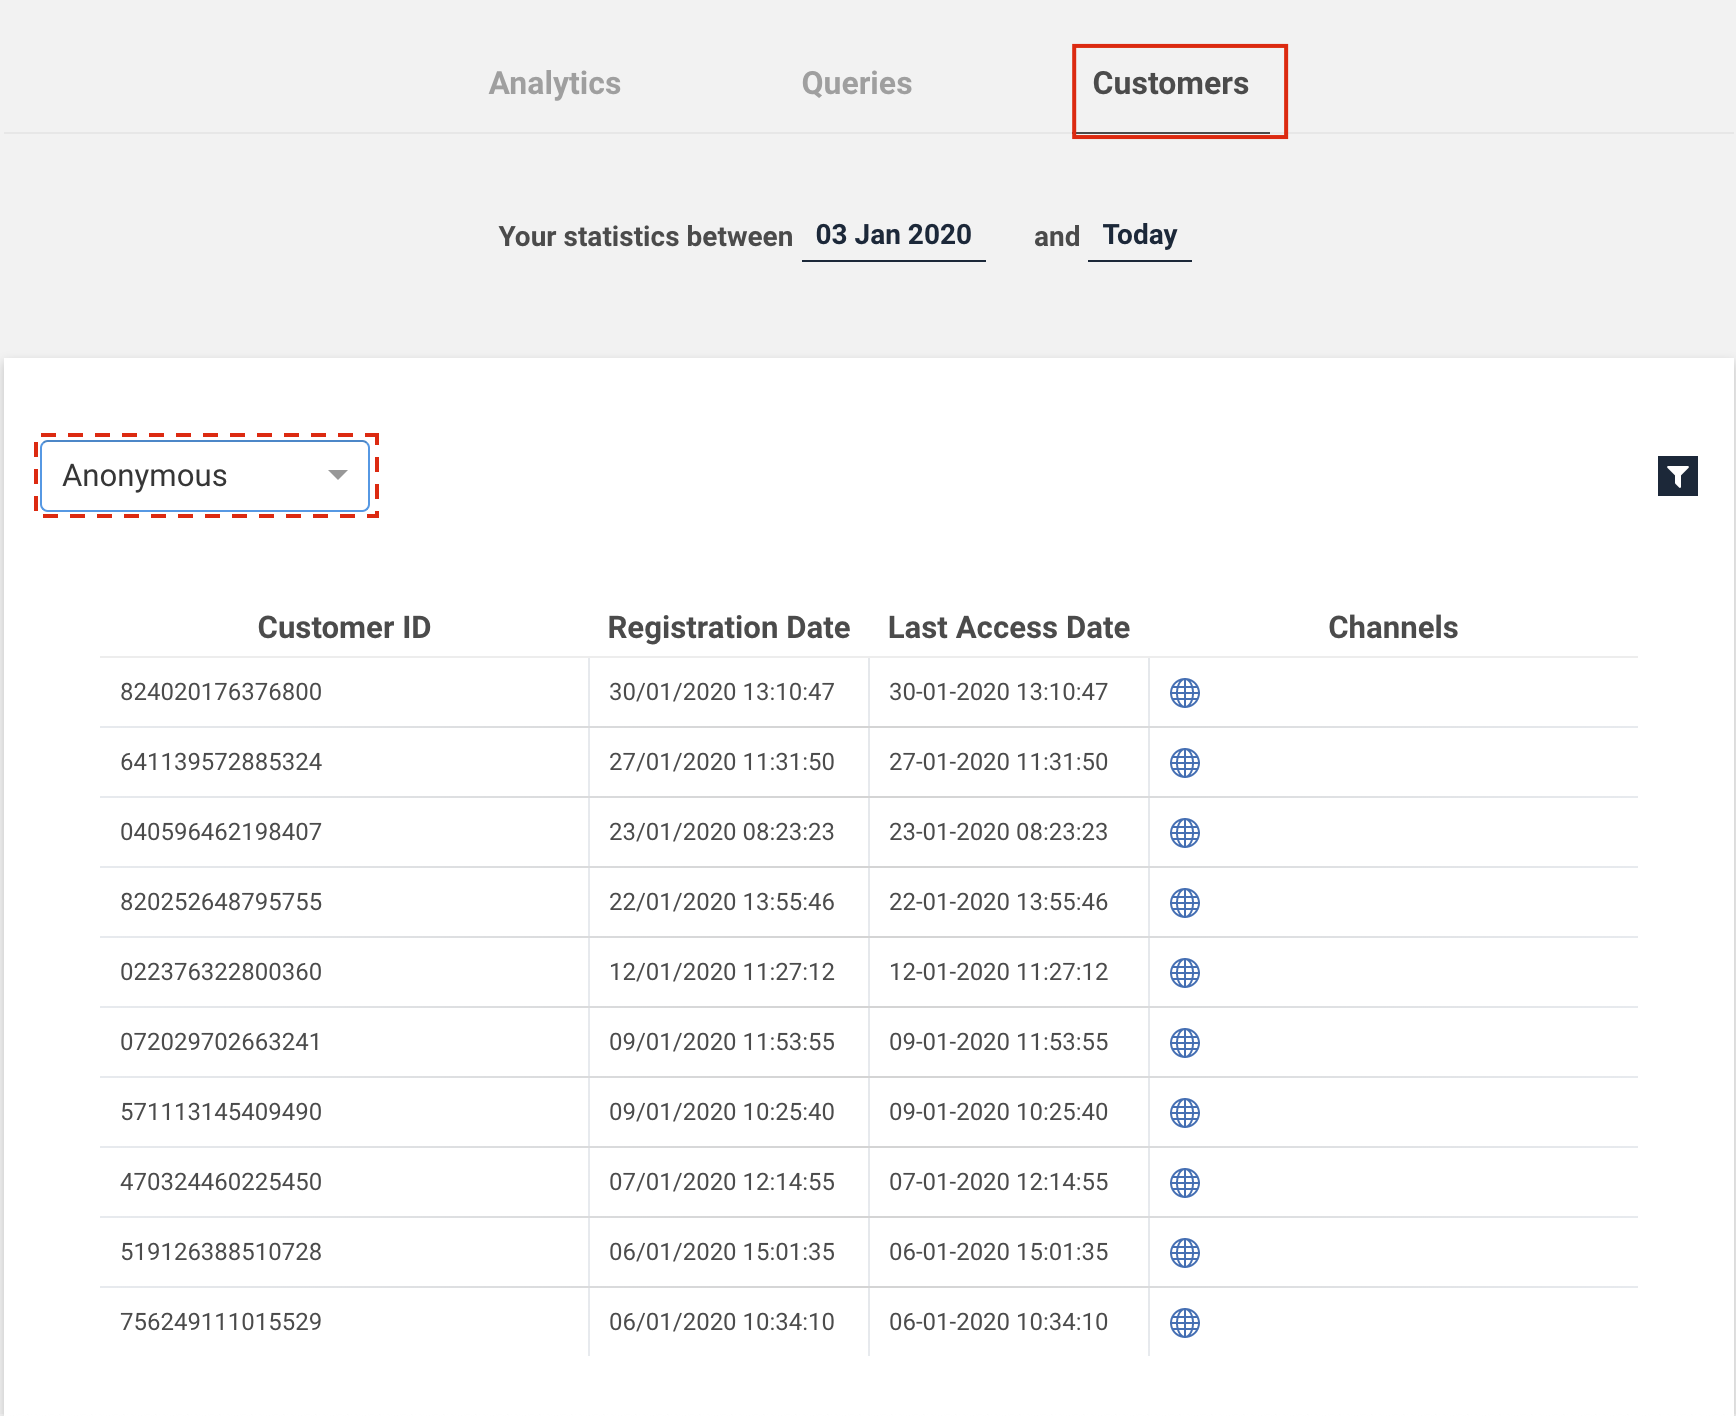 - Registered Users: The users who has interacted with the bot with some authentication or login.

You can analyse the following parameters from the customer profile:
Report Parameters |
Description |
|---|---|
| Name | Name of the user who has interacted with the bot. |
| Customer ID | User's customer id. |
| Email ID | User's Email Id. |
| Phone No. | User's phone number. |
| Registered Date | The date when the user has registered himself/herself on the bot. |
| Last Access Date | The date of last access from the user to interact with the bot. |
| Last Access Location | The location of the user from where interacted with the bot. |
| Channel | The channel from the user has interacted with the bot. |
| Status | The user status whether user is active, blocked, etc. |
| Last Login Date | The date on which the user has logged in to interact with the bot. |
| Browser Agent | The browser from where the user has interacted with the bot. |
| Overall Messages | The number of messages that have been transferred between user & the bot. |
| Accuracy | The accuracy of the bot to give the response for utterances. |
| Average Session | The time until the user was active on the bot. |
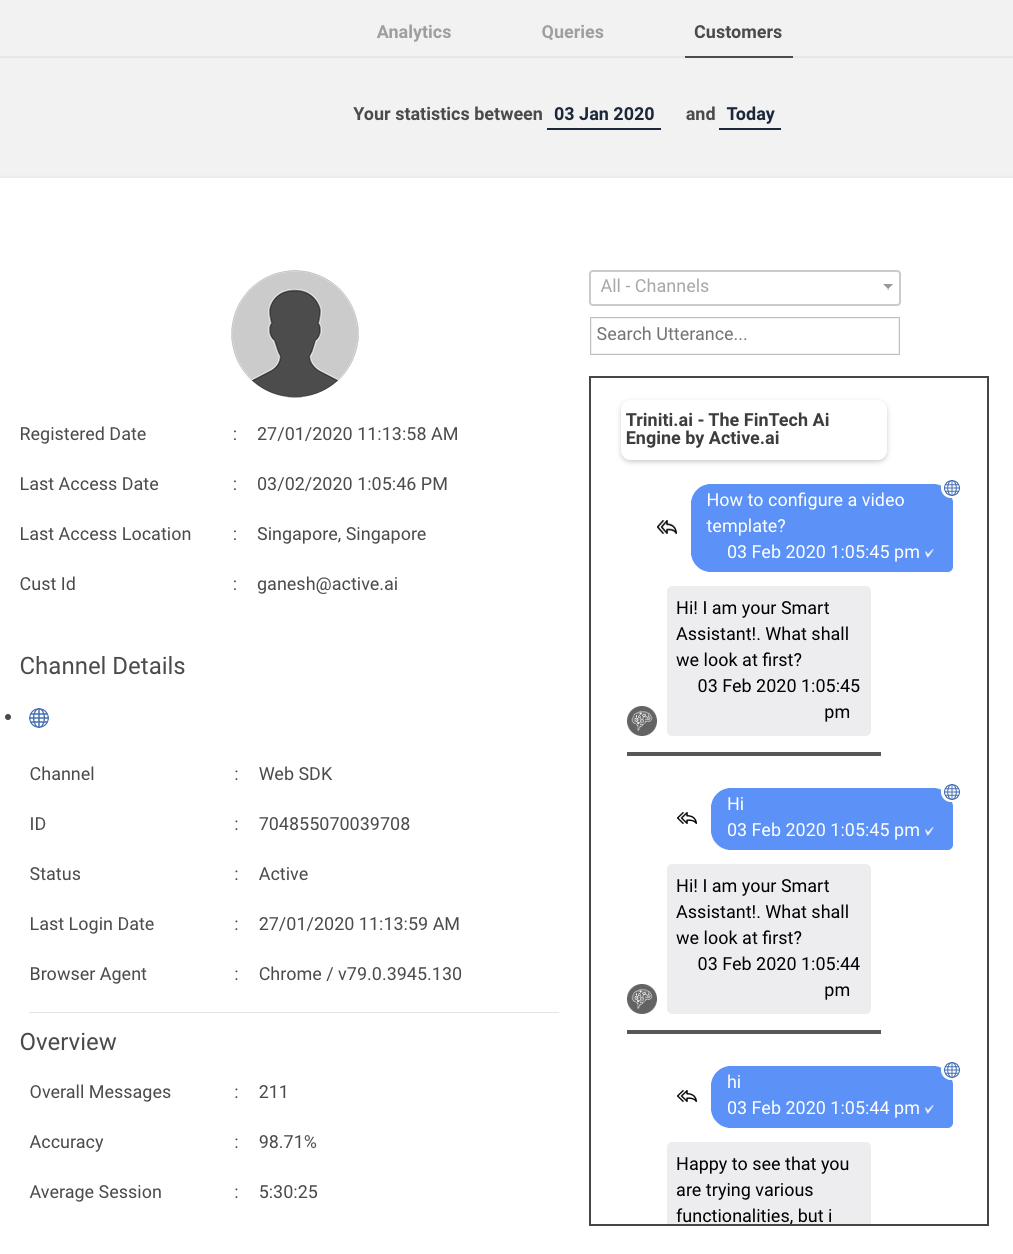
- You can also apply the custom filter by clicking on the filter icon in customer section of analytics.
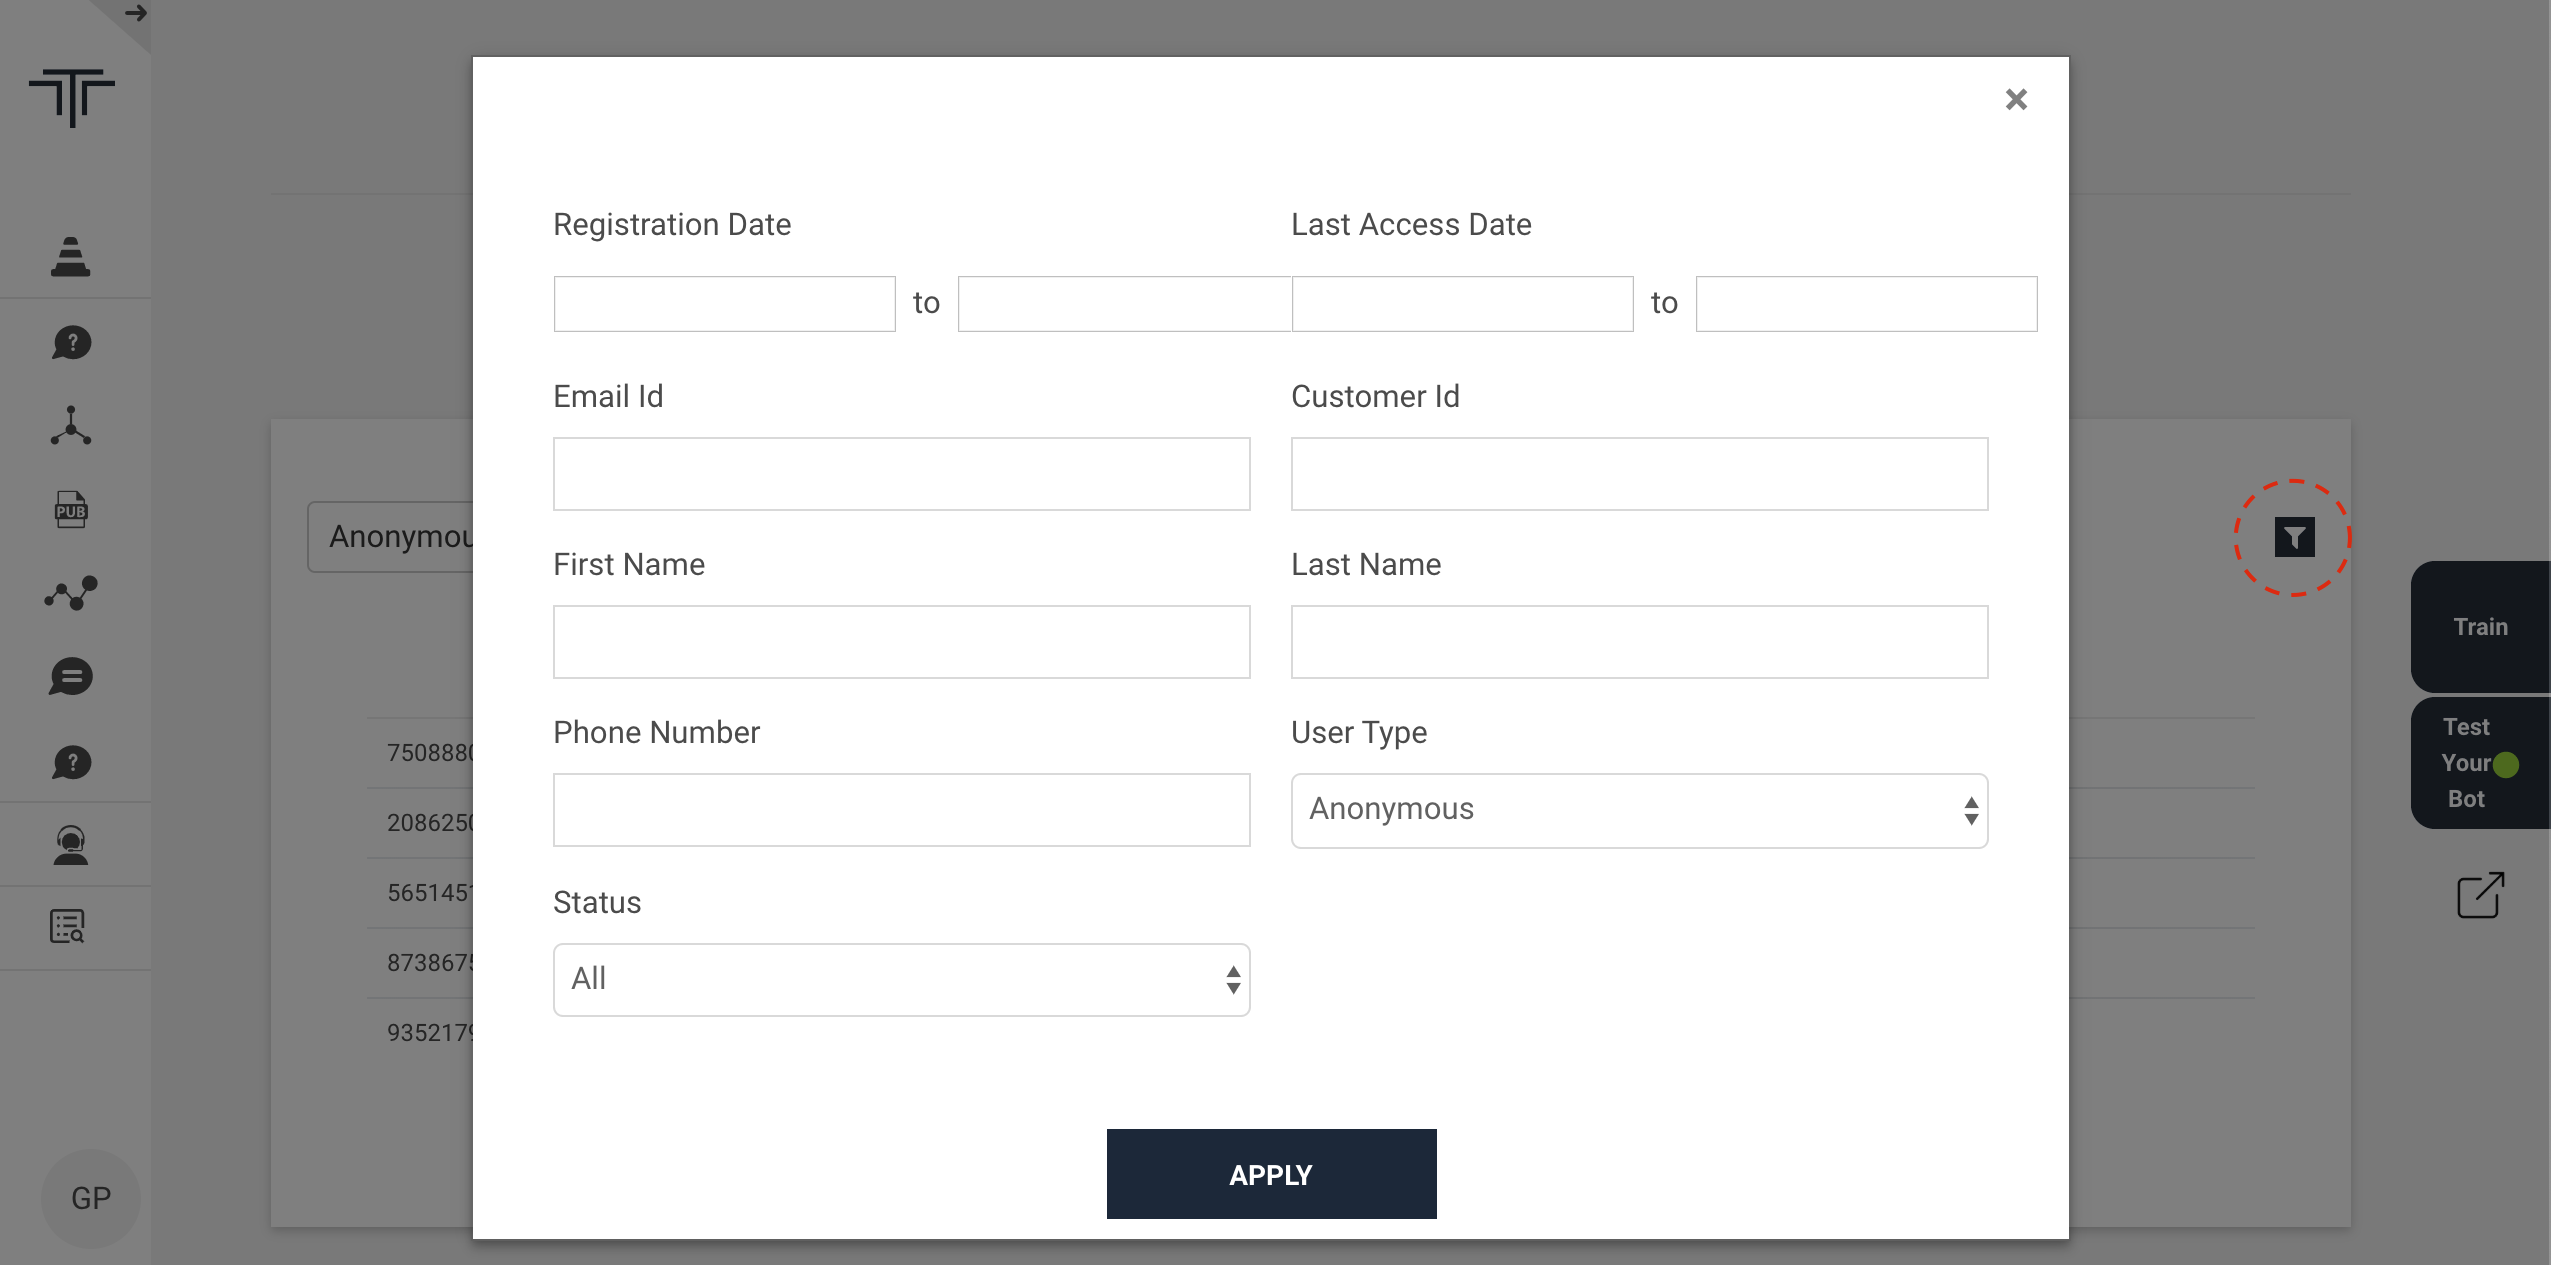
To check customer profile follow these steps:
- Goto your workspace
- Click on Analytics
- Click on Customer
Conversational Analytics
The Conversational Analytics shows overall statistics of the AI Engine and what is happening on the bot in a graphical manner, which includes all the answered & unanswered utterances including FAQs, Smalltalks, Clicks, Intents, etc. This will contain all the unique counts of the messages based on the category of the utterances (Eg; FAQs, Smalltalks, Intents, etc.), you can expand the total messages to see the category of utterances and their respective unique counts.
In the conversation analytics, you can filter based on the date, channel, response type, and language. It will also show the top total messages.
AI Version upgrade process
This tutorial explains the AI upgrade process.
- If customers have an older version then customers will not be able to train their data, It will throw an error stating that "Our AI version has been upgraded, Please upgrade the version by going to workspace setting and clicking on Upgrade version x.x mlt under credentials section"
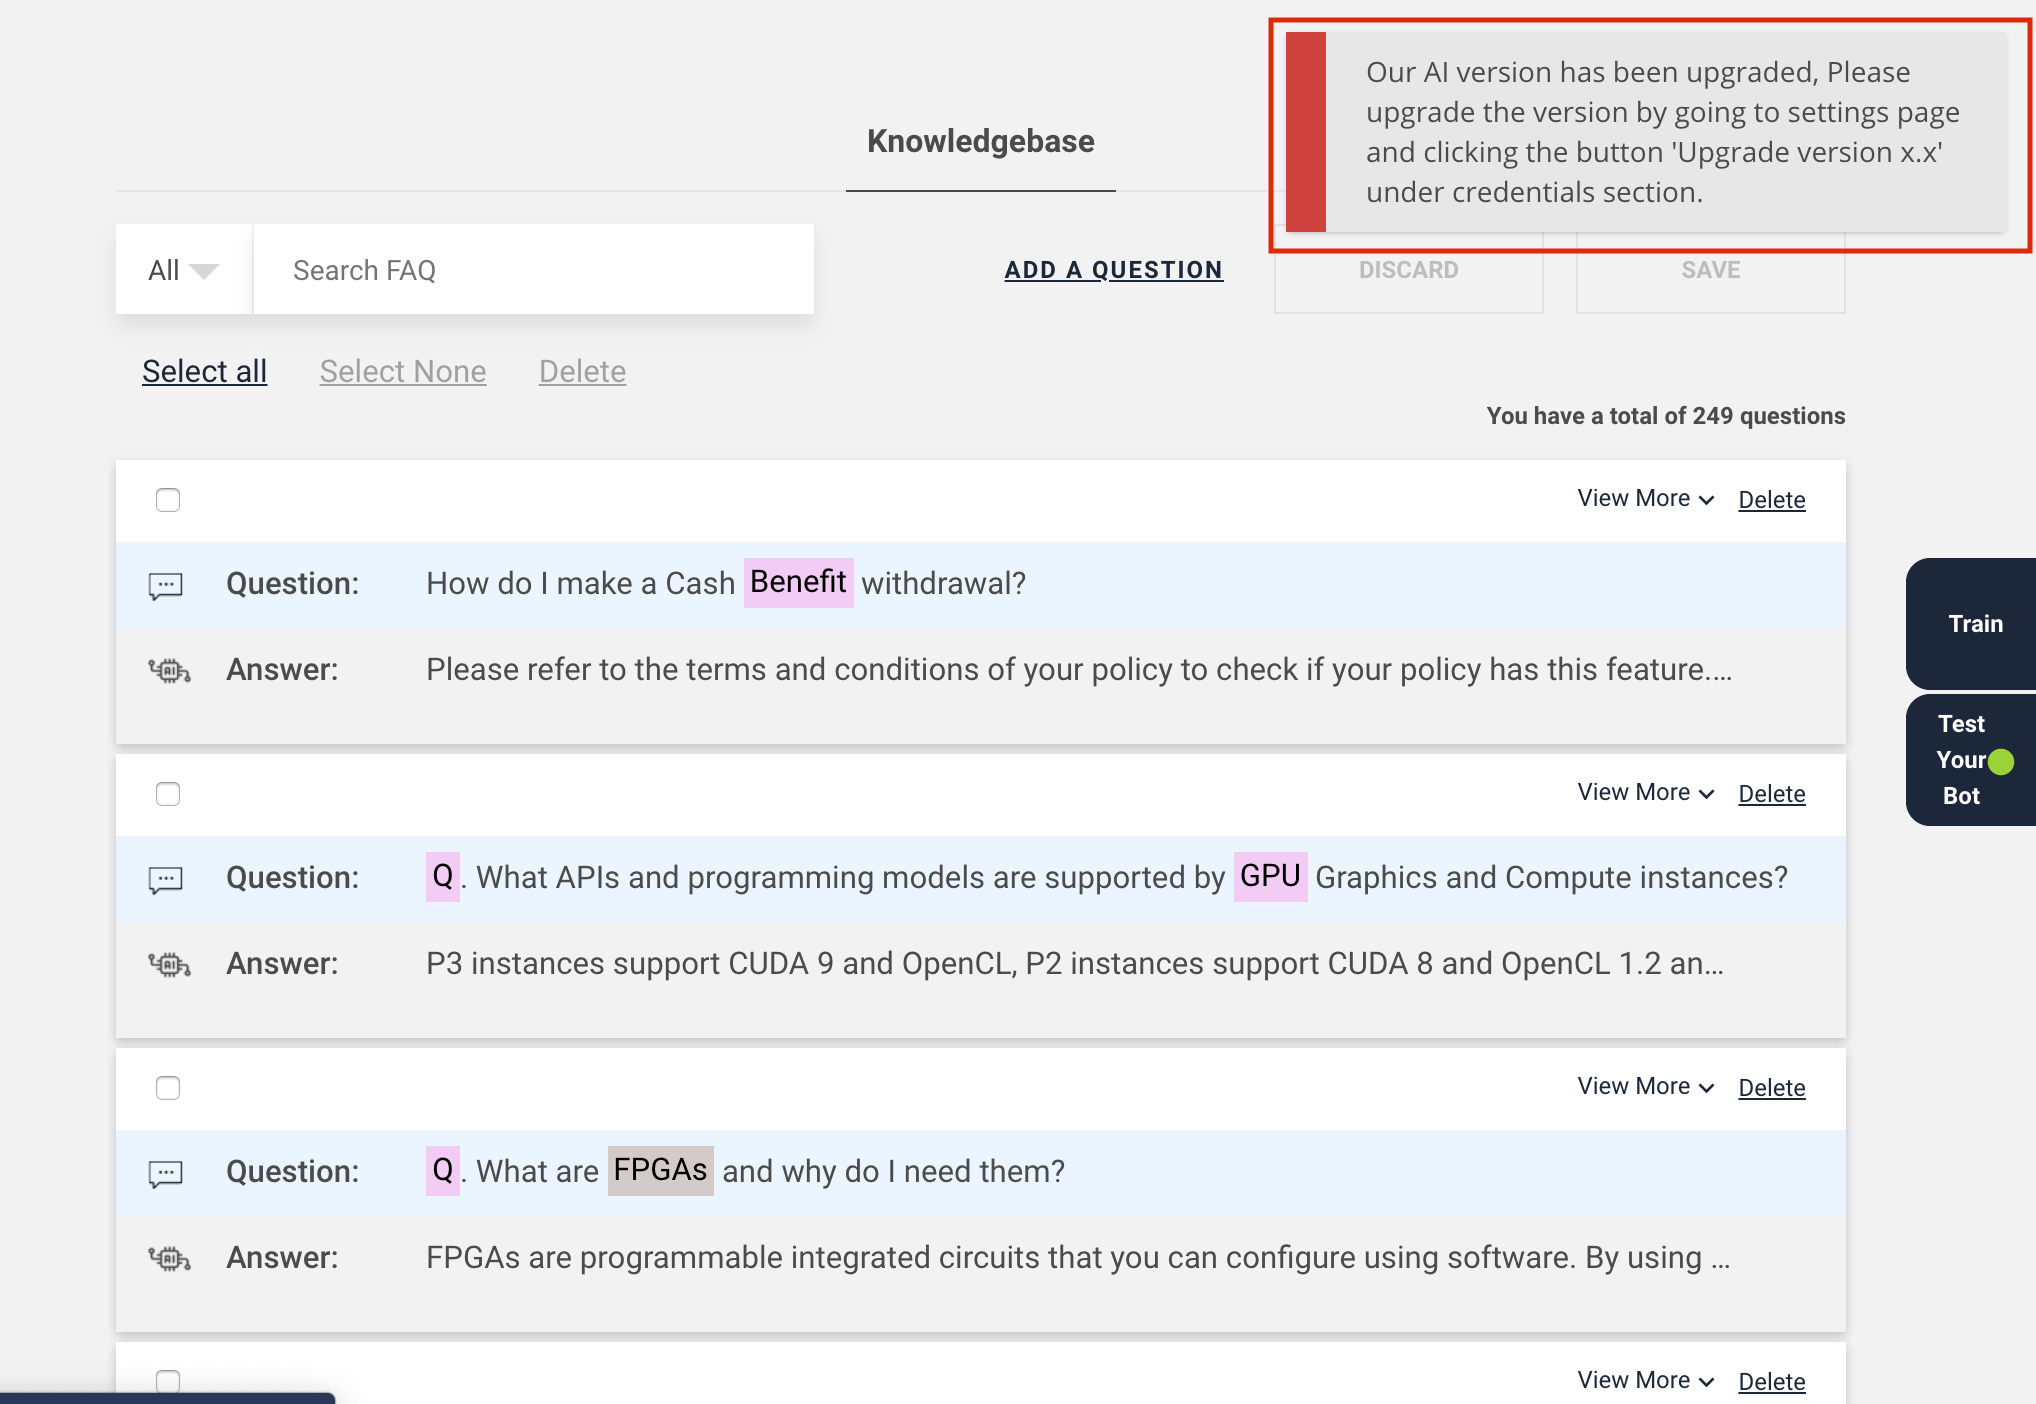
- Customers can upgrade the version by following these steps:
- Goto workspace settings
- Click on Upgrade version x.x mlt under credentials section
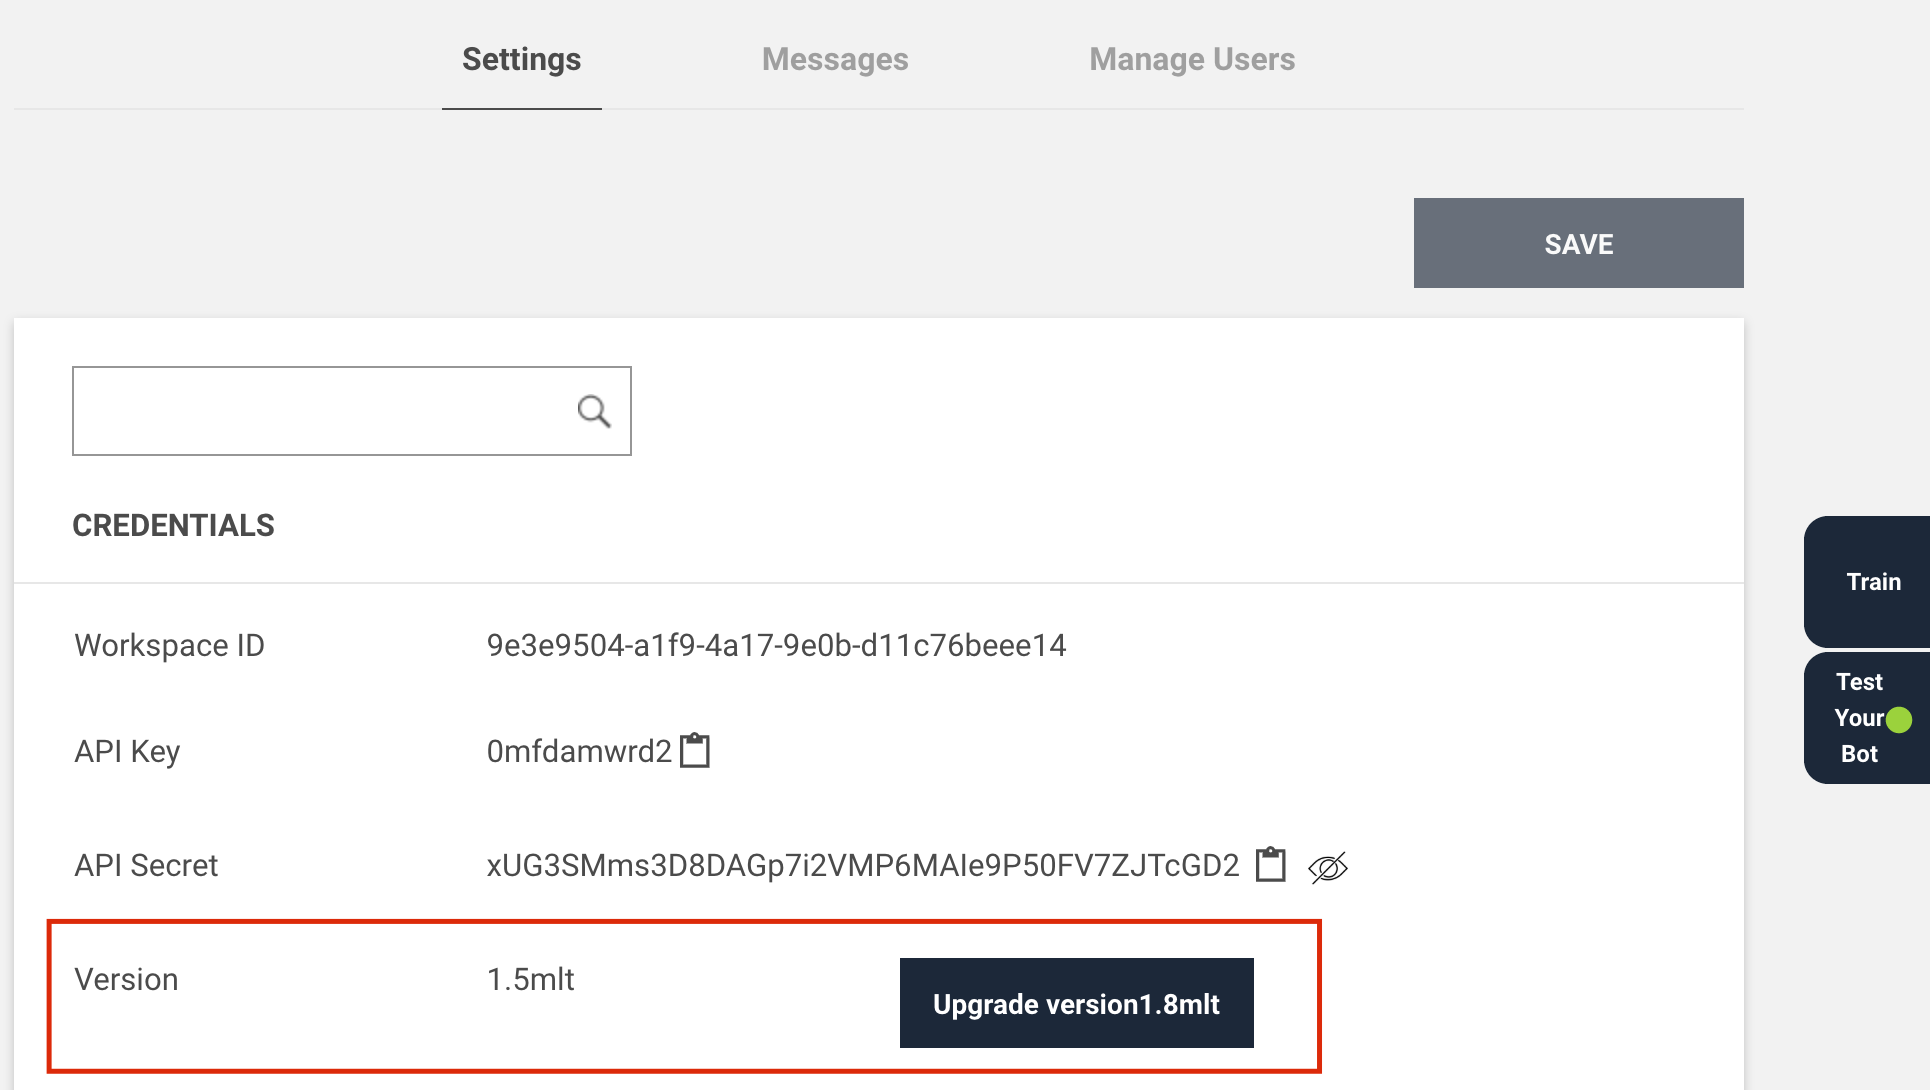
- When customers click on the 'Upgrade version x.x mlt', After clicking on the upgrade, the button will disappear and the train will start automatically
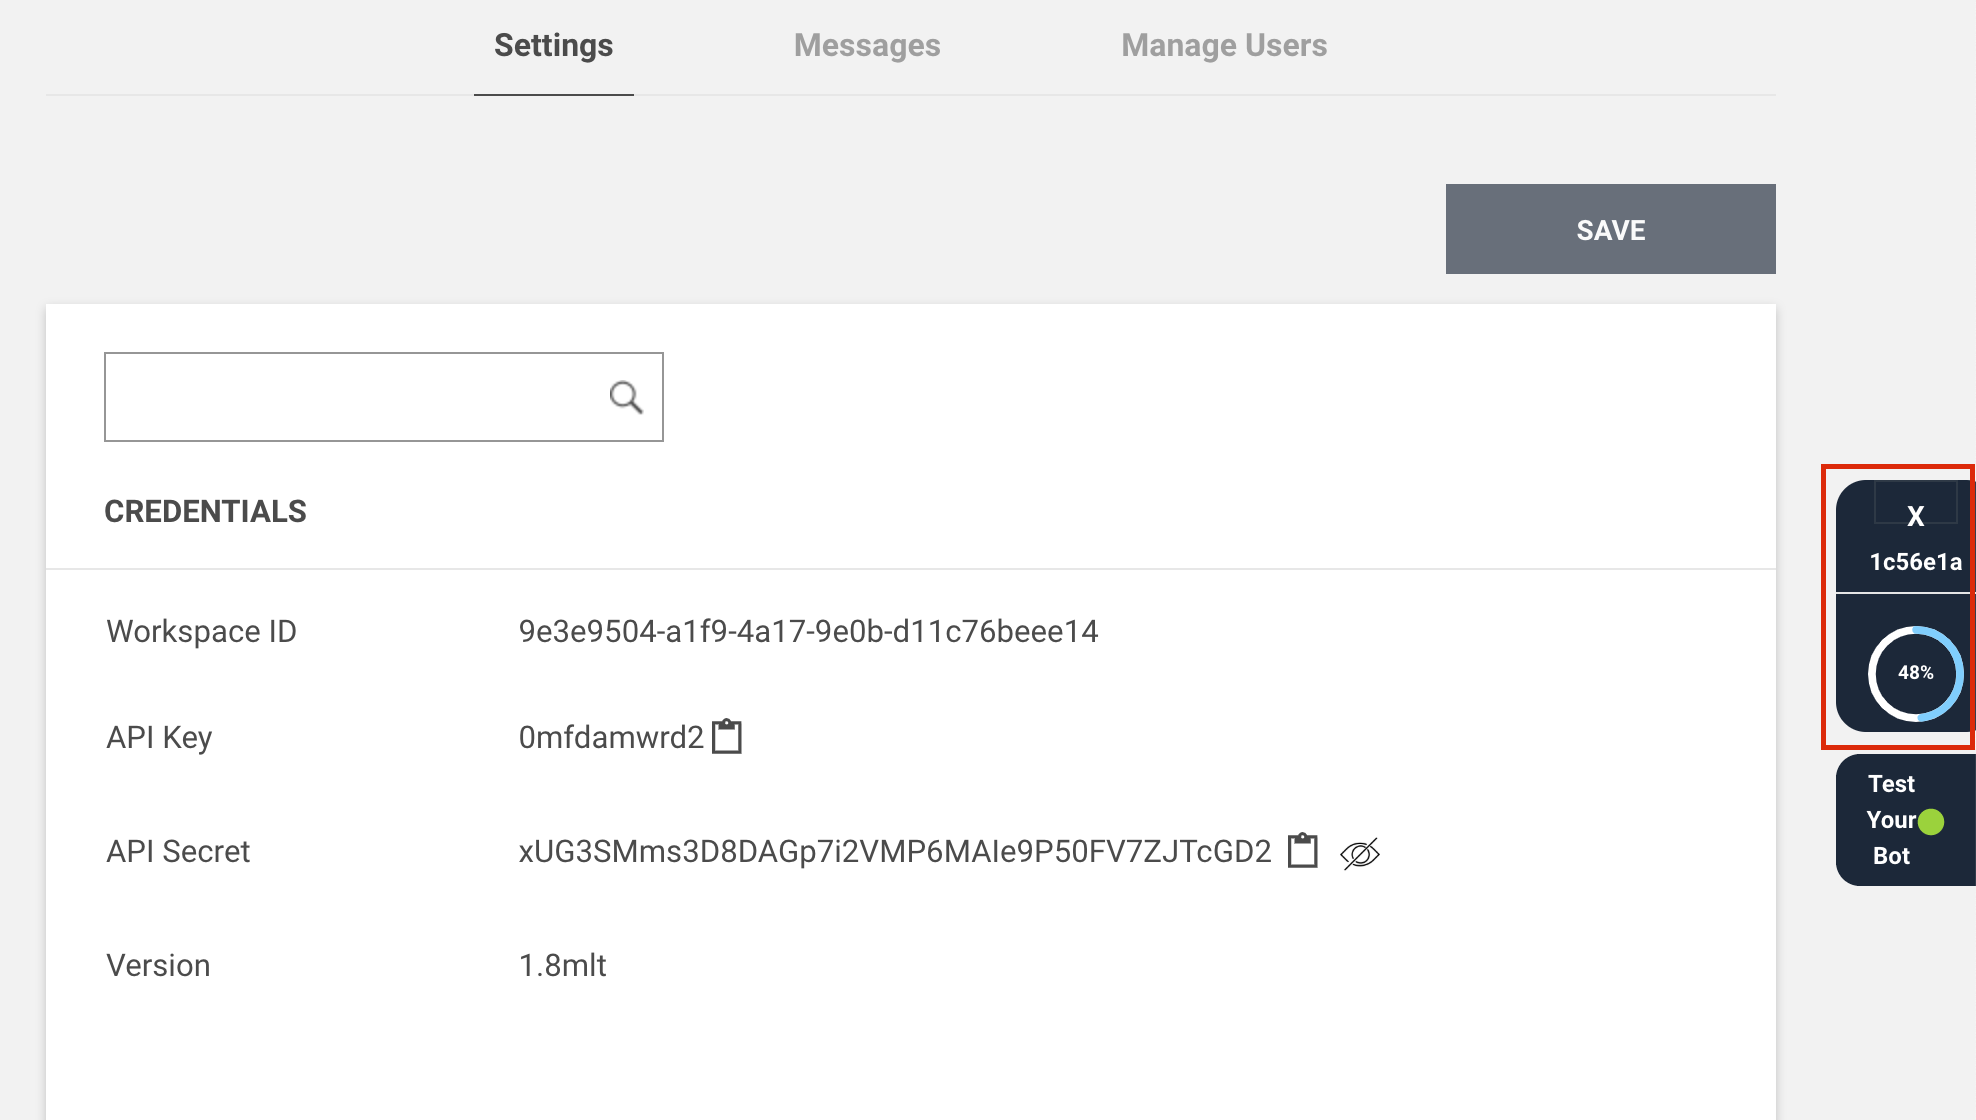
- Customer can also verify the version by clicking on the 'info' button, the version will be displayed there.
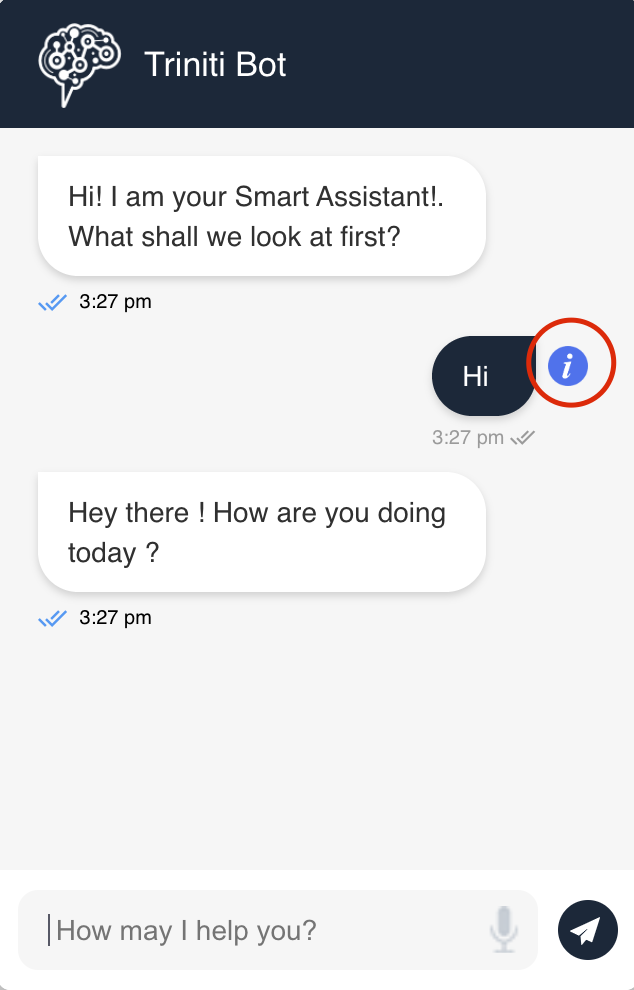 |
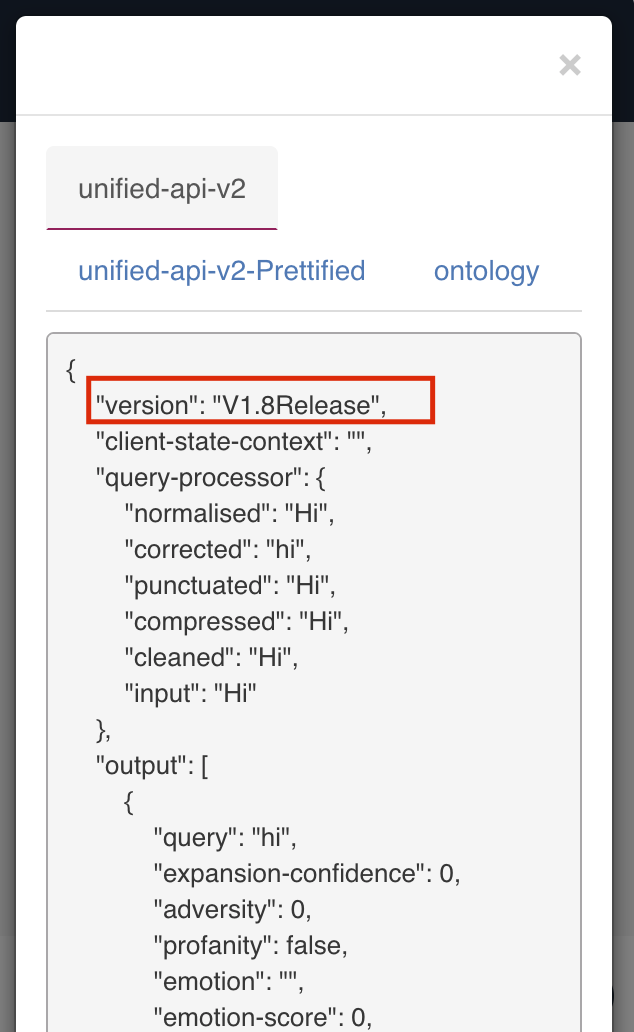 |
Batch Testing
If you want to test utterances which are added in the knowledgebase has proper accuracy or will give a proper response, so you can perform a batch testing for your knowledgebase rather than testing individually.
Samples files You can download these sample files for better understanding: 1. Batch Test Sample File (The file which will be uploaded to perform a batch test) 2. Batch Test Result
Batch Testing process
Create a CSV file of the utterances/varients for which you want to test the accuracy. Note: The file should contain the column in this order: id, questions, answers (You can get the faq id by downloading the trained data/exporting the knowledgebase)

- Navigate to 'Publish' section from side menu
- Click on 'Batch Testing'
- Upload the created csv file.
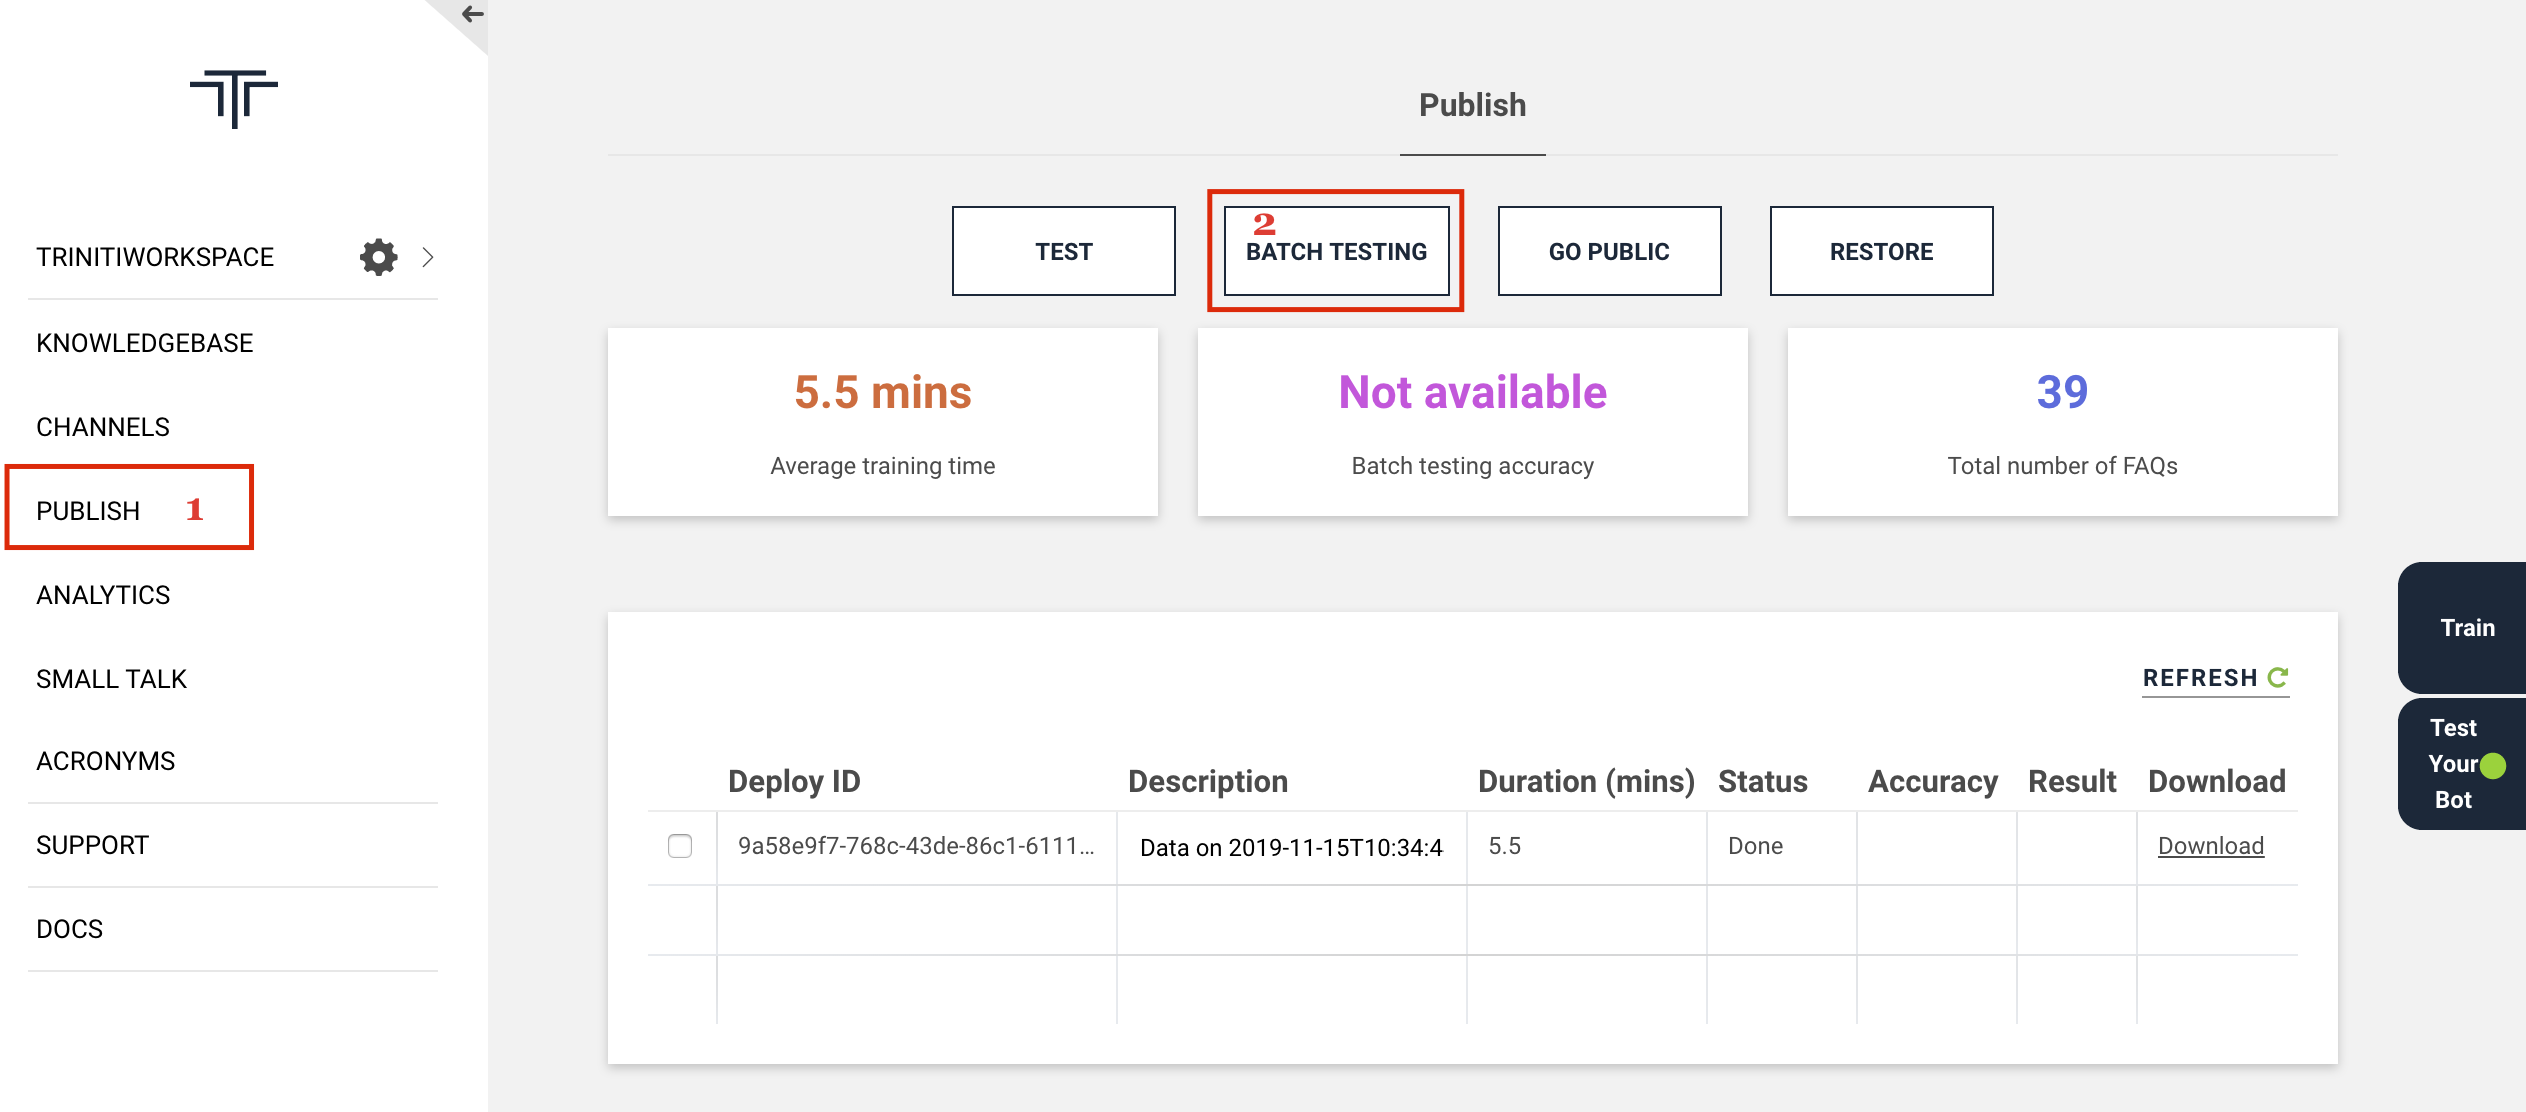
After uploading the 'faqs.csv', the batch testing will start.
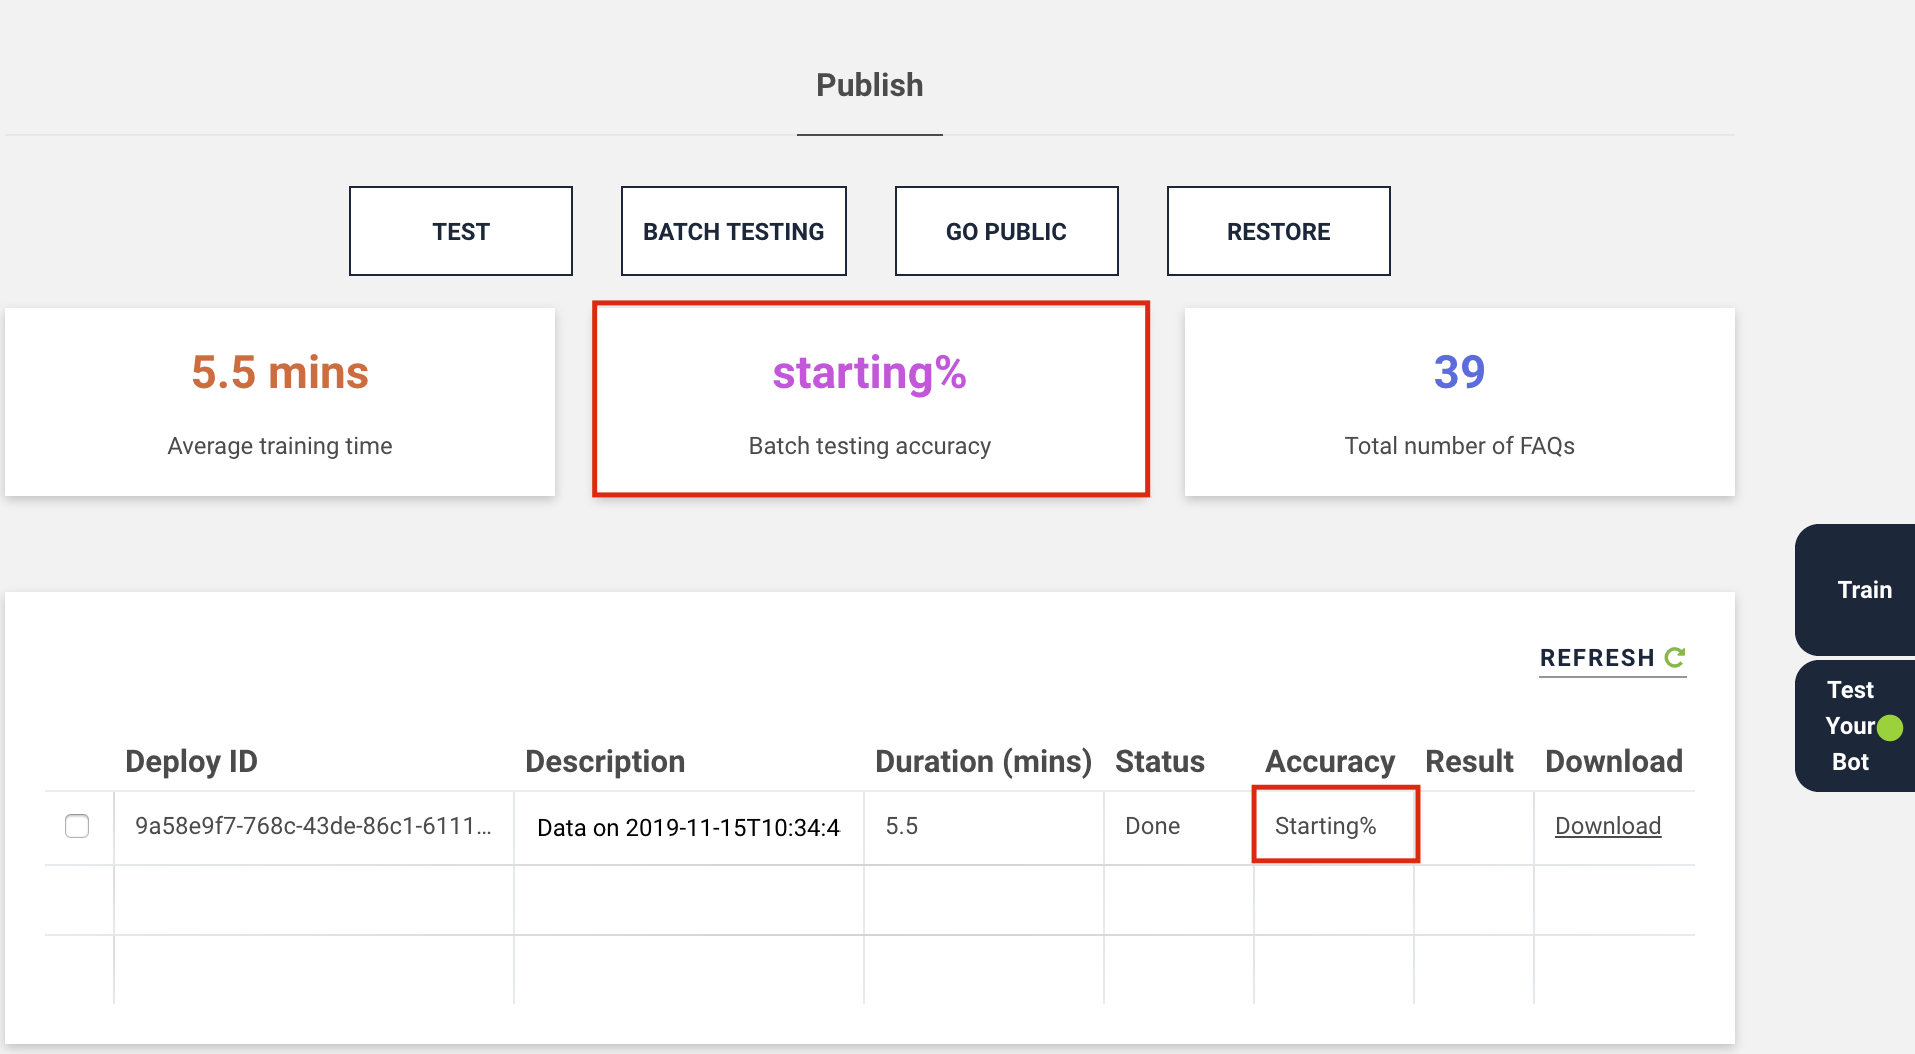
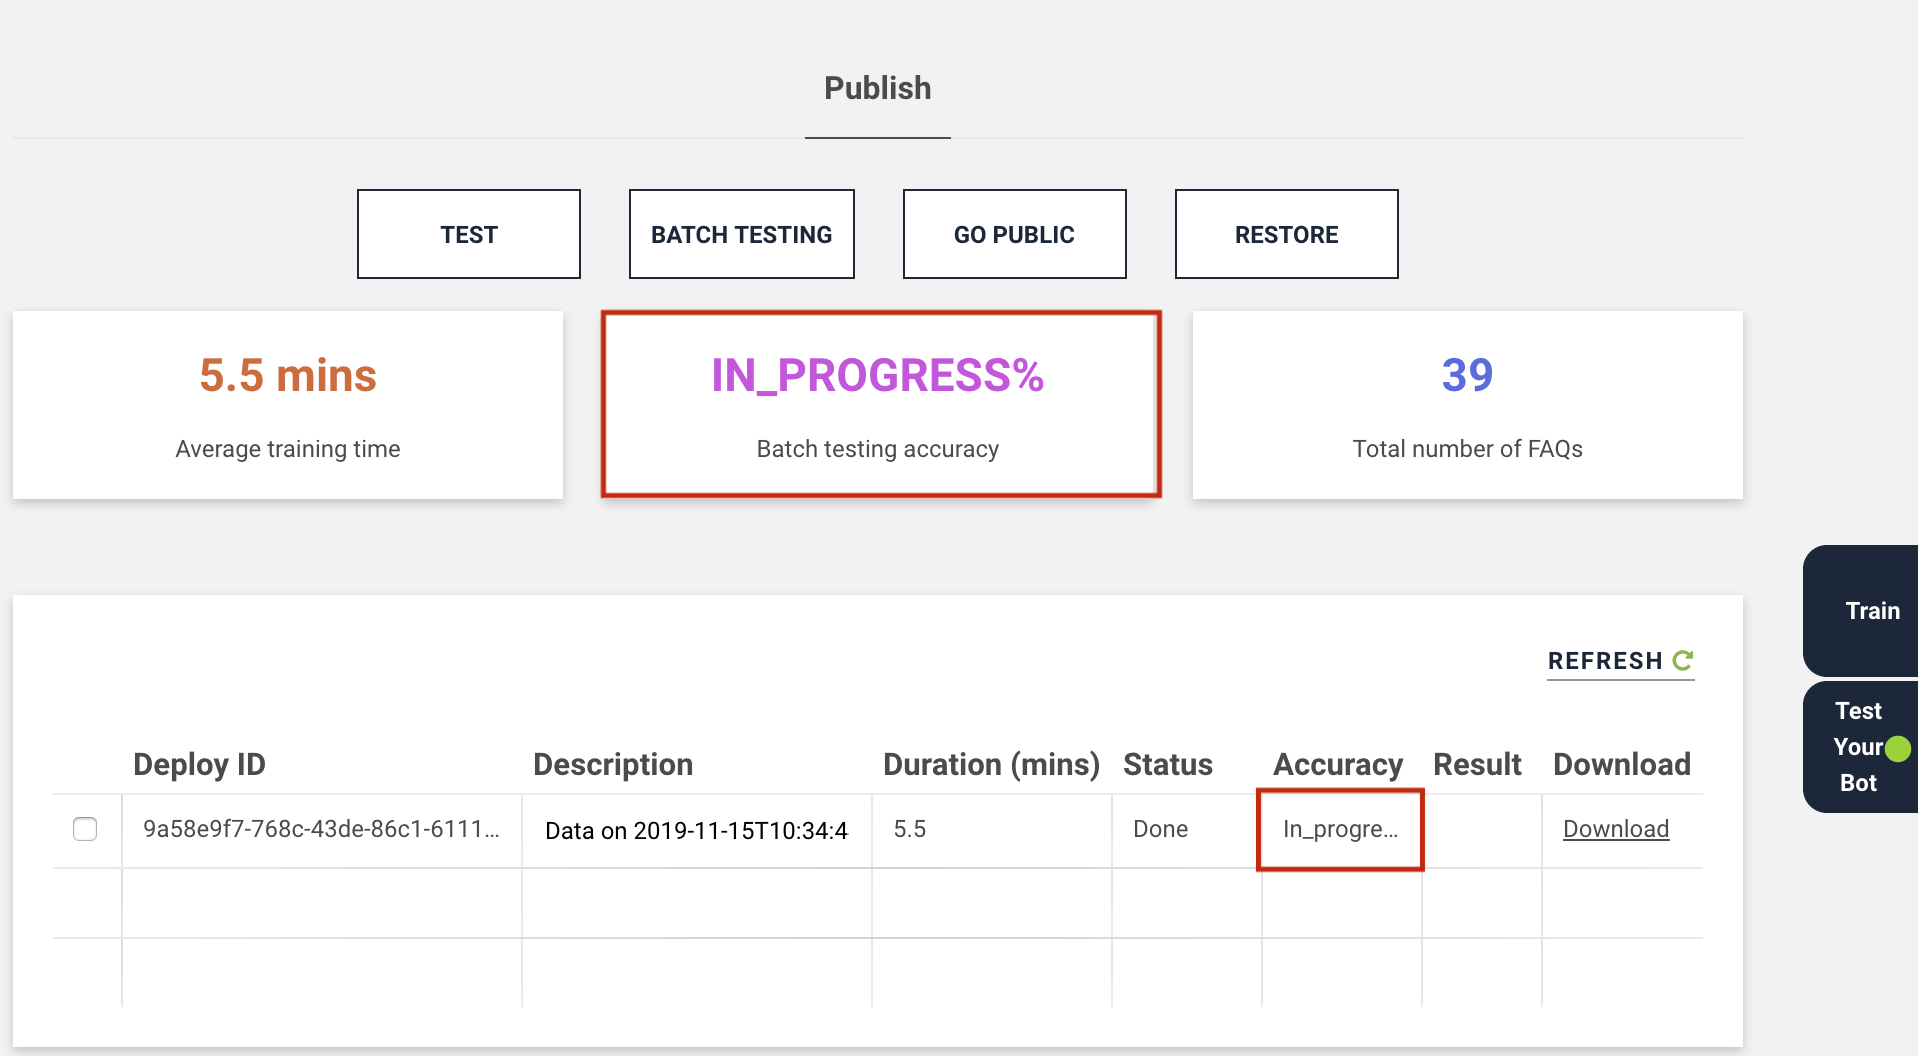
You will get the batch testing accuracy in %age, the utterances which match to your knowledgebase responses for the faq id(s) The percentage will show the amount of matched utterances accuracy.
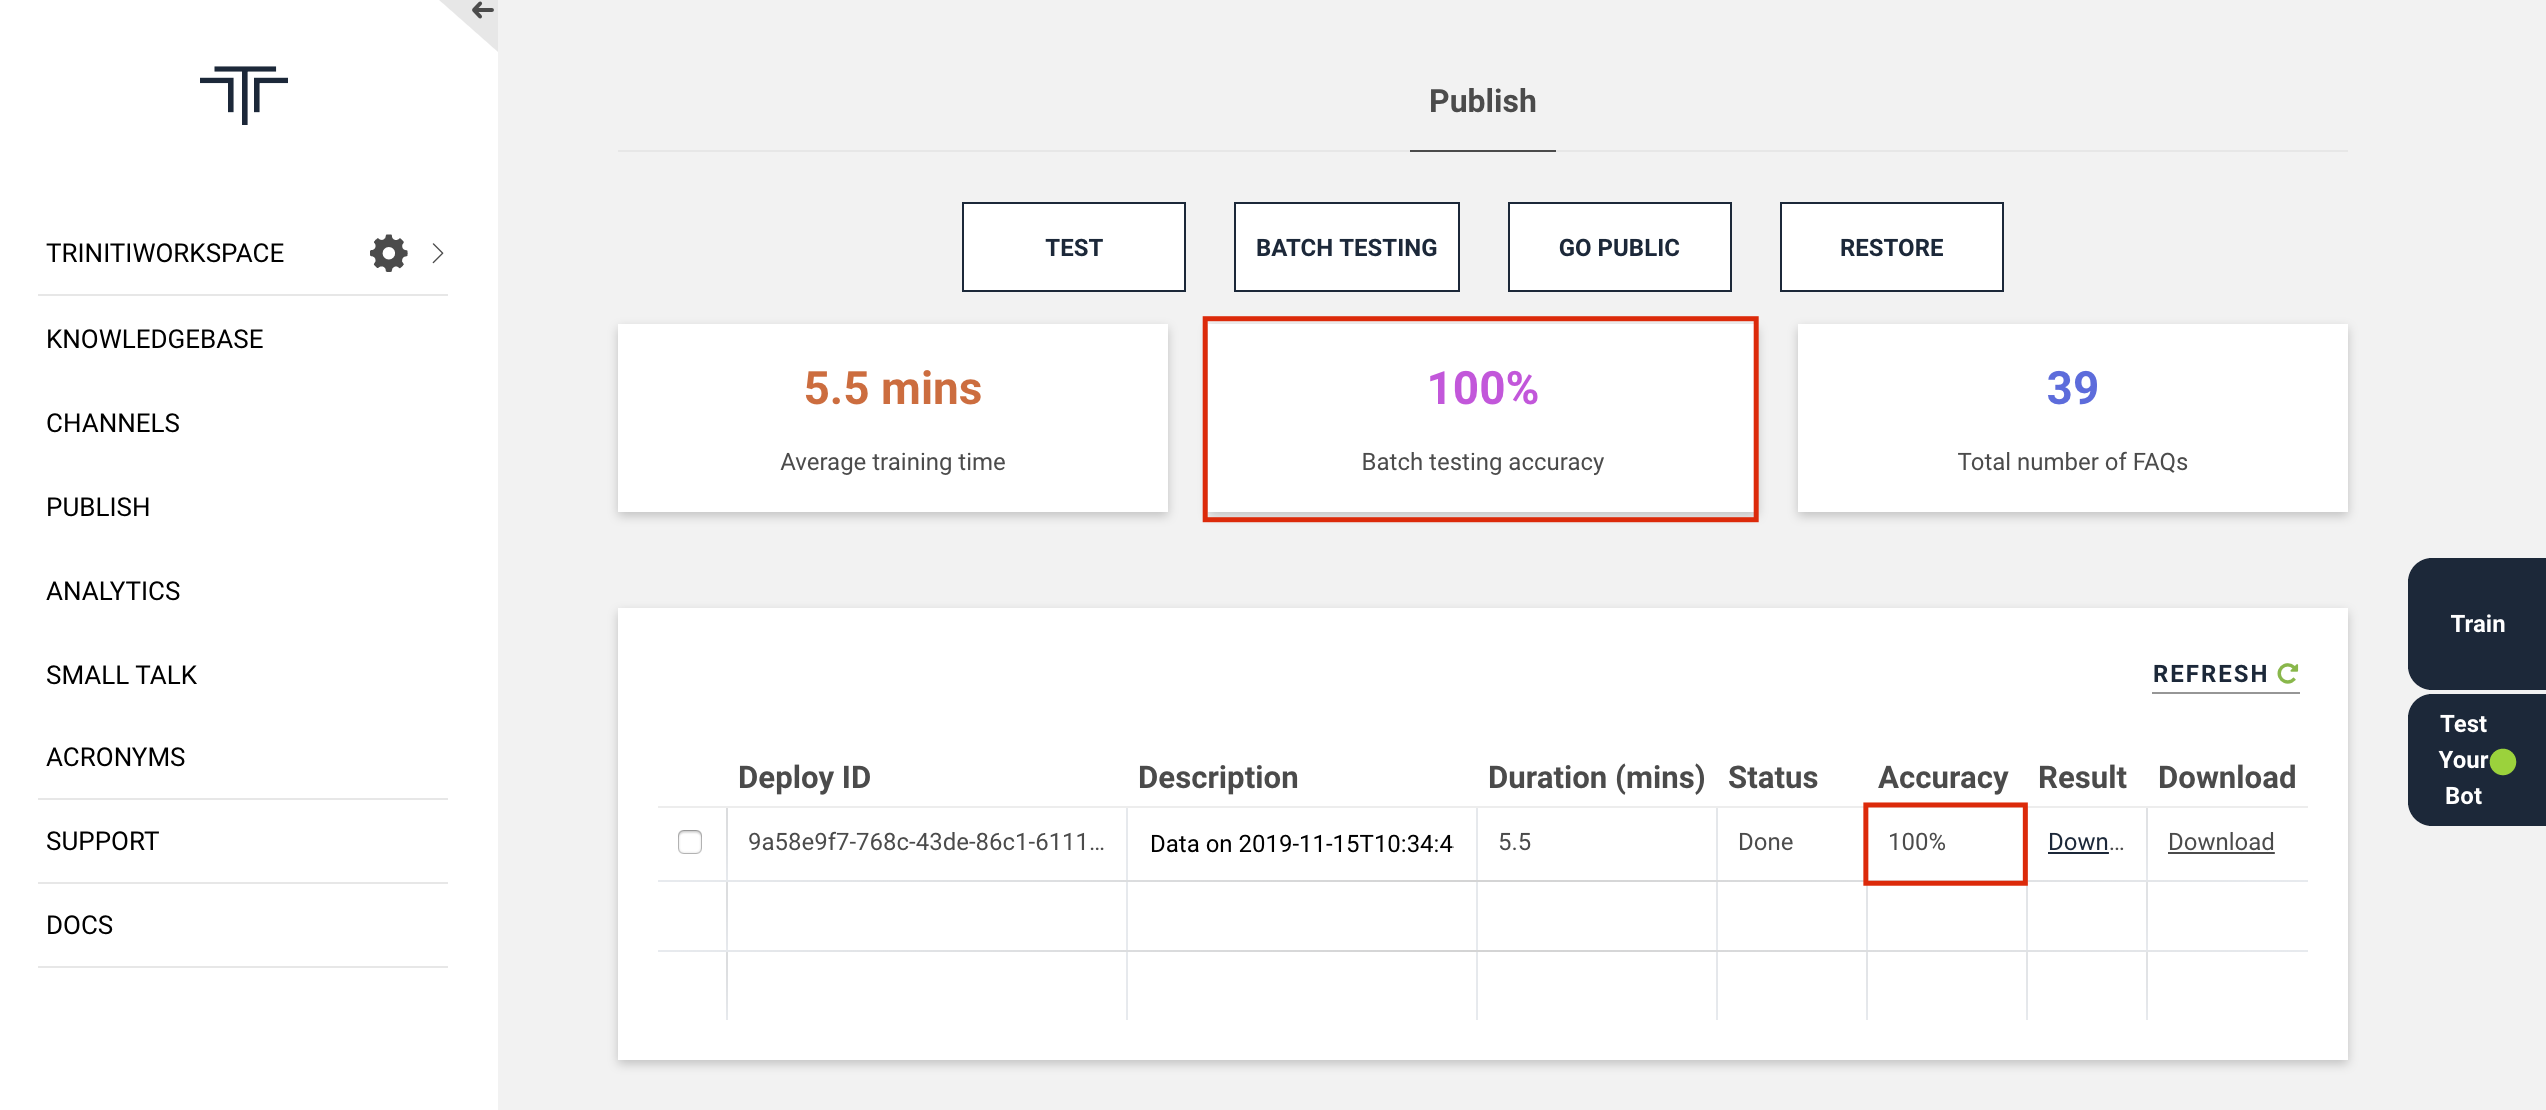
You can download the test result and compare the utterances
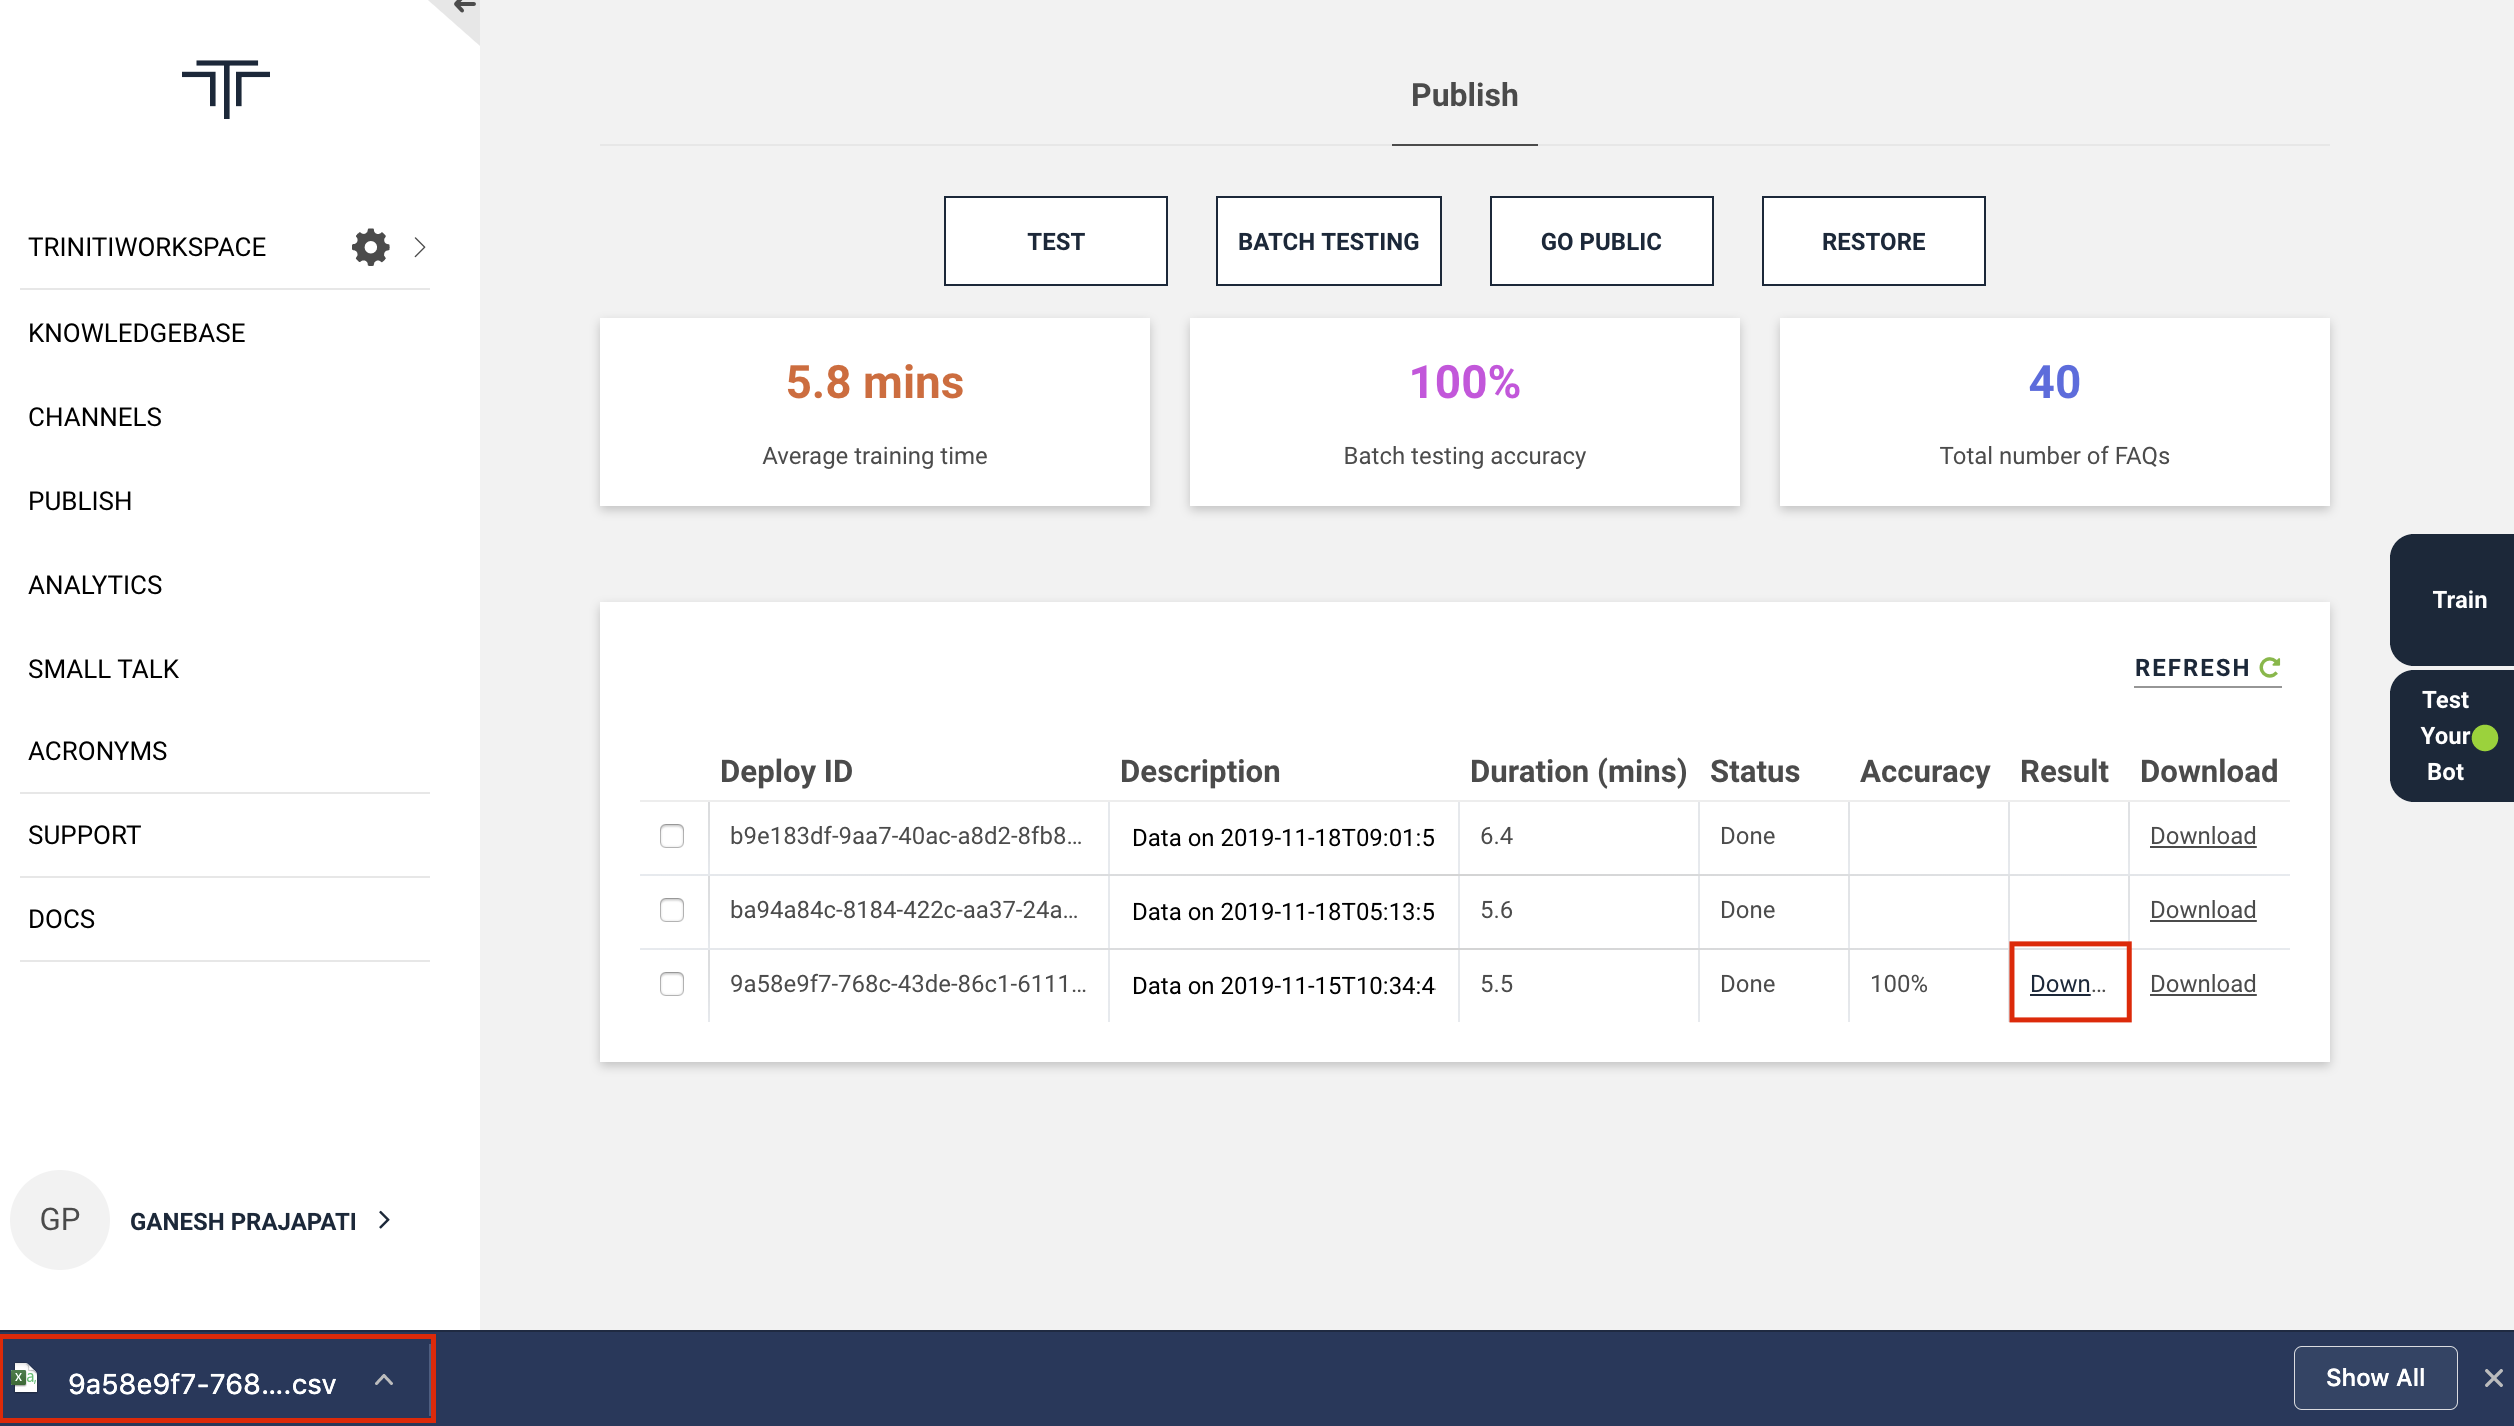
The downloaded file will contain "question, expected_id, generated_answer & match"

If the matches are true for the questions then your knowledgebase is proper. otherwise you will have to update your knowledbase as per the test results.
Manage Billing & Subscription
Setting up Payment Information
Invoice payment can be made through credit card or EFT( Electronic Funds Transfer)

We accept Master, Visa and Amex type of credit cards.

Workspace payment mapping. Each workpsace can be configured to used different credit cards.
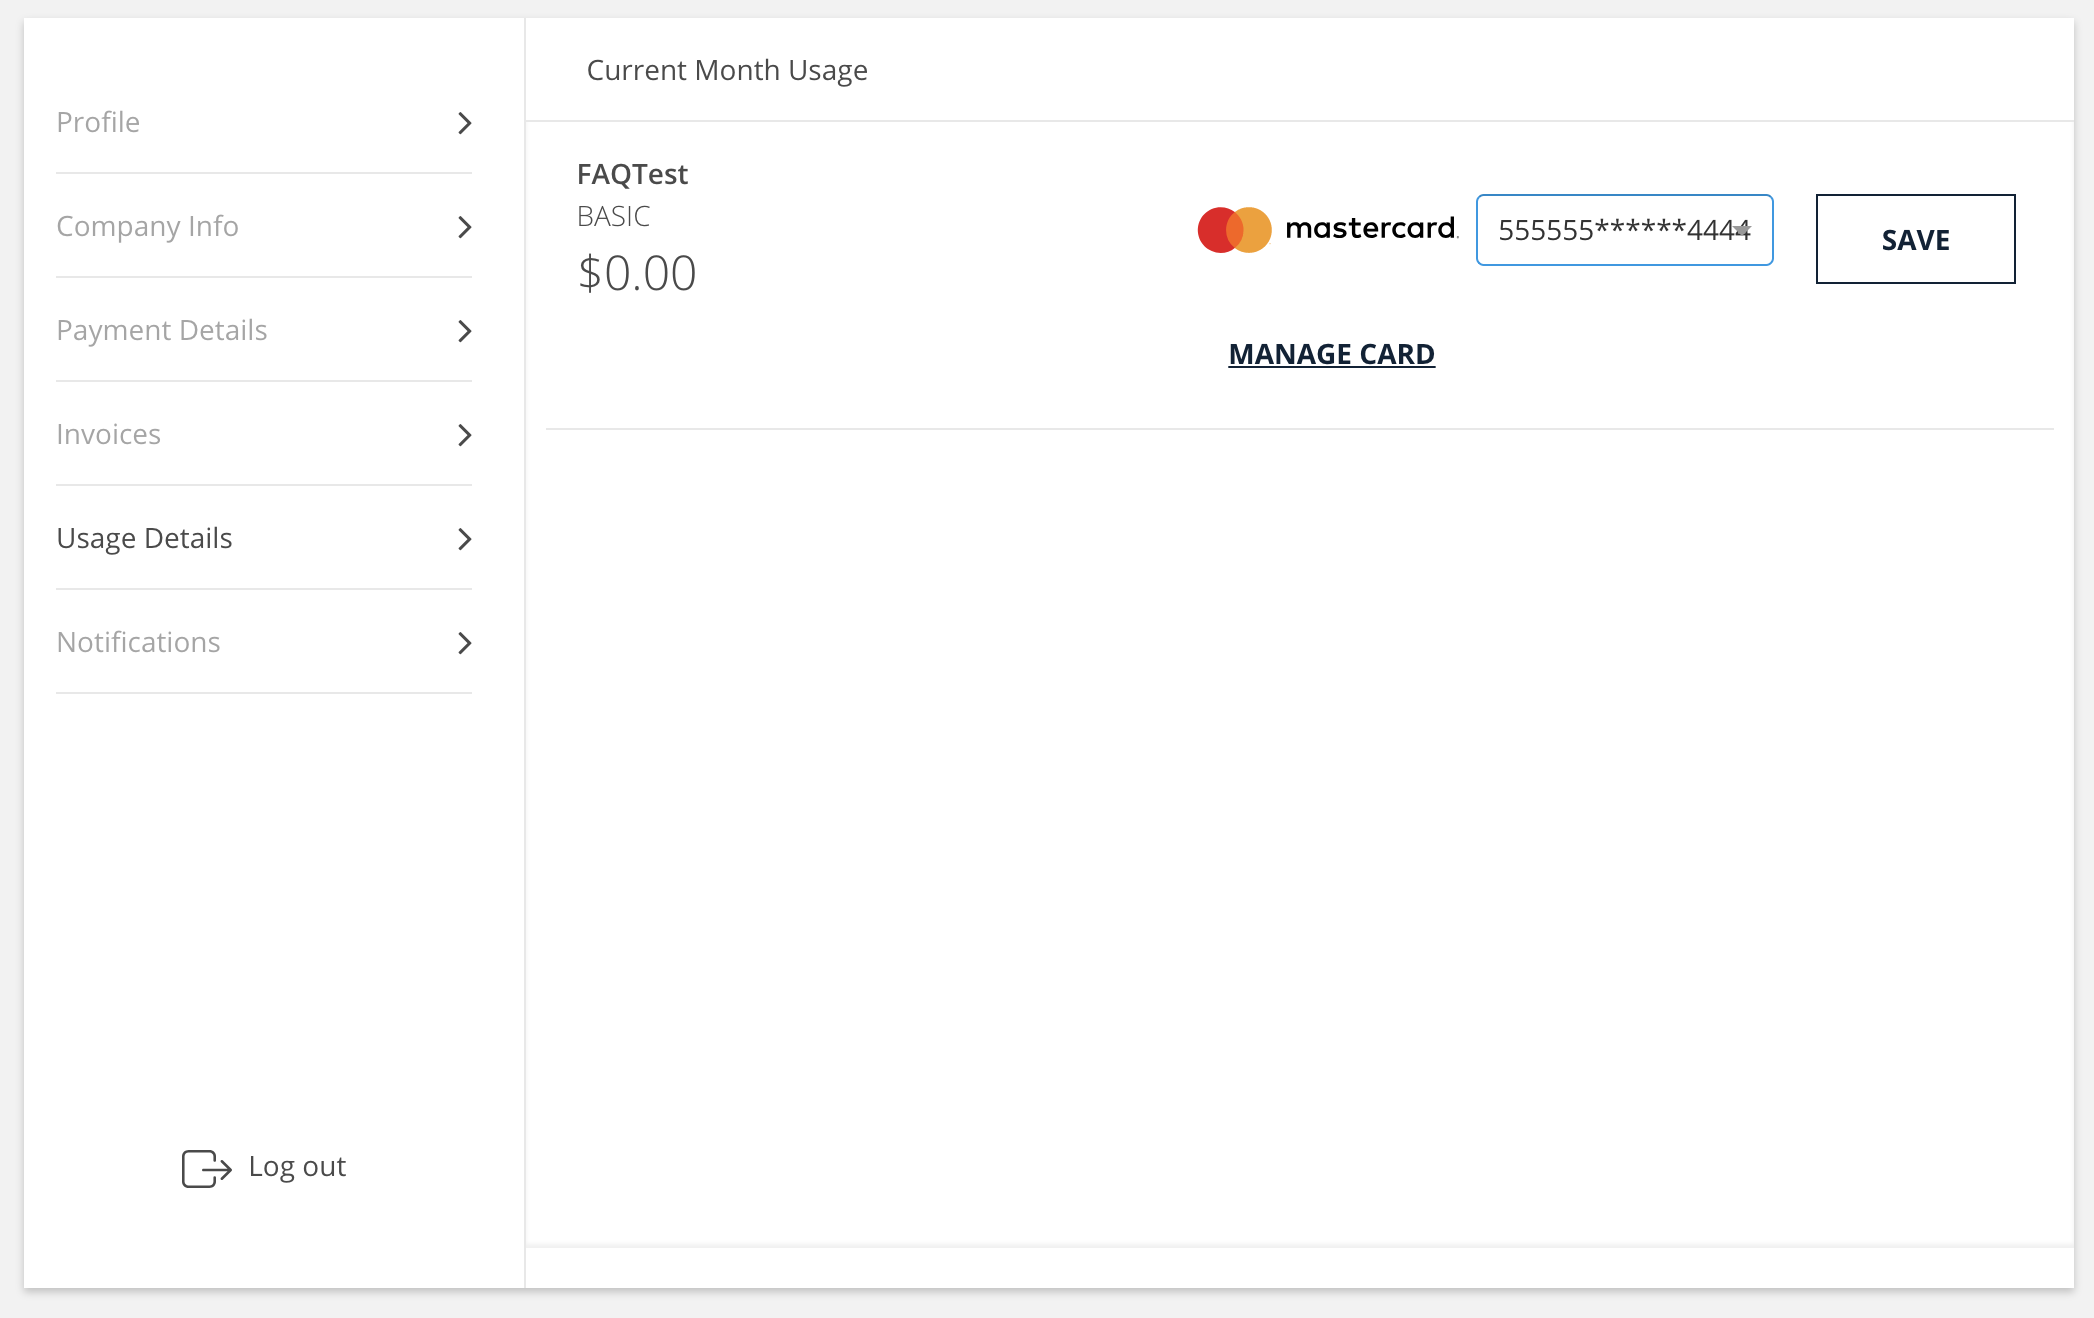
Charges
Charges can be configured on either per API or Slab wise. Charges can be configured differently for each plan.
Per API
Based on the total api usage , workspace charges will be calculated.
- For First n API , the base charge will be charged. For any api usage greater than n [usage > n], Per api charge will be applied. that is [usage-n] > n , then
- (usage-n) * per api charge
- Total Charge = the base charge for n api + [usage -n] * per api
- Ex: For First 50 API the base charge is $5 and for per api $0.1, then
- For 100 API total charge will be $10 [$5 for 50 and $5 for another 50]
Slab
- For total api usage,
- For First n API , the base charge will be charged and then api's will be chargeb based on the slab's
- Total Charge = the base charge of first n api + [usage-n] slab charged
- Ex: For First 50 API the base charge is $5 and then slabs are
- Next 1-10 APIs charge is $0.5
- Next 11-20 APIs charge is $1
- For 100 API, total charge will be $7.5 [$5 for 5 and $2 for 10-20 [2 * slaps 2 ] + $ 0.5 for 1-10 [1 * slaps1]]
- The charges will be defined based on the plans. We are supporting 3 plans
- FREE
- BASIC
- STANDARD
- PREMIUM
Managing Plans
We have the following paid plans whose charges will be differ.
- Free
- Basic
- Standard
- Premium
User can upgrade from
- FREE -> BASIC
- BASIC -> STANDARD
- STANDARD -> PREMIUM
But can't downgrade
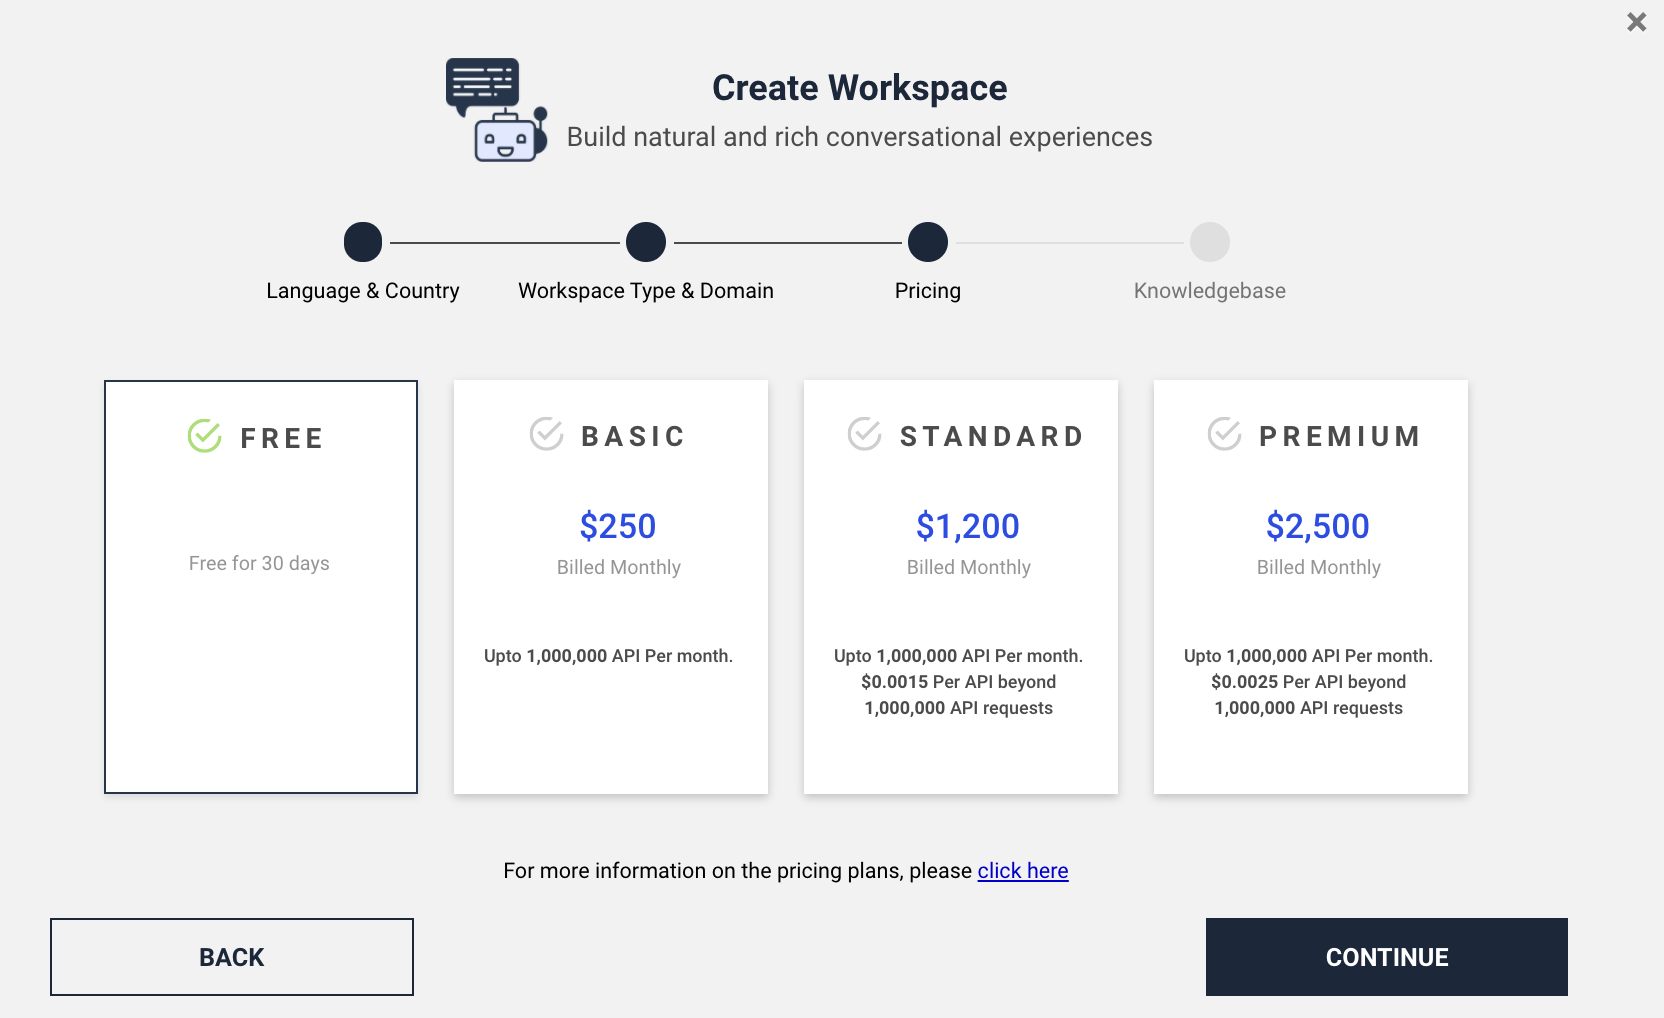
Managing Invoices
The Invoice will be generated on 1st of every month for the previous month workspace usage. Be default each workspace allocated a payment method (Primary credit card) and can be changed. Different invoices generated based on different payment methods. For instance, there are three workspaces (A, B & C). Workspace A & B allocated a payment method say Visa Credit Card and workspace C allocated a payment method say Master Card. There will be two invoices one with Visa Credit Card - includes charges of workspaces A & B and another Master Credit Card for workspace C.
Respective credti card will be charged with the calculated invoice amount who details are in the invoice PDF. If the payment fails for a credit card, there will be 3 re-try attempts. Even 2rd attempt fails the workpsaces belongs to that invoice gets BLOCKED. Customer can't use those workspcase. Customer needs to make sure the payment arrangement done for the same. Customer have the 'Pay Now' option for the failed invocies which once paid the workspaces status becomes ACTIVE and can be used again.
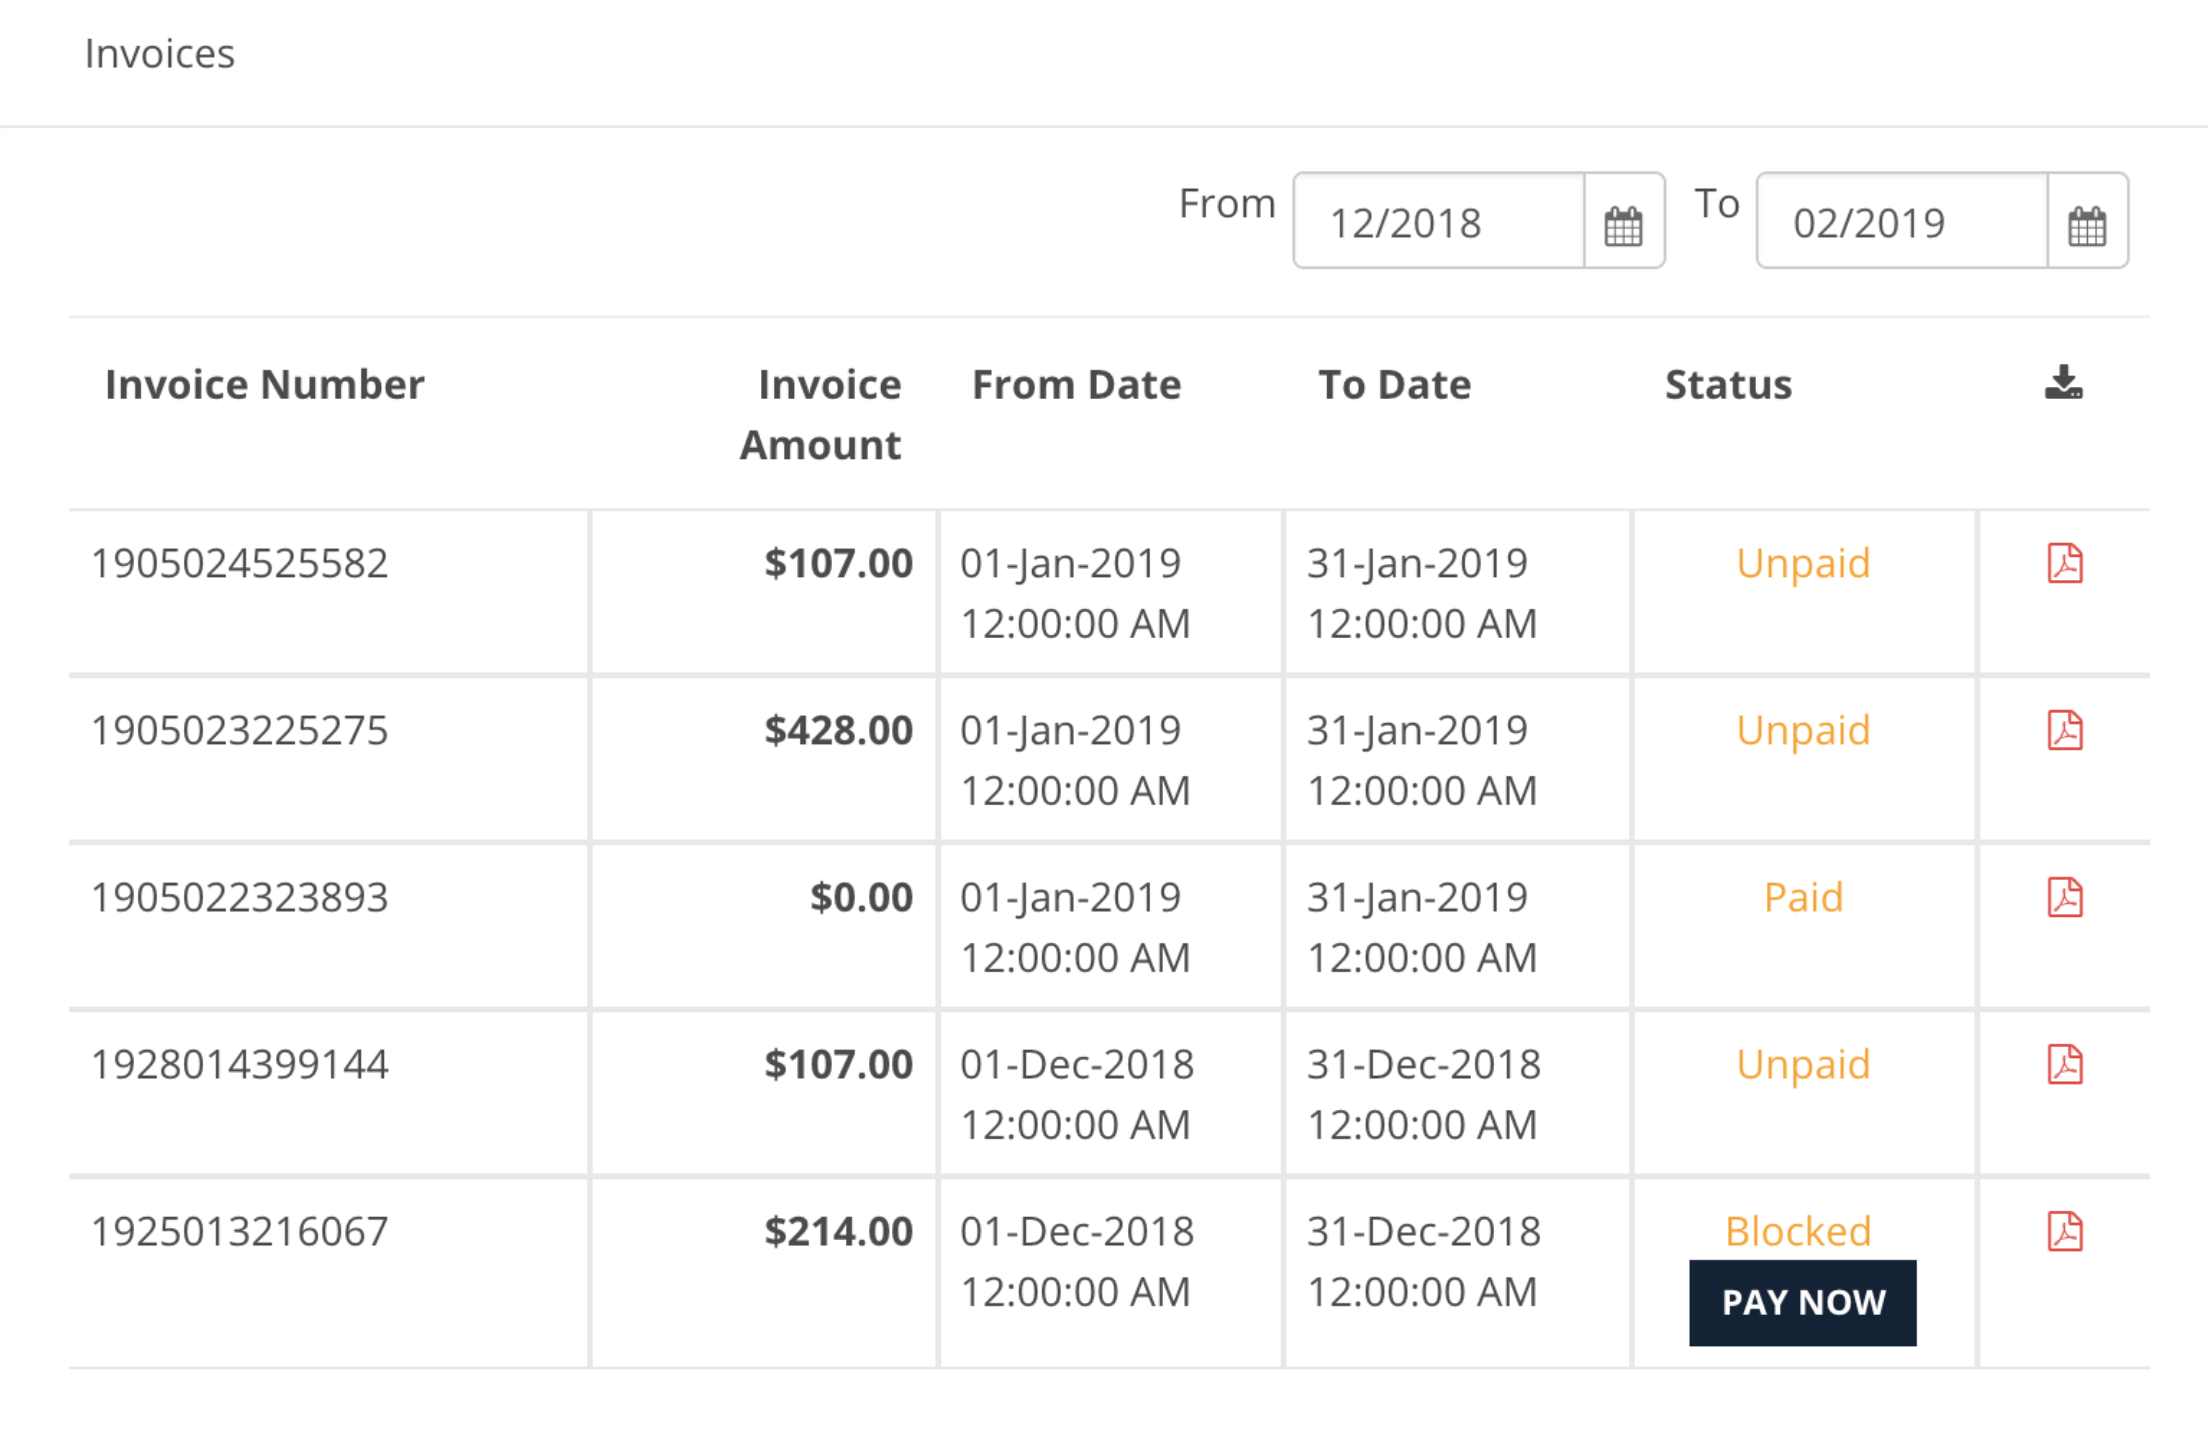
Invoice contains the details like total api consumed, domain charges, discount if applicable and taxes and email will be sent to the registed user email id. The invoice amount will be charged on the same day of invoice generation. If Invoice amount is not paid with 3 attempts, then the workspace will be marked as BLOCKED. Once the invoice amount is paid through Pay Now option, then workspace status will be changed to ACTIVE.